How-To Geek
How to assign a static ip address in windows 10 or windows 11.
When organizing your home network it's easier to assign each computer it's own IP address than using DHCP. Here we will take a look at doing it in XP,

Quick Links
What is a static ip address, assign static ip addresses via your router, how to set a static ip address in windows 11, how to set a static ip address in windows 10, how to set a static ip address in windows 7 or 8 using "network connections", set a static ip address in windows vista, set a static ip address in windows xp, key takeaways.
- To set a static IP address in Windows 10 or 11, open Settings -> Network & Internet and click Properties for your active network.
- Choose the "Edit" button next to IP assignment and change the type to Manual.
- Flip the IPv4 switch to "On", fill out your static IP details, and click Save.
Sometimes, it's better to assign a PC its own IP address rather than letting your router assign one automatically. Join us as we take a look at assigning a static IP address in Windows.
A static IP address is manually set to a permanent, fixed address rather than being assigned automatically by your router using a procotol known as Dynamic Host Configuration Protocol (DHCP). DHCP is a handy way for devices to connect to your network more easily, because you don't have to configure IP addressing for each new device yourself. The downside to automatic addressing is that it's possible for a device's IP address to change from time to time, which is why people choose static IPs for certain types of devices. For example:
- You have a device like a home media server that you want to be able to find using the same IP address or host name each time.
- You have certain apps that can only connect to network devices using their IP address. In particular, many older networking apps suffer this limitation.
- You forward ports through your router to devices on your network. Some routers play nice with port forwarding and dynamic IP addresses; others do not.
Whatever your reason, assigning static IP addresses to devices is not difficult, but you do have a choice to make---whether to do it from the router or on the device itself.
Related: How to Set a Static IP Address in Ubuntu
While this article covers assigning static IP addresses to PCs within Windows itself, there is another way to go about it. Many routers allow you to assign a pool of IP addresses that are handed out to specific devices (based on the device's physical, or MAC address). This method offers a couple of significant advantages:
- IP addresses are still managed by the router, meaning that you won't have to make (and keep up with) changes on each individual device.
- It's easier to assign addresses within the same IP address pool your router uses.
This article is about assigning static IP addresses directly to PCs running Windows. We've already got a great guide on How to Set Static IP Addresses On Your Router , so if that's the way you want to go, be sure to give it a read.
With all that in mind, though, let's take a look at how to assign static IP addresses within any version of Windows.
Related: How to Find Your Router's IP Address on Any Computer, Smartphone, or Tablet
To set a static IP address in Windows 11, you'll want to open Settings, go to Network & Internet, and then find the Properties for your network. Inside there you'll be able to click the Edit button for IP Assignment and then fill out the manual network details.
First, open up the Settings app and then find Network & Internet on the left-hand side. You'll be presented with a panel that shows your current network connection. You can click where it says "Properties" right underneath the network, or if you have multiple network connections you can drill down into the specific network to see the IP address details for each one . In this case it's called "Ethernet", but you will most likely see "Wi-Fi" as the option to choose.
Once you've drilled down into the network connection that you want to set a manual IP for, scroll down until you see "IP Assignment" and then click the Edit button to the right.
Once there, you'll flip the drop-down to "Manual" and switch the IPv4 switch to "On". At this point you can fill out your network details and click Save to finish.
You can also use the old-school Network Connections panel in Windows 11, so if you prefer to use that method, keep reading.
If you're interested in more advanced networking, you might need to set up a static TCP/IP route , reset the entire TCP/IP stack on Windows , check open TCP/IP ports , find your MAC address on Windows , or find your IP address from the Command Prompt . We've got you covered there too.
To set a static IP address in Windows 10, you'll need to open the Settings app and drill down to Network & Internet. From there you'll select Properties for your network, and then the Edit button next to IP Assignment where you can input a manual IP address.
First, open the Settings app and locate the Network & Internet button.
On the next screen you'll see your network status, which should show you your active network. Here you'll want to click the Properties button. If you have multiple different networks, you could select them from the left-hand menu---in our case you'll notice we have both Wi-Fi and Ethernet networks, so you'll want to pick the one that you are trying to set a manual IP address for. You'll notice this is the same method we use when we're trying to find an IP address on Windows 10 .
On the network properties screen, scroll down until you see "IP settings" and click the Edit button under "IP assignment".
In the resulting popup window, change the Edit IP settings dropdown to Manual and then flip the IPv4 switch to "On". Fill out the details, click Save, and you should be good to go.
You might need to reboot to get all of your applications to work properly, just because it's Windows.
It's worth noting that you can use the old Network Connections method to set an IP address in any version of Windows, so if you prefer that method, keep reading.
To change the computer's IP address in Windows 7, you'll need to open the "Network Connections" window. Hit Windows+R, type "ncpa.cpl" into the Run box, and then hit Enter.
In the "Network Connections" window, right-click the adapter for which you want to set a static IP address, and then select the "Properties" command.
In the properties window for the adapter, select "Internet Protocol Version 4 (TCP/IPv4)" and then click the "Properties" button.
Select the "Use the following IP address" option, and then type in the IP address, subnet mask, and default gateway that corresponds with your network setup. Next, type in your preferred and alternate DNS server addresses. Finally, select the "Validate settings upon exit" option so that Windows immediately checks your new IP address and corresponding information to ensure that it works. When you're ready, click the "OK" button.
And then close out of the network adapter's properties window.
Windows automatically runs network diagnostics to verify that the connection is good. If there are problems, Windows will give you the option of running the Network troubleshooting wizard. However, if you do run into trouble, the wizard likely won't do you too much good. It's better to check that your settings are valid and try again.
Changing your IP from DHCP to a Static address in Vista is similar to other versions of Windows, but getting to the correct location is a bit different. Open the Start Menu, right-click on Network, and select Properties.
The Network and Sharing Center opens...click on Manage network connections.
Right-click on the network adapter you want to assign an IP address and click Properties.
Highlight Internet Protocol Version 4 (TCP/IPv4) then click the Properties button.
Now change the IP, Subnet mask, Default Gateway, and DNS Server Addresses. When you're finished click OK.
You'll need to close out of Local Area Connection Properties for the settings to go into effect.
Open the Command Prompt and use the
command to verify that the changes were successful.
To set a Static IP in Windows XP, right-click the "My Network Places" icon, and then select "Properties."
Right-click the adapter for which you want to set the IP, and then select "Properties" from the context menu.
Select the "Internet Protocol (TCP/IP)" entry, and then click the "Properties" button.
Select the "Use the following IP address" option. Type in the IP address, subnet mask, default gateway, and DNS server addresses you want to use. When you're finished, click the "OK" button.
You will need to close out of the adapter's properties window before the changes go into effect.
And you can verify your new settings by using the
command at the command prompt.
By and large, it's better to let most of your devices have their IP addresses assigned automatically by your router. Occasionally, though, you might want to set a static IP address for a particular device. While you can set static IP addresses directly on your devices (and this article has shown you how to do just that on Windows PCs), we still recommending setting up static IP addressing on your router if possible. It will just make life easier.
Related: How to Find Any Device's IP Address, MAC Address, and Other Network Connection Details
How to configure a static IP on Windows 10 or 11
Do you need to switch from a dynamic to a static IP address configuration on Windows 11 or 10? Here's how.

- Windows 11 static IP
- Windows 10 static IP
On Windows, the router's Dynamic Host Configuration Protocol (DHCP) server is (usually) responsible for assigning a dynamic Transmission Control Protocol/Internet Protocol (TCP/IP) configuration to every device in the network, including to your computer running Windows 11 or Windows 10.
Although a dynamic IP address is the recommended configuration for most situations, you may need to change to a static IP address if you're thinking about setting up a printer or file sharing, or you have to configure port forwarding on the router to your computer.
The reason is that a dynamic network configuration can change at any time after the lease from the DHCP expires and if the address changes, network resources you may have configured will stop working. Setting a static IP address will always stay the same on the computer, allowing a more reliable experience sharing resources in the network or forwarding ports.
Whatever the reason, on Windows 10 and 11, you have many ways to configure a static TCP/IP address, including using the Settings app and Command Prompt.
This guide will walk you through the different ways to configure a static network configuration on Windows 11 and 10.
How to set a static TCP/IP network configuration on Windows 11
On Windows 11, you can change your computer's dynamic IP configuration to static in at least two ways through the Settings app or commands.
Configure IP from Settings app
Get the Windows Central Newsletter
All the latest news, reviews, and guides for Windows and Xbox diehards.
To assign a permanent TCP/IP configuration on Windows 11, use these steps:
- Open Settings .
- Click on Network & internet .
- (Optional) Click on Advanced network settings .
- Under the "More settings" section, click on Hardware and connection properties.
- Note the current IPv4 , Subnet mask , Default Gateway , and DNS server addresses to determine the new configuration, as it has to be in the same network scope.
- Click the Ethernet or Wi-Fi page on the right side from the "Network & internet." page.

- Quick note: If you select the Wi-Fi page, you need to click on the connection properties to access the network settings.
- Click on the Edit button for the "IP assignment" setting.

- Select the Manual option from the drop-down menu.
- Turn on the IPv4 toggle switch.
- Confirm the IP address for the computer – for example, 10.1.4.90.
- Confirm the subnet mask for the configuration – for example, 255.255.255.0.
- Confirm the default gateway address (usually your router's IP) – for example, 10.1.4.1.
- Confirm the preferred DNS address – for example, 10.1.4.1.

- Quick note: In a home network, you may also be able to use the router's IP address for the DNS configuration. You can also use third-party DNS services like Google Public DNS, Cloudflare, Cisco's OpenDNS, and others.
- (Optional) Select the "On (automatic template)" option for the "DNS over HTTPS" setting and leave the "Fallback to plaintext" option disabled unless you want to encrypted as well as unencrypted traffic or you're troubleshooting connectivity.
- Quick note: DNS over HTTPS (DoH) is a feature that encrypts the DNS queries over the HTTPS protocol to improve security and privacy on the internet. You only want to enable this feature if the DNS server supports this feature.
- Confirm the alternate DNS address (if applicable).
- (Optional) Select the "On (automatic template)" option for the "DNS over HTTPS" setting and leave the "Fallback to plaintext" option disabled.
- Click the Save button.
Once you complete the steps, the computer will start using the static network configuration. If everything has been configured correctly, you should be able to open the web browser to access the internet.
If you entered an address (such as the DNS address) and then changed it, you probably won't be able to save the settings. If this is the case, cancel the configuration, start over, enter the correct configuration, and then try to save the settings.
Configure IP from Command Prompt
To set a static TCP/IP configuration on Windows 11, use these steps:
- Open Start .
- Search for Command Prompt , right-click the top result, and select the Run as administrator option.
- Type the following command to see your current networking configuration and press Enter : ipconfig /all
- Confirm the name of the adapter and the networking configuration, including the IPv4 , Subnet mask , Default Gateway , and DNS Servers .

- Type the following command to configure a static TCP/IP address and press Enter : netsh interface ip set address name= "ADAPTER-NAME" static IP-ADDRESS SUBNET-ADDRESS DEFAULT-GATEWAY-ADDRESS
In the above command, replace ADAPTER-NAME with the name of your network adapter. Change IP-ADDRESS SUBNET-ADDRESS DEFAULT-GATEWAY-ADDRESS with the device IP address, subnet mask, and default gateway addresses you want. For example, this command sets the 10.1.4.90, 255.255.255.0, 10.1.4.1 configuration: netsh interface ip set address name="Ethernet 10Gb" static 10.1.4.90 255.255.255.0 10.1.4.1

- Type the following command to set a DNS server address and press Enter : netsh interface ip set dns name="ADAPTER-NAME" static DNS-ADDRESS
In the command, change ADAPTER-NAME with your adapter's name and DNS-ADDRESS with the DNS server address of the network. For example, this command sets the local router as the DNS server: netsh interface ip set dns name="Ethernet 10Gb" static 10.1.4.1
- Type the following command to set an alternate DNS server address and press Enter : netsh interface ip add dns name="ADAPTER-NAME" DNS-ADDRESS index=2
In the command, change ADAPTER-NAME with the adapter's name and DNS-ADDRESS with an alternate DNS server address. For example, netsh interface ip add dns name="Ethernet 10Gb" 1.1.1.1 index=2
After you complete the steps, the commands will set a static network configuration on Windows 11.
How to set a static TCP/IP network configuration on Windows 10
On Windows 10, you can also use the Settings app and Command Prompt to set up a static IP network configuration.
To assign a permanent TCP/IP configuration on Windows 10, use these steps:
- Click on Ethernet or Wi-Fi .
- Click on the active connection on the right side.

- Click the Edit button for the "IP assignment" setting.

- Select the Manual option.
- Confirm the subnet prefix length (subnet mask) for the configuration – for example, 24 to specify the 255.255.255.0 subnet mask.

- Quick tip: It's important to use the number that represents the network instead of the subnet mask. Otherwise, the configuration won't save. If you don't know the subnet prefix length for your subnet mask, you can use any online subnet calculator to find out.
Once you complete the steps, Windows 10 will start using the static IP configuration. If you lose network connectivity, restart the computer to regain access to the local network and internet.
To change from dynamic to static IP address with commands on Windows 10, use these steps:
In the command, change ADAPTER-NAME with your adapter's name and DNS-ADDRESS with the DNS server address of the network. For example, this command sets the local router as the DNS server: netsh interface ip set dns name=" Ethernet 10Gb" static 10.1.4.1
In the command, change ADAPTER-NAME with the adapter's name and DNS-ADDRESS with an alternate DNS server address. For example, netsh interface ip add dns name="Ethernet0" 1.1.1.1 index=2
After you complete the steps, the network configuration will switch from dynamic to static on Windows 10.

Mauro Huculak is technical writer for WindowsCentral.com. His primary focus is to write comprehensive how-tos to help users get the most out of Windows 10 and its many related technologies. He has an IT background with professional certifications from Microsoft, Cisco, and CompTIA, and he's a recognized member of the Microsoft MVP community.
- 2 Valheim's Ashlands biome update makes my favorite survival game even better, and you can play it now in public testing
- 3 As Fallout 4 and Fallout 76 keep reaching new heights with sky-high player counts, it highlights a new problem for Xbox
- 4 After Embracer Group's acquisitions and subsequent troubles, the company is splitting into three oddly-named entities
- 5 Why THIS Kickstarter-backed game is the must-play Xbox Game Pass title this month
How to Assign Static IP Address to Your Devices
By default, your router assigns dynamic IP Address to every device that connects to it. This is called DHCP (short for Dynamic Host Control Protocol). But sometimes, we need our devices to have the same IP address (i.e. Static IP) every time it connects to the network. Reason being,
- Access your computer from the Internet.
- Share data between two devices on the same network.
- Quickly access your Network Printer or NAS.
- Use your computer as a media server.
- Or your work WiFi requires you to use Static IP address.

What IP address should you choose?
If two devices on the network have the same IP address, then there will be conflicts. The Internet won’t work on one of them or both, depending on your router. So, it’s important to assign a unique IP address to your computer. There are a couple of ways to pick an unused IP address.
For instance– first find your device’s IP address , say it’s 192.168.1.7 ; then keep the first three values (i.e. 192.168.1) as it’s and replace the last digit with some far number like 192.168.1.222 . Though make sure the last digit should be between a 0-255 range.
Assigning Static IP address to most devices is easy, just go to its network settings, look for DHCP option and turn it OFF. Once you do that, you’ll see a text area to enter Static IP address. Enter the new IP address there, save changes and that’s it.
So let’s see how to Assign Static IP address to various Operating Systems
1. Assign IP Address on Windows 10/8/7
You can do this quickly through the command line. You will need to first find your subnet mask, default gateway, and network adapter name. In my case, I’m on a Wi-Fi network, so the adapter name is Wi-Fi. To find yours just type the following command.
Once you get the output, find for the Network Adapter which has IP listed under it. The adapter name is a one-word name suffixed to the end of the Network Title. You will also need the Subnet mask and the Default Gateway Address.

Once you have the adapter name, Subnet Mask and Default Gateway, run the following command.
Wherein, Wi-Fi should be replaced by your adapter name and the IP, subnet mask and gateway address according to your configuration.

This will change your IP address from DHCP to manual with the static IP address you have specified.
In case you find it too confusing, you are not alone. You can do the same via GUI which is much more intuitive. You’ll need the Subnet Mask and Default Gateway Address . You can refer to the above step on how to find these details. Once you have noted down the address, click on Start Menu and type in Network and Sharing Center. Click once you see the Network and Sharing Center Icon.

Alternatively, if you are in Windows 10 then you can right-click on the Start menu and click on “ Network Connections “.

A new window will open, click on Change Adapter Options.

Right Click on your Current Network Adapter ( like WiFi) and choose Properties.

When the new window pops up, select Internet Protocol Version 4(TCP/IPv4) and click on Properties.

Once you get the pop-up window, select “ Enter the IP address you want ” and fil the IP Address, For Subnet Mask , and Default Gateway Address enter the values that you have noted down previously. Next, click on OK to save changes.

To switch to dynamic IP, click on Obtain the IP address automatically. Once this is enabled, your system will start picking an IP address dynamically from the router.
2. How to setup static IP on Ubuntu
On Ubuntu, you can set a static IP Address via the terminal or GUI. Firstly, let’s start with the command line. Right-click anywhere on the desktop to open the terminal.

Once the terminal window opens, we need to run a command. We need the subnet mask and network adapter name in order to set a static IP and to get that, run the following command on the terminal.
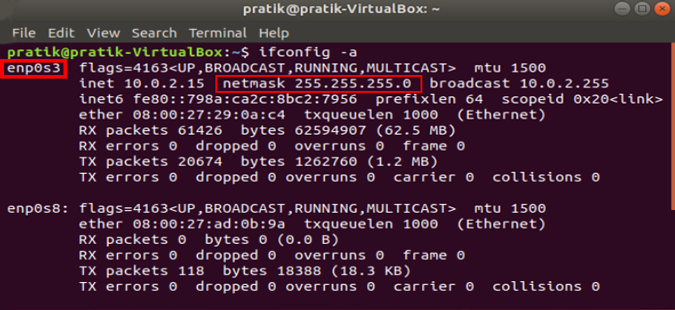
Once you have the subnet mask noted down, in my case, it’s 255.255.255.0, we can proceed further.
It is pretty simple and straight forward. We need to open the Network Adapter settings. To do that, click on the Network Icon at the top right corner of the desktop.

Now, navigate on the active network and click on the expand button for more options. Click on Wired Settings to open the Network menu.

Once you get the Wired Settings dialogue, make sure you are on the Network page. Click on the Settings icon beside the active network to open the adapter properties.
When you get the pop-up, navigate to the IPv4 tab to change the IP settings.

On the IPv4 tab, select the radio button which says “ Manual “. Some text fields will appear, you need to enter the IP address, Netmask and Gateway accordingly. Once it is validated, you can click on the Apply button to register the changes.

Again you need to restart the network for the changes to take effect. You can do it manually via command line or just switch off and switch on the Network adapter. Once done, run ifconfig on the terminal to check the IP address. It should be the same IP address which you have specified earlier.

3. How to setup static IP on Mac
If you are on macOS, setting static IP is quite similar to that of Ubuntu. But, here you don’t need the subnet mask or Default Gateway Address. Right click on the apple icon at the top left corner of the desktop. Click on System Preferences from the dropdown list.

Once the System Preferences dialogue box displays, navigate to Network and click on it to open the Network Settings

Alternatively, you can also hit Cmd+Space to trigger the Spotlight search. Type “ Network ” in the search bar and click on the icon once it appears. This will directly navigate you to the Network Settings.

From the pop-up window, select an active network interface. For example, I am connected to a WiFi network so my active network is Wi-Fi. Make sure you are on the active network tab and then click on Advanced .

A new window will open the configuration settings for that adapter. Move over to the IP settings by clicking on the TCP/IP tab .

From the Configure IPv4 menu, choose Using DHCP with manual address. Enter a static IP address in the IPv4 Address and leave the Subnet Mask and Router field as default. Click Ok to save the changes.

Now when you do an ifconfig, the system should be using the static IP you have defined in the previous times. If the IP’s have not changed, try restarting the Wi-Fi and it should fix it.
To switch back to dynamic IP, move back to “ Using DHCP ” from the Configure IPv4 menu.
4. How to setup static IP on Android

The network which you are connected to should be on top of the list. Tap on the settings icon beside the Wi-Fi network name.

Once the pop-up opens, you will see IP settings at the bottom of the menu. The default option is “DHCP”. Tap on it to change the IP configuration.

Select “ Static ” from the presented drop-down menu. Enter the desired IP address and leave the other options as default. Make sure that other devices are not using the same IP. You can see the IP address of the other devices in your network by using a small utility called Fing . For a detailed process, check our article on how to find the IP Address of any Device on your network . Once you have entered the IP, click on Save to register the change. Now, your Android phone should start using the desired IP Address.

In almost all the Android version, you get the option to set static IP Address. For some rare older Android versions, you can use a third-party app like WiFi Static . It’s free and it doesn’t require ROOT.
To switch back to dynamic IP, repeat the same procedure and select “DHCP” from the IP settings instead.
5. How to setup static IP on iPhone and iPad
If you are using an iPhone or iPad, then you can set static IP Address natively. You would need the Subnet Mask of your network. This can be obtained from the Wi-Fi settings and we would see to it in the further steps. To get started, click on the Settings icon in the dock to get to the Settings menu.

Now on the Settings menu page, tap on Wi-Fi to get to the Wi-Fi settings.

On the Wi-Fi page, you should see your connected Wi-Fi network at the top. Click on the “i” button beside it. This will open the Wi-Fi configuration window.

Once the Wi-Fi settings page appears, you will see an option called “ Configure IP “. By Default, this would be set to automatic. Just below this option, you will see “ Subnet Mask “, note it down as we will need it in the further steps. In order to set static IP, we need to change Configure IP it to Manual. Tap on it and it will open the IPv4 settings page.

There should be 3 options available on the “Configure IPv4” page. Select “ Manual ” from it. As soon as Manual IP is enabled, you will get extra text fields at the bottom to enter the IP Address, Subnet Mask, Router. We need to fill in the IP Address of our choice and Subnet Mask which we noted down in the previous step. Now, after you fill both the fields, the save button at the top right corner will be enabled. Click on it to save the static IP configuration.

Now, when you return to the Wi-Fi settings page, you will see your device is using the Static IP address. This should be the same IP address we have set in the IP configuration menu.

This static IP address will be applicable only to that particular Wi-Fi network. In case, you connect to some other Wi-Fi network the IP will change accordingly.
6. How to setup static IP to any Device from Router
Other network devices like your Wireless Printer, PS4, NAS, IP Camera, Raspberry Pi , etc. do not have an Interface. Hence, in order to configure the network, either you have to connect remotely or use the router. If you have access to the router, setting Static IP for network devices is the easiest and convenient way. I would recommend this method over any other.
So, to assign a Static IP Address to any network device, you need to login to the web portal of the router. The web portal address, username, and password are mostly printed behind the router. In case you don’t have physical access to the router, the web portal URL is mostly the PC’s gateway address. To find that, open command prompt and type the following command.
Once you have the web portal loaded, log in with the credentials. Now every router has a different web UI, but the overall structure is the same. Basically, you will have to link the IP Address to the Mac Address and Hostname of the device. So, we need to find the MAC address & Hostname of the network device. To do that, look for DHCP client list which should look something like the following screenshot.

You can get your MAC Address & Hostname under DHCP Client list. Once, you have the MAC address & Hostname noted down, we can proceed further. On most of the routers, you will have the option to set a Static IP under the section IP Mac binding or DHCP Static IP option. In case you are on a custom ROM like dd-wrt, head over to Services tab and you will have DHCP Server . Under DHCP Server, add an entry for Static Leases by clicking on the Add button.

Clicking on the Add button will create a new row. You have to enter the MAC Address, Hostname, desired Static IP and Lease time . Lease time is a unit in minutes after which your IP will be renewed. Since we are adding only 1 entry for the particular host the IP will be the same even after the renewal. Once, done click on Save changes .

Once you have configured successfully on the router, just restart the Wi-Fi on the device. When it connects it should start using the static IP. In case of issues, make sure that you have the correct MAC Address and Hostname. To check, just run the command ipconfig or look back again in the router’s DHCP client list.

These changes are written to the ROM so restarting the router won’t make changes to the static IP configuration. In order to get back to Dynamic IP, just remove the entry from the IP leases.
What’s next
Once you have started configuring the IPs on Router and network devices, you are good to go configure telnet and SSH. Have a look at our brief article on How to Enable Telnet Server in Windows 10 , Best SSH clients for iOS To Manages Remote Servers and 6 Best FTP Clients For Android . A word of caution would be to note down the static IPs assigned to devices as assigning the same IP to two network devices would render them useless.
Also Read: How To Change DNS on Windows|Mac|Android|iOS

Mrinal Saha
Mrinal is a tech geek who spends half of his day reading and writing about tech. While the nights are spent on shooting or editing YouTube videos. Feel free to geek out with him on-
You may also like
I tried meta ai on whatsapp: 5 things..., stuck out of google account log in back..., perplexity ai: 3 alternatives that are equally good..., 4 fixes for tiktok links not opening on..., how to customize incoming call screen on android..., how to check if text is ai-generated, look up your ip and mac address natively..., how to transfer data from one google account..., how to enable parallel downloading in chrome, how i look up ip address of any..., leave a comment cancel reply.
You must be logged in to post a comment.
How to Set a Static IP Address on a Windows PC
You can learn how to set up a static IP address on your computer. Here's how.
While most of the internet runs on dynamic addresses these days, static addresses are sometimes helpful to use as well. Whether you need to run a server of your own, set up external devices or services, or are just simply looking to explore, before you get your hands dirty, you need to know your way around and be super careful while setting up an IP address.
Moreover, there's more than one way to go about this. So, one by one, let's look at all the ways you can easily set up a static IP address on your Windows.
Static IP Addresses: The Whys and Hows
An IP address of a computer that stays the same over time is known as a Static IP address . This is in contrast to a dynamic IP Address, which is an address that can tweak over time.
Today, most devices use a dynamic IP address because of their ease of use and management. However, in rare cases, Static IP addresses can become handy. Some of those cases include:
- When you have external devices that you can only connect to your network through your IP address.
- When you connect to other networks through a VPN.
- Static IP addresses can make hosting a server somewhat easier.
Because of a slew of such benefits, using a Static IP address can make your life super easy in some situations. So, now let's look at the different methods you can use to set up a static IP address for yourself.
How to Set a Static IP Address on Windows 11
Like most things on Windows, you have multiple ways to do this. Let's look at the most straightforward method first, which is using Windows Settings.
Here's how you can set a static IP Address using the Windows settings:
- Head to the Start menu search bar, type in 'settings,' and select the best match. Alternatively, press the Windows Key + I to launch the Settings menu.
- Then head to Network & internet settings .
- Look for the Properties button. It's right next to your connection settings.
- Scroll down and look for the IP assignment section. Then click on Edit .
- In the new Edit IP settings dialog box, click on the scroll-down menu and select Manual .
- Toggle on the switch for the IPv4 button.
- Fill in all the network details here, including the IP address , Subnet mask , Gateway , and then click on Save .
Follow the above steps meticulously, and your Windows 11 will have a new static IP address from here on.
How to Set Up a Static IP Address on Windows 10
The basics of setting up an IP Address in Windows 10 are similar. Even though the implementation of steps might differ here and there, you have to follow a pattern that's pretty much the same. Here's how:
- Open the Windows 10 Settings.
- Click on Network & Internet .
- Depending on how you are connected to the Internet, select Wi-Fi or Ethernet .
- Select the current network connection.
- Toggle on the IPv4 switch.
- Set up the static IP address here and fill in other relevant information, such as the Preferred DNS , Default Gateway , etc.
- Click on Save .
After you are done, you will have a new static IP address on your PC from here on.
How to Set Up a Static IP With Command Prompt
The above method, using the Settings GUI, is only one of the ways to tweak your IP address settings. For those of you who tilt more towards a command line rather than a simple click-and-play GUI, luckily, alternatives exist. For instance, you can also use the Command prompt, and set up the address with just a few commands.
To change up your IP address through your Command Prompt, follow the below steps:
- Head to the Start menu search bar, type in 'cmd,' and launch the cmd as administrator.
- Type in the following command in the cmd and hit Enter : ipconfig /all
- Subnet mask
- Default Gateway
- DNS Servers
- Type in the following command to assign static IP address on your Windows and hit Enter : netsh interface ip set address name= "Ethernet1" static 10.1.4.220 255.255.255.0 10.1.4.1 In the above command, replace Ethernet1 with the name of your adapter, and change 10.1.4.220 255.255.255.0 10.1.4.1 with the device IP address, subnet mask, and default gateway address corresponding to your network configuration
- Now type the following command to set up a DNS server address and hit Enter : netsh interface ip set dns name= "Ethernet1" static 10.1.4.1
That's it. Your new static IP address will be set up from here.
How to Set Up a Static IP Address With PowerShell
PowerShell is another tool primarily handy for power users, designed to give them more control and management capabilities through task automation. If any of the above methods fail, you can also use PowerShell to set up the Static IP Address. Here’s how you can get started:
- Head to the Start menu search bar, type in ‘powershell,’ and run it as administrator.
- Type the following command to view your current network configuration and press Enter : Get-NetIPConfiguration
- InterfaceIndex
- IPv4Address
- IPv4DefaultGateway
- Type in the following command to set up a static IP address and hit Enter : New-NetIPAddress -InterfaceIndex 10 -IPAddress 10.1.4.119 -PrefixLength 24 -DefaultGateway 10.1.4.1
- Here, replace all values of information. Replace the InterfaceIndex number (10) with the number assigned to your adapter. Similarly, replace the above IPAddress with a static IP address that you want to set.
- Finally, type in the following command to assign the DNS server address and hit Enter : Set-DnsClientServerAddress -InterfaceIndex 10 -ServerAddresses 10.1.4.1
Again, replace the InterfaceIndex number (10) with your network’s corresponding number. Also, replace the ServerAddress with the DNS IP address.
You will have a new static IP address as soon as you finish all the above steps.
Setting up a Static IP Address on a Windows PC
Setting up your static IP address doesn't have to be complicated. If you follow the above methods we have laid out above, you should be done without any significant difficulties.
And while static IP address has their uses, dynamic addresses are undoubtedly necessary. So, before you make an important switch, ensure you understand their significant differences well.
How to set a static IP address on Windows 11
Here are the steps to set a static IP address on Windows 11 with Command Prompt, PowerShell, Control Panel, and Settings.

UPDATED 7/21/2023: On Windows 11, a static IP address is a network configuration that never changes, making it the preferred option to share files , a printer on a local network , or configure port forwarding.
Usually, when a computer connects to the network, it receives a dynamic IP address assigned by the local Dynamic Host Configuration Protocol (DHCP) server. The only problem is that this configuration can change at any time, as soon as you restart the computer or after the settings expire, and this can cause services like port forwarding and remote desktop to stop working. A static network configuration always maintains the same settings, making it ideal for hosting services that other users can access through the network.
This guide will teach you how to set a static IP (version 4) address on Windows 11 . (See also this video tutorial with the steps to complete this task.)
Assign static IP address on Windows 11 from Command Prompt
Assign static ip address on windows 11 from powershell, assign static ip address on windows 11 from settings, assign static ip address on windows 11 from control panel.
To set a static IP address on Windows 11 with Command Prompt, use these steps:
Open Start on Windows 11.
Search for Command Prompt , right-click the top result, and select the Run as administrator option.
Type the following command to see your current networking configuration and press Enter :
Under the network adapter, note the name of the adapter as well as the following information in these fields:
- Subnet mask
- Default Gateway
- DNS Servers

Type the following command to assign a static IP address on Windows 11 and press Enter :
In the above command, replace “Ethernet0” with the name of your network adapter. Change “10.1.4.119 255.255.255.0 10.1.4.1” with the device IP address, subnet mask, and default gateway address corresponding to the local area network.
Type the following command to set a DNS server address and press Enter :
In the command, make sure to change “Ethernet0” with your adapter’s name and “10.1.4.1” with the DNS server address of the network.
Type the following command to set an alternate DNS server address and press Enter :
In the command, change “Ethernet0” with the adapter’s name and “8.8.8.8” with an alternate DNS server address.

After completing the steps, you can use the ping command (for example ping google.com ) to see if the configuration works correctly.
You can use PowerShell with the “NetTCPIP” module to manage networking settings, including changing the IP address settings to a static configuration.
To set a static IP address with PowerShell, use these steps:
Open Start .
Search for PowerShell , right-click the result, and select the Run as administrator option.
Type the following command to view your current network configuration and press Enter :

Confirm the following network information:
- InterfaceIndex
- IPv4Address
- IPv4DefaultGateway
Type the following command to set a static IP address and press Enter :

In the command, replace the “InterfaceIndex” number (10) with the corresponding number of your adapter. Change “IPAddress” with the static IP address you want to assign to your device. Change “PrefixLength” (subnet mask) with the correct bit number if necessary. Typically, on a home network, the setting is “24.” Also, change the “DefaultGateway” option with the default gateway address of the network.
Type the following command to assign a DNS server address and press Enter :

If you need to set a secondary DNS server address, use a comma to use the same command with another address. For example:
In the command, replace the “InterfaceIndex” number (10) with your network adapter’s corresponding number. Also, change “ServerAddresses” with the DNS IP address.
Once you complete the steps, the new network configuration will apply to the computer.
Regardless of your chosen method, always assign a TCP/IP address in the network range and outside of the DHCP server scope to allow proper connectivity and avoid configuration conflicts. The reason is that multiple computers sharing the same address will cause problems, preventing them from connecting to the internet.
On Windows 11, you can set a static IP address configuration from the Settings app for wireless and wired adapters.
Set static IP address on Wi-Fi adapter
To assign a static IP address configuration to a Wi-Fi adapter, use these steps:
Open Settings on Windows 11.
Click on Network & Internet .
Click the Wi-Fi tab.

Select the current network connection.

Under the “IP settings” section, click the Edit button.

Select the Manual option.

Turn on the IPv4 toggle switch.
Set a static IP address for Windows 11 – for example, 10.1.4.119 .

Specify a Subnet mask – for example, 255.255.255.0 .
Specify a Default Gateway address.
Specify a Preferred DNS address (required).
(Optional) Specify an “Alternate DNS” address.
Use the “DNS over HTTPS” drop-down menu and select the Off option for the preferred and alternate addresses, but you can enable DoH with these options:
- Off: Transmits all DNS traffic without encryption.
- On (automatic template): Sends all DNS traffic with encryption.
- On (manual template): Allows you to specify a specific template. It is only required if the DNS service doesn’t work automatically or has a template that works as expected.
Turn off the “Fallback to plaintext” toggle switch (if you enable DoH).
Click the Save button.
Once you complete the steps, the static network configuration will apply to the computer. You can test the new settings by opening the web browser and loading a website.
Set static IP address on Ethernet adapter
To assign a static IP address to an Ethernet (wired) adapter on Windows 11, use these steps:
Open Settings .
Click the Ethernet tab.

After you complete the steps, you can test your settings using your web browser to open a website.
On Windows 11, you can still use Control Panel to change the IP settings for Ethernet or Wi-Fi adapters.
To assign a static IP configuration through the Control Panel, use these steps:
Open Control Panel .
Click on Network and Internet .
Click on Network and Sharing Center .
Click the Change adapter settings option on the left navigation pane.

Right-click the network adapter and select the Properties option.
Select the “Internet Protocol Version 4 (TCP/IPv4)” option.
Click the Properties button.

Select the “Use the following IP address” option.
Assign the static IP address – for example, 10.1.4.119 .

Specify a Subnet mask . Typically, on a home network, the subnet mask is 255.255.255.0 .
Specify a Default gateway address – for example, 10.1.4.1 (Usually, your router’s address).
Under the “Use the following DNS server addresses set Preferred DNS server” section, set the “Preferred DNS server address,” which is usually your router’s IP address or server IP address providing DNS resolutions (for example, 10.1.4.1 ).
(Optional) Specify an “Alternative DNS server,” which the computer will use if it cannot reach the preferred DNS server.
Click the OK button.
Click the Close button again.
Once you complete the steps, you can open the web browser and load a website to see if the configuration works.
If you want to revert the changes, you can use these instructions to remove the static settings to configure a dynamic IP address on Windows 11.

Mauro Huculak is a Windows How-To Expert who started Pureinfotech in 2010 as an independent online publication. He has also been a Windows Central contributor for nearly a decade. Mauro has over 14 years of experience writing comprehensive guides and creating professional videos about Windows and software, including Android and Linux. Before becoming a technology writer, he was an IT administrator for seven years. In total, Mauro has over 20 years of combined experience in technology. Throughout his career, he achieved different professional certifications from Microsoft (MSCA), Cisco (CCNP), VMware (VCP), and CompTIA (A+ and Network+), and he has been recognized as a Microsoft MVP for many years. You can follow him on X (Twitter) , YouTube , LinkedIn and About.me . Email him at [email protected] .
- How to delete network folder with thumbs.db file on Windows 10
- How to enable new energy and battery usage settings on Windows 11
We hate spam as much as you! Unsubscribe any time Powered by follow.it ( Privacy ), our Privacy .
Ipconfig Configure Static IP Address in Windows 11: A Step-by-Step Guide
Setting up a static IP address on your Windows 11 computer is like giving your device a permanent home address on the internet. This can be useful if you want to set up a server, remote access, or just ensure a consistent connection. To do this, you’ll dive into the network settings, enter some numbers, and save your changes.
Step by Step Tutorial to Configure Static IP Address in Windows 11
Before we jump into the nitty-gritty, here’s a quick primer on what you’ll be doing: you’ll access the network settings, select your connection, and manually input IP information to replace the automatic settings.
Step 1: Open Network Settings
Open your Windows 11 settings and go to the network section.
Network settings are the control center for all things internet on your computer. By accessing these settings, you’re taking the first step towards customizing how your device connects to the world wide web.
Step 2: Edit IP Assignment
Find and click on the ‘Edit’ button under IP assignment.
This is where you’ll switch from having your IP address automatically assigned (usually by your router) to entering your own fixed numbers.
Step 3: Select Manual
In the edit network screen, select ‘Manual’ from the dropdown menu.
By selecting manual, you’re telling your computer that you’re the boss and you’ll be providing the IP address details.
Step 4: Enter IP Information
Enter the static IP address, subnet mask, and default gateway information.
This is the most technical part. You’ll need to know the right numbers to put here. They’ll typically come from your internet service provider or network administrator.
Step 5: Save Changes
Save your changes and exit the settings.
Once you’ve entered all the right numbers and double-checked them, hit save, and you’ve successfully set up a static IP address!
After you complete these steps, your Windows 11 machine will use the static IP address you’ve set. This means that every time your device connects to the network, it will use the same IP address, which can help in various networking scenarios.
Tips for Configuring Static IP Address in Windows 11
- Ensure you have the correct IP address, subnet mask, default gateway, and DNS server information before starting.
- Always double-check the numbers you enter to avoid connectivity issues.
- If you’re not sure what numbers to use, consult your internet service provider or network administrator.
- Remember that setting a static IP address might cause conflicts if other devices are using the same address; make sure it’s unique within your network.
- If you encounter connectivity problems after setting a static IP address, you can always switch back to automatic IP assignment.
Frequently Asked Questions
What is a static ip address.
A static IP address is a fixed address assigned to your computer that doesn’t change over time.
Why would I want to set a static IP address?
You might want a static IP if you’re setting up a server, need remote access, or want a consistent connection without the risk of your IP changing.
Will setting a static IP address make my internet faster?
Not necessarily. It’s more about consistency and control than speed.
Can I set a static IP address on a Wi-Fi connection?
Yes, you can set it on any type of network connection, including Wi-Fi.
What if I set the wrong static IP address?
If you enter incorrect information, you might lose your internet connection. Double-check your numbers or revert to automatic assignment to fix this.
- Open Network Settings
- Edit IP Assignment
- Select Manual
- Enter IP Information
- Save Changes
Configuring a static IP address in Windows 11 is a straightforward process that can bring several benefits to your network management. Whether you’re a gamer wanting to host uninterrupted gaming sessions, a professional needing stable remote access, or just someone keen on organizing their network, a static IP address is a way to go. Remember to always have the right information on hand before you start, and don’t hesitate to seek help if you’re unsure about the numbers you need to input. With the steps provided, you’re well on your way to a more stable and predictable network experience. Keep in mind that while static IP addresses have many advantages, they may not be necessary for everyone. Assess your needs, do your homework, and if it all adds up, take the plunge and give your Windows 11 device that permanent spot on the digital map.

Matthew Burleigh has been writing tech tutorials since 2008. His writing has appeared on dozens of different websites and been read over 50 million times.
After receiving his Bachelor’s and Master’s degrees in Computer Science he spent several years working in IT management for small businesses. However, he now works full time writing content online and creating websites.
His main writing topics include iPhones, Microsoft Office, Google Apps, Android, and Photoshop, but he has also written about many other tech topics as well.
Read his full bio here.
Share this:
Join our free newsletter.
Featured guides and deals
You may opt out at any time. Read our Privacy Policy
Related posts:
- Where is the MAC Address on My iPhone? [2023 Guide]
- How to Make All Columns the Same Width in Excel 2013
- How to Find IP Address in Mac: A Step-by-Step Guide
- How to Check IP Address in Windows 11 Computer: A Step-by-Step Guide
- How to Share Internet from iPhone
- How to Screenshot on Acer Laptop
- How to Find Your Router IP Address: A Step-by-Step Guide
- How to Find Your IP Address on an iPhone 7
- How to Change a Printer IP Address: A Step-by-Step Guide
- Windows 11: How to Forget a WiFi Network in Simple Steps
- How to Remote into a Computer on a Different Network in Windows 11
- How to Create a Desktop Shortcut for a Website in Windows 7
- How to Configure Guest WiFi: A Step-by-Step Guide
- How to Find Printer IP Address: A Step-by-Step Guide
- 5 Things to Know Before You Buy an Amazon Fire TV Stick (2023 Update)
- How to Create an Internet Shortcut in Windows 10
- How to Enable Windows Explorer Dark Theme in Windows 10
- How to Change Default Browser Windows 7 Guide
- How to Display the My Computer Icon on the Windows 7 Desktop
- How to Reset Network Settings on an iPhone
- 9 Free Online Earth Day Games for Kids
- The Best Gadgets for The Beach or Pool
- When to Use a Static IP Address
Are static IP addresses better than dynamic addresses?
- Massachusetts Institute of Technology
- University of Illinois
:max_bytes(150000):strip_icc():format(webp)/headshot-00415ba557444a8a9b6bb139498b97c5.jpg "static ip assignment")
In This Article
Jump to a Section
Static IP Address Uses
- Static vs. Dynamic
- When Not to Use a Static IP
Static IP Address Assignment on Home Networks
- Getting a Static Public IP Address
A static IP address, or fixed IP address , is an IP address that never changes. Not everyone needs a static IP address, but knowing how they differ from dynamic IP addresses can help you understand whether you should use a static IP address.
Here are some example situations for when you might need a static IP address:
- Setting up a home file server .
- Adding a second router to a network.
- Enabling access to a computer when away from home or work.
- Forwarding ports to certain devices.
- Sharing a printer over a network.
- Connecting to an IP camera when away from home.
Static & Dynamic: What They Mean
The terms static and dynamic are simple to understand. At the core, the only real change you'll notice between static versus dynamic IP addresses is that the former never changes, while the latter does.
Most people don't care if their IP address changes. If you never know what your IP address is and never have a reason to keep it the same, then dynamic addresses are fine for you.
However, if your network or computer is set up in a specific way where some devices would work easier and set up would be smoother for you as the admin if an IP address always stayed the same, then static addressing is what you want.
Static IP addresses are assigned manually by an administrator. In other words, the device receiving the static IP is given a specific address (such as 192.168.1.2 ), and from then on, the address never changes.
Dynamic IP addresses are not assigned manually. They are assigned automatically by DHCP (Dynamic Host Configuration Protocol).
When Static IP Addresses Are Used
Static IP addresses are necessary for devices that need constant access.
For example, a static IP address is necessary if your computer is configured as a server, such as an FTP server or web server. If you want to ensure that people can always access your computer to download files, force the computer to use a static, never-changing IP address.
If the server was assigned a dynamic IP address, it would change occasionally, preventing your router from knowing which computer on the network is the server.
If you want to access your home computer while you're on a trip or your work computer when you're at home, setting up the computer to use a static IP address lets you reach that computer at any time without fearing that the address will change and block your access to it.
A shared printer is another example of when to use a static IP address. If you have a printer that everyone in your house or office needs to share, give it an IP address that won't change no matter what. That way, when every computer is set up to connect to that printer, those connections remain indefinitely because the address never changes.
Here are some other reasons to use static IPs:
- They provide slightly better protection against network security problems than DHCP address assignment provides.
- Some network devices don't support DHCP.
- They help avoid potential IP address conflicts where DHCP might supply an address already assigned elsewhere.
- They provide geolocation that's more accurate than a dynamic IP address.
When Not to Use a Static IP Address
Because a static IP address is assigned manually, it's less efficient for a network admin to give it out, especially in mobile situations. Someone must visit the device in person to give it an IP address instead of letting DHCP assign the address automatically.
For example, you wouldn't set a static IP address on a smartphone because the moment it reaches another Wi-Fi network, the address might not be supported on that network, meaning that it won't be able to access the internet.
Dynamic addressing is more convenient in this situation because it's easy for administrators to set up. DHCP works automatically with minimal intervention needed, allowing mobile devices to move between different networks seamlessly.
Businesses are more likely to use static IP addresses than home networks. Implementing static IP addresses isn't easy and frequently requires a knowledgeable technician.
However, you can have a static IP address for your home network. When making static IP assignments for local devices on home and other private networks, the address numbers should be chosen from the private IP address ranges defined by the Internet Protocol standard:
- 10.0.0.0–10.255.255.255
- 172.16.0.0–172.31.255.255
- 192.168.0.0–192.168.255.255
These ranges support thousands of IP addresses. It's common for people to assume they can choose any number in the range and that the specific choice doesn't matter much. This is untrue.
To choose and set specific static IP addresses suitable for your network, follow these guidelines:
- Do not choose any addresses that end with .0 or .255 . These addresses are usually reserved for use by network protocols .
- Do not choose the addresses at the beginning of a private range. Addresses like 10.0.0.1 , 192.168.0.1 , and 192.168.0.100 are commonly used by network routers and other consumer devices. These are the first addresses hackers attack when trying to break into a private computer network.
- Don't choose an IP address that falls outside the range of your local network. For example, to support all addresses in the 10.x.x.x private range, the subnet mask on all devices must be set to 255.0.0.0. If they aren't, some static IP addresses in this range don't work.
How to Get a Static Public IP Address
Internet service providers (ISP) traditionally assign all their IP addresses to customers dynamically, due to historical shortages of available IP numbers.
Contact your service provider if you prefer a static IP address. You can't get a static public IP address without requesting it from your ISP. Customers can sometimes obtain a static IP by subscribing to a special service plan and paying extra fees.
Get the Latest Tech News Delivered Every Day
- What Is a Static IP Address?
- What Is a Public IP Address? (and How to Find Yours)
- What Is an IP Address?
- How Is 192.168.1.2 Used?
- What Is DHCP? (Dynamic Host Configuration Protocol)
- Uses for the 192.168.0.2 and 192.168.0.3 IP Addresses
- What Is a Dynamic IP Address?
- Understanding the 192.168.1.100 IP Address
- NETGEAR Default Password List
- What Is a Private IP Address?
- How to Change Your IP Address
- How to Find Your IP Address on Windows 10
- How to Work With IP Address 192.168.100.1
- 192.168.1.4: IP Address for Local Networks
- What Is the 192.168.1.5 IP Address Used For?
- How to Obtain a Fixed IP Address
Understanding IP Address Assignment: A Complete Guide

Introduction
In today's interconnected world, where almost every aspect of our lives relies on the internet, understanding IP address assignment is crucial for ensuring online security and efficient network management. An IP address serves as a unique identifier for devices connected to a network, allowing them to communicate with each other and access the vast resources available on the internet. Whether you're a technical professional, a network administrator, or simply an internet user, having a solid grasp of how IP addresses are assigned within the same network can greatly enhance your ability to troubleshoot connectivity issues and protect your data.
The Basics of IP Addresses
Before delving into the intricacies of IP address assignment in the same network, it's important to have a basic understanding of what an IP address is. In simple terms, an IP address is a numerical label assigned to each device connected to a computer network that uses the Internet Protocol for communication. It consists of four sets of numbers separated by periods (e.g., 192.168.0.1) and can be either IPv4 or IPv6 format.
IP Address Allocation Methods
There are several methods used for allocating IP addresses within a network. One commonly used method is Dynamic Host Configuration Protocol (DHCP). DHCP allows devices to obtain an IP address automatically from a central server, simplifying the process of managing large networks. Another method is static IP address assignment, where an administrator manually assigns specific addresses to devices within the network. This method provides more control but requires careful planning and documentation.
Considerations for Efficient IP Address Allocation
Efficient allocation of IP addresses is essential for optimizing network performance and avoiding conflicts. When assigning IP addresses, administrators need to consider factors such as subnetting, addressing schemes, and future scalability requirements. By carefully planning the allocation process and implementing best practices such as using private IP ranges and avoiding overlapping subnets, administrators can ensure smooth operation of their networks without running out of available addresses.
IP Address Assignment in the Same Network
When two routers are connected within the same network, they need to obtain unique IP addresses to communicate effectively. This can be achieved through various methods, such as using different subnets or configuring one router as a DHCP server and the other as a client. Understanding how IP address assignment works in this scenario is crucial for maintaining proper network functionality and avoiding conflicts.
Basics of IP Addresses
IP addresses are a fundamental aspect of computer networking that allows devices to communicate with each other over the internet. An IP address, short for Internet Protocol address, is a unique numerical label assigned to each device connected to a network. It serves as an identifier for both the source and destination of data packets transmitted across the network.
The structure of an IP address consists of four sets of numbers separated by periods (e.g., 192.168.0.1). Each set can range from 0 to 255, resulting in a total of approximately 4.3 billion possible unique combinations for IPv4 addresses. However, with the increasing number of devices connected to the internet, IPv6 addresses were introduced to provide a significantly larger pool of available addresses.
IPv4 addresses are still predominantly used today and are divided into different classes based on their range and purpose. Class A addresses have the first octet reserved for network identification, allowing for a large number of hosts within each network. Class B addresses reserve the first two octets for network identification and provide a balance between network size and number of hosts per network. Class C addresses allocate the first three octets for network identification and are commonly used in small networks.
With the depletion of available IPv4 addresses, IPv6 was developed to overcome this limitation by utilizing 128-bit addressing scheme, providing an enormous pool of potential IP addresses - approximately 3.4 x 10^38 unique combinations.
IPv6 addresses are represented in hexadecimal format separated by colons (e.g., 2001:0db8:85a3:0000:0000:8a2e:0370:7334). The longer length allows for more efficient routing and eliminates the need for Network Address Translation (NAT) due to its vast address space.
Understanding these basics is essential when it comes to assigning IP addresses in a network. Network administrators must consider various factors such as the number of devices, network topology, and security requirements when deciding on the IP address allocation method.
In the next section, we will explore different methods of IP address assignment, including Dynamic Host Configuration Protocol (DHCP) and static IP address assignment. These methods play a crucial role in efficiently managing IP addresses within a network and ensuring seamless communication between devices.
Methods of IP Address Assignment
IP address assignment is a crucial aspect of network management and plays a vital role in ensuring seamless connectivity and efficient data transfer. There are primarily two methods of assigning IP addresses in a network: dynamic IP address assignment using the Dynamic Host Configuration Protocol (DHCP) and static IP address assignment.
Dynamic IP Address Assignment using DHCP
Dynamic IP address assignment is the most commonly used method in modern networks. It involves the use of DHCP servers, which dynamically allocate IP addresses to devices on the network. When a device connects to the network, it sends a DHCP request to the DHCP server, which responds by assigning an available IP address from its pool.
One of the key benefits of dynamic IP address assignment is its simplicity and scalability. With dynamic allocation, network administrators don't have to manually configure each device's IP address. Instead, they can rely on the DHCP server to handle this task automatically. This significantly reduces administrative overhead and makes it easier to manage large networks with numerous devices.
Another advantage of dynamic allocation is that it allows for efficient utilization of available IP addresses. Since addresses are assigned on-demand, there is no wastage of unused addresses. This is particularly beneficial in scenarios where devices frequently connect and disconnect from the network, such as in public Wi-Fi hotspots or corporate environments with a high turnover rate.
However, dynamic allocation does have some drawbacks as well. One potential issue is that devices may receive different IP addresses each time they connect to the network. While this might not be an issue for most users, it can cause problems for certain applications or services that rely on consistent addressing.
Additionally, dynamic allocation introduces a dependency on the DHCP server. If the server goes down or becomes unreachable, devices will not be able to obtain an IP address and will be unable to connect to the network. To mitigate this risk, redundant DHCP servers can be deployed for high availability.
Static IP Address Assignment
Static IP address assignment involves manually configuring each device's IP address within the network. Unlike dynamic allocation, where addresses are assigned on-demand, static assignment requires administrators to assign a specific IP address to each device.
One of the main advantages of static IP address assignment is stability. Since devices have fixed addresses, there is no risk of them receiving different addresses each time they connect to the network. This can be beneficial for applications or services that require consistent addressing, such as servers hosting websites or databases.
Static assignment also provides greater control over network resources. Administrators can allocate specific IP addresses to devices based on their requirements or security considerations. For example, critical servers or network infrastructure devices can be assigned static addresses to ensure their availability and ease of management.
However, static IP address assignment has its limitations as well. It can be time-consuming and error-prone, especially in large networks with numerous devices. Any changes to the network topology or addition/removal of devices may require manual reconfiguration of IP addresses, which can be a tedious task.
Furthermore, static allocation can lead to inefficient utilization of available IP addresses. Each device is assigned a fixed address regardless of whether it is actively using the network or not. This can result in wastage of unused addresses and may pose challenges in scenarios where addressing space is limited.
In order to efficiently allocate IP addresses within a network, there are several important considerations that need to be taken into account. By carefully planning and managing the allocation process, network administrators can optimize their IP address usage and ensure smooth operation of their network.
One of the key factors to consider when assigning IP addresses is the size of the network. The number of devices that will be connected to the network determines the range of IP addresses that will be required. It is essential to accurately estimate the number of devices that will need an IP address in order to avoid running out of available addresses or wasting them unnecessarily.
Another consideration is the type of devices that will be connected to the network. Different devices have different requirements in terms of IP address assignment. For example, servers and other critical infrastructure typically require static IP addresses for stability and ease of access. On the other hand, client devices such as laptops and smartphones can often use dynamic IP addresses assigned by a DHCP server.
The physical layout of the network is also an important factor to consider. In larger networks with multiple subnets or VLANs, it may be necessary to segment IP address ranges accordingly. This allows for better organization and management of IP addresses, making it easier to troubleshoot issues and implement security measures.
Security is another crucial consideration when allocating IP addresses. Network administrators should implement measures such as firewalls and intrusion detection systems to protect against unauthorized access or malicious activities. Additionally, assigning unique IP addresses to each device enables better tracking and monitoring, facilitating quick identification and response in case of any security incidents.
Efficient utilization of IP address ranges can also be achieved through proper documentation and record-keeping. Maintaining an up-to-date inventory of all assigned IP addresses helps prevent conflicts or duplicate assignments. It also aids in identifying unused or underutilized portions of the address space, allowing for more efficient allocation in the future.
Furthermore, considering future growth and scalability is essential when allocating IP addresses. Network administrators should plan for potential expansion and allocate IP address ranges accordingly. This foresight ensures that there will be sufficient addresses available to accommodate new devices or additional network segments without disrupting the existing infrastructure.
In any network, the assignment of IP addresses is a crucial aspect that allows devices to communicate with each other effectively. When it comes to IP address assignment in the same network, there are specific considerations and methods to ensure efficient allocation. In this section, we will delve into how two routers in the same network obtain IP addresses and discuss subnetting and IP address range distribution.
To understand how two routers in the same network obtain IP addresses, it's essential to grasp the concept of subnetting. Subnetting involves dividing a larger network into smaller subnetworks or subnets. Each subnet has its own unique range of IP addresses that can be assigned to devices within that particular subnet. This division helps manage and organize large networks efficiently.
When it comes to assigning IP addresses within a subnet, there are various methods available. One common method is manual or static IP address assignment. In this approach, network administrators manually assign a specific IP address to each device within the network. Static IP addresses are typically used for devices that require consistent connectivity and need to be easily identifiable on the network.
Another widely used method for IP address assignment is Dynamic Host Configuration Protocol (DHCP). DHCP is a networking protocol that enables automatic allocation of IP addresses within a network. With DHCP, a server is responsible for assigning IP addresses dynamically as devices connect to the network. This dynamic allocation ensures efficient utilization of available IP addresses by temporarily assigning them to connected devices when needed.
When considering efficient allocation of IP addresses in the same network, several factors come into play. One important consideration is proper planning and design of subnets based on anticipated device count and future growth projections. By carefully analyzing these factors, administrators can allocate appropriate ranges of IP addresses for each subnet, minimizing wastage and ensuring scalability.
Additionally, implementing proper security measures is crucial when assigning IP addresses in the same network. Network administrators should consider implementing firewalls, access control lists (ACLs), and other security mechanisms to protect against unauthorized access and potential IP address conflicts.
Furthermore, monitoring and managing IP address usage is essential for efficient allocation. Regular audits can help identify any unused or underutilized IP addresses that can be reclaimed and allocated to devices as needed. This proactive approach ensures that IP addresses are utilized optimally within the network.
The proper assignment of IP addresses is crucial for maintaining network security and efficiency. Throughout this guide, we have covered the basics of IP addresses, explored different methods of IP address assignment, and discussed considerations for efficient allocation.
In conclusion, understanding IP address assignment in the same network is essential for network administrators and technical professionals. By following proper allocation methods such as DHCP or static IP assignment, organizations can ensure that each device on their network has a unique identifier. This not only enables effective communication and data transfer but also enhances network security by preventing unauthorized access.
Moreover, considering factors like subnetting, scalability, and future growth can help optimize IP address allocation within a network. Network administrators should carefully plan and allocate IP addresses to avoid conflicts or wastage of resources.
Overall, a well-managed IP address assignment process is vital for the smooth functioning of any network. It allows devices to connect seamlessly while ensuring security measures are in place. By adhering to best practices and staying updated with advancements in networking technology, organizations can effectively manage their IP address assignments.
In conclusion, this guide has provided a comprehensive overview of IP address assignment in the same network. We hope it has equipped you with the knowledge needed to make informed decisions regarding your network's IP address allocation. Remember that proper IP address assignment is not only important for connectivity but also plays a significant role in maintaining online security and optimizing network performance.
Enhance Online Security: The Ultimate Guide to Conceal Your IP Address
Alternative Methods to Conceal Your IP Address Without a VPN
Maintain Privacy: Learn How to Alter Your IP Address
The Significance of IP Address for Online Security and Privacy
Comprehensive Handbook on VPNs, IP Addresses, and Proxy Servers
How To Get Static IP Address

- How-To Guides
- Tech Setup & Troubleshooting

Introduction
When it comes to internet connectivity, most users are familiar with dynamic IP addresses, which are automatically assigned to devices by Internet Service Providers (ISPs) each time they connect to the internet. However, there are instances where you may need a static IP address. In this article, we will explore what a static IP address is, why you might need one, and the various methods you can use to obtain a static IP address.
A static IP address is a unique numerical label assigned to a device or network by an ISP. Unlike dynamic IP addresses that change each time a device connects to the internet, a static IP address remains constant. It provides a fixed address that can be used to access devices or services remotely.
So why would you need a static IP address? There are several reasons. Firstly, if you are hosting a website or running a server that needs to be accessible to users at all times, a static IP address ensures that your website or server remains consistently reachable. Additionally, if you utilize remote desktop or file sharing services, a static IP address makes it easier for others to connect to your device or network securely.
Now that you understand the importance of a static IP address, let”s explore the different methods you can use to obtain one.
What is a Static IP Address?
A static IP address is a unique numerical label assigned to a device or network that remains constant. Unlike dynamic IP addresses, which are automatically assigned by ISPs and change each time a device connects to the internet, a static IP address provides a fixed address that does not change.
Think of a static IP address as a virtual “home address” for your device or network. It allows you to have a consistent online identity that can be accessed by other devices or services. Just like a physical address helps people find your home, a static IP address enables devices from across the internet to locate and connect with your device or network.
With a static IP address, you can host services and websites that need to be accessible to users at all times. For example, if you’re running a web server, a static IP address ensures that the server’s resources are consistently reachable by users. It allows you to establish a stable connection for services like remote desktop access, file sharing, or virtual private networks (VPNs).
Compared to dynamic IP addresses, static IP addresses offer several advantages. For one, they provide more stability and reliability. Since the IP address doesn’t change, there are no interruptions in connectivity due to IP address reassignment. This is particularly important for businesses and organizations that require a constant online presence.
Additionally, static IP addresses simplify the process of mapping domain names to IP addresses. Domain names, like example.com, serve as human-friendly references, while IP addresses are used by computers to locate websites. With a static IP address, you can easily associate your domain name with your device or network and create a seamless connection between your website and the world.
Now that you have an understanding of what a static IP address is, let’s delve into the reasons why you might need one.
Why would you need a Static IP Address?
There are several compelling reasons why you might need a static IP address for your device or network. Let’s explore some of the common scenarios where a static IP address proves advantageous:
1. Hosting Services: If you run a website, game server, or any other online service that needs to be accessible to users at all times, a static IP address is essential. With a static IP, users can reliably connect to your services without the need to constantly update IP addresses.
2. Remote Access: If you frequently access your device or network remotely, a static IP address simplifies the process. Whether it’s remote desktop access or file sharing, a static IP ensures that you can easily connect to your device from anywhere without the hassle of tracking changing IP addresses.
3. Security: Static IP addresses can enhance security measures. For example, if you operate security cameras or surveillance systems, a static IP allows you to connect to your cameras reliably and monitor your premises securely. Similarly, if you need to set up a Virtual Private Network (VPN) to ensure secure remote access to your network, a static IP address is essential for establishing a stable and secure connection.
4. Reliable Online Gaming: Online gaming often requires a consistent and stable connection. By using a static IP address, you can avoid potential disruptions or lag caused by dynamic IP address changes. This ensures a smoother gaming experience and minimizes the risk of disconnections.
5. Convenience for Hosting Email or DNS Servers: If you’re hosting email or DNS servers, having a static IP address makes it easier for other mail servers or DNS resolvers to locate and communicate with your server. It simplifies the setup process and minimizes the likelihood of email delivery issues or DNS resolution errors.
These are just a few examples of why you might need a static IP address. Whether it’s for hosting services, remote access, security, online gaming, or server operations, a static IP address offers stability, convenience, and reliable connectivity.
Now that you understand the benefits of having a static IP address, let’s explore different methods to obtain one.
Different ways to get a Static IP Address
There are several methods you can use to obtain a static IP address for your device or network. Let’s explore the different options:
- Contact your Internet Service Provider (ISP): The most straightforward approach is to contact your ISP and inquire about obtaining a static IP address. Many ISPs offer static IP address services for an additional fee. They can guide you through the process of setting up and configuring a static IP address for your connection.
- Configure a Static IP Address through your router: If you have a router that supports static IP address configuration, you can set up a static IP address directly through your router’s interface. By assigning a specific IP address to your device within the router’s settings, you can ensure that the device always receives the same IP address whenever it connects to the network.
- Use a Virtual Private Network (VPN): Another way to obtain a static IP address is by using a VPN service that provides dedicated IP addresses. Many VPN providers offer the option to purchase a static IP address addon. When you connect to the VPN, you’ll be assigned a specific static IP address that remains constant for your online activities.
- Dynamic DNS Services: Dynamic DNS (DDNS) services can also be utilized to achieve a similar result to a static IP address. DDNS services allow you to associate a domain name with a dynamic IP address. Special software or hardware on your network keeps the DDNS service updated with your changing IP address. This way, you can access your device or network using a domain name, even if the IP address changes.
Each method has its own advantages and considerations. Contacting your ISP is generally the simplest approach, but it may come at an additional cost. Configuring a static IP address through your router offers more control, but it requires a router that supports static IP assignment. Using a VPN with a dedicated IP address provides flexibility and privacy benefits. Lastly, dynamic DNS services offer a workaround to achieve a similar outcome without an official static IP address.
Consider your specific needs and technical capabilities when choosing the most suitable method to obtain a static IP address. Now that we have explored different ways to obtain a static IP address, let’s examine the pros and cons of using a static IP address.
Option 1: Contact your Internet Service Provider (ISP)
The easiest and most straightforward way to obtain a static IP address is by contacting your Internet Service Provider (ISP). Most ISPs offer static IP address services for an additional fee. By reaching out to your ISP, you can inquire about the availability and pricing of static IP addresses.
Here’s how the process typically works:
- Contact your ISP: Call or email your ISP’s customer support and express your interest in acquiring a static IP address. They will provide you with the necessary information about their static IP services, including the cost and any additional requirements.
- Complete the paperwork: Your ISP may require you to fill out certain paperwork or sign an agreement to proceed with the static IP address request. This is a standard procedure to ensure that you understand the terms and conditions associated with obtaining a static IP address.
- Configuration and setup: Once the request is approved, your ISP will guide you through the process of configuring and setting up the static IP address. This may involve configuring your modem or router settings or making changes to your network setup. Your ISP’s technical support team will provide you with the necessary instructions and support to ensure a smooth setup process.
One of the main advantages of obtaining a static IP address through your ISP is the reliability and support that comes with it. Since the static IP address is provided directly by your ISP, you can rely on their technical assistance if any issues arise. Additionally, having a static IP address directly from your ISP ensures that it is properly registered and recognized across the internet.
However, it’s important to note that acquiring a static IP address through your ISP usually involves an additional monthly or annual fee. The cost may vary depending on your location, ISP, and the specific service package you choose. Be sure to inquire about the pricing details and any contract terms associated with the static IP address service.
Contacting your ISP and obtaining a static IP address is a convenient option for users who prefer a hassle-free setup and reliable support. However, if you prefer more control over your network configuration or want to explore alternative methods, there are other options available. Let’s explore another method: configuring a static IP address through your router.
Option 2: Configure a Static IP Address through your router
If you have a router that supports static IP address configuration, another option to obtain a static IP address is by configuring it through your router’s settings. This method allows you to set up a static IP address directly on your local network, without involving your Internet Service Provider (ISP).
Here’s how you can configure a static IP address through your router:
- Access your router’s administration interface: Open your web browser and enter your router’s IP address in the address bar. This IP address can typically be found in the user manual or on the back of the router. Alternatively, you can try common default router IP addresses such as 192.168.1.1 or 192.168.0.1.
- Log in to your router: Enter the router’s username and password to access the administrative interface. If you haven’t changed these credentials before, it may be the default login information provided by the manufacturer. Consult your router’s documentation for the correct credentials.
- Locate the DHCP settings: Once logged in, navigate to the DHCP settings section in the router’s configuration interface. Look for options related to IP address assignment or DHCP server settings.
- Configure the static IP address: Within the DHCP settings, find the area for static IP assignment. Specify the desired IP address that you want to assign to your device. Ensure that the IP address is within the correct IP range and is not already in use by another device on your network.
- Save and apply changes: After configuring the static IP address, save the settings and apply the changes. Your router will then assign the specified IP address to your device whenever it connects to the network.
A major advantage of configuring a static IP address through your router is the control it provides over your local network. This method allows you to manage IP address assignments within your network environment, ensuring consistent connections for your devices.
However, it’s important to note that not all routers support static IP address configuration, especially those provided by your ISP. Check your router’s specifications or consult the manufacturer’s documentation to confirm if this functionality is available. Additionally, configuring a static IP address through your router requires some technical knowledge and familiarity with router administration interfaces.
Configuring a static IP address through your router offers flexibility and control over your network’s IP assignment process. However, if this option is not feasible for you, there is an alternative method to consider: using a Virtual Private Network (VPN) to obtain a static IP address.
Option 3: Use a Virtual Private Network (VPN)
If you’re looking for an alternative way to obtain a static IP address, using a Virtual Private Network (VPN) can be an effective solution. Many VPN providers offer dedicated IP address services that provide you with a static IP address for your online activities.
Here’s how you can use a VPN to obtain a static IP address:
- Select a VPN provider: Look for a VPN provider that offers dedicated or static IP address options. Make sure to choose a reputable provider with servers in locations that suit your needs.
- Subscribe to the VPN service: Sign up for a subscription plan that includes a dedicated IP address. Be aware that VPN providers often charge an additional fee for this service, so consider your budget and requirements.
- Configure the VPN connection: Install the VPN client software provided by the VPN provider on your device. Follow the instructions to set up the VPN connection and connect to a server that offers a dedicated IP address.
- Enjoy your static IP address: Once connected to the VPN server, you will be assigned a dedicated IP address that remains constant for your online activities. This IP address can be used for hosting services, remote access, or any other purpose where a static IP is required.
Using a VPN to obtain a static IP address offers several advantages. Firstly, it provides a high level of privacy and security for your online activities, as your internet connection is encrypted and routed through the VPN server. Additionally, a VPN allows you to bypass regional restrictions and access geo-blocked content by connecting to servers in different locations.
However, it’s important to consider the potential drawbacks of using a VPN for a static IP address. The cost of a VPN subscription, including the dedicated IP address feature, can be higher compared to other methods. Furthermore, the performance of a VPN connection might be slightly slower compared to a direct connection, depending on the VPN provider and server locations.
Using a VPN with a dedicated IP address can be an excellent option for users who prioritize privacy, security, and flexibility. It allows you to obtain a static IP address without relying on your ISP or configuring your router. When considering this option, research different VPN providers, compare their offerings, and choose the one that best fits your needs.
Now that we’ve explored different methods to obtain a static IP address, let’s move on to discussing the pros and cons of using a static IP address.
Pros and Cons of using a Static IP Address
Using a static IP address offers certain advantages and disadvantages based on individual needs and requirements. Let’s explore the pros and cons of using a static IP address:
1. Stability and Reliability: A static IP address provides a fixed address for your device or network, ensuring consistent connectivity. It eliminates the risk of losing connections due to dynamic IP address changes.
2. Remote Access and Hosting: With a static IP address, you can easily set up remote access to your device or network, making it convenient for activities such as remote desktop access, file sharing, and hosting services.
3. Convenience for Users: For users who require frequent or regular access to specific devices or services, a static IP address provides convenience, as there’s no need to remember changing IP addresses or configure systems for each connection.
4. Improved Security: A static IP address simplifies security measures, as specific IP addresses can be whitelisted or allowed access for secure communication, remote management, or online transactions.
5. Better Performance for Online Gaming: Online gamers can benefit from a static IP address, as it ensures a consistent and stable connection, reducing the risk of disconnections and lag during gameplay.
1. Additional Cost: Acquiring a static IP address often involves paying an extra fee. This can vary depending on the ISP, service plan, or VPN provider, adding to the overall cost of the internet connection.
2. Complex Setup: Configuring a static IP address may require technical knowledge and expertise, especially when setting it up through router configuration or VPN services. Novice users might find the process challenging.
3. Limited Flexibility: Static IP addresses are tied to specific devices or networks. If you change locations or need to use a different device, you may need to reconfigure the IP settings or obtain a new static IP address.
4. Potential Security Risks: While a static IP address can enhance security measures, it can also be a potential target for hackers or malicious activities. Proper security measures, such as firewalls and regular system updates, should be implemented to mitigate such risks.
5. Dependence on ISP: If you choose the option of obtaining a static IP address through your ISP, you are reliant on their infrastructure and technical support. Any issues with the ISP’s network or service could impact the connectivity and availability of the static IP address.
Considering these pros and cons will help you decide whether obtaining a static IP address aligns with your specific needs and preferences. Evaluate the advantages and disadvantages in relation to your requirements to make an informed decision.
A static IP address can provide numerous benefits, such as stability, convenience, and improved accessibility for remote access and hosting services. Whether you choose to contact your ISP, configure a static IP through your router, or use a VPN, it’s important to assess your specific needs and technical capabilities.
Considerations for choosing a method:
1. Cost: Determine the additional cost involved in obtaining a static IP address through your ISP or VPN provider, and assess whether it aligns with your budget.
2. Technical expertise: Consider your level of technical knowledge and familiarity with router configuration or VPN setup. If you prefer a hassle-free approach, contacting your ISP might be the best option.
3. Flexibility: Evaluate the portability of the static IP address. If you frequently change locations or devices, a VPN or dynamic DNS service might offer more flexibility compared to a static IP provided by your ISP.
4. Security: Prioritize security measures when utilizing a static IP address. Implement firewalls, encryption, and regular system updates to mitigate potential risks.
5. Performance: Assess the performance implications of using a VPN, as it may introduce slight latency compared to a direct connection.
By carefully considering these factors, you can choose the most suitable method to acquire a static IP address that meets your specific requirements and preferences.
Remember, a static IP address is not always necessary for all users or situations. Evaluate your needs and determine if the advantages of having a static IP address outweigh the associated costs and potential complexities. If a static IP address is essential for your online activities, take the necessary steps to obtain and configure it properly to enjoy the benefits it offers.
Whether you’re hosting services, managing remote access, or seeking a consistent connection, utilizing a static IP address can provide the stability, convenience, and reliability you need. Take control of your online presence and enhance your network’s capabilities with a static IP address.
Leave a Reply Cancel reply
Your email address will not be published. Required fields are marked *
Save my name, email, and website in this browser for the next time I comment.
- Crowdfunding
- Cryptocurrency
- Digital Banking
- Digital Payments
- Investments
- Console Gaming
- Mobile Gaming
- VR/AR Gaming
- Gadget Usage
- Gaming Tips
- Online Safety
- Software Tutorials
- Tech Setup & Troubleshooting
- Buyer’s Guides
- Comparative Analysis
- Gadget Reviews
- Service Reviews
- Software Reviews
- Mobile Devices
- PCs & Laptops
- Smart Home Gadgets
- Content Creation Tools
- Digital Photography
- Video & Music Streaming
- Online Security
- Online Services
- Web Hosting
- WiFi & Ethernet
- Browsers & Extensions
- Communication Platforms
- Operating Systems
- Productivity Tools
- AI & Machine Learning
- Cybersecurity
- Emerging Tech
- IoT & Smart Devices
- Virtual & Augmented Reality
- Latest News
- AI Developments
- Fintech Updates
- Gaming News
- New Product Launches
- Fintechs and Traditional Banks Navigating the Future of Financial Services
- AI Writing How Its Changing the Way We Create Content
Related Post
How to find the best midjourney alternative in 2024: a guide to ai anime generators, unleashing young geniuses: how lingokids makes learning a blast, 10 best ai math solvers for instant homework solutions, 10 best ai homework helper tools to get instant homework help, 10 best ai humanizers to humanize ai text with ease, sla network: benefits, advantages, satisfaction of both parties to the contract, related posts.

What Is An External IP Address

What Is A Static IP Address

How To Configure Two Routers In Packet Tracer

How Workstation Gets An IP Address

How to Access Sites Blocked in Chrome? (A Simple Guide)

Can’t Get Network Printer To Print When Plugged Into Network Switch

What Does Ips Mean In A Tablet

How To Open Ports On A Wireless Router
Recent stories.

Fintechs and Traditional Banks: Navigating the Future of Financial Services

AI Writing: How It’s Changing the Way We Create Content

How to Know When it’s the Right Time to Buy Bitcoin

How to Sell Counter-Strike 2 Skins Instantly? A Comprehensive Guide

10 Proven Ways For Online Gamers To Avoid Cyber Attacks And Scams

- Privacy Overview
- Strictly Necessary Cookies
This website uses cookies so that we can provide you with the best user experience possible. Cookie information is stored in your browser and performs functions such as recognising you when you return to our website and helping our team to understand which sections of the website you find most interesting and useful.
Strictly Necessary Cookie should be enabled at all times so that we can save your preferences for cookie settings.
If you disable this cookie, we will not be able to save your preferences. This means that every time you visit this website you will need to enable or disable cookies again.
- Engineering Mathematics
- Discrete Mathematics
- Operating System
- Computer Networks
- Digital Logic and Design
- C Programming
- Data Structures
- Theory of Computation
- Compiler Design
- Computer Org and Architecture
- Webmail vs Email Clients
- Difference between Micro Computer and Mini Computer
- Difference between Microsoft Teams and Skype
- Difference between Component and Object
- Difference between UMTS and GSM
- Difference between Google Voice and JustCall
- Difference between Software Security and Cyber Security
- Difference between Google Voice and Skype
- Difference between Google Hangouts and Skype
- Difference between Google Voice and Google Duo
- Difference between HBase and Cassandra
- Difference between GSM and LTE
- Difference between SCTP and UDP
- Difference between Cloud Computing and Cluster Computing
- Difference between Thunderbolt and USB-C
- Difference between Pulse Code Modulation (PCM) and Delta Modulation (DM)
- Difference between Server and Mainframe
- Difference between VRC and LRC
- Difference between Checksum and CRC
Difference between Static and Dynamic IP address
IP stands for Internet Protocol . IP address may be a distinctive numerical symbol allotted to every device on a network to spot each affiliation unambiguously. The distinction between Static and Dynamic IP address lies inside the length of allotted scientific discipline address. The static scientific discipline address is fastened scientific discipline address that is manually allotted to a tool for a protracted amount of your time. On the opposite hand, the Dynamic scientific discipline address often changes whenever user boots his/her machine, and it’s mechanically allotted. Difference between Static and Dynamic IP address:

static and dynamic ip address
Please Login to comment...
Similar reads.
- Difference Between

Improve your Coding Skills with Practice
What kind of Experience do you want to share?
IMAGES
VIDEO
COMMENTS
To set a static IP address in Windows 10 or 11, open Settings -> Network & Internet and click Properties for your active network. Choose the "Edit" button next to IP assignment and change the type to Manual. Flip the IPv4 switch to "On", fill out your static IP details, and click Save. Sometimes, it's better to assign a PC its own IP address ...
10 minutes. TOOLS. Windows 10 or 11. Step 1: Open the Command Prompt. Your first step should be to track down your computer's current IP address, subnet mask, and default gateway. Do this by ...
To set a static TCP/IP configuration on Windows 11, use these steps: Open Start. Search for Command Prompt, right-click the top result, and select the Run as administrator option. Type the ...
From the Configure IPv4 menu, choose Using DHCP with manual address. Enter a static IP address in the IPv4 Address and leave the Subnet Mask and Router field as default. Click Ok to save the changes. Now when you do an ifconfig, the system should be using the static IP you have defined in the previous times.
Set static IP address on Windows 10 from Settings. To assign a static IP address on Windows 10, use these steps: Open Settings on Windows 10. Click on Network & Internet. Click on "Wi-Fi" or "Ethernet.". Click on the current network connection. Under the "IP settings" section, click the Edit button. Using the drop-down menu, select ...
Generally, static IP addresses are easier to track. Dynamic IP addresses are a bit easier to set up than static ones as well. To get a static IP address, you have to do the process manually. For a dynamic one, the DHCP server will assign one for you. With a static IP, you have to re-enter the IP address every time you upgrade your computer.
Type in the following command to set up a static IP address and hit Enter: New-NetIPAddress -InterfaceIndex 10 -IPAddress 10.1.4.119 -PrefixLength 24 -DefaultGateway 10.1.4.1. Here, replace all values of information. Replace the InterfaceIndex number (10) with the number assigned to your adapter.
Assign static IP address on Windows 11 from Settings. On Windows 11, you can set a static IP address configuration from the Settings app for wireless and wired adapters. Set static IP address on Wi-Fi adapter. To assign a static IP address configuration to a Wi-Fi adapter, use these steps: Open Settings on Windows 11. Click on Network & Internet.
A static IP address is an IP address that was manually configured for a device instead of one that was assigned by a DHCP server. It's called static because it doesn't change vs. a dynamic IP address, which does change. Routers, phones, tablets, desktops, laptops, and any other device that can use an IP address can be configured to have a ...
Right-click on your network adapter and select Properties. Click Internet Protocol Version 4 (TCP/IPv4). Click Properties. Select Use the Following IP Address and enter the IP Address, Subnet Mask ...
Use Control Panel to set a static IP in Windows 11. Hit the Windows key, type Control Panel in the search bar and click Open. Navigate to Network & Internet. Select Network and Sharing Center. On the left pane, select Change adapter settings. Right-click your network connection and click the Properties option.
Step 4: Enter IP Information. Enter the static IP address, subnet mask, and default gateway information. This is the most technical part. You'll need to know the right numbers to put here. They'll typically come from your internet service provider or network administrator.
Static IP addresses are necessary for devices that need constant access. For example, a static IP address is necessary if your computer is configured as a server, such as an FTP server or web server. If you want to ensure that people can always access your computer to download files, force the computer to use a static, never-changing IP address.
IP address assignment is a crucial aspect of network management and plays a vital role in ensuring seamless connectivity and efficient data transfer. There are primarily two methods of assigning IP addresses in a network: dynamic IP address assignment using the Dynamic Host Configuration Protocol (DHCP) and static IP address assignment.
A static IP (Internet Protocol) address is a fixed, unchanging address assigned to a device or network. Unlike dynamic IP addresses, which are assigned by the Internet Service Provider (ISP) and can change periodically, a static IP remains constant, allowing for consistent access and identification.
A static IP address is a 32 bit number assigned to a computer as an address on the internet. This number is in the form of a dotted quad and is typically provided by an internet service provider (ISP). An IP address (internet protocol address) acts as a unique identifier for a device that connects to the internet. Computers use IP addresses to locate and talk to each other on the internet ...
Static IP address assignment. An administrator manually configures static IP addresses on a node. The admin sets the desired IP address, subnet mask, default gateway, name server and other values. While the process is usually simple, admins should keep the following points in mind:
Depending on the interface you want to modify, click either on the Network or Wi-Fi tab. To open the interface settings, click on the cog icon next to the interface name. In "IPV4" Method" tab, select "Manual" and enter your static IP address, Netmask and Gateway. Once done, click on the "Apply" button.
IP addresses are assigned to a host either dynamically as they join the network, or persistently by configuration of the host hardware or software. Persistent configuration is also known as using a static IP address. In contrast, when a computer's IP address is assigned each time it restarts, this is known as using a dynamic IP address.
Configuring a static IP address through your router offers more control, but it requires a router that supports static IP assignment. Using a VPN with a dedicated IP address provides flexibility and privacy benefits. Lastly, dynamic DNS services offer a workaround to achieve a similar outcome without an official static IP address.
Static IP Assignment. Assigning a static IP address to a user is accomplished by editing the properties of their user account in Active Directory. Open the Active Directory Users and Computers console (dsa.msc), navigate to the Dial-in tab on the target individual's Active Directory user account, and check the box next to Assign Static IP ...
While dynamic ip address change any time. 3. Static ip address is less secure. While in dynamic ip address, there is low amount of risk than static ip address's risk. 4. Static ip address is difficult to designate. While dynamic ip address is easy to designate. 5. The device designed by static ip address can be traced.
Step 1: Define private subnet. Set up a second private subnet, different from the default, dynamic IP address network: Sign in to the Admin Web UI. Click Configuration > VPN Settings. Enter your static IP address with the netmask under Static IP Address Network (Optional). Click Save Settings and Update Running Server.