Canvas at Penn
Penn's Source for Courseware Innovation & News

Viewing Grades and Feedback
Check with your instructor about expectations regarding grades in your Canvas course. Some instructors may not utilize the Canvas Gradebook to track all assignments, and the final grade posted on Canvas may not be reflective of the final grade that is posted on Path@Penn at the conclusion of a term.
On this Page
Checking grades, calculating total score, viewing a rubric, reading comments, seeing feedback, determining dropped grades, additional resources, getting help.
Notifications can inform students when an instructor has posted grades for assignments, quizzes, or discussions. However, the content within a notification will never include numerical score data.
Students can check grades for a class by clicking on “Grades” within a Canvas course. A blue dot indicates the number of new grades that have been posted.

By default, Canvas calculates a total score based on graded assignments only. To view the total grade if the semester ended today, uncheck the box next to “Calculate based only on graded assignments” on the right side of the page. Ungraded assignments will be given a score of 0.

If an assignment has a rubric attached, click on the rubric icon that looks like a clipboard to display the rubric parameters and associated comments below.

Instructors may leave comments to provide feedback. To view these comments, click the chat box icons next to the assignment. Then, a feedback box listing all comments will appear on the right side of the webpage.

Instructors have the ability to write digital annotations on your submission directly. To view this feedback, click on the title of the assignment.

Then, click “View Feedback” on the screen that appears next.

The annotations will then be viewable by scrolling through the document reader.

An instructor may configure some scores to be dropped. Assignments that are dropped and not tabulated in the final grade have a due date and score in a light gray font. Hovering over the name of a dropped assignment will prompt a message about the grade being dropped to appear.

The following links provide additional details on how students access grades in Canvas:
- Viewing grades in a current course
- Approximating assignment scores using the What-If Grades feature
- Using and understanding the icons and colors in the Grades page
- Finding grades on the Canvas mobile app for Android
- Finding grades on the Canvas mobile app for iOS
Please check with your instructor if you believe you are finding discrepancies or inaccuracies with your grade on Canvas. The representatives at [email protected] are unable to make changes to grades but can assist instructors with checking that their assignments are set up properly.
Last Updated: 27 Oct 2023
Search Utah State University:
Grading assignments in canvas.
On This Page
Enter Score on Grades Page
View online submission and submit a score in speedgrader, sort and name display options, annotation tools, grade entry, use a rubric, additional feedback, moving to next student, more resources.
If students aren't submitting anything, like for an in-class activity or participation points, you will need to create a "no submission" assignment on the Assignments page. Then, you can go right to the Grades page and enter a grade for each student, just as you would in spreadsheet software.
Enter "EX" (excused) for students who do not need to complete the assignment so that the score won't count as a "0" when it comes time to calculate a final grade.
When students submit artifacts online (text, document, picture, etc.) you will use the SpeedGrader to grade the assignment. The SpeedGrader will show a preview of the student submission and give you a box to enter the score and a comments field.
You can access the SpeedGrader in a couple of ways:
On the Canvas Dashboard, click on the assignment title in the To Do list

In the course, click on the assignment title in the To Do list on the home page

In the course, click on the Assignment page, then the title of the assignment, and click SpeedGrader

In the course, click on Grades , then the three dots, and SpeedGrader

Once you are in the SpeedGrader, you can sort the submissions alphabetically, by the date of submission, or by submission status and hide the student names.
If students submitted documents for the assignment, you have the option to use a pointer, highlighter, text entry, text strikethrough, or box outline to provide feedback. When using these tools, be sure to add a comment for students to view the feedback. Here is sample verbiage you might use:
Please be sure to view the comments on the body of your paper by clicking on the "View Feedback" link from the assignment page.
If you prefer to use annotation tools using an application on your computer, you can download the file and upload the edited version. For example, you could download the submitted file and open it into a word processing software like Microsoft Word and use the Track Changes feature. There, you can save your document with the annotations and upload them to SpeedGrader by using the File Attachment button underneath the comment box on the right-hand panel of the Speedgrader.

Enter the score in the grade field on the right panel.

You can use a rubric to grade the assignment. See Rubrics for more details.
You can provide additional feedback to students in the form of comments, an uploaded file, video, or audio recording.

You can move to the next student by clicking on the left arrow at the top of the page, or use the dropdown menu to select a specific student.
- Canvas guide: How do I use SpeedGrader?
- Canvas guide: How do I post grades for an assignment in the Gradebook?
Canvas How-To: Gradebook Setup and Grading
Section menu close, office of academic technology.
- Instructional Technology
- Online Course Design
- Training Opportunities
- OAT Updates & Tech Tips
- Copyright & the TEACH Act
Contact Information
Mary Stuart Rogers, MSR 380
First: Exploring Assignment and Activity Types
Canvas makes a distinction between assignments and activities. Assignments are almost always graded. Activities still require students to do something, but the task itself will not earn the student any points.
What is the difference between a Canvas Assignment and a Canvas Activity?
Second: Understanding Assignments vs. Grading
In a Canvas course, the structure of the grade book is configured on the Assignments page. The Grades page contains the data and calculations of the grade book – the scores. When you create any graded activity in Canvas, an item appears on the Assignments page and a column is automatically present in the Grades. Using assignment groups on the Assignments page also contributes to the structure of what you see in the Grades page.
Creating Assignments First
To get started configuring your Canvas Gradebook , be sure to first create a Canvas Assignment for every graded assignment in your course. Assignments can be set to display grades as points, a percentage, complete/incomplete, GPA scale, or letter grade. After creating and publishing a graded assignment, it will appear in the Grades page of the course.

For an in depth look at each assignment and activity type, visit the help pages for Assignments , Discussions , and Quizzes .
How do I use the New Gradebook?
Former Blackboard User Tip : Many Blackboard Grade Center setup tasks are addressed in the Assignments area of a Canvas course.
Creating Assignment Groups
Assignment Groups give your gradebook structure, helping students see the major graded components of your course.
Note : In Canvas, every graded activity must be placed into a group, even if it is the only item in the group.

How do I add an assignment group in a course?
Former Moodle User Tip: Assignment Groups in Canvas are similar to Categories in the Moodle Gradebook.
Grading In-Class or Assignments Without Submissions
Grading of in-class presentations, participation, in-class exams, or assignments submitted as hard copy can be included in your grade book as non-submission assignments. They must still be an assignment in Canvas so that a corresponding column can be present in the grade book.

How do I create assignment columns for non-submission assignments in the Gradebook?
Entering or Updating Grades in the Gradebook
Like an Excel spreadsheet, grades can easily be entered and updated directly within the Canvas Grade book. Use the keyboard Enter and Arrow Keys to quickly enter grades. Click on the arrow inside each cell to make comments or change the submission status.

How do I enter and edit grades in the New Gradebook?
Using a Default Grade
For assignments where the majority of students are to receive the same grade, use the Default Grade option to bulk update each student's grade for an individual assignment.

How do I set a default grade for an assignment?
Mute Grade Notifications for Assignments
Mute an assignment while you grade, ensuring all students see their grades at the same time. You can also decide to hide the entire gradebook from students.

How do I mute or unmute an assignment in the New Gradebook? How can I hide the gradebook from students?
Gradebook tools
Gradebook tools.
Gradebook Tools maximize your productivity when using the Gradebook. They also make grading in bulk much more straightforward. These tools are found on the top of the student roster.
- Grade book: View all students and assignments.
- Individual: View grades and points for a single student at a time with customizable settings.
- Grade book History: View previous grades on assignments from yourself or a grader.
- Arrange or Filter students by different categories.
- Toggle the visibility for Notes and Unpublished Assignments .
- View the Statuses ' legend for a color key in the grade book, along with customizing the colors.
- The Actions dropdown allows you to Import or Export grades and rosters in the .csv file type.
- The All Modules dropdown allows you to view assignments from all modules or a singular module at a time.
- The Search Bar allows you to quickly find students.
- Set a default grade for all missing work.
- Set a customized grade deduction for late work.

How do I upload changes to the Gradebook?
Weighting Assignments by Percentage
Should you choose to grade using weighted assignment categories, open the Assignments Groups Weight screen to give each group a percentage of the total course grade.

How do I weight the final course grade based on assignment groups?
Dropping Lowest Scores
Within an Assignment Group, choose to drop the lowest scores within a series of assignments with the same group. The assignments in the group do not have to be worth the same amount of points.

How do I create drop rules for an assignment group?
Using SpeedGrader
Use SpeedGrader to enter grades directly within an assignment while providing students written or verbal feedback.
For an in depth look, visit the help pages for SpeedGrader .
Creating a Rubric
Help students see the criteria you will use to grade their assignments. Rubrics in Canvas are interactive, permitting an instructor to simply select a cell in the rubric to provide points towards a total score.
For an in depth look, visit the help pages for Rubrics .
Viewing a Student's Grades
You can view an individual student's grades during office hours or advising by clicking on their name in the Gradebook. This will provide an overview of their progress in each assignment group.

How do I view a student's Grades page in a course?
Handling Missing Submissions in Canvas
In Canvas, any missing submissions, or activities or assignments that have not yet been graded by an instructor will appear as a dash (-) in the Canvas gradebook. A dash (-) in the gradebook is not the same as a zero (0). Canvas will NOT calculate a dash (-) into a student's total grade.
Here are two examples of when a dash (-) will appear in your gradebook.
Example 1 : A student did not attempt an online quiz or upload a required assignment in Canvas. For that gradebook item they will have a dash (-) in the gradebook. A dash (-) in the gradebook is not the same as a zero (0).
Example 2 : You collected an in-class assignment and manually graded students' assignments. You entered all grades for the assignments you collected. If a student did NOT turn in their assignment, you did nothing. For that gradebook item, a student who did not submit the assignment will have a dash (-) in the gradebook. A dash (-) in the gradebook is not the same as a zero (0).
The Effect of Dashes on the Course Grade
Dashes allow the student to see a course grade that is only comprised of the grades entered in the gradebook. Since dashes are not zero grades, this means the grade can appear "inflated" or even inaccurate.
Changing missing submissions (-) to zero (0) grades
There are 3 suggested ways to update any gradebook items from a dash (-) to a zero (0) so that the student's gradebook total is accurate.
1. Replace (-) with 0 as you grade with SpeedGrader or Gradebook
Check your Canvas gradebook for any missing submissions from students. Manually change any dashes to zeros so that the gradebook item will count towards their total grade. See the guides below on how to edit grades in Canvas.
How do I enter and edit grades in SpeedGrader?
2. Use the default grade tool to change all missing submissions to zeros
Canvas has a gradebook tool that you can use to change all grades for a specific gradebook column. Once you have entered grades for a submitted assignment, (or the deadline for an online self-graded quiz has passed) Canvas can update existing missing submissions (items that appear as dashes) to a zero. For more information on this process, please see the guide below.
Note: When using the tool this way, make sure you do NOT select "Overwrite already-entered grades" as this would replace any grades you have already entered!

3. Apply the Missing Submission Policy in the Gradebook
Canvas has a new gradebook tool that allows for grading policies. The missing submissions policy allows an automatic score to apply to missing submissions. The missing label applies to things that are still missing after the due date. By setting this policy to a 0%, missing submissions will automatically receive this score. You can always adjust the score down the line by removing the missing label and modifying the score.

How do I apply a Missing Submission policy in the New Gradebook?
What to learn more?
View all Canvas Guides for Assignments and Grades .
Information on this page is adapted from content created by the Center for Effective Teaching and Learning at Cal State L.A
Updated: September 09, 2022
Modal Title
Key Concepts for Grading in Canvas
This guide provides an overview of how grading works in Canvas. Specific how -to information on the sections below may be found in the Canvas Instructor Guide .
The Grades function within Canvas allows you to maintain all of your grades online. It provides a robust tool for tasks typically done in a spreadsheet application, making it possible to keep all grading online.
Steps to organize your Gradebook
To enter your grade book, click on the Grades link on your course menu (left of your screen). A list of your students appears on the left side, once you enroll your students , with columns to the right for any learning activity you have set-up to be assessed within Canvas.
Note: The only column created by default in your Gradebook is the Total column. It serves the purpose of calculating the total value of graded assignments in your course. The Total column can be weighted based on the way your graded assignments are grouped. The Total column can be used with the course’s letter grade scheme in order to calculate student final letter grades in your course.
1. Start by creating “Assignment Groups”
2. correlate your grading scheme for the letter grades.
In Canvas, you create a grading scheme instead of typing letters into your Gradebook or the SpeedGrader. The grading scheme correlates percentage ranges or scores to specific letter grades. You can enable the default grading Canvas scheme or create your own grading scheme in your Canvas course, then enable your custom grading scheme.
Use the following:
- Enter and edit grades in the Gradebook guide
- Add a grading scheme in a course
- Watch the grading scheme video (2m 37s) on Vimeo
3. Manage unique calculations (e.g., drop lowest score) in assignment groups

4. To add a Gradebook column, create an Assignment first
The gradebook in Canvas is a blank slate until you create the assignments (see the difference between assignments and learning in Canvas ).
You add columns to the gradebook by adding assignments. The easiest way to remember is that Assignments = Gradebook Columns. Once you create an Assignment, Canvas automatically includes it in the Gradebook, Calendar, Assignments, and Syllabus pages.
Assignments can be:
- Both graded (published assignments, graded discussions, graded quizzes, and surveys) and ungraded assignments (practice quizzes, ungraded surveys, and not graded assignments).
- As simple as just a name, due date, and point score; or, it can include instructions, open and close dates.
Submissions for assignments can be:
- online (through Canvas),
- on-paper (in-person),
- or no-submission (to create extra columns in the Gradebook, or when you want to create an assignment that involves multiple scores).
Tip: No Submission and On Paper assignments still appear to students on their Assignments page. To avoid confusion, you should note it in the assignment description, so students will know whether a submission is required and how they are supposed to submit it.
5. Assign either a point value or percentage to the graded assignments

- An assignment is only calculated into the grade after it is graded, so you should grade it or input a 0. (if the instructor does not input a 0, then the final grade will not reflect how poorly the student is doing).
- Treat Ungraded as 0s” will NOT affect the grade for the student. It is only a display change for the gradebook.
6. Discover what the colors and icons in the gradebook mean
The most common color you will notice is pink, which denotes late assignment submissions. Icons appearing in the gradebook indicate both that the submission has been made by the student, as well as what the submission type is. For an explanation of the icons and colors in the Gradebook, view the How do I use the icons and colors in the Gradebook? web guide.
7. Offer extra credit
There are several easy ways to offer extra credit: Create a no-submission assignment with 0 total points and add points to it, add extra points to an existing assignment, as well as the following:
- Add extra points to a quiz using Fudge points within SpeedGrader™, view the How do I use quiz fudge points in SpeedGrader? web guide
- Create an extra credit category on a rubric, view the How do I create a rubric in a course? web guide
- Create extra credit assignment inside an Assignment Group
For additional assistance, read through the How to give an extra credit in a course? web guide.
8. Calculate the Course Final Grade (in Canvas)
- Use the Assignment Groups
- Use Weighting Grades
- Use Grading Rules
- How do I add a grading scheme in a course? and
- How do I enable a grading scheme for a course?

9. Calculate the Course Final Grade in a spreadsheet (out-of-Canvas)
For your customized grade calculations outside of canvas, you can download the gradebook calculate the grades and upload your calculated grades back into the Canvas gradebook. To use this out-of-Canvas system, do the following steps
- Create at least two assignment groups and check the option to weight the final grade by assignment group.
- Set the weight for one group at 0% and the other at 100%
- Place all of your assignments in the group that is weighted at 0%
- Create a no-submission assignment for the custom final grade in the group weighted at 100%
- Download the gradebook as a CSV file and use Excel to calculate your own unique grading scenario with the final grade appearing in a column that will match with the custom final grade column you created in Canvas.
- Import the spreadsheet into Canvas to populate the custom column.
Note: For steps 5 and 6 you can also use some other method to calculate grades and either import a spreadsheet or type the grades in by hand. Either way, because the custom final grade column is all by itself in an assignment group weighted at 100% of the grade, Canvas’s final score column will pull its score directly from it as an exact match. All you need to do now is customize your grading scheme in your course settings to reflect your own letter-grade breakdown, and you have successfully posted grades calculated by your own algorithm.
10. End of Semester: Don't Forget to Download the Gradebook
Learner-centered gradebook practices, 1. hide assignments in the gradebook before doing any grading.
By default, students can see results in their Grades tab as soon as their submission is graded. If you want all students to see grades at the same time, rather than live as you enter them, use the three dots on individual assignments in the gradebook to alter the Grade Posting Policy and then select to Manually release grades. After all the grading for that assignment is done, return to the three-dot menu and select Post Grades . View the following web guides:
- How do I select a grade posting policy for an assignment in the Gradebook?
- How do I post grades for an assignment in the Gradebook?
- How do I hide grades for an assignment in the Gradebook?
- How do I select a grade posting policy for a course in the Gradebook?

2. Hide the total column (it is visible to students by default)
3. excuse a student from an assignment.
If needed, a student may be excused from assignments, discussions, or quizzes. Excused items are not calculated as part of the student’s total grade. To use this feature in the gradebook, find the cell for the appropriate student and assignment, type “EX” in that cell, and then press the Enter key. Read through this via the How do I excuse an assignment for a student in the Gradebook? web guide.
4. Make a note about student progress
You can use the notes column to keep track of information in your course that is important to student assessment or growth such as student effort, student challenges, SIS (Student Information Service) IDs, or any other general notes. Students are not able to see notes column. You may toggle between the show/hide notes column link without losing your notes. View the How do I use the Notes column in the Gradebook? web guide.
Tip: Students can view their grades based on “What-If” scores so that they know how grades will be affected by upcoming or resubmitted assignments. They can test scores for an assignment that already includes a score, or an assignment that has yet to be graded. To learn more about this feature, visit How do I approximate my assignment scores using the What-If Grades feature? Web guide.
Self-Paced Canvas Videos
To become more acquainted with the Gradebook:
- Read the How do I use the New Gradebook web guide and
- View the Canvas Gradebook Overview video (7m 55s)
To learn more about Assignments:
- View the What are Assignments? web guide
- View the Canvas Assignment Overview video (5m 29s)
Canvas-led Training Workshop at Iowa State:
In September 2017, CELT hosted Erin Wasson, Canvas Trainer, to facilitate key workshop topics; view the Canvas-lead Grading and Assignments training video (1h 14m).
Canvas Tips For Students
Just another university of saskatchewan site.

Viewing Rubrics and Grades in Canvas

Seasonal message @sparrowcoffee, Photo by B. D. W. Kristoff, CC by 2.0
Brette D. W. Kristoff , Graduate Student – Communications Specialist, GMCTL, December 15, 2020
View Rubrics for Assignments:
- A Canvas Rubric appears immediately below your assignment details
- Depending on how your instructor set it up, your rubric may or may not show the point values for each set of criteria.
- Note not all instructors will use rubrics!
How to view your Grades and Graded Rubrics in Canvas:
Open the Grades tab from your Course Navigation Menu:
- Select the assignment title to view the assignment details. Here you can view the assignment due date, grade status, and the total point value for each assignment.
- You can also view any comments left by your instructor.
- Use the drop-down menu to view your grades in each of your Canvas courses. Select the Arrange By menu to sort grades by module, due date, or assignment group.
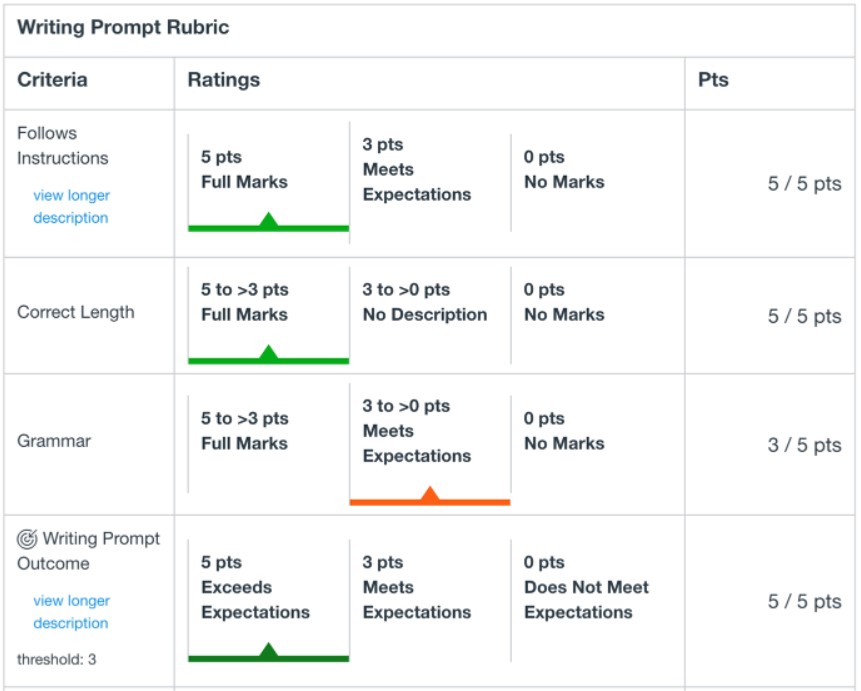
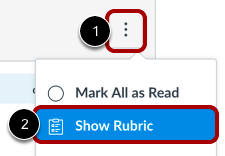
To see the Rubric results for a submitted assignment, click on the Rubric icon (circled below), to the right of the assignment title to show the details:
The Rubric with ratings will be marked by colours, with the points at the end of each row and an overall total at the bottom.
View Rubrics for Graded Discussions:
- To learn more about how to use Canvas Discussion boards, read our Student Guide for Using Canvas Discussion Boards.
- If a Show Rubric icon is not displayed, then there is no Canvas Rubric attached to the discussion.
- Click on the rubric criteria to view longer descriptions.
- Review the rubric to self-evaluate and make sure your discussion post meets the criteria and course outcomes.
- Your graded Canvas Rubric is accessed through your Grades page, in the same way as with an Assignment.
We acknowledge that the University of Saskatchewan’s main campus is situated on Treaty 6 Territory and the Homeland of the Métis. We pay our respect to the First Nations and Métis ancestors of this place and reaffirm our relationship with one another.
For more support options with Canvas, see the USask Student Canvas page .
Leave a Reply Cancel reply
Your email address will not be published. Required fields are marked *
Save my name, email, and website in this browser for the next time I comment.
University Center for Teaching and Learning
How to use the gradebook to enter and calculate grades in canvas.
- Quick Start
- Instructor Help
- Student Help
Using the Gradebook
Are you looking for instructions on how to import your Canvas final grades into PeopleSoft? Instructions are available from the Office of the Registrar here .
This page covers:
- Interaction between the Assignments page and the Grades page, and
- Using the gradebook, including calculating grades.
Assignments Page
Before getting into the grades page proper, let us explore some additional features on the assignments page that manage parts of your grading in Canvas.

- (B) Create new assignment groups with the +Group button.
- (C) Options for your assignments page overall are behind the top-right most button.
- (D) If your course has weighted scoring enabled, you can easily see the value for each assignment group.
- (E) If any assignment group rules apply, you can see them like shown here. Pointing at this for a moment will remind you which rules are applied.
- (F) This button give you options for the given assignment group.
Assignment Groups
Assignment groups are how you can organize your assignments in Canvas. They function on the assignments page similar to how modules work for your course. You can use assignment groups only for organization if you would prefer (such as all sub-parts of a large semester-long assessment belonging to one group, or all reflection papers being organized together), but using assignment groups also adds the following features:
- The Grades page can show the subtotal for each assignment group as its own column.
- Assignment groups can be set to drop certain scores, such the common “drop lowest quiz”.
- Weighted scoring can be applied to the groups, such that all of the assignments in a group constitute a certain percentage of your course’s final grade.
Note : All courses start with and must have at least one assignment group.
Organizing Assignment Groups
Assignments and assignment groups will default to appearing in your Grades page in the same order as they appear on the Assignments page.
Assignment Group Rules (Dropping Lowest)
Using assignment groups, you can instruct Canvas to keep only the highest or lowest assignments in a group.
- Navigate to your course’s Assignments page.
- Click on the edit button to the right of the assignment group to modify. (F) in the above screenshot.
- Click edit.
- Enter the number of highest or lowest scores to ignore within a group.
- If any assignments be more important than others that they should not be dropped, click the Add Assignment link under Never Drop to add them to a list of assignments that are always kept.

View the full documentation for assignment group rules.
Weighted Final Grades
You can easily use Canvas to calculate your final scores for your course based on weighted percentages.
- Click on the edit button in the top right of the page. (C) in the above screenshot.
- Click Assignment Groups Weight.
- Check “Weight final grade…”
- Assign the percentage for each group. Canvas will show you the total shown. Any groups not contributing to the final score can be weighted to zero. Refer to the full documentation (linked below) to see what Canvas will do if your total is higher or lower than 100%.
- Click Save.

Note : Assignments preserve their relative weight (based on points) within an assignment group. An assignment worth more points than another in the same assignment group will contribute more to that group’s value. Canvas does not have equal distribution of all assignments within an assignment group unless all assignments have the same point value.
View the full documentation for weighted final scores.
Important note: Anything that is to appear in your gradebook needs to be an assignment in your course. To “add a column” to your gradebook, you must create an assignment. Learn more about creating assignments . You can create assignments that are of type “no submission” or “on paper” to handle assignments such as class participation or an in-class exam where the student does not directly submit something in Canvas for grading.
Gradebook Overview
Key parts of the Gradebook are indicated below.

- (A) The hamburger button shows or hides the course navigation menu . When you go to the gradebook, Canvas defaults to hiding this menu. Click on this to reveal it so you can return to other parts of your course.
- (B) The table in the center of the gradebook is the main part of content. Each row represents a student in your course, and each column an assignment. (Some columns represent calculated subtotals for assignment groups, or the final score for the course.)
- (C) Notice the horizontal scroll bar at the bottom of the page. The gradebook often gets quite wide as assignments are added.
- A “-” grade means the assignment is currently exempted and is the default grade. If an unsubmitted assignment should count against a student’s grades, make sure to enter a score of “0”. See the common tasks below for bulk filling blank.
- Note: A dark gray cell indicates that the assignment was not assigned to that student. A column with a lot of dark gray entries indicates either that the assignment was not published, or that there might be an issue with the Assign To box on that assignment’s settings.
- The column header also conveys additional information, including: its point value, whether or not the assignment grades are hidden (an eyeball in the left corner), if the assignment is unpublished, or that assignment’s grade posting policy. Clicking on the title in a column header takes you you to that assignment.
- (F) You can build filters with the filters button . Clicking the filters button will open a menu on the right to build and save filters for your gradebook. You can add conditions, name the filter set, and save it. In the future, just click the Apply Conditions switch to turn on or off all filters in that filter set at once. Only one filter set can be enabled at a time. An example of what you can do with filters would be “show me all the quizzes for students in my Tuesday section”.
- (G) The settings gear in the top right of the gradebook allows you to set grade policies for your course, such as late grade policies. You can also change view settings here, including changing the colors of the gradebook or disabling subtotal columns from appearing for you.
- (H) The gradebook view selection above the gradebook table allows you to choose which gradebook you want to view. Options include the standard gradebook, an individual view, or the gradebook history for your course where you can audit changes over time. Depending on some course options enabled, you may have additional options enabled here.
- (I) Use the Import and Export buttons to download or upload data from/to Canvas. Exporting your gradebook will create a CSV file for you to download. Import will request a CSV file to upload. When working with CSV files (such as in Excel), please make sure you do not sort the header columns or rows that Canvas provided.
- (J) Use the quick search boxes to filter your gradebook quickly to find a particular student or assignment. Just click into the box and start typ ing.
Common Tasks
Here are short descriptions of how the most common tasks are performed in the Canvas gradebook.
Verifying Online Submissions
Scroll horizontally (C) until you find the column for the assignment column. Then scroll vertically (if necessary) to see who has and has not submitted. Tip: Try tying in the Search Assignments and/or student name quick search (J) above to filter rather than scrolling.
Grading Online Submissions
Please see the Grade Assessments using SpeedGrader page for this.
Entering Grades
Either utilize the SpeedGrader, or scroll to cell (assignment column and student row) to enter the grade. Click in it, and type the score. You can move down a column by pressing enter. See the Student Information area below to learn how to mark exemptions.
Bulk Grading (and filling in zeroes)
If you have an assignment you want to enter a bulk grade for (such as “everyone gets 5 points for this extra credit assignment”), click on the options button for that column header and choose set default grade, type the score and click Set Default Grade. If you do this process with a grade of 0, and do not check to override, this will let you easily replace all “-” or missing assignments with a zero.
If you click the options button for the header of the total column at the end of the gradebook, you can choose Apply Score to Ungraded. This will let you tell Canvas to fill in a zero for all missing assignments in the gradebook. You might want to look at Gradebook History (discussed below) after using bulk grading options to verify what changes were made.
Checking Totals
Scroll to the rightmost column of the gradebook. Canvas displays the student’s score according to the available data. The total score is the overall course score, and subtotals are displayed for each assignment group. For more about weighted grades or dropping scores, see the above discussion about assignment groups.
Note: A grade of – (including future assignments) is usually not counted against a student’s score. Make sure to fill in grades for a complete gradebook. You can set late and missing submission polices. See Gradebook Settings below. You can also set grading schemas (number-to-letter grade values; check Related links on the Instructor Help tab).
Message Students
You can choose “Message Students Who” from any the options button for any assignment column to send messages to a filtered list of students in your course. Selecting this will allow you to choose to email students who have not yet submitted, have not yet been graded (but did submit), or scored greater than or less than a score you specify. After selecting your filter, you will get a list of the students who will be sent an Inbox message. You can X any of them to omit them from the list. Type your message and click send.
To send a message to a specific student, see Student Information below to learn about the Context Card.
Show or Hide Total or Subtotal Columns
To hide totals or subtotals from your view , click on the gear (G), change to View Options, and check the boxes to hide Totals or Subtotals. Click Apply at the bottom right. To hide totals and subtotals from your students’ views , go to Course Settings, and, at the bottom of Course Details, click More Options. Check or uncheck “Hide totals in student grades summary” and click Update Course Settings.
Changing the Gradebook View
Filter the gradebook.
To filter your gradebook, click the Filters button and click Create New Filter. Add Condition(s) and values and click the Apply Conditions toggle to use the filter. Only one filter set can be used at a time. You can give the current (new) filter a name and save it for easy use later. Use the trash can icon to remove any conditions or saved filters.
Sort the Gradebook
Gradebook history.
Select Gradebook History from the Gradebook menu. This will show you a register of every change in your gradebook, including before and after changes to grades, and who made the change. This data is preserved here even if you delete an assignment, or a student is removed from your course. Filter the list with the menus above the chart. To return to your gradebook, just select Grades again from the course navigation menu.
Individual View
Select Individual View from the Gradebook menu. You can use this view to focus on one student at a time, including the checkbox to hide student names as you review grading patterns. Once you select global settings, you select a student in the content selection area to see the breakdown of that student’s grades. Or select an assignment to see some statistics about it. (Or both be taken to that submission.) Individual view has links to other functionality discussed elsewhere on this page, such as Message Students Who. Return to the normal gradebook view by selecting Gradebook from the dropdown menu in the top right corner.
As an alternative to the Gradebook Individual View, try the Grades button from the student context card discussed later in this document. That view will show you the grades for each assignment in your course for that student in an easy-to-review format.
Student Information
Click on a student’s name in the first column of the gradebook, and a context card will pop up on the right of your view. This is a quick way to get an idea of the student’s performance information in your class. This shows information about the student you clicked on as seen in the screenshot below. You can see the, the student’s information, grades and recent assignments (the quantity varies by your screen size), and relative activity. The stars at the bottom show the student’s relative activity to others in your course. Clicking on the name views their profile page, the mail icon sends an inbox message, Grades takes you to viewing their individual grades page, and Analytics takes you to analytics for your course filtered by that student. (You can learn more about analytics, and what Canvas counts as participation on the help page for New Analytics .)

If you click on a cell in the gradebook, and click on the icon (appears like a door with an arrow) that appears in that cell, the grade detail tray will open on the on the right. This allows you to set the status of the assignment (such as to excuse the assignment, excluding it from grade calculations), or exchange comments with the student about the assignment. This pane also has arrows to go between students or assignments, and has a link to SpeedGrader, where it will take you directly to the submission for this cell.

Gradebook Policy Settings
Clicking the gear in the top right of the gradebook will open the menu as shown in the screenshot below. Here you can set course grade policies.

Late Policies
Note : The some of policies set here apply retroactively, so be careful with changing it after you already have grades in your course.
The “grade for missing submissions” setting allows you to apply a grade to assignments marked as missing. To count a missing assignment as zero, check this and fill in 0. Note that assignments without a due date are never missing unless you manually mark them as such.
The “deduction for late submissions” allows you to deduct a percentage from the grade per hour or day the assignment is late, and allows you to set a minimum grade (effectively a maximum late deduction). Note that assignments without a due date are never late unless you mark them as such.
Grade Posting Policy
On the Grade Posting Policy tab, you choose whether grades for assignments are set to be posted manually, or automatically. The default of automatic is that as soon as you enter a grade for a student, they can see it. You can override this on a per-assignment basis by clicking on that options button in that assignment from its column header. For any assignments that are set to a manual posting policy, students do not see any grades or feedback until you post them by clicking on the options button for that assignment. Additional information about this, including a useful flow chart, can be found on the Instructor Help tab.
Note: Comments can still be visible to the student before this, so be cautious what you enter as a comment in SpeedGrader or the Grade Detail Tray. Also, assignments created before setting this policy may not toggle. If you change this after you have already created assignments, verify individual assignments say manual in their column header.
Gradebook Help for Instructors
Video overview.
- How do I use the Gradebook?
- How do I create assignment columns for non-submission assignments in the Gradebook?
- How do I enter and edit grades in the Gradebook?
- How do I enter grades for an individual assignment as a specific grading type in the Gradebook?
- How do I apply scores to ungraded assignments?
- How do I change the status of a submission in the Gradebook?
- How do I post grades for an assignment in the Gradebook?
- How do I hide grades that were previously posted in the Gradebook?
- How do I use the Notes column in the Gradebook?
- How do I use the Total column in the Gradebook?
- How do I override a student’s final grade in the Gradebook?
- How do I use the icons and colors in the Gradebook?
- How do I change the color for a grading status in the Gradebook?
- How do I sort an individual assignment column in the Gradebook?
- How do I arrange columns in the Gradebook?
- How do I create a filter in Enhanced Gradebook Filter?
- How do I sort and display student data in the Gradebook?
- How do I view assignments or students individually in the Gradebook?
- How do I view a student’s Grades page in a course from the Gradebook?
- How do I view the history of all grading changes in the Gradebook?
- How do I view the Unpublished Assignments column in the Gradebook?
Tools and Communication
- How do I view a context card for a student in a course?
- How do I leave comments for students in the Gradebook?
- How do I send a message to students from the Gradebook?
- How do I export grades in the Gradebook?
- How do I import grades in the Gradebook?
- How do I download all student submissions for an assignment in the Gradebook?
- How do I upload all student submissions for an assignment in the Gradebook?
- How do I curve grades in the Gradebook?
- How do I edit the Roll Call Attendance assignment?
- How do I take roll call using the Attendance tool?
- How do I use the Roll Call Attendance tool in a course?
Assignment Groups (Categories/Weighting)
- How do I create rules for an assignment group?
- How do I weight the final course grade based on assignment groups?
- How do I use posting policies in a course?
- How do I select a grade posting policy for a course in the Gradebook?
- How do I select a grade posting policy for an assignment in the Gradebook?
- How do I apply a Late Submission policy in the Gradebook?
- How do I apply a Missing Submission policy in the Gradebook?
- How do I set a default grade for an assignment in the Gradebook?
- How do I import my final grades from Canvas to PeopleSoft/Faculty Center?
- How do I enable a grading scheme for a course?
- How do I add a grading scheme in a course?
- How do I use grading schemes in a course?
- How do I view grading schemes in a course?
- How do I get to SpeedGrader from the Gradebook?
- How do I use the Learning Mastery Gradebook to view outcome results in a course from the Gradebook?
- How do I view outcomes or student results individually in the Learning Mastery Gradebook from the Gradebook?
Gradebook Help for Students
- How do I view my grades in a current course?
- How do I use the icons and colors in the Grades page?
- How do I approximate my assignment scores using the What-If Grades feature?
- How do I view my grades in a concluded course?
Assignments
- How do I know when my instructor has graded my assignment?
- How do I view assignment comments from my instructor?
- How do I view my assessment results as a student in New Quizzes?
- How do I view quiz results as a student?
- How do I view quiz comments from my instructor?
- Where can I find my peers’ feedback for peer reviewed assignments?
- How do I view my Roll Call Attendance report as a student?
- How do I view my Learning Mastery scores in the Grades page?
- How do I download assignment submissions from all my courses?
- Generative AI Resources for Faculty
- Importing Grades from Canvas to PeopleSoft
- Enter and Calculate Grades in Canvas
- End-of-term Teaching Surveys
- Finals Week Assessment Strategies
- Alternative Final Assessment Ideas
- Testing Services Hours During Finals
- Not sure what you need?
- Accessibility
- Canvas and Ed Tech Support
- Center for Mentoring
- Creating and Using Video
- Diversity, Equity and Inclusion
- General Pedagogy
- Graduate Student/TA Resources
- Remote Learning
- Syllabus Checklist
- Student Communication and Engagement
- Technology and Equipment
- Classroom & Event Services
- Assessment of Teaching
- Classroom Technology
- Custom Workshops
- Open Lab Makerspace
- Pedagogy, Practice, & Assessment
- Need something else? Contact Us
- Educational Software Consulting
- Learning Communities
- Makerspaces and Emerging Technology
- Mentoring Support
- Online Programs
- Teaching Surveys
- Testing Services
- Classroom Recordings and Lecture Capture
- Creating DIY Introduction Videos
- Media Creation Lab
- Studio & On-Location Recordings
- Video Resources for Teaching
- Assessment and Teaching Conference
- Diversity Institute
- New Faculty Orientation
- New TA Orientation
- Teaching Center Newsletter
- Meet Our Team
- About the Executive Director
- Award Nomination Form
- Award Recipients
- About the Teaching Center
- Annual Report
- Join Our Team
Getting Started with Canvas Assignments
- Last modification date Updated On June 8, 2023
- Categories: Assignments , Canvas , Uncategorized
- Categories: assessment , Getting Started , Grading

Canvas Assignments are a way for instructors to provide students opportunities to practice using the knowledge and skills they have gained or to assess student performance related to such knowledge and skills. (Creating an Assignment is the only way to create a new column in the Gradebook.)
In Canvas there are four basic Submission Types for assignments. The submission types include:
- No Submission : For assignments for which you are not collecting any content from the students.
- Text Entry : For students to enter text directly into a text box on Canvas.
- Website URL : For students to enter a URL (usually to a blog, video, podcast, etc.).
- Media Recordings : For students to upload or record media for submission.
- File Uploads : For students to upload files for submission ( Restrict Upload File Types will allow you to limit which types of files may be submitted).
- On Paper : For assignments students will submit in person.
- External Tool : For assignments which students will submit through a third-party tool (such as Turnitin, Panopto Video Quiz, and PlayPosit).

Managing an Assignment
Managing assignment groups.
When getting started with Assignments, learn to
- Create an assignment shell with the Canvas guide How do I create an assignment?
If you select Peer Reviews Appear Anonymously , annotation tools in SpeedGrader will become unavailable.
If you change the Assign To area from Everyone to select students after submissions have already begun, and do not have a second set of Assign To dates, submissions from unassigned students will disappear.
- Published assignments are visible as existing outside of availability dates, but students cannot see the details.
- If looking to update the due and/or availability dates on multiple assignments, see How do I bulk update due dates and availability dates as an instructor?
- If choosing the option to make an assignment a Group Assignment : If only assigning to specific groups, make sure to click the X on the Everyone Else choice under Assign to .
Media Recording Assignments are not recommended due to technical reasons. Instead, have students submit media by embedding it in a Text Entry assignment through Panopto .
Clearly express expectations and criteria for grading by using a Rubric .
Be cautious limiting submission attempts, as students often make mistakes loading documents and need multiple attempts to ensure you have the correct submission.
- Delete an assignment with the Canvas guide How do I delete an assignment?
- This duplication process will not work for Quizzes.
- Attach a rubric to an assignment for grading or to communicate expectations to students with the Canvas guide How do I add a rubric to an assignment?
Accessibility Tips
- Use descriptive text for links, instead of long URLs or ‘click here’.
- Make instructions brief and to-the-point. Avoid long paragraphs and sentences.
- Consider allowing multiple submission types to accommodate technical limitations students may face.
Assignment Groups are a way to categorize different graded items in Canvas. For example, you may have journals, blogs, and essays which your students create in your course. Assignment Groups allow you to label and group different types of assignments separately in order to better organize and for ease when applying weighting (see How do I weight the final course grade based on assignment groups? ). When getting started with Assignment Groups, learn to
- Add and delete assignment groups with the Canvas guide How do I add an assignment group in a course?
- Move or reorder an assignment group with the Canvas guide How do I move or reorder an assignment group?
- Make rules governing grading expectations within assignment groups with the Canvas guide How do I create rules for an assignment group?
Additional Resources
- CTI Resource: What is the Assignments Index Page?
- How do I bulk update due dates and availability dates as an instructor?
- How do I weight the final course grade based on assignment groups?
- Canvas Student Guide

Subscribe By Email
Get a weekly email of all new posts.
Your Email Leave this field blank
This form is protected by reCAPTCHA and the Google Privacy Policy and Terms of Service apply.
Grading Efficiently with Canvas
by Cecilia Lo | Sep 19, 2018 | Canvas , Canvas Features/Functions , How-tos , Pedagogy

You can do a lot more than collecting assignments, entering grades, and weighting grades in Canvas (see our blog post on Tips on Managing Assignments and Grades in Canvas ). In fact, Canvas’ Gradebook, Speedgrader, online Rubrics, and communication tools can help you grade and manage student assignments and grades more efficiently. Here are a few common challenges in grading and how Canvas can help you and your students meet them:
1. Save time marking up assignments and ensure grading consistency

1) Free-form comment; 2) Chrome’s Speech-to-Text function; 3) Attach file comment; 4) Record a voice or video comment.
If your students submit their assignments (as a Word document, PDF, or as images) online in Canvas, you can use Canvas’ SpeedGrader to annotate, leave feedback, and enter grades all in one place . Writing thoughtful feedback can often be very time-consuming, and SpeedGrader has a few features to facilitate the process. SpeedGrader’s annotation feature is very much like Microsoft Word’s Comment feature: it allows you to highlight, strike out, and insert text, write free-form comments, and draw free-form shapes on a document. If you use Chrome (the browser), its speech recognition feature works with Canvas’ feedback mechanism, and you can “write” your feedback via speech. The feature works very much like speech recognition on a smartphone, and you can edit the text before posting. If you have an answer key or other file comments , you can attach it to your comments with just a few clicks.

Select a rating on the Rubric grid and Canvas will automatically calculate the total points.
Grading consistently is especially difficult when a class is large or when there are multiple graders. Canvas’ online Rubrics tool, which integrates seamlessly with SpeedGrader, can help you grade faster and ensure grading consistency . Rubrics specify the qualities or processes that must be exhibited in order for a given piece of work to be assigned a particular evaluative rating. They provide a guide for both instructors and learners as to how “what learners do” in a course will be assessed and/or graded. In Canvas, after you attach a rubric to an assignment and choose it for grading, you will be able to click the rating that applies to the student’s submission and Canvas will automatically calculate the total score for you in the SpeedGrader.

Once there is a submission, the Download Submissions link will appear. Click on it to bulk download all submissions. The Re-Upload Submissions link will appear after you have downloaded submissions.
If you are more comfortable with using Word to mark up papers, Canvas supports bulk download and re-upload of assignment submissions . The key is that 1) you must keep the same file names when you save your changes and markups, and 2) you must re-upload the files as a single ZIP file. See the resources below for step-by-step instructions.
- How do I use SpeedGrader?
- How do I add annotated comments in student submissions using DocViewer in SpeedGrader?
- How do I use Chrome’s speech recognition feature to leave a comment in SpeedGrader?
- How do I add a rubric in a course?
- How do I use a rubric to grade submissions in SpeedGrader?
- How do I use a non-scoring rubric to assess submissions in SpeedGrader?
- How do I use free-form comments instead of ratings in a rubric in SpeedGrader?
- How do I leave feedback comments for student submissions in SpeedGrader?
- How do I download all student submissions for an assignment in SpeedGrader?
- How do I upload all student submissions for an assignment in SpeedGrader?
2. Help students focus on your feedback
One of the biggest challenges when returning homework to students is how to help them focus on the feedback instead of the numeric grade. Canvas’ new Student Planner or To-Do List View aims to do exactly this. The List View displays graded assignments, emphasizing free-form comments entered via the SpeedGrader. When students click on the graded assignment link, it will take them to the marked-up version (if applicable) of their assignment together with instructor feedback.

Canvas has built-in tools for instructors to record their feedback in SpeedGrader.
Canvas has a few other tools that can help you engage students in assignment feedback. Numerous studies have shown that students perceive audio and video feedback as more individualized, personalized, and easier to comprehend and act upon than written feedback, because it is easier to decipher tone and meaning. (McCarthy, 2015, provides a thorough overview of scholarly literature on the efficacy of written, audio, and video feedback.) In addition, video feedback has the further advantage of letting instructors demonstrate correct approaches to the material. Canvas has built an audio/video recorder into its SpeedGrader, which allows you to click a button and easily record your feedback using your computer’s microphone and/or webcam.

Message Students Who…function in Canvas Gradebook
Canvas makes timely feedback and intervention easy by providing easy ways to contact students , especially if you use Canvas’ Gradebook to manage student grades. In the Gradebook, you can message students based on how they do in a particular assignment . You can message all students who have not turned homework in, who scored less/more than a certain grade point value, or whose work has not been graded yet with just a few clicks. If you want to message a particular student, click on the student’s name in the gradebook to open the student’s Context Card , then click on the envelope button to send them a message . (You can also do this in Discussion boards or on the People page.)

Message individual students using the Message (envelope) button in the Student Info Card.
A further advantage of using Canvas’ Gradebook to manage grades is that it helps students be accountable for their own grades and progress . The Canvas Gradebook allows students to view their own grades and monitor their progress. Students can use the What-If Grades function to determine how well they need to do on future assignments to achieve their desired course grade. As long as grades are entered in a timely fashion, you can help students monitor their own progress and ward off grade begging or excuses at the end of the quarter.
- Josh McCarthy, “Evaluating written, audio and video feedback in higher education summative assessment tasks,” Issues in Educational Research (2015) 25.2: 153-169. [Accessed on September 11, 2018, http://www.iier.org.au/iier25/2015conts.html ]
3. Manage multiple TAs/Graders
If you have multiple TAs or graders in your course, you can contact the UChicago Canvas team to help you set up your course to make the grading process smoother and more efficient. If your TAs always grade and interact with a specific subset of students in your course, we can set up “Manually Created Sections” (in addition to sections assigned by the Registrar) that limit TAs’/Graders’ interaction to a specific group of students . This will allow them to see only this group of students’ assignment submissions and grades, and message them. For more information on how to request Manually Created Sections, see Adding Students, TAs, Co-Teachers and Sections to Canvas .
If you instead have multiple graders grading the same set of students, you can make use of Canvas’ anonymous and moderated grading function to manage grading . Canvas’ updates for this function in July 2018 provide improved assignment flexibility with fully anonymized, multiple-grader anonymity, and moderated options. See our blog post announcing the updated feature for more details.

To view gradebook history, click on the Options (gear) icon in the Gradebook, select View Gradebook History , enter the appropriate filter terms, and click the maroon Filter button.
With multiple graders, you might sometimes need to track grade changes. Canvas’ grade history function allows you to see who changed a student’s grade when . See our Tips on Managing Assignments and Grades in Canvas blog post for details.
Further Resources
You can see the complete Instructor Guides for the topics discussed above at:
- Assignments
- Speedgrader
Further Readings
- Tips on Managing Assignments and Grades in Canvas
- Teach Smart with Technology: Use a Rubrics Tool to Make Grading More Efficient
- Why should you use the CarmenCanvas Gradebook? https://odee.osu.edu/news/2016/12/29/why-should-you-use-carmencanvas-gradebook
- Online Grade Books Provide Transparency, Accountability https://www.facultyfocus.com/articles/educational-assessment/online-grade-books-provide-transparency-accountability/
Recent Posts
- Link to Library Resources in Canvas
- Create Positive Classroom Relationships with NameCoach
- Assess the Big Picture for Your Class Using Canvas Outcomes
- Schedule Page Publication in Canvas
- Support Your Pedagogy with Anonymous Canvas Discussions
Monthly Archives
- February 2023
- January 2023
- December 2022
- November 2022
- September 2022
- August 2022
- February 2022
- October 2021
- February 2021
- January 2021
- December 2020
- November 2020
- October 2020
- September 2020
- August 2020
- February 2020
- January 2020
- December 2019
- November 2019
- October 2019
- September 2019
- February 2019
- January 2019
- December 2018
- November 2018
- October 2018
- September 2018
- August 2018
- February 2018
- January 2018
- December 2017
- September 2017
- August 2016
- October 2014
- September 2014
- Canvas Features/Functions
- Symposium for Teaching with Technology
- Teach Smart with Technology
- Uncategorized
- Featuring good practices of using Canvas
Marking and grading assignments efficiently in Canvas
Marking and grading assignments are made easier in Canvas with its own marking tool, the Speedgrader. It offers a flexible range of options for marking assignments and giving feedback. For any assignments submitted via the “Online” submission option in Canvas, we recommend that you use the Speedgrader to mark.
Here are some tips to efficiently set grading policy, mark and grade your assignments in Canvas:
Set the “Grade Posting Policy” to “Manual”.
The first step before you set up your assignments is to set the Grade Posting policy in Canvas to Manual. When a manual grade posting policy is applied to an assignment, it will stop all notifications to students until you are ready to post and release grades. This is important as you do not want to release the grades to individual students as you enter the marks until you have marked all student submissions for that assignment. Choose ‘Grade Posting Policy’ from the Cogwheel in Grades to select the option to ‘Manually Post Grades.’ For automatically graded quizzes (e.g., MCQ quizzes), the posting policy can be set to automatic.
Make sure all markers have appropriate access to mark and grade.
The second step is to ensure that appropriate staff roles (e.g., Teacher, TA, Tutor) are added to all markers who are involved in marking the assignments.
Mark student submissions using SpeedGrader.
SpeedGrader is a powerful one-stop grading tool in Canvas where instructors can leave inline comments, add grades, and provide qualitative feedback for student submissions. It can be used with assignments, quizzes, and graded discussions; and allows you to access and grade individual assignments student by student. Instructors can also provide personalised feedback to students using text comments, file attachments, or media comments. The speech recognition feature is another useful option within Canvas’ feedback mechanism as it writes out the feedback as you speak it out. Even for assignments that are not counted towards the final grade, you can provide grades and feedback to students using SpeedGrader. You can access SpeedGrader directly from the Assignment itself or from the Grades section for every assignment.
Add annotations to student submissions.
In addition to adding marks and providing feedback comments, you can also mark up or annotate directly on the submissions. This annotation feature is available within SpeedGrader, and allows you to highlight, strike out, and insert text, write free-form comments, and draw free-form shapes on a document.
Manage grading with multiple markers.
Some assignments require multiple markers and require clear communication between these markers on the grading process. The Gradebook history function in Grades allows markers to see who changed a student’s grade and when the change was made. Multiple markers for specific sections: For multiple markers grading specific sections of students in your course, use SpeedGrader to filter students by specific sections. Markers can then grade and provide feedback for student submissions by sections. Multiple markers for same set of students: For multiple markers grading the same set of students, make use of moderated grading function in Canvas assignments to manage grading. With multiple graders, you might sometimes need to track grade changes.
Use Rubrics to grade consistently.
Rubrics is not always needed when grading assignments. But, when you have an especially large class and multiple graders, then grading consistently becomes especially difficult. For such cases, attach a rubric to an assignment to help you with grading. This will enable you to choose the rating for each student submission via SpeedGrader such that the total score is automatically calculated.
Release grades/feedback in Gradebook.
Only when you have graded all student submissions for an assignment and ready to release the grades and feedback to students, post your grades. Once grades are posted for an assignment via the Canvas Grades section, the crossed eye icon for that assignment column will disappear to indicate that students can view the grades and feedback.
- Select a grade posting policy for a course
- Canvas user roles and permissions at NUS
- Use SpeedGrader
- Add annotated comments in student submissions
- Filter columns and rows in the Gradebook
- Add a moderated assignment to be graded by multiple markers
- Review moderated assignments in SpeedGrader
- Add a rubric in a course
- Use a rubric to grade submissions in SpeedGrader
- Post grades for an assignment in the Gradebook
Published in Guiding principles
- Assignments
Higher Ed and Technology: Academics at Chapman

How do students see grades and instructor feedback in Canvas?
November 30, 2020
Have you ever wondered how your students see their grades and the feedback that you are providing for them in Canvas? In last week’s Tech Tuesday, we looked at grades and feedback from a student perspective:
Here are the Canvas Guides for the topics that we covered. Please feel free to share these with your students!
For students:
- How do I view my grades in a current course?
- How do I use the icons and colors in the Grades page?
- How do I use the What-If Grades feature?
- How do I view assignment comments from my instructor?
- How do I view annotation feedback comments from my instructor directly in my assignment submission?
- How do I view quiz comments from my instructor?
For instructors:
- How do I hide totals in my students’ grade summaries?
- How do I hide grade distribution scoring details from students?
Remember that you can always use the Student View feature to experience your Canvas course from the perspective of a student. For example, you can enter student view, submit an assignment, then leave student view. You can then grade the Test Student’s assignment submission and provide feedback as yourself/the instructor. The next time that you enter student view, you can click on Grades in the left-hand course navigation menu to see what the grade and your feedback look like from the perspective of the Test Student. For instructions on how to use the Student View feature:
How do I view a course as a test student using Student View?
More Stories

How Can I Make My Canvas Quizzes More Secure and Promote Academic Integrity?
February 26, 2024 by Elena Marusak | Canvas
Dear Chapman Instructors, If you are using Canvas to deliver quizzes and exams, you may be wondering how you can make your Canvas quizzes more secure and promote academic integrity. Below are some steps you can take as you are building your quiz questions, choosing your settings, and proctoring the quiz. Randomize the Question Order

2024 Creative Learning Experience With Adobe:
March 14, 2024 by Briana Craig | Technology
This blog post is authored by Briana Craig, Student Technology Assistant at Educational Technology Services. The Creative Learning Experience with Adobe workshop provided an informative and eye-opening journey into the world of Adobe Creative Cloud products. As I entered the workshop, my knowledge was limited to the basics of only a few Adobe products. However, now that I’ve
- Panther Mail
- Staff & Faculty Email
- Campus Life
- Prospective Students
- Current Students
- Faculty & Staff
- Parents & Families
- Degrees & Programs
- Argyros School of Business & Economics
- Attallah College of Educational Studies
- College of Performing Arts
- Crean College of Health & Behavioral Sciences
- Dodge College of Film & Media Arts
- Fowler School of Engineering
- Fowler School of Law
- Schmid College of Science & Technology
- School of Communication
- School of Pharmacy
- Wilkinson College of Arts, Humanities, & Social Sciences
- News and Stories
- Chapman Alumni
- Crean College of Health and Behavioral Sciences
- Dodge College of Film and Media Arts
- Schmid College of Science and Technology
- Wilkinson College of Arts, Humanities, and Social Sciences
- View More Blogs
- Inside Chapman
You are using an outdated browser. Please upgrade your browser to improve your experience.
E-Campus Faculty and Staff
How-to: create graded assessments in canvas.

By: Robyn Brown & Gracia Ostendorf
Types of graded assessments in canvas.
There are multiple ways to collect work, assess student performance, and record scores in your Canvas course. Three of the most commonly used options for assessments are Assignments , Quizzes , and Discussion Boards . Each offer unique, and pedagogically different, opportunities for engaging students with your course content. This guide will explain each type of Canvas graded course activity further, as well as provide the step-by-step instructions for creating them within your Canvas course site.
Any graded assessment will automatically show up in your Canvas Gradebook, where you can keep track of your students’ progress and course grade. You simply need to ensure that the assessment you’ve created is a “graded” type in Canvas for it to appear in the Gradebook. Watch the video or read through the steps below to learn how to do that for Canvas Assignments, Canvas Discussions, and Canvas Quizzes.
Explore Each Type and How-to Create Them
Assignments, discussion boards.
“Canvas Assignments” is a broad term used for all of the graded activities within Canvas. “Assignments” can include:
- Note: It is possible to have a Discussion Board in Canvas that is not graded. This type of Discussion Board would not be referred to as an “Assignment.”
- Online Submissions (i.e. files, images, text, URLs, etc.)
Assignments in Canvas can be used to challenge students' understanding and help assess competency by using a variety of media. The Assignments page shows students all of the Assignments that will be expected of them and how many points each is worth. Any assignment created and published in the Assignments page will automatically show up in the Grades, Calendar, and Syllabus features so students can view them. The reverse is also true: any assignments created in the Calendar will automatically show up in the Grades, Assignments, and Syllabus features. Assignments can also be organized in Modules.
Assignments can be used to:
- Set up online submissions that can be quickly graded in the SpeedGrader
- Grade Discussions, either by the whole class or student groups
- Set up peer reviews
- Facilitate online tests and exams (using Quizzes)
- Open Quizzes for a limited amount of time
- Record attendance
- Create ungraded activities
A Canvas Assignment includes instructions written by the instructor and collects student work in a variety of possible formats, such as:
- a text submission
- a website URL
- media recordings (audio or video files)
- file uploads
To Create An Assignment in Canvas:
- Create a new assignment in your Canvas course by clicking “Assignments” in the left-hand navigation menu, followed by the blue “+ Assignment” button in the upper-right-hand corner
- Add instructions for the assignment in the text editor box
- In the options below the text editor box:
- Select the number of points the assignment is worth
- Keep Submission Type as “Online”
- Select the formats you’d like to allow for students’ submissions (Online Entry Options)
- Choose a due date for the assignment
- ***NOTE: Assignments, Quizzes, & Discussion Boards must be “Published” in order to be visible to students. View the Canvas Guide for Publishing Assignments for more details.
Additional Resources: E-Campus’ Canvas Instructor Orientation’s: Create Assignments Resource
Quizzes in Canvas are assignments that can be used to build formative and/or summative assessments to test students’ understanding of course contents.
There are four different quiz types:
- A graded quiz is the most common quiz and rewards students’ points based on their quiz responses
- A practice quiz is a learning tool to see how well users understand course material without providing a grade
- A graded survey rewards students with points for completing a survey but grading is not based on right or wrong answers
- An ungraded survey obtains opinions or other information without providing a grade
To Create a New Quiz
- Click on Quizzes from the Navigation Menu and click on the Add Quiz button
- In the Details tab, enter the name of your quiz. In the Rich Content Editor, introduce your quiz with formatted text, images, video, or sample math equations. You can even use the media commenting tool to record an introduction to the quiz. Then scroll down to finish setting up the quiz type, group assignment selection and give it a due date if needed
- Click on the Questions tab, manually enter a new question by clicking the Add New Question button. Name the quiz questions, select a question type (short answer, essay answer, multiple choices, etc.), assign a point value and click Update Question
- Preview your questions. If you’d like to view question details, click the Show Question Details checkbox
- Save and Publish. Once you’re satisfied with the questions, save your quiz and publish it. If you’d like to come back to it, just click Save
Here is a video tutorial on How to Create a New Quiz in Canvas . You may also create question banks so that you can find individual questions easily without having to create them each time. Check out this guide on How to Create a Question Bank .
Additional Resources: E-Campus’ Canvas Instructor Orientation’s Create Quizzes Resource
Canvas provides an integrated system for class discussions, allowing both instructors and students to start and contribute to as many discussion topics as desired. Discussions can also be created as an assignment for grading purposes (and seamlessly integrated with the Canvas Gradebook), or simply serve as a forum for topical and current events.
Discussion topics can be organized as focused or threaded discussions. Focused discussions only allow for two levels of nesting, the original post, and subsequent replies. Threaded discussions allow for infinite levels of nesting. Focused discussions are relatively short-lived interactions, while threaded discussions allow replies within replies and may last for a longer period of time.
Use a focused discussion for single posts and related comments. One discussion leader typically posts a message and multiple learners comment on it. Participants may leave a side comment to a reply, but cannot develop the conversation beyond two layers of nesting. focused discussions might also be used to:
- answer a single question
- share resources amongst peers
- collect results from a simple research activity
- share solutions to a single problem
- correct misconceptions
- clarify course policies
- get feedback on a work in progress
- share insights about a single reading
Use a threaded discussion for multiple posts and related comments. One or more discussion leaders post a message and multiple learners comment on it with the freedom to create any number of related discussion topics and comments.
Threaded Discussions might also be used to:
- post and answer multiple, related or unrelated questions
- organize results from a complex research activity
- share and iterate upon ideas shared by each student in the course
- debate the pros and cons of a single issue or multiple issues
- ask multiple questions of a single discussion leader
- refine ideas between multiple discussion leaders and multiple learners
- facilitate group discussions around multiple topics
- facilitate discussions around a discussion (fishbowl conversations)
- explore at length the feasibility of different solutions to a complex problem
To Create a New Discussion:
- Click on “Discussions” from the left-hand course navigation
- Click “+ Discussion” on the right-hand side
- Create a title for your discussion
- You can also add links, files, and add images
- Post to “All Sections” of the course or select special groups (if created)
- By default, discussions are crated as focused discussions. Select “Allow threaded replies” to create a threaded discussion
- To require users to reply to the discussion before they can see any other replies, click the Users must post before seeing replies checkbox
- To enable a discussion podcast feed, click the Enable podcast feed checkbox
- To allow students to like discussion replies , click the Allow liking checkbox
- To add an ungraded discussion to the student to-do list, click the Add to student to-do checkbox. Student to-do items display in the course calendar, in the student-specific List View Dashboard, and in the global and course home page to-do lists. Graded discussions automatically display in a student's to-do list
- To make the discussion a group discussion, click the This is a Group Discussion checkbox
- Adjust date settings
- Click Save, or Save & Publish to post it to students
Additional Resources: E-Campus’ Canvas Instructor Orientation’s: Create Discussion Boards Resource Canvas Guide: What are Discussions?
E-Campus have created a How-To: Set-Up and Use Canvas Gradebook guide. Once you have created graded course activities in Canvas, Canvas Gradebook will be your next step.
You may also be interested in:

We've Got Your Back
If at any point you would like support or guidance while you are teaching a distance learning course, please connect with us! We are here to help.

Center for Educational Effectiveness
Combining grading efficiency with effective assessment, strategies and techniques for instructors.
- April 11, 2024
When looking for ways to efficiently evaluate student work, instructors can modify their assessments to streamline grading and feedback, while ensuring that the assessment supports student learning. This resource provides guidance and strategies for combining grading efficiency and effective assessment. To frame our discussion, we begin with some guidelines for grading in ways that are efficient for instructors while promoting learning.
Free yourself of the need to grade everything . Instructors may feel that it’s necessary to comprehensively evaluate every piece of work that a student produces. While grades can provide students with feedback, the greatest value of an assessment often accrues from the cognitive and intellectual work that students engage in as they do the assessment. Grades are a byproduct of a much richer cycle of learning and feedback that engages students in the deep learning that is a key part of the university experience. Focus on assessing and providing feedback on those assignments that have the most substantial impact on student learning. Strategies such as modifying the structure of your grading scheme can assist with this.
Limit grading and substantial feedback to assessments that engage students in higher-order thinking and/or require them to synthesize their learning . Carefully review your assessments to identify those which ask students to do more critical thinking, analysis, synthesis or other higher-order thinking tasks (see Bloom’s Revised Taxonomy for a framework for identifying higher- and lower-order thinking skills). Focusing your feedback and grading efforts on assessments that require higher-order thinking will help promote student learning and will be the best use of your feedback and grading time. Examples of tasks that would be comprehensively assessed include research papers, projects, reports, and presentations. The use of rubrics can greatly increase grading efficiency while also providing students with useful, learning-focused feedback.
Use automated grading systems for assessments that target lower-order thinking skills , for example, memorization of facts, or those cases where quick information retrieval is important. Multiple choice Canvas quizzes can work well for this ; Canvas question feedback functions can be used to provide students with automatic, formative feedback to improve their learning. Multiple choice exams can also assess higher-level thinking, but require time and careful review of test items. Please visit CEE’s website for information about CEE consultations on test creation and analysis .
Provide multiple opportunities for feedback. The instructor is an important source of feedback; however, students can receive helpful feedback from many sources. Varying feedback strategies can help students to engage in more collaborative work ( peer feedback ), gauge their understanding with reference to the rest of the class ( class-level feedback ) and help them develop metacognitive skills necessary to critically evaluate their own academic work ( self-assessment ).
Six Strategies for Streamlining Assessment and Grading
1. modify grading structures .

Use binary grading (“completed” or “not completed”) for assessments that help students build skills through practice. Examples of this kind of assessment are problem sets in STEM courses, grammar exercises in language classes, and reading guides in courses with a substantial reading component. Instructors can establish a minimum threshold for “completed” by giving students a rubric that sets out the criteria that must be met in order to receive a full-credit grade. Showing students an example of an assignment that meets the full requirement and would receive a grade of “completed” can also help guide students in succeeding with this type of assessment.
Grade a subset of assignments by giving students a choice. Rather than grade every assignment, instructors can require students to complete all assignments and allow students to choose a subset of the assignments that they’ll receive a grade and feedback on. This permits students to choose those assessments they feel best represent their work. Requiring students to complete all of the assignments and choose a subset for grading maximizes learning and gives students a larger pool of assessments to choose from.
2. Automate Formative Feedback through Canvas Quizzes

Quizzes can be a great formative assessment tool and provide students with instantaneous feedback when designed with certain features in Canvas. When creating a quiz in Canvas, instructors can not only automate quiz scoring but also pre-load formative feedback into the quiz questions and answer options. Instructors can specify in Canvas when this pre-loaded feedback can be accessed by students.
When building Quizzes in Canvas, use the color-coded comment boxes underneath each answer to pre-load feedback. Use the green comment box for feedback explaining why this answer is correct and how students might have reasoned toward this answer. Use the red comment box(es) underneath incorrect answer option(s) to provide feedback on why these options are not correct and/or misconceptions that may have led students to these distractors.
Instructors can also utilize comments for the entire question to provide general feedback, including: how to reason toward the correct answer, common mistakes and/or misconceptions related to the question, and/or relevant course materials to review for further information.
3. Streamline Feedback with Rubrics & SpeedGrader
Using Rubrics for Assessment and Feedback:

Rubrics are a great way to prioritize feedback on only those elements of a student’s assignment that truly matter for the learning outcomes.
Rubrics specify key criteria or standards, levels of proficiency, and descriptions of what each criterion looks like at each proficiency level. Aim for only a few specific and necessary criteria on the rubric. Resist the temptation to include “important but not necessary” criteria in the rubric.
Rubrics can be the foundation for giving clear and actionable feedback on student work. Streamline feedback by focusing on only those items that are covered in the rubric, which you have already determined to be most necessary. Keep in mind that too many comments can interfere with learning: students lose the signal in the noise. Prioritize the ways in which the work demonstrates particular criteria at relative performance levels.
Streamlining Assessment Feedback with SpeedGrader

Integrating your rubric with the SpeedGrader tool in Canvas can enhance the efficiency and effectiveness of feedback. To do this, first build your rubric in Canvas and then attach the rubric to the relevant assignment. Once in SpeedGrader, you can utilize the rubric and provide feedback on student work.
SpeedGrader also allows you to build a Comment Library for frequent comments. You can preload anticipated comments into your Comment Library as well as save comments to your Comment Library as you interact with student work.
Typing comments is one of many options in SpeedGrader, which also includes spoken comments (audio recordings that students can listen to later), video comments (screen capture videos that students can watch later), and speech-to-text comments that translate spoken audio into text (only available in Google Chrome).
4. Assign Peer Feedback

Having students review and give feedback on classmates’ work is one strategy for giving timely feedback. Additionally, peer review has many pedagogical benefits, including: increasing engagement and fostering collaboration and community, challenging students to express their thoughts clearly and diplomatically, and reinforcing student learning and metacognition as they reflect on how their thinking changed once reading their classmates’ work.
To streamline the peer feedback process, consider peer review on assignments or discussions on Canvas . Canvas peer reviews can show student names or display anonymously . You can manually assign peer reviewers or let Canvas automatically assign them. You can have students complete a rubric and/or leave a comment in the comment sidebar.
However you decide to have students provide peer feedback, you’ll want to clearly explain how they should (and should not) assess their classmates. Consider modeling appropriate/productive comments.
5. Save Time with Group- or Class-level Feedback
Rather than repeating identical comments for multiple students, provide feedback at the group or course level by summarizing trends you notice while grading. Send a classwide e-mail, use the Canvas Announcement tool, or allot time in class to share your feedback.
Besides saving you time and ensuring consistent feedback quality, group feedback also allows students to see where others may be excelling or struggling. This encourages students to self-assess their own work in comparison to the group norms or expectations. Similarly, students can learn from the different perspectives and approaches of their peers. Time saved by efficient collective feedback can go toward tailoring feedback to address specific needs and strengths.
To maximize the benefits of formative assessment, consider a combination of feedback, feed up, and feed forward:
- Feedback helps someone understand what they have or haven't done well based on observations or assessments that have already occurred. It's retrospective, looking back on what has been done to reinforce or correct it.
- Feed up clarifies the objectives or goals by answering the question, "What are we trying to achieve?" Feed up provides a target or standard against which to measure performance.
- Feed forward includes information or suggestions about what to do next or in the future to improve. Unlike feedback, which looks at past performance, feed forward is future-oriented. It focuses on potential strategies, actions, or behaviors that can enhance future performance. Feed forward offers constructive guidance on how to do better moving forward, rather than just focusing on what went wrong in the past.
6. Engage Students in Self-Assessment
This strategy involves students in assessing their own work by engaging in two steps. First, students can review their work by using an answer key or comparing their work to a well-crafted sample assignment. Then, to demonstrate that they’ve fully considered and assessed their work, students can:
- Complete a written reflection based on question(s) provided by the instructor (e.g., “Choose 2-3 areas where you made errors and provide a thoughtful explanation of how you would correct them”).
- Revise the assignment (or part of the assignment) as part of the self-assessment process, explaining why they made the changes they’ve made.
- Discuss the reflection with others. The reflection can be used as a point of departure for a pair discussion in class to further increase the learning value of the task, and it can be graded using binary grading to keep the grading load manageable.
Concluding Note: The Necessity of Transparency
Regardless of the strategies you use to streamline grading and assessment, it is necessary to be transparent with students about your choice of grading methods. Provide a rationale for your practices that are centered on students’ learning and development.
For example, when using binary grading, it can help to explain to students that you will use this style of grading for those assignments where students are building skills to encourage them to practice, and a more ranked form of grading (e.g., A-F) on major assignments that synthesize their learning in the course. This can reassure them that skills-building assignments have value in and of themselves, even without extensive feedback from the instructor.
When students understand the expectations for their learning and the reasons behind instructors’ assessment choices, they are more likely to utilize feedback, anticipate challenges, and self-motivate their learning.

Downloadable Version
Resource developed by Erica Bender, Katie Healey, and Patricia Turner for the UC Davis Center for Educational Effectiveness
- Create an email message
- Use @mentions
- Suggested recipients
- Create a signature
- Add attachments
- Check spelling
- Add a reaction
- Out of office replies
- Delay or schedule
- Recall a message
- Automatic forwarding
- Read receipt
- Save a file or draft
- Change display name
- Create a folder
- Use inbox rules
- Use Favorites
- Focused Inbox
- Custom views
- Change message font size
- View as conversations
- Display number of messages
- Phishing and suspicious behavior
- Protected messages
- Open a protected message
- More to explore

Turn on automatic forwarding in New and Classic Outlook for Windows ( also Outlook on the web )
Important: Steps may be different between new and classic Outlook for Windows. To determine which version of Outlook you're using, look for File on the ribbon. If there's no File option, follow the steps under the New Outlook tab. If the File option appears, select the tab for Classic Outlook .
At the top of the page, select Settings .
Select Mail > Forwarding .
Toggle the Enable forwarding switch, enter the forwarding email address, and click Save .
Note: If you want a copy of the original message to remain in your mailbox, select Keep a copy of forwarded messages .
You can automatically forward or redirect your email messages by setting up an Inbox rule. This is useful if you want to read and respond to messages from another email account or when you want someone else to receive and respond to your email in your absence.
On the ribbon, select the Home tab, then in the Move section, select Rules > Manage Rules & Alerts .
On the Email Rules tab, ensure that Apply changes to this folder is set to the email address you want to start from.
Select New Rule .
Under Start from a blank rule , select Apply rule on messages I receive . Select Next .
Select Next —without selecting any conditions or editing the rule description. Then confirm that this new rule should be applied to every message you receive.
Under Step 1: Select action(s) , select redirect it to people or public group and stop processing more rules .
Under Step 2: Edit the rule description , select the people or public group link.
In the Rule Address dialog, under Address Book , select the contact list that contains the address you want to forward to, then enter and confirm the email address that you want to forward all your mail to so that the address is in the To box at the bottom. Select OK .
Select Finish , then select Apply , then select OK .
When you first check that messages are being forwarded successfully, look in the Junk or Spam folder to see if the forwarded messages have been put there.
Reply to or forward an email message
Manage email messages by using rules
Select Enable forwarding , enter the forwarding email address, and select Save .
Create, reply to, or forward email messages in Outlook on the web

Need more help?
Want more options.
Explore subscription benefits, browse training courses, learn how to secure your device, and more.

Microsoft 365 subscription benefits

Microsoft 365 training

Microsoft security

Accessibility center
Communities help you ask and answer questions, give feedback, and hear from experts with rich knowledge.

Ask the Microsoft Community

Microsoft Tech Community

Windows Insiders
Microsoft 365 Insiders
Was this information helpful?
Thank you for your feedback.

You're signed out
Sign in to ask questions, follow content, and engage with the Community
- Canvas Developers Group
Current graded by
- Subscribe to RSS Feed
- Mark Topic as New
- Mark Topic as Read
- Float this Topic for Current User
- Printer Friendly Page

- Mark as New
- Report Inappropriate Content
- All forum topics
- Previous Topic

Web Fonts being part of a custom theme?
Custom css json dashboard, how to enable upload/recording media option to tak..., outh2 flow token generation, acceder a la, setting assignment unlock date for a specific sect..., if i have a course id, quiz id and a question id c..., community help, view our top guides and resources:.
To participate in the Instructurer Community, you need to sign up or log in:
IMAGES
VIDEO
COMMENTS
From the grades page you can select the Course for which you want to view grades [1]. By default, grades are sorted chronologically by assignment due date. In the Arrange by menu [2], you can also sort by module, assignment name, or assignment group. To see the specified grades, click the Apply button [3].
Note that all of those numbers add up to 100%. To determine a student's overall grade, Canvas would automatically perform the following calculation: Final grade = (overall homework grade) x 15% + (overall discussion grade) x 20% + (overall quiz grade) x 25% + (overall exam grade) x 40%. Points are still relevant within each grading category.
By default, Canvas calculates a total score based on graded assignments only. To view the total grade if the semester ended today, uncheck the box next to "Calculate based only on graded assignments" on the right side of the page. Ungraded assignments will be given a score of 0. Viewing a Rubric
On the Canvas Dashboard, click on the assignment title in the To Do list. In the course, click on the assignment title in the To Do list on the home page. In the course, click on the Assignment page, then the title of the assignment, and click SpeedGrader. In the course, click on Grades, then the three dots, and SpeedGrader.
In a Canvas course, the structure of the grade book is configured on the Assignments page. The Grades page contains the data and calculations of the grade book - the scores. When you create any graded activity in Canvas, an item appears on the Assignments page and a column is automatically present in the Grades. Using assignment groups on the ...
The gradebook in Canvas is a blank slate until you create the assignments (see the difference between assignments and learning in Canvas).. You add columns to the gradebook by adding assignments. The easiest way to remember is that Assignments = Gradebook Columns. Once you create an Assignment, Canvas automatically includes it in the Gradebook, Calendar, Assignments, and Syllabus pages.
Students can access their grades by clicking on Grades in the course navigation menu on the left. Where you, as the instructor, would have the full gradebook displayed, the students instead have a list of: how many points that assessment was worth. Provided below is a screenshot of the students' view of their grades.
How to view your Grades and Graded Rubrics in Canvas: Open the Grades tab from your Course Navigation Menu: Select the assignment title to view the assignment details. Here you can view the assignment due date, grade status, and the total point value for each assignment. You can also view any comments left by your instructor.
Managing Assessment Security in Canvas Creating Assignments for Your Canvas Course Understanding Learning Analytics in Canvas Using the Gradebook to Enter and Calculate Grades How to Assign Extra Credit in ... you select a student in the content selection area to see the breakdown of that student's grades. Or select an assignment to see some ...
Assignment Groups are a way to categorize different graded items in Canvas.For example, you may have journals, blogs, and essays which your students create in your course. Assignment Groups allow you to label and group different types of assignments separately in order to better organize and for ease when applying weighting (see How do I weight the final course grade based on assignment groups?
Here are a few common challenges in grading and how Canvas can help you and your students meet them: 1. Save time marking up assignments and ensure grading consistency. 1) Free-form comment; 2) Chrome's Speech-to-Text function; 3) Attach file comment; 4) Record a voice or video comment. If your students submit their assignments (as a Word ...
Only when you have graded all student submissions for an assignment and ready to release the grades and feedback to students, post your grades. Once grades are posted for an assignment via the Canvas Grades section, the crossed eye icon for that assignment column will disappear to indicate that students can view the grades and feedback. Resources
For example, you can enter student view, submit an assignment, then leave student view. You can then grade the Test Student's assignment submission and provide feedback as yourself/the instructor. The next time that you enter student view, you can click on Grades in the left-hand course navigation menu to see what the grade and your feedback ...
To Create An Assignment in Canvas: Create a new assignment in your Canvas course by clicking "Assignments" in the left-hand navigation menu, followed by the blue "+ Assignment" button in the upper-right-hand corner. Add instructions for the assignment in the text editor box. In the options below the text editor box:
Canvas' online grading via the SpeedGrader tool is a core feature of the Canvas Assignment tool, which allows students to quickly receive and reply to instructor comments on their work. Canvas Assignments also work hand-in-hand with the Canvas Grades area, so students can quickly see how well they did on each assignment and how they are doing ...
Does Canvas have a grade history feature? Yes, Canvas's grading history feature allows you to see who graded each item and revert grades for students if needed. The New Gradebook offers this feature for instructors to use. Further resources: How do I view the history of all grading changes in the New Gradebook?
In the Grades tab, click on the "Show All Details" button on the upper right. Go to grades, scroll down to the assignment you want to see the score details for. There will be your score, the total points for the assignment, and then to the right of those there should be a little tiny checkbox with a plus. It's the same spot where you would be ...
Integrating your rubric with the SpeedGrader tool in Canvas can enhance the efficiency and effectiveness of feedback. To do this, first build your rubric in Canvas and then attach the rubric to the relevant assignment. Once in SpeedGrader, you can utilize the rubric and provide feedback on student work.. SpeedGrader also allows you to build a Comment Library for frequent comments.
Important: Steps may be different between new and classic Outlook for Windows. To determine which version of Outlook you're using, look for File on the ribbon.If there's no File option, follow the steps under the New Outlook tab. If the File option appears, select the tab for Classic Outlook.
View the archived grading scheme [1]. To unarchive the grading scheme, click the Unarchived icon [2]. Notes: Archived grading schemes can still be used wherever they are currently in use, but they cannot be selected for new courses or assignments. An archived grading scheme cannot be leveraged in the future by a course or assignment unless the ...
Current graded by. Hi. We are using an API to pull grades out of Canvas to upload to our Student records systems. We are using the current_graded_by API to pull out the latest grade. Whilst this is working for 75% of our marked assignments it is pulling out a Null for recently marked assignments and therefore not giving us the appropriate grade ...
Community Coach. Monday. I can leave comments on my new quizzes. I go under the "Syllabus" in the course, and click on that quiz. Then, on the right side of the screen, I click on "Speed Grader" in the top right of the screen: From there I can click on the icon that shows 2 caption bubbles and enter comments. (See the second picture, far below.)
Edit Grading Scheme Details. Edit the title in the Grading Scheme Name field [1]. You can choose to have the grading scheme by percentage or points [2]. For each line item, edit the grading scheme name in the Letter Grade field [3]. Edit the minimum end of each individual range in the To [Number] % field [4].
Current graded by. Hi. We are using an API to pull grades out of Canvas to upload to our Student records systems. We are using the current_graded_by API to pull out the latest grade. Whilst this is working for 75% of our marked assignments it is pulling out a Null for recently marked assignments and therefore not giving us the appropriate grade ...