
View Options in PowerPoint – A Complete Beginner’s Guide!
By: Author Shrot Katewa

There are many different types of presentations view available in PowerPoint including Normal View, Outline View, Presenter View, and Slide Show View to name a few. All these views serve different purposes and it is important to know how to use them appropriately to get the most out of PowerPoint!
In this article, we will talk about what each type of view does in PowerPoint and how to access them so that you can choose the best for your needs! So, let’s get started!
[ A Quick Note Before We Begin – for this article, I will be using one of the presentation templates from Envato Elements . With Envato Elements, you get access to thousands of presentation designs with unlimited downloads so you never run out of options again. Plus, you get free previews so you know exactly what you’re getting before buying! It is also very affordable. Check out their pricing here ]
1. What are the Different Type of View Options Available in PowerPoint?
Microsoft PowerPoint is equipped with a variety of Slide View options that can be used for different purposes.
These are the different view options available in PowerPoint –
- Normal View
- Slide Sorter View
- Notes Page View
- Reading View
- Outline View
- Slide Show View
- Presenter View
- Slide Master View
2. How to Access the Different View Modes in PowerPoint?
To access the different view modes in PowerPoint, you have to click on the ‘View’ tab in the ribbon. The 2-step process is described below.
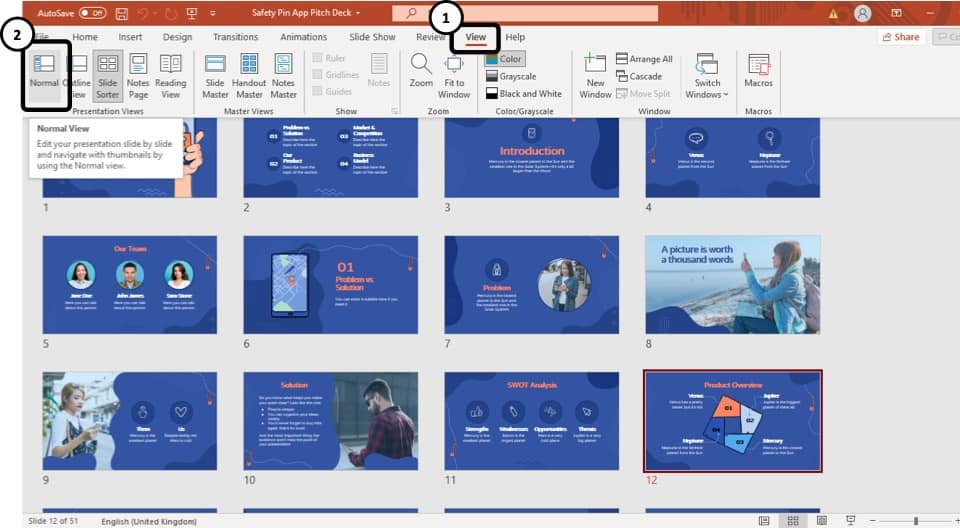
Step-1: Click on the ‘View’ tab
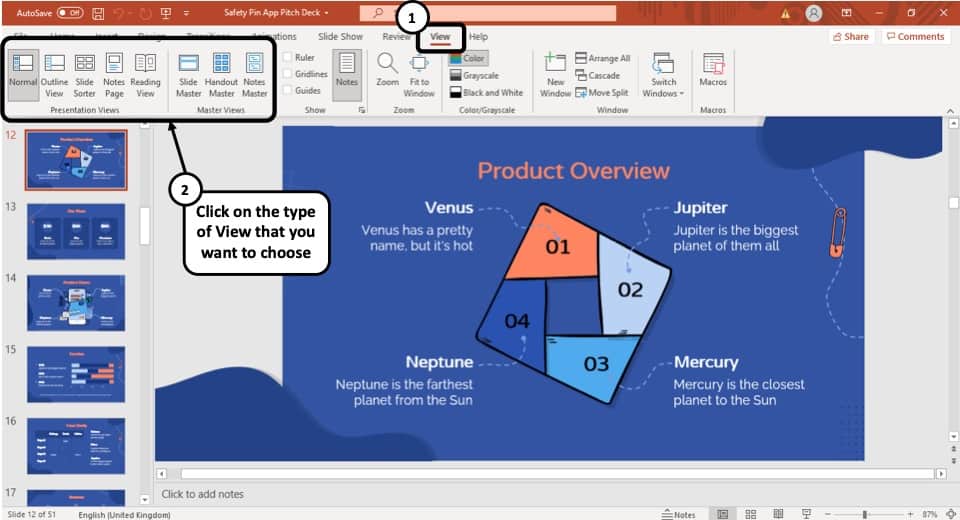
At first, select the ‘View’ tab, which is the second to last tab in the ribbon section of your PowerPoint Window.
Step-2: Select your preferred ‘View Mode’
Once you have access to the ‘View’ tab, you can select your preferred view mode such as the Outline View , Slide Sorter view, Slide Master view, etc. from the Presentation View section or the Master View section. (as shown in the image in step 1)
3. What is the Purpose of Various View Modes in PowerPoint?
Each view mode in PowerPoint has its own purpose. Let’s go through the purposes of the different slide view options one by one below –
1. Normal View
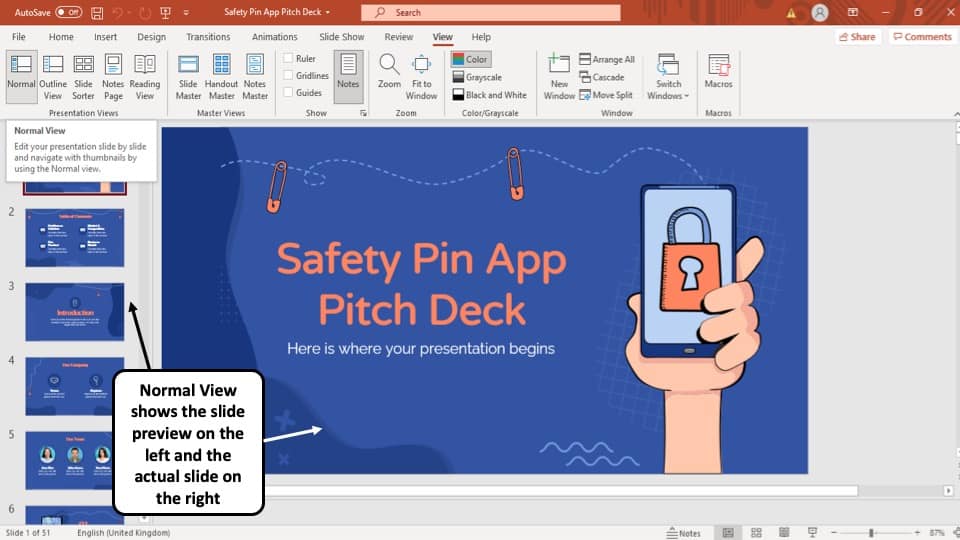
The ‘Normal View’ option is the first option in the ‘Presentation Views’ section of the ‘View’ tab. It is the most commonly used viewing option and is also the default slide view for PowerPoint.
The slides appear on the left of the PowerPoint window in the ‘Slide Navigation’ bar. Thumbnails of the slide are represented as boxes in the ‘Slide Navigation’ bar with its consecutive serial number to the left of it.
The main function of normal view mode in PowerPoint is to navigate through slides in a vertical grid while allowing you to add, design, or edit the slides while getting a preview of the slides on the left.
2. Slide Sorter View
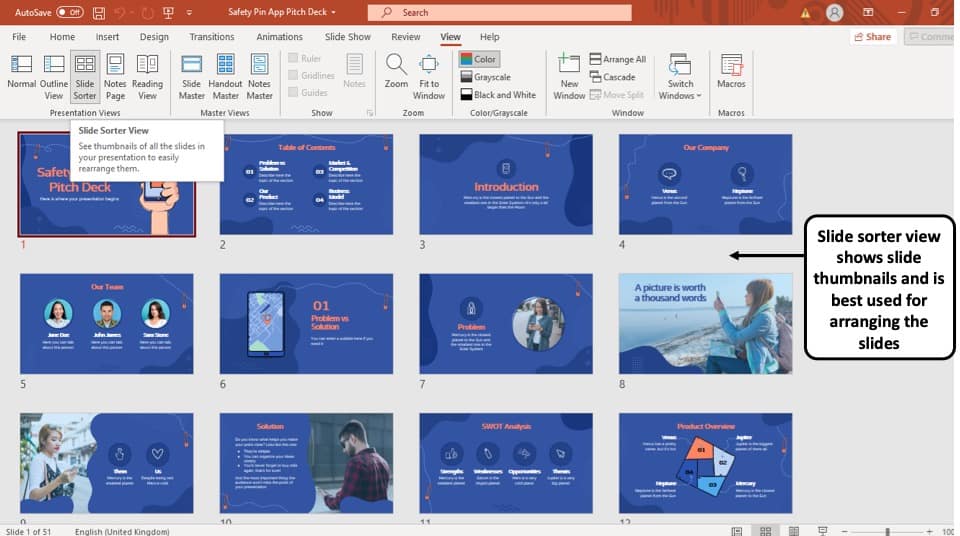
The ‘Slide Sorter’ option gives you an overview of all the slides in your PowerPoint presentation.
The slides are represented as thumbnails as a grid of boxes arranged side by side. The serial number of the slide is given on the bottom left corner of the slide thumbnail.
This option serves the purpose of viewing the slides together in one window making it easier to rearrange and organize them in a quick fashion.
3. Notes Page View

The ‘Notes Page View’ option gives you the view of each slide and its speaker notes in one page.
In this view, the slides appear at the top and the speaker notes are given on the bottom of the two sections. The serial number of the slide is not shown in this view. You can also edit speaker notes from here.
The main purpose of the notes page view in PowerPoint is to preview what each page will look like before you print the slides with speaker notes.
4. Reading View:
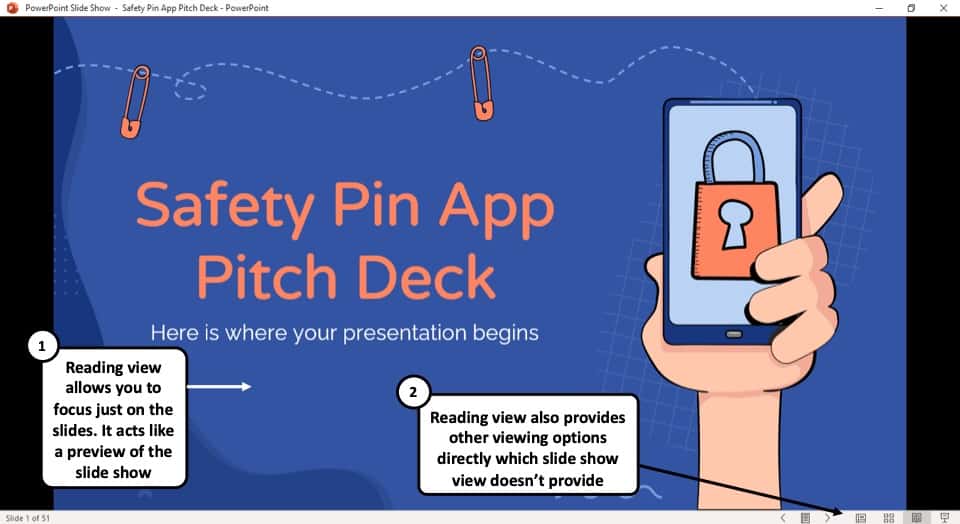
The Reading View option allows you to view your PowerPoint presentation without going into Full Screen mode. All the transitions and animations can be seen in this view. The serial number of the slide is given at the bottom right corner of the window.
It is used to preview the slide and review the slides with full focus. This mode also makes other view options easily accessible, which is not the case in ‘Slide Show’ mode where the presentation is shown in the full screen, and the options are not visible on screen.
The reading mode is actually more useful for word documents, as it allows the reader to focus just on the text. In my opinion, it adds little value to a PowerPoint presentation.
5. Outline View:
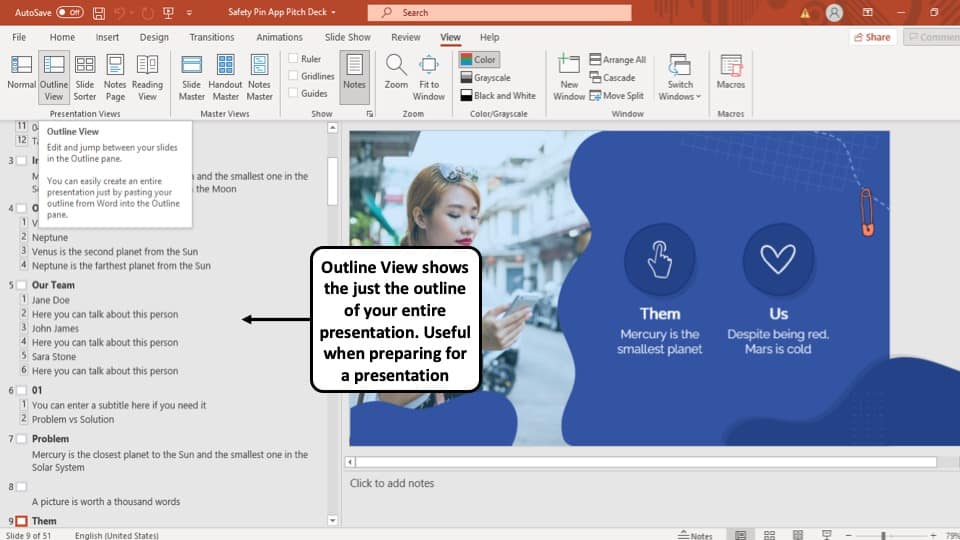
The ‘Outline View’ shows you the entire outline of your PowerPoint presentation in the ‘Slide Navigation’ bar.
In this view, there is no thumbnail of the presentation. Instead, there is an outline of all the data present in that slide. The serial number of the slide is at the left followed by a small white box that represents a slide and then the outline of that slide.
You can also create an entire slide in the pane of this view by copy and pasting data from Microsoft Word. However, you will have to design the slide separately once the data has been added to each slide.
6. Slide Show View:
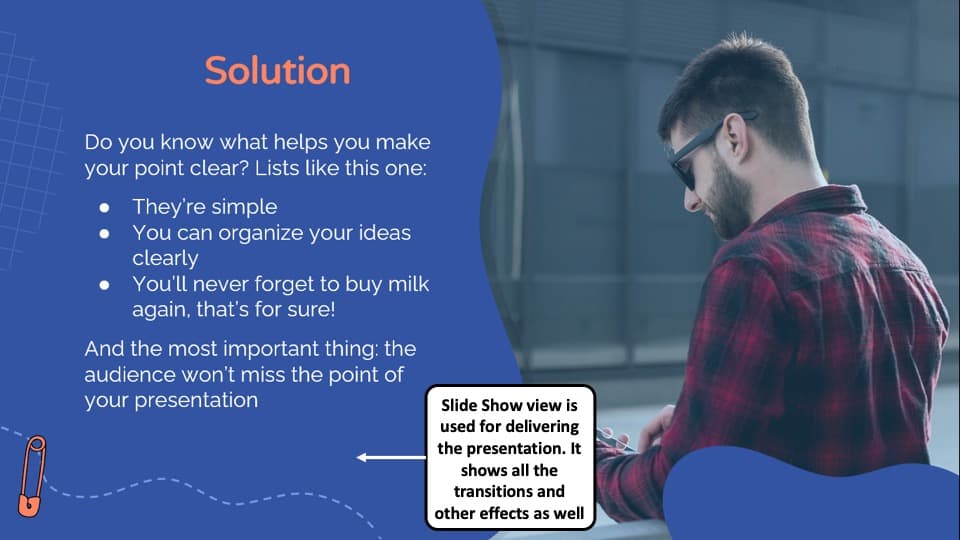
The Slide Show View is the view that your audiences are going to see. This view shows each slide of your PowerPoint presentation in full screen.
All the transitions, animation, and multimedia files in your PowerPoint presentation are played here. Consecutive slides can be accessed using the direction keys on your keyboard or by clicking once on the slide.
7. Presenter View:
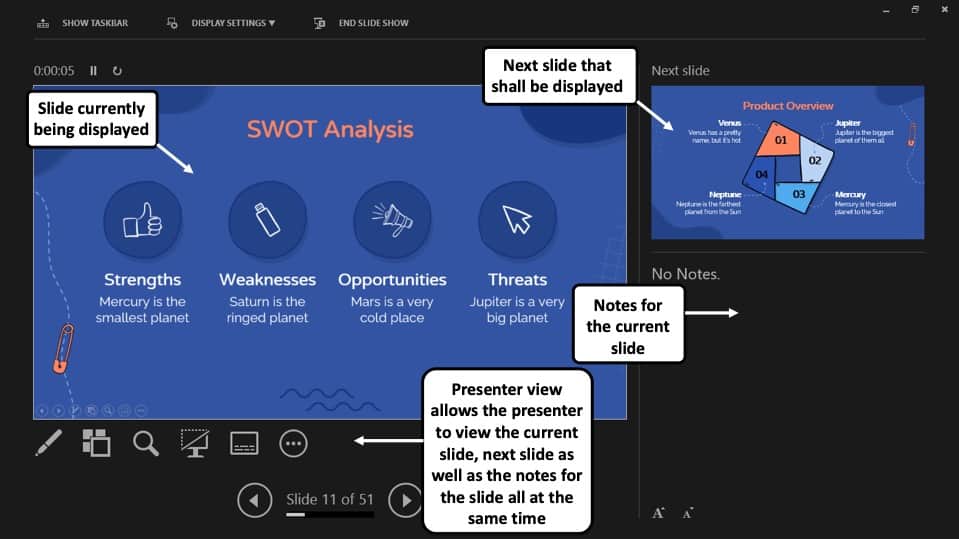
This is the view that you as a presenter are going to see while the audience is seeing the ‘Slide Show’ view.
Although you can give a presentation even in the slide show view, but it is always recommend to deliver the presentation using the “Presenter View” mode in PowerPoint as it provides you with additional features and benefits!
This view mode in PowerPoint will split the screen in multiple windows. The window on the left represents the current slide that is being displayed (the one that is visible to your audience).
The window in the top right section indicates the next slide in the queue. Whereas, the notes section displays the notes or key points made by each slide. Both, the notes section as well as the next slides window are only visible to the presenter and not to the audience!
The purpose of the “ Presenter View ” is to give the presenter all the aids to be prepared for the next slide and highlight the key points to be made on the current slide while delivering the presentation.
8. Slide Master View:
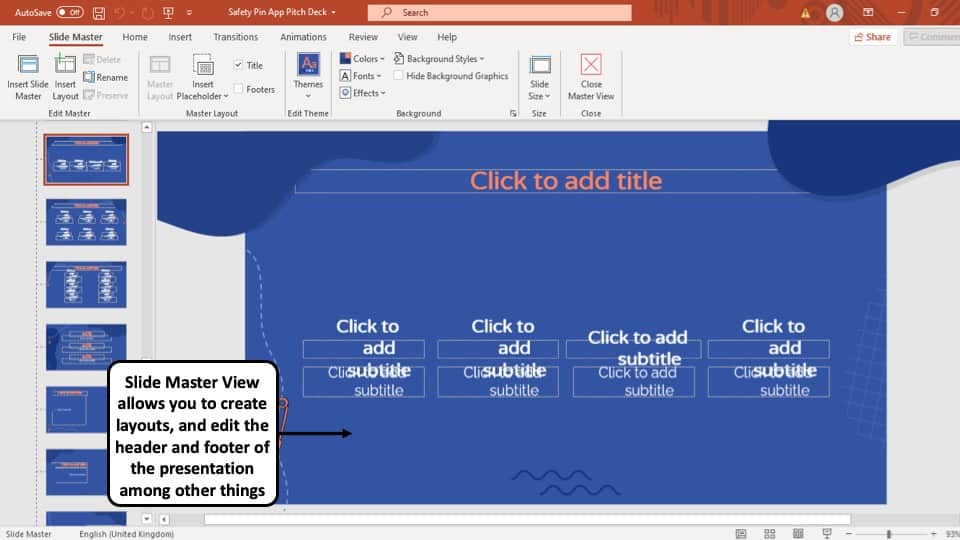
This view gives you a view of all the layouts used on the slides of your PowerPoint presentation.
The ‘ Slide Master View ’ option allows you to edit all the aspects of the layouts in your presentation such as fonts, background, color, and pretty much everything you can think of.
You can edit all the slide layouts of the presentation. Furthermore, you can also edit the header and footer of the presentation using the “ Slide Master View ” in PowerPoint.
4. How to Open the Presenter View in PowerPoint?
There are 2 different ways you can enter into Presenter View in PowerPoint –
- Using Slide Show View
- Using the short cut key i.e. Alt+F5
If you are using the Office 365 version of PowerPoint , you can actually directly access the “Presenter View” in the View section. Simply click on “View”. Then, click on “Presenter View”
Let’s look at both the methods quickly –
Method 1 – Using the Slide Show View
Step-1: Click on the ‘Slide Show’ button at the bottom right corner of the screen
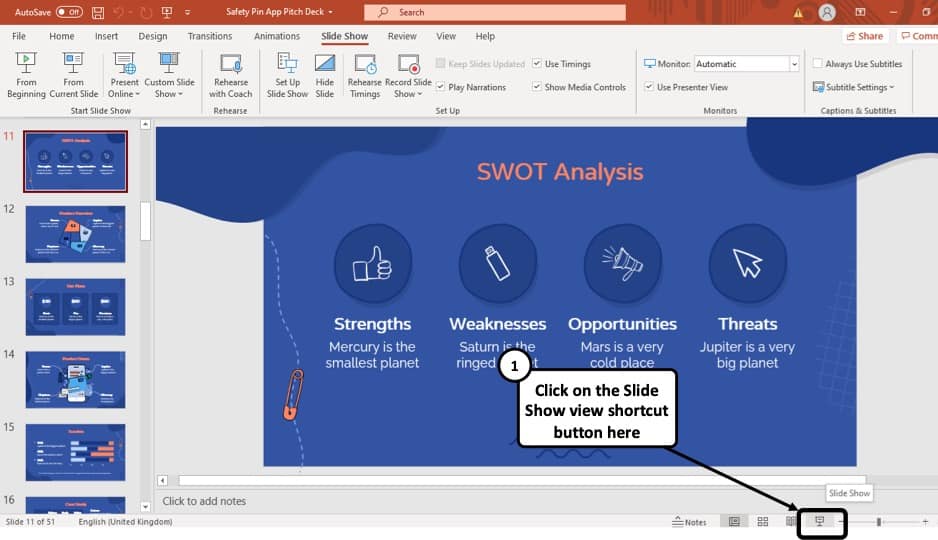
At first, you have to click on the ‘Slide Show’ button that looks like a projector screen which is located at the bottom right corner of your PowerPoint window. (as indicated in the image above)
Step-2: Right-click and choose “Show Presenter View”
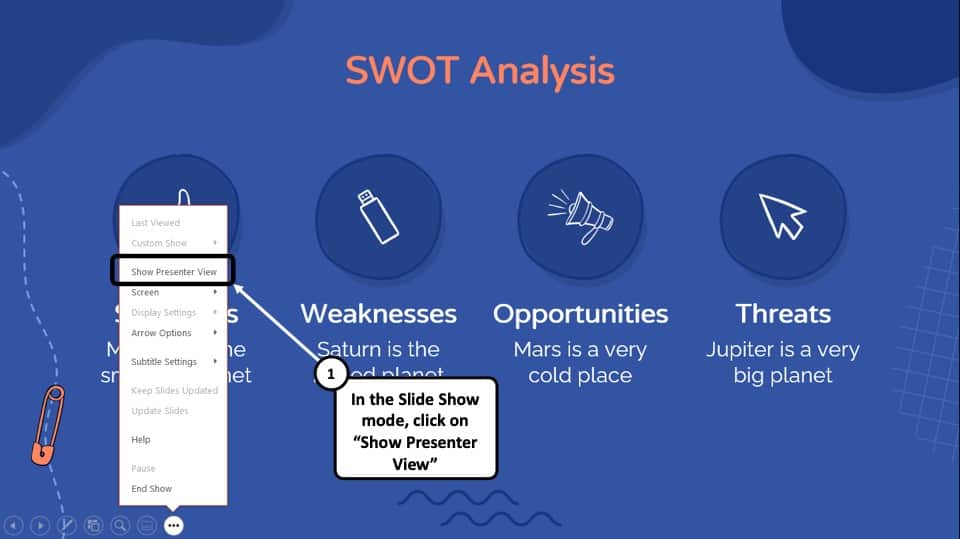
Once you are in the ‘Slide Show’ mode, using your mouse right-click anywhere on the screen. From the menu that appears, choose the “ Show Presenter View ” option
Method 2 – Using the Keyboard Shortcut
Alternatively, you can press ‘ Alt + F5 ’ on your keyboard and that will immediately open the ‘Presenter View’ mode.
The keyboard shortcut to open the “Presenter View” in PowerPoint on Mac is “Option+Enter” key.
5. How to Change PowerPoint Back to Normal View?
To change your PowerPoint back to ‘Normal View’ from ‘Slide Show’ mode, ‘Presenter View’ option or the ‘Reading View’ option, all you have to do is simply press the ‘ESC’ button on the keyboard of your computer. This will take you back to Normal View.
If you are using any other view apart from these 3 view modes in PowerPoint, you need to do the following –
If you are in a different viewing option, such as ‘Slide Sorter’ option, or the ‘Reading View’ option then you have to select the ‘Normal View’ option from the ‘View’ tab instead of the ‘Slide Sorter’ option or the different slide view option you are currently on.
More PowerPoint Related Topics
- How to Crop a Picture in PowerPoint? [Complete Step-by-Step Tutorial!]
- How to Give a Presentation on Zoom? A Helpful Resource!
- What is a Presentation Clicker? [And How to Use it!]
- How to Convert a PowerPoint to PDF? [A Simple Guide!]
- PowerPoint vs Google Slides: Which is Better? [ULTIMATE Test!]
- How to Change Bullet Style in PowerPoint? A Complete Guide
Credit to Pressahotkey (via Freepik) for the featured image of this article
- PowerPoint Tutorials
Presentation Views in PowerPoint
Job-ready Online Courses: Knowledge Awaits – Click to Access!
There are multiple ways a person can view the slides in a presentation. The main advantage of having multiple views is that every view has a special property, a special feature that makes the process of creating an effective and impressive PowerPoint presentation very simple. For every view the first step is common: Click on the ‘View’ tab in the top pane in your PPT window. Further, here is a comprehensive list of different views and the uses of each.
List of PowerPoint Presentation Views:
1. powerpoint normal view:.
- This is the view that your presentation opens up in as soon as you create a new presentation.
- The advantage of this view is that in this view, editing the slides is very easy. Adding pictures, formatting data, adding tables and graphs, etc., are some other tasks that are available in this view. Basically, all operations are very accessible in this view.

2. PowerPoint Outline view:
- This view shows the outline of each slide in the left pane.
- The outline of each slide contains the slide title along with the content in the slide. In this view, one can see the overview of the content in every slide in the presentation.

3. PowerPoint Slide sorter view
- To have a look at all slides in one window, the best view option is slide sorter.

- The advantage of this view is that the user can sort (as the name suggests) the slides and rearrange them as required. We can delete the slides with ease in this view.

4. PowerPoint Notes Page view:
- In this view, each slide is presented as a part of a page that also contains the slides notes at the bottom.
- The advantage of this view is that the user can see the slide content as well as the slide notes for each slide.
- This view can also be imported as a document for the user’s reference.

5. PowerPoint Reading View:
- In the reading view, the user can see each slide as it would be presented to the audience.
- This view allows the user to preview their slideshow.

6. PowerPoint Slide Show View
- It automatically switches to full screen mode and you can no longer edit the presentation.

Another way to shift between views:
In the bottom right corner of your window, you will be able to see an array of small icons. These icons indicate each view. By clicking on any one of the icons, you can quickly switch to that particular mode of view.
Some useful tips:
- You can press F6 key to swiftly change views in the clockwise direction and Shift + F6 to switch views in the anti-clockwise direction.
- The normal view is also referred to as tri-pane view as it includes three different panes.
- To switch between outline and slides view, you can use the Ctrl + Shift + F6 shortcut.
- Each view has its own advantages and purpose.
The various presentation views are huge highlighting features in PowerPoint. This feature makes the process of creating a PowerPoint presentation easy and time saving. Everyone must take advantage of the multiple presentation views to create awesome presentations.
Your opinion matters Please write your valuable feedback about DataFlair on Google
Tags: PowerPoint Outline view powerpoint presentation views PowerPoint Reading View PowerPoint Slide Show View PowerPoint Slide sorter view powerpoint views
Leave a Reply Cancel reply
Your email address will not be published. Required fields are marked *
- Microsoft's Promise of Easy AI
- Walmart's Killer Tech Deals This Week
Different Ways to View Slides in PowerPoint
Use different views to design, organize, outline, and present your slideshow
- Brock University
Many people spend all their time in the Normal view when working on their PowerPoint presentations . However, there are other views that are useful as you put together and present your slideshow. In addition to Normal view (also known as Slide view), you'll find Outline view, Slide Sorter view, and Notes Page view.
Information in this article applies to PowerPoint 2019, 2016, 2013; PowerPoint for Microsoft 365, and PowerPoint for Mac.
Design Slides in Normal View
Normal view, or Slide view as it is often called, is the view you see when you start PowerPoint. It is the view where you'll spend most of your time in PowerPoint. Working on a large version of a slide is helpful when you're designing your presentation .
Normal view displays thumbnails of each slide, the slide where you enter your text and images, and an area to keep presenter notes.
To return to Normal view at any time, select View > Normal .
The four slide views are located on the View tab. Toggle between them to compare views.
Organize a Presentation in Outline View
In the Outline view , your presentation is displayed in outline form. The outline contains the titles and main text from each slide. The graphics are not shown, although there may be a small notation that they exist. You can work and print in either formatted text or plain text.
Outline view makes it easy to rearrange your points and move slides to different positions. Outline view is useful for editing purposes. And, it can be exported as a Word document to use as a summary handout .
To view an outline of your presentation instead of thumbnails, select View > Outline View .
Rearrange a Presentation in Slide Sorter View
Slide Sorter view shows a miniature version of all the slides in the presentation in horizontal rows. These miniature versions of the slides are called thumbnails.
Use Slide Sorter view to delete or rearrange your slides by dragging them to new positions. Add effects, such as transitions and sounds, to several slides at the same time in Slide Sorter view. And, add sections to organize your slides. If you are collaborating with colleagues on a presentation, assign each collaborator a section.
To locate the Slide Sorter view, select View > Slide Sorter .
Keep Presentation Prompts in Notes Page View
When you create a presentation, add speaker notes that you refer to later while delivering the slideshow to your audience. Those notes are visible to you on your monitor, but they aren't visible to the audience.
Notes Page view shows a small version of a slide with an area below for speaker notes . Each slide is displayed on its own notes page. Print these pages to use as a reference while making a presentation or to hand out to audience members. The notes do not show on the screen during the presentation.
To locate the Notes Page view, select View > Notes Page .
Get the Latest Tech News Delivered Every Day
- Outline View in PowerPoint or OpenOffice
- Slide Layouts in PowerPoint
- The 10 Most Common PowerPoint Terms
- How to Use Speaker Notes in PowerPoint
- How to Print PowerPoint Slides
- How to Select More Than One Slide in PowerPoint
- How to Use the Slide Sorter View in PowerPoint
- How to Hide and Unhide a Slide in PowerPoint
- How to Print PowerPoint Slides With Notes
- Thumbnails Are Used for Navigation in Digital Files
- Converting PowerPoint Slides to Word Documents
- How to Use Copilot in Powerpoint
- Add, Delete or Change the Order of PowerPoint Slides
- How to Add Page Numbers in PowerPoint
- How to Make a Slideshow on PowerPoint
- Converting PowerPoint Presentations to Word Documents
What are the different views of a presentation?
- Slide Sorter
| shows one slide at a time Slide view is optimized for editing. You can edit not only the text of a slide but also any graphics, sounds, and animations that might be included on the slide. This is usually the best view when you are working with an individual slide. |
|
| shows the contents of your presentation in outline format. This view is optimized for organizing and arranging the content of your presentation. Because the contents of all slides (that will fit on the page) are shown at once, you can easily view and change the order of topics and subtopics. This view is also probably the most efficient for entering the contents of your presentation. |
| shows a thumbnail image of each slide in your presentation. This view is best when you want to rearrange the order of your slides or just want to see each slide in your presentation with the formats and colors you have chosen. In Slide Sorter View you can't edit the contents of a slide, but you can quickly switch to Slide View were you can edit the contents. |
|
| shows one slide at a time with speaker's notes. This view is best when you are entering or reviewing the notes you made for slides. |
| shows your presentation as it will look to the audience when you run it. This view displays one slide at a time in full-screen mode. |
|
Copyright 1997 by the Curators of the University of Missouri
Unsupported browser
This site was designed for modern browsers and tested with Internet Explorer version 10 and later.
It may not look or work correctly on your browser.
- Presentations
How to Work With Views in Microsoft PowerPoint
- Bahasa Indonesia
The many views of PowerPoint will help you prepare for your big presentation.
You're probably accustomed to views like Normal view. But in this tutorial, you'll learn more ways of working with your presentation such as Slide Sorter view, shown here:

Master PowerPoint Views
Here are the most popular views in PowerPoint:
- Normal View . The default PowerPoint workspace, which includes thumbnails for each slide and a larger view of a single slide in the center.
- Outline View . Shows your presentation in an outline style, which is great for reviewing content.
- Slide Sorter View . Perfect for reviewing the order of your slides and re-sequencing them.
- Reading View . An in-window preview of how your presentation will appear, including transitions and animations.
Need Help? Download Our eBook on Making Great Presentations (Free)
We also have a useful compliment to this tutorial. Quickly grab it before you read on. Download our FREE eBook: The Complete Guide to Making Great Presentations . It'll help you write, design, and deliver the perfect presentation.

How to Work With PowerPoint Views (Quick Video Tutorial)
PowerPoint is a great tool for creating presentations. Views allow you to make edits, reorders slides, edit notes, and work efficiently in PowerPoint. Learn how to use PowerPoint Views in this short video:

Working With Microsoft PowerPoint Views
In the rest of this tutorial, I cover more details about the major views in PowerPoint for mastering your presentation files and how to get the most out of them. I also touch on more views you can use in PowerPoint as well.

The Bravo PowerPoint Template has over 50 unique slides. It has picture placeholders that make adding images to the slide easy. Plus, this template comes with icons and device mockups.
How to Change Views in PowerPoint
To change views, find the View button on PowerPoint's ribbon and click on it. Then, find the section on the left labeled Presentation Views. This tutorial will walk you through each of these views and how you can use them.

Now that you know how to switch views, let's find out more about the different PowerPoint views and why you should work through them while building a presentation.
How to Use PowerPoint Normal View
Normal View is typically the default view for working in Microsoft PowerPoint. This is a general purpose, do-it-all view that you're likely accustomed to. You can think of it as the primary editing view in PowerPoint.
On the left side of PowerPoint's Normal View are thumbnails for each of the slides. You can click to switch between slides, and even drag and drop to reorder them right inside of the sidebar.

I use Normal View in PowerPoint as a starting point for my presentations. It's a general view for creating your presentations from. The stage area is used for building and styling your slides, and you can easily move to a different slides from the sidebar.
After I've spent time putting together my content, it might be time to rethink the sequence of the material. That's where Slide Sorter View comes into play.
Normal View is the default view in PowerPoint, but if you're working in another view you can switch back to Normal View in PowerPoint. Click on View in the PowerPoint ribbon. Then Click the Normal icon.
Using PowerPoint Outline View
The Outline View in PowerPoint shows your presentation in a traditional, easy-to-read outline. This view puts your main points in the sidebar.

When you switch to Outline View , the sidebar changes its focus to the content of your slides. The sidebar doesn't show all the text from the slides, just the major points from your presentation. You can even double click in the sidebar on the outline text to update the slide itself.
I like to use Outline View to review the major points that my presentation should make. As I'm working in Outline View , I'm asking myself a few key questions, like:
- Are my main ideas clear?
- Do I focus on them, and not the details?
Outline View is perfect for this purpose, as it leaves only your key points showing in the sidebar.
Slide Sorter View in PowerPoint
You've nailed down the content in Normal View , and now it's time to think about the order that you'll present your slides.
Slide Sorter View is a helpful way to re-order the slides in your PowerPoint presentation. Click on Slide Sorter to enter into this view.

When you switch to Slide Sorter View , all your slides will be represented as thumbnails on the stage. You can even change the size of the slides by pulling the zoom slider and view your slides large enough to read their contents.

The great thing is that you can drag and drop these thumbnails to reorder your presentation. I'm often surprised by how much my presentations benefit from simple reordering of the slides.
There's a presentation principle called BLUF, or "bottom line up front." Basically, lead off with the most important point in your entire presentation. Your audience may not have the patience or attention span to follow multiple slides to a conclusion
When you switch to Slide Sorter View , it's a great time to apply the BLUF principle. Make sure that the bottom line (most important facts) are at the very beginning of the presentation. If you've buried the heart of the presentation deep in the slides, drag and drop the key slides closer to the front.
5. PowerPoint Notes Page View
Speaker notes are one of my favorite PowerPoint tools. Instead of writing your notes down on notecards, you can add them to each slide. You can add speaker notes from either Normal View , or more easily in Notes Page View .
Best of all, these notes won't be viewable to your audience when presenting. You can either print note pages, or they'll be visible in Presentation View (more on that in a moment.)

When you're working in PowerPoint Notes Page View , you'll see the notes you've added to a slide underneath it. You can also double click in the box and add notes on the fly. This preview is what you'll see when you print your notes pages.
If you'd like to find out more about the power of speaker notes, check out this 60 second tutorial on how to use them to your advantage:

6. When to Use Reading View
You've nailed the sequence, content, and speaker notes for your presentation. Now, it's time to review what your audience will see with PowerPoint Reading View .

Once you enter Reading View , your PowerPoint presentation will cover the entire window. You can use the arrow keys on your keyboard to switch slides. As you progress through the presentation, PowerPoint will play any transitions or animations that you've added to your slides.
Reading View should be your final step while preparing for your presentation in PowerPoint. I always go through each slide in my deck to make sure it appears exactly the way I expect.
To leave Reading View , press the Escape key on your keyboard. There's one more view worth checking out.
7. Presentation View in PowerPoint
Presentation View is what you'll use when sharing your PowerPoint slide deck with an audience. In practice, Presentation View is very similar to what you'll see in Reading View . Use Presentation View when you're ready to share.

One option worth checking out is Use Presenter View , which you can toggle on from the Slide Show tab. Presenter View is great for dual display options, such as when you're using an external monitor. Your screen will show a preview of the slide, as well as the speaker notes and next slide.

Make Great Presentations (Free eBook Download)
We've got the perfect complement to this tutorial, which will walk you through the complete presentation process. Learn how to write your presentation, design it like a pro, and prepare it to present powerfully.
Download our eBook: The Complete Guide to Making Great Presentations . It's available for free with a subscription to the Tuts+ Business Newsletter.

Recap and Keep Learning
Think of the various PowerPoint views in this tutorial as different ways to view your presentation. Here's a possible workflow:
- Build your PowerPoint presentation in Normal View .
- Re-sequence the slides in Slide Sorter .
- Review content in Outline View .
- Preview the presentation in Reading View .
PowerPoint sometimes gets a bad rap as an ineffective tool, but when used correctly, it's great for building visual aids for your presentation. If you want to learn more about PowerPoint, check out the resources below:
- Envato Elements has over 350 templates for PowerPoint available for a flat rate with unlimited download.
- The PowerPoint in 60 Seconds series has a great selection of easy-to-learn skills for PowerPoint.
- If you want to learn more about how to build great-looking slides, check out How to Get Started With Using SmartArt .
More PowerPoint Templates
As you experiment with PowerPoint views, you may be looking for other PowerPoint templates to work with. Here are some curated lists of templates:

The Top Source for PowerPoint Templates (With Unlimited Use)
Envato Elements is a top source for premium PowerPoint templates . It has more than just PowerPoint templates. It has many digital assets. They include images, audio, font, and more.

A subscription is a good value if you make PowerPoint presentations often. To become a subscriber, you need to pay a low monthly fee and have unlimited access to any digital asset you want.
Using a premium template saves you time because it's already mostly made. All you need to do is add your information and images. But if you’re a creative person and are worried that with a premium template, you won’t get to be creative, then don’t be. A good template is fully customizable. You can change the colors, font, or anything else you need.
Use a Premium PowerPoint Template in Your Next Project Today!
Now that you know more about the different views in PowerPoint. Knowing how to use the different views can help you fully use PowerPoint. If you use PowerPoint, try signing up for Envato Elements.
Editorial Note : This tutorial was originally published in March of 2017. It's been updated for accuracy with help from Sarah Joy.

Want to create or adapt books like this? Learn more about how Pressbooks supports open publishing practices.
Unit 1 Use a Theme Template and Slide Layouts to Create a Presentation
4 View and Save Presentations
view and save presentations, topics include:, open an existing presentation, correct text, view a presentation, save vs save as, view options, quit powerpoint, print a presentation.
To view an existing presentation, start PowerPoint, click on the File tab, select Open . Your Windows Explorer will open and allow you to choose an existing presentation. Note: This section is information only, you can work along exploring this feature. Later in this lesson you will use this PowerPoint open in the hands on practice activities.
In the first learning activity we learned that there are four buttons located in the View area that are used to view a presentation.
A useful way to view your presentations is in black and white or Grayscale . If you need to use a projector that can only handle Black & White or Grayscale you should view your presentation with a black and white command applied to be sure your text and layout is still readable.
To see how your slides would look in black and white, click the View tab, select Grayscale or Black and White in the Color/Grayscale group and scroll through your slides.
A new tab will then display. From the Black and White tab, select one of the various black and white settings.
A presentation can be printed in many formats. You can print the slides of your presentation, handouts for the audience, the notes page, or the outline view. Prior to printing the desired material, you may want to specify the page Orientation; select Slide Orientation located in the Page Setup group in the Design tab. The dialogue box will appear; this allows you to set the orientation either Portrait or Landscape.
The next step to printing your presentation is to display the print dialogue box. Click on the File tab, then Print . At the Print screen you have the the option to print all of the slides, or you can specify the slides that you would like to print.
The drop list beside Full Page Slides : displays a list of printing options such as print slides, handouts, notes pages and outline view.
The Color drop list includes the options to have your presentation print in Color, Grayscale and Pure Black and White.
Once you have determined how you want your presentation to print, you can then select the number of copies and click OK.
While viewing your presentation, you need to proofread your presentation for any errors. PowerPoint is equipped with a spell checking feature to check for and correct misspelled words. Keep in mind that the spell check only recognizes misspelled words not misused words. To check your presentation for any spelling mistakes, click on the Spelling button located in the Review tab. When PowerPoint recognizes a misspelled word it offers suggestions, you then have the option to choose the correct spelling or ignore the misspelled word.
When creating a presentation, you must save your files to a disk. When saving the presentation for the first time, you will use the Save As command located under the File tab.
You will then name your presentation and save it either on your hard drive or on a disk. When naming a PowerPoint presentation, you will notice that the new file will be named with the extension .pptx.
Once you have saved your presentation with a new name, when you make any additional changes you can use the Save command. The Save command saves any changes you make to the file in the same location you specified when you used the Save As command. Be sure to save your files frequently.
Once you have saved your PowerPoint Presentation, click on the X located to the right of the Title bar. This command will close the PowerPoint program.
Presentation Software Copyright © 2013 by bpayne is licensed under a Creative Commons Attribution 4.0 International License , except where otherwise noted.
Share This Book
In order to continue enjoying our site, we ask that you confirm your identity as a human. Thank you very much for your cooperation.
How Many Views in MS Powerpoint? Here’s What You Need To Know
Are you looking to create a professional presentation using Microsoft PowerPoint? If so, then you need to know about the various views available.
In this article, well go over the different views in MS Powerpoint, as well as tips for creating professional presentations.
Short Answer
Microsoft PowerPoint has four main views: Normal, Slide Sorter, Outline, and Notes. Normal view is the default view and is used for most of the work in PowerPoint. Slide Sorter view is used to rearrange slides, and Outline view is used to view and edit the text on the slides. Notes view is used to add notes to slides for reference during the presentation.
Overview of Microsoft PowerPoint
It is used to create visual aids such as slideshows, which are often used in businesses and educational settings.
The interface of Microsoft PowerPoint is divided into four main views: Normal view, Slide Sorter view, Notes Page view, and Slide Show view. Normal view is the default view, which provides a blank canvas for you to create your presentation. Slide Sorter view allows you to rearrange slides in the order you want them. Notes Page view allows you to view and edit your slides notes. Finally, Slide Show view allows you to view your presentation as it will appear when presented.
It also has a wide range of templates and backgrounds to choose from, making it easy to create visually appealing presentations.
It also has collaboration features that allow you to collaborate with other users and share your presentation online.
It offers up to four different views to help you create presentations, and offers a range of formatting and customization tools to make your presentation look professional.
Description of the Four Views
Microsoft PowerPoint is a powerful presentation software program used to create slideshows. It offers up to four different views to help users create presentations: Normal, Slide Sorter, Notes Page, and Slide Show.
Normal view is the default view and is the most commonly used.
You can add text, images, shapes, and more to make your presentation come to life.
You can drag and drop to change the order of your slides, or click on the Reorder Slides button to quickly change the order.
You can also preview the order of your slides in this view.
You can add images, text, and links to your notes to help you deliver a more powerful and engaging presentation.
With Microsoft PowerPoint, you have the tools you need to create powerful and professional presentations.
Normal View
This view allows you to create slides, add text, insert images, and create animations.
The Insert tab is where you can add content such as pictures, tables, charts, and shapes.
Finally, the Design tab allows you to customize the overall look of the presentation, such as color schemes, fonts, and backgrounds.
Slide Sorter View
It allows you to quickly and easily rearrange, delete, or add slides to your presentation.
This view also allows you to easily add new slides to your presentation, as well as delete slides you no longer need.
Notes Page View
This view is useful for adding detailed information to accompany each slide, as well as for providing additional instructions or context.
To access Notes Page view, simply select it from the View tab at the top of the screen.
You can also add new slides to your presentation from this view.
You can also change the background color and add images or shapes to the notes page.
To do this, simply select the Format button at the top of the window, and select the desired options.
With this view, you can easily add more information to your presentation without cluttering up the slide itself.
Slide Show View
The Slide Show view in Microsoft PowerPoint is the most important view of all.
It provides a preview of how your presentation will look when it is presented, allowing you to make any last minute adjustments or corrections before you present it.
In the Slide Show view, each slide appears one at a time, with the transition between slides being set according to the transition settings you have chosen.
One of the great features of the Slide Show view is that it allows you to view your presentation in full screen mode.
Overall, the Slide Show view in Microsoft PowerPoint is essential for creating successful and professional presentations.
With the Slide Show view, you have all the tools you need to make sure your presentation looks its best.
Tips for Creating Professional Presentations
But with a few tips, you can create an engaging and powerful presentation that is sure to impress your audience.
This will help engage your audience and keep their attention throughout the entire presentation.
Using both visuals and text can be an effective way to get your message across.
Finally, practice presenting.
By following these tips, you can create an engaging and professional presentation with Microsoft PowerPoint.
Final Thoughts
Now that you know how to navigate and utilize all four views in PowerPoint, you can get started on creating your next professional presentation!
Recent Posts
PowerPoint Views
The six different powerpoint views.
There are 6 different views you can use to look at your PowerPoint presentation and each one has its advantages over the others. The default view in PowerPoint is normal view. This means that when you sart PowerPoint, and as lond as you don't change the view, you will be working in Normal View. There are two place to change to a different view: at the top of the left side panel and at the bottom of the workspace to the right (next to the zoom slider). OK, make that three, as you can also see the presentation views on teh View tab!
To change to Slides View or Outline view, click the corresponding tab at the top of the left side panel:
To change to any of the other PowerPoint view, use the small toolbar at the bottom:
Here is an explanation of how you should use the different views:
| PowerPoint View | Description |
|---|---|
| Slides View | This is a great place to view the slides in your presentation as thumbnail-sized images while you edit. The thumbnails make it easy for you to navigate through your presentation and to see the effects of any design changes. You can also easily rearrange, add, or delete slides here |
| Outline View | This is a great place to start writing your content, to capture your ideas, plan how you want to present them, and move slides and text around. The Outline tab shows your slide text in outline form. |
| Normal View | Normal view is the main editing view, where you write and design your presentations. |
| Slide Sorter View | Slide Sorter view gives you a view of your slides in thumbnail form. This view makes it easy for you to sort and organize the sequence of your slides as you create your presentation, and then also as you prepare your presentation for printing. |
| Reading View | Use reading view to deliver your presentation not to an audience (via a large screen, for example), but instead to someone viewing your presentation on their own computer. Or, use Reading view on your own computer when you want to view a presentation not in full-screen Slide Show view, but in a window with simple controls that make the presentation easy to review. You can always switch from Reading view to one of the other views if you want to change the presentation. |
| Slide Show View | Use Slide Show view to deliver your presentation to your audience. Slide Show view occupies the full computer screen, exactly like an actual presentation. In this view, you see your presentation the way your audience will. You can see how your graphics, timings, movies, animated effects, and transition effects will look during the actual presentation. |
Most Popular Tutorials
- Selected Reading
- UPSC IAS Exams Notes
- Developer's Best Practices
- Questions and Answers
- Effective Resume Writing
- HR Interview Questions
- Computer Glossary
Presentation Views in Powerpoint 2010
PowerPoint supports multiple views to allow users to maximise benefits the features available in the program. Each view supports a different set functions and is designed accordingly.
PowerPoint views can be accessed from two locations.
Views can be access quickly from the bottom bar just to the left of the zoom settings

Views can also be access from the Presentation Views section in the View ribbon

Here is a short description of the various views and their features.
Normal View
This is the default view in PowerPoint and this is primarily used to create and edit slides. You can create/ delete/ edit/ rearrange slides, add/ remove/ modify content and manipulate sections from this view.

Slide Sorter View
This view is primarily used to sort slides and rearrange them. This view is also ideal to add or remove sections as it presents the slides in a more compact manner making it easier to rearrange them.

Reading View
This view is new to PowerPoint 2010 and it was created mainly to review the slide show without losing access to rest of the Windows applications. Typically when you run the slide show, the presentation takes up the entire screen so other applications cannot be accessed from the taskbar. In the reading view the taskbar is still available while viewing the slide show which is convenient. You cannot make any modifications from this view.

This is the traditional slide show view available in all the earlier versions of PowerPoint. This view is used to run the slide show during presentation.

Copyright © 2014 by tutorialspoint. All Rights Reserved.
- Start the presentation and see your notes in Presenter view Article
- Add speaker notes to your slides Article
- Rehearse and time the delivery of a presentation Article
- Record a slide show with narration and slide timings Article
- Print your PowerPoint slides, handouts, or notes Article
- Create a self-running presentation Article

Start the presentation and see your notes in Presenter view
Using Presenter view is a great way to view your presentation with speaker notes on one computer (your laptop, for example), while only the slides themselves appear on the screen that your audience sees (like a larger screen you're projecting to).
If you're using a newer version of PowerPoint, just connect the monitors and PowerPoint automatically sets up Presenter View for you.
If Presenter view appears on the wrong screen, you can swap the display quickly .
Turn off Presenter view if you prefer not to use it.

Start presenting
On the Slide Show tab, in the Start Slide Show group, select From Beginning .

Use the controls in Presenter view
To move to the previous or next slide, select Previous or Next .

To view all the slides in your presentation, select See all slides .

Tip: You’ll see thumbnails of all the slides in your presentation (as shown below), making it easy to jump to a specific slide in the show.

To view a detail in your slide up close, select Zoom into slide , and then point to the part you want to see.

For more details on zooming in, see Zoom in to part of a slide .
To point to or write on your slides as you present, select Pen and laser pointer tools .

Press the Esc key when you want to turn off the pen, laser pointer, or highlighter.
To hide or unhide the current slide in your presentation, select Black or unblack slide show .

You can use PowerPoint on your smartphone as a remote control to run your presentation and view your speaker notes. See Using a laser pointer on your smartphone when presenting in PowerPoint for more information, including a brief video.
Swap the Presenter view and Slide view monitors
To manually determine which screen shows your notes in Presenter view and which shows only the slides themselves, on the task bar at the top of Presenter view, select Display Settings , and then select Swap Presenter View and Slide Show .

What the notes look like in Presenter view
Tip: You can add notes either while you’re presenting, directly from Presenter view, or as you’re editing your presentation. For information on how to add speaker notes to your presentation see Add speaker notes to your slides.

The notes appear in a pane on the right. If you need to add or delete something, simply click in the text box to edit it. The text wraps automatically, and a vertical scroll bar appears if necessary. You can change the size of the text in the Notes pane by using the two buttons at the lower left corner of the Notes pane:

To change the size of the panes in Presenter View, point your mouse at the vertical line that separates them, then click and drag.
Tip: If you don't need to see the current slide in Presenter View at all, and would like your notes to be larger, drag that vertical separator line all the way to the left.
Turn off Presenter view
If you want Presenter view turned off while you are showing your presentation to others:
On the Slide Show tab of the ribbon, clear the check box named Use Presenter View .

Keep your slides updated
If you're working with a team of people to create your slide deck it may be that changes are being made to the slides right up to the last minute. Traditionally once you've started your presentation your slides wouldn't update. If you're using PowerPoint for Microsoft 365 you have the option to let your slides be updated by your team even as you're presenting so that you always have the up-to-the-minute changes.
You can turn this on by going to the Slide Show tab of the ribbon, selecting Set Up Slide Show , and checking the box for Keep slides updated .

If you've already started your presentation and you want to make sure that setting is on, you can do that from Presenter view. Select the More slide show options button (which looks like three dots) and on the menu make sure Keep Slides Updated is checked.

Using a laser pointer on your smartphone when presenting in PowerPoint
To start using Presenter view, select Slide Show > Presenter View .

To move to the previous or next slide, select the Previous or Next arrow.

To turn off the pen, laser pointer, or highlighter, press the Esc key.
To make the screen black or to un-black the screen, Press b on the keyboard.

Extend your Mac desktop to the second monitor
On the Apple menu, select System Preferences .
Open the Displays app.
Click the Arrangement tab in the dialog box.
Clear the Mirror Displays check box.
By doing this process, you now have a two-monitor setup. You can present a PowerPoint slide show on one screen while having other applications open on the other screen, keeeping those other apps private to yourself.
To manually determine which screen shows your notes in Presenter view and which shows only the slides themselves, on the task bar at the top left of Presenter view, select Swap Displays .
When your computer is connected to a projector and you start Presenter View, it appears on your computer's screen, while only the slides appear on the projector screen.

The notes appear in a pane on the right:
The text wraps automatically, and a vertical scroll bar appears if necessary.
You can edit the text in the Notes pane.
You can change the size of the text in the Notes pane by using the two buttons at the lower left corner of the Notes pane:

You can adjust the size of the current slide, and notes and next slide panels, by using your mouse to grab and drag the vertical line that separates the two panels.
Turn off Presenter view before a presentation begins
On the PowerPoint menu, select Preferences .
In the PowerPoint Preferences dialog box, under Output and Sharing , click Slide Show .

In the Slide Show dialog box, clear the Always start Presenter View with 2 displays check box.

Close the dialog box.
Turn off Presenter view during a presentation
At the top of the Presentation view window, click Use Slide Show .

This button closes Presenter view. As a result, both your personal computer screen and the projector screen show the slide show.
If you're working with a team of people to create your slide deck it may be that changes are being made to the slides right up to the last minute. Traditionally once you've started your presentation your slides wouldn't update. If you're using PowerPoint for Microsoft 365 for Mac you have the option to let your slides be updated by your team even as you're presenting so that you always have the up-to-the-minute changes.
You can turn this on by going to the Slide Show tab of the ribbon, and checking the box for Keep Slides Updated .

Create a self-running presentation
Record your slide show
Keep slides updated

Need more help?
Want more options.
Explore subscription benefits, browse training courses, learn how to secure your device, and more.

Microsoft 365 subscription benefits

Microsoft 365 training

Microsoft security

Accessibility center
Communities help you ask and answer questions, give feedback, and hear from experts with rich knowledge.

Ask the Microsoft Community

Microsoft Tech Community

Windows Insiders
Microsoft 365 Insiders
Was this information helpful?
Thank you for your feedback.
Learn Programming and technology with ease @ developerpublish.com
- What is My IP Address?
- Password Generator
Presentation Views in Microsoft PowerPoint
This post covers various Presentation Views in Microsoft PowerPoint and different use cases when you use them.
What are the different Presentation Views in Microsoft PowerPoint?
Various PowerPoint views that are supported in Microsoft Office includes.
Normal View
Slide sorter view, notes page view.
- Slides Show View
Master Views
How to choose the presentation view in microsoft powerpoint.
To choose the PowerPoint view, select the View tab in PowerPoint and then select the Presentation view that you wish your slide to use.

Alternatively, you can switch between different presentation views by selecting them from the Taskbar at the screen’s bottom.

The Normal View is the preferred presentation view in case you want to create and edit your slide.
The Slide Sorter View is ideal if you want to see the thumbnails of all your slide decks. It lets you to easily re-order them.
The Notes Page View is ideal if you want to view your speaker notes.
Slide Show View
The Slide Show View is ideal for the users who wish to present their slide on the projector. You can also use the Use Presenter View option in PowerPoint to display the current slide, next slide, and speaker notes.
If you want to make a change to all the slides within your presentation, Master Views might be an ideal one.
Leave A Reply Cancel reply
Your email address will not be published. Required fields are marked *
You May Also Like

Content Placeholders in PowerPoint
- May 5, 2022

How to Create Text Boxes Manually in PowerPoint?

Rearranging Slides in PowerPoint
- May 2, 2022
Login with your site account
Remember Me
Computers Professor
Computers Fundamentals, MS Office, C, Java, Web Technology.
Label Links
- Interview Questions
- Multiple Choice Questions
- Web Technology
- Computer Shortcut keys
- Computer Tips
- Computer Tricks
- Data Structures
- Information Technology
- Model Papers
- MS PowerPoint
- Software engineering
Explain Various Views In Power Point?
Like to share, post a comment.
- Explain DOS Internal and External Commands?
- What is E-Commerce? What are the Applications, Different types of E-Commerce and explain Advantages and Disadvantages of E-Commerce?
- What are the Various Desktop Icons?
- Program to Print all Even Numbers in an Array using Pointers.
- Multiple Choice Questions and Answers on Windows Azure Platform of Cloud Computing for Freshers
- B.Sc. (I YEAR) SEMESTER-II SANSKRIT MODEL QUESTION PAPER ADIKAVI NANNAYA UNIVERSITY
- Write an html program on preparing curriculum by using nested table?
- Computer Fundamentals Multiple choice Questions and Answers on Data Types for Freshers
- Multiple choice Questions and Answers on Microsoft Cloud Services of Cloud Computing for Freshers
- Write about date object in Java Script

- Web Services
- Interview Q
PowerPoint Tutorial
Presentation basics, text basics, inserting picture, working with tables, working with charts, slide effects, shortcut keys.

| Once you create the presentation you can view it in different ways. Select the View tab. Locate the Presentation Views group. It displays four options to view presentations; Normal View, Slide Sorter View, Slide Show View and Notes Page View. Normal View: The normal view appears by default when we open the PowerPoint window. We create and edit slides in Normal View. This view also offers three view options out of four options in the form of buttons on the status bar.
This view provides space below the slide to add notes.
|

- Send your Feedback to [email protected]
Help Others, Please Share

Learn Latest Tutorials

Transact-SQL

Reinforcement Learning

R Programming

React Native

Python Design Patterns

Python Pillow

Python Turtle

Preparation

Verbal Ability
Interview Questions

Company Questions
Trending Technologies

Artificial Intelligence

Cloud Computing

Data Science

Machine Learning

B.Tech / MCA

Data Structures

Operating System

Computer Network

Compiler Design

Computer Organization

Discrete Mathematics

Ethical Hacking

Computer Graphics

Software Engineering

Web Technology

Cyber Security

C Programming

Control System

Data Mining

Data Warehouse

- School Guide
- Class 9 Syllabus
- Maths Notes Class 9
- Science Notes Class 9
- History Notes Class 9
- Geography Notes Class 9
- Political Science Notes Class 9
- NCERT Soln. Class 9 Maths
- RD Sharma Soln. Class 9
- Math Formulas Class 9
Layout and Views in Presentation Tool
- Types of Presentation Tools in MS Office
- How to Edit a Powerpoint Presentation?
- Create Presentations Using RISE in Jupyter Notebook
- Top 10 AI Chatbot for Making Presentation
- Horizontal Scrollview in Android
- What are Presentation Graphics?
- Views In Django | Python
- Explain the concept of Partials/Layout templates in Express Views.
- Different Ways to Fix "Android Studio Does not Show Layout Preview"
- How to Use ChatGPT to Create Presentations using Slides AI
- How to Change Slide Layout in MS PowerPoint ?
- 10 Best Presentation Tools to Create Engaging Presentations in 2024
- Relative Layout in Android
- How to Implement View Binding Inside Dialog in Android?
- Android- Hide or Show Specific Layout & Views Efficiently
- How to Take Sub-View Screenshot in Android?
- Createview - Class Based Views Django
- Detail View - Function based Views Django
- How to Use WebView in Android?
Microsoft PowerPoint provides different types of tools to make presentations presentable and interactive for different purposes like for business, for class, for projects, etc. Layout and Views tools are one of the presentation tools. The View in power points is the look of the working space that helps you to modify your slides as you desire. Slide Layout depicts the layout of your slide it contains placeholder boxes, various formatting and positioning contents like titles, body text, charts, SmartArt, videos, etc. In this article, we will discuss Layout and Views tools in detail.
View tool is all about looks that matter same with the presentation viewing presentation differs according to the need of users. Or we can say that this tool allows you to view your presentation in different ways according to your requirement. For example, if a user wants to read the presentation, wants to make a note of it, wants to sort the slides according to their use. Then he/she can use the presentation view.
Views in PowerPoint are divided into two parts:
1. Presentation Views: This part of views contains all the views that are required for the purpose of presenting your slides to others or as well as for you too. It is divided into five types and each of them has a specific purpose.

- Normal View: It’s the basic view when you start building your slides. It is generally used for writing and designing a presentation and consists of two default boxes one is for title or heading and the second is for multiple tasks.
- Outline View: It is made up of main text, titles, and any important images from each slide in an outline manner.
- Slide Sorter: Mainly used when user wants to sort their slides in a manner they desired. Or we can say that this view option is used when the user wants their slides in the thumbnail form.
- Notes Page: It is the important view among all the views. It makes the slides look like a page and using this view you can make your notes easily from the slides.
- Reading View: This view is used to read your slides in a way that you are reading some books.
2. Master Views: This part of view allows you to change the standard slide layouts that are in-built in PowerPoint. Or we can say that it allows modifying slide and slide layouts.
- Slide Master: It allows you to instantly modify your slides and allows you to apply various formatting styles on your slides.
- Handout Master: This view converts your slides into a page that has a by default header and footer. And you can print these slides into handouts as well. It contains 6 slides on one page. If you modify the handout master the same changes will appear on all the pages of the printed handout.
- Notes Master: This view is mainly used when user wants to take print of their slides and notes. It contains 2 slides on one page. Or we can say that it changes the look of the presentation into the notes pages view. You are allowed to change the content of the not master.
How to access the views tab in PowerPoint?
There are two ways to access views in PowerPoint:
1. Go to the views tab as shown below in the image.

2. Go to the quick access tab to access views in PowerPoint as shown in the below image.

How to apply slide sorter view?
To apply a sorter view on the current presentation follows the following steps:
Step 1: Open Microsoft PowerPoint and then create slides.

Step 2: Go to the View and choose slide sorter from the presentation view and you will get the following result.

Slide Layouts
Slide Layout shows all the available layouts for your slide containing placeholder boxes, various formatting and positioning contents like titles, SmartArt, body text, charts, videos, blank slides as well, etc. It also contains the color, fonts, effects, and backgrounds of the slides. Powerpoint provides a build-in slide layout and custom layouts so you can use them according to your requirements. For example, if you want to present your ideas for business growth, a class presentation, first page for the details, want to include different topics separately, want a blank ppt for rough work. For all these works and uses PowerPoint presentation slide layouts for you to make it easy to create presentations for varied types of works and people.
Parts of Slide Layouts
- Title Slide: It is a basic layout consisting of two placeholders by default when we open blank slides.
- Title and Content: It is a layout with two placeholders for title, headings, illustrations, or images.
- Section Header: This type of layout is used when you want to separate the major topics from other topics.
- Two Content: It consists of 3 placeholders one is for the title and the other is for content
- Comparison: As the name suggests it is used for making comparisons between different points in a slide.
- Title Only: It consists of only title and heading placeholders for the slides.
- Blank: This is one of the common layouts and it didn’t consist of any placeholders
- Content with Caption: This layout is for making content with captions available
- Picture with Caption: This layout is for describing pictures and images with captions available
How to access Slides Layout for your slides?
To access the slides layout for your slide follow the following steps:
Step 1: Open Microsoft PowerPoint.

Step 2: Now go to the Home and then click on the layout option and you will get a list of predefined layouts. Now choose one of them according to your requirement.

For example, here, we have selected a comparison layout so we will get the following output:


Please Login to comment...
Similar reads.
- Algo-Geek 2021
- School Learning
- School Programming
Improve your Coding Skills with Practice
What kind of Experience do you want to share?
Lesson Plan
June 17, 2024, 6:05 a.m.
Lesson plan: History of Juneteenth and why it became a national holiday

A Juneteenth celebration in Richmond, Virginia, 1905. Library of Congress
This lesson was originally published on June 16, 2021, and was updated on June 16, 2024.
For a Google version of this lesson plan, click here . (Note: you will need to make a copy of the document to edit it).
In this lesson, students will explore and discuss the history and context around the Juneteenth holiday in the United States. Topics explored will include the history of racial injustice in the U.S., the Civil War and the limitations of the Emancipation Proclamation. Additionally, students will be encouraged to explore the modern significance of Juneteenth and its long-term impact.
Estimated time
One 50-60 minute class period
Grade Level
Grades 6-12
On June 15, 2021, the Senate unanimously approved a bill approving June 19 as a federal holiday for “Juneteenth National Independence Day.” The House passed the bill one day later. Still, many Americans are still unaware of the history and significance of June 19.
On Jan. 1, 1863, President Abraham Lincoln issued the Emancipation Proclamation declaring “that all persons held as slaves” in the Confederacy “shall be free.” While this may have freed some enslaved people on paper, the reality was much more complicated.

Source: PBS NewsHour via Associated Press
For instance, the Emancipation Proclamation only freed those slaves held under the Confederacy, not in border states loyal to the Union, including Kentucky, West Virginia and Delaware, where slavery was still legal after the Emancipation Proclamation. In fact, slavery was still legal in Kentucky until Dec. 1865, when the 13th Amendment was passed, though Kentucky voted against ratifying the amendment.
Confederate states and slaveholders also resisted emancipation, and many people remained enslaved in Confederate states after the proclamation, even as many enslaved people fought for their freedom or escaped behind Union lines. On June 19, 1865, Major General Gordon Granger of the Union issued an order in Galveston, Texas, alerting all enslaved persons that they were legally free.
At this point in 1865, Texas was the westernmost state in America and one of the last Confederate states to be occupied by the Union. Many slaveholders had fled Union advances in other parts of the South to Texas, along with the people they had enslaved.
While it took time for the logistics of “freeing” enslaved people to come into effect, the importance of June 19, or “Juneteenth” lived on. Considering how complicated emancipation was, many dates were considered for holding celebrations of emancipation, but over 150 years later, June 19 remains.
What originally was a holiday mainly observed by Texans has grown to be recognized all over the country. Each year on “Juneteenth,” (or more formally Juneteenth National Freedom Day), communities all around the United States gather and celebrate and reflect on the history of slavery and struggle for civil rights and equality, including the work that still remains after conditional advances such as the Emancipation Proclamation.
Warm up activity
As a class, watch the BrainPop video (8 minutes) below found here introducing Juneteenth. While watching the video, answer the following discussion questions.

Source: BrainPop
Discussion questions:
- What is “Juneteenth”? What does it celebrate?
- Why did it take so long for enslaved peoples in Texas to finally be free? What obstacles existed?
- What were some of the forms of discrimination against newly freed people mentioned in the video?
- What is the Great Migration?
- How did Juneteenth become a national, not just regional, celebration?
After watching the video, separate into groups of 3-4 to discuss the focus questions (5 minutes).
Main activities:
- Why was June 19th chosen as the date to celebrate the freedom of all Americans? What were some of the drawbacks to other dates? Can you make an argument for why you think a different date might have been better and/or worse?
- Gates describes several reasons why Juneteenth struggled to be remembered at times, and why it was able to endure. Compare and contrast what the BrainPop video included as reasons why Juneteenth struggled and endured with what Gate’s emphasizes. What do you think were the most important factors in Juneteenth’s momentum and remembrance continuing?
- “When did they start recognizing Juneteenth, if at all?”
- “What was the process of Juneteenth becoming a holiday in my state?”
- If Juneteenth isn’t recognized in your state, see if you can answer, “Why is Juneteenth not recognized?”
- This search engine for state and local government websites
- The Library of Congress
Additional activities
- Brainstorm or plan a Juneteenth celebration activity. This can be decorating a common area, bringing in a relevant local speaker or planning a refreshment break for your school. Juneteenth celebrations can be in the home, at school or in community locations. For more inspiration see these resources:
- “ How to Celebrate ” from Juneteenth.com
- See how others are celebrating Juneteenth on Twitter .
- Some activists feel ambivalent about Juneteenth becoming a national holiday, or reject the idea. To learn more about the nuances surrounding making Juneteenth a federal holiday, watch this NewsHour interview with Dr. Mark Anthony Neal recorded in 2020 amid the George Floyd protests.
- The day now known as Juneteenth was formally recognized as a national holiday in 2021, due in large part to the activism of retired teacher Opal Lee. Learn more about Lee's activism and the message of Juneteenth in this NewsHour interview with Opal Lee.
If classrooms finish and plan a celebratory activity, please share your ideas with us on social media @NewsHourEXTRA on Twitter.
This lesson was written by Cecilia Curran, NewsHour Classroom intern, while she was a rising sophomore at Amherst College. This lesson was edited by NewsHour Classroom's education producer and former history teacher Vic Pasquantonio.
Fill out this form to share your thoughts on Classroom’s resources. Sign up for NewsHour Classroom’s ready-to-go Daily News Lessons delivered to your inbox each morning.
Recent Lesson Plans

Lesson Plan: Political Parties: Two is Company, Three’s a Crowd
The Founders did not intend to create a two-party system and yet that is exactly what has thrived in American history. But what about the role of third-party candidates?

Lesson Plan: Using robotics to support rural communities
A short project-based lesson that weaves arts & sciences together

Lesson plan: Watergate and the limits of presidential power
On August 9, 1974, President Richard M. Nixon resigned from the Oval Office. Use this resource to teach young people about this period in U.S. history.

How2Internet: Use media literacy skills to navigate the misinformation highway
Learn to produce a fact-check video using media literacy skills
- government-civics
- social-studies
- social-issues
- news-media-literacy
- lesson plan
SUPPORTED BY VIEWERS LIKE YOU. ADDITIONAL SUPPORT PROVIDED BY:
Copyright © 2023 NewsHour Production LLC. All Rights Reserved
Illustrations by Annamaria Ward
COMMENTS
To access the different view modes in PowerPoint, you have to click on the 'View' tab in the ribbon. The 2-step process is described below. Step-1: Click on the 'View' tab. At first, select the 'View' tab, which is the second to last tab in the ribbon section of your PowerPoint Window. Step-2: Select your preferred 'View Mode'.
1. PowerPoint Normal view: This is the view that your presentation opens up in as soon as you create a new presentation. The advantage of this view is that in this view, editing the slides is very easy. Adding pictures, formatting data, adding tables and graphs, etc., are some other tasks that are available in this view.
Views for creating your presentation Normal view. You can get to Normal view from the task bar at the bottom of the slide window, or from the View tab on the ribbon.. Normal view is the editing mode where you'll work most frequently to create your slides. Below, Normal view displays slide thumbnails on the left, a large window showing the current slide, and a section below the current slide ...
Presentation views are different ways of displaying a PowerPoint presentation on your computer screen or a projector. They allow you to edit, rehearse, and p...
Use Slide Sorter view to delete or rearrange your slides by dragging them to new positions. Add effects, such as transitions and sounds, to several slides at the same time in Slide Sorter view. And, add sections to organize your slides. If you are collaborating with colleagues on a presentation, assign each collaborator a section.
In PowerPoint you can work with presentations in five different views: Slide. Outline. Slide Sorter. Notes Page. Slide Show. Each view is optimized for a specific purpose. (In the lower left-hand corner of the images below, notice how the view icons change for each view.
To change views, find the View button on PowerPoint's ribbon and click on it. Then, find the section on the left labeled Presentation Views. This tutorial will walk you through each of these views and how you can use them. Click on the Views tab on the PowerPoint ribbon to find the option to change presentation views.
Presentation Views in Powerpoint 2010. PowerPoint supports multiple views to allow users to gain the maximum from the features available in the program. Each view supports a different set of functions and is designed accordingly. PowerPoint views can be accessed from two locations. Views can be accessed quickly from the bottom bar just to the ...
Exercise files. Download the 'before' and 'after' PowerPoint presentations from the video tutorial and try the lesson yourself. Exploring PowerPoint's Views.pptx. 1.1 MB Exploring PowerPoint's Views - Solution.pptx. 1.1 MB. The different PowerPoint views allow you to work on different parts of your presentation such as slides, slide ...
You then click on any of the buttons in the Presentation Views and Master Views groups. All views are explained in more detail in separate, linked pages. Figure 1: View tab of the Ribbon. PowerPoint 365 views, accessible from the View tab of the Ribbon are: Normal view; Outline view; Slide Sorter view;
To see the full course that this video came from, go here: ️https://www.simonsezit.com/courses/microsoft/powerpoint-2021-online-course/In this Microsoft Pow...
The third view is the Reading View. This view allows an inpidual to view the presentation in a window with simple controls that make the presentation easy to review on the computer. The fourth view is the Slide Show View. This view is used to deliver the presentation to an audience. With this view, you can see the slide transitions and timing.
Views to Navigate. PowerPoint has a number of different views to work with when working on your presentation. Each view represents one way to look at your presentation, and each provides different ...
It offers up to four different views to help users create presentations: Normal, Slide Sorter, Notes Page, and Slide Show. Normal view is the default view and is the most commonly used. It offers a blank canvas for you to create your presentation, with a toolbar at the top and side menus on the left.
Select the Use Presenter View checkbox. Select which monitor to display Presenter View on. Select From Beginning or press F5. In Presenter View, you can: See your current slide, next slide, and speaker notes. Select the arrows next to the slide number to go between slides. Select the pause button or reset button to pause or reset the slide ...
To be in Slide view you click on the following button located in the bottom-left hand corner of any slide: ( ). The Slide view shows a single slide. In Slide view, you work on one slide at at time. Here, you can type your slide title and body, add other text to the slide, draw shapes, add clip art, choose a color scheme, make a graph, etc.
To change to Slides View or Outline view, click the corresponding tab at the top of the left side panel: To change to any of the other PowerPoint view, use the small toolbar at the bottom: Here is an explanation of how you should use the different views: This is a great place to view the slides in your presentation as thumbnail-sized images ...
Views can be access quickly from the bottom bar just to the left of the zoom settings. Views can also be access from the Presentation Views section in the View ribbon. Here is a short description of the various views and their features. Normal View. This is the default view in PowerPoint and this is primarily used to create and edit slides.
Start presenting. On the Slide Show tab, in the Start Slide Show group, select From Beginning. Now, if you are working with PowerPoint on a single monitor and you want to display Presenter view, in Slide Show view, on the control bar at the bottom left, select , and then Show Presenter View.
Normal View. The Normal View is the preferred presentation view in case you want to create and edit your slide. Slide Sorter View. The Slide Sorter View is ideal if you want to see the thumbnails of all your slide decks. It lets you to easily re-order them. Notes Page View. The Notes Page View is ideal if you want to view your speaker notes ...
1. Normal view: - Normal view displays there panes -the outline pane, the slide pane and the notes pane. The three panes allow you to work on all aspects of the presentation in one place. 2. Outline view: - It is easy to rearrange the individual line items while in outline view and we can collapse items in this view that you can see just ...
Viewing Slides. Once you create the presentation you can view it in different ways. Select the View tab. Locate the Presentation Views group. It displays four options to view presentations; Normal View, Slide Sorter View, Slide Show View and Notes Page View. Normal View: The normal view appears by default when we open the PowerPoint window.
How to apply slide sorter view? To apply a sorter view on the current presentation follows the following steps: Step 1: Open Microsoft PowerPoint and then create slides. Step 2: Go to the View and choose slide sorter from the presentation view and you will get the following result. Slide Layouts. Slide Layout shows all the available layouts for your slide containing placeholder boxes, various ...
Explore the significance of Juneteenth and the value of making it a national holiday