

What are the steps to the scientific method? (Plus, a free worksheet!)
Krystal DeVille
Updated on: October 29, 2020

The scientific method is a 6 step method scientists use to conduct experiments and learn about the world around them.
It is essentially a framework on how to ask a question and then answer it.
We all make observations and ask questions about the world around us. Then, we make a guess (or hypothesis) about what we think the answer is. The scientific method is the process to determine if your hypothesis is correct.
Whether you are making slime at home, growing seeds, or conducting a much more elaborate experiment, you can use this free scientific method worksheet to guide your process!
Table of Contents
Download the Free Scientific Method Worksheet
Implementing the scientific method in your at home & fun science experiments, is a great way to reinforce logic and problem solving skills.
There are 6 steps to the scientific method, plus one feedback step:
- Make an Observation
- Ask a Question
- Form a Hypothesis
- Test Your Hypothesis
- Observe Results
- Form Conclusion
The “7th” step to the scientific method is the feedback step, where you make an iteration or ask a new question to test. This step loops back to the first step of your next experiment
Now, let’s dive into each step of the scientific method with an example!
In this example, we’ll walk through the scientific method in an experiment where you’re testing how seeds may grow in different types of soil.
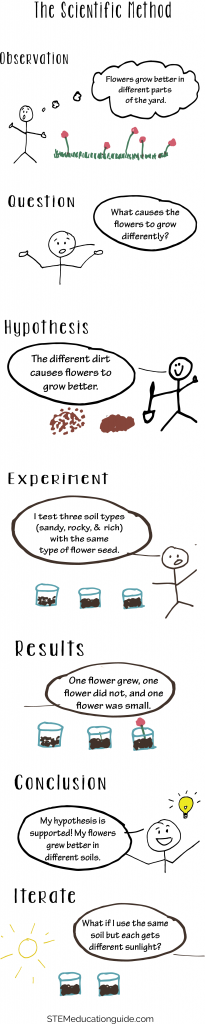
Step 1: Make an Observation
We all notice things occurring around us! This first step of starting your experiment.

In this example, you notice that the flowers are growing differently around the yard. In some parts of the yard, the flowers are already blossoming! While in other parts, they’re still struggling to grow.
This is also when you may do some initial research. You notice they get different amounts of sunlight and that one area of your yard is much rockier. In this step, record your observations and research.
Step 2: Ask a Question

Next, ask your question.
In this experiment, we’re trying to understand why the flowers grow at different rates around the yard. Why are some big and others small?
Step 3: Form a Hypothesis

In the next step, you create your hypothesis. A hypothesis is an assumption or idea that you can test in an experiment or study.
It’s important to emphasize that the hypothesis is something you can test.
When creating your hypothesis, use your research and observations to form your assumption.
In this example, you had observed that the soil was very different across the yard. In some places it was very sandy, other places very rocky. You form your hypothesis off this assumption that different soils cause the flowers to grow better.
Step 4: Experiment

Next, it’s time for your experiment! Use the free worksheet to list each step of your experiment and the materials that you need.
The experiment should be focused on either concluding your hypothesis is true, or it is not.
In this experiment, we decide to fill jars with 3 different types of soil samples collected around the yard. In each jar, we place a seed and then set them in the same place and water them at the same time every day.
For older students, during the experimental step, you can also list your controlled variables. What needs to stay constant in order to test your hypothesis?
In this experiment, water, sun, and the type of seed are our controlled (or constant variables. The dirt is our independent variable – the thing that we are testing.
You can download this great worksheet too on understanding the different variables in a science experiment!
Step 5: Results

Next, observe and record your results.
In our experiment, we watched the flowers grow and recorded how each flower grew different day to day.
We may want to note which flower sprouted first, which one bloomed first, and which one lived longest.
We make notes about all of our observations and results in our worksheet or notebook.
Step 6: Conclusion

Lastly, use your results and observations to determine if your hypothesis was supported.
A conclusion should center around your hypothesis. Was your hypothesis supported or not supported?
And remember to explain that a wrong hypothesis is not a bad experiment .
It’s important to teach about and avoid research bias. An experiment is about testing a hypothesis, not proving it. An experiment that shows that a hypothesis is not true is just as good as the one that shows a hypothesis is correct!
Step 7: Iterate (Feedback Step)
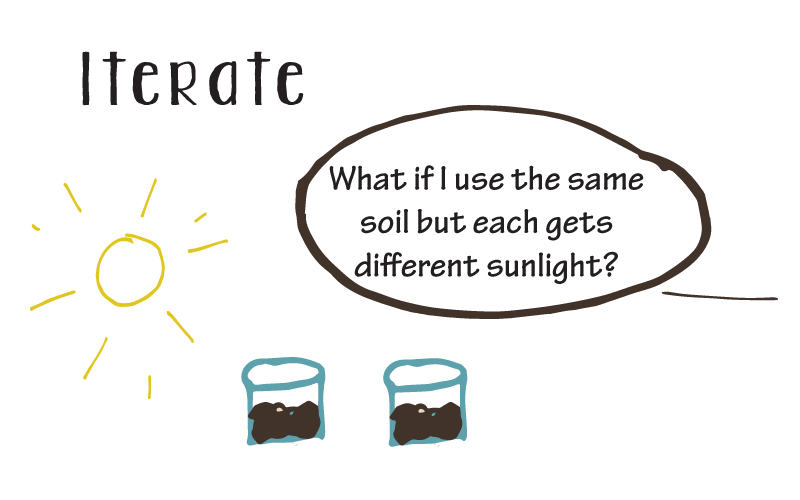
Testing your first hypothesis doesn’t mean your experiment is over!
During your experiment, you may make other observations or want to test other variables. The last step is your feedback step, where you iterate or repeat.
This loops back into the first steps of a new experiment where you make an observation and ask a question, and then start a new experiment using the steps of the scientific method.
Feel free to save or Pin our full example of the scientific method:
History of the Scientific Method
Historically speaking, no specific person can be credited with designing the Scientific Method as we know it today. There isn’t even an “Ultimate Scientific Method” that is the best and most tried system.
Every scientific process works well as long as it starts with curiosity, can be tested through an experiment, and leads to a conclusive observation. It stands as a logical, rational, and problem-solving type of method applicable to a multitude of fields.
That’s not always the fun answer, so let’s take a second to credit those that did historically advance the Scientific Method. The Scientific Method has a rich history that has progressed and evolved from geniuses such as Aristotle, Al-Biruni, and Isaac Newton.
Science was traditionally categorized into an overarching branch mixed with Philosophy and Technology. It wasn’t until the Scientific Revolution that it became its own independent field of study.
The Scientific Revolution started in the 1500s and made immaculate breakthroughs to develop the emergence of modern science.
With the monumental advancements from Enlightenment scientists such as Galileo Galilei, Francis Bacon, and Rene Descartes in changing variables and recording their process.
The scientific method made great gains in the 16th century and 17th centuries. Even then, the “Scientific Method” as a term did not gain much headway until the 20th century, but the design itself was put into words for future generations to expand on.
Wrapping Up Scientific Method
Regardless of the experiment – and countless others to use, some even on this very same website – the importance of the Scientific Method for kids is limitless. When using this structure, you provide your child with the foundation of a logical and rational way to solve any problem.
Science doesn’t always require using safety goggles or a microscope; it can be utilized with anything. If you’re curious and have a question, then apply this method!
Tell you what, how about you use this as an experiment in and of itself. See if your child or children enjoy using the Scientific Method to conduct their own experiments.
Make a hypothesis: Will they enjoy it or not? When you come to the conclusion that they love it and are only benefiting from it, then share those thoughts here with us! Until then, have fun experimenting!
1 thought on “What are the steps to the scientific method? (Plus, a free worksheet!)”
I find your concepts and worksheets relevant to my teaching with respect to STEM education.
Leave a Comment Cancel reply
Save my name, email, and website in this browser for the next time I comment.
most recent

Activities and Games , Toy Gift Guides
Best stem subscription boxes for kids: hands-on reviews.

Engineering , Math , Science , Technology
How to use ai for teachers: enhancing classroom learning.

Product Reviews , Toy Gift Guides
14 best stem toys for 9 to 10- year-olds.

Science , Engineering , Math , Technology
Show appreciation: what to include in a teacher’s card.

Laser Engraving , Activities and Games , Art Projects
Laser etching vs. 3d printing: a kid-friendly guide.

Movies That Inspire Kids to Pursue Their Passions in the Arts

News and Trending
The impact of hands-on learning on stem education outcomes.
STEM Education Guide
[email protected] STEM Education Guide 9125 SVL BOX Victorville, CA 92395
Your Compass for STEM Discovery
© 2024 STEM Education Guide
Scientific Method
Scientific Method introduces students to the basic steps of this useful process. Students will learn how to develop a hypothesis based on their observations about something and conduct a simple experiment to test it.
The “Options for Lesson” section on the classroom procedure page lists some additional suggestions you might want to add to your lesson. One such option is to spend extra time discussing the concept of variables in experiments. Another suggestion is to allow students to come up with their own experiments to present to the class on an “Experiment Day.”
Description
Additional information, what our scientific method lesson plan includes.
Lesson Objectives and Overview: Scientific Method teaches students how scientists use this process to conduct experiments. Students will learn how to define and explain this method and use it in a simple experiment. They will understand each step and be able to follow them correctly. This lesson is for students in 3rd grade and 4th grade.
Classroom Procedure
Every lesson plan provides you with a classroom procedure page that outlines a step-by-step guide to follow. You do not have to follow the guide exactly. The guide helps you organize the lesson and details when to hand out worksheets. It also lists information in the yellow box that you might find useful. You will find the lesson objectives, state standards, and number of class sessions the lesson should take to complete in this area. In addition, it describes the supplies you will need as well as what and how you need to prepare beforehand. For this lesson, you will need to supply one penny, one dime, one nickel, a ruler, a water dropper, a cup of water, and paper towels for each group of students. You will need to prepare beforehand to know how many of each item you need to get. You are also more than welcome to adjust the activity and have students use different objects, or even different coins.
Options for Lesson
There is a number of suggestions in the “Options for Lesson” section of the classroom procedure page that you might want to consider adding to the lesson. One such suggestion is to have each group of students experiment with a single coin and compare with other groups. Alternatively, you could have them look at more than the three coins you provided. Another options is to discuss variables and the two types that apply to experiments. You could also use the practice page as a homework assignment or the homework as a practice. One final suggestion is to plan an “Experiment Day.” Have students come up with an experiment and hypothesis and then present their work to the class.
Teacher Notes
On the teacher notes page, you will find a paragraph of additional information. It will provide a little extra guidance and thoughts on the material. This lesson, for instance, will outline the scientific method as having four steps with a few sub-steps. You can use the space on the page to write any notes you have before you present the lesson to your class. Or, if you have some ideas on other activities to use or ways you might adjust the lesson, this is a good place to write them down.
SCIENTIFIC METHOD LESSON PLAN CONTENT PAGES
Introduction and background knowledge.
The Scientific Method lesson plan contains two pages of content. To teach students about this process, the pages outline each step using an overarching example about spiders and spider webs. The first page describes the process and explains how to use this process to find answers to questions. It starts off asking students if they have ever needed to solve a problem at home. Perhaps a video game stopped working or started acting strangely. Depending on the problem, maybe they were able to fix it, or they realized that they had to get a new game.
The lesson describes that this process of identifying a problem, guessing how to solve it, and seeing the results is the scientific method in action. This process is not just for scientists in a laboratory, and it’s not just to solve problems within the field of science. The scientific method is a process that students can apply to just about any problem that deals with any topic. Students will discover that the purpose of this process is simply to prove or disprove a theory about why something happens or how to solve a problem. The lesson plan divides the process into four steps: observation, hypothesis, experiment, and conclusion.
Students might enjoy learning how one scientist’s observation of melting chocolate led to the invention of the microwave. You might want to have students research this scientist to learn more about how he used the scientific method to test his theory.
First Two Steps of the Scientific Method
Students will learn about observing and creating a hypothesis (making a guess) based on what they observed. They may not already know this, but observing is not just an action for the eyes. In fact, students may learn that, depending on what they want to observe, they will need an entirely different sense. They may need to listen, taste, smell, or touch something in order to observe it the way they need to. Sometimes, they may even need to use more than one of the five senses. Scientists observe things so that they can study, learn about, or identify an event or object. Regarding the spider web example, the scientist observes the pattern, size, and texture of the web. This observation requires both sight and touch.
Students will next discover what a hypothesis is, which is an educated guess or theory that might explain an event that someone observed. Usually, it is a statement that answers a specific question. It requires three things: it must explain the observation, be testable by others, and produce the same results when repeated. In the example, the scientist asks the question, do big spiders build stronger webs? The hypothesis: if a spider is larger, then it will create a stronger web.
Last Two Steps of the Scientific Method
Next, students will learn about setting up an experiment to test their theory. The experiment will either prove or disprove the hypothesis. In other words, they will be able to see whether their guess was true or false. With the scientific method, the experiment should only test a single variable. That variable must be something that can change. In addition, the experiment must be repeatable. If another scientists cannot repeat the exact same test, then the experiment needs to change. The example shares that the scientist tests the strength of various spiders’ webs. He measures the spiders’ sizes and use the same method to test the web strength for each one. Then he compares the spiders’ sizes to their webs’ strength.
Finally, students will analyze the data they collect to see if they were right or wrong. This is the conclusion step of the scientific method. During this step, scientists gather all the data from the experiment and analyze it to discover the answer to their question. If the hypothesis is correct, then they can use their statement to answer the question. If not, they must come up with a new guess or theory and perform another test. For the example, the scientist gathers his data. If he finds that larger spiders do, in fact, build stronger webs, then that is his conclusion. Otherwise, his new hypothesis might be that the size of a spider does not affect the strength of its web.
SCIENTIFIC METHOD LESSON PLAN WORKSHEETS
The scientific method lesson plan includes three worksheets: an activity worksheet, a practice worksheet, and a homework assignment. (The “Options for Lesson” section of the classroom procedure page suggests the possibility of switching the latter two if you want.) Each worksheet helps gauge students’ grasp of the material. The activity will especially help them practice the scientific method in a hands-on way. The guidelines on the classroom procedure page outlines when to distribute each handout.
COIN TEST ACTIVITY WORKSHEET
The activity requires students to compare a penny, nickel, and dime in relation to how many drops of water each can hold. Students will first write some things they observe about each coin. Then they will write a hypothesis as to how many drops each coin can hold, but they won’t just write a number. Following the steps of the scientific method, students will then test their theories and record the data. At the end, they will conclude whether or not they were correct and explain what they found.
MATCH THE STEP PRACTICE WORKSHEET
For the practice worksheet, students will review 20 descriptions. There are four words in the word bank: observation (O), hypothesis (H), experiment (E), and conclusion (C). Students will mark the statements with the letter they represent.
SCIENTIFIC METHOD HOMEWORK ASSIGNMENT
There are two parts to the homework worksheet. First, students will answer six questions that are multiple choice. For the second section, they will read 12 sentences. They must determine which step of the scientific method the sentence corresponds to.
Worksheet Answer Keys
The last couple pages of the lesson plan provide answer keys all three worksheets. On the activity worksheet, it is possible that there will be some slight variation with the figures for the coin measurements. However, they should be fairly close if not exactly the same. The answer key provides a sample hypothesis to test for the sake of the rest of the activity, which will vary from group to group. The practice worksheet lists the correct answers in red. The same is true for the homework answer key. It highlights the correct multiple choice answer for that section and marks in red the correct terms for the second section.
Thank you for submitting a review!
Your input is very much appreciated. Share it with your friends so they can enjoy it too!
Great site for teachers
Awesome site! Easy to use and great prices!!! Thank you Learn Bright
scientific method
It was a great way to introduce the scientific method to my students
I was very pleased with the lesson plan on the scientific method. There were some changes made in the middle of the school year, and I ended up teaching science to 4 and 5 grade. The other teacher had only taught with videos, and I wanted to start my teaching off with a fun, hands-on experiment. It was a huge success and now my kids are excited to come to Science class!
Very useful
I used this lesson as an introduction to the scientific method with 3rd and 4th graders and it went very well. The worksheets were clear and easy for the children to follow.
Related products

Careers: Civil Engineer

Lewis and Clark Expedition

Meriwether Lewis and William Clark

Careers: Robotics Technician
Make your life easier with our lesson plans, stay up-to-date with new lessons.
- Lesson Plans
- For Teachers
© 2024 Learn Bright. All rights reserved. Terms and Conditions. Privacy Policy.
- Sign Up for Free
- Grades 6-12
- School Leaders
Free printable Mother's Day questionnaire 💐!
Grab Your Free Scientific Method Worksheet Printable
Supercharge scientific inquiry.

Perfect for teachers who want to nurture critical thinking skills, this free printable helps students understand and apply the scientific method . Whether conducting a mind-blowing biology experiment, exploring the power of chemical reactions, or unraveling the mysteries of physics, this scientific method worksheet guides students through the systematic process of questioning, researching, hypothesizing, experimenting, analyzing, and sharing. Grab this worksheet now and use it throughout the year to help transform your students into budding scientists!

What’s included?
This worksheet includes space for students to fill in every step of the scientific inquiry process. Plus it has prompts to ensure they stay on track. Designed with convenience in mind, this free scientific method worksheet is not just a helpful tool for students, it’s also a time-saver for busy teachers.
Its simple format and clear instructions make it easy to use in the classroom. Whether you’re planning a onetime experiment or a series of investigations, you’ll use this worksheet time and time again throughout the school year. It’s flexible enough to adapt to various grade levels and scientific topics. And it’s sure to become your go-to resource for all your engaging and interactive science lessons.
Ready to save and print your free scientific method worksheet?
Don’t miss out on this opportunity to simplify your science prep work and watch your students thrive in their scientific explorations! Just click the button to fill out the form at the top of this page.
Yes, I Want My Printable Worksheet!
You Might Also Like
Free Posters To Teach Students About the Scientific Method
Question, research, hypothesize, experiment, analyze, share. Continue Reading
Copyright © 2024. All rights reserved. 5335 Gate Parkway, Jacksonville, FL 32256
Email Newsletter
Receive free lesson plans, printables, and worksheets by email:
Scientific Method Worksheets
All savvy scientists conduct experiments using the scientific method. This method allows for different observations to take place in order to prove one's theory in regards to the nature of science. It is important that students understand that they must investigate their theory by testing out their hypothesis. Untested theories have no substance in the real world.
We offer a wide variety of worksheets dedicated to helping students learn all about the scientific method. Once they understand how this truth seeking method works, then you can incorporate experiments into your lesson. We have tons of exciting science experiments for you and your class to test out. They are interesting, fun, and surely a crowd pleaser.
The Scientific Method is a series of techniques used to examine phenomena. This methodology date back to third century BC The primary goal for the use of Scientific Method is in truth seeking. We provide students with a series of worksheets below to introduce them to the basic process.
- Adjectives to Describe a Problem - Write an adjective on each line to describe a problem.
- Adjectives to Describe an Hypothesis
- Adjectives to Describe a Well Written Conclusion
- Influential Scientists Worksheets
- Scientific Method Outline
- Science Rubric Makers
- Steps of the Scientific Method - Can make for a nice class poster or the front of a binder for students.
- Lesson Plans
- Teacher Resources
Printable Science Labs That Use and Apply the Scientific Method
- Battle of the Spheres
- Cool Down, It's Just Water!
- It's Just a Phase They're Going Through!
- Jelly Bean Graph
- Jelly Bean Record Page
- Jelly Bean Sort
- Introduction to Populations
- It's Coming To Me!
- Now that's Phun!
- Now that's using your head!
- One, Two, Three Isaac Newton and Me!
- Time to lend NASA a hand
- The Biochemical Guessing Game!
- The Dissolution Solution!!
- What's going on here?
- Who needs Bell Atlantic?
- WOW, That's Hot and Cold!
What Is the Scientific Method?
The scientific method is a simple way of researching. Everyone can use this method to prove something they think is true. Scientists use this method when they are studying different things in the world. Learning about the scientific method is essential so you can find the answers you want to a question. You need a lot of information to use the scientific form! This information is called data.
Scientific Method Steps
There are 7 steps of the scientific method. We will take a really deep dive into this later on, but for a brief overview: The first thing that researchers do is that they gather a lot of information about a topic. For example, a scientist studying one plant will collect a lot of information about it. Then they will look for a reason to explain why the plant does a particular thing. The reason is called a hypothesis. The hypothesis is not enough. To convince people that their answer is the right one, they have to experiment. The experiment will try to prove the hypothesis. The results of the experiment will be collected and presented. These results will show if it was correct or not. Everyone can use it at home to prove a hypothesis.
Look Around You and Observe
The first step is to look around your house. Can you see anything interesting happening? For example, notice how it turns dark outside at night.
Think of a Question
Suppose you noticed that it turns dark outside at night. You now have a question that you formed from this observation: why does it turn dark at night?
Predict an Answer
Based on your observations, you can predict an answer. For example, it turns dark at night because there is no sun to light up the sky. This is your hypothesis. You will now have to prove that it’s true. Otherwise, how will people believe you?
Experiment to Find Out
Now you have a hypothesis so you can experiment. An experiment has to be perfect, so it is accurate. Make sure that there is at least one constant in your experiment. For example, you can check whether or not the sun is up. Make sure you check at two fixed times in the daytime and at night. This way, you can observe the effect of the sun on the darkness of the sky.
Write Down the Results
You will have to record whatever results you find. Note down anything else you see as well. These results will show you if your hypothesis is correct.
Did You Predict Correctly?
After gathering results, you can write down all the results to see if they make sense. If you predicted that the sun would make the sky bright, the results would show that it was sunny in the daytime when the sun was out, but it was dark in the nighttime when the sun was gone.
Where Did the Scientific Method Come From?
Many scientists have contributed to the scientific method. Some famous scientists like Isaac Newton also wrote a lot about it. They wanted people to know they could use this method when studying science. We know so many things today because scientists proved them with the scientific method. For example, how would we know about gravity if Isaac Newton didn’t drop an apple and a feather?
Simple Experiments to Try at Home
There are simple ways to carry out experiments in your house. Here are some of them.
Soda and Vinegar
For this experiment, you can pour soda and vinegar into a glass. Put some resins inside the glass. Watch how the resins move fast. Why are they moving like this?
Glitter and Soap
Fill up a tray with water. Squeeze some dish soap into the tray. Now pour glitter into the same try. Does the soap make the glitter float? If it does, then how is it that soap can help remove glitter from surfaces?
Draw a stick figure on a tray. Use an erasable board marker to draw the figure. Now fill the tray with water. Notice how the figure floats. Why does this happen? What does it prove about how easily erasable dry markers can be peeled away.
This is a simple experiment. You may have crushed many soda cans before throwing them in the trash. Have you ever wondered why empty soda cans can easily be crushed? What if you could destroy the can without squeezing it with your hands? Try placing the soda can in the water. Water puts a lot of pressure on the objects inside it. Observe how the soda can behave now.
Chalk from Eggshells
Did you know that you can make your chalk? This is because chalk and eggshells are made from the same material. Add food coloring to crushed shells and try drawing with them. What did you learn from this observation?
Why Is It Important?
It is essential for kids to understand the scientific method. It is where all the discoveries of science come from. It is also the accepted method for scientists and researchers to conduct research and solve issues. It is also useful because it helps us see different patterns in our surroundings and figure out why things happen.
Once you learn about the scientific method, you can easily prove any theory you have. If you think that more than 10 bees like to come near flowers in a day, you can watch and count the number of bees that come near a sunflower in your garden. If they are 10, then you’ll know that your theory is right.
What Are the 7 Steps of the Scientific Method?
Scientists and researchers use the scientific method to establish facts through experimentation and testing objectively. The scientific methods involve making observations, forming a hypothesis, making predictions, conducting experiments, and analyzing.
There are seven steps in the scientific method. Let us look at each of these steps in detail, but first, it is essential to understand what the scientific method is and why it is so crucial in research. Read on to find out!
What Is It and Why Is It So Important?
What makes the scientific methods so important is that it aids in the process of experimentation by providing an objective and standardized approach to it. Hence, this scientific method ultimately improves the quality of the experiments and enhances the accuracy of the results.
The scientific method ensures that the scientists or researchers are not influenced by personal or preconceived notions that can impact the study results, causing bias and inaccuracy. Using a standardized approach helps people stick to the facts and reduces their reliance on opinions.
The scientific method teaches you to assess and carefully go over all the evidence before making a statement, which is vital in science. It also trains the brain to examine and process information logically. It teaches one to be more observant, test all the facts, and make relevant connections and inferences.
The benefits of the scientific method go beyond science and research.
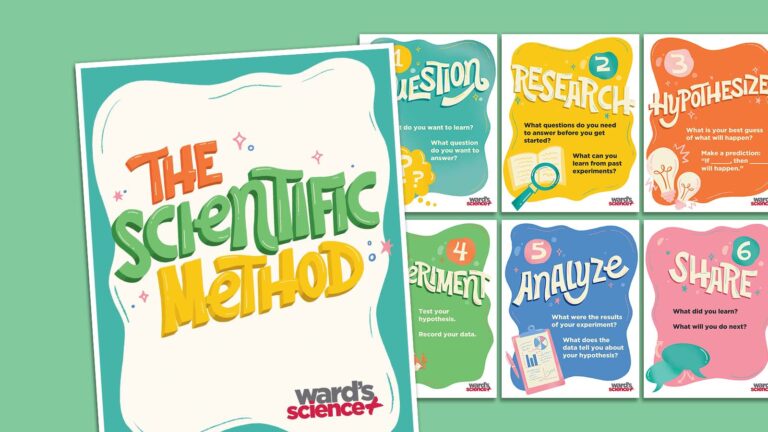
The Seven Steps - Here are the seven steps of the scientific method that you should know about:
1. Ask a Question
The first step the defining and asking the question you want an answer to. You must ensure that your question is measurable in terms of experimentation. For example, it is quite likely for most results to be measured in numerical terms. Although it is relatively more challenging to measure behavioral results, they are also a part of the scientific method.
The question you ask could start with How, What, When, Who, Which, Why, or Where?
For example, if you want to carry out an experiment about the relationship between technology and student grades and performance, your question could be as follows:
Does technology directly or indirectly impact student performance in terms of academics?
This is an example of the research question, and the following steps will work toward finding an accurate answer to this question.
2. Perform Background Research
Conducting research is one of the most critical steps of the scientific method. Once you have formulated the research question, you need to conduct preliminary background research to understand what has been said previously about the topics.
Preliminary research will help you solidify your research topics by narrowing down your study or broadening it. At this point, you may want to narrow down your search. So, instead of assessing the impact of technology on student performance, you may want to base your study on the effects of mobile phones on student performance or student grades.
Depending on the type of research question, you can find relevant information in the following sources:
- Library resources - Internet - Books and magazines - Research journals - The newspaper - Biographies - Political commentary - Textbooks.
Taking the same example mentioned in the first step, you can review past scientific studies on the impact of mobile phones on students or teenagers.
3. Form or Propose a Hypothesis
The third step of the scientific method is forming a hypothesis. This step involves making an educated guess about how things work. In simpler words, to form a hypothesis means answering the research question in an explanatory manner that can be tested.
In the hypothesis statement, state your hypothesis and the prediction that you will be testing in your research. Keep in mind that your predictions must be easy to measure.
Here is an example of a hypothesis statement:
"If students use their phones excessively, then the students' grades are likely to fall."
4. Conduct an Experiment to Test Your Hypothesis
Now that you have formed your hypothesis statement, it is time to test whether your prediction is accurate. To test your hypothesis, you need to focus on facts and steer clear of your personal opinion and judgments to ensure the accuracy of the test results.
Conducting a fair test involves changing one factor at a time while all other factors remain constant.
Experimentation is an essential part of the scientific method as it is a way to test your predictions quantifiably.
For example, you can study the grades of students who own a cell phone and spend a lot of time on it, or you could look at the grades of students who own a cell phone but don't spend long hours on it.
Another approach could be to look at students' grades who don't own a cell phone. You must also factor in all the information you have gathered through other sources and focus on the relevant facts to your research.
5. Make Relevant Observations
In this step, you must assess your scientific process to ensure that all the conditions remain constant across all measures of experimentation. If you change factors in your experiment, you must keep all other factors constant to maintain fairness.
Once you have completed your experiment, it would be a good idea to run it a few more times to ensure the accuracy of the results.
6. Analyze the Results and Draw Conclusion
You've done all the hard work, and it is now time to assess the findings of your experiments and establish whether or not they support the hypothesis you formed. The process of drawing conclusions means determining whether what you believed to be true actually happened.
7. Present Your Findings
The last step is to compile and communicate the results of your study. Here are some of the forms you can use to present your findings:
- A presentation - A report - A journal
The benefits of the scientific method go beyond science and research and are particularly important for students. We hope this guide was helpful in understanding the seven steps of the scientific method and will come in handy during your next study.
If you're seeing this message, it means we're having trouble loading external resources on our website.
If you're behind a web filter, please make sure that the domains *.kastatic.org and *.kasandbox.org are unblocked.
To log in and use all the features of Khan Academy, please enable JavaScript in your browser.
Biology library
Course: biology library > unit 1, the scientific method.
- Controlled experiments
- The scientific method and experimental design
Introduction
- Make an observation.
- Ask a question.
- Form a hypothesis , or testable explanation.
- Make a prediction based on the hypothesis.
- Test the prediction.
- Iterate: use the results to make new hypotheses or predictions.
Scientific method example: Failure to toast
1. make an observation..
- Observation: the toaster won't toast.
2. Ask a question.
- Question: Why won't my toaster toast?
3. Propose a hypothesis.
- Hypothesis: Maybe the outlet is broken.
4. Make predictions.
- Prediction: If I plug the toaster into a different outlet, then it will toast the bread.
5. Test the predictions.
- Test of prediction: Plug the toaster into a different outlet and try again.
- If the toaster does toast, then the hypothesis is supported—likely correct.
- If the toaster doesn't toast, then the hypothesis is not supported—likely wrong.
Logical possibility
Practical possibility, building a body of evidence, 6. iterate..
- Iteration time!
- If the hypothesis was supported, we might do additional tests to confirm it, or revise it to be more specific. For instance, we might investigate why the outlet is broken.
- If the hypothesis was not supported, we would come up with a new hypothesis. For instance, the next hypothesis might be that there's a broken wire in the toaster.
Want to join the conversation?
- Upvote Button navigates to signup page
- Downvote Button navigates to signup page
- Flag Button navigates to signup page

Scientific Method Worksheets: Free and For All Ages!
Need some scientific method worksheets for your kids?
Wouldn’t hurt if they were free and easy to print?
I got you, Homeschool Mama!
At the bottom of this post you will find 7 Scientific Method Worksheets in a free printable pack! And they can be used for early elementary students to about 7th grade.
They will easily slide into any lesson plan as you teach the scientific method steps!
The 7 Steps Of The Scientific Method

There seem to be several variations out there, but let’s pause and nail down the basics of the scientific method.
Here is a quick review if you need a brush-up:
1. Make An Observation

The first step is to look at the world around you. What do you notice? What interests you? What are you curious about?
Things outside? In the kitchen?
What do you not understand or have questions about? What would you like to know more about?
Example : My mom waters her flowers every day, but she doesn’t water the grass. But the grass and flowers look to be equally healthy.
2. Ask A Question

Work with your young scientists to develop a question from their observations.
Example : Do flowers really need to be watered more than the rain that waters the grass? Is my mom just wasting her time?
****Some science curriculum will teach that you should have a step of research at this point in the scientific method. Feel free to do that with older kids to look up background information and enrich your experiment. Younger kids may feel that this step stifles their curiosity or slows down their science learning energy.
3. Come Up With A Hypothesis (Prediction)
Help your student to make a hypothesis (kids usually love saying this word!) about what they think is the answer to their question.
Depending on the age of the child, tell them it is an educated guess or a prediction.
Example : I predict that the flowers will do just fine without extra water from my mom.
4. Test The Prediction (Do An Experiment!)

Obviously, this is the fun part of science.
Kids get to put the books and pencils aside and start building their own science experiments!
Your students will likely need help with their experimental design. Definitely dig in and help them figure out the best way to test their hypothesis.
For older kids, you might introduce the concepts of independent variables and control group vs. experimental group.
Example : I stop watering the flowers for 1 month while keeping a daily photographic record of the flowers and grass’ health/appearance.
I also keep a data table to monitor rainfall and temperature.
As a control group, I water only one flower regularly as my mother did.
5. Analyze Results

Now that the experiment is over, it’s time to sit down and do some data analysis.
Which is fancy science talk for looking closely at the results of your experiment. Are there any patterns or trends in your data collection?
Did anything unexpected happen? What did the experiment show you?
Example : All my flowers are turning brown, but the grass looks about the same. The charts and pictures during the experiment show me that it only took 3 days to start noticing wilting in the flowers. The flowers perked up after a rain, but they would start to wilt again a few days later. My control flower (that I watered regularly) looks as health as it did on day 1.
6. Compare Results To Your Hypothesis
Look at the results of your experiment and compare them to your prediction.
Was your hypothesis correct or incorrect?
Example : My hypothesis was incorrect. The flowers did not thrive on the same amount of water that the grass gets.
7. Make a Conclusion

At the end of the experiment, you must write out what you can conclude from your experiment. Older kids should be encouraged to follow up with further questions they have from the results of the experiment.
Example : I conclude that the grass in my yard does not need as much water as the flowers.
As a question for further study, I would like to know if this is only true of the type of flowers in my garden. Would other flowers respond the same way? Why do wild flowers seem so healthy without any human help?
7 Free Scientific Method Worksheets!
Now that we’ve brushed up on our knowledge of the scientific method, let’s dive into these worksheets!

This worksheet is actually a colorful poster displaying all the steps of the scientific method for your students!
I recommend printing it on cardstock or laminating it.
It’s the perfect thing to have displayed in your homeschool or science classes.

This is a follow-up student worksheet that matches the above poster.
The boxes help your student hit all of the most important steps as they work through their own experiments – without being too overwhelming.

I love this science worksheet for simple experiments with first grade and 2nd grade students.
Writing out or drawing every detail as they go along, may seem overwhelming.
This style of worksheet is a fun way of bringing the scientific method down to their level!

This worksheet option goes a step further.
It allows young students to walk through the steps of the scientific method by drawing pictures or writing small phrases.
This can be a great way to make science more approachable!

This worksheet is more appropriate for 3rd grade and up.
The steps are still slightly abbreviated, but the child is expected to write out sentences.

This worksheet is perfect for a more detailed and thorough approach.
The student has space for thinking through and writing out their experiment steps.
Science teachers can get a quick overview of how the student is doing.

This last worksheet is clearly for the older student, such as 5th grade and up.
Writing out full sentences and recording their work is more appropriate at this age.
The worksheet still provides the structure of showing each of the steps.
****This sheet does have a space for hypothesis and prediction. I left that for the older students because some lessons do teach them as separate things. The hypothesis is the answer to your question, and the prediction is what you think will happen in the experiment. Using my flower/grass experiment from earlier, let me give you an example. Hypothesis : Flowers do not need more water than grass. Prediction : The flowers and grass will look healthy after 1 month of only rainwater.
Click Here To Download Your Scientific Method Worksheet Packet!
You might be wondering why there wasn’t a “typical” worksheet in this post.
Such as a cut and paste, crossword, or match with an answer key.
The reason is that hands-on activities are the best way to teach the scientific method – not worksheets. Kids will learn science and *remember* it more when they get to DO it.
And as you know, that’s actually true of most things.
I hope these worksheets bless your students and you enjoy exploring the world around you!

Leave a Reply Cancel reply
Your email address will not be published. Required fields are marked *
Home » Worksheets » 9 Best Worksheets For Understanding Scientific Method
9 Best Worksheets For Understanding Scientific Method
The Scientific Method is one of the most critical skills of the curriculum. It is not just something that is used in the science lab. It is a problem-solving tool, employs critical thinking, and teaches your students about processes and procedures that will help them in the real world. It may be in a career as a scientist or even if it is just in the kitchen when they are experimenting with a new dish.
Table of Contents
Things to look for when choosing scientific method worksheets, 9 best scientific method worksheets, where to find them online, free vs paid worksheets, instead, invest in a teach simple membership.
Not all Scientific Method worksheets are made equal – as teachers, we know the internet is jam-packed with excellent (and not-so-excellent) teaching materials. But, after hours of browsing, you may still struggle to find something worthwhile for your students. Fortunately, l teachers are willing to support each other. Websites like Pinterest offer countless ideas, lesson plans, activities, and worksheets – some are free, and some come at a price – but most can help save you time.
But how can you ensure you don’t squander the precious time you’ve saved from researching? And how can you guarantee the quality of the paid resources you choose? Here are some ideas and tips to help you save time and money, ensuring you only select the best.
Kids are curious and want to know about the world around them. If they are taught to experiment using simple materials, it can empower them to discover knowledge for themselves. And in its simple form, it can be used by children as young as kindergarten. The scientific method is a process or method of research. As children learn to create, gather data, evaluate, analyze, and communicate, they can use their newfound critical thinking skills to tackle any problem that comes their way. But keep the following in mind when choosing a worksheet for your students.
Check the worksheet carefully
No matter if you paid for it or got it for free, don’t assume it’s perfect. Worksheets often have spelling mistakes, incorrect info, or elements unsuitable for your school or classroom. The best way to check is to do a practice run yourself.
Make sure the correct vocabulary is used
The scientific method has specific terminology that should be used from the start. Simplified explanations and images for younger kids can be given, but always in conjunction with the correct terms. For example, they should know that making assumptions based on observations is a hypothesis. It’s essential to make sure that all the steps are present too.
Make sure the worksheet is meaningful
There is a lot that separates a quality worksheet from just another piece of paper.
If your worksheet has questions, make sure they require thought and valuable, clearly motivated answers. While level one questions have their place, your questions should incorporate all levels of Bloom’s taxonomy. Basic yes or no questions are not really teaching anyone anything.
It makes space or encourages note taking
Students must learn the value of taking quality notes and writing down observations early on. Either have space for it on your worksheet or have an instruction that tells them to do it in a notebook.
Worksheets are great for flow charts, Venn diagrams, spider diagrams, or any other tool that assists in brainstorming and organization of thoughts.
Teach Simple is your one-stop shop for all your resources. Here are some of their best Scientific Method worksheets and a few other quality resources from around the web.
- Scientific Method Interactive Foldable Booklets By Knowledge Box Central
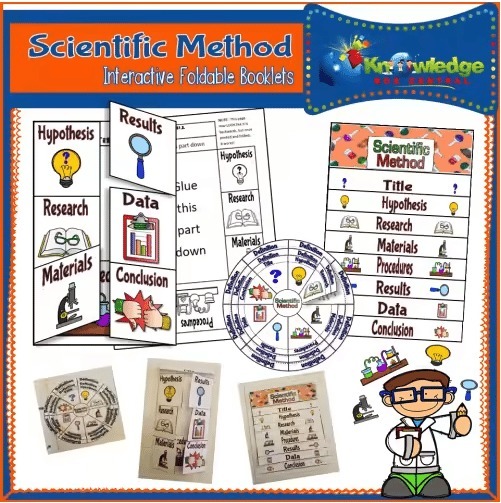
Perfect for all grades, these booklets offer an imaginative way to teach the Scientific Method and make it enjoyable for your students to document the steps while carrying out investigations or experiments.
- Scientific Method Worksheet By Have Fun Teaching
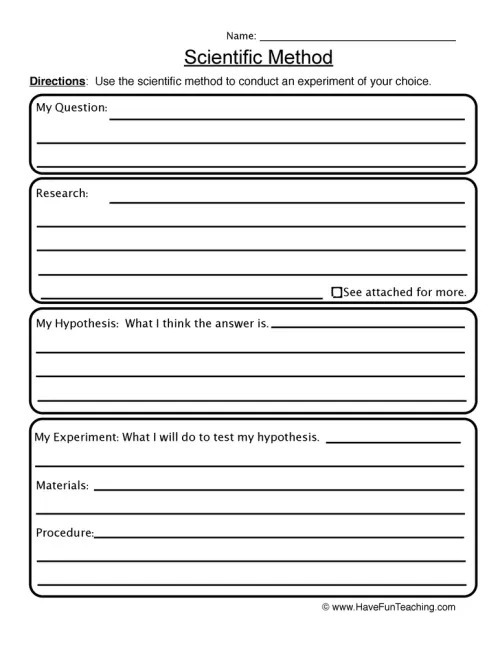
This worksheet is simple and sweet but has everything you need. It also has plenty of space for your students to write their findings.
- Scientific Method Activity Booklet By Have Fun Teaching
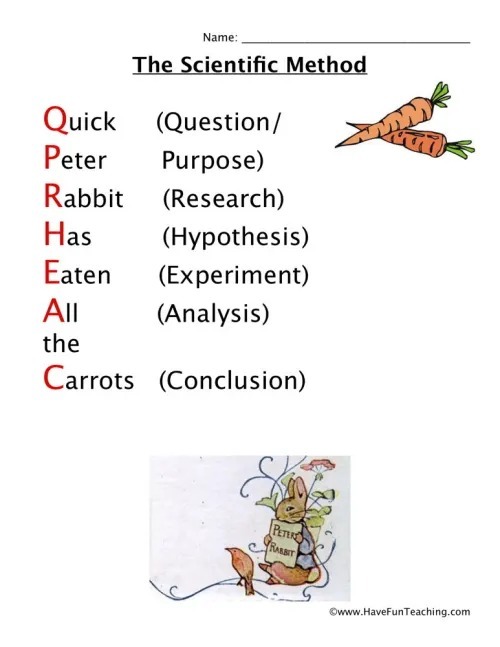
This cute little activity book is perfect for early elementary school. It has a mnemonic to help students remember the Scientific method and plenty of space for their written notes.
- Brainy Acts Of Following Directions: Logic Activities By Classroom Complete Press
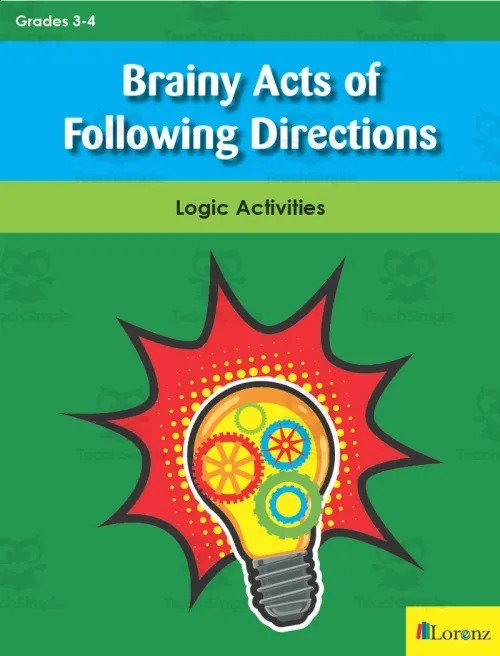
These logic activities for older elementary students will sharpen their direction-following skills, leading them on exciting adventures to find hidden treasures, solve mysteries, and more! The worksheets can be used for lessons, to begin and finish the day, or simply for fun.
- The Scientific Method Lesson & Science Experiment – Scientific Method Unit By Teach Simple
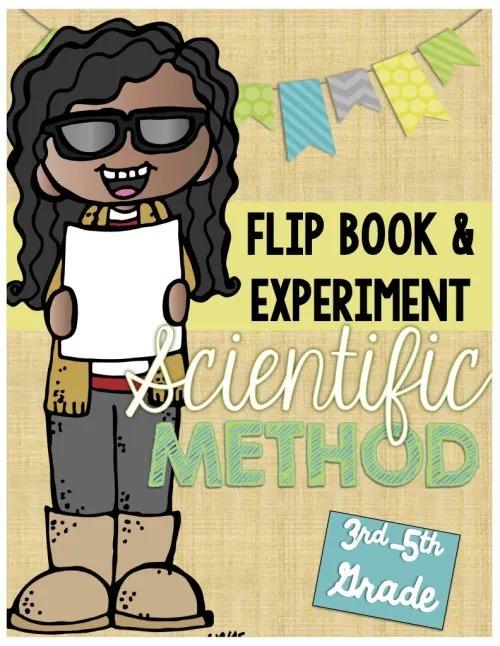
This flip book is jam-packed with student-friendly information. For example, the scientific method lesson comes with an experiment you can do as your students read along. This allows your students to see the data and put it into practice.
It is also available in a mini book to save paper.
- Scientific Method And Science Skills – Lab Station Activity By Teach With Fergy

This one is great for high school students. The interactive Lab Station encourages your students to engage with the content uniquely. Each station provides an opportunity for your pupils to give their opinion, answer questions based and give feedback on which they can be assessed
- Gummy Bear Investigation Lab By Rodriguez’s Resources
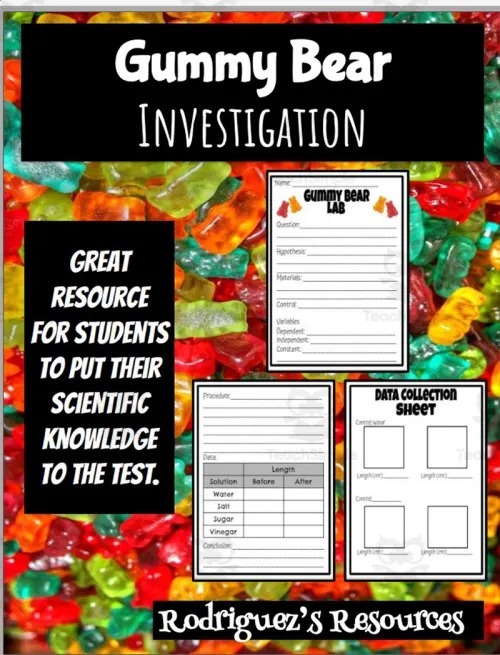
There is nothing better than making an experiment accessible with tangible (tasty) subject matter. In this lab, students will go through the steps of the scientific method to predict what will happen to a gummy bear if it is left for 24 hours in a liquid.
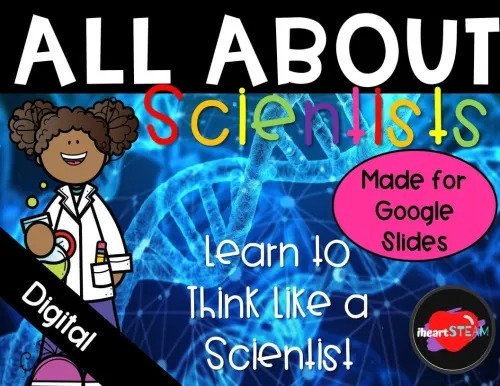
- All About Scientists Interactive Slideshow By I Heart STEAM
If you want students to learn about being a scientist and think critically, this All About Scientists resource is for you. Students will learn about the scientific process and be able to show what they know. They will wrap the lesson up by making their own scientific claim and testing it.
- Science Experiment: Independent, Dependent, And Controlled Variables By Grace Under Pressure
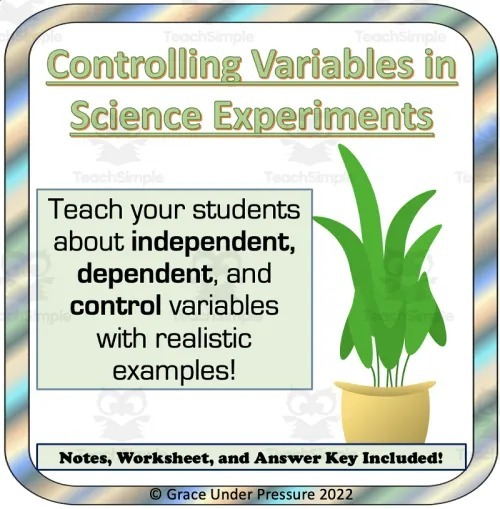
Here is another one for high school students. This science lesson is an excellent introduction to a science fair unit. Using humor and real-life situations, it teaches students about independent, dependent, and controlled variables . It allows students to start brainstorming basic experimental design ideas individually or in pairs.
If you are strapped for time and want to find resources quickly, here are a few to get you started.
Scientific Method worksheets and resources
- Teach Simple elementary scientific method resources
- Easy teacher Worksheets – Scientific Method
- 123homeschool for me Scientific Method Worksheets
- Nature inspired learning
Middle School
- Teach Simple middle school scientific method resources
- Mrs. A. Ancheta science resources
- Ngss Life Science Resources
- Science Buddy- Exploring the Scientific Method
- Teach-nology
High School
- Teach Simple high school scientific method resources
- Scientific Method: How Can a Causal Question Be Answered?
As a teacher, you know that relying solely on textbooks can lead to a lackluster lesson. That’s why many teachers are willing to invest hundreds of dollars in supplementary teaching materials such as lesson plans – to inject some fun and excitement into the classroom! However, with all the resources available, it can be overwhelming trying to find quality content.
Paid lesson plans can undoubtedly offer the quality you need – but at what cost? Most of them are placed behind a paywall, giving you only a brief glimpse of the materials before you invest. It’s almost like gambling – you never really know how good the quality is or if it aligns with your curriculum until you take a chance and buy it. Many paid resources offer freebies to try and encourage you to buy more – but these can often be of limited value.
Many resource platforms sell each product individually, and you pay per download. This may make sense if you only need one or two things, but if you are looking for a regular supply of quality resources, a subscription-based service is far more practical and affordable.
At Teach Simple , we provide subscription-based access to all the lesson plans and teaching materials you’ll ever need. Teachers crafted our materials, and each resource is peer-reviewed to guarantee it meets standards. In addition, it offers insightful blogs, classroom management tips and strategies, and loads of inspiration and ideas.
You will never need to look much further for a Scientific Method worksheet again. Teach Simple will have what you need, or one of our detailed blogs and articles will fill you with creative ideas and provide links to examples and resources.
Share Article:
Download unlimited teaching resources, join free today, teach simple.
The team behind Teach Simple is a small but dedicated group who are passionate about education and making a positive impact on the lives of teachers and students.
We have a lot of interesting articles and educational resources from a wide variety of authors and teaching professionals.
12 Best Elements Compounds And Mixtures Worksheet
11 worksheets for exploring the fundamentals of atomic structure.
Last Updated on September 10, 2023 by Teach Simple
the scientific method and study guide
All Formats
Resource types, all resource types.
- Rating Count
- Price (Ascending)
- Price (Descending)
- Most Recent
The scientific method and study guide

The Scientific Method Google Form Quiz and Study Guide - Experimental Design

- Google Drive™ folder

The Scientific Method - Steps to the Inquiry Process Handout and Study Guide

- Easel Activity

Step of the scientific method study guide and quiz

- Word Document File

Introduction to Biology and the Scientific Method Study Guide

Study Guide : The Scientific Method B & W

Scientific Practices Study Guide and Review Worksheet (SOL 4.1)
Scientific Method Unit - 2nd Grade - Scientific Investigation - Science Intro

Scientific Method Vocabulary Quiz ( Study Guide and Puzzle / Science / Lab / ELA)

Scientific Practices Study Guide and Review Worksheet (SOL 5.1)

Grade 3 Science Refrigerator Study Guides
The Scientific Method Lesson & Science Experiment - Scientific Method Unit

Midterm or Final Exam for Biology including a Study Guide and 130 Review Slides

Scientific Method Bookmark: Use as a Study Guide , Review, or Practice

Biology SOL Picture Review Study Guide

Scientific Inquiry Jeopardy

Alberta Grade 1 Science - Scientific Methods - Study Guide

Alberta Grade 2 Science: Scientific Method - Study Guide (2024)

Alberta Grade 3 Science: The Scientific Method - Study Guide (2024 Curriculum)

The Scientific Method

Scientific Method + Study Guide Prezi

Nature of Science/ Scientific Method Review Sheet & Study Guide
Experiments Scientific Method Lesson & Flashcards study guide exam prep 23-2024

Scientific Method Review worksheet/ study guide with answer key

Exploring Chemistry Lapbook with Study Guide
- We're hiring
- Help & FAQ
- Privacy policy
- Student privacy
- Terms of service
- Tell us what you think
IMAGES
VIDEO
COMMENTS
The Scientific Method Homework and Study Guide (Quizlet) 15 terms. SAVANNAH_HOOD4. Preview. science scientific method. 29 terms. JudeS0508. Preview. English vocab 1.
Exploring the Scientific Method The scientific method is a process that scientists use to better understand the world around them. It includes making observations and asking a question, forming a hypothesis, designing an experiment, collecting and analyzing data, and drawing a conclusion. This is sometimes also referred to as scientific inquiry.
The series of worksheets you will find in this section will really test your understanding of the concept of the scientific method. You will be put to the test in many diverse scenarios. We start by learning the order of the steps of process and the history of how value was attributed to this process. We learn how to form and write valid ...
Things to study: • Scientific method worksheets and notes • How‐To handouts for scientific method, variables and hypothesis • THIS STUDY GUIDE! • Self‐check tutorials and ... Things to do: • Pay attention in class • Do the homework • Ask 1 ...
The scientific method is a 6 step method scientists use to conduct experiments and learn about the world around them. It is essentially a framework on how to ask a question and then answer it. We all make observations and ask questions about the world around us. Then, we make a guess (or hypothesis) about what we think the answer is.
Scientific Method Unit 4 "Questions" worksheet Write a testable question for each of the following ideas for experiments. 1. You want to figure out how many pine cones are on the average branch of a pine tree. 2. You want to know whether or not a McDonald's super-sized fry has more fries in it than a large fry. 3.
Study with Quizlet and memorize flashcards containing terms like data, independent variable, dependent variable and more.
scientific method lesson plan worksheets The scientific method lesson plan includes three worksheets: an activity worksheet, a practice worksheet, and a homework assignment. (The "Options for Lesson" section of the classroom procedure page suggests the possibility of switching the latter two if you want.)
Perfect for teachers who want to nurture critical thinking skills, this free printable helps students understand and apply the scientific method.Whether conducting a mind-blowing biology experiment, exploring the power of chemical reactions, or unraveling the mysteries of physics, this scientific method worksheet guides students through the systematic process of questioning, researching ...
They are interesting, fun, and surely a crowd pleaser. The Scientific Method is a series of techniques used to examine phenomena. This methodology date back to third century BC The primary goal for the use of Scientific Method is in truth seeking. We provide students with a series of worksheets below to introduce them to the basic process.
Can You Spot the Scientific Method Worksheet Each sentence below describes a step of the scientific method. Match each sentence with a step of the scientific method listed below. ____ 7. Stephen predicted that seeds would start to grow faster if an electric current traveled through the soil in which they were planted. ____ 8.
Use these editable worksheets as homework or classwork to accompany your lessons on the scientific method. When complete, it becomes a fantastic study guide for your unit test covering the steps and application of the scientific method. Complete Teacher Answer Key is included. Related Resources Include:
6. Use what you learned about rockets to explain why you think your prediction might be true. Together, your reasons and your prediction are called your hypothesis. A hypothesis is a testable explanation for how something works. 7. Write down the procedure you will follow to do your experiment. Make sure your procedure includes all the elements ...
The scientific method. At the core of biology and other sciences lies a problem-solving approach called the scientific method. The scientific method has five basic steps, plus one feedback step: Make an observation. Ask a question. Form a hypothesis, or testable explanation. Make a prediction based on the hypothesis.
Scientific Method Study Guide (ANSWER KEY) Using the picture below, create observations, inferences, and predictions. Observations are things you notice with your senses. Inferences are conclusions you draw based on your observations. Predictions are what you think will happen next. Observations: Inferences: Predictions:
This is a good review document of the scientific method which includes questions on variable and controls and the steps to the scientific method. It is an editable word document and there is an answer key. Reported resources will be reviewed by our team. Report this resource to let us know if this resource violates TPT's content guidelines.
Hand out this worksheet before introducing the scientific method. Students are to fill in this worksheet while you teach about the scientific method. Students then use this worksheet as a central place to study from to prepare for a test or quiz. Accommodations: Students with an IEP may work with a partner filling in the definitions.
This worksheet option goes a step further. It allows young students to walk through the steps of the scientific method by drawing pictures or writing small phrases. This can be a great way to make science more approachable! This worksheet is more appropriate for 3rd grade and up.
The steps of the scientific method include: Ask a question. Do background research. Construct a hypothesis. Do an experiment. Analyze data from the experiment. Draw conclusions. Communicate results. In learning about the scientific method, students learn about independent, dependent, and controlled variables; the importance of doing multiple ...
This quiz and worksheet allow students to test the following skills: Reading comprehension - ensure that you draw the most important information from the related lesson on the scientific method ...
9 Best Scientific Method Worksheets. Teach Simple is your one-stop shop for all your resources. Here are some of their best Scientific Method worksheets and a few other quality resources from around the web. Scientific Method Interactive Foldable Booklets By Knowledge Box Central.
Students will learn and practice the steps of the scientific method.I have the steps in this order:1. Ask a Question2. Make an Observation3. Make a Hypothesis4. Do an Experiment5. Make a ConclusionThis 19-page unit includes: - Scientific method cut and paste sheet- Scientific method overview/study guide- Scientific method posters/anchor charts-