- PRO Courses Guides New Tech Help Pro Expert Videos About wikiHow Pro Upgrade Sign In
- EDIT Edit this Article
- EXPLORE Tech Help Pro About Us Random Article Quizzes Request a New Article Community Dashboard This Or That Game Popular Categories Arts and Entertainment Artwork Books Movies Computers and Electronics Computers Phone Skills Technology Hacks Health Men's Health Mental Health Women's Health Relationships Dating Love Relationship Issues Hobbies and Crafts Crafts Drawing Games Education & Communication Communication Skills Personal Development Studying Personal Care and Style Fashion Hair Care Personal Hygiene Youth Personal Care School Stuff Dating All Categories Arts and Entertainment Finance and Business Home and Garden Relationship Quizzes Cars & Other Vehicles Food and Entertaining Personal Care and Style Sports and Fitness Computers and Electronics Health Pets and Animals Travel Education & Communication Hobbies and Crafts Philosophy and Religion Work World Family Life Holidays and Traditions Relationships Youth
- Browse Articles
- Learn Something New
- Quizzes Hot
- This Or That Game New
- Train Your Brain
- Explore More
- Support wikiHow
- About wikiHow
- Log in / Sign up
- Computers and Electronics
- Presentation Software
- PowerPoint Insertions

5 Ways to Embed a Video File in Microsoft PowerPoint
Last Updated: March 27, 2024 Fact Checked
Embedding a Web Video
Embedding a video file, embedding a stock video, using android, linking movie files (powerpoint 2007).
This article was co-authored by Mitch Harris and by wikiHow staff writer, Rain Kengly . Mitch Harris is a Consumer Technology Expert based in the San Francisco Bay Area. Mitch runs his own IT Consulting company called Mitch the Geek, helping individuals and businesses with home office technology, data security, remote support, and cybersecurity compliance. Mitch earned a BS in Psychology, English, and Physics and graduated Cum Laude from Northern Arizona University. This article has been fact-checked, ensuring the accuracy of any cited facts and confirming the authority of its sources. This article has been viewed 1,125,419 times.
If you want to spruce up your PowerPoint presentations, you can add a video to your slides. If you have a video file on your computer, you can easily embed it into your presentation. You can also embed YouTube videos, use looping stock videos, or, on older versions of PowerPoint, link to the videos. This wikiHow will show you how to add a video to Microsoft PowerPoint using your Windows, Mac, or Android device.
Things You Should Know
- Copy a YouTube URL. In PowerPoint, click "Insert' → "Video" → "Online Videos/Movie". Paste the URL and click "Insert".
- To embed a video file, click "Insert" → "Video" → "This Device" → select a file → "Insert".
- To use a stock video, click "Insert" → "Video" → "Stock Videos" → select a video → "Insert".

- You must have a subscription to use Office 365 . [1] X Trustworthy Source Microsoft Support Technical support and product information from Microsoft. Go to source
- Adding a video to your PowerPoint can help you make a great presentation .

- You can insert a video from supported websites such as: YouTube, SlideShare, Vimeo, Microsoft Stream, and Flip.

- On Mac, this will look like Online Movie .

- You'll see a preview of the video.

- To adjust when the video plays, click the drop-down menu next to Start: . Select In Click Sequence , Automatically , or When Clicked On .
- Check the boxes to apply any of the following: Play Full Screen , Hide While Not Playing , Loop until Stopped , and/or Rewind after Playing .
- Click Volume to adjust the video's volume. Select Low , Medium , High , or Mute .

- Select the web video and click the Video Format tab.
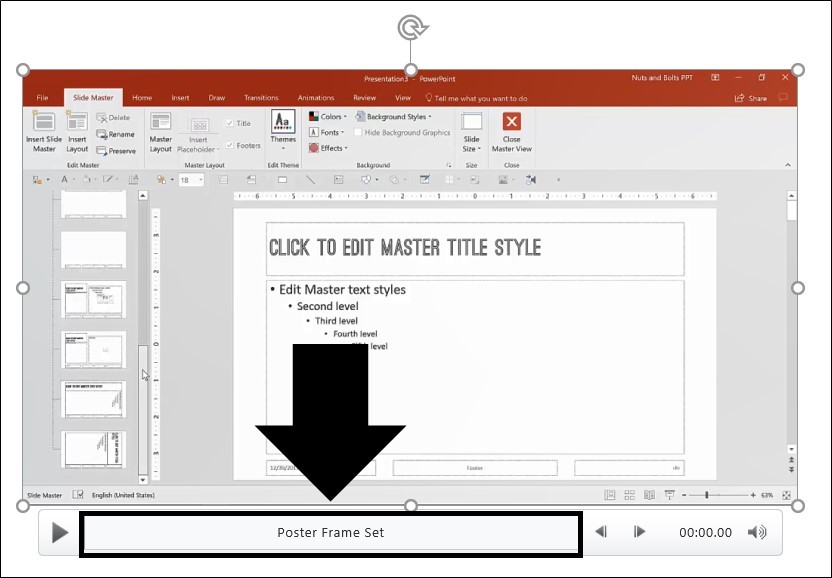
- Click Poster Frame on the left of the toolbar.
- Click Image from File… .
- Select From a File , Stock Images , Online Pictures , or From Icons .
- Select the image source from the chosen method, and then click Insert .

- Stock videos work best as a background graphic to your PowerPoint text, since these videos loop seamlessly

- The stock video will be added to your slide. By default, it will cover the entire slide.

- PowerPoint is available for Android in the Google Play Store .

- The menu will open.

- If you want to take a video using your camera, tap Open Camera instead.
- The video file will be added to your PowerPoint.

- Videos can only be "embedded" (included in the presentation file itself) in PowerPoint 2010 or newer.

- Click the Office button and select "Publish."
- Select "Package for CD" and then select your presentation.
- Ensure that "Linked files" is selected in the "Options" menu.
Community Q&A
You Might Also Like

- ↑ https://support.microsoft.com/en-us/office/insert-a-video-from-youtube-or-another-site-8340ec69-4cee-4fe1-ab96-4849154bc6db#OfficeVersion=Windows
- ↑ https://support.microsoft.com/en-us/office/insert-audio-or-video-in-powerpoint-for-android-95e0a2af-35fb-405a-8536-cdcd934f659a
- ↑ https://support.office.com/en-us/article/My-movie-doesn-t-play-190cf574-183d-4b7f-b627-3783a14b7b07?ui=en-US&rs=en-US&ad=US
- ↑ https://support.office.com/en-us/article/Add-and-play-a-movie-in-a-presentation-f3fcbd3e-5f86-4320-8aea-31bff480ed02
About This Article

1. Open the slide. 2. Click Insert . 3. Click Movie . 4. Click Movie from File or Video on my PC . 5. Select the video and click OK . 6. Click Playback . 7. Choose how to play the video. 8. Save your presentation. Did this summary help you? Yes No
- Send fan mail to authors
Reader Success Stories
Rjan Berglund
May 26, 2017
Is this article up to date?

Jun 20, 2017
Nov 7, 2016
Jul 27, 2016

Featured Articles

Trending Articles

Watch Articles

- Terms of Use
- Privacy Policy
- Do Not Sell or Share My Info
- Not Selling Info
wikiHow Tech Help Pro:
Level up your tech skills and stay ahead of the curve
How to embed a video in PowerPoint for a more engaging presentation

Making an engaging PowerPoint presentation is no easy feat.
You have to figure out what to say, and what you want your audience to grasp. Then, decide how to bring the two together to deliver a compelling presentation.
One popular way to add flair is by embedding video into the content, like what Dr. Frans de Waal did in his TED Talk on inequity aversion . To emphasize his points, he included videos of animal experiments, turning a mind-numbingly boring topic into an engaging and viral presentation—which now has over 5 million views.
In this step-by-step guide, you’ll learn how to embed a video in PowerPoint so you can create exceptional presentations that grab your audience’s attention and help them remember what you said.
How to embed a video in PowerPoint from your PC or Mac
First, of course, you’ll need a video, either one online or from your media library. The next step is to find a way to make it play during your PowerPoint presentation. You could do it manually by bringing up the video from another website or program while you’re speaking, but that process is clunky and you might end up facing technical challenges.
Luckily, there are simpler and easier methods of embedding videos in PowerPoint. You can link to your video file externally or embed it directly in your presentation.
Use the tutorial below to insert videos in PowerPoint from a computer.
How to embed a video in PowerPoint in Windows
Step 1: select the powerpoint slide.
Launch Microsoft PowerPoint on a Windows computer and open a blank or existing PowerPoint file.
Then, go to the slide you want to embed a video and select the Insert tab in the toolbar.
Step 2: Click Video > This Device
Select the Video option. Here, you can either embed a video from your computer or from an online source, like a website or YouTube and other supported platforms.
Click This Device from the drop-down menu to embed a video from a folder on your computer.
PowerPoint supports MP4 files encoded with H.264 video and AAC audio. So, you can upload videos in file formats, such as M4V, MOV, ASF, AVI, MPG, MPEG, or WMV.
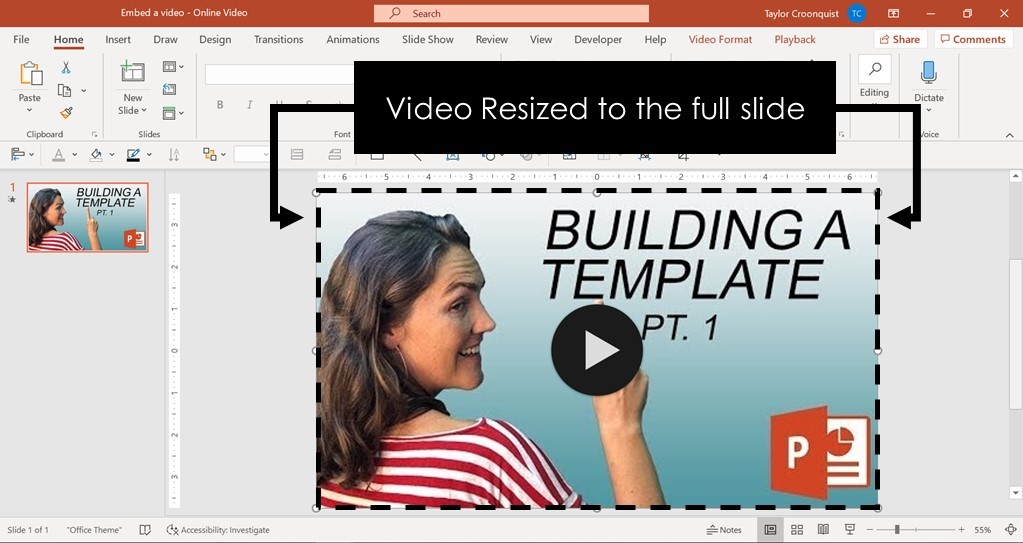
If you don't want to play a video full screen, resize it to your preferred dimensions.
For precise height-to-width proportions:
- Select Format (PowerPoint 2013 or newer) or Options (PowerPoint 2010) in the Size group
- Click the Dialog Box Launcher Icon image
- Click Size, then select the Lock aspect ratio checkbox under Scale
- Enter your preferred height and width under Size and rotate or enter the percentage of size that you want in the Scale height and width boxes
Then, select Video Format to access formatting options like borders and effects or right-click the video for more options. You can also use the Designer tool to choose from professional slide templates.
Then, click the Playback tab to trim your video, add captions, choose playback options, like In Click Sequence, Automatically, or When Clicked On.
Note: In PowerPoint for Microsoft Office 365 or PowerPoint 2016 version 1709 or later, you can use the In Click Sequence option. This way, your video can play in sequence with other actions you’ve programmed on the slide, like animations or transitions.
To insert a web video, select Video > Online Videos .
Note: PowerPoint supports YouTube, SlideShare, Vimeo, Stream, and Flip video providers.
Step 3: Click Insert
If you choose to embed an online video, copy the link to the video you want to embed and paste it in the blank field. A preview of your video will appear in the Insert video pop-up.
Click the Insert button to embed the video in your presentation.
PowerPoint will download and insert the video on the selected slide. You can drag the edges of the video thumbnail to resize it, then use Video Format options, like shape, border, and effects to enhance the video.
Select the Playback tab to insert captions or choose how your video plays (automatically or when clicked).
Note: You can’t change when an online video starts. But if you’re embedding a YouTube video, you can copy the video URL at the current time to link from a specific start time.
Click the Slide Show tab to preview the video with all the formatting changes you made. Then, save your presentation to your computer or click the Share button to move or copy it to the cloud.
How to embed a video in PowerPoint on a Mac
To embed a video in PowerPoint for Mac, you’ll need to save the video file in the same folder as your presentation.
Launch PowerPoint and open a blank or existing presentation, then select the slide you’d like to add a video to.
Select Insert .
Step 2: Click Video > From File
Click Video to access video embed options from the drop-down menu:
- Video browser
- Video from file
- Stock videos
- Online film
Select Video from file to insert a video file from your Mac.
In the Choose a Video dialog box, select the video file you want to insert, then click the Insert button to embed the video on the slide.
If you want to put a link to the video on the slide, click Show Options in the lower left corner of the dialog box.
Then, select the Link to file box, and click Insert .
Select the Video Format tab to add effects and choose whether your video will play automatically or when clicked.
Tip: If you’re using the 2016 version of PowerPoint (or newer), you can play back videos with multiple audio tracks. These versions also support closed captions and subtitles embedded in video files.
Select the Playback tab to do the following:
- Trim your video
- Add fade in and fade out effects
- Play the video on full screen or hide during the show
- Insert captions
- Select start time options (in click sequence, automatically, or when clicked)
- Loop the video to play repeatedly and continuously during the presentation
- Rewind your video
How to embed a video in PowerPoint from YouTube
Embedding a YouTube video to a PowerPoint presentation is simple. You can use the video URL or integrated search function to embed a video you uploaded to YouTube or someone else’s video (with permission).
To add a video to your PowerPoint presentation, you’ll copy the video embed code and paste it into the slide you want. The code will load the video at the source and play it on the platform you’re using.
You won’t need to download and upload the video from YouTube and the video will load and play faster regardless of the file size. Plus, you can share video content that’s covered under copyright, so you’re not in danger of crossing any legal lines.
Follow these steps to embed a video in PowerPoint from YouTube on a Windows PC or Mac.
How to embed a video in PowerPoint from YouTube in Windows
Step 1: click “insert video”.
Open a PowerPoint presentation and select the slide you want to embed your video.
Click Insert > Video .
Step 2: Choose “Online video”
Select the Online Videos option.
Step 3: Insert the URL from YouTube
Right-click the video to copy the video link or embed code, or click Share to get the embed code. Then, paste the URL or embed code in the link field.
A preview of your video will appear in the Insert video dialog box.
Click Insert to embed the video in your presentation.
Resize the video thumbnail, then use the video formatting options to enhance it.
Click Playback play the video automatically or when clicked or add captions. Then, preview the video with all the edits you made and save or share your presentation.
Note: YouTube’s video file formats are similar to those PowerPoint supports, so your video will likely play without issues. However, YouTube supports some formats that PowerPoint doesn’t, including FLV, 3GPP, WebM, DNxHR, ProRes, HEVC (h265), and CineForm. If your video isn’t playing, check to make sure it’s a supported file format.
How to embed a video in PowerPoint from YouTube on a Mac
Step 2: choose “online film”.
Select Online Film .
A URL pop-up will appear prompting you to enter the link to the YouTube video.
Go to YouTube and copy the link or embed code of the video you want to embed in your presentation. You can right-click the video and select copy video URL or copy embed code, or click Share and copy the video link or embed code.
Paste the video link or embed code in the URL pop-up in your PowerPoint presentation, then click Insert .
Resize your video and polish your slides before saving the presentation to your computer.
How to insert a video file link in PowerPoint
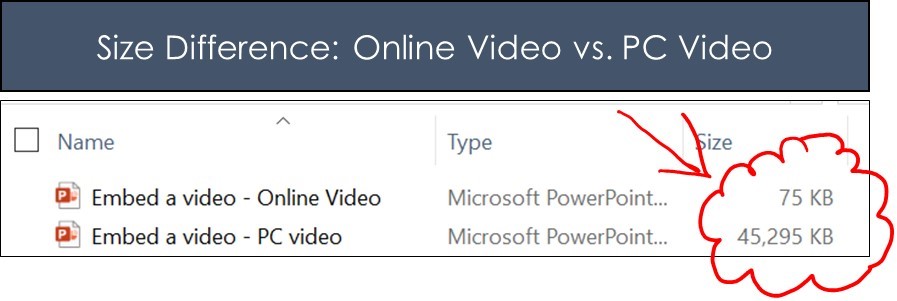
Embedding a video in PowerPoint may be convenient, but it increases the size of your presentation.
To reduce your presentation file size, insert a video file link to create a linked video. The downside with linked videos is that links can break, but you can prevent this by copying and storing your presentation and linked videos in the same folder, then linking to the video there.
Ensure you have a stable internet connection, then use the steps below to insert a video file link in PowerPoint on a PC or Mac.
Insert a video file link in PowerPoint on a PC or Mac
Step 1: take a screenshot of the video.
Find the video you want to link to in PowerPoint and take a screenshot of the clip.
To take a screenshot in Windows, you can either use the Snipping tool, press the PrtScn (print screen) key and Windows Logo key on your keyboard.
If you’re using a Mac computer, you can take a screenshot by pressing and holding SHIFT + COMMAND + 3 keys together (for full screenshot) or SHIFT + COMMAND + 4 keys to screenshot a specific area.
Step 2: Insert the screenshot in your presentation
Alternatively, navigate to the slide you want to add your screenshot to, select Insert > Pictures > Picture from File . Then, find the screenshot you took, select Insert to add it to the slide, then crop, resize, and position it to your liking.
Step 3: Hyperlink the image to your video
Right-click the image and select Link .
If your video is in Descript, copy the video link from your dashboard.
Insert the video link in the address field then click OK .
The hyperlink will be connected to the image itself, not other elements on the slide or the entire slide.
Click Slide Show to test your video and ensure it links to the right video. When you click on the image, it will open in a web browser, ready for you to play.
Why can’t I embed a video in PowerPoint?
Embedding videos to a PowerPoint presentation is a straightforward process, but sometimes the video may fail to play. Let’s review some reasons for playback failure and how to resolve them.
Video playback issues
Video playback may fail in PowerPoint if:
- The storage folder is corrupt
- The video’s audio is out of sync
- The video file is corrupt, damaged, in an unsupported file format, or missing certain files
How to fix: Convert your video into a supported file format, check PowerPoint playback settings, or make the video visible by unchecking the Hide while not playing option in the playback tab. You can also save your presentation using the PPT or PPTX extension, so it’s easier to open the file in older or modern Office versions.
File size and compatibility
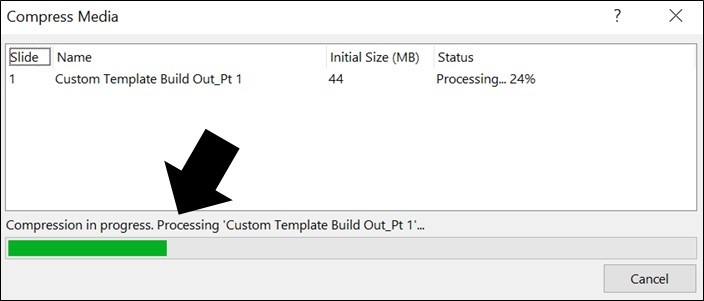
Your video might not play if the file is too big. To resolve this issue, compress the media file by going to File > Info > Compress Media. Then, select one of these options:
- Presentation quality/full HD: Adjusts the video size while maintaining its quality.
- Internet quality/HD: Saves on space and video quality.
- Low quality/Standard: Saves more space but doesn’t keep overall video and audio quality. This option is ideal if you want to share the presentation with others and ensure your videos will still play.
If your video file is incompatible with PowerPoint, it may be in an unsupported file format or missing a codec.
How to fix: Convert the video to a supported format or add a missing codec to your computer for smooth playback.
Broken links
When adding an online video, you might accidentally enter an incorrect link or the video link may be broken at the source. This means it won’t embed correctly and won’t play when you’re presenting.
How to fix: Before inserting or embedding an online video, install the required updates for your version of PowerPoint and check that you’ve copied the right link. Then, test your video to ensure it plays on any device.
Make the best videos to embed in PowerPoint with Descript
Embedding a video in PowerPoint is a pretty simple process with several benefits for you and your audience. To prevent yawns and glazed-over eyes, you’ll need professional-quality videos that will draw your audience in, keep them engaged, and improve message recall.
Descript’s audio and video editing software lets you record, edit, and publish studio-grade videos to YouTube, then embed them in your PowerPoint presentations in a few clicks.
Plus, Descript’s AI-powered automatic transcription generates high-quality transcripts from your video’s audio, which you can use as notes while making your presentation. You can also use Descript’s AI features to get text summaries, auto-generate copy for social media posts, and enhance your audio with Studio Sound .
Take Descript for a spin today to make quality videos that will help you deliver exceptional PowerPoint presentations.
Featured articles:

AI for Creators
9 AI content creation tools to supercharge your creativity
AI content creation is exploding, but some tools are better than others. Find the best in this guide.

How to write a YouTube script that engages your audience: The ultimate guide
Are you looking to create better narratives in your YouTube videos? Learn how to write a YouTube script that keeps people hooked.

175 YouTube channel name ideas for more subs
Unlock the perfect name for your YouTube channel. Discover 175 YouTube channel name ideas for more subs and views!

Other stuff
10 excellent Loom alternatives to record your screen
Looking for the best ways to record your screen without Loom? Find out 10 Loom alternatives, their features, and pricing.
Tips & Tricks
How to make videos for social media: 9 winning tips
Looking to learn how to make videos for social media? Find out in this complete guide.

How to use Descript: Tips & tricks to speed up your editing workflow
Descript makes audio & video editing easier, but even experts may not know how to use Descript to its full potential. Here are 7 tips to help.

Articles you might find interesting

Product Updates
How the Naval Podcast Team Distills Hour-Long Conversations Into Four-Minute Episodes
Babak Nivi agreed to let us peek behind the scenes at the process for turning one free-flowing conversation into many short episodes of the Naval Podcast. Here’s how they do it:

Here's what creators are saying about Descript Season 1: Overdub, Studio Sound + more
We asked creators to test out the latest features from Descript's Season 1 update, including our voice cloning Overdub software, Studio Sound audio enhancement tool and more.

How to Make a Compilation Video
Compilation videos are a great way to fit a lot of content into a little space, which helps you keep viewers glued to your video — and your video alone.

Podcast Sponsorship: The Tool to Create Revenue
Finding the right sponsors in the early stages can feel overwhelming, but it’s not impossible. Here’s why working with podcast sponsors is a smart idea. Take your show to the next level.

Turn listeners into superfans: 3 steps to build podcast listener engagement
Turning casual podcast listeners into superfans isn't easy, but there is a method to it. Here's how to build your podcast listener engagement.

From tech frustration to podcasting success: a #MadewithDescript Q&A
A new podcaster overcame her frustrations with complicated editing tools when she discovered Descript — and produced a better podcast as a result.

Join millions of creators who already have a head start.
Get free recording and editing tips, and resources delivered to your inbox.
Related articles:
Share this article
Home Blog PowerPoint Tutorials How to Insert a Video into PowerPoint
How to Insert a Video into PowerPoint

Adding videos to slides can save a lot of time explaining different concepts. A short video can help make even complex ideas easy to grasp with visual aids and assist the presenter in avoiding making several slides explaining the topic. You can add videos to your custom slides or PowerPoint templates from your device or online sources by following a few easy steps.
How to Add Video to PowerPoint
Just as we explained in a previous tutorial about how to add a video to Google Slides , adding a video to PowerPoint is quite similar. To get started, click the Insert tab and select Media -> Video . Now, select the source for your video.

Add Video from Device
You can add a video from your device by browsing to the location where the video is located to select it.

Add a Stock Video
To add a stock video, select the Stock Videos option from the Video dropdown menu, search for a video, and select to insert it.

Add Videos from Online Sources
Videos can also be added from online sources by adding the URL for a video from different sources such as YouTube, SlideShare, Vimeo, Stream, and Flip. For more details regarding this process, see our tutorial about how to embed a YouTube video in PowerPoint .

Format Video Added to PowerPoint
Once you have added a video in PowerPoint, you can format the video to adjust it according to need. The video size can be adjusted either from the Video Format tab or via drag and drop. The same tab also provides options to crop, rotate, and adjust the colors of the added video. Cropping and resizing options are available in the Video Format tab from the Size menu.

To add a video frame or change the look of the video outline, go to the Video Styles menu from the Video Format tab.

The video rotation and other adjustment options can be found in the Arrange menu in the Video Format tab.

The Adjust menu in the Video Format tab provides options for color correction, adding a poster frame, and resetting the video design.

Adjust Playback Settings for Video in PowerPoint
There are a number of playback settings that you can adjust from the Playback tab in PowerPoint. You can add closed captions, select the video to play in the loop, and rewind automatically once it’s played, as well as edit the video.

From the Video options menu in the Playback tab, select the Start dropdown menu to decide if the video will be played automatically when clicked or in a click sequence. From this menu, you can also select whether the video is to be played in full screen and hidden when not played.

Insert Captions is another option in the Playback tab that enables importing closed captions to be added to the video. The closed captions format supported by PowerPoint is WebVTT.

To edit a video in PowerPoint, the Playback tab provides the Editing menu. From this menu, you can trim the video and add a Fade (in and out) effect.

Final Words
Videos added to PowerPoint can be of immense help in explaining something important to an audience. Many YouTube videos make it easy to quickly provide the necessary information instead of using multiple slides or creating a custom video to get your point across.
By effectively using videos in your PowerPoint slides, you can make your slides easier to grasp and work smart to present ideas and concepts quickly. However, it is worth testing out the slides once the videos are added by running them as a slideshow. If it’s an online video, ensure you have a stable Internet connection when presenting your slides; if it’s an offline video added to your slides, make sure the slides don’t lag on the system you are using. Do you know you can also convert slides to videos? See our tutorials on how to convert a PowerPoint presentation to an HD video and how to convert a Google Slides presentation to a video to learn about turning your slides into video presentations .

Like this article? Please share
Microsoft PowerPoint, PowerPoint Tools Filed under PowerPoint Tutorials
Related Articles

Filed under PowerPoint Tutorials • March 26th, 2024
How to Translate in PowerPoint
Unlock the experience of PowerPoint translation! Learn methods, tools, and expert tips for smooth Spanish conversions. Make your presentations global.

Filed under PowerPoint Tutorials • March 19th, 2024
How to Change Line Spacing in PowerPoint
Adjust text formatting by learning how to change line spacing in PowerPoint. Instructions for paragraph indenting included.

Filed under PowerPoint Tutorials • March 15th, 2024
How to Group in PowerPoint
Organize your slides’ content efficiently by mastering how to group in PowerPoint. 3 different approaches to grouping and ungrouping elements.
Leave a Reply
Critical PowerPoint Shortcuts – Claim Your FREE Training Module and Get Your Time Back!
How to Embed a Video in PowerPoint (Step-by-Step)
- PowerPoint Tutorials
- Shortcuts & Hacks
- September 27, 2019
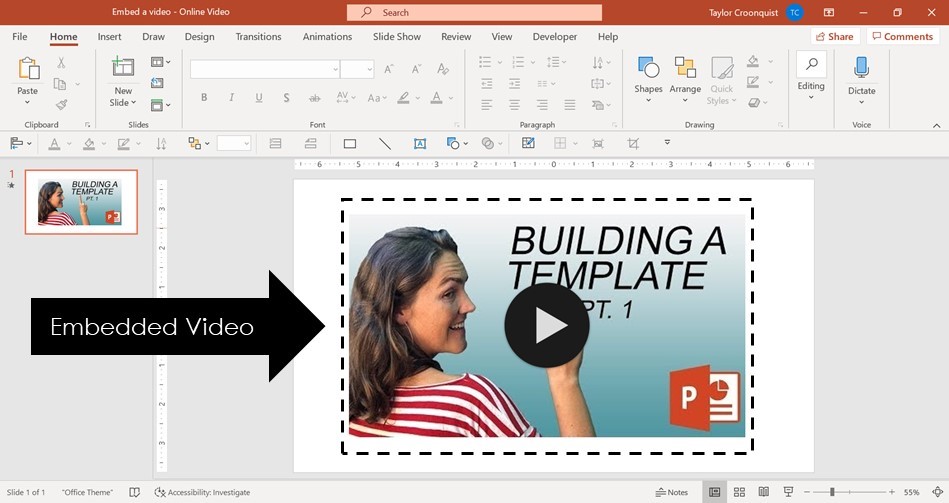
In this article, you’ll learn how to embed a video in PowerPoint directly from your hard drive as pictured below.
On top of that, you’ll learn what you can and can’t do when embedding videos into PowerPoint, including:
- How to trim a video (including how to trim a YouTube video)
- Getting your video to play full screen
- Creating a video thumbnail or Poster Frame
- How to compress your videos
If you want to grab the latest version of Microsoft Office (Microsoft 365) like I’m using in this tutorial, you can check it out here .
But before you get carried away adding videos to PowerPoint, it’s important to first understand what your options are.
Table of Contents
Embedding online videos vs. desktop videos.
- Videos from your computer
- Videos from online sources like YouTube
1. Video size
2. Internet connection
Online videos require a good – STRONG – internet connection to play properly.
That means that if you embed a YouTube video in your PowerPoint and the conference room you are presenting in has a weak internet connection, you are in trouble.
So I highly recommend spot checking the internet quality of the room you will be presenting in before working with any online video in your presentation.
If your internet connection is weak, be prepared to skip the video in your presentation.
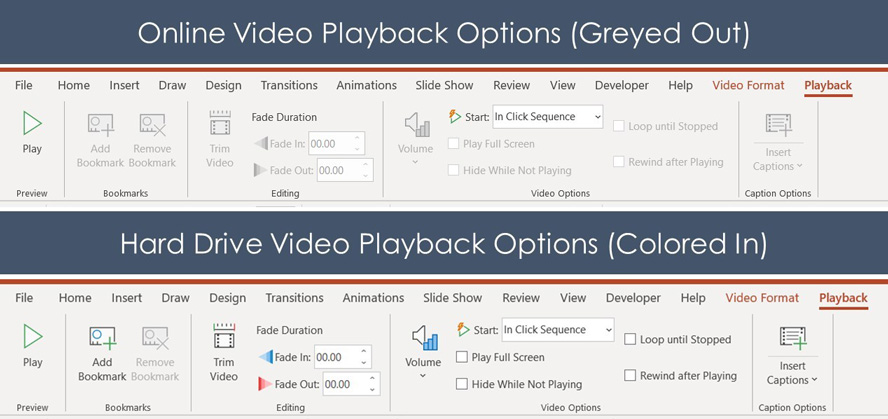
3. Playback options
How to embed a video in PowerPoint
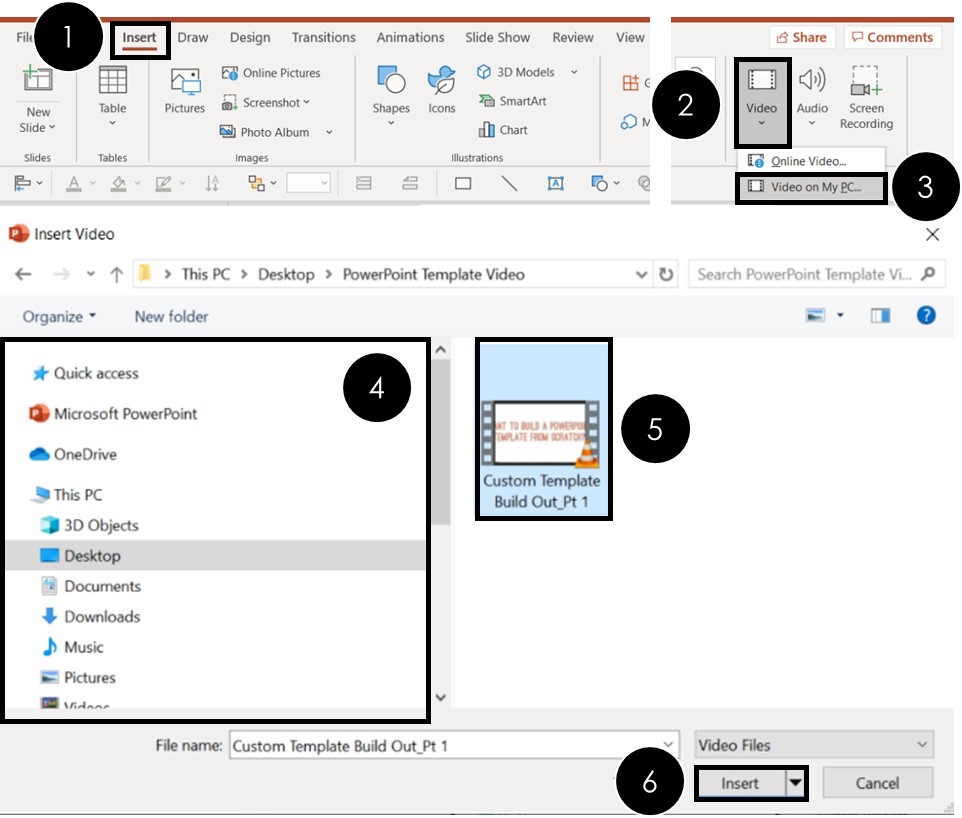
To embed a video in PowerPoint from your computer, simply:
- Navigate to the Insert tab
- Open the Video drop down (within the Media group)
- Choose Video on my PC
- Navigate to where the video resides on your PC
- Select the Video
- Click Insert
Clicking Insert , the video is added to your PowerPoint slide as an editable PowerPoint object, as you can see below.

With the video now inserted on your slide, you can use the features found in the Video Playback and Formatting tabs. These tabs will be discussed below.
If you convert your presentation into a video, your embedded video will play within your video (if that makes sense). To learn how to convert PowerPoint to video, read our guide here .
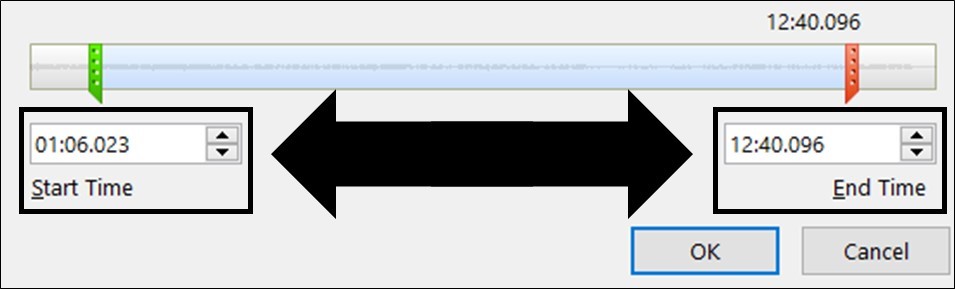
How to trim an embedded video in PowerPoint
- Select your video
- Navigate to the Playback tab
- Select the Trim Video command
- Adjust the Green Start Time cursor
- Adjust the Red End Time cursor
How to add a Video thumbnail
Adding a video thumbnail (or what PowerPoint calls a Poster Frame ) is super easy.
But this is only applicable to videos you add to your presentation from your computer. That’s because online videos will automatically populate with whatever thumbnail their creator gave it (you cannot edit it or change it in PowerPoint).
There are two types of thumbnails you can add to your videos in PowerPoint:
- Use a frame from your video as the thumbnail (easiest)
- Import your own custom thumbnail image (most flexible)
Neither is better or worse (your video will still play the same either way), it’s just a personal preference.
What is a video thumbnail and why is it important?
A video thumbnail is simply an image that is displayed before you play your video. You will see these on YouTube videos all the time before you click to play them.
In PowerPoint, the thumbnail image can become an important part of your overall slide design theme.
If you don’t add your own thumbnail, the first frame of your video will automatically be used as the video’s Poster Frame .
Adding a Poster Frame is an optional step, but can go a long way to improving the overall design of your PowerPoint slides.
Here are the different ways to add a thumbnail or Poster Frame to your embedded video:
1. Using a video frame as the thumbnail (or Poster Frame)
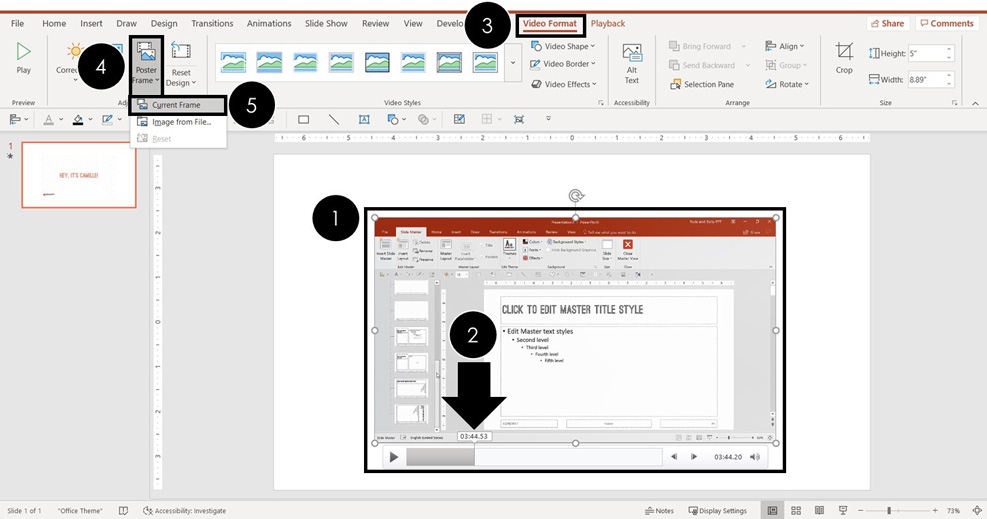
- Scrub to the video frame you want to use as your thumbnail
- Navigate to the Video Format tab
- Open the Poster Frame drop down
- Select Current Frame
2. Importing a video thumbnail (or Poster Frame)

- Choose Image from file…
- Select From a File
- Navigate to the image on your computer
- Select the image you wan to use
For help creating your own video thumbnail, you can see how to crop photos in PowerPoint and how to remove an image background .
How to reset a thumbnail (or Poster Frame)
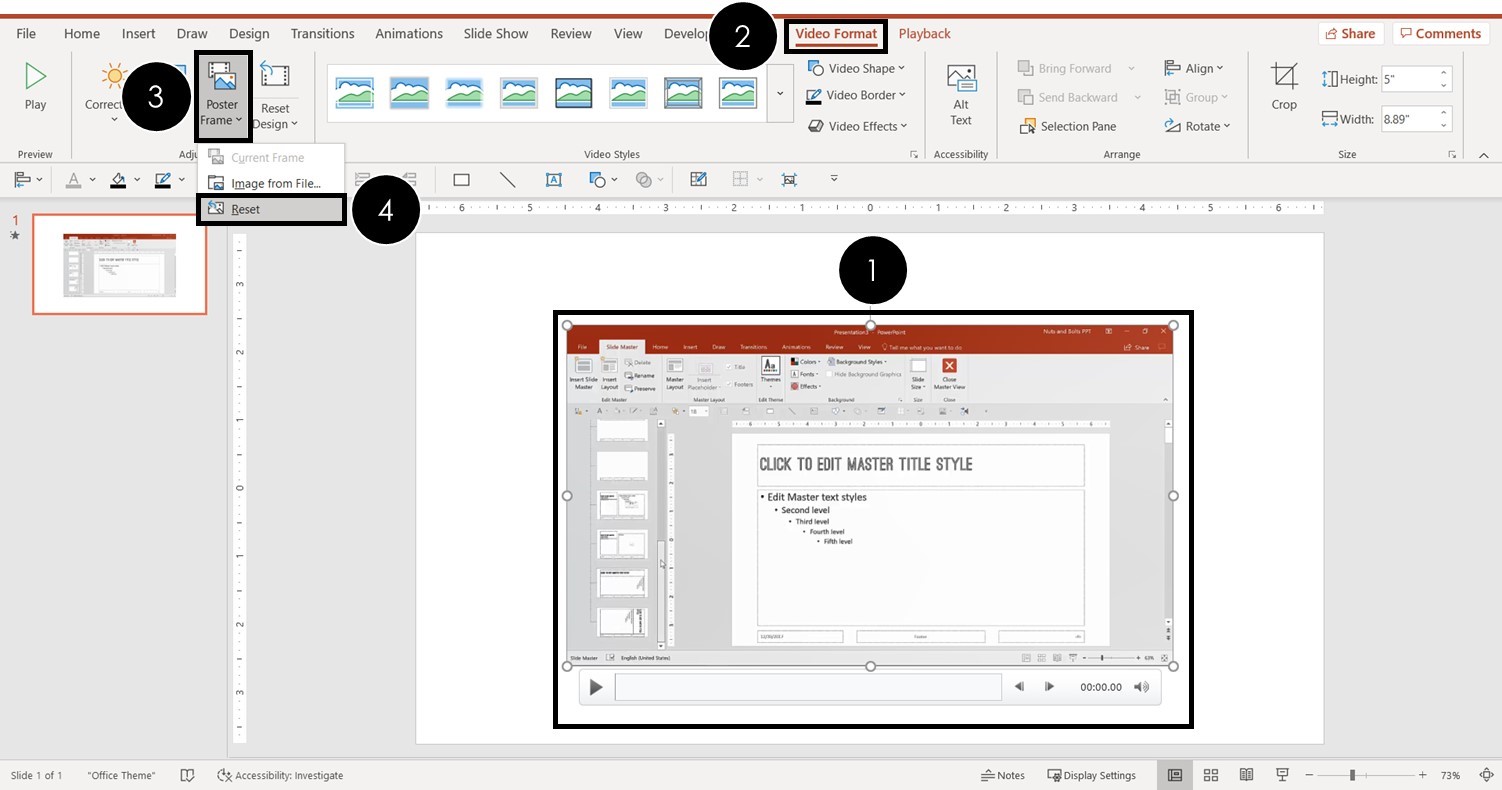
- Select Reset
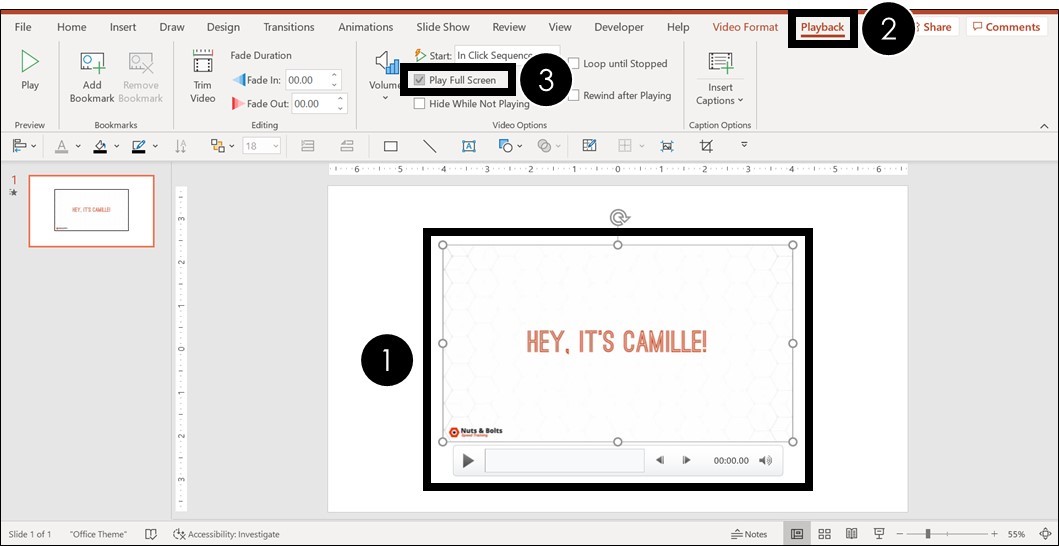
How to make a video play full screen
- Select the video on your slide
- Navigate to the Playback tab
- Click Play Full Screen
Getting an online video to play full screen
How to compress a video in PowerPoint
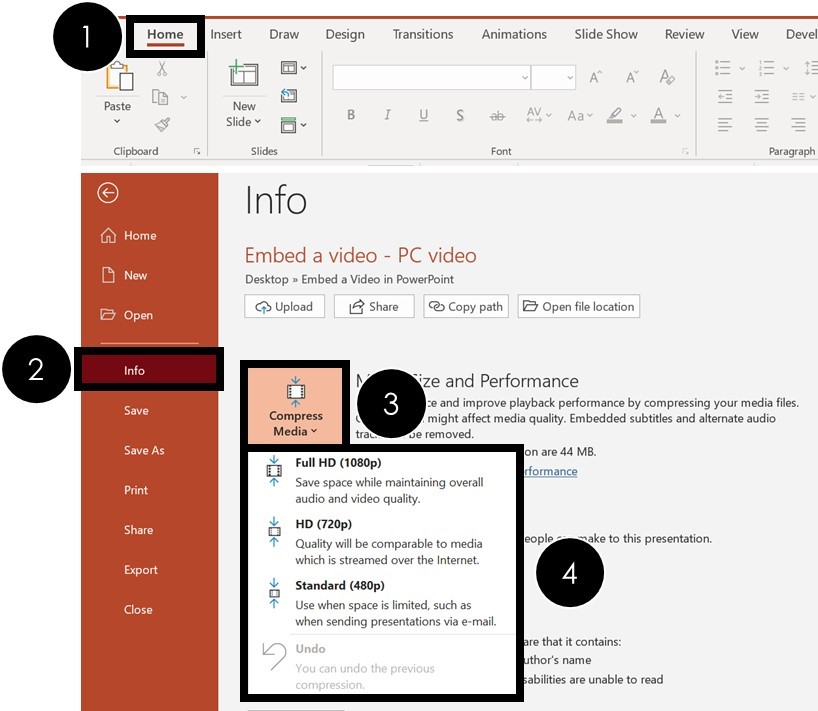
- Navigate to File
- Select the Info tab (selected by default)
- Open the Compress Media drop down
- Choose between 1080p , 720p and 480p
- Full HD (1080p) : Save space while maintaining overall audio and video quality.
- HD (720p): Quality will be comparable to media which is streamed over the Internet.
- Standard (480p): Use when space is limited, such as when sending presentations via e-mail.
So that’s how to embed a video in PowerPoint, including how to embed a YouTube video in PowerPoint.
You also learned about the different formatting options available to you, which can determine which type of video you want to embed in your PowerPoint presentations in the first place.
When used well, videos are a great way to back up your main points and improve the overall quality of your presentation as they are more engaging than static images.
🔒 Unlock the PowerPoint Shortcuts Trusted by Industry Leaders KKR, American Express, HSBC, and More!
Join over 114,880 professionals from diverse fields including consulting, investment banking, advertising, marketing, sales, and business development who have supercharged their PowerPoint game with our proven methods.
✅ Customize compelling presentations effortlessly.
✅ Master time-saving techniques for faster deck creation.
✅ Boost your career prospects with top-notch PowerPoint skills.
Get FREE access to the Critical PowerPoint Shortcuts module of our premium training course by entering your name and email below.
DISCLAIMER: PC Users Only!
We respect your privacy and will keep your info safe and confidential.
Related Articles
About the author.

Popular Tutorials
- How to Strikethrough Text (l̶i̶k̶e̶ ̶t̶h̶i̶s̶) in Word, Excel & PowerPoint
- How to Make Animated Fireworks in PowerPoint (Step-by-Step)
- Strikethrough Shortcut (l̶i̶k̶e̶ ̶t̶h̶i̶s̶) for Word, Excel & PowerPoint
- How to Create a Flash Card Memory Game in PowerPoint (Like Jeopardy)
- Keyboard Shortcuts Not Working: Solved
PowerPoint Tutorial Categories
- Strategies & Opinions
- Presentation Design
- Pictures, Icons, Videos, Etc.
- New Features
- Miscellaneous
- Charts & Data Viz
We help busy professionals save hours and gain peace of mind, with corporate workshops, self-paced courses and tutorials for PowerPoint and Word.
Work With Us
- Corporate Training
- Presentation & Template Design
- Courses & Downloads
- PowerPoint Articles
- Word Articles
- Productivity Resources
Find a Tutorial
- Free Training
- For Businesses
We help busy office workers save hours and gain peace of mind, with tips, training and tutorials for Microsoft PowerPoint and Word.
Master Critical PowerPoint Shortcuts – Secure Your FREE Training Module and Save Valuable Time!
⌛ Master time-saving expert techniques.
🔥 Create powerful presentations.
🚀 Propel your career to new heights.
We value your privacy – we keep your info safe.
Discover PowerPoint Hacks Loved by Industry Giants - KKR, AmEx, HSBC!
Over 114,880 professionals in finance, marketing and sales have revolutionized their PPT skills with our proven methods.
Gain FREE access to a full module of our premium PowerPoint training program – Get started today!
We hate spam too and promise to keep your information safe.
You are currently viewing a placeholder content from Facebook . To access the actual content, click the button below. Please note that doing so will share data with third-party providers.
- Slidesgo School
- Google Slides Tutorials
How to Add a Video in Google Slides

In this new Slidesgo School tutorial, you’ll learn how to add a video to your presentations , be it from YouTube or from your own computer . You’ll also find out what format options Google Slides has to offer regarding videos.
How to Embed a YouTube Video
How to insert a video, how to cut and edit a video.
- Open your presentation in Google Slides and select the slide where you want to add the video.
- Click Insert → Video. A new window will open.
- On the first tab, Search, you can look for the YouTube video you want to add to the presentation. Once located, click Select to add it to the slide. You can now adjust its size to your liking.
- If you have the URL of the video, click the By URL tab and paste it in the text field. You’ll see a preview of the video. If it’s correct, click Select to add the video to the slide. Place it whenever you like and adapt it according to your needs.
- Please note that you can’t crop a video in Google Slides, so you’ll need to play around with the rest of the graphic elements to have a coherent design.
- To insert a video that isn’t from YouTube, it must be stored in your Google Drive account.
- Access Google Drive.
- Drag the video to Google Drive or click New → Upload files. Locate the file in your computer and upload it to Google Drive.
- Click Insert → Video. A new window will open. On the Google Drive tab you’ll see all your videos stored in or shared with your Google Drive account. Choose the video you want to upload and click Select. The video will be added to the slide, and now you can adjust it to your liking.
- Select the video that you’ve added to the presentation.
- Go to the toolbar and click Format options. As an alternative, right-click the video → Format options. You can also click Format → Format options. A new panel will open on the right side of the screen.
- Click the Video playback drop-down arrow to see the options. You can set the start and the end time, trimming the video accordingly. There are two boxes below. Check the first one to enable autoplay when presenting, and the second one to mute the audio.
- The rest of the tabs on the Format options panel contain settings to adjust the size and position of the video, and you can also add a drop shadow to it.
- Within the Size and rotation tab, you can modify the width and height values for the video. There’s also an option to lock the aspect ratio in case you want to keep the video proportions.
- Within the Position tab, you can set exactly where you want to place the video, taking the top-left corner or the center of the video as reference. To move the video, you’ll need to modify the values of the X and Y axes.
- The last tab, Drop shadow, contains a box, which you can check to add a drop shadow. If you click the drop-down arrow, you’ll find options to modify the color and the behavior of the shadow (angle, transparency, distance and blur).
Do you find this article useful?
Related tutorials.

How to print PowerPoint notes
Crafting an impactful PowerPoint slideshow and delivering a captivating presentation are distinct skills. The first focuses on designing appealing visuals to convey a clear message, while the second involves employing effective presentation techniques to ensure the audience grasps the idea. The content of this article will help you with the latter part of this process, guiding future presenters on how to print PowerPoint with speaker notes to enhance your presentations success and effectiveness.

Discover Our Online Presentation Software for Free
We have great news for you today! If you’ve been a Slidesgo fan for years (or months, or weeks, or days, or mere hours, we welcome everyone!), you’ll probably know for now that our templates are available mostly in two formats: for use in Google Slides and PowerPoint.Google Slides is a free tool, since you only need a Google account in order to use it. PowerPoint, on the other hand, is part of the Microsoft Office suite, so it’s not a free program, but that didn’t stop it from being one of the most popular options in the world!What if we...

Webinar: Presentation Audit
With more than 15,000 templates released on Slidesgo and a user base composed of millions of people, we estimate that the total number of presentations created adds up to… um, a lot! Our team of professional designers work very hard to provide you with editable slides so that the only thing you need to do is, well, customize the elements to your liking. Starting from any given template, the results may vary a lot depending on the person who edited the contents.Have you ever wondered “Is my presentation good enough?” and wished that an expert on presentations looked at your template...

How to Change Slides Orientation in Google Slides
A change of perspective is always good! Do you want your public to look at your slides in a new way? Changing slides orientation will do the work. In this tutorial you’re going to learn how to go from horizontal slides, to vertical ones (and vice versa!).
- Skip to primary navigation
- Skip to main content
- Skip to primary sidebar
- Skip to footer
Don't Miss a Post! Subscribe
- Guest Posts
- Educational AI
- Edtech Tools
- Edtech Apps
- Teacher Resources
- Special Education
- Edtech for Kids
- Buying Guides for Teachers
Educators Technology
Innovative EdTech for teachers, educators, parents, and students
How to Put a YouTube Video in Google Slides
By Med Kharbach, PhD | Last Update: March 20, 2024

In today’s post, I share with you a simple yet impactful technique that I’ve found incredibly useful in my presentations: inserting YouTube videos into Google Slides. This not just enriches your presentation but can significantly enhance the learning experience for your students. So, let’s dive in!
Here is a step by step guide on how to put a YouTube video in Google Slides. There is also video tutorial at the bottom of the post:
Step 1: Open Your Presentation
First things first, have your Google Slides presentation open. Identify the perfect spot where you think a video could bring life to your slides. It could be anywhere you feel your audience might benefit from a visual break or a multimedia explanation.
Step 2: Insert the Video
Navigate to the top menu and click on “Insert,” then select “Video.” You’re now at a crossroads: you can either search for a video directly within Google Slides or, if you’re like me and have a specific video in mind, go for the URL option. For this guide, let’s use the URL method.
Find the YouTube video you want to insert, copy its URL , then paste it into the designated field in Google Slides. Click “Insert.” And there it is, beautifully embedded in your slide.
Step 3: Customize Your Video
Now, let’s tailor the video to fit our needs. Google Slides offers several customization options on the right pane:
- Play Preference: Decide whether the video should start playing on click, automatically upon arriving at the slide, or manually. I prefer the “play on click” option for better control over the presentation flow.
- Start and End Times: This feature is a gem for educators. You can choose specific segments of the video to play, which is excellent for focusing on relevant content without playing the entire video.
- Mute Audio, Size, and Position: These additional options allow for further customization. Muting the audio is useful if you want to talk over the video. Adjusting the size and position is straightforward—click and drag the video to fit your slide as you see fit.
Step 4: Deletion and Playback
If you need to remove the video, simply right-click on it and select “delete.” To see how your video will look during the actual presentation, click on “Slideshow.” This step is always a bit magical, seeing how your content comes to life.
Watch this YouTube video to see how to embed a YouTube video into Google Slides:
Related: Here is How to Insert a Page Break in Google Docs
Wrapping Up
Integrating YouTube videos into Google Slides is a way to bring diversity, engagement, and depth to your presentations. From illustrating complex concepts with visual examples to breaking up the monotony of traditional slides, the impact is profound. I encourage you to explore this feature and see how it can enhance your teaching toolkit.

Join our mailing list
Never miss an EdTech beat! Subscribe now for exclusive insights and resources .

Meet Med Kharbach, PhD
Dr. Med Kharbach is an influential voice in the global educational technology landscape, with an extensive background in educational studies and a decade-long experience as a K-12 teacher. Holding a Ph.D. from Mount Saint Vincent University in Halifax, Canada, he brings a unique perspective to the educational world by integrating his profound academic knowledge with his hands-on teaching experience. Dr. Kharbach's academic pursuits encompass curriculum studies, discourse analysis, language learning/teaching, language and identity, emerging literacies, educational technology, and research methodologies. His work has been presented at numerous national and international conferences and published in various esteemed academic journals.
Join our email list for exclusive EdTech content.

Microsoft 365 Life Hacks > Presentations > How to create an educational presentation
How to create an educational presentation
Using presentations can be an effective way to teach lessons and ensure that your audience can retain new facts. With visual aids, video and animated clips, and even interactive quizzes, you can use presentation software like Microsoft PowerPoint to dazzle your students.

The advantages of PowerPoint presentations in education
Students have different learning styles : some are visual learners, who retain images and videos more effectively than speech. Some take to audio and sound more easily. Others prefer to interact with their lessons—which usually refers to holding physical objects but can also be directly related to guessing answers and responding to questions.
Fortunately, PowerPoint’s versatility means that it can appeal to all of these diverse learning styles. You can embed multimedia elements such as videos, audio clips, and interactive graphics, creating a multi-sensory experience. PowerPoint can also be helpful when considering any visual impairments that your audience members may have so that you can present with different forms of media to cater to all learning styles.

Tell your story with captivating presentations
Powerpoint empowers you to develop well-designed content across all your devices
Before diving into PowerPoint, consider the following factors to help your audience retain as much information as possible:
- Define lesson objectives: Set a goal for what kind of lesson you want to impart to your audience. What do you want students to learn? You can answer this question by outlining your lesson objectives and clearly defining your goals, which will also guide the structure and content of your presentation.
- Organize your content: Divide your lesson into key points and organize them into a logical sequence that builds in complexity. Start with basic points or even a review of previous concepts before diving into more intricate or complicated aspects of your lesson. Each point should be presented on a separate slide to maintain clarity and focus.
- Use visuals effectively: Enhance your presentation with relevant visuals such as images, videos, audio clips, or interactive simulations to cater to different learning preferences and keep the presentation engaging. These can convey complex information more efficiently than text alone. At the same time, it can be easy to be carried away by inundating your audience with too many visual elements, so ensuring smooth flow and transitions is key.
- Encourage interaction: Foster active participation by including interactive elements like quizzes, polls, or discussion prompts to prompt student engagement. After you introduce a new concept in your lesson, these interactive elements can reinforce them and make them stick.
- Practice delivery: Public speaking isn’t always easy. One of the most effective ways to sound confident is to practice delivering your presentation before the day of your lesson. Familiarize yourself with the content and also the way that it’s presented: pacing, transitions, and interactive elements. This preparation will boost your confidence, ensure a smooth flow, and help you address any potential challenges during the actual presentation.
Staid lessons can be livened up thanks to the power of presentation! No matter what you’re teaching—the ABCs to a kindergarten class, or nuclear physics to a graduate department—you can check out more tips for effective presenting such as how to create compelling presentation designs , using the 10-20-30 rule for presenting, or discovering the history of PowerPoint .
Get started with Microsoft 365
It’s the Office you know, plus the tools to help you work better together, so you can get more done—anytime, anywhere.
Topics in this article
More articles like this one.

Five tips for choosing the right PowerPoint template
Choose an appropriate PowerPoint template to elevate your presentation’s storytelling. Consider time length, audience and other presentation elements when selecting a template.

How you can use AI to help you make the perfect presentation handouts
Learn how AI can help you organize and create handouts for your next presentation.

How to use AI to help improve your presentations
Your PowerPoint presentations are about to get a boost when you use AI to improve a PowerPoint presentation.

How to password protect your PowerPoint presentations
Learn how to password protect your PowerPoint presentations and secure your valuable files.
Everything you need to achieve more in less time
Get powerful productivity and security apps with Microsoft 365

Explore Other Categories
Google Slides
How to Turn Google Slides into a Video?

Table of Contents
Using slides for presentations is a popular choice. However, if you don’t plan on giving the presentation live more than once, converting it into a video might be a better option. This way, you can add your voice to the presentation, and viewers won’t have to manually click through each slide.
Videos are easier to share and don’t run into compatibility issues like slideshows might. While Google Sheets and Excel can work together, they’re not always perfectly compatible. Videos, on the other hand, can be played on almost any modern video player or platform, including YouTube.
Although Google doesn’t have this feature built-in, there are free add-ons available in Google Workplace that can do the job. In this guide, we’ll show you how to use one of these add-ons, along with a few more methods, to convert your presentations into videos effortlessly.
How to Convert Google Slides to Video?
Looking to take your Google Slides presentations to the next level? Converting them to videos allows you to share them more easily and create engaging content. Here are several methods to achieve this:
1. Make Use of Add-ons:
Creator Studio is a handy tool you can add to Google from the Google Workspace Marketplace. It changes Google Slides into GIF images and MP4 video files. You can also add an MP3 audio file or record your voice to narrate your presentation. When your presentation becomes a video, it will include the background sound you added. If you want to know more, take a look at the step-by-step instructions below:
Step 1 – Install: Go to Extensions > Add-ons > Get add-ons . Search for “ Creator Studio ” and install it.
Step 2 – Open: Go to Extensions > Creator Studio > Create Video .
Step 3 – Customize: Set Output width and Interval between slides . Choose Video File (MP4) or Video with Audio (if adding narration).
Step 4 – Convert: Click Go and wait for the video to render.

2. Using PowerPoint
If you have access to Microsoft PowerPoint, you can export your Google Slides presentation as a PPTX file and then use PowerPoint’s built-in “Create a Video” feature. This method offers advanced control over video quality and resolution, making it suitable for professional presentations.
Step 1 – Download: Go to File > Download as > Microsoft PowerPoint (.pptx) .

Step 2 – Open in PowerPoint: Launch PowerPoint and open the downloaded file.
Step 3 – Export to Video: Go to File > Export . Choose Create a Video .
Step 4 – Customize: Select the desired video quality and resolution .
Step 5 – Record Narration (Optional): Click Record Narration to add your voiceover.
Step 6 – Save: Click Create Video and choose your preferred saving location.
3. Using Canva
Canva, a popular design platform, allows you to import your Google Slides presentation and convert it into a video. With its user-friendly interface and pre-designed templates, Canva is a great option for creating visually appealing video presentations without extensive editing skills. To convert your slides using Canva follow these steps:
Step 1 – Import Slides: Go to Canva and click Create a Design . Choose Presentations and select Import from Google Slides .
Step 2 – Edit (Optional): Make any desired edits using Canva’s editing tools.
Step 3 – Convert to Video: Click the Share button and choose Download as MP4 .
4. Using a Recording App
For a quick and straightforward solution, consider using a screen recording app. While this method doesn’t offer the same level of customization as the other options, it can be effective for basic presentations where narrating your slides is sufficient. Have a look at the steps below to see how it’s done:
Step 1 – Choose an App: Select a screen recording app like Loom or Screencastify.

Step 2 – Set Up Recording: Choose the recording area (entire screen or specific window).
Step 3 – Record: Start recording your presentation while narrating or adding annotations (if the app allows).
Step 4 – Stop Recording: End the recording and edit the video (optional) using the app’s features.
Step 5 – Save: Download the final video in your preferred format.
What are the Benefits of Converting Google Slides into a Video?
1. easy to watch and share.
When making presentations, people often use formats that anyone can easily see. Videos are one such format because they work on phones, TVs, computers, and tablets. This makes them accessible even for those who aren’t familiar with Google Slides. People can share videos on platforms like YouTube, TikTok, Facebook, or others without needing special software.
Plus, videos don’t need any special programs to watch or share files. Unlike Google Slides, which needs a Google account to see and send files.
2. Engaging Content Everywhere
Videos work well on different platforms, reaching a wide audience. They get lots of likes and comments on social media. You can also put videos on websites for tutorials and demos, making your site more exciting and keeping people’s attention longer.
If you add a video to emails, people are more likely to click and watch. It’s a way to keep people interested using modern techniques like email marketing.
3. Better Storytelling
In business, presentations can be really important. Sometimes Google Slides might not be enough to explain ideas to investors. Using videos can make storytelling better by mixing text with pictures and effects. Adding voiceovers and narrations can make presentations more personal.
Videos can create strong emotional connections with music and animations. When explaining hard stuff, videos can make it easier for people to understand ideas.
4. Easy Offline Viewing
Change Google Slides into a video and get a file with all the pictures and stuff. You can save this file on your device or share it with others. Unlike Google Slides, you don’t need the internet to see the file. You can download videos and watch them later, even if you’re not online. Also, you can record conferences to remember what was said later.
Frequently Asked Questions
How do i convert google slides to powerpoint.
You can change your Google Slides into PowerPoint. Just download your Google Slides file as a PowerPoint file. To do this, go to the top bar, click on “File,” and then select “Download.”
How to Convert Google Slides to PowerPoint with Audio?
Unfortunately, you can’t directly convert Google Slides to PowerPoint with audio. You’ll need to export the Slides as a PPT file. After downloading it, open the file in Microsoft PowerPoint and then add the audio manually.
Will my slide animations work in the video?
Sometimes, depending on the method you choose.
How long does it take to convert Google Slides to video?
It depends on the length of your presentation and the tool you use.
Save Time and Effortlessly Create Presentations with SlidesAI


Google Slides: How to add GIFs and stickers to your presentation
G oogle Slides helps you make impressive presentations with its diverse template library, collaboration options, and seamless integration with Google apps. You can use it on your Android phone, iPhone, desktop PC, laptop, or affordable Chromebook . Your audience might lose interest if your slides appear uninspired. Break the monotony by including an occasional GIF or sticker. This tutorial shows you how to add GIFs and stickers to Google Slides.
When to add GIFs and stickers to Google Slides
A GIF (Graphics Interchange Format) is an image file that uses a series of pictures to create an animated sequence. It's like a video without sound and is typically used to express reactions or make memes.
If you think your presentation might cause audience members to nod off to sleep, add a GIF or two to your Google Slides. There's a time and place for humor, so use it sparingly. For instance, a funny Star Wars GIF or sticker will attract your classmates' attention. But it might not fly during a board meeting presentation.
How to autoplay your Google Slides presentation
How to get gifs and stickers for your presentation.
If you can't find a particular GIF or sticker online, go to Giphy or Tenor.com and enter your search term. You can also explore the trending section to find popular GIFs. If you're using a phone, download the Giphy app from the Google Play Store or Apple App Store. You'll also find other third-party apps for Android and iOS.
How to add GIFs and stickers on desktop
We walk you through three ways of adding GIFs and stickers to Google Slides. The first method adds them from the web, the second accesses GIFs downloaded to your desktop PC, and the third uses a web link.
How to add GIFs and stickers from the web
- Open Google Slides .
- Click Insert from the toolbar.
- Select Image .
- Choose GIFs and stickers .
- Enter your search term.
- Select the GIF or sticker you want to add.
- Click Insert .
- To resize the image, click and drag any corner.
How to add GIFs and stickers saved on your computer
Adding GIFs and stickers from your computer is the easiest way to include them in your slideshow. You must download them to your PC before following these steps.
- Click Upload from computer .
How to add GIFs and stickers via URLs
First, keep your GIF or sticker's URL handy.
- Choose By URL .
- Paste the link.
- Click Insert image .
How to add GIFs and stickers on mobile
The Google Slides mobile app isn't as feature-rich as the desktop version. However, it will do in a pinch. First, download the GIFs or stickers you want on your phone. You can't add them to your presentation via URL.
The following steps work on Android and iOS. We use an Android smartphone in this tutorial, but iPhone users can follow along.
- Open the Google Slides app.
- Tap the plus icon in the upper-right corner.
- Select Image . Close
- Tap From photos .
- Choose a GIF or sticker from your gallery. Close
Why can't I add a GIF or sticker to Google Slides?
There are many reasons why your GIF or sticker might not load correctly despite following the steps listed above.
- Older versions of Google Slides might have issues with GIF playback, so get the latest update.
- GIFs and stickers may not appear as intended if you have poor internet connectivity. To avoid issues, download and add them to your slides instead of using URLs.
- Large GIF files may not work well with Slides. Compress the images or replace them with smaller files.
The best Google Slides templates for work, school, and home
How to edit gifs and stickers in google slides.
You can customize GIFs to match the theme of your presentation. You can add a border, crop, resize, and recolor images.
How to crop an image
- Double-click the GIF or sticker.
- Drag the black tabs until the image gets cropped to your preference.
- When you're happy with the final image, press Enter . If you aren't, type Ctrl + Z to undo the changes.
How to use formatting options
Use Google Slides' formatting options to change your GIF or sticker's orientation, size, color, opacity, and brightness.
- Select your GIF or sticker by clicking it.
- Select Format from the toolbar.
- Click Format options .
- Adjust the orientation or size from the Size and Rotation section.
- Change the tone of the image from the Recolor section.
- Customize your image's opacity, brightness, or contrast from the Adjustments section.
How to add a border
- Click the GIF or sticker.
- Select the pencil icon from the menu bar.
- Choose a border color.
- Click the border weight icon to adjust the thickness.
Get your point across with GIFs and stickers
If a picture is worth a thousand words, animated GIFS are worth even more. Pique your audience's interest by adding GIFs and stickers in Google Slides. If you want to make custom GIFs on Android, we have a guide for creating GIFs from stop-motion photos .

Like what you're reading?
How to make a slideshow with music using Prezi
Get your team on prezi – watch this on demand video.

Anete Ezera March 29, 2024
Ever thought about why we remember movie scenes? It’s because music moves us, and sticks with us. That’s exactly why knowing how to make a slideshow with music is a must. And with Prezi, it’s easy to add slideshow music to presentations, showcasing your message loud and clear.
Prezi is your go-to platform for creating presentations that truly resonate. Here, you’re not just stacking slides but crafting experiences. From embedding the perfect background music to compliment your narrative, to mixing visuals and text in the most effective way, Prezi transforms your story into an immersive journey. Let’s dive into all you need to know about how to make a slideshow with music.

What are multimedia elements?
Multimedia elements transform a bland presentation into an unforgettable experience. A good presentation combines many different forms of multimedia to create the finished product. Let’s look at some key multimedia for presentations:
- Images: Consider images as a medium that instantly pulls viewers towards them. They are strong agents in sending your ideas across, stimulating feelings, and also enhancing your plot.
- Music: Presentations are shaped by music. It can influence mood and provide an emotional experience that’s going to ensure people remember the message.
- Text: Often the focus of a presentation. The text delivers the critical details — clear, concise, and compelling. It’s your voice when you’re not speaking, so make every word count.
- Videos: Videos make your point more understandable. They are able to show how things happen, inform about case studies, or just make the audience feel in a different world and time. It is telling stories on the move.
- Animations: Enhance your presentation with animations that can increase interest and attract attention, especially when you have a lot of data to present or need to demonstrate complex processes. They are also ideal for bringing a little element of enjoyment into the display.
Every element has its own role to play in connecting with the senses of the audience. By using tools like Prezi, the integration of such elements into your presentations is actually easier than you might expect. Whether that’s incorporating an inspiring soundtrack, using breathtaking imagery, or captivating videos, Prezi allows you to realize your vision. Now, let’s delve deeper into how to make a slideshow with music.
The advantages of knowing how to make a slideshow with music
For those wondering how to make a slideshow with music, understanding its importance is a good place to start. Adding music to your presentations is about more than just filling the silence. Here’s why music is your best ally in presentations:
- Sets the tone: From the get-go, music can establish the mood. Whether you’re aiming for motivational, contemplative, or energetic, the right music cues up your audience’s emotions to match your message.
- Boosts engagement: Let’s face it, we all have a bit of a wandering mind. Music acts as a gentle tether, keeping your audience engaged and interested, making them more likely to absorb your message.
- Aids retention: Ever had a song stuck in your head? That’s the power of music. When associated with your key points, music can help those ideas stick, enhancing recall long after your presentation ends.
- Emotional connection: Music has a unique way of touching hearts. By pairing your content with the right tunes, you create a memorable experience that can resonate on a deeper level.

In short, music is a tool that can elevate your presentations from good to great. With Prezi, incorporating music becomes an effortless part of your storytelling, ensuring your presentations not only convey information but also emotion and inspiration.
The psychology behind music-infused presentations
Have you ever noticed how a certain melody can evoke strong emotions or transport you back to a particular moment in time? Music goes beyond what words can achieve, by playing a key role in influencing emotions and memories. Recognizing the way that music affects our minds can really influence the quality of your presentations.
Since music has a dramatic impact on many parts of the brain, especially those linked to emotion, focus, and memory, choosing music for slideshows that matches the theme makes a more profound impression.
Additionally, music can foster a sense of unity and belonging among listeners. When your audience shares a musical experience, it can turn your presentation into a collective journey, rather than just a lecture.

So, the next time you’re wondering how to make a slideshow with music, consider the psychological impact that music can have on your audience. By harnessing the power of music to create emotional resonance and connection, you can elevate your presentations from informative to unforgettable.
Choosing the right music
Selecting the right music for your presentation is crucial. It’s about finding a melody that amplifies your message rather than just picking a popular track. Here are some tips to ensure your music hits the right note:
- Align with your theme: The music should mirror the essence of your presentation. A motivational speech? Go for something uplifting. A solemn topic? Choose a more subdued soundtrack. Connecting with the overall theme is an important aspect for those who are questioning how to make a slideshow with music.
- Know your audience: Consider who’s listening. What might resonate with them? The right music for slideshows can build a bridge between your message and their perceptions.
- Purpose over preference: Always choose music that serves the purpose of your presentation. It should enhance, not distract. Whether it’s to energize, soothe, or inspire, make sure the music plays its role effectively.
- Consider the pace and energy: The tempo of your music should match the pace of your presentation. Faster music can add excitement to dynamic, fast-paced sections, while slower tempos might be better for moments requiring reflection or emphasis.
- Mind the rights: Last but not least, legality. Ensure you have the right to use the music. There are plenty of royalty-free options that can suit your presentation perfectly without causing legal headaches.
With these guidelines in mind, choosing the right music becomes a strategic decision that enhances the impact of your presentation, creating a more engaging and memorable experience for your audience. But, for those still wondering how to create a slideshow with music, the simple answer is Prezi .
Prezi: the perfect place for adding music to slideshows
Navigating the creation of presentations has never been easier, thanks to Prezi. Gone are the days of static slides and monotone monologues. Prezi revolutionizes how we share ideas, transforming every presentation into an engaging, memorable journey. Let’s explore why Prezi is your ultimate tool for those who need to know how to make a slideshow with music.
The canvas is yours
Prezi breaks free from the traditional slide-by-slide format, offering you an open canvas. This freedom allows for a more natural flow of information, where you can zoom in on details or pull back to show the big picture. It’s storytelling without boundaries, where each zoom can highlight a new chapter in your narrative.
A symphony of visuals and music
Imagine your presentation as a symphony, where each element plays a part in creating a captivating performance. Prezi makes it easy to conduct this symphony, blending visuals with music to set the tone and rhythm of your story. Whether it’s a stirring background track or an upbeat tune to energize your audience, Prezi helps you synchronize your content with the perfect soundtrack.
Engage with every zoom
Prezi’s signature zoom feature isn’t just about moving closer or farther away. It’s about engagement. By zooming into specific details, you draw your audience’s attention right where you want it. Then, zoom out to provide context, showing how each piece fits into the larger puzzle. It’s a dynamic way to keep your audience hooked from start to finish.
Explore this presentation and see how engaging the experience is for yourself:
Visuals at your fingertips
With Prezi, you’re never short on creativity. A vast library of visuals is at your disposal, ready to enhance your message. From high-quality images to engaging animations, these elements can be seamlessly integrated into your presentation, ensuring that your ideas are felt by everyone. So, if you’ve been worrying about how to make a picture slideshow with music and animations blend seamlessly, Prezi has you covered.
The power of Prezi Video
These days, personal connection is more important than ever. Prezi Video brings that connection to the forefront, allowing you to share your screen and yourself simultaneously. Not only that, but Prezi Video allows users to import and play videos whilst presenting, so you can communicate your points with ease. Whether you’re presenting life or recording a message, this feature adds a personal touch that can significantly boost engagement and comprehension.

Making an impact
Ultimately, the goal of any presentation is to make an impact, and to leave your audience with something they’ll remember. Prezi empowers you to do just that. By harmonizing music with visuals and narrative, you create a multisensory experience that engages, informs, and inspires. It’s not just about sharing information; it’s about making an impression that lasts.
Tailoring music to your theme: how to add music to a slideshow with Prezi
Whether you need a soft melody to underscore a serious point or a lively tune to celebrate a milestone, Prezi makes it easy to integrate the perfect music that complements your theme. To answer the question of how to make a slideshow with music, Prezi provides an option to import MP3 or M4A files from your computer.

You can also select a file from your Google Drive, One Drive, or Dropbox account by clicking the arrow next to the upload button. In our support article , you can find a step by step instruction.
Put your creative ideas into action after discovering how to make a slideshow with music
In conclusion, never underestimate the power of music in your presentations. It’s not just background noise; it can elevate your message, engage your audience, and make your presentation unforgettable. And there’s no better partner when making a slideshow with music than Prezi . With its intuitive platform, integrating music into your presentations is an effortless process. Whether you need to inspire action, convey emotion, or simply make your points stick, knowing how to make a slideshow with music is invaluable for crafting presentations that truly stand out.

As you look forward to your next presentation, consider the role music can play in bringing your message to life. With Prezi’s innovative features at your fingertips, you’re equipped to create presentations that capture attention as well as capture the hearts of your audience. Embrace the power of music and let Prezi be your guide to presentations that truly make an impression and are remembered long after the final slide.

Give your team the tools they need to engage
Like what you’re reading join the mailing list..
- Prezi for Teams
- Top Presentations
Introducing .NET Smart Components – AI-powered UI controls

Daniel Roth
March 20th, 2024 24 20
New advances in AI promise to revolutionize how we interact with and use software. But adding AI features into existing software can be challenging. That’s why we built the new .NET Smart Components, a set of genuinely useful AI-powered UI components that you can quickly and easily add to .NET apps. You don’t have to spend weeks of dev time redesigning your UX or researching machine learning and prompt engineering. .NET Smart Components are prebuilt end-to-end AI features that you can drop into your existing app UIs to make your users more productive.
The .NET Smart Components are an experiment and are initially available for Blazor, MVC, and Razor Pages with .NET 6 and later. We expect to provide components for other .NET UI frameworks as well, like .NET MAUI, WPF, and Windows Forms, but first we’re interested in your feedback on how useful these components are and what additional capabilities you’d like to see added.
Watch Steve Sanderson demonstrate what the .NET Smart Components can do:
What’s included
The .NET Smart Components currently include the following smart features:
Smart Paste
Smart Paste fills out forms automatically using data from the user’s clipboard with the click of a button. You can use this with any existing form in your web app. This helps users add data from external sources without re-typing.
Learn more: Smart Paste docs
Smart TextArea
An intelligent upgrade to the traditional textarea. You can configure how it should autocomplete whole sentences using your own preferred tone, policies, URLs, and so on. This helps users type faster and not have to remember URLs etc.
Learn more: Smart TextArea docs
Smart ComboBox
Upgrades the traditional combobox by making suggestions based on semantic matching. This helps users find what they’re looking for.
Learn more: Smart ComboBox docs
Running the samples
You can try out the .NET Smart Components with Blazor or MVC/RazorPages using the .NET Smart Components sample apps on GitHub.
To get started with the .NET Smart Components sample apps:
Download and install the .NET SDK if you don’t already have it installed.
Clone or download the .NET Smart Components sample repo from GitHub: https://aka.ms/smartcomponents.
Deploy an Azure OpenAI backend if you don’t already have one, and then edit the RepoSharedConfig.json file at the root of the solution to add your API key, deployment name, and endpoint URL.
RepoSharedConfig.json
Run either ExampleBlazorApp or ExampleMvcRazorPagesApp to see the .NET Smart Components in action.
Add to an existing app
Once you’re ready, you can add .NET Smart Components to your existing Blazor, MVC, or Razor Pages apps by following these guides:
- Get started with .NET Smart Components and Blazor
- Get started with .NET Smart Components and MVC or Razor Pages
Feedback and support
The .NET Smart Components are currently experimental and not officially supported. We want to hear from you whether these components are useful and how we can improve them to best meet your app development needs. Please take a moment to share your thoughts and feedback with us by filling out our short .NET Smart Components survey . You can also report issues and suggest improvements by creating an issue on GitHub.
Thank you for trying out the .NET Smart Components!

Daniel Roth Principal Product Manager, ASP.NET

24 comments
Leave a comment cancel reply.
Log in to join the discussion or edit/delete existing comments.
Looks promising. But without source code it isn’t of much use if you want to combine the smart features with third party UI libraries.
Hi Samuel. We expect to make the source available once we establish there is sufficient interest. We’ve already received this request from others on GitHub, so can go ahead and add your 👍 on the original post of this issue: https://github.com/dotnet-smartcomponents/smartcomponents/issues/13 .
I would question the AI part of this functionality, not every if statement is AI. and the smart paste makes me shudder in fear, because of privacy concern. that my paste content gets uploaded to server, and analyzed.
Thanks for sharing this feedback! Please note these components aren’t just doing simple if statements – they’re leveraging AI services to augment the user experience.
As for privacy, these components are intended to be used as part of forms that would submit to your server anyway. The data also gets sent to Azure OpenAI, which has a strict privacy policy that you can read about here: https://learn.microsoft.com/legal/cognitive-services/openai/data-privacy .
Did you have to type all this answer, or did you use a smart component? 😉
How can I run it on the WPF or WinUI framework?
As was pointed out
are initially available for Blazor, MVC, and Razor Pages with .NET 6 and later. We expect to provide components for other .NET UI frameworks as well, like .NET MAUI, WPF, and Windows Forms, but first we’re interested in your feedback on how useful these components are and what additional capabilities you’d like to see added.
Does it also work with an API key from openai.com, at least for playing around with it?
Hi Alex. Yup, you can instructions on how to use an OpenAI API key here: https://github.com/dotnet-smartcomponents/smartcomponents/blob/main/docs/configure-openai-backend.md
Nice idea! I wonder if this could have been implemented as a browser extension that can work on any site.
Looks interesting but as the OpenAI backend is still by request only and only available to organisations (not individuals) with an Azure subscription it’s usefulness as something to even try out is rather limited
You can alternatively use an OpenAI API key. Instructions here: https://github.com/dotnet-smartcomponents/smartcomponents/blob/main/docs/configure-openai-backend.md
Fantastic application of existing technology to solve real-world problems! Amazing.
Why just web pages and blazor? How about with MAUI and WinUI?
Hi Ken. We wanted to get feedback from the community first on how useful these components are before we expand them to other UI frameworks. If you’d like to use these components with a particular UI framework, please let us know on our GitHub issue tracker: https://github.com/dotnet-smartcomponents/smartcomponents/issues .
That looks great. One question: I don’t want to keep the API Key in the appsettings.Development.json because the source code, including this json, is public on GitHub. So is there a way for me to get it from environment variable and register it in the Program.cs (I’m using Blazor Web Server)?
Or am I overthinking, as there may be no threat model to require me to secure the API Key?
Please refer to https://learn.microsoft.com/en-us/aspnet/core/security/app-secrets?view=aspnetcore-8.0 for more info about storing your secrets during development.
Thank you. Just want to report that it works on Azure with the Environment Variables keys as SmartComponents__ApiKey and SmartComponents__DeploymentName.
I keep getting errors when running either of the apps and I believe it points too when I put in my account in place of YOUR_ACCOUNT. And not recognizing my DeploymentName.
Hi Karen. If you’re using Azure OpenAI, you should be able to get the endpoint URL from the Azure portal when you browse to your Azure OpenAI resource. To get the deployment name, make sure you actually create a deployment using the Azure AI Studio and then use the name from that deployment. You can get to the Azure AI Studio from your Azure OpenAI resource in the Azure portal.

Insert/edit link
Enter the destination URL
Or link to existing content
Turn your presentation into a video
When you make a recording of a presentation, all its elements (narration, animation, pointer movements, timings, and so on) are saved in the presentation itself. In essence, the presentation becomes a video that your audience can watch in PowerPoint.
So you have two options for turning your presentation into a video that's ready to view:
Save/export your presentation to a video file format (.mp4 or .wmv).
Save your presentation as a PowerPoint Show (.ppsx) file. (A PowerPoint Show appears full-screen in Slide Show, ready to view immediately.)
Save as a video file
After you've created your slides and recorded any timing and narrations and laser pointer gestures that you want to include, you're ready to create a video file.

On the File menu, select Save to ensure all your recent work has been saved in PowerPoint presentation format (.pptx).
Click File > Export > Create a Video . (Or, on the Recording tab of the ribbon, click Export to Video .)
In the first drop-down box under the Create a Video heading, select the video quality you want, which pertains to the resolution of the finished video. The higher the video quality, the larger the file size. (You may want to test them to determine which one meets your needs.)
* The Ultra HD (4K) option is only available if you're using Windows 10 or later.
The second drop-down box under the Create a Video heading tells whether your presentation includes narration and timings. (You may switch this setting if you like.)
If you haven't recorded timed narration, by default the value is Don't Use Recorded Timings and Narrations .
The default time spent on each slide is 5 seconds. You can change that timing in the Seconds to spend on each slide box. To the right of the box, click the up arrow to increase the duration, or click the down arrow to decrease the duration.
If you have recorded a timed narration, by default the value is Use Recorded Timings and Narrations .
Click Create Video .
In the File name box, enter a file name for the video, browse for the folder that will contain this file, and then click Save .
In the Save as type box, choose either MPEG-4 Video or Windows Media Video .
You can track the progress of the video creation by looking at the status bar at the bottom of your screen. The video creation process can take up to several hours depending on the length of the video and the complexity of the presentation.
Tip: For a long video, you can set it up to be created overnight. That way, it’ll be ready for you the following morning.
To play your newly-created video, go to the designated folder location, and then double-click the file.
Save as a PowerPoint Show
When someone opens a PowerPoint Show file, it appears full-screen in Slide Show, rather than in edit mode. The viewer begins watching the presentation immediately.
On the File menu, select Save As .
Choose the folder location where you want to store your PowerPoint Show file.
In the Save as type box, choose PowerPoint Show (*.ppsx) .

Select Save .
Why turn your presentation into a video?
When you want to give a high-fidelity version of your presentation to colleagues or customers (either as an e-mail attachment, published to the web, on a CD or DVD), save it and let it play as a video.
You can save your presentation as either an MPEG-4 video file (.mp4) or a .wmv file. Both formats are widely supported and can be streamed over the internet.
Some tips to remember when recording your presentation as a video:
You can record and time voice narration and laser pointer movements in your video.
You can control the size of the multimedia file and the quality of your video.
You can include animations and transitions in your movie.
Viewers do not need to have PowerPoint installed on their computers to watch it.
If your presentation contains an embedded video, the video will play correctly without your needing to control it.
Depending on the content of your presentation, creating a video may take some time. Lengthy presentations and presentations with animations, transitions, and media content will likely take longer to create. Fortunately, you can continue to use PowerPoint while the video is being created
What parts of a presentation won't be included in a video?
The following items won't be included in a video that you create using PowerPoint:
Media inserted in previous versions of PowerPoint. To include these, you can convert or upgrade the media object.
For example, if you inserted the media using PowerPoint 2007, it will be linked and it will play in the presentation. However, when you export the file as a video, the linked media will be dropped. You can convert the file to the new file format (click the File tab, and under Info , click Convert ), or you can right-click the media object and then click to upgrade; it will embed the file and export it correctly.
QuickTime media (unless you have a third-party QuickTime codec named ffdShow installed and you have optimized for compatibility)
OLE/ActiveX controls
What to do with your video after creating it
After you create a video, you can share it with others by using the following methods:
Email your presentation to others
Save to a file share or other location
Upload it to your organization's Microsoft Stream video-sharing site , as described in the next section, "Save to a video-sharing site."
Save to the Microsoft video-sharing site
After you've created the video file, you can upload it to a video-sharing site. Microsoft Stream is an enterprise video service where people in an organization can upload, view, and share videos. Microsoft 365 business or education subscribers have access to this service from within PowerPoint for Microsoft 365.
Select File > Export , and then select Publish to Microsoft Stream .

Type a title and a description for the video.
Set other options, including whether you want others in your organization to have permission to see the video:

Select the Publish button.
The upload process can take several minutes, depending on the length of the video. A status bar at the bottom of the PowerPoint window tracks the progress, and PowerPoint shows a message when the upload is finished:

Click the message to go directly to the video playback page on Microsoft Stream.
For more information about this service, begin reading with What is Microsoft Stream? It includes information about Office 365 Video vs. Microsoft Stream.
1 The Ultra HD (4K) option is only available if you're using Windows 10 or later. 2 In PowerPoint 2016, the Ultra HD (4K) option isn't available in the Volume License edition.
When someone opens a PowerPoint Show file, it appears full-screen in Slide Show, rather than in edit mode. The viewer begins watching the presentation immediately.
Burn your presentation to a disc
Click File > Export > Create a Video .
PowerPoint 2013 and newer versions can save your presentation as either an MPEG-4 video file (.mp4) or a .wmv file. Both formats are widely supported and can be streamed over the internet.

Need more help?
Want more options.
Explore subscription benefits, browse training courses, learn how to secure your device, and more.

Microsoft 365 subscription benefits

Microsoft 365 training

Microsoft security

Accessibility center
Communities help you ask and answer questions, give feedback, and hear from experts with rich knowledge.

Ask the Microsoft Community

Microsoft Tech Community

Windows Insiders
Microsoft 365 Insiders
Find solutions to common problems or get help from a support agent.

Online support
Was this information helpful?
Thank you for your feedback.
How-To Geek
How to send a video through email.
You might be limited by the file size, but there are a few workarounds.
Quick Links
Ways to send a video via email, send a video through email with gmail, send a video through email with outlook, other options for sharing a video via email.
Like all other files, it's possible to send videos via emails and you can do this with any email provider. There are two ways to do it, and your choice depends on the video's file size. Let's take a look.
Related: What Is Cloud Storage, and Why Should You Use It?
Most email providers cap the size of the files that you can attach to your emails . For instance, in Gmail, you can only attach files up to 25 MB in size. In Outlook, the attachment limit is 20 MB.
That means if your video's file size is within the allowed file limit, you can attach your video to your email directly. It will be sent like a regular attachment.
However, if your video's file size exceeds the maximum limit, you can't attach your video to your emails. In this case, use a cloud storage provider and upload your video there. Then add your video's link in your email so that the recipient can view and download the video. We'll explain how to do just this in the sections below.
To use Gmail to send your video, first, open a web browser on your desktop and launch the Gmail site.
In the following instructions, we'll be using the desktop version of Gmail. The process for the mobile app is virtually the same, so follow along on mobile if you wish.
Log in to your account on the site, or create a free new Gmail account if you do not already have one.
Related: How to Create a Gmail Account
Once you are logged in, in Gmail's top-left corner, click "Compose" to compose a new email . You will attach your video to this email.
If your video's file size is 25 MB or less, then at the bottom of the "New Message" window, click "Attach Files"(a paperclip icon) and find your video in the dialog that opens.
If your video's file size is larger than 25 MB, then at the bottom of the "New Message" window, click "Insert Files Using Drive." We'll select this option.
On the window that opens, click the "Upload" tab.
On the "Upload" tab, to add a video from your computer, click the "Select Files From Your Device" button.
In the "open" window, select the video file you want to send via email.
Your selected video will be listed on the "Upload" tab. To start uploading the video, click "Upload" at the bottom of the tab.
Gmail will upload your selected video to Google Drive, take you back to the "New Message" window, and automatically attach the video's link in your email.
Fill in the rest of the fields in your email and click "Send" to send your email along with your video's link.
Your recipient can click the video link in the email to access your video on Google Drive. And that's all.
Related: How to Type Emails Faster in Gmail
To use Outlook to email your video to someone, launch a web browser on your computer and access the Outlook site, or open the Outlook app. Sign in to your Outlook account.
Once you are signed in, in Outlook's top-left corner, click "New Message" to compose a new email.
If your video's file size is less than 20 MB, attach your video to your email directly by clicking Attach > Browse This Computer.
Simply select your video file in the dialog that opens.
If your video is larger than 20 MB, then upload it to OneDrive and add its link to your email. Do that by clicking Attach > Upload and Share.
On the "open" window, select the video you want to share via email.
To change which folder your video is uploaded on OneDrive, then in the "Upload To" prompt, click "Change Location." Then start uploading your video file by clicking "Upload."
Outlook will upload your video to OneDrive and add its link to your current email. Now fill in the rest of the fields in the email and hit "Send" at the top to send your email.
Once your recipients receive the email, all they will have to do is click the link in the email to watch your video. And you are all set.
If your video is only slightly larger than the maximum allowed limit for your email provider, try compressing your video (you might want to try zipping the file ) and see if that brings the size under the allowed limit.
Another option is to upload your video to YouTube , set the video to "Unlisted" so only the chosen people can watch it, and then share the video's link with your people via email. This isn't very different from the Google Drive and OneDrive options that we discussed above.
And that's how you can share your videos with people via email. Happy sharing!
If you often have to send large files via email , check out our dedicated guide to learn what options you have.
Related: Email Attachment Size Limit: How to Send Large Files via Email
IMAGES
VIDEO
COMMENTS
Adjust the playback settings. Select the video and click the Playback tab. You'll be able to edit how your video plays on the slide. To adjust when the video plays, click the drop-down menu next to Start:.Select In Click Sequence, Automatically, or When Clicked On.; Check the boxes to apply any of the following: Play Full Screen, Hide While Not Playing, Loop until Stopped, and/or Rewind after ...
Then, open your presentation with PowerPoint on your computer. On the PowerPoint window, in the left sidebar, click the slide in which you want to add a video. At the top of the PowerPoint window, click the "Insert" tab. In the "Insert" tab, under the "Media" section (which is to the extreme right side of the interface), click "Video."
In Normal view, click the slide where you want the link to the video to be in. On the Insert tab, click the arrow under Video, and then select This Device (or Video on My PC ). In the Insert Video box, click the file that you want to link to, click the down arrow next to the Insert button, and then click Link to File.
Copy the address of the web page from the Address bar of your browser. Switch to PowerPoint for the web and select the slide where you want to place the video. On the Insert tab of the ribbon, in the Media group, select Online Video. In the Online Video dialog box, paste the address you copied in step 2. Select Insert.
In this video, you'll learn the basics of inserting videos in PowerPoint 2019, PowerPoint 2016, and Office 365. Visit https://edu.gcfglobal.org/en/powerpoint...
Haily is here to run you through the ins-and-outs of adding a video to your PowerPoint presentation — whether that's by inserting a video, uploading a linked...
Select Format to put frames and effects on your video. Select Video Effects, Video Border, or Video Shape to add effects, borders, or crop your video to a shape. Select Corrections or Color to adjust the video's color tone. Select Poster Frame to choose the video's opening frame, and then click and drag with your mouse to select your ...
Step 3: Insert the URL from YouTube. Right-click the video to copy the video link or embed code, or click Share to get the embed code. Then, paste the URL or embed code in the link field. A preview of your video will appear in the Insert video dialog box. Click Insert to embed the video in your presentation.
In this step-by-step tutorial video, learn how to insert a video on YouTube into a Microsoft PowerPoint presentation. Along with embedding the video, I also ...
How to Add Video to PowerPoint. Just as we explained in a previous tutorial about how to add a video to Google Slides, adding a video to PowerPoint is quite similar. To get started, click the Insert tab and select Media -> Video. Now, select the source for your video. Insert a video from This Device.
Select the Video. Click Insert. Clicking Insert, the video is added to your PowerPoint slide as an editable PowerPoint object, as you can see below. With the video now inserted on your slide, you can use the features found in the Video Playback and Formatting tabs.
Select the slide where you want to embed the YouTube video. On the "Insert" tab, click the "Video" button. On the drop-down menu, select the "Online Video" option. The Insert Video window that appears lets you search YouTube for a video or paste in that embed code you copied from the YouTube website. Paste the embed code and click ...
Select the slide you want the video to appear on. Click over to the Insert tab. Click the arrow next to Video, then select Video on My PC. Select the video from your computer's files and click Insert. With PowerPoint, when you save your presentation file, having an embedded video will greatly increase the file size.
To insert a video file into PowerPoint, open your presentation and select a slide. From the ribbon bar, click Insert > Video > Video on my PC. Locate the video file on your PC in the Insert Video ...
Start the embed process by accessing Google Slides in a web browser and launching your presentation. Select the slide in which you want to embed your video, then from the menu bar at the top, select Insert > Video. On the "Insert Video" window, from the tab list at the top, select the "Google Drive" tab. In the "Google Drive" tab, find and ...
Upload. Open your presentation in Google Slides and select the slide where you want to add the video. Click Insert → Video. A new window will open. On the Google Drive tab you'll see all your videos stored in or shared with your Google Drive account. Choose the video you want to upload and click Select. The video will be added to the slide ...
A video presentation is a presentation that can be shared and viewed as a video. Technically, for a presentation to be a video presentation, it must be an MP4 or MOV file type. A video presentation can be shared online on YouTube, Vimeo and other social media platforms. The best part of a video presentation with audio is that you can share it ...
Click Recording tab > Video > and then browse to the location on your computer or network where the video file is stored. Select the file and click Insert.. The video will "auto-play" That means that when viewers look at the presentation in Slide Show, and they arrive at the slide where the video is placed, the video immediately begins to play.The viewer doesn't need to click Play to start it.
Join 400,000+ professionals in our courses here 👉 https://link.xelplus.com/yt-d-all-coursesLearn how to create a video using PowerPoint. I'll first show you...
Finally, here is an important point about videos and file size. When you click Insert to insert a video the video file is embedded in the presentation and that results in a large file size for the presentation. To reduce file size, save the presentation and click the FILE tab on the Info tab under properties you will see the file size.
If you need to remove the video, simply right-click on it and select "delete." To see how your video will look during the actual presentation, click on "Slideshow." This step is always a bit magical, seeing how your content comes to life. Watch this YouTube video to see how to embed a YouTube video into Google Slides:
The advantages of PowerPoint presentations in education. Students have different learning styles: some are visual learners, who retain images and videos more effectively than speech.Some take to audio and sound more easily. Others prefer to interact with their lessons—which usually refers to holding physical objects but can also be directly related to guessing answers and responding to ...
Head on to the recording studio. Access the "Present and record" option on the editor's top-right side or click on the three-dot menu to select it among recommended actions. Select "Go to recording studio" and set up your camera and microphone. Start recording with your notes in Presenter's View and have the options to pause and ...
When your presentation becomes a video, it will include the background sound you added. If you want to know more, take a look at the step-by-step instructions below: Step 1 - Install: Go to Extensions > Add-ons > Get add-ons. Search for "Creator Studio" and install it. Step 2 - Open: Go to Extensions > Creator Studio > Create Video.
G oogle Slides helps you make impressive presentations with its diverse template library, collaboration options, and seamless integration with Google apps. You can use it on your Android phone ...
Learn how to publish your own video using Microsoft PowerPoint with narration, annotations, animations, and timings. As full disclosure, I work at Microsoft ...
Videos: Videos make your point more understandable. They are able to show how things happen, inform about case studies, or just make the audience feel in a different world and time. It is telling stories on the move. ... Adding music to your presentations is about more than just filling the silence. Here's why music is your best ally in ...
New advances in AI promise to revolutionize how we interact with and use software. But adding AI features into existing software can be challenging. That's why we built the new .NET Smart Components, a set of genuinely useful AI-powered UI components that you can quickly and easily add to .NET apps.
Click File > Export > Create a Video. (Or, on the Recording tab of the ribbon, click Export to Video .) In the first drop-down box under the Create a Video heading, select the video quality you want, which pertains to the resolution of the finished video. The higher the video quality, the larger the file size.
On the "Upload" tab, to add a video from your computer, click the "Select Files From Your Device" button. In the "open" window, select the video file you want to send via email. Your selected video will be listed on the "Upload" tab. To start uploading the video, click "Upload" at the bottom of the tab.