
Return to Blog
The art foundations of painting and drawing: a comprehensive review on painting foundations, in this article, we will delve deep into the essential foundations of painting, from drawing fundamentals to composition and color theory, equipping you with the knowledge and skills necessary to transform your art journey and unleash your true potential as an artist and picture-maker., key takeaways.
- Gain essential skills and knowledge to create captivating artwork with John English’s Foundations of painting drawing on-demand workshop
- Explore the fundamentals of painting through hands-on demonstrations, figure drawing, landscape painting & working with mixed media.
- Master composition, form principles, color theory & perspective techniques for a professional portfolio that impresses!
Topics Covered

Whether you’re an aspiring illustrator or just keen to learn art fundamentals, getting a grasp on the foundations of painting and drawing is vital for your artistic development. The world of art is vast and detailed, but most students can see significant progress by focusing on eight key areas:
- Fundamentals of drawing
Foundations of painting
Composition, using reference for picture-making, principles of form, color theory, perspective, portfolio development.
Sharpening your skills in these areas, guided by an amazing teacher, enables you to craft beautiful and captivating art that stands out.
Foundations of Drawing and Painting: A Review of a learn-by-doing on-demand workshop

Grasping the basics of drawing is fundamental for any artist, serving as the foundation for crafting realistic and visually appealing paintings. The drawing fundamentals include:
- Techniques such as mark making
- Understanding proportions and perspective
- Shading and highlighting
- Creating texture and depth
These essential building blocks for crafting beautiful and captivating drawings can be found in everyday objects.
Developing a toolkit of drawing fundamentals can empower you to easily solve many technical issues on the picture plane. By studying anatomy, perspective, and figure drawing, you can gain valuable knowledge that will help you create more realistic and dynamic drawings. The course “Fundamentals of Drawing,” taught by the inspiring instructor Maria Lia Malandrino, provides an excellent opportunity to explore the foundational principles of drawing in a structured way.
Anatomy is a great way of understanding the structure of any given thing, and with that knowledge, you can better capture the way those elements “stack” in your drawings. Additionally, understanding value can help you create more realistic and dynamic drawings. Anatomy can be incredibly beneficial for professional art, especially in entertainment art and life drawing since it can be used to accurately depict any living creature you may be drawing.

Painting is an exciting and expressive art form that allows artists to create visually stunning works of art. The essential elements of painting include:
All of these elements are essential to creating captivating pieces that will leave a lasting impression on the viewer.
Each of these elements plays a crucial role in the overall success of a painting. For example:
- Color can be a powerful tool in creating contrast, depth, and emotion.
- Composition helps establish a sense of balance and harmony in the artwork.
- Brushwork adds texture and movement.
- Perspective creates a realistic sense of depth and distance.
Mastering these elements allows artists to produce visually appealing and harmonious paintings that make a difference.

The importance of composition in art cannot be overstated. It is the arrangement and organization of the various elements within an artwork, such as:
A well-thought-out composition is essential in creating a harmonious and engaging visual experience that draws the viewer’s eye and keeps them interested in the piece.
When selecting a composition, size, angle, perspective, and attention to foreground/background objects are all important factors to consider. Carefully arranging and blending various elements in your artwork can result in an overall look or effect that leaves a lasting impression, with a well-defined focal point enhancing the visual appeal.
In the Expressions, Acting & Composition subsection, you will uncover how to masterfully simplify human emotion with expression sheets and gain precious insight for crafting captivating expressions.

References play a significant role in art, serving as a source of inspiration or information to help artists understand and depict certain elements accurately. Whether it’s a photograph, a drawing, or any other visual representation, using references can bring your artwork to life, providing accurate depictions of colors, shapes, and textures. They can also help you comprehend the composition of your artwork and create a sense of depth and perspective.
Leveraging references can enable an artist to:
- Craft more realistic and precise artwork
- Understand the composition of the artwork and how to create a sense of depth and perspective
- Enhance the accuracy and realism of artworks, elevating their art to new heights.
The concept of form is an integral part of art, allowing artists to create the illusion of three-dimensional objects through the use of light and shadow. In essence, form is the representation of an object in three dimensions, taking into account its depth, height, and width. All objects are made up of basic shapes like squares, circles, and triangles, and understanding the principles of form can help artists create more realistic and visually appealing artwork.
Applying cross-contour lines for greater definition and refining forms leads to stunning drawings that truly come alive. Drawabox lessons are a fantastic way to build your drawing muscles and improve your ability to create convincing forms in your artwork. With practice and perseverance, artists can develop a deep understanding of form and its role in creating visually stunning artwork.
Mastering the principles of color theory is essential for creating visually appealing and harmonious color schemes in your paintings. Color theory explores how colors work together and how they can influence our feelings and perceptions. Understanding the relationships between colors and their interaction enables artists to create not only visually appealing artwork but also pieces that evoke emotion and narrate a story.

Studying value in art can be immensely beneficial in honing your color selection skills. By understanding the impact of colors and how they can affect the overall mood and atmosphere of an artwork, you can create captivating and emotionally resonant pieces. For example, the digital painting by CGS student Raphaelle B., which uses green hues and pushes the saturation higher on the ghost dragon, demonstrates the power of color in creating visually striking artwork.

Perspective is a crucial element of painting, as it can be utilized to create a realistic sense of depth and distance in a painting. By understanding the principles of perspective, such as horizon lines and vanishing points, artists can create stunning illusions of three dimensions in their two-dimensional artwork. Perspective adds a sense of depth and space, creating a realistic representation of the scene that truly brings it to life.
To master perspective, artists should study the essential techniques and principles that govern this fascinating aspect of art. Learning how objects appear to diminish in size as they recede from the viewer and effective use of horizon lines and vanishing points enable artists to produce not only visually appealing but also accurate representations of the world around us.
Creating a professional and visually appealing portfolio is essential for showcasing your artistic skills and attracting potential clients or employers. Portfolio development involves:
- Creating and organizing a collection of work or projects that demonstrate your talents, skills, and previous experiences
- Highlighting your abilities and accomplishments
- Making it an invaluable tool in furthering your career as an artist.
CG Spectrum’s career services provide invaluable support and feedback on students’ portfolios or showreels, assistance with resume and job searches, and exclusive career workshops and webinars featuring top industry leaders. Leveraging these resources and concentrating on portfolio development helps artists compile a collection of work that not only displays their skills and achievements but also distinguishes them in the competitive art world.
Learn from hands-on demonstrations
In addition to the essential foundations of painting, this article also includes practical demonstrations and examples of various painting techniques to help bring these concepts to life. By exploring:
- Head drawing
- Figure drawing
- Landscape painting
- Working with mixed media
Artists who want to learn can gain hands-on experience and a deeper understanding of the techniques and principles of painting on their art journey, further enhancing their skills and abilities.
This article provides an in-depth look at the fundamentals of painting, from the basics of
Head drawing tutorial

Learning how to accurately draw the human head, including facial features and proportions, is essential for creating realistic and expressive portraits. Studying anatomy, perspective, and shading equips artists with valuable knowledge to create more realistic and dynamic head drawings, capturing the essence and personality of their subjects.
For those looking to learn to draw and improve their head drawing skills, there are plenty of step-by-step tutorials and courses available to help beginners get started. By practicing regularly and applying the principles of head drawing, artists can create stunning portraits that capture the likeness and character of their subjects with accuracy and precision.
figure drawing tutorial

Understanding the principles of human anatomy is crucial for accurately depicting the human figure in various poses and movements. Figure drawing is an amazing art form that allows you to capture the proportions, anatomy, and movement of the human body, creating stunning and lifelike representations of the human form.
Studying human anatomy enables artists to:
- Craft realistic and accurate depictions of the human figure in their drawings
- Effortlessly capture the essence and movement of their subjects
- Bring their artwork to life with accuracy and precision, whether they’re working on a dynamic action scene or a tranquil yoga pose.
Understanding human anatomy and the principles of figure drawing is essential for artists to create lifelike and captivating artwork.
landscape painting demonstration and presentation

Landscape painting is a beautiful and expressive art form that allows artists to explore the beauty of the natural world, from majestic mountains to tranquil valleys and sparkling bodies of water. Mastering the techniques and principles of landscape painting, including composition, color, and perspective, allows artists to create visually stunning outdoor scenes that captivate viewers and transport them to the breathtaking locations depicted in the artwork.
Color is essential in landscape painting to create a sense of depth and atmosphere, as well as to evoke a mood or feeling. Perspective, on the other hand, adds a sense of depth and space, creating a realistic representation of the scene that brings it to life. By studying and applying these principles, artists can create stunning landscape paintings that truly capture the beauty and essence of the natural world.
working with mixed media, an extension of the landscape painting tutorial
Working with mixed media is an exciting and innovative way to explore the possibilities of combining different artistic mediums, such as watercolor, acrylic, and oil paint, to create unique and visually interesting artwork. Mixed media allows artists to experiment with various techniques and materials, resulting in one-of-a-kind pieces that showcase their creativity and versatility.
Experimenting with various materials and techniques allows artists to craft artwork that is more visually engaging than traditional art forms. Some examples of mixed media artwork include stunning paintings that incorporate photography, captivating sculptures that incorporate paint, and creative collages that incorporate sculpture. The possibilities are endless, and the only limit is your imagination.
Mastering the art of painting requires a strong foundation in the essential elements of drawing, composition, form, color theory, perspective, and portfolio development. By practicing and honing your skills in these areas and exploring hands-on demonstrations, you can transform your art journey and create visually stunning and captivating pieces that leave a lasting impression. Remember, the key to success is perseverance, dedication, and a willingness to learn and grow, so don’t be afraid to dive in and explore the fascinating world of painting.
Leave a Reply
Leave a reply cancel reply.
Your email address will not be published. Required fields are marked *
Save my name, email, and website in this browser for the next time I comment.
Share this entry
- Share on Facebook
- Share on Pinterest
- Share on Reddit
- Share by Mail
")
Foundations of Drawing & Painting

John English

Color Theory
This course equips you with a robust understanding of color theory. Learn and master your use of color to elevate the mood, emotion, and impact of your artwork.

Brent Watkinson

Kyle T. Webster: Illustrator, Designer, & Entrepreneur
Kyle Webster is visiting with Visual Arts Passage students and sharing his extensive experience in illustration, design, and entrepreneurship as an artist.

Scott Anderson: Editorial & Publishing Illustrator

Tyler Jacobson: Fine Artist & Illustrator

Audrey Benjaminsen: Illustrator & Painter

Go Where They Gather, A Letter to Artists
Need some guidance.
We can help you with any questions related to enrollment, portfolio development, and the student experience.
Illustration Courses
- Process: Skill and Craft
- Ideation & Visual Storytelling
- Portfolio Development
- Career Development
Fine Arts Courses
- Skill & Style for Fine Arts
- Developing Voice for Fine Arts
Let’s Connect
EarlyBird Enrollment Now Open Use code CHIRP at checkout & save $200
We use essential cookies to make Venngage work. By clicking “Accept All Cookies”, you agree to the storing of cookies on your device to enhance site navigation, analyze site usage, and assist in our marketing efforts.
Manage Cookies
Cookies and similar technologies collect certain information about how you’re using our website. Some of them are essential, and without them you wouldn’t be able to use Venngage. But others are optional, and you get to choose whether we use them or not.
Strictly Necessary Cookies
These cookies are always on, as they’re essential for making Venngage work, and making it safe. Without these cookies, services you’ve asked for can’t be provided.
Show cookie providers
- Google Login
Functionality Cookies
These cookies help us provide enhanced functionality and personalisation, and remember your settings. They may be set by us or by third party providers.
Performance Cookies
These cookies help us analyze how many people are using Venngage, where they come from and how they're using it. If you opt out of these cookies, we can’t get feedback to make Venngage better for you and all our users.
- Google Analytics
Targeting Cookies
These cookies are set by our advertising partners to track your activity and show you relevant Venngage ads on other sites as you browse the internet.
- Google Tag Manager
- Infographics
- Daily Infographics
- Popular Templates
- Accessibility
- Graphic Design
- Graphs and Charts
- Data Visualization
- Human Resources
- Beginner Guides
Blog Beginner Guides How To Make a Good Presentation [A Complete Guide]
How To Make a Good Presentation [A Complete Guide]
Written by: Krystle Wong Jul 20, 2023

A top-notch presentation possesses the power to drive action. From winning stakeholders over and conveying a powerful message to securing funding — your secret weapon lies within the realm of creating an effective presentation .
Being an excellent presenter isn’t confined to the boardroom. Whether you’re delivering a presentation at work, pursuing an academic career, involved in a non-profit organization or even a student, nailing the presentation game is a game-changer.
In this article, I’ll cover the top qualities of compelling presentations and walk you through a step-by-step guide on how to give a good presentation. Here’s a little tip to kick things off: for a headstart, check out Venngage’s collection of free presentation templates . They are fully customizable, and the best part is you don’t need professional design skills to make them shine!
These valuable presentation tips cater to individuals from diverse professional backgrounds, encompassing business professionals, sales and marketing teams, educators, trainers, students, researchers, non-profit organizations, public speakers and presenters.
No matter your field or role, these tips for presenting will equip you with the skills to deliver effective presentations that leave a lasting impression on any audience.
Click to jump ahead:
What are the 10 qualities of a good presentation?
Step-by-step guide on how to prepare an effective presentation, 9 effective techniques to deliver a memorable presentation, faqs on making a good presentation, how to create a presentation with venngage in 5 steps.
When it comes to giving an engaging presentation that leaves a lasting impression, it’s not just about the content — it’s also about how you deliver it. Wondering what makes a good presentation? Well, the best presentations I’ve seen consistently exhibit these 10 qualities:
1. Clear structure
No one likes to get lost in a maze of information. Organize your thoughts into a logical flow, complete with an introduction, main points and a solid conclusion. A structured presentation helps your audience follow along effortlessly, leaving them with a sense of satisfaction at the end.
Regardless of your presentation style , a quality presentation starts with a clear roadmap. Browse through Venngage’s template library and select a presentation template that aligns with your content and presentation goals. Here’s a good presentation example template with a logical layout that includes sections for the introduction, main points, supporting information and a conclusion:

2. Engaging opening
Hook your audience right from the start with an attention-grabbing statement, a fascinating question or maybe even a captivating anecdote. Set the stage for a killer presentation!
The opening moments of your presentation hold immense power – check out these 15 ways to start a presentation to set the stage and captivate your audience.
3. Relevant content
Make sure your content aligns with their interests and needs. Your audience is there for a reason, and that’s to get valuable insights. Avoid fluff and get straight to the point, your audience will be genuinely excited.
4. Effective visual aids
Picture this: a slide with walls of text and tiny charts, yawn! Visual aids should be just that—aiding your presentation. Opt for clear and visually appealing slides, engaging images and informative charts that add value and help reinforce your message.
With Venngage, visualizing data takes no effort at all. You can import data from CSV or Google Sheets seamlessly and create stunning charts, graphs and icon stories effortlessly to showcase your data in a captivating and impactful way.

5. Clear and concise communication
Keep your language simple, and avoid jargon or complicated terms. Communicate your ideas clearly, so your audience can easily grasp and retain the information being conveyed. This can prevent confusion and enhance the overall effectiveness of the message.
6. Engaging delivery
Spice up your presentation with a sprinkle of enthusiasm! Maintain eye contact, use expressive gestures and vary your tone of voice to keep your audience glued to the edge of their seats. A touch of charisma goes a long way!
7. Interaction and audience engagement
Turn your presentation into an interactive experience — encourage questions, foster discussions and maybe even throw in a fun activity. Engaged audiences are more likely to remember and embrace your message.
Transform your slides into an interactive presentation with Venngage’s dynamic features like pop-ups, clickable icons and animated elements. Engage your audience with interactive content that lets them explore and interact with your presentation for a truly immersive experience.

8. Effective storytelling
Who doesn’t love a good story? Weaving relevant anecdotes, case studies or even a personal story into your presentation can captivate your audience and create a lasting impact. Stories build connections and make your message memorable.
A great presentation background is also essential as it sets the tone, creates visual interest and reinforces your message. Enhance the overall aesthetics of your presentation with these 15 presentation background examples and captivate your audience’s attention.
9. Well-timed pacing
Pace your presentation thoughtfully with well-designed presentation slides, neither rushing through nor dragging it out. Respect your audience’s time and ensure you cover all the essential points without losing their interest.
10. Strong conclusion
Last impressions linger! Summarize your main points and leave your audience with a clear takeaway. End your presentation with a bang , a call to action or an inspiring thought that resonates long after the conclusion.
In-person presentations aside, acing a virtual presentation is of paramount importance in today’s digital world. Check out this guide to learn how you can adapt your in-person presentations into virtual presentations .

Preparing an effective presentation starts with laying a strong foundation that goes beyond just creating slides and notes. One of the quickest and best ways to make a presentation would be with the help of a good presentation software .
Otherwise, let me walk you to how to prepare for a presentation step by step and unlock the secrets of crafting a professional presentation that sets you apart.
1. Understand the audience and their needs
Before you dive into preparing your masterpiece, take a moment to get to know your target audience. Tailor your presentation to meet their needs and expectations , and you’ll have them hooked from the start!
2. Conduct thorough research on the topic
Time to hit the books (or the internet)! Don’t skimp on the research with your presentation materials — dive deep into the subject matter and gather valuable insights . The more you know, the more confident you’ll feel in delivering your presentation.
3. Organize the content with a clear structure
No one wants to stumble through a chaotic mess of information. Outline your presentation with a clear and logical flow. Start with a captivating introduction, follow up with main points that build on each other and wrap it up with a powerful conclusion that leaves a lasting impression.
Delivering an effective business presentation hinges on captivating your audience, and Venngage’s professionally designed business presentation templates are tailor-made for this purpose. With thoughtfully structured layouts, these templates enhance your message’s clarity and coherence, ensuring a memorable and engaging experience for your audience members.
Don’t want to build your presentation layout from scratch? pick from these 5 foolproof presentation layout ideas that won’t go wrong.

4. Develop visually appealing and supportive visual aids
Spice up your presentation with eye-catching visuals! Create slides that complement your message, not overshadow it. Remember, a picture is worth a thousand words, but that doesn’t mean you need to overload your slides with text.
Well-chosen designs create a cohesive and professional look, capturing your audience’s attention and enhancing the overall effectiveness of your message. Here’s a list of carefully curated PowerPoint presentation templates and great background graphics that will significantly influence the visual appeal and engagement of your presentation.
5. Practice, practice and practice
Practice makes perfect — rehearse your presentation and arrive early to your presentation to help overcome stage fright. Familiarity with your material will boost your presentation skills and help you handle curveballs with ease.
6. Seek feedback and make necessary adjustments
Don’t be afraid to ask for help and seek feedback from friends and colleagues. Constructive criticism can help you identify blind spots and fine-tune your presentation to perfection.
With Venngage’s real-time collaboration feature , receiving feedback and editing your presentation is a seamless process. Group members can access and work on the presentation simultaneously and edit content side by side in real-time. Changes will be reflected immediately to the entire team, promoting seamless teamwork.

7. Prepare for potential technical or logistical issues
Prepare for the unexpected by checking your equipment, internet connection and any other potential hiccups. If you’re worried that you’ll miss out on any important points, you could always have note cards prepared. Remember to remain focused and rehearse potential answers to anticipated questions.
8. Fine-tune and polish your presentation
As the big day approaches, give your presentation one last shine. Review your talking points, practice how to present a presentation and make any final tweaks. Deep breaths — you’re on the brink of delivering a successful presentation!
In competitive environments, persuasive presentations set individuals and organizations apart. To brush up on your presentation skills, read these guides on how to make a persuasive presentation and tips to presenting effectively .

Whether you’re an experienced presenter or a novice, the right techniques will let your presentation skills soar to new heights!
From public speaking hacks to interactive elements and storytelling prowess, these 9 effective presentation techniques will empower you to leave a lasting impression on your audience and make your presentations unforgettable.
1. Confidence and positive body language
Positive body language instantly captivates your audience, making them believe in your message as much as you do. Strengthen your stage presence and own that stage like it’s your second home! Stand tall, shoulders back and exude confidence.
2. Eye contact with the audience
Break down that invisible barrier and connect with your audience through their eyes. Maintaining eye contact when giving a presentation builds trust and shows that you’re present and engaged with them.
3. Effective use of hand gestures and movement
A little movement goes a long way! Emphasize key points with purposeful gestures and don’t be afraid to walk around the stage. Your energy will be contagious!
4. Utilize storytelling techniques
Weave the magic of storytelling into your presentation. Share relatable anecdotes, inspiring success stories or even personal experiences that tug at the heartstrings of your audience. Adjust your pitch, pace and volume to match the emotions and intensity of the story. Varying your speaking voice adds depth and enhances your stage presence.

5. Incorporate multimedia elements
Spice up your presentation with a dash of visual pizzazz! Use slides, images and video clips to add depth and clarity to your message. Just remember, less is more—don’t overwhelm them with information overload.
Turn your presentations into an interactive party! Involve your audience with questions, polls or group activities. When they actively participate, they become invested in your presentation’s success. Bring your design to life with animated elements. Venngage allows you to apply animations to icons, images and text to create dynamic and engaging visual content.
6. Utilize humor strategically
Laughter is the best medicine—and a fantastic presentation enhancer! A well-placed joke or lighthearted moment can break the ice and create a warm atmosphere , making your audience more receptive to your message.
7. Practice active listening and respond to feedback
Be attentive to your audience’s reactions and feedback. If they have questions or concerns, address them with genuine interest and respect. Your responsiveness builds rapport and shows that you genuinely care about their experience.

8. Apply the 10-20-30 rule
Apply the 10-20-30 presentation rule and keep it short, sweet and impactful! Stick to ten slides, deliver your presentation within 20 minutes and use a 30-point font to ensure clarity and focus. Less is more, and your audience will thank you for it!
9. Implement the 5-5-5 rule
Simplicity is key. Limit each slide to five bullet points, with only five words per bullet point and allow each slide to remain visible for about five seconds. This rule keeps your presentation concise and prevents information overload.
Simple presentations are more engaging because they are easier to follow. Summarize your presentations and keep them simple with Venngage’s gallery of simple presentation templates and ensure that your message is delivered effectively across your audience.

1. How to start a presentation?
To kick off your presentation effectively, begin with an attention-grabbing statement or a powerful quote. Introduce yourself, establish credibility and clearly state the purpose and relevance of your presentation.
2. How to end a presentation?
For a strong conclusion, summarize your talking points and key takeaways. End with a compelling call to action or a thought-provoking question and remember to thank your audience and invite any final questions or interactions.
3. How to make a presentation interactive?
To make your presentation interactive, encourage questions and discussion throughout your talk. Utilize multimedia elements like videos or images and consider including polls, quizzes or group activities to actively involve your audience.
In need of inspiration for your next presentation? I’ve got your back! Pick from these 120+ presentation ideas, topics and examples to get started.
Creating a stunning presentation with Venngage is a breeze with our user-friendly drag-and-drop editor and professionally designed templates for all your communication needs.
Here’s how to make a presentation in just 5 simple steps with the help of Venngage:
Step 1: Sign up for Venngage for free using your email, Gmail or Facebook account or simply log in to access your account.
Step 2: Pick a design from our selection of free presentation templates (they’re all created by our expert in-house designers).
Step 3: Make the template your own by customizing it to fit your content and branding. With Venngage’s intuitive drag-and-drop editor, you can easily modify text, change colors and adjust the layout to create a unique and eye-catching design.
Step 4: Elevate your presentation by incorporating captivating visuals. You can upload your images or choose from Venngage’s vast library of high-quality photos, icons and illustrations.
Step 5: Upgrade to a premium or business account to export your presentation in PDF and print it for in-person presentations or share it digitally for free!
By following these five simple steps, you’ll have a professionally designed and visually engaging presentation ready in no time. With Venngage’s user-friendly platform, your presentation is sure to make a lasting impression. So, let your creativity flow and get ready to shine in your next presentation!
Discover popular designs

Infographic maker

Brochure maker

White paper online

Newsletter creator

Flyer maker

Timeline maker

Letterhead maker

Mind map maker

Ebook maker

How to Paint in a High Key (Plus Master Painting Examples)
In this post, I discuss how you can use a high key to create beautiful displays of color in your paintings.
So what is a high key? It means you push all the values in your painting towards the lighter end of the value scale. So your darks will become mid-tones, and your lights will usually remain around the same value.
How to Paint Within a High Key?
The benefits of painting in a high key, the compromise of a high key, master paintings in a high key, want to learn more, thanks for reading.
Below is a standard 9-value scale, ranging from near white to near black (it is impossible to paint with absolute white or black).
When you start a painting, you have the option of using all these values between near white and near black.

A high key merely compresses the value range you use in a painting towards the lighter end. You can also compress the value range towards the darks (this is referred to as a low key ) or you could just compress the lights and darks, so you are only painting within the mid-tones.
Below is an example of some of the different keys you can paint in.

It is generally recommended that you compress your value range to some extent, as it can be difficult to manage a full range of values.

Painting within a high key is pretty simple really. All you need to do is push the darkest darks in your painting to around the mid-tone range and then compress all the other values within this new range. Your lightest lights can stay the same.
Most importantly, you must ensure the values between your darkest dark and lightest light retain the same relationship. You are just compressing the values, not changing their position.

So why would you want to paint in a high key?
One of the main reasons is that it allows you to paint with more vibrant colors. Why? Because most colors reach a peak saturation around the mid-tone range and lose saturation in darker or lighter value ranges.
In order to hit those dark values, you usually need to start using some kind of black. But as you add more black, you also reduce the saturation of your color.
But, if you compress the value range so that your darks are now actually in the mid-tone range, then you can use more saturated colors as your darks. Overall, your painting will be a much more colorful display.
A high-key painting is also just a pleasure to look at. The harmony between colors seems to increase as the colors increase in value. An arrangement of high-key colors seems to produce a glimmering effect.
But painting in a high key does come with compromises, as discussed below.
When you paint in a high key, you naturally compromise the value structure of your painting to some extent. So you will not be able to rely on a strong value structure but instead on complex color harmonies to create interest in your paintings.
Also, when you compress your values, you are usually painting outside of the way things ordinarily appear. Instead of painting what you see, you are painting the relationships you see between values. This is a much harder (but still very effective) way of painting.

Here are some paintings created by master artists which are in high key. It is no surprise that some of the most beautiful high-key paintings (in my opinion) are by Claude Monet .
The impressionists are known to paint in a high key so that they could utilize more color in their paintings. Instead of blacks and browns in the darks, they used rich greens, blues and other colors.
Enjoy these beautiful displays of color.

You might be interested in my Painting Academy course. I’ll walk you through the time-tested fundamentals of painting. It’s perfect for absolute beginner to intermediate painters.
I appreciate you taking the time to read this post and I hope you found it helpful. Feel free to share it with friends.
Happy painting!

Draw Paint Academy
About | Supply List | Featured Posts | Products
Dan Scott is the founder of Draw Paint Academy. He's a self-taught artist from Australia with a particular interest in landscape painting. Draw Paint Academy is run by Dan and his wife, Chontele, with the aim of helping you get the most out of the art life. You can read more on the About page .
Enjoyed this post? Join over 123,000 artists who subscribe to the Draw Paint Academy newsletter.
29 comments on “How to Paint in a High Key (Plus Master Painting Examples)”
I could never understand why artists painted in high key, but now I am beginning to see the light! Thanks once again for a valuable lesson Dan.
Much appreciated
No problem Norm! Dan
You are doing a good job here with drawpaintacademy.com. I’ve been studying art and have paintied all my life and I know what I’m doing with acrylics. Much of what your saying is a delightful reminder of the painter’s imperative order of things, many of these are automatic for me but your presentation serves to remind me why I do certain things. A big thank you. I can say that painters of all abilities will benefit from your instruction. Best wishes. Ken Roberts http://www.artbykenroberts.com
Thanks for the kind words Ken. I just checked out your art – it is beautiful! Amazing use of color.
Very interesting, I will try working with this technique in the future – I have to admit that I was not overly impressed with it as to me it just looked washed out and faded BUT as I looked through the paintings by Monet I see the beauty that can be accomplished by this technique – thank you for the post Dan! My personal favorite is the Bay of Antibes!
Thanks for the comment Pamela! I think it is a difficult style of pull off. If done well, it can produce a beautiful harmony of glimmering color. But as you said, if not done well, the painting may appear washed out and faded.
Also, thank you for the Range Charts – its nice to have an example of each individual range.
As always, you’ve given me new tools and ideas! Thanks!
No problem Deborah 🙂
je vous remercie pour votre post ”Comment peindre dans une haute clé ”. Impressionnant de beauté et très enrichissant.
This was a wonderful explanation of colors in ways that I can understand. Thank you
No problem Virginia thanks for the comment, Dan.
claude monet one of the best. iam just happy to recieve such great painting advise. i would like to re start my oil and acrylic painting . i have stopped for two years, i think its about time to begin again . personal regards , Donald Jones.
When, like me, you only start watercolour painting as a retirement hobby, there’s just so much to learn. I’d noticed the lovely fresh colours of the impressionists’ work, but it didn’t occur to me to think about it all in terms of values. Thank you for opening my eyes and for helping me to learn more about my new hobby.
No problem Anne 🙂
Thanks for this post. I’m excited to try this soon!
No problem Kathy 🙂 Yes it is a fun style to paint in.
I have always felt a tug in my heart to put brush to canvas when I look at a Money or Van Gogh, but have absolutely no experience or training. So, I never have even attempted. Your explanations and examples are new knowledge for me and my understanding and love of beautiful painting has grown exponentially. Thank you!
For me as a beginner in painting your articles are very important for understanding how to paint volume, how choose the color and understand the gradation of color when painting light and shadow. I still admire with great works of masters on the basis of which I can improve mine own skills with your help. Thank you so much, Dan!
Hi Larissa, thanks so much for the very kind comment. Just glad I am able to help.
I am new to Painting, To be frank I am not aware of the measures to be taken while we paint. But after I read few articles at drawpaintacademy, I could know the basics. I am sure to follow your guidance.
Thank you so much for the wonderful article!
Hi Sandiv, glad the posts help 🙂 Let me know if you need anything.
Wow, these examples by Money are absolutely gorgeous. I like that he uses this high-key technique since it makes it easier to use more color in the paintings. This might be a great tip for my sister who is looking for a master painter.
I love this article and have shared it on my Facebook timeline to help some of my other artist friends.
Lynne https://s-lynneprice.com/
Thanks Sarah! Appreciate the share. Dan
Dan, you have put so much time and effort and thoughtfulness into these informative posts. I really do appreciate the information you give us. Thank you of much.
Thanks for your kind words Joyce! Just happy to help. Thanks, Dan
Appreciate it very much intended for publishing this kind of fascinating article on this matter. It has definitely created me personally believe as well as I’m hoping to learn to read much more.
Thanks for your article. I will share this to my friends and I hope my friends will also liked this article.
Leave a Comment Cancel reply

A Closer Look at Marie Joséphine Charlotte du Val D’Ognes by Marie Denise Villers
January 5, 2022

A Closer Look at Woman With a Parasol by Claude Monet
January 12, 2021

Paintings That Break the Composition Rules
April 26, 2021

Interview With Award-Winning Australian Artist Leon Holmes
June 3, 2021

The Ultimate Guide to Painting the Sky
July 4, 2022

Ampersand Gessobord: My Detailed Review and Why I Prefer It Over Canvas
December 11, 2023
Master of the Life of the Virgin, The Presentation in the Temple
The priest Simeon is shown receiving the infant Christ from the Virgin Mary in front of an elaborate altar. The scene is based on a passage in the Gospel of Luke (2:22–40), which describes Mary and Joseph’s visit to the temple in Jerusalem for the rituals of Mary’s purification and of Christ’s presentation to God.
Simeon recognised Christ’s divinity upon seeing him, saying ‘Lord, now lettest thou thy servant depart in peace, according to thy word: For mine eyes have seen thy salvation’ (Luke 2: 29–30). The embroidery on his cope shows the Roman Emperor Augustus having a vision of the Virgin and Child – a decisive experience which made the ruler recognise that their spiritual power was greater than his.
This painting, along with seven other panels now in the Alte Pinakothek, Munich, once formed part of the central panel of an altarpiece made for the church of Saint Ursula in Cologne. It was commissioned by Dr Johann von Hirtz, a councillor in the city.
This scene is based on a passage in the Gospel of Luke (2:22-40), which describes Mary and Joseph’s visit to the temple in Jerusalem for the rituals of Mary’s purification and of the infant Christ’s presentation to God. In conformity with Jewish law, all women had to be ritually purified forty days after giving birth, while first-born sons were to be presented and redeemed by an offering to God. The priest, Simeon, is shown receiving the infant from Mary in front of an elaborate altar. The two turtle doves held by a woman at the left were brought as the sacrificial offering to secure Christ’s redemption.
Simeon was the first to recognise Christ’s divinity after the latter’s birth. Upon seeing the child, the priest said: ‘Lord, now lettest thou thy servant depart in peace, according to thy word: For mine eyes have seen thy salvation’ (Luke 2: 29–30). The Old Testament scenes visible on the carved stone altarpiece and on the back of Simeon’s embroidered cope underscore the theological significance of the event, as they were deemed to foreshadow Christ’s Passion. The altarpiece shows Cain slaying his brother Abel, the sacrifice of Isaac, and the drunkenness of Noah, while the embroidery of Simeon’s cope depicts the Roman Emperor Augustus’s vision of the Virgin and Child during which he – a pagan – recognised that their spiritual power was greater than his. The small boys cast in bronze who hold up the altar may be references to pagan art, and reinforce the message of the cope by illustrating that paganism was surpassed by Judaism and Christianity.
The painting once formed part of an altarpiece made for the church of Saint Ursula in Cologne, consisting of scenes of the life of the Virgin Mary. Seven other panels are today in the collection of the Alte Pinakothek in Munich. The work was commissioned by Johann von Hirtz, an alderman and mayor of the city.
The centre panel of the altarpiece consisted of four scenes arranged in a square grid – The Presentation in the Temple appeared in the lower right. It was once thought that the altarpiece took the form of a triptych (a painting composed of three parts) but recent technical analysis has raised the possibility that the panels may have been shown individually or in a different formation to that of a triptych.
Download a low-resolution copy of this image for personal use.
License and download a high-resolution image for reproductions up to A3 size from the National Gallery Picture Library.
This image is licensed for non-commercial use under a Creative Commons agreement .
Examples of non-commercial use are:
- Research, private study, or for internal circulation within an educational organisation (such as a school, college or university)
- Non-profit publications, personal websites, blogs, and social media
The image file is 800 pixels on the longest side.
As a charity, we depend upon the generosity of individuals to ensure the collection continues to engage and inspire. Help keep us free by making a donation today.
You must agree to the Creative Commons terms and conditions to download this image.

More paintings by Master of the Life of the Virgin

Art Studio Life
Articles » Painting » How to Master the Art of High Key Painting and Use of Light Values
How to Master the Art of High Key Painting and Use of Light Values
- Last Updated: January 23, 2024
- Written by: Elisabeth Larson Koehler
- 14 Comments
This article may contain affiliate links, please read my affiliate disclosure for more information.

Fundamentals of Color Mixing [FREE] Guide >>
Get my Color Mixing Artist's Guide, with helpful tips for mixing colors you can start putting into practice right away!
When it comes to painting (and drawing), there exists a broad spectrum of values to explore and work with. However, for a more refined approach, one can narrow down their focus to a specific range. Today, our attention will be directed towards high key values, and how they can be masterfully applied to create a painting that is “high key”.
In this article, we will explore what high key values in painting are, what makes them unique, and how you can apply them to your own work.
What makes a painting high key?
High key paintings are characterized by their lightness in value, and lack of strong contrasts. For example, when you take a look at a value scale, as it relates to art, you will notice how it ranges from the darkest value your medium can produce to the lightest value. And the degree of lightness or darkness you can create, will vary depending on whether you are using oil paints, pastels, watercolors, or any other medium.

In the diagram above, you can see a clear image of a basic value scale that is divided up into “low key”, “middle key”, and “high key”. And the values that fall into the upper 3rd range of the value strip can be designated as high key values or light values.
So, paintings that are considered “high key” are primarily made up of the values that fall within the higher/ lighter range of values. Instead of relying on strong contrasts, high key painting is made up of subtle differences in value and color to establish depth and form.

The Role of Soft Colors in High Key Paintings
The colors in high key painting tend to be softer and less saturated than those in darker or middle key paintings. This is because more saturated colors have more pigment and are therefore darker in value. It is important to understand color value in art to be able to create high key paintings.
Examples of high key paintings

High key paintings have been done for thousands of years. Take for example the Roman Fresco painting seen above. The piece is primarily made up of values found in the upper value register. When you compare the piece to any work by Caravaggio it will become immediately clear how light in value the painting really is.

High Key Values in Impressionist paintings
In addition, we see a strong presence of high key values in paintings from the impressionists. Artists like Claude Monet and Pierre-Auguste Renoir were known for their high key painting techniques. A big reason for this is that their focus was on color versus creating strong light and dark value contrasts. In the painting below by Monet, we can see how the entire painting is made primarily of light values. There are of course a few slightly darker value colors in the painting to create a sense of light. However, these values are just slightly darker and still fall within the higher key range of the value scale.

We can also see how Monet uses color temperature to create the illusion of shadow versus creating stronger darker value contrasts. When working in a higher value range it is very important to pay close attention to color temperature as the subtlest changes make a big difference in your painting.
How to apply high key values in your own work

Once you have a firm understanding of values and can consistently create a luminous quality in your artwork, it’s beneficial to explore the use of high key values in your paintings. This technique can be applied to various subjects, such as landscapes, still life, portraits, or even abstract compositions.
How to create high key values in different mediums
You are also not limited by medium. High key values can be applied whether you work with oil paints, watercolor, gouache or something entirely different. Though it is important to keep in mind that some mediums have different ranges of values than others. For example, watercolors tend to be a little lighter in value than other mediums. You just need to pay attention to the value range of the medium you are working with.

Choosing your value scale
As you gain expertise and mastery in establishing clear values in your work. You will be able to select the most suitable value scale to operate within. Which will allow you to achieve greater precision and refinement in your work.
Even if you are painting something that has rather dark values, you can impose high key values on your subject. Doing so, can help you to create a light and playful mood in your work. Even if the subject matter you are depicting, is something that might typically be considered heavy or serious.

Where to find inspiration for a high key painting or drawing
As you can see from the examples provided within this article. High key paintings are stunning and can be applied to many different subjects. By utilizing a soft color scheme and subtle changes in value, you can create something subtle, gentle and dreamy like.
So, consider experimenting with high key painting in your own work. You will see how it can give your work a whole new dimension!
Want to remember this? Save How to Master the Art of High Key Painting to your favorite Pinterest board!

Did you get your FREE color mixing guide?
Subscribe (free) to get my best tips, and Color Mixing Artist's Guide . With tips to get started mixing colors right away!
Hello! I'm Elisabeth Larson Koehler
Art Studio Life exists for you to be able to stay inspired, learn, and improve your skills.

COLOR MIXING MASTER GUIDE (150+ Page PDF Ebook)
My ever popular Color Mixing Master Guide , will help take the uncertainty out of mixing colors. With over 60 Color Mixing Charts − spend less time struggling with mixing color and more time creating the shades of colors you want for your painting!
Recommended:
14 thoughts on “how to master the art of high key painting and use of light values”.

Thanks Elisabeth much appreciated, will try to follow these ideas in my work.

You are so welcome Warren, very glad this is helpful!

Thankyou Elizabeth I visited an Art Show yesterday and was particularly drawn to one Artists paintings that featured the very light luminous quality you talk about. On close examination she used broken colour and subtle changes in colour to produce the effect. Reading your article was an A-haa moment in understanding the technique. Love it ! I really appreciate the depth of Insight you pass on as a teacher . Thankyou so much Judith
I am so glad to hear that Judith! This is one of my favorite aspects of learning more about painting – I get to enjoy art more when I see it. It sounds like you had that same experience! Thank you for sharing 🙂

Thank you for this article. I thought that paintings required high value contrast. Painting with high key values is a new addition to my understanding of what I see. Cathleen
You are so welcome Cathleen! This isn’t a topic that is talked about very much, glad that it could help you to understand painting more.

I really appreciate the work you put into this painting blog, Elisabeth. It’s been many years since I was in school for painting, and your perspective on the subject keeps me connected to my purpose. Thank you and please continue!
Thank you for sharing and your kind words Christopher – so glad that the material on this blog helps to keep you connected to painting!

Hi Elizabeth, I am not to crazy about high value painting. I lean more towards middle value. Sometimes I think the dark are even to dark on some paintings. I do like Monochrome. I seem to like the bright er colors.
Its good to have a preference for what key one prefers. If you like bright colors – then the middle/ darker value range is more the way to go! But you might find moments where a high key feels more appropriate

Very interesting. I will try to incorporate more high values in my watercolor paintings. I had not been exposed to this concept before. Thank you!
So glad this was new information and informative for you. I think it will be great to incorporate it more into your watercolor paintings!

I learned so much from this article, Elisabeth. Thank you very much.
So glad to hear that Eva! Thank you for sharing
Leave a Comment Cancel Reply
Your email address will not be published. Required fields are marked *
Notes Master in PowerPoint (Everything You Need to Know!)
By: Author Shrot Katewa

There are times when I often forget to talk about every single point that I had planned for when giving a presentation. This is not an uncommon phenomenon. That is exactly when PowerPoint notes can come in handy! But, to leverage the power of notes in PowerPoint, you need to understand the notes master in PowerPoint thoroughly.
The notes master in PowerPoint is a feature that allows you to control the settings of the notes section of PowerPoint. It allows you to change layouts, font size, font type, font style, and much more. To enable the Notes Master in PowerPoint, click on the “View” ribbon and then on “Notes Master”.
Through this article, I am going to talk about how you can use the Notes Master for making presenter notes. I’m also going to share the type of problems you might face in the Notes Master and how you can solve them. Plus, I’ll also provide you with some ninja tips to make this tool helpful for you!
So, let’s get started!
What are Presenter Notes in PowerPoint?
When you are presenting in front of an audience, they will either look at the information written on the presentation slide or listen to what you are saying.
If there is too much information on the presentation slide, it will be hard for the audience to process all the information. This is why presentation design often follows a minimal design style.
But, keeping minimal text on the slide can also be a problem – now your audience needs to pay close attention to what you are saying in order to understand the context of the presentation. While that is great if you want to grab their attention, this also means you need to make sure that you don’t miss out on a point! This is where presenter notes can come in handy.
Presenter Notes, also known as speaker notes, are the key points, important messages, or information in a summarized format on an individual slide. Making the notes handy helps the presenter to deliver his or her message clearly to the audience.
Presenter Notes helps the presenter navigate each slide while providing relevant information for that particular slide.
Think of the presenter Notes as a scratch piece of paper, where you can put all the key messages or important stats so that the audience can understand what you are saying.
You can also use presenter Notes to add more information about your presentation slide’s animations or to add important links and how to navigate through your PowerPoint slides.
What is Notes Master in PowerPoint?
Notes Master is a powerful tool in the Microsoft PowerPoint application that allows you to create, edit, and customize your presenter Notes.
The note Master is located in the “View” tab inside the PowerPoint application. Select the “View” tab. Now choose “Notes Master” from the “Master Views” group. This will open the Notes Master menu.
What Can You Do with Notes Master?
You can use notes master to create, edit, and customize the settings and appearance of your presenter notes in the PowerPoint application.
The notes master also allows you to customize the appearance of your speaker notes when they are printed out.
For instance, you can change the page layout, text format, text color, page orientation of the presenter notes using the Notes Master tool. This truly is a powerful editing tool that gives you complete control over the appearance of your presenter note section.
How to Use Notes Master in PowerPoint?
To use the notes master for your presentation slide, first, you have to open the notes master tool. To do that, follow the steps given below –
Step 1 – Click on the View Tab
The first thing is to open your PowerPoint slides presentation. Once the slide is open in the PowerPoint application, click on the “ View ” tab located in the menu bar of your PowerPoint application.
Step 2 – Choose Notes Master
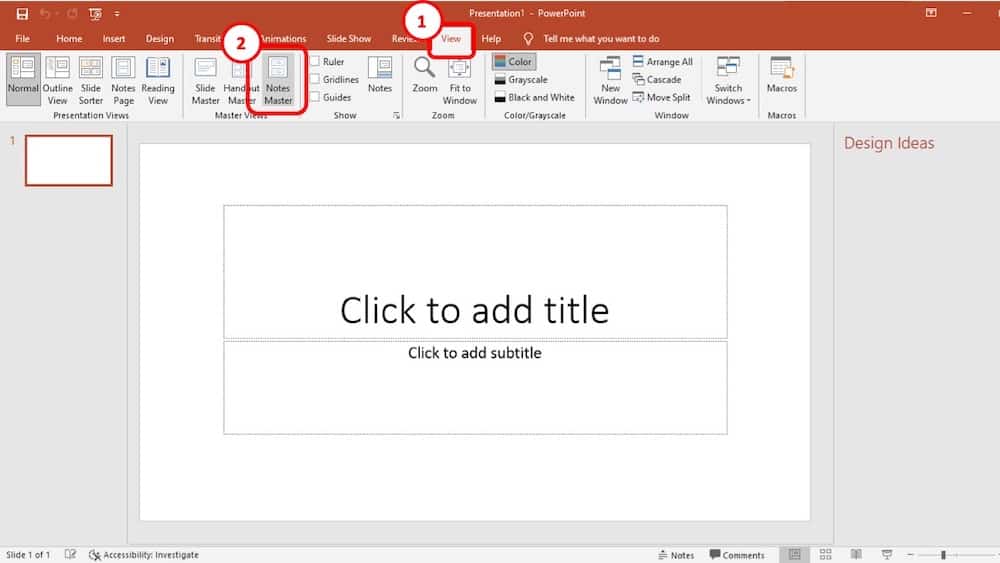
Clicking on the “ View ” tab will open a command window. From there, choose the “ Notes Master ” from the “ Master Views ” group. This will open the “Notes Master” menu.
Step 3 – Customize the Notes Master
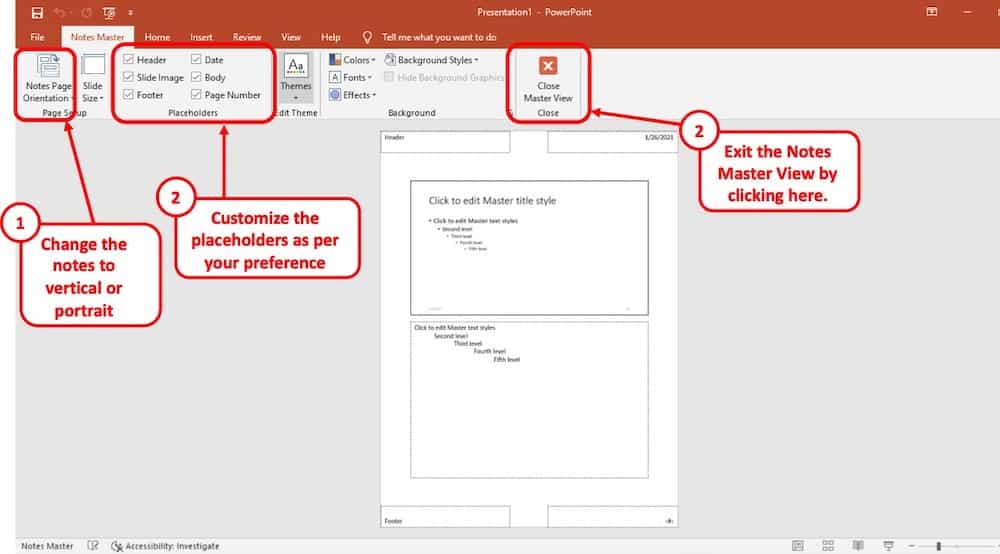
From the notes master editor menu, you can customize your presenter notes.
To do that, first, check the placeholders that you want to use and uncheck those that you don’t want in your presenter Notes. There are several parameters included in the “Placeholder” group. These are- date, slide image, body, header, page number, and footer.
You can view the changes that you make in the Notes Master preview section (the white section displayed).
You can also change the presenter note page orientation into either landscape or portrait mode. There are also some additional editing tools like text font size, text color, background style, and much more that you can mess around with to make your Notes much more attractive.
Once you are done customizing your presenter notes pages you can close the “Notes Master” menu. To do that, just simply click on the “Close Master View” button located on the Notes Master menu.
How to Print PowerPoint Presentation Notes?
Now that you know how to customize your notes in a PowerPoint presentation, it is time for you to add notes to your slides.
Once you have created your notes in the PowerPoint presentation slides, you can easily print them along with the slides and prepare for giving the presentation even when you are not in front of a computer.
Step 1 – Click on the File Option
To print notes in PowerPoint, click on the “File” tab located in the top left corner of your screen.
Step 2 – Click on Print from the Options on the Left
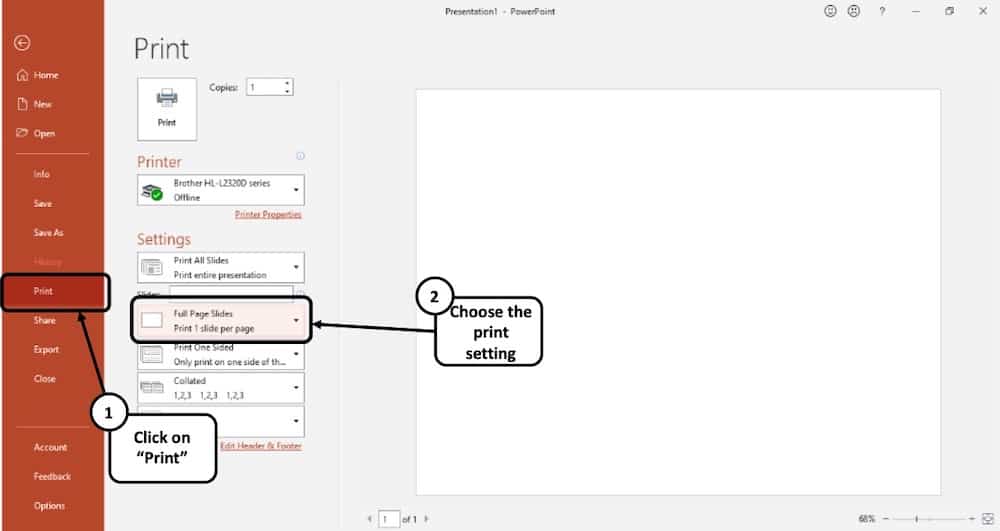
When the file option is clicked from the menu bar, a new window will be presented. From there, select “Print”. Another window will open as a result.
Step 3 – Choose the “Notes Pages” Print Layout Option
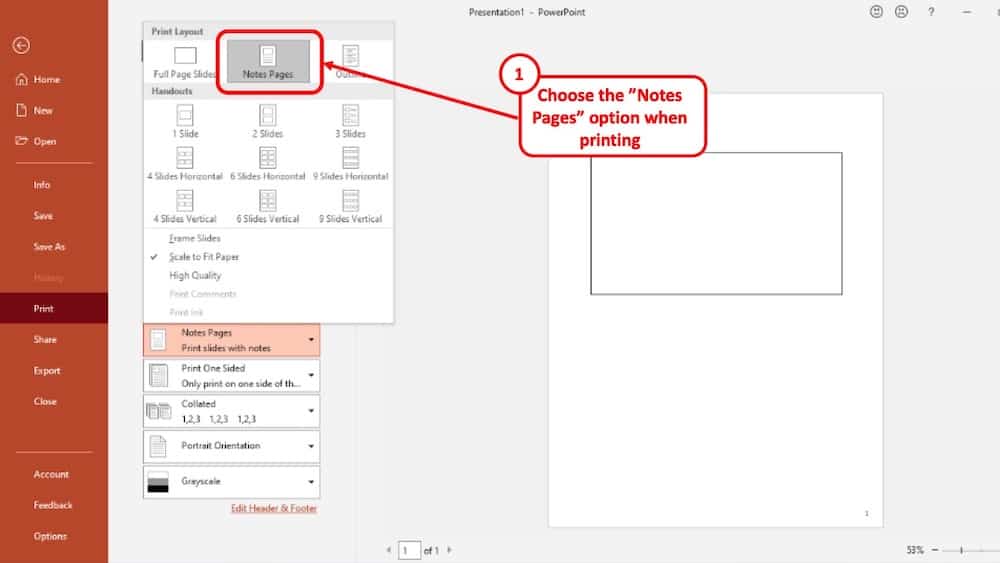
From the new window, choose the “Full Page Slides” located in the “Settings” menu. From there, select “Note Pages” as your print layout. You will see a preview of how your presenter note pages will look like.
Step 4 – Click on Print
If you want to make changes to any other print settings, you can do that too. Once you are done, all you have to do is to click on the “Print” button. And your Notes will be printed.
How to Apply Notes Master to All Slides?
Like other Master tools in the PowerPoint, any changes in the Notes Master command menu will be applied to all the slides in the presentation file. But the Notes Master tool is still undergoing some development and it is still missing some features.
When you are using this tool, sometimes many random things can happen to your note pages. For example, if you change anything in the Notes Master menu, it may not be applied to all slides. And Notes Master has no feature that you can use to apply the changes to all the slides at once. In such a case, you will need to apply Notes Master to individual slides.
This can be quite bothersome and time consuming if there are a lot of slides in the presentation file and you need to check each slide and apply the changes individually. But there is an alternative method that you can use to apply Notes Master to all slides using a Microsoft Visual Basic script.
To use this method, follow the step-by-step guide given below:
First, go to the “ Developer ” tab located on the top of your screen. The developer menu will open.
From the developer menu, click on the “ Visual Basic ” option. A new window will open.
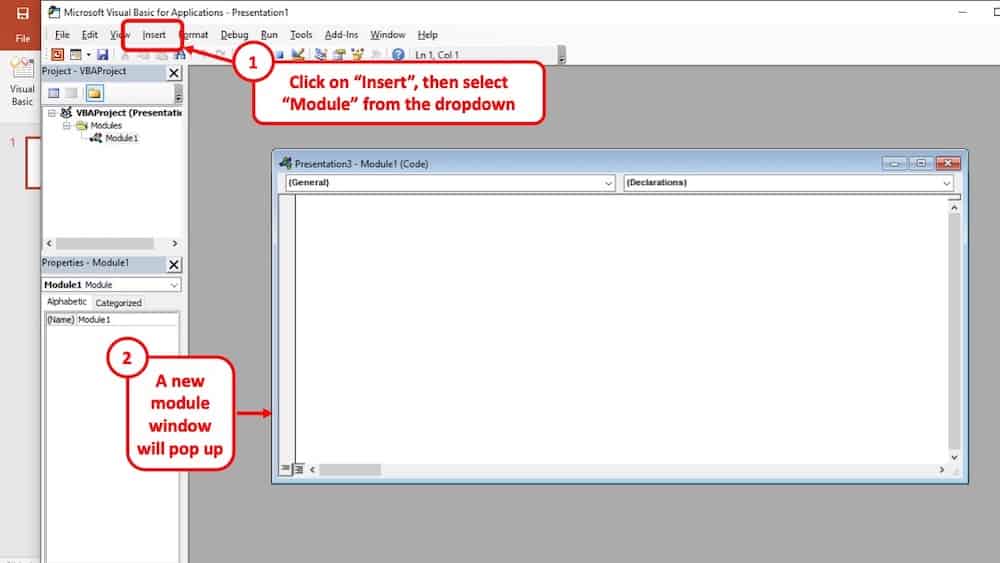
From the new window, click on “ Insert ” located on the top left corner of the screen. From the dropdown menu, select “ Module ”. An editor window will open.
In the editor window, paste the following Microsoft Visual Basic script:
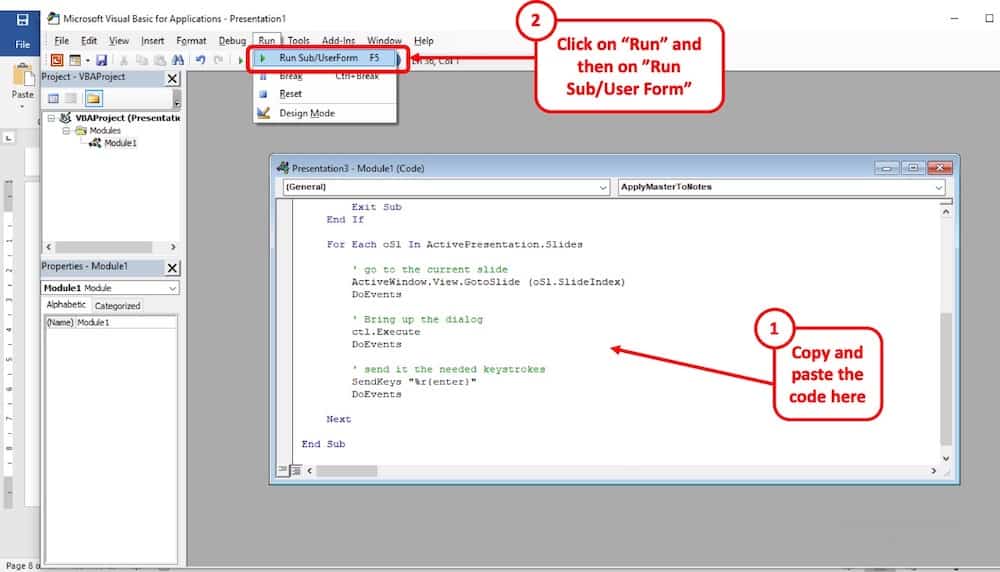
After pasting the script to the editor window, press “ F5 ” or click on “ Run>Run Sub/UserForm ” It will take some time to reapply Notes Master to all the slides depending on the number of slides in the presentation file. Once the reapply process is done, you will see that your problem is solved.
Note: This method works on Microsoft PowerPoint version 2007 or above. For some of you, you might notice that the “Developer” tab is missing in your PowerPoint application. In this case, read the following section to enable the developer tab in PowerPoint.
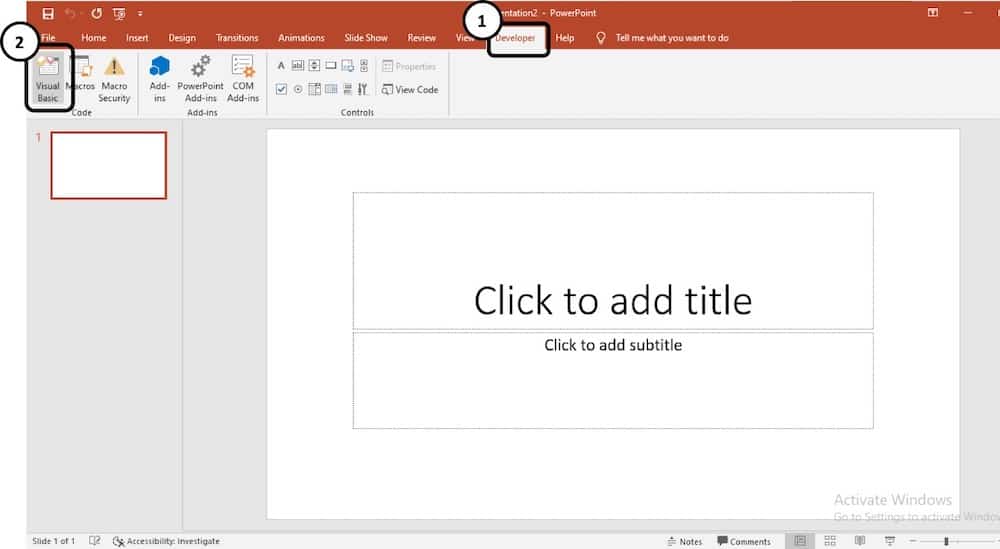
How to Enable the Developer Tab in PowerPoint?
In order to expedite certain processes in PowerPoint, you can always use the visual basic codes through the developer tab just as we showcased in the previous example. But, you often don’t get to see the “Developer” tab by default in PowerPoint.
In fact, I covered this topic of Enabling Developer Tab in PowerPoint in thorough detail a little while ago. Please go through this article as it also includes the process for PowerPoint on Mac!
[Tutorial!] How to Enable Developer Tab in PowerPoint?
In case you prefer reading on this page, below is a summarized version of the steps that you need to take to enable the developer tab in PowerPoint.
Step 1: First, click on the “File” tab located in the top left corner of the application. A new window will open.
Step 2: From there, select “Options” located in the bottom left corner of the application.
Step 3: Now from the newly opened window, select the “customize ribbon” option. From there, locate “Customize the ribbon” and under that select “Main Tab.”
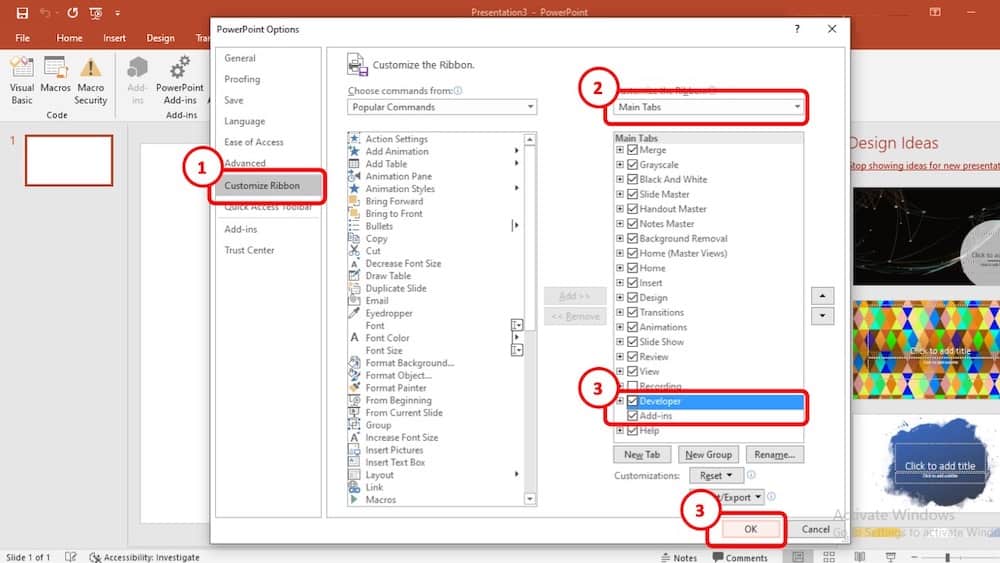
Step 4: Now locate the “Developer” tab and make sure that there is a checkmark beside it. Now press “Ok”. Now if you return to your presentation slide, you will notice that the “Developer” tab has been added to your PowerPoint application’s ribbon.
How to Reset Notes Master in PowerPoint?
As mentioned before, Notes Master is still a bit buggy. Sometimes you might see that the size of your note page is not what you set earlier or some texts or graphics in the slide might appear in some weird spots in your presenter Notes. In these circumstances, resetting the Notes Master can solve these problems.
Here’s how to reset notes master in PowerPoint –
- Go to the “View” Ribbon.
- Select “Notes Master”
- Uncheck all options under “Placeholders”
- Then, recheck all options under “Placeholders”
- Set the “Notes Page Orientation” as Portrait
In case you need visual aids, here’s the step-by-step process with pictures.
Open the presentation slide, go to the “ View ” tab located on the main ribbon of your PowerPoint application. Select “ Notes Master ” from there.
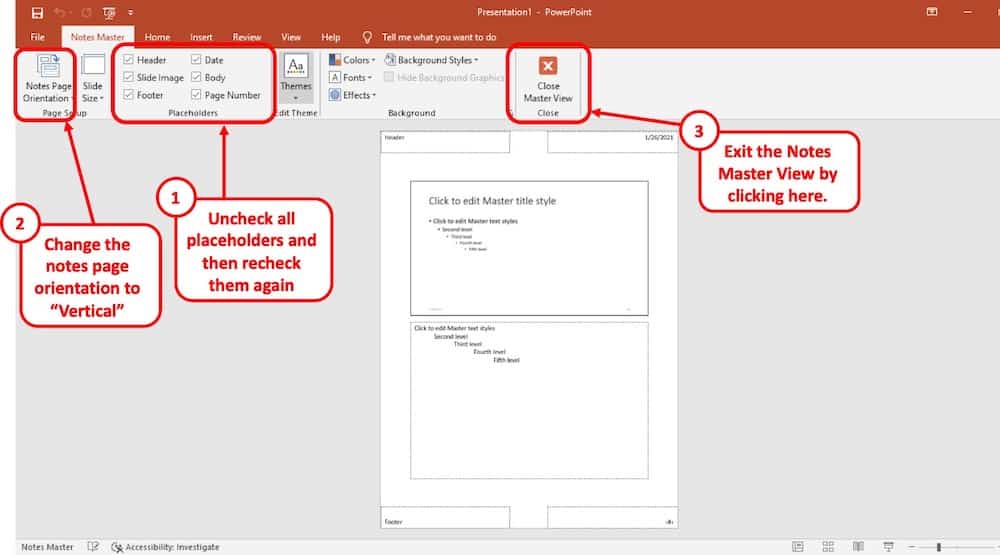
Uncheck all the options that are grouped under “Placeholder” and make sure that you check them again. This should reset the Notes Master in the PowerPoint application.
Make sure that the “Notes Page Orientation” of the “Notes Master” is set to “ Portrait ” as that is the default orientation of the notes master in PowerPoint.
How to Present PowerPoint without Showing Notes?
Presenter Notes will allow you to keep track of the key points and important stats of your presentation. But you need to make sure that your Notes remain hidden while you are presenting in front of an audience. And to do that, follow the steps given below:
Step 1: First, you will need to connect the projector screen or a second display to your computer. The second display or projector screen will be the one that your audience will be able to see.
Step 2: Now Open the “Display settings” from the control panel. From there, make your computer monitor your primary display by simply checking the “Make this my main display” option.
Step 3: Now choose “Extend These Displays” from the display settings window and close it.
Step 4: Now open your PowerPoint presentation slide and click on the “Slide Show” tab located on the main ribbon of the application.
From there, checkmark the “Use Presenter View” located in the “Monitors” cluster. You will see that the monitors are added on the “Monitors” option.
From there, select the secondary monitor or projector screen as your presentation display.
Step 5: Now press the slide show icon located on the taskbar of the PowerPoint application.
As a result, the presentation display will only show the slides whereas you will be able to see both the slides and Notes on your computer monitor.
Notes Master vs. Handout Master – What’s the Difference?
Notes Master and handout Master in the Microsoft PowerPoint application are more or less similar when it comes to customization and formatting Notes. However, there are some key differences present between them.
How does Notes Master Compare to Handout Master?
Notes Master tool is designed to create, edit, and customize presenter Notes. The Notes created in the presentation slide can help the speaker to keep track of key points while presenting his or her slides in front of an audience. Typically, each note page contains only one slide.
On the other hand, “Handout Master” is a tool created to make audience handouts. These handouts contain key points from the presentation slide which can help the audience to understand the presenter’s message much more clearly. Handouts usually contain more than one slide per page.
Notes Master or Handout Master – which is better?
The editing options are somewhat similar for both handout Master and Notes Master. However, Notes Master offers more placeholder options to format note pages. And Notes are typically helpful to only the presenter. In this regard, Notes Master is better compared to handout Master.
However, you should use handout Master if and only if you need to include texts and graphics for the audience handouts. But the features and functionality are almost similar for both Notes Master and handout Master. So, even if you only know how to use Notes Master, you will face no problem using the handout Master.
How to Fix Notes Master in PowerPoint?
Notes Master has a lot of bugs. They can be quite bothersome. These bugs can occur randomly. Some of these bugs include changing the note page layout or changing the page size and orientation. In such a case, you will need to troubleshoot Notes Master in PowerPoint.
To fix the page size, follow the steps given below:
Step 1: Frist, go to the “File” tab and select “Print>Print Properties.” From there, change the paper size to anything other than the “Letter” size. Now click “Ok” and return to your presentation slides.
Step 2: Follow the same methods explained in step 1 to change the page size. But this time set the page size to “Letter” and press “Ok.”
Step 3: Now go to the “View” tab and select “Notes Master.”
Step 4: When you are using the Notes Master, right-click on an empty space of your note page, and from the context menu click on “Notes Master Layout.” A dialogue box will open.
Step 5: From the dialogue box, uncheck everything and press “Ok.”
Step 6: Now repeat the process explained in step 4 and step 5. But this time, check all the options in the dialogue box and click “Ok.”
Then close the Notes Master view.
This should fix your problem with note page size problem. But your page layout will still appear a bit messy.
In order to fix the note page layout, follow these steps:
Step 1: Click on the “View” tab and select “Notes Master.”
Step 2: Now right-click on an empty space on the note page. This will open a context menu. From there select “Notes Layout>Reapply Master.”
Make sure that you check the “Body” and the “Slide image.” Otherwise, you will lose the note that you made previously in the presentation file. If they are checked by default, leave them as they were and proceed to the next step.
Step 3: Now press “Ok.” This will fix your note page layout.
Important Note: You will need to apply this method to the note pages individually. Because PowerPoint still doesn’t have the feature to apply Notes Master to all the slides at the same time.
Final Thoughts
After going through the entire article, I hope that you have learned everything there is about making speaker Notes using the Notes Master tool in the PowerPoint application. Put a lot of thoughts into how you can prepare your presenter Notes. This will make the presentation seem much more professional and you will be able to deliver your message clearly.
Image Credit for Featured Image
Byte Bite Bit
How to Change the Color of Bullet Points in PowerPoint: Your Step-by-Step Guide
Creating a PowerPoint presentation is a bit like painting a canvas, where every element matters—even the color of your bullet points. Whether we’re presenting quarterly stats to the board or ideas for the next community project, we know how crucial it is to make every slide pop. The right choice in bullet point color can draw our audience’s eyes exactly where we want them and keep their attention hooked on our message. After all, who hasn’t found themselves hypnotized by the rainbow wheel of doom at least once?

We’ve been there, wrangling with PowerPoint’s seemingly simple, yet sometimes perplexing features. Changing the color of bullet points seems like it should be straightforward, but the countless hues and shades available can be overwhelming. It’s not just about picking our favorite color; it’s about enhancing readability and ensuring our points strike a chord with our audience. With a few clicks in the right place, we have the power to turn a mundane list into a visually interesting segment of our presentation.
- 1.1 Understanding Bullets and Numbering
- 1.2 Formatting Bullet Styles and Colors
- 1.3 Organizing Content with Multilevel Lists
- 2.1 Inserting and Formatting Pictures
- 2.2 Customizing Slide Backgrounds and Color Themes
- 3.1 Working with Text Boxes and Placeholders
- 3.2 Leveraging the Slide Master for Consistent Formatting
- 4.1 Utilizing the Paragraph Group for Advanced Text Formatting
- 4.2 Implementing Advanced Bullet and Numbering Customizations
Creating Engaging Bullet Points in PowerPoint

Bullet points in PowerPoint are tools of the trade for presenting ideas clearly and effectively. To keep your audience hooked, it’s all about mastering the art of variety and visual appeal in your lists. Let’s dive in and make those bullet points pop!
Understanding Bullets and Numbering
Formatting bullet styles and colors, organizing content with multilevel lists, enhancing presentations with visual elements.
Let’s talk about giving our PowerPoint presentations that extra flair. Believe me, with the right visual tweaks, we can turn a dull slide into a crowd-winner. All it takes is a bit of picture pizzazz and a splash of color customization.
Inserting and Formatting Pictures
Dropping a picture into a slide is a no-brainer. Click Insert , then Picture , and voilà! But here’s the real art: making that picture shine. First, always ensure the image supports our content; it should speak a thousand words, or at least complement the few we’ve got up there. To tweak the size, grab a corner handle and drag – remember, maintaining the aspect ratio is key to avoid a stretched disaster.
Nifty formatting options are just a right-click away, which brings us to styles. A drop shadow here, a reflection there, or an artistic effect can turn the mundane into the magnificent. But it’s not just about looks; consider accessibility. Does the image have alt text? Have we described what’s important in the picture? We want everyone on board, so let’s not leave anyone behind.
Customizing Slide Backgrounds and Color Themes
Let’s not shy away from color themes! They’re the unsung heroes of presentation design. Tired of the same old white background? A new background color can be the knight in shining armor for your slide. Here’s the secret sauce: contrast. We want our text to pop, not to blend into obscurity.
Changing slide backgrounds is like repainting a room—it sets the mood. To change it, we’ll head over to the Design tab, click on Format Background , and pick a color, gradient, texture, or picture fill. It’s the power of choice at our fingertips. Let’s keep it professional though, neon green might be too electric for that corporate presentation.
Remember folks, a picture is worth a thousand words, and the right background is worth a thousand eyeballs. Let’s make our slides a visual feast they’ll remember!
Mastering Slide Layouts and Designs
When we talk about professional PowerPoint presentations, the devil is in the details. It’s all about mastering the toolset — think about text alignment with the ruler, using Slide Master to ensure consistency, and knowing the nooks and crannies of your placeholders and text boxes. Master these, and you’ll be the wizard of PowerPoint workflows!
Working with Text Boxes and Placeholders
Let’s tackle text boxes and placeholders head-on because that’s where our content lives, right? First, let’s get them to sit pretty. We pop open the Home Tab on our ribbon and play with fonts and spacing until it’s sitting just right. But hey, remember the ruler? It’s not there just for show. It helps us align our text boxes with surgical precision, so our slides look tailored and sharp.
Leveraging the Slide Master for Consistent Formatting
Next up, the Slide Master. Think of it as the overlord of slide consistency. We jump into the Slide Master View and set up the whole shebang — choose our bullet styles, decide on text placeholders, you name it. This way, every new slide we add matches the others like they were separated at birth. We can even save our own custom layouts. Now, that’s slick!
What’s cool is that you don’t need to fiddle with formatting every time you add a new slide. It’s automatic, like magic, but better because it’s real. So let’s harness the power of the Slide Master, and make our slides so consistent they’ll make a metronome jealous.
Advanced PowerPoint Formatting Techniques
When it comes to giving your presentation that extra pizzazz, knowing how to jazz up those bullet points is like adding a cherry on top of a sundae. Let’s go beyond the basics and dive into the niftier tricks that’ll have your bullet points not only looking snappy but also keeping your audience’s eyes glued to your slides. We’re talking customization that makes your key points pop and keeps everything looking sharp and on-brand. So, roll up your sleeves, and let’s get those bullets dressed to impress!
Utilizing the Paragraph Group for Advanced Text Formatting
Firstly, let’s chat about the trusty Paragraph group on your PowerPoint ribbon. It’s like your toolbox for crafting text that not only conveys your message but does it with style. Need to adjust line spacing or align your text just right? The Paragraph group’s got your back. Just click on that little launcher arrow, and boom, you’re in control.
Customizing text placeholder: A quick tip—don’t hesitate to play around with those text placeholders. Resizing, repositioning, or reshaping them can totally change the game, adding that custom touch that says, “We mean business.”
Implementing Advanced Bullet and Numbering Customizations
Next up, let’s sink our teeth into the more tantalizing bullet and numbering customizations. You know what they say about the devil being in the details, and in PowerPoint, those details are your pathway to a presentation that’s as sleek as a new sports car’s finish.
When it’s time to customize, click that Bullets dropdown and select “Bullets and Numbering.” Then, hit the Bulleted tab, and feel free to click on the color icon at the bottom to launch the color palette. Choose the hue that matches your style and apply it with a click—watch as your bullet points transform faster than a chameleon on a rainbow.
By the way, if you’re looking to make those bullets truly one-of-a-kind, don’t be shy—click on “Customize” in the bottom left corner to introduce new characters into your bullet family. Why settle for the mundane when you can have a bullet point that’s as unique as your content?
And remember, when you nail that perfect look, let the ‘Format Painter’ be your magic wand, copying that style across your presentation, ensuring everything is matchy-matchy—consistency is key!
Related posts:
- How to Access Files on SSD: Quick and Easy Guide
- Add Emojis in Microsoft Teams: A Quick Guide to Enhance Your Chats
- How to Add or Remove a Password in MS Excel: Secure Your Data with Confidence
- How to Automap a Shared Calendar in Outlook Office 365: A Step-by-Step Guide
- Windows 11 Print Screen Not Working: Quick Fixes for Your Issue
- Windows Driver Foundation Wudfhost.exe High CPU Usage: Effective Solutions and Analysis
- How to Recover Deleted Emails in Outlook: A Step-by-Step Guide
- How to Access OneDrive on PC: Your Simple Step-by-Step Guide
- How to Add Animation to PowerPoint: Enhancing Presentations with Motion
- How to Make a Flow Chart: Your Step-by-Step Guide in Charting Processes
- How to Delete a Calendar in Outlook: Step-by-Step Guide
- How to Make Sub Bullet Points in PowerPoint: Mastering Slide Hierarchy
Leave a Comment Cancel reply
Save my name, email, and website in this browser for the next time I comment.
Unleashing Creativity: Master the Art of PowerPoint Presentations
Share your love
PowerPoint Presentations in the fast-paced world of business, captivating presentations are the key to leaving a lasting impression. A compelling PowerPoint presentation can make the difference between engaging your audience and losing their interest. In this article, we delve into the realm of innovative and creative PowerPoint styles, transforming mundane presentations into visual masterpieces.
Table of Contents
The Power of Creative Styling in PowerPoint Presentations
Creativity is the cornerstone of an exceptional PowerPoint presentation. By incorporating unique design elements, vibrant colors, and visually appealing graphics, your presentation can stand out in a sea of monotony. Think outside the box and consider unconventional layouts that emphasize your content and captivate your audience.
Embracing Bold Headings: A Visual Delight
Headings play a pivotal role in guiding your audience through the presentation. Make them bold and impactful, ensuring they are appropriate for h tags. Bold headings not only enhance readability but also create a hierarchy, allowing your audience to grasp the core concepts effortlessly.
Crafting an Engaging Introduction: A Stellar Start
Begin your presentation with a compelling message, subtly incorporating the phrase.
In the fast-paced world of business, captivating presentations are the key to leaving a lasting impression. A compelling PowerPoint presentation can make the difference between engaging your audience and losing their interest. In this article, we delve into the realm of innovative and creative PowerPoint styles, transforming mundane presentations into visual masterpieces.

Creativity is the cornerstone of an exceptional PowerPoint presentation. By incorporating unique design elements, vibrant colors, and visually appealing graphics, your presentation can stand out in a sea of monotony. Think outside the box and consider unconventional layouts that emphasize your content and captivate your audience. Unleashing Creativity: Master the Art of PowerPoint Presentations
Begin your presentation with a compelling message, subtly incorporating the phrase. This inclusive approach invites your audience to support your creative endeavors while setting a positive tone for the presentation.
The Art of Transition: Seamless Flow of Ideas
Transition words serve as bridges, connecting one idea to the next. Utilize them effectively to maintain a seamless flow throughout your presentation. Words like "moreover," "however," and "in addition" enhance the coherence of your content, ensuring your audience remains engaged from start to finish.
Active Voice: Conveying Confidence and Authority
Employing the active voice in your content imparts confidence and authority. Instead of passive constructions, opt for active sentences that clearly convey the subject's actions. This direct approach resonates with the audience, making your content impactful and memorable.
Conciseness: Less is More
In the realm of presentations, brevity is key. Keep your sentences concise, with each sentence conveying a specific idea. Avoid lengthy explanations and convoluted phrases. By embracing simplicity, your message becomes more potent, leaving a lasting impression on your audience.
The Magic of Visuals: Enhancing Comprehension
A picture is worth a thousand words. Integrate relevant visuals and graphics into your presentation. Visual elements not only enhance comprehension but also add aesthetic appeal. Infographics, charts, and images can convey complex data in a digestible format, ensuring your audience grasps the information effortlessly.
Conclusion: Elevate Your Presentations with Creative Flair
In conclusion, mastering the art of PowerPoint presentations requires a fusion of creativity, concise content, and engaging visuals. By embracing bold headings, active voice, smooth transitions, and captivating visuals, your presentations can become powerful tools that captivate, inform, and inspire. So, go ahead, unleash your creativity, and transform your presentations into unforgettable experiences for your audience. Unleashing Creativity: Master the Art of PowerPoint Presentations
How to Create Stunning Presentation Slides: Tutorial Video
#CreativePowerPoint #Techniques, #Innovative #Presentation #Designs, #PowerPoint #Mastery #Workshop, #Artistic #Slide #Creation, #Visual #Storytelling #Skills, #Engaging #Presentation #Ideas, #Creative #Graphics #in #PowerPoint, #Slide #Design #Innovation, #Captivating #Presentation #Content, #Unleash #Creative #Expression, #Mastering #PowerPoint #Visualization, #Inspiring #Presentation #Concepts, #Creative #Infographics #in #Presentations, #Design #Thinking #in #PowerPoint, #Interactive #Presentation #Elements, #Artful #PowerPoint #Delivery, #Originality #in #Presentations, #Crafting #Unique #Slides, #Creative #Animation #in #PowerPoint, #Presentation #Design #Excellence, #Imaginative #Slide #Layouts, #Expressive #PowerPoint #Artistry, #Designing #Memorable #Presentations, #Innovative #Data #Visualization
Easy Hindi Typing Tutorial
Related Posts

The Power of Video Editing with OpenShot Video Editor

Download Teacher Planner: Organize, Inspire, and Excel in Education

Script Writing for Beginners: 10 points Complete Guide
Leave a comment cancel reply.
Your email address will not be published. Required fields are marked *
Save my name, email, and website in this browser for the next time I comment.
We will keep fighting for all libraries - stand with us!
Internet Archive Audio

- This Just In
- Grateful Dead
- Old Time Radio
- 78 RPMs and Cylinder Recordings
- Audio Books & Poetry
- Computers, Technology and Science
- Music, Arts & Culture
- News & Public Affairs
- Spirituality & Religion
- Radio News Archive

- Flickr Commons
- Occupy Wall Street Flickr
- NASA Images
- Solar System Collection
- Ames Research Center

- All Software
- Old School Emulation
- MS-DOS Games
- Historical Software
- Classic PC Games
- Software Library
- Kodi Archive and Support File
- Vintage Software
- CD-ROM Software
- CD-ROM Software Library
- Software Sites
- Tucows Software Library
- Shareware CD-ROMs
- Software Capsules Compilation
- CD-ROM Images
- ZX Spectrum
- DOOM Level CD

- Smithsonian Libraries
- FEDLINK (US)
- Lincoln Collection
- American Libraries
- Canadian Libraries
- Universal Library
- Project Gutenberg
- Children's Library
- Biodiversity Heritage Library
- Books by Language
- Additional Collections

- Prelinger Archives
- Democracy Now!
- Occupy Wall Street
- TV NSA Clip Library
- Animation & Cartoons
- Arts & Music
- Computers & Technology
- Cultural & Academic Films
- Ephemeral Films
- Sports Videos
- Videogame Videos
- Youth Media
Search the history of over 866 billion web pages on the Internet.
Mobile Apps
- Wayback Machine (iOS)
- Wayback Machine (Android)
Browser Extensions
Archive-it subscription.
- Explore the Collections
- Build Collections
Save Page Now
Capture a web page as it appears now for use as a trusted citation in the future.
Please enter a valid web address
- Donate Donate icon An illustration of a heart shape
Something Old, Nothing New; Final Visual Presentation for the degree of Master of Visual Arts: Painting (Visual Component)
Item preview.

Share or Embed This Item
Flag this item for.
- Graphic Violence
- Explicit Sexual Content
- Hate Speech
- Misinformation/Disinformation
- Marketing/Phishing/Advertising
- Misleading/Inaccurate/Missing Metadata
plus-circle Add Review comment Reviews
Download options, in collections.
Uploaded by LexW on December 6, 2023
SIMILAR ITEMS (based on metadata)

- Our Services
- We are hiring!
- Painting Contractors: How To Pick The Right One!
- +15036461211
The Skills and Techniques of Master Painters

In the world of professional painting, master painters stand apart through their exceptional skills and techniques. Their expertise is not just in applying paint but in transforming spaces with precision, creativity, and a deep understanding of their craft. This blog explores the key skills and techniques that define master painters and set them apart in the field of painting. These artisans elevate the act of painting to an art form, each stroke contributing to a larger vision of beauty and harmony.
Mastery of Color Theory
Master painters possess an in-depth understanding of color theory. This knowledge enables them to create harmonious color schemes and use color effectively to set moods, highlight architectural features, and create illusions of space. Their ability to mix and match colors skillfully is crucial in achieving the desired ambiance in any space. Additionally, they understand the psychological effects of color and how to use it to influence emotion and perception within a room.
Advanced Surface Preparation
The quality of a paint job is significantly influenced by how well the surface is prepared. Master painters excel in preparing surfaces meticulously, whether it involves sanding, priming, or repairing imperfections. They understand that thorough preparation is key to the paint’s longevity and the overall quality of the finish. It’s this foundation that ensures the final coat of paint adheres properly and looks flawless.
Precision and Attention to Detail
Precision and attention to detail are hallmarks of master painters. They excel in cutting-in, creating straight lines where walls meet trim or ceilings without the need for masking tape. Their steady hands and focused approach result in crisp, clean lines and flawless finishes. Such precision showcases their commitment to excellence and the pride they take in their work.
Mastery of Various Techniques
From brushing and rolling to spraying, master painters are skilled in a variety of application techniques. They know how to choose the best method for each project, considering factors like the type of paint, the texture of the surface, and the desired finish. Their adeptness in these methods ensures efficient application and a superior final appearance. This versatility allows them to tackle any project, regardless of complexity.
Custom Finishes and Textures
Master painters are adept at creating custom finishes and textures. Techniques like faux finishing, marbling, wood graining, and distressing are within their repertoire. These specialized skills enable them to replicate the look of different materials or create unique decorative effects. Consequently, their artistic touches can transform a plain surface into a visual and tactile experience.
Knowledge of Materials
An in-depth knowledge of materials is essential for master painters. They are well-versed in the properties of various types of paints, primers, and finishes, and know how to select the best products for durability, coverage, and environmental compatibility. Their expertise extends to understanding the latest innovations in painting materials and how to apply them in diverse situations. This comprehensive knowledge ensures that each project not only looks good but also stands the test of time.
Problem-Solving Skills
Painting projects can present unforeseen challenges. Master painters possess strong problem-solving skills, allowing them to tackle issues like moisture, uneven surfaces, or color discrepancies effectively. They are adept at diagnosing issues and executing solutions that ensure the project’s success. Moreover, their ability to anticipate and respond to problems is what often saves time and resources.
Continuous Learning and Adaptation
The painting industry is continually evolving with new products and techniques. Master painters commit to lifelong learning, staying up-to-date with the latest trends and innovations. This willingness to learn and adapt is crucial in maintaining their mastery. By continually honing their craft, they are able to bring the most advanced and effective painting techniques to every project they undertake.
Final Thoughts
The skills and techniques of master painters go beyond mere paint application. Their deep understanding of color theory, meticulous surface preparation, attention to detail, versatility in techniques, artistic ability in custom finishes, knowledge of materials, problem-solving skills, and commitment to continuous learning define their expertise. Master painters are true artists in their field, turning ordinary spaces into extraordinary ones. Their work is not only a service, but also an investment in beauty and longevity. For more insights into the world of professional painting, visit our website at sisupainting.com and our blog at sisupainting.com/blog .
April 17, 2024
Professional House Painters
Advanced Techniques Artistry in Painting Craftsmanship Master Painting Professional Development
Previous The Role of a House Painter in Home Renovation
Next training and certifications for professional painters, related posts ....

Training and Certifications for Professional Painters

Starting Your Own House Painting Business: A Beginner’s Guide
Leave a reply cancel reply.
Your email address will not be published. Required fields are marked *

Introducing the ultimate Copilot+ PCs – The all-new Surface Pro and Surface Laptop
- Pete Kyriacou – CVP, Microsoft Devices
Today, Microsoft and Surface introduced the fastest, most intelligent Windows PCs ever: Copilot+ PCs. The all-new Surface Pro and Surface Laptop are the ultimate Copilot+ PCs, delivering incredible performance, all-day battery life and brand-new AI experiences. They showcase the beauty and innovation that happens at the intersection of software and hardware.
Surface was created to lead the PC industry with innovation and technology that showcases the best of Microsoft and empowers our customers to achieve more. We’ve been at the forefront of new PC categories, with thoughtful designs and new features that inspire our customers. And as we dive into the new wave of AI, Surface continues to put our customers first.
Copilot+ PCs
Copilot+ PCs provide a quantum leap in computing, with power, performance and breakthrough AI experiences. Debuting with Snapdragon ® X Elite and Snapdragon X Plus processors, Copilot+ PCs are tuned to deliver optimal processing and response times – and are faster than the latest Macbook Air. i
Performance like this means the apps customers love work great. Microsoft has partnered closely with developers across the globe to optimize their applications for this processor. In addition, the powerful new Prism emulation engine delivers a 2x performance boost compared to Surface Pro 9 with 5G. On the new Surface Pro and Surface Laptop, powered by Snapdragon X Elite and Snapdragon X Plus processors, experiences like Adobe Creative Cloud, Microsoft 365 and Chrome will feel snappy, quick and responsive.
In addition, Copilot+ PCs have the most powerful Neural Processing Units (NPUs) in the PC category today. With over 45 trillion of operations per second (TOPS), these NPUs power new AI experiences – here are three that we love:
In addition to Microsoft experiences, the power of the NPU extends in our work with developers who are leveraging the NPU for their own AI workloads. Some examples of these new AI experiences include:
- Davinci Resolve: Effortlessly apply visual effects to objects and people using NPU-accelerated Magic Mask in DaVinci Resolve Studio.
- Cephable: Stay in your flow with faster, more responsive adaptive input controls, like head movement or facial expressions via the new NPU-powered camera pipeline in Cephable .
- CapCut: Remove the background from any video clip in a snap using Auto Cutout running on the NPU in CapCut.
We are seeing many developers around the world and across various industries working on exciting new ways to accelerate their applications using the power of the NPU, including: WhatsApp, Luminar Neo, LiquidText, Camo, djay Pro and more.
All-new Surface Pro
Over 10 years ago, Surface pioneered the 2-in-1 category. Since then, the tablet that can replace your laptop has advanced the expectations of a productivity device, delivering more power, more battery life and innovation people love. The all-new Surface Pro unlocks a new way to think about a laptop: Combining accelerated performance, all-day battery life and industry-leading AI capabilities in an ultra-flexible design that can replace your tablet, your laptop and can even power your multi-monitor set-up.
The all-new Surface Pro , powered by Snapdragon® X Elite and Snapdragon X Plus processors, delivers incredibly fast speeds, 90% faster than Surface Pro 9. It’s built for the ultimate multitasker, supporting up to three external 4K displays, with two USB 4 ports, and a stunning 13” display with new optional OLED with HDR technology, delivering new levels of peak brightness and immersive colors. Wi-Fi 7 offers the fastest wireless connection iv available and optional 5G v keeps you connected to the fastest cellular network, while you’re on the move.
The ultra-wide, quad-HD front-facing camera is our best Surface camera ever. AI-powered Windows Studio Effects like Automatic Framing, keep you in focus, even as you move around your space. The 10MP Ultra HD rear-facing autofocus camera supports 4K video so you can capture and edit all on one device.
Surface Pro is made with more recycled materials than Surface Pro 9, including 72% recycled content in the enclosure. vi Surface Pro is serviceable by design with more replaceable components than ever, including the motherboard, battery, cameras and more.
The all-new Surface Pro Flex Keyboard unlocks new levels of flexibility. It’s ready to be used attached to your Pro for the ultimate laptop set-up or detached for more flexibility and to support your creative workflows.
It is built with enhanced extra carbon fiber layers for stability and has a larger, customizable haptic touchpad. With integrated pen storage, your Slim Pen is secure, charged and ready to go.
Surface Slim Pen gets even better with the new Surface Pro, with all new AI experiences. The ink now flows naturally with Zero Force inking, ultra-precise shading, 4,096 points of pressure sensitivity and a built-in haptic engine for a more natural writing experience.
The all-new Surface Pro is the most flexible laptop, reimagined.
All-new Surface Laptop
When we first launched Surface Laptop, it redefined the classic PC category, pushing boundaries and elevating the user experience to new heights. We introduced premium materials, a vibrant array of colors, ultra-productive 3:2 aspect ratio touchscreens, and a fit and finish like nothing else. We delivered power and performance, and the best typing experience on the market to this day, in a light, sleek design. Beyond elegant design, the Surface Laptop showcased an incredible balance of premium features that delivered the best of Microsoft on a Surface device. This holistic approach revolutionized the industry, setting new standards for excellence and heralding a new era of innovation in laptop design.
The all-new Surface Laptop maintains these principles – purpose built to unlock a new AI era with Copilot experiences that transform the PC experience.
Redesigned from the inside out, this new Laptop has modern lines and a stunning PixelSense touchscreen display with razor-thin bezels. With 120Hz refresh rate, HDR technology, Dolby Vision IQ™ vii and Adaptive color technology, this display delivers crisper whites, darker blacks and an extended color spectrum. There are two screen sizes, as our new 13.8” display provides larger viewing area than a traditional 14” laptop, in a more compact design and a 15” with an even larger working canvas. This ultra-light and stylish Laptop comes in four stunning colors viii : Platinum, Black, Dune and Sapphire.
Surface Laptop unleashes lightning-fast speed and AI accelerated power for the ultimate multitasking. It is 86% faster than Laptop 5, delivering incredible performance. It can power up to three external 4K monitors. The 45 TOPS NPU unlocks new AI experiences and delivers industry-leading performance for seamless productivity with the longest battery life on any Surface – up to 22 hours on the Surface Laptop 15” ix and up to 20 on the Surface Laptop 13.8” x . With a large variety of ports and lightning-fast Wi-Fi 7, you will always be connected.
The new Surface Laptop has a Full HD Surface Studio Camera that supports AI-powered Windows Studio Effects like Automatic Framing, Portrait Blur, Creative Filters and Voice Focus – so you come across clearly and confidently. AI-enhanced sound with premium Omnisonic® Speakers and Dolby® Atmos® xi , and Studio Mics amplify your voice and presence.
Surface Laptop is known for its comfortable and quiet typing experience and now, every keystroke is perfected. With optimal key travel for accurate and swift typing and a large precision haptic touchpad that is smooth, responsive and customizable for your personal preference.
This is the fastest, most intelligent Surface Laptop ever.
Surface product principles
Accessibility, security and sustainability are core components in every product in the Surface lineup. The all-new Surface Pro and Surface Laptop make major strides across all three categories.
Surface products are built to empower everyone on the planet to achieve more. When we develop inclusive products, we create a more comfortable and empowering product experience for everyone, without excluding people in the process. Our journey involves continuous learning from the disability community, placing them at the heart of our design process to develop solutions that unlock their full potential.
Our accessible offerings are comprehensive, ranging from an ecosystem of adaptive accessories to adaptive features built into the fabric of our hardware and software. With the new Copilot+ PCs from Surface, we continued to prioritize adaptability, resulting in products that are inclusive by design.

That’s why we designed the new Surface Pro Flex Keyboard with a bold keyset option, xii to reduce eye strain and assist people with low vision. We added a customizable, haptic touchpad, the most inclusive touchpad on the market today, to both our Surface Pro keyboard and our Surface Laptop, empowering customers with a wide range of hand movement and dexterity capabilities to easily adjust the touchpad to their preferences, resulting in a more delightful experience for all.
These hardware capabilities, alongside new experiences that utilize the power of the NPU, increase your productivity and creativity, allowing you to work, learn and play in the way that is most natural to you.
Security and privacy are always top of mind for us, implementing chip-to-cloud security that begins with inherently secure Surface devices. These new Surface PCs are meticulously built to protect your data from day one. Starting with tracing the origin of even the smallest components on the motherboard through building the lines of code ensuring a secure boot. Every Copilot+ PC will be a Secured-Core PC with Microsoft Pluton Security enabled by default and Windows Hello Enhanced Sign-in enabled by default. We take our responsibility to keep your data safe seriously.
In 2020, Microsoft set a goal to become carbon negative by 2030 – and at Surface, we know we have a responsibility to the planet. With the new Surface Pro and Surface Laptop we are introducing our most significant sustainability advancements yet. We have reduced our carbon emissions by an average of 78% per enclosure through several sustainability interventions, including using 100% recycled aluminum alloy, 100% recycled rare-earth metal magnets and 100% carbon free electricity at manufacturing facilities. xiii
We are also committed to reducing plastic waste – with all-new paper-based packaging with more recyclable components – and extending the lifetime of your device with innovative repairability features.
This is just the beginning. We will continue delivering sustainability advancements across the device lifecycle as we work towards Microsoft’s 2030 commitments.
Pre-order today
The brand-new Surface Pro and Surface Laptop deliver incredible speeds, all-day battery life and all-new AI experiences, all starting at $999. You can pre-order today and learn more about our new products at Microsoft.com. They’ll be available at key retailers worldwide starting June 18. To learn more about Surface for your organization, visit the Surface for Business blog.
i Based on Cinebench 2024 Multi-threaded conducted by Microsoft in April 2024 comparing pre-release build of Surface Laptop with Snapdragon X Elite running pre-release Windows 11 26100 and Apple MacBook Air 13″ with M3 running macOS 14 Sonoma.
ii Recall is optimized for select languages (English, Chinese (simplified), French, German, Japanese and Spanish.) Content-based and storage limitations apply. See https://aka.ms/copilotpluspcs .
iii Currently supports translation for video and audio subtitles into English from 40+ languages. See https://aka.ms/copilotpluspcs .
iv 6GHz band not available in all regions.
v 5G availability options with 5G coming later in 2024. 5G not available in all areas; compatibility and performance depends on carrier network, plan and other factors. See carrier for details and pricing.
vi Enclosure includes Bucket and Kickstand. 100% recycled aluminum alloy in Bucket and Kickstand. 100% recycled rare earth metals in magnets. Based on validation performed by Underwriter Laboratories, Inc. using Environmental Claim Validation Procedure, UL 2809-2, Second Edition, November 7, 2023.
vii Requires Dolby Vision® encoded content and video.
viii Colors available on selected models only. Available colors, sizes, finishes and processors may vary by store, market and configuration.
ix Local video playback: Testing conducted by Microsoft in April 2024 using preproduction software and preproduction Surface Laptop Snapdragon® X Elite C12 512GB, 16GB RAM devices. Testing consisted of full battery discharge during video playback of a .mov file through the Windows Media Player application in 1080p at 24 FPS. All settings were default except screen brightness set to 150 nits with Auto-brightness disabled. Wi-Fi was connected to a network. Tested with Windows 11. Battery life varies significantly with settings, usage and other factors.
x Local video playback: Testing conducted by Microsoft in April 2024 using preproduction software and preproduction Surface Laptop Snapdragon® X Plus C10 256GB, 16GB RAM devices. Testing consisted of full battery discharge during video playback of a .mov file through the Windows Media Player application in 1080p at 24 FPS. All settings were default except screen brightness set to 150 nits with Auto-brightness disabled. Wi-Fi was connected to a network. Tested with Windows 11. Battery life varies significantly with settings, usage and other factors.
xi Requires Dolby® Atmos® encoded content/audio.
xii Surface Pro Flex Keyboard with bold keyset available only in U.S. English.
xiii As compared to a baseline no-interventions scenario modeling the same products without any sustainability interventions in the production phase of the devices.
COMMENTS
Master Painting Examples . The best way to learn composition is to analyze master paintings and observe why they work and what you might do better. This will help you learn the language of composition. Let's run through some master painting examples, plus some key observations in terms of composition. Sir Arthur Streeton, Australia Felix ...
Grasping the basics of drawing is fundamental for any artist, serving as the foundation for crafting realistic and visually appealing paintings. The drawing fundamentals include: Techniques such as mark making. Understanding proportions and perspective. Shading and highlighting. Creating texture and depth.
Know your audience: Tailor your presentation to meet the needs and interests of your audience. Use language, examples, and stories that resonate with them. Keep it simple: Use clear and concise ...
Master of Liesborn. This is one of the few surviving intact scenes which once formed part of an altarpiece made for the high altar of the Benedictine abbey at Liesborn in the west of Germany. This painting is likely to have originally appeared to the right of the main scene showing the Crucifixion.Shortly after birt...
Apply the 10-20-30 rule. Apply the 10-20-30 presentation rule and keep it short, sweet and impactful! Stick to ten slides, deliver your presentation within 20 minutes and use a 30-point font to ensure clarity and focus. Less is more, and your audience will thank you for it! 9. Implement the 5-5-5 rule. Simplicity is key.
Painting within a high key is pretty simple really. All you need to do is push the darkest darks in your painting to around the mid-tone range and then compress all the other values within this new range. Your lightest lights can stay the same. Most importantly, you must ensure the values between your darkest dark and lightest light retain the ...
The first step is creating the master slide, which you can do by clicking on the "View" tab and then the button marked "Slide Master." When you click the slide master button, the program generates a set of slides under the first slide in the presentation. These slides feature a template and a simple design. 2. Adjust the master slide.
The Tigger Movie Presentation Cel with Key Master Production Background Painting and Animation Drawings Group (Walt Di... (Total: 5 Original Art), 2000 Medium: hand-painted cel Size: 10 x 15 in. (25.4 x 38.1 cm.) Description: * Sale: * Estimate: * Price: * Bid Department: *
In conclusion, mastering the art of PowerPoint presentations requires a fusion of creativity, concise content, and engaging visuals. By embracing bold headings, active voice, smooth transitions ...
3. Click "Layout" and choose a new layout. - Keyword: Change Layout. - Shortcut: None. These are just a few examples. If you would like more questions or have specific topics you want to cover ...
Workshop of the Master of the Life of the Virgin. Not on display. [email protected]. Get all the latest news from the Gallery's Bicentenary year, updates on exhibitions, plus occasional offers and information on how to support us. Master of the Life of the Virgin, The Presentation in the Temple, probably about 1460-75.
Just like for creating a master template, the first thing is to access the master view. Go to View tab > Slide Master to see exactly all the design guidelines your presentation has at the moment. #2. Edit the Master Slide. If there's a common element that you want to change, the Master Slide is the place to do it!
A painting in a High Key really means is it's very light. There are only a few darks in the painting. All the colours are very well lit. It is light. A painting in a low key looks much darker with the majority of the painting in darks. Where the majority of the colours fall within the dark range it is in a low key.
So, paintings that are considered "high key" are primarily made up of the values that fall within the higher/ lighter range of values. Instead of relying on strong contrasts, high key painting is made up of subtle differences in value and color to establish depth and form. In the above watercolor painting by JMW Turner (The Channel ...
The programme is delivered across three terms and includes a combination of programme, School and College units. Term 1. In Establishing a Painting Practice (45 credits), you will understand what informs the content, subject matter, form and execution of your work, as well as establish the audio, visual and material research that feeds your work and practice.
Step-1: Click on the "Insert" tab. The first step is to click on the master slide from the slide layout panel on the left side of the screen in the "Slide Master" view. Then click on the "Insert" tab from the menu ribbon. Step-2: Click on the "Pictures" button.
Step 1 - Click on the View Tab. The first thing is to open your PowerPoint slides presentation. Once the slide is open in the PowerPoint application, click on the " View " tab located in the menu bar of your PowerPoint application. Step 2 - Choose Notes Master. Clicking on the " View " tab will open a command window.
Here are the top reasons why effective Presentation Skills can help you on your journey to success. You will better Your Language Skills. Gain Immense Self Confidence. Will be able to communicate your messages clearly. It will help you reduce stress. You will master Your Time Management Better. Presentation Skills are Important for Business ...
Leveraging the Slide Master for Consistent Formatting. Next up, the Slide Master. Think of it as the overlord of slide consistency. We jump into the Slide Master View and set up the whole shebang — choose our bullet styles, decide on text placeholders, you name it. This way, every new slide we add matches the others like they were separated ...
Crafting an Engaging Introduction: A Stellar Start. Begin your presentation with a compelling message, subtly incorporating the phrase. Unleashing Creativity: Master the Art of PowerPoint Presentations In the fast-paced world of business, captivating presentations are the key to leaving a lasting impression.
21 slides : Title from artist's statement Issued in case In conjunction with this presentation, the artist released "for incorporation into the University Collections, University of Alberta, as part of the Master of Visual Arts Thesis Collection" one work: Untitled (wood, cotton fabric, negligee, acrylic paint, gel, 130 x 107 x 17 cm)
The quality of a paint job is significantly influenced by how well the surface is prepared. Master painters excel in preparing surfaces meticulously, whether it involves sanding, priming, or repairing imperfections. They understand that thorough preparation is key to the paint's longevity and the overall quality of the finish.
Surface Laptop is known for its comfortable and quiet typing experience and now, every keystroke is perfected. With optimal key travel for accurate and swift typing and a large precision haptic touchpad that is smooth, responsive and customizable for your personal preference. This is the fastest, most intelligent Surface Laptop ever.