
Microsoft 365 Life Hacks > Presentations > How to password protect your PowerPoint presentations

How to password protect your PowerPoint presentations
Learn how to password protect a PowerPoint presentation and get additional tips for keeping your online files safe even as you share them with your colleagues and contributors.

As the most versatile and widely used presentation software, Microsoft PowerPoint presentations often contain valuable content that requires protection. From company earnings results to trade secrets, students’ projects, or the questions and answers to a quiz, it’s essential for PowerPoint users to safeguard their sensitive data and confidential information, so that they won’t be easily accessed by hackers or unauthorized parties in general.
Why should you add password protection to your PowerPoint files?
A password is the easiest way to add a layer of protection to any of your files, and it’s an effective deterrent to ward off those who aren’t supposed to access them. If you’re sharing sensitive information at your work, or delivering a confidential presentation, a password will reduce the chance of a data breach or the misuse of your presentation’s contents.

Tell your story with captivating presentations
Powerpoint empowers you to develop well-designed content across all your devices
There are many ways in which your files can fall into the wrong hands: whether you store them on a removable USB drive, which can be easily lost, or email an unencrypted file to a compromised account, adding a password adds an extra layer of security. If you’re sharing a PowerPoint presentation online with multiple collaborators, consider using secure cloud storage like Microsoft OneDrive .
By taking a few minutes to implement password protection, you gain peace of mind knowing that your data is safeguarded. Be sure to share your file access with only the people who are authorized to see it.
How to add a password to your PowerPoint presentation
Adding a password to protect your PowerPoint file is easy! Follow these steps to password protect your presentation :
- Open your PowerPoint presentation and select File , then Info .
- Select Protect Presentation . Here, you have multiple options on who can access, view, or edit your presentation.
- Always Open Read-Only prevents viewers from accidentally making changes. Restrict Access allows you to select who can read, copy, or edit. Add a Digital Signature secures your file with proof that someone has opened it. Mark as Final lets your viewers know that they’re looking at the final draft of your presentation.
- To add a password, select Encrypt with Password , the second option in the drop-down menu.
- A dialog box will open. Enter your password and select OK .
Be sure to remember what your password is, as PowerPoint’s powerful encryption abilities will lock you out if you’re not able to remember your own password. You can use any word or combination of letters and numbers to secure your file and remember that all passwords are case-sensitive. When sharing your password-protected PowerPoint files via email, use encrypted emailing ( which Outlook offers ) for an added layer of security.
Taking a few moments to easily add this security layer can save you from unauthorized access and the potentially damaging impact of a data breach. Whether it’s a presentation in a corporate environment, an academic project, or some personal content, adding password protection ensures that your files will remain confidential and secure.
But don’t just stop there: PowerPoint’s advanced presentation features are effective for all subjects and audiences! If you’re looking to get the most out of conveying information, read these additional tips and tricks on how to ace your upcoming presentation , whether you’re looking to dazzle your audience , improving your public speaking skills , or you’re curious about the 30+year history of PowerPoint .
Get started with Microsoft 365
It’s the Office you know, plus the tools to help you work better together, so you can get more done—anytime, anywhere.
Topics in this article
More articles like this one.

How to introduce yourself in a presentation
Gain your audience’s attention at the onset of a presentation. Craft an impressionable introduction to establish tone, presentation topic, and more.

How to add citations to your presentation
Conduct research and appropriately credit work for your presentation. Understand the importance of citing sources and how to add them to your presentation.

How to work on a group presentation
Group presentations can go smoothly with these essential tips on how to deliver a compelling one.

How to create a sales presentation
Engage your audience and get them interested in your product with this guide to creating a sales presentation.
Everything you need to achieve more in less time
Get powerful productivity and security apps with Microsoft 365

Explore Other Categories
7 Ways to Protect PowerPoint Presentation from Editing!
By: Author Shrot Katewa

Isn’t it annoying when you spend hours and hours creating a visually appealing presentation and do all the hard work, only to find out that your colleague or your manager has made changes to the presentation!
Intentional or not, now you’ve got to make the changes to your presentation again; some of which could have been easily avoided if you were able to prevent the presentation file from editing.
Here’s how to protect a PowerPoint presentation file –
- Mark the presentation as “Final”
- Restrict permission to PowerPoint
- Save the presentation as a PowerPoint Show file
- Set a password to modify PowerPoint
- Convert PowerPoint to pictures
- Convert PowerPoint to a PDF
- Convert PowerPoint to a video
There are many applications of knowing how to protect your PowerPoint presentation.
So, in this article, let’s understand the 7 different ways to protect PowerPoint in further detail such that you can ensure that the person you are sharing your presentation with, will not be able to make changes to it.
Let’s get started!
1. How to Protect PowerPoint presentation from Editing?
We shall divide the 7 ways into two groups –
- Prevent PowerPoint file from editing
- Convert PowerPoint to make it uneditable
Prevent PowerPoint File from Editing
There are actually 4 ways in which you can prevent users from editing your PowerPoint presentation.
You can either mark the presentation as final, restrict the presentation by allowing access to specific users, save the presentation as a PPS file or set a password for your presentation.
All the 4 methods and the process to use them are explained elaborately in the following section –
Method 1 – Mark the Presentation as Final
By marking the PowerPoint presentation as final, the PowerPoint file will become “Read-only” .
Although this method doesn’t restrict people from editing your file. However, they will not be able to save changes to the original file. When using this method, PowerPoint will force users to save another copy of the presentation file; thereby protecting your presentation.
This method is especially helpful when you share the presentation over the same network within your organization or even when the presentation is saved on a cloud. It is also helpful when more than one person is working on the same presentation.
It is not a perfect fix, but a quick fix to the problem for sure.
The process of marking your PowerPoint presentation as final is given below –
Step-1: Click on the “File” tab
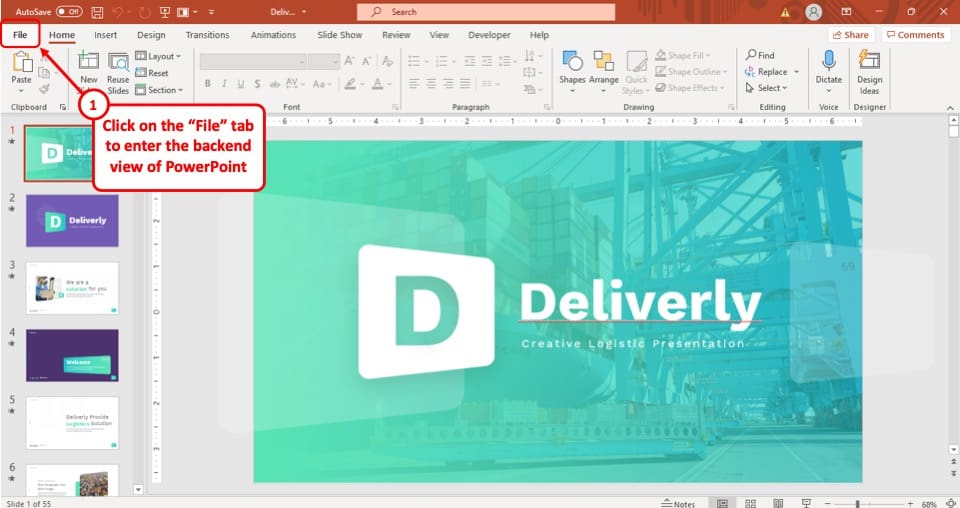
The first step of the process is to click on the “ File ” tab, which is the first option in the ribbon of your PowerPoint presentation. This will take you to the backend view of the PowerPoint.
Step-2: Select the “Info” option
After you have accessed the “ File ” tab, select the “ Info ” option which is the 4 th option in the tab. This will take you to a new page in the “ File ” tab.
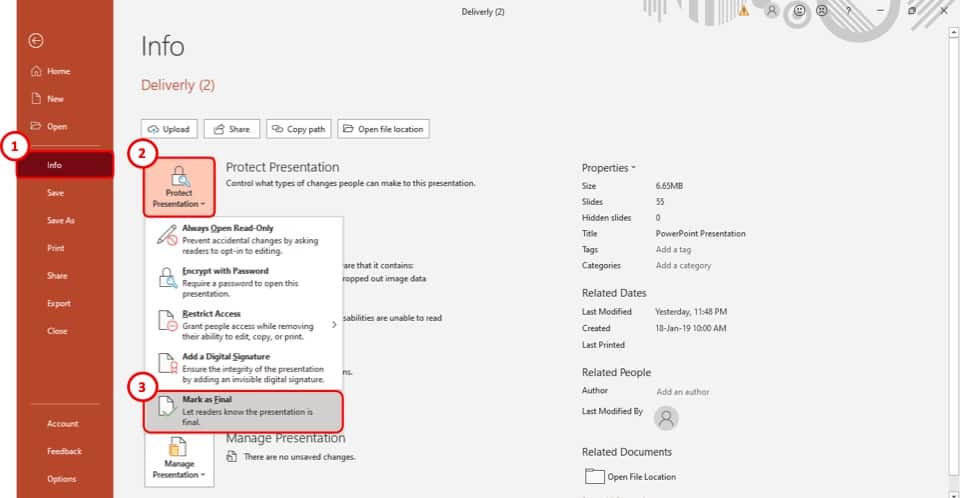
Step-3: Select the “Protect Presentation” option
The third step is to select the “ Protect Presentation ” option in the “ Info ” section (as shown in the image in step 2). It is the first of the four boxes on the “ Info ” page.
After you click on the “ Protect Presentation ” option, a drop-down menu will appear on your screen.
Step-4: Click on “Mark as Final”
From the drop-down menu, select the “ Mark as Final ” option. It is located at the very bottom of the dropdown menu (as shown in the image in step 2).
Step-5: Hit the “OK” button
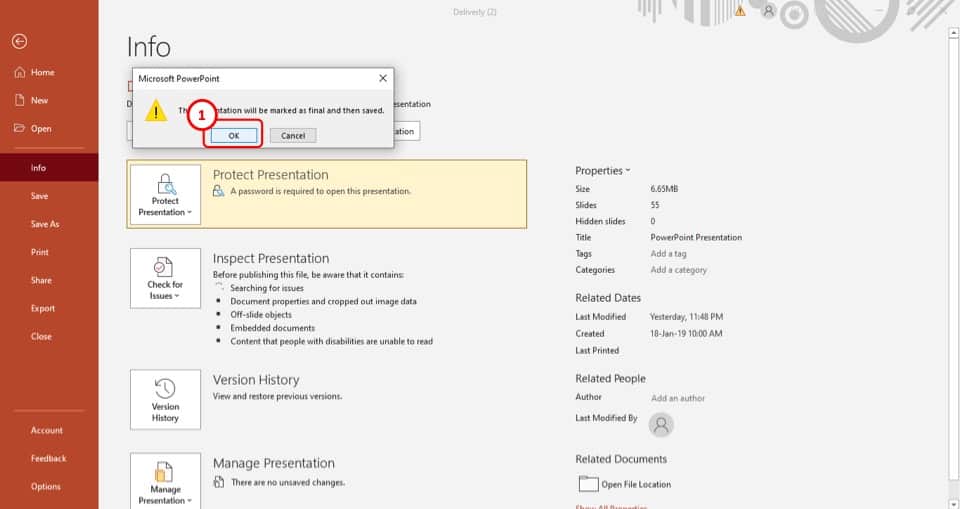
After you click on the “ Mark as Final ” option, a pop-up window will appear on your screen.
Simply click on the “ O K” button and the presentation will be saved as final. Once your presentation is “Saved as Final”, you won’t be able to edit this presentation going forward.
Thus, I recommend that you make this change once you’ve finished your presentation.
Method 2 – Restrict Permission
The next method is to restrict the permissions to edit a PowerPoint presentation.
In my opinion, this is one of the best ways to protect a PowerPoint presentation and to prevent users from editing the PowerPoint file!
By restricting permission, you will be able to allow specific users to access your PowerPoint presentation.
To use this feature in your presentation, follow step-1 through step-3 from the previous section and then follow the easy steps described below.
The first step is to click on the “ File ” tab to enter the backend view of your PowerPoint presentation.
Step-2: Click on the “Info” option
Now, click on the “Info” tab from the options in the left part of your screen.
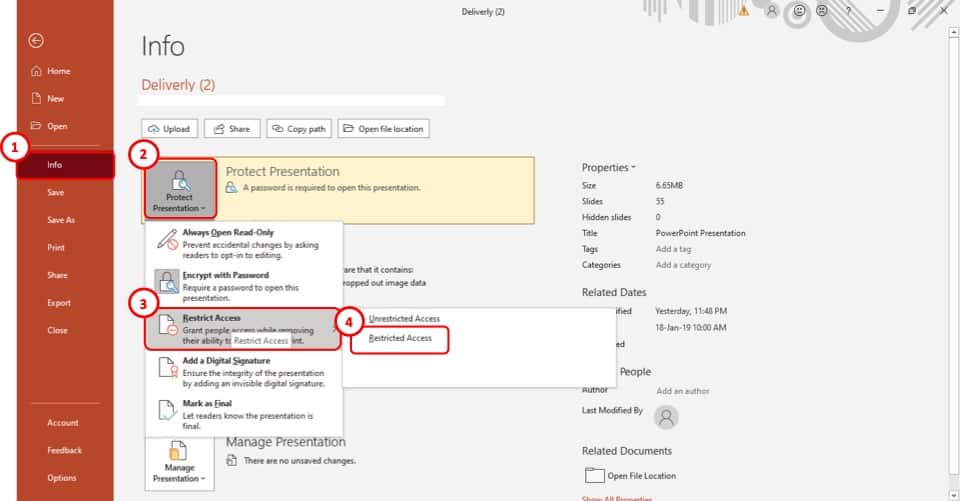
Step-3: Select the “Restricted Access” option
The next step is to select the “ Restrict Access ” option from the drop-down menu of the “ Protect Presentation ” option. It is the 3 rd option in the drop-down menu (as shown in the image in step 2)
Once you click on the “ Restrict Access ” option, another drop-down menu will appear on your screen. Select the “ Restricted Access ” option which is the second option in the menu.
Step-4: Click on the checkbox

After you click on the “ Restricted Access ” option, a pop-up window will appear on your screen.
From the pop-up window, click on the “ Restrict permission to this presentation ” checkbox. It is located at the top of the pop-up window.
Step-5: Add the email address of the users
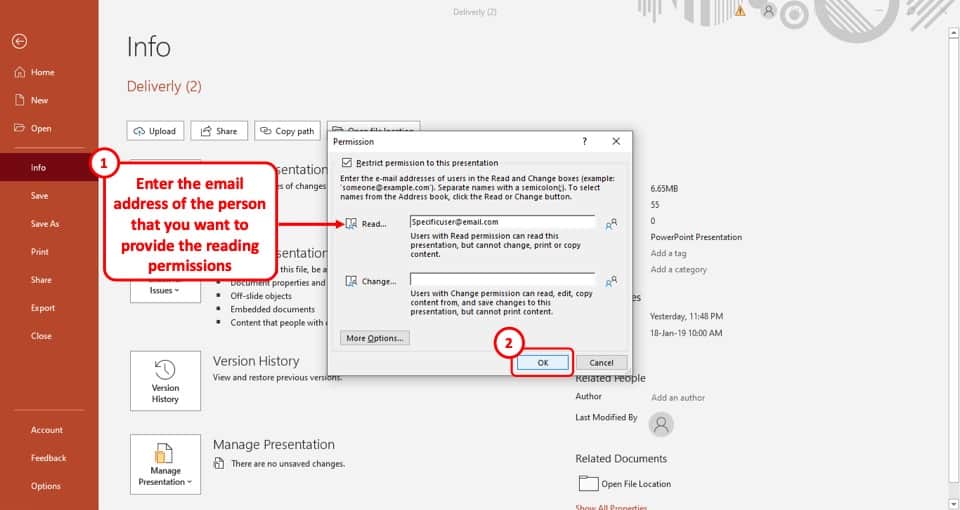
In the final step, all you have to do is type in the email addresses of the users with whom you want to share the presentation, in the “ Read ” option.
This will ensure that the users can only view the presentation file and not edit it. After that just click on the “ OK ” button located in the bottom right of the pop-up window.
Now, only the specified users will get permission to view the PowerPoint presentation.
Method 3 – Save the Presentation as a PPS file
Another method to prevent your PowerPoint presentation from editing and thus protecting it is to save the presentation as a PowerPoint Show file or a PPS file.
Saving a presentation as a PPS or PPSX will open the file directly in the presentation show mode when you open the file. Furthermore, when you exit the presentation show mode, the file will close and the user will not be able to access the content on the slides.
To save the presentation as a PPSX file, simply use the file “ Save As ” option, and choose the “ PPS ” file format from the “ File Format ” option.
I’ve written a detailed article on how to use the PPSX file in PowerPoint . If you need the step-by-step guide for the process, click on the link and check out the article for detailed guidance!
Method 4 – Set a Password to Modify PowerPoint
You can also set a password in order to prevent users from modifying a PowerPoint presentation. This method will prompt a password before opening a presentation.
Although this method will not help if you want to prevent people from editing the file as you will need to provide the password even to view the file. And, once the password is entered, the users will be able to make the changes.
However, this method is super helpful when you want to protect a PowerPoint presentation and prevent it from being access by unintended users.
To set a password to modify your PowerPoint presentation, follow the easy steps given below –
As before, click on the “ File ” tab in PowerPoint. This will open the backend view in PowerPoint from where you can enable additional settings.
Step-2: Select the “Encrypt with Password” option
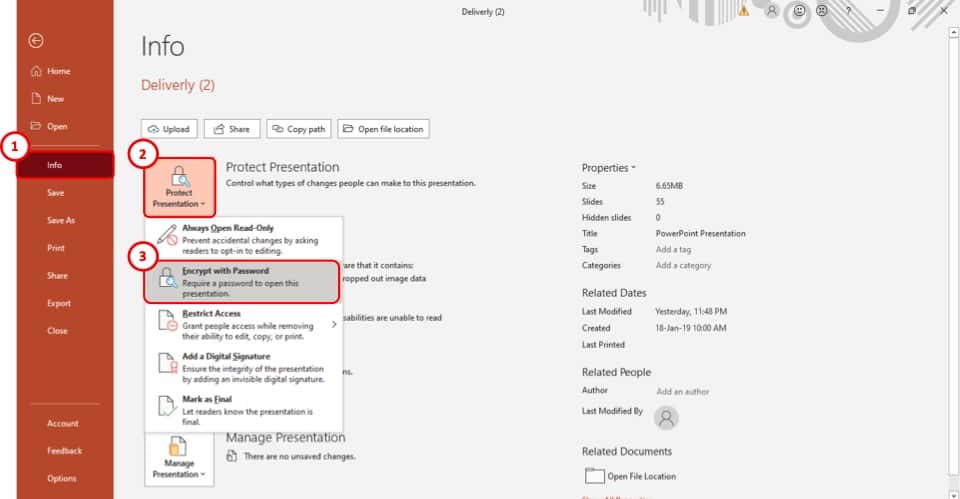
The first step is to select the “ Encrypt with Password ” option from the drop-down menu. It is the 2 nd option on the menu.
Step-3: Enter your preferred password
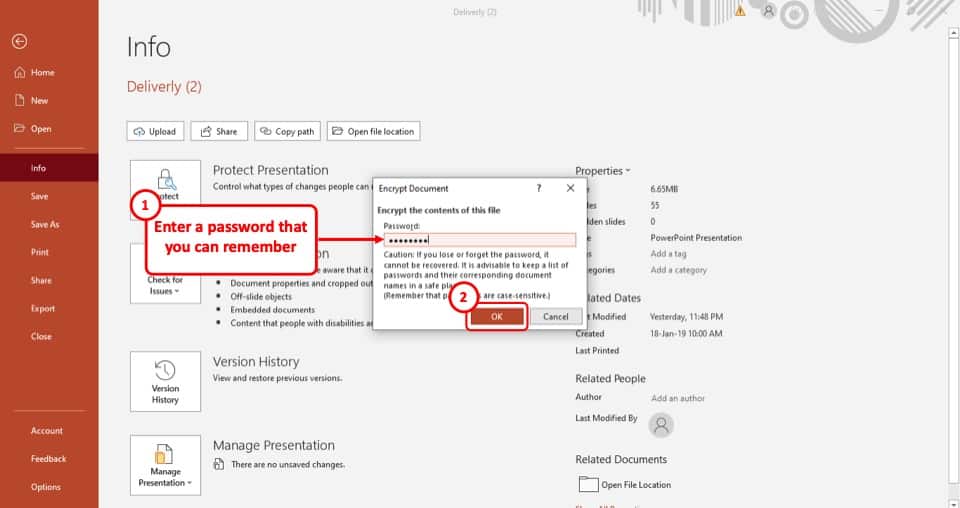
After you select the “ Encrypt with Password ” option, a pop-up window will appear on your screen. In that pop-up window, type in your preferred password in the “ Password ” box. After that, click on the “ Ok ” button.
Once you click on the “ OK ” button, you will be taken to a new page in the pop-up window.
Step-4: Re-enter the password
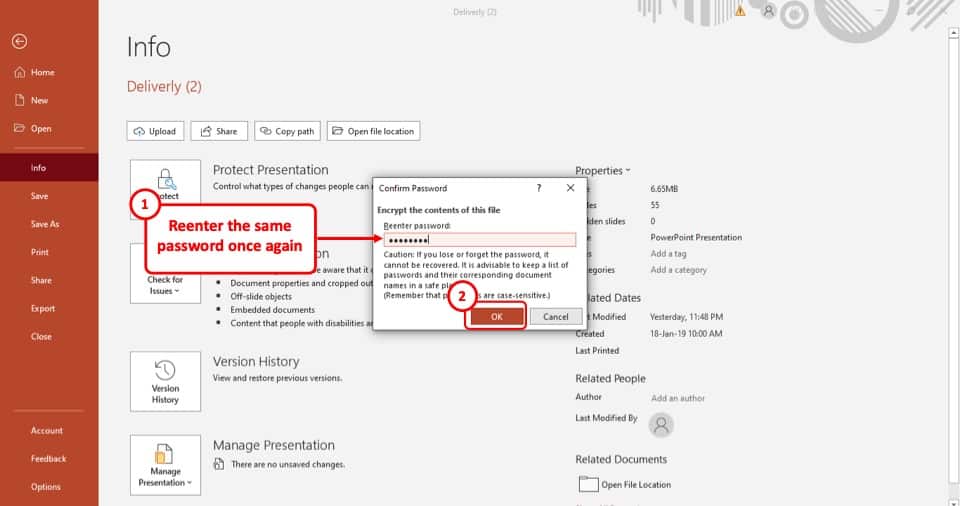
Now, all you have to do is to re-enter the password on this page and then select the “ OK ” button again.
Once done, your PowerPoint presentation will be password protected and users will have to enter the password to access your PowerPoint presentation.
Make PowerPoint Uneditable Permanently?
In the 4 methods described above, you will be able to prevent or protect your PowerPoint presentation file. More importantly, you will be able to share the PowerPoint presentation with the intended users.
However, if sharing a PowerPoint file is not important, there are other ways in which you can protect your presentation and prevent it from being edited further!
Interestingly, the methods described below will allow you to make a copy of your presentation and make it completely uneditable!
There are 3 ways in which you can make your PowerPoint presentation uneditable permanently.
You can either convert the presentation into a picture or convert it into a PDF file or you can convert it into a video. Let’s take a look at the 3 methods below –
Method 1 – Convert PowerPoint to Picture
The first way to protect your PowerPoint presentation is to convert it to pictures.
To convert your PowerPoint presentation as a picture, you will have to use the “ Save As ” option from the “ File ” tab. Simply choose a picture file format from the “ File Type ” options in the “save as” window.
If you need further guidance on how to carry out this process, check out my other article on how to save PowerPoint as an image for full details.
Method 2 – Convert PowerPoint to a PDF
You can also convert your PowerPoint file to a PDF. This is actually one of the most common methods used when you want to prevent your client or colleague from editing the presentation.
The advantage to save PowerPoint as a PDF over saving it as an image is that when you save your PowerPoint presentation as a PDF file, it is saved all the slides in one file just as the case would be in a presentation.
However, when you save a presentation as a Picture, the slides usually get saved as individual images.
Although the process to save a PowerPoint as a PDF is quite similar to that of saving it as an image, but if you are unsure how to do this, check out our other article on how to convert PowerPoint as PDF that details the process in an easy manner!
Method 3 – Convert PowerPoint to a Video
You can also convert your PowerPoint to a Video in order to protect your PowerPoint file!
If you have a lot of animations in your presentation, and you want to retain the animations when you show it to your colleagues or the audience, but you don’t want them to edit the file, then you can convert the presentation to a video format.
This will allow you to retain the animations, and make the presentation uneditable.
Converting a PowerPoint to a video requires you to use the “ Save As ” function. However, there are a few additional things that you may need to keep in mind.
Check out our article on how to convert PowerPoint to Video for a full guide with helpful tips.
2. How to Password Protect a PowerPoint Presentation from Opening?
You can set a password that users will have to enter before they can access your PowerPoint presentation.
The process to password protect a PowerPoint presentation is elaborately explained in method 4 of the previous section of this article. Simply follow the steps explained in the earlier section and you will be able to add a password to your PowerPoint file.
3. How to Remove Password from a PowerPoint Presentation?
The process of removing the password from a PowerPoint file is quite straightforward. However, it is important to know the password in order to change or remove the password protection in PowerPoint.
Let’s take a look at how to remove a password from a protected PowerPoint presentation –
3a. If You Know the Password
If you remember the password to your PowerPoint presentation, open the PowerPoint file, go to the “ Encrypt Presentation ” option in the “Info” section of the “ File ” tab and follow the steps given below.
Step-1: Open the “Encrypt Password” option
The first step is to click on the “ File ” tab. Then, from the backend view, click on the “ Info ” option.
Next, click on the “ Protect Presentation ” option, and from the dropdown, select the “ Encrypt with Password ” option.
Step-2: Clear the Password from the box
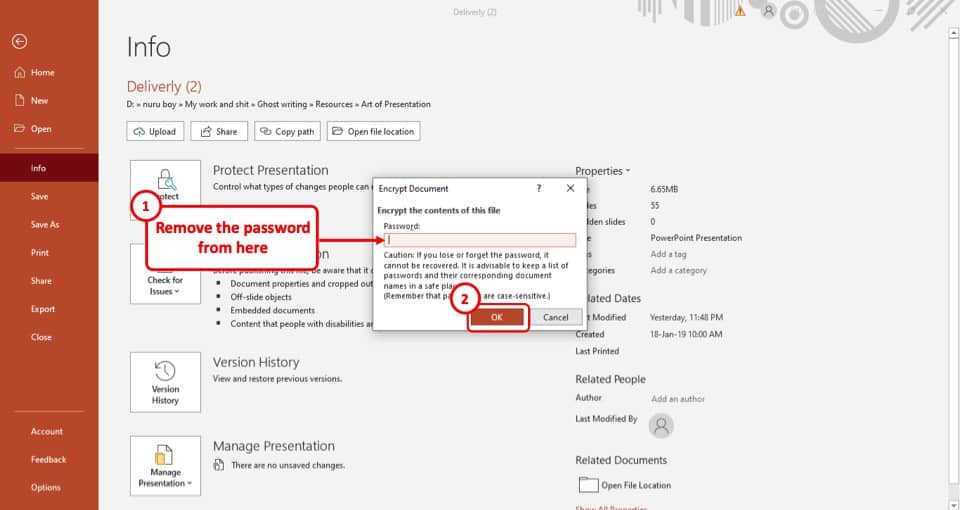
Once you’ve clicked on the “ Encrypt Presentation ” option, clear the password from the “ Password ” box.
After you’ve cleared the password, simply hit the “ OK ” button, located at the bottom right corner of the pop-up window and the password will be removed immediately.
3b. If You Forget the Password
Unfortunately, there is no direct way of removing a password from your PowerPoint file.
To do this, you will have to use third-party software that will unlock the encrypted PowerPoint file for you.
The software that we would recommend is “iSunshare” . It is free to use, and you will be able to unlock more than just PPT files. To download the software from their website, click here .
Credit to cookie_studio (on Freepik) for the featured image of this article (further edited).
Restrict changes to PowerPoint presentations
If you don't want content reviewers to accidentally change your PowerPoint presentation, you can use formatting and editing restrictions.
Note: To further restrict reviewers from making changes to your document or spreadsheet, you can make the file read-only or you can password protect it.
Restrict permission to content in files
Select File > Info .

After you assign permission levels, select OK . The Message Bar appears, indicating that the presentation is rights-managed. If you must make any access permission changes to the presentation, select Change Permission . If a presentation with restricted permission is forwarded to an unauthorized person, a message appears with the author's e-mail or website address so the individual can request permission. If the author doesn't include an email address, unauthorized users get an error message.
Set an expiration date for a file
Select Protect Presentation , point to Restrict Access , and then select Restricted Access .
In the Permission dialog box, select Restrict permission to this presentation , and then select More Options .

Select OK twice.

Need more help?
Want more options.
Explore subscription benefits, browse training courses, learn how to secure your device, and more.

Microsoft 365 subscription benefits

Microsoft 365 training

Microsoft security

Accessibility center
Communities help you ask and answer questions, give feedback, and hear from experts with rich knowledge.

Ask the Microsoft Community

Microsoft Tech Community

Windows Insiders
Microsoft 365 Insiders
Was this information helpful?
Thank you for your feedback.
Critical PowerPoint Shortcuts – Claim Your FREE Training Module and Get Your Time Back!
How to Password Protect PowerPoint (Step-by-Step)
- PowerPoint Tutorials
- Shortcuts & Hacks
- February 27, 2019
Are you ready to learn how to password protect PowerPoint presentations so that others cannot edit or copy and paste your content?
Before you get started though, please remember this. If you forget the password you created in the steps below, you will not be able to recover your password, or unlock your presentation.
Now before password protect your presentation, it’s important to first understand the difference between the two types of Passwords you can use to protect your PowerPoint presentations.
Two Types of PowerPoint Passwords
PowerPoint has two different styles or types of passwords you can add to your presentation which determine what someone can and can’t do with your presentation.
While the difference between the two pop-up windows as you can see in the picture below appears small, the difference is big.

1. Password to Open
Adding a password to open forces you (or whoever opens your presentation) to input a password to be able to not only see but edit the content of your presentation.
If they do not know the correct (case-sensitive) password, they cannot open, review or modify your presentation in any way. Just keep in mind that there is NO WAY to recover a forgotten password.
So if you password protect your presentation AND forget your password, you too will not be able to open or edit your presentation.
2. Password to Modify
Adding a password to Modify gives your clients and colleagues two different ways to access your presentation.
- They can enter the correct password and get full editing rights to your document (just like a normal presentation).
- They can choose to open your file in a Read-Only format, allowing them to view (but not edit) your PowerPoint presentation.
To give someone the Read-Only option pictured below to access your presentation, you must use the password to Modify option.

In the Read-Only version of your presentation, people can still print, save your file as a PDF and run your presentation in the Slideshow modes. To see all the slideshow shortcuts and techniques, check out our ultimate slideshow guide here.
On top of that, all of your PowerPoint animations, effects, hyperlinks, etc. will still work in the Read-Only version of your document. But other than reviewing your document, people will NOT be able to edit, modify or copy and paste any of your content.
How to add a password to PowerPoint
To password protect your PowerPoint presentation using either the Password to Open or Password to Modify options, follow the steps below.
1. Open the PowerPoint presentation you want to password protect
The only way to add a password to a specific presentation is from within the presentation itself. So as a first step, find and open the presentation that you want to password-protect.
As a best practice, I recommend creating a non-password-protected copy of your presentation and saving it on your computer. That way if you forget your password, you can always open the non-password-protected version on your computer.
To create a copy of your presentation, simply Ctrl + C to copy and Ctrl + V to paste it inside a File Explorer window.

2. Open the Save As dialog box

The FASTEST way to access the Save As dialog box from within PowerPoint is using your keyboard shortcuts. You can use either of the two keyboard shortcuts (whichever is easier for you to remember):
- F12 for Save As
- Ctrl + Shift + S for Save As
If you hit F12 and nothing happens, that means that your function keys are reversed. In this case, try adding the Function key to the sequence: Fn + F12 .
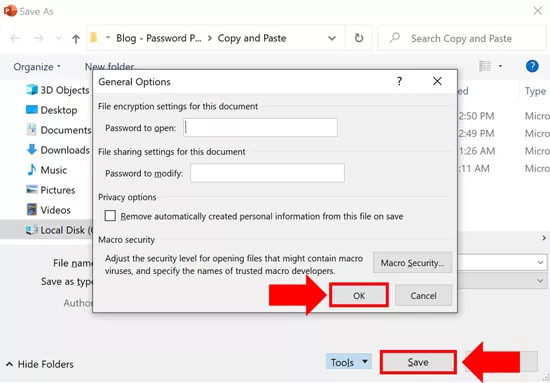
3. Open the Tools dropdown

Inside the Save As dialog box, open the Tools dropdown (it is right next to the Save button as pictured above).
Note : The Save As dialog box is also the trick to converting PowerPoint to PDF .
4. Select General Options

Inside the Tools dropdown, select General Options . This is where you can add/remove passwords to your PowerPoint presentations.
5. Enter your password (Open or Modify)

Inside the General Options dialog box, decide which type of password to add to your presentation (see my explanation of both types at the top of this page).
Your two options are:
- Password to Open
- Password to Modify
To get started, simply click into the input box for the type of password you want to protect PowerPoint with (Open or Modify) and type your password.
Remember too that passwords are case-sensitive, so be careful you don’t have the Caps Lock key on when you enter your password. Thankfully, you get the chance to confirm your password in the next step.
6. Confirm your Password

This is your chance to confirm you have typed the correct password for your presentation. As there is no way to view the password you have typed, I recommend taking care here to make sure you type what you think you typed.
If you make a mistake and the two passwords are not the same, you get the following error notification.

Clicking OK , you can either re-type your password correctly or select Cancel to exit out of the Confirm Password dialog box.
PowerPoint will not allow you to add a password to your presentation unless you can first confirm your password.
7. Rename your Presentation (Recommended)

While renaming your password-protected presentation is optional, to me this is a critical best practice.
I personally like to add “- with Password” or “PW” or “Password to Open” to identify the document as having a password. This also helps you distinguish it from your original (non-password protected) document that you hopefully saved in step #1 above.
In this step, you can also choose where to save your password-protected document on your computer by navigating between your folders.
8. Save and Close your document

Once you have selected a location on your computer to save your password-protected presentation, click Save and then close out of your document to trigger the password.
As long as you have your document open, you will not need to enter the password to open it (as it is already open). Closing the document triggers the password gate to close, requiring a password to open it again.
9. Double-check your password works properly

Before you send off your document as final, double-check that your password properly works. This is especially important if you created a non-password-protected version of your presentation, to make sure you are working with the correct file.
Find your protected presentation on your computer and double-click it to open it up. If the document immediately opens without asking you to enter a password, it means that:
- You selected the non-password-protected version of your document
- You never closed your PowerPoint presentation after adding your password (see step #8 above)
- You made a mistake somewhere along the way and should start over
Either way, double-checking this now will save you from accidentally sending your client the wrong file.
Once your password is properly added to your presentation, opening the document forces you to enter a password to continue. Once you see the dialog box, try entering your password to make sure you have the right one.
How to remove a password from PowerPoint
Tired of always having to enter in a password to edit your presentation? Well, let’s look at how to remove a password from your presentation.
For example, you added a password to your presentation to work with a specific client, and now that project is over. So you want to remove the password so you and your team can access it without always having to enter a password.
Removing a password is very similar to adding a password. Simply follow these steps.
1. Find and open the password-protected presentation

The only way to remove a password from PowerPoint is from within the password-protected presentation.
Navigate to the file on your computer, and double-click it to open it. If a dialog box does not pop open asking you for a password to continue, it means one of two things:
- You have selected the wrong presentation
- Your presentation is not password-protected
Notice how easy it is to see which presentation is password-protected in the picture above? That is why I recommend adding a qualifier in the name of any PowerPoint presentation you password protect.
2. Enter the correct password and click OK

Regardless of whether you have a Password to Open or a Password to Modify, enter the correct password and click OK to get full editing rights to your document.
You cannot remove a password in the Read-Only version of PowerPoint that you can access with the Password to Modify .
If you do not know the password to the presentation, you cannot remove the password from the document (sorry). This is why I recommend saving a non-password-protected version of your file first.
3. Open the Save As dialog box

Once you have successfully opened the password-protected presentation, now you can remove the password. To get started, hit F12 or Ctrl + Shift + S to open the Save As dialog box.
4. Open the Tools dropdown
Inside the Save As dialog box, click to open the Tools dropdown.

5. Select General Options
Inside the Tools dropdown, select General Options to remove the password from your presentation.

6. Select and delete the password
Depending on what type of password was added to your presentation, you should see a sequence of circles or asterisks marks in either the Password to Open or Password to Modify option as pictured below.

Simply select the password in the dialog box and hit either Delete or Backspace on your keyboard.
Two things you cannot do in this dialog box are:
- You cannot view the password. So if you open a password-protected presentation on your computer, your colleague cannot sneak a peek at the password when you are not looking.
- You cannot password-protect your presentation with both types of passwords. You will either have a Password to open or a Password to modify , never both (it is impossible).
7. Click OK and then Save
After deleting the password, click OK and then click Save .
This saves your presentation without the password, allowing you to open the file without having to use a password in the future. If you like, you can also choose to rename your file now that it is no longer password-protected.
8. Double-check the password is removed
Before you forget, double-check that the password has been removed from your presentation.
Close your PowerPoint presentation (Ctrl + W on your keyboard) and then reopen. If you are again asked to enter a password to open or modify the presentation then something went wrong along the way.
If this happens to you, don’t sweat it. It is better to figure this out now (and fix the problem) rather than having your client or colleague email you about the issue.
PowerPoint Password Tips
I cannot stress this enough, DO NOT forget your password.
A number of people have asked whether it is possible to recover a password they have forgotten. Unfortunately, there is no way to retrieve a forgotten password like this that I know of.
This is why I recommend saving a copy of your original presentation (a non-password protected version) before adding a password to it. That way if you forget your password, you can always go back to the original (non-password protected) document, without having to recreate the wheel.
A few additional PowerPoint password tips are:
Tip #1. Passwords are case sensitive, so watch out for upper case letters.
That means that locking PowerPoint with the uppercase password ‘OPEN SESAME’ is treated differently than the lowercase password ‘open sesame.’
Tip #2. Make your passwords easy to remember
One way to make your passwords easy to remember is to either reference the client’s name in the password or just used the first four letters of the document.
An example using the client’s name could be m icrosoft open (I recommend using lower-case) if your client is Microsoft
An example using the first four letters for a file called “Quarterly Report” would be quar open (again making it all lower case so it is easier to remember).
Tip #3. Don’t use the same password for all of your presentations
Just like you shouldn’t use the same password for all your personal things, you don’t want to use the same password to open all of your presentations. That is because if someone figures that out, they will be able to open all of your password-protected presentations.
Tip #4. Develop a naming convention that makes sense for you
For help developing a naming convention for your passwords so they are always easy to remember, check out the following tips by GrowMap here .
Now you know how to both add and remove passwords to your PowerPoint presentations.
Two important things to remember about password protecting your presentations are:
#1. Most people are not familiar with having to add a password to open a presentation. So, if your password-protect your presentation, warn your clients and colleagues in advance.
#2. There is no way to recover your password if you forget it. So, use an easy to remember password, write it down and better yet, save a non-password-protected version of your presentation that you can always refer to it if necessary.
If you enjoyed this article and want to learn more about our PowerPoint training products and services, visit us here .
What’s Next?
Related articles, about the author.

This Post Has 2 Comments

Thanks for the article! So there is no way to recover the password? I had this problem once and tried googling for it, there are a lot of sites that claim it’s possible. Fortunately it was just an edit password and a simple ppt, so ended up making a new presentation with the same text and pictures.

To my knowledge, there is no way to recover a password. That is why I recommend saving a copy of your presentation without a password before adding one. Sorry I don’t have a better answer for you.
Comments are closed.
Popular Tutorials
- How to Strikethrough Text (l̶i̶k̶e̶ ̶t̶h̶i̶s̶) in Word, Excel & PowerPoint
- How to Make Animated Fireworks in PowerPoint (Step-by-Step)
- Strikethrough Shortcut (l̶i̶k̶e̶ ̶t̶h̶i̶s̶) for Word, Excel & PowerPoint
- How to Create a Flash Card Memory Game in PowerPoint (Like Jeopardy)
- Keyboard Shortcuts Not Working: Solved
PowerPoint Tutorial Categories
- Strategies & Opinions
- Presentation Design
- Pictures, Icons, Videos, Etc.
- New Features
- Miscellaneous
- Charts & Data Viz
We help busy professionals save hours and gain peace of mind, with corporate workshops, self-paced courses and tutorials for PowerPoint and Word.
Work With Us
- Corporate Training
- Presentation & Template Design
- Courses & Downloads
- PowerPoint Articles
- Word Articles
- Productivity Resources
Find a Tutorial
- Free Training
- For Businesses
We help busy office workers save hours and gain peace of mind, with tips, training and tutorials for Microsoft PowerPoint and Word.
Master Critical PowerPoint Shortcuts – Secure Your FREE Training Module and Save Valuable Time!
⌛ Master time-saving expert techniques.
🔥 Create powerful presentations.
🚀 Propel your career to new heights.
We value your privacy – we keep your info safe.
Discover PowerPoint Hacks Loved by Industry Giants - KKR, AmEx, HSBC!
Over 114,880 professionals in finance, marketing and sales have revolutionized their PPT skills with our proven methods.
Gain FREE access to a full module of our premium PowerPoint training program – Get started today!
We hate spam too and promise to keep your information safe.
You are currently viewing a placeholder content from Facebook . To access the actual content, click the button below. Please note that doing so will share data with third-party providers.
Unsupported browser
This site was designed for modern browsers and tested with Internet Explorer version 10 and later.
It may not look or work correctly on your browser.
- Presentations
How to Lock a PowerPoint Presentation (+Video)
In this tutorial, you’ll learn how to lock a PowerPoint from editing. We’ll explore how to use password protect PowerPoint features to secure your slides. It only takes a few quick steps.
And when you complete these password protecting PowerPoint steps, you can rest easy. You'll know that your slides are guarded against unwanted edits. Once you know how to password protect a PowerPoint, you’ll see that it’s a common-sense step you’ll take every time you build your own slides.
Learn How to Build Amazing Presentations with our PPT eBook (Free)
We also have a helpful compliment to this tutorial. Download our FREE eBook: The Complete Guide to Making Great Presentations . Grab it now before you read on.

How to Quickly Password Protect Your PowerPoint Files (Quickstart Video)
If you like to learn via screencasts, we've got you covered. You'll see how to password protect a PPT with the quick video below.

Note : Watch this short tutorial screencast or follow the quick steps below that complement this video.
How to Lock and Protect Your PowerPoint Presentation
Using PowerPoint password protection is a key step to keeping your files safe. With global sharing, it’s all too easy for the wrong person to start editing or changing your slides!
That’s where password protecting PowerPoint slides comes in. Knowing how to password protect a PPT helps you stay safe and in control of all your slides.

In this quick tutorial guide, you’ll learn how to password protect a PowerPoint. We’ll demonstrate using the Be PowerPoint Presentation Template from Envato Elements. Download it today to follow along.
1. Launch the Info Menu
Learning how to password protect a PPT begins on PowerPoint’s Info menu. Here, you will find the powerful Protect Presentation settings. Think of these as the control center for security in PPT.
To see how to lock a PowerPoint from editing, begin by finding the File menu. This is in the upper left corner of the PowerPoint ribbon. Click on File .

On the left, shaded in orange, you’ll see a sidebar menu. From the list of options here, click on Info . The Info menu will launch and appear onscreen.
2. Lock PowerPoint from Editing with a Strong Password
On the Info menu, look at the option tabs in the middle. At the top, you’ll see Protect Presentation. Click on Protect Presentation. This is how to password protect a PPT with ease.

From the list of options, choose Encrypt with Password. The Encrypt Document menu will pop up. Here, you can type in a strong password. Key it in, re-enter the password, then click OK.

3. Open Slides to See PowerPoint Password Protection
Now, when anyone opens your slides, they’ll see the password protect PowerPoint box appear. Before the slides open, they’ll be asked to input the password that you’ve chosen.

You can see this in action. Find your slides where you saved them and double-click to open them. When you do, you’ll immediately be prompted to enter a password.
You’ve just learned how to password protect a PowerPoint. As you can see, the password protect PowerPoint process is fast and easy.
4. Optional: Mark PowerPoint Slides as Final
There is a second, optional feature to lock a PowerPoint from editing. Think of it as an important version control feature. It helps encourage viewers to leave files unchanged. It’s called Mark as Final.

To mark slides as final, return to the File > Info tab. Once again, click on the Protect Presentation dropdown. But this time, click Mark as Final from the list of options. This marks your PPT slides as Read Only. Editors won’t be able to type or edit without saving a new copy. Thus, your original slide deck is protected.
It's possible that this feature is enough instead of password protecting PowerPoint files. You could simply signal this preference instead of applying the full lock PowerPoint from editing function.
Either way, these options will help you protect your PowerPoint file and make sure it's not edited any further. PowerPoint password protection is valuable, and it’s a key step in your slide design process. Start using it every day.
More Great Envato Tuts+ PowerPoint Tutorials
You've mastered the art of how to lock a PowerPoint from editing. These controls for password protecting PowerPoint files ensure that your file stays safe.
There's no reason to stop here. We have plenty more resources that add to your PowerPoint skillset. Learn more in our PowerPoint tutorials and quick video tutorials on Envato Tuts+. Here are a few pieces that are highly popular with our readers:

Make Great Presentations ( Free PDF eBook Download )
We also have the perfect complement to this tutorial, which will walk you through the complete presentation process. Learn how to write your presentation, design it like a pro, and prepare it to present powerfully.

Download our handy eBook : The Complete Guide to Making Great Presentations . It's available for free with a subscription to the Tuts+ Business Newsletter.
The Top Source for the Very Best PowerPoint Templates (With Unlimited Downloads)
Searching for the very best Microsoft PowerPoint templates? Envato Elements has you covered. For a flat monthly rate, you can explore thousands of stunning PPT slide deck designs . With unlimited downloads, you can easily try out as many as you want!
Find PowerPoint Templates

The Elements offer is powerful, and slide templates are only one of countless features. You’ll also enjoy fonts, stock photos, music, and so much more. As a creative, you’ll have tens of millions of digital assets to explore.

Elements helps you boost your design styles faster than ever. Our powerful new AI search technology is the ideal digital assistant for all of your creative needs. Building a project on a certain theme? Simply describe your project and watch as the perfect content is collected for you. In seconds, you’ll have the visuals and audio you need.
Envato Elements is the ultimate creative value in 2024 and beyond. So, what are you waiting for? Join today a nd get started.
Start Password Protecting PowerPoint Slides Today
In this tutorial, you learned how to password protect a PowerPoint deck. As you can see, it only takes a few clicks to password protect PowerPoint files. But the benefits are unmatched. With this simple process, you can avoid any unwanted changes. You can keep your work safe and secure after you lock PowerPoint from editing.
Begin with a stunning PowerPoint slide deck from Envato Elements. Build out slides and keep them safe by using lock PowerPoint from editing features. What are you waiting for? Truly, you can’t afford to skip PowerPoint password protection. Put your new skills to good use right now!
Editorial Note: This tutorial was originally published in September of 2017. It's been completely reviewed and revised for accuracy and relevancy by Andrew Childress .

Byte Bite Bit
How to Lock a PowerPoint from Editing: Secure Your Presentation
Ever been in a situation where you spent hours perfecting your presentation, only to find out someone else made unintended changes? We’ve all been there, and it can be frustrating. To ensure your PowerPoint stays exactly as you designed it, learning how to lock it from editing is a game-changer.

Microsoft PowerPoint offers multiple methods to protect your presentation. We can set passwords, mark the presentation as final, or even save it in a read-only format. These tweaks not only secure our content but also give us peace of mind knowing that our hard work remains intact.
Let’s dive into these practical steps. You’ll discover easy-to-follow instructions to prevent accidental or unauthorized changes. Whether you’re presenting to colleagues, clients, or any audience, these tips will help you maintain control over every slide. So, let’s ensure your Microsoft PowerPoint presentations are always polished and protected.
- 1.1 Setting Up a Password to Protect a Presentation
- 1.2 Applying Editing Restrictions in PowerPoint
- 2.1 Making a Presentation Read-Only
- 2.2 Restricting Permission by User Roles
- 2.3 Marking Presentations as Final
- 3.1 Using Digital Signatures for Authenticity
- 3.2 Setting Expiration Dates for Presentation Access
- 4.1 Censoring Information with Proofing Tools
Securing Presentations with Passwords
Protecting PowerPoint presentations by setting up a password enhances security by preventing unauthorized access and editing. This is essential to maintain the integrity and privacy of your work.
Setting Up a Password to Protect a Presentation
First, we need to open our PowerPoint presentation and select the File tab. From there, navigate to Info . Next, select Protect Presentation and choose the Encrypt with Password option.
A pop-up will prompt us to enter a password. Make it strong—use a combination of uppercase, lowercase letters, numbers, and special characters. Click OK and re-enter the password when prompted. Remember to save the document to apply the new settings.
Tip: Store your password in a safe place. If you forget it, you’ll lose access to your presentation.
Applying Editing Restrictions in PowerPoint
Aside from password protection, PowerPoint allows us to restrict editing permissions. Start by selecting the File tab, then Info . Opt for Protect Presentation and select Restrict Access .
In the Permission dialog, tick the Restrict permission to this presentation checkbox. We can then specify who can edit or only view the document. Advanced settings allow setting a presentation expiration date to control access duration.
Furthermore, under Additional permissions for users , we can allow specific actions like printing or copying content.
By using these tools, we ensure our presentation remains unaltered unless we permit changes, offering robust protection for our work.
Managing Access for Different Users
When it comes to managing who can edit or view your PowerPoint presentation, there are several options available. You can make the presentation read-only, limit access based on user roles, or mark the presentation as final to prevent any changes.
Making a Presentation Read-Only
One effective way to lock a PowerPoint presentation from editing is to make it read-only. By setting the presentation to always open as read-only, unauthorized users are prevented from making changes.
To do this:
- Open the PowerPoint file.
- Go to the File tab and select Info .
- Choose the Protect Presentation option.
- From the dropdown menu, select Always Open Read-Only .
Now, every time someone opens the .pptx file, it will be non-editable by default. This method is simple and useful for safeguarding your work without the need for complex permissions.
Restricting Permission by User Roles
Sometimes, we need to give different levels of access to various users. By restricting permissions based on roles, such as administrators and viewers, we can ensure tighter security and control.
Steps to restrict permission:
- Navigate to the Review tab.
- Click on Restrict Editing .
- In the Restrict Editing pane, select the Allow only this type of editing in the document option.
- Set the necessary permissions for users, allowing specific roles such as editing, commenting, or viewing.
This helps in controlling who can modify the content versus those who can only view it, keeping the workflow streamlined and secure.
Marking Presentations as Final
To prevent any further edits after finalizing a presentation, we can mark it as final. This feature locks the presentation and signals that the file should not be edited.
To mark a presentation as final:
- Open the presentation.
- Click on Protect Presentation .
- Choose Mark as Final from the dropdown.
By marking the presentation as final, we make it clear that no changes should be made. This feature is perfect for finalized projects that must stay intact.
These methods ensure that we maintain control over our PowerPoint presentations, protecting the integrity and confidentiality of our work.
Advanced Security Measures
To enhance the protection of your PowerPoint presentations, integrating digital signatures and setting expiration dates are crucial. These advanced security measures provide both authenticity and controlled access.
Using Digital Signatures for Authenticity
Adding a digital signature is a smart way to verify the ownership and integrity of your presentation. A digital signature, backed by a digital ID, ensures that the content hasn’t been tampered with. To add a digital signature in Microsoft Office, go to the File tab and choose Info . Click Protect Presentation and then Add a Digital Signature .
Using Microsoft 365 , you can also use built-in tools to streamline the process. It’s essential to have a digital ID from a trusted certificate authority to validate the signature properly. This adds a layer of trust for recipients, confirming the content’s authenticity.
Setting Expiration Dates for Presentation Access
Restricting access to your PowerPoint by setting expiration dates is another effective measure. This option is handy for time-sensitive information. In Microsoft Office, navigate to File and select Info . Under Protect Presentation , point to Restrict Access and choose Restricted Access .
Here, enable the This presentation expires on checkbox and enter an expiration date. This ensures that viewers can only access the presentation up to a specified date, enhancing security and control over sensitive content. This feature is particularly useful for managing collaborative work within our teams, ensuring timely and secure content sharing.
Stay ahead of unauthorized access and ensure your presentations remain secure and authentic with these advanced measures.
Handling Sensitive Content in Presentations
When dealing with sensitive content in PowerPoint presentations, it’s crucial to manage information carefully to maintain privacy and confidentiality. Proper techniques include censoring sensitive information and using proofing tools to protect content.
Censoring Information with Proofing Tools
We can use proofing tools to hide or obscure sensitive data in presentations. Tools like Microsoft PowerPoint offer options for censoring or redacting content.
By employing text boxes or shapes , we can cover sensitive information in a slide. Sometimes, the simplest approaches work best: adding a black box over a name or figure ensures that the information is no longer visible.
PowerPoint also allows us to edit the document properties. Go to the File tab and select Info . Here, we can edit or remove personal information and comments to ensure no hidden metadata is left in the file.
Images can be tricky; converting sensitive images to a less editable format, like JPEG or PNG, might help. For example, screenshots of sensitive data converted to images can make unauthorized editing more difficult.
| Text Box/Shape | Censoring Information | Add black box over sensitive text |
| File Info | Remove metadata | Edit or delete properties |
| JPEG/PNG | Convert Images | Save screenshots as non-editable files |
Using these tools effectively ensures that our presentations stay secure and private.
Related posts:
- How to Record a PowerPoint Presentation: Step-by-Step Guide for Professionals
- How to Crop a Picture into a Circle in PowerPoint: A Step-by-Step Guide
- How to Print PowerPoint with Notes: A Step-by-Step Guide
- How to Convert PowerPoint to PDF: A Step-by-Step Guide
- How to Change Slide Size in PowerPoint: A Step-by-Step Guide
- How to Save a PowerPoint as a Video for Smooth Presentations
- How to Change Font on All Slides in PowerPoint: A Step-by-Step Guide
- How to Save a PowerPoint as a Video: Step-by-Step Guide
- Where is Word Art in PowerPoint: Quick Guide for Users
- How to Hide a Slide in PowerPoint: Step-by-Step Guide
- How to Rotate Ruler in PowerPoint: Step-by-Step Guide
- How to Blur an Image in PowerPoint: A Step-by-Step Guide
Leave a Comment Cancel reply
Save my name, email, and website in this browser for the next time I comment.
- Advanced Features and Interactivity
How to Lock a PowerPoint Presentation?
Written by: Bill Whitman
Last updated: April 9, 2024

How to Lock a PowerPoint Presentation
Locking a PowerPoint presentation is essential for protecting your content from unauthorized editing or viewing. This can be achieved through several methods, including password protection, marking as final, and using file permissions. Each method serves a specific purpose, whether it’s to prevent editing, restrict access to only certain viewers, or secure the presentation for confidential information. By following these steps, you can ensure your PowerPoint presentation is locked and secure.
Quick summary
- Utilize password protection to prevent unauthorized editing or viewing.
- Mark the presentation as final to discourage editing.
- Adjust file permissions for restricted access.
- Use Read-Only options as a simpler security measure.
Password Protection
One effective way to lock your PowerPoint presentation is by setting a password. This can either be a password to open the presentation, which restricts access to authorized users, or a password to modify, allowing viewers to open but not edit the presentation. Here’s how:
- Open your PowerPoint presentation.
- Click on File > Info .
- Choose Protect Presentation , then select Encrypt with Password .
- Type your desired password and click OK . Re-enter the password to confirm.
Remember, losing the password may result in permanent loss of access to the presentation, so keep it in a safe place.
Mark as Final
Marking a presentation as final is a way to tell users that it is complete and editing should be avoided. While this doesn’t strictly “lock” the presentation, it makes it read-only, which discourages unintentional modifications.
- Open your presentation.
- Click File > Info .
- Select Protect Presentation and then choose Mark as Final .
File Permissions
For those using Microsoft 365 or storing their presentations on OneDrive or SharePoint, setting file permissions is another secure way to lock your PowerPoint presentation. This option allows you to control who can view or edit the file. Adjust permissions through the app where the file is stored, either by sharing options or by setting permissions directly for specific users.
Read-Only Option
Another straightforward method to prevent editing is saving your presentation as a Read-Only file. This doesn’t require a password, but asks users to acknowledge they are opening a read-only file.
- Click File > Save As .
- Choose your desired location to save the file.
- In the Save As dialog box, click Tools (next to the Save button), then select General Options .
- Check the box for Read-only recommended , then click OK .
- Save your presentation.
At LearnPowerpoint.io , we’re committed to providing our trusted advice for your PowerPoint needs. By understanding and using these protection methods, you can effectively lock your PowerPoint presentation, ensuring its content remains intact and secure from unwanted modifications or views. Remember, the level of security you choose should correspond to the sensitivity and importance of your presentation content. Practice these methods to find which works best for your specific needs.
Other Categories
- Basic Features and Usage
- Media and Design
- Slides and Organization
- Text and Formatting

How to Use PowerPoint on iPad?

How to Rotate Text in PowerPoint?

How to Cite Photos in PowerPoint?

How to Insert Symbols in PowerPoint?

How to Create a Timeline in PowerPoint?

How to Edit Footer in PowerPoint?

How to Merge Shapes in PowerPoint?

How to Use Animation Painter in PowerPoint?

How to Create a Gantt Chart in PowerPoint?
Featured posts.
- Slide Library
- Slide Library for PowerPoint
- Downloadable slides and shapes
- Slide Library search
- Search Library via shortcut keys
- Slide Library update alerts
- Rename or delete objects
- Share Slide Library
- Save slides or shapes to Slide Library
- Save presentation to Slide Library
- Manage Templates
- View all templates and set default
- Agenda Wizard
- Create Agenda Slides
- Update Agenda Slides
- Agenda Slide Numbering
- Navigate via Agenda
- Table of Contents
- Import Agenda Items
- Save Agenda Format
- Manage Colors
- Color Palette Toolbar
- Customize Color Toolbar
- Apply fill with outline color
- Recolor Charts
- View RGB color values & names
- Theme Color Tints and Shades
- Share Color Palette with team
- Insert Shapes
- Standard PowerPoint shapes
- Callouts / Speech Bubbles
- Hand Drawn Circles
- Harvey Balls
- Create Mini Slides
- Move to Multiple Slides
- Right Facing Centered Triangle
- Status Indicators
- Arrange and Align Shapes
- Select same color or size
- Select shapes by attribute
- Align shapes
- Align to first selected shape
- Choose Align anchor point
- Align using shortcut keys
- Copy paste position multiple shapes
- Straighten Lines
- Swap positions
- Distribute evenly
- Set Horizontal Gaps
- Set Vertical Gaps
- Squeeze or expand gaps
- Remove gaps
- Group Objects by Row
- Group Objects by Column
- Send to back, bring to front
- Send backward, bring forward
- Flip or rotate
- Group, ungroup and regroup
- Edit Shapes
- Same height, same width
- Copy paste position, size
- Resize shapes
- Slice shapes
- Multiply shapes
- Stretch shapes and fill gaps
- Toggle line weight and style
- Change margins toggle
- Chevrons same angle
- Paragraph Styles
- Save Paragraph Styles
- Apply Paragraph Styles
- Use PowerPoint Indent Increase/ Decrease to apply bullet styles
- Reset Paragraph Styles
- Ticks and Crosses bullets
- Paint Formatting
- Advanced Format Painter
- Position & Size Painter
- Table Format Painter
- Style Painter
- Text Format Painter
- Change Shape Painter
- Chart Format Painter
- Angles & Curves Painter
- Animation Painter
- Cycle Accent Colors
- Format Text
- Fit text to textboxes
- Wrap Text Toggle
- Merge Textboxes
- Split Textboxes
- Increase/ Decrease Font size
- Change Text Case
- Color Bold Text
- Delete Text or Replace
- Insert Superscript text
- Format Tables
- Create table from text boxes
- Convert table to text boxes
- Convert text to table
- Insert columns and rows
- Paste Excel data without source formatting
- Paste Excel data into text box tables
- Export Table or Box Table Data to Excel
- Set cell margins
- Express Table layout
- Table stripes
- Autofit columns
- Evenly space columns
- Align shapes over tables
- Harvey Balls for Tables
- Status Indicators for Tables
- Customizable PowerPoint Shortcut Keys
- Extra PowerPoint shortcuts
- Add PowerPoint shortcuts
- Search shortcut keys
- Reassign PowerPoint shortcuts
- Reset PowerPoint shortcuts
- McKinsey PowerPoint shortcuts
- F4 or Ctrl+Y redo or repeat
- Printable PowerPoint Shortcuts PDF
- How to Print a Custom Shortcuts list
- Search Shortcut Keys
- Searchable PowerPoint Shortcuts list
- Format Toolbar Overview
- Format Toolbar Layout Options
- Lock or Unlock Objects
- Lock objects
- Lock objects to the Slide Master
- Unlock objects
- Proofing Tools
- Fix Lines & Outlines
- Fix Layout, Transitions, Animations
- Fix Punctuation & Language
- Fix Margins, Bullets, Indents
- Check for Confidential items
- Reduce File Size
- Check Slide Master
- Sync Template Settings
- Set Proofing Language
- Change set language for PowerPoint presentations
- Flip PowerPoint Slides
- Flip Slides for Translation
- Slide Numbering
- Manage Slide Numbering
- Slide Numbers with totals
- Add words to Slide Numbers
- Change Starting Slide Number
- Skip Slide Numbers on Hidden Slides
- Slide Navigator
- Footers & Footnotes
- Filename Footer
- Enlarge Footnotes
- Refine Slides
- Add summary slide
- Format slide title
- Display No Fly Zone
- Send slide to appendix
- Camouflage mode
- Format Painter
- Set Grayscale
- Format Images
- Compress file size
- Format Charts
- Charts Toolbar
- Config Options
- Customize Settings
- Dark Mode Display
- Review Slides
- Customizable Status Stamps
- Sticky Notes
- Tag slides with filename and page number
- Share Slides
- Email selected slides in PPT or PDF format
- Print selected slides
- Save selected slides
- Slide Library for Teams
- Team Slide Library
- Create multiple Team Slide Libraries
- Synchronize Team Slide Libraries
- Synchronize Team Slide Library to your company Dropbox/ Box/ OneDrive folder
- Updating your Team Slide Library
- Import entire presentation to the Slide Library
- Share Slide Library with a colleague
- Share Custom Settings
- Share Custom Settings with Team
- Getting Started
- Getting started with PPT Productivity add-in for PowerPoint
- Downloadable PowerPoint Elements for Slide Library
- Tutorial - How to Create Custom Paragraph Styles for PowerPoint
- Can I use PPT Productivity on a Mac?
- PPT Productivity Basic Tools Tutorial
- PPT Productivity Plus Tools Tutorial
- New Features
- August 2023 update: Color Toolbar enhancement, new icons and more
- February 2023 update: New Slide Libraries available to download!
- January 2023 Update: Agenda Wizard, Format Painters + More
- How to copy and paste formatting in PowerPoint
- PowerPoint How To
- What are the most popular PowerPoint shortcuts?
- Where are PPT templates stored? Finding templates in PowerPoint
- Pasting data into a PowerPoint table without source formatting?
- Consulting Toolkit
- How to create effective consulting slides using Minto Principles
- Missing the McKinsey PowerPoint Shortcuts?
- Missing the Accenture QPT for PowerPoint?
- Missing the BCG PowerPoint Tools?
- Missing the Bain Toolbox for PowerPoint?
- How to add Stamps or Stickers to PowerPoint slides?
- Looking for a Consulting PowerPoint Toolbar?
- Top 10 PowerPoint Hacks / Shortcuts used by strategy consultants
- PowerPoint Tips
How to protect / lock a PowerPoint presentation?
- September 28, 2020
Unless you protect your PowerPoint document, anyone with access to the .pptx file can open, copy and edit the contents. Here's a guide to how you can protect/ lock your PowerPoint presentations.
This post is part of our hints and tips for standard PowerPoint features. PPT Productivity is a time saving add-in for PowerPoint. If you’d like to boost your productivity in PowerPoint and save time aligning, formatting and reusing slides, visit our homepage and download the PPT Productivity free trial today!
To protect your document, go to the file tab in PowerPoint, select Info, then click ‘Protect Presentation’
In the drop-down menu, you will find 4 or 5 options for protecting presentations in PowerPoint (options available depend on which version of PowerPoint you are running): ‘Always Open Read-Only’, ‘Encrypt with Password’, ‘Restrict Access’, ‘Add a Digital Signature’, ‘Mark as Final’.
Note - This article is about general locking of a PowerPoint presentation. However if you want to lock specific shapes on your PowerPoint slide from being edited – visit PPT Productivity's website to learn more about the PPT Productivity shape locking tool for PowerPoint .

Choose which option best suits your needs:
Always Open Read-Only PowerPoint setting prevents accidental changes by displaying a yellow banner at the top of the PowerPoint presentation indicating that the presentation is read only. The reader will need to opt-in to editing the document by clicking the ‘Edit Anyway’ button

Encrypt with Password PowerPoint setting lets you password protect your PowerPoint presentation. A password will be required to open the document. It’s very important to note that if you forget the password, you will not be able to open the presentation.
If your organization uses Microsoft 365, you also have a Restrict Access option in PowerPoint. The Restrict Access option allows people to view the PowerPoint presentation, but prevents them from editing, copying, or printing. To use the Restrict Access option, you need to have Information Rights Access set up on your machine. Find more information about Information Rights Access .
A digital signature adds unique code to a message which only comes from the digital ID held by the true sender. If you choose Add a Digital Signature in PowerPoint, you will need to have a Digital Signature set up. For more information about Digital Signatures visit the Microsoft Support Page .
Mark as Final PowerPoint setting sets the PowerPoint presentation status to Final. Typing, editing commands and proofing marks are turned off. A yellow banner noting that the document has been marked as final will appear at the top of the presentation. Readers will still be able to Edit the document if they click on the ‘Edit Anyway’ button.

Once you have decided which option is best for your needs, select the relevant option and save your document. Done!

See our tools at work
Book a personal demo with our PPT professionals

Start 30 Day Free Trial
Start your 30 day free trial - Microsoft Office for Windows
Download and Install
Existing customers download to install on a new computer
Related productivity tips

How do I get more icons in PowerPoint?
This hints and tips post gives you an overview of what icons are, why icons in PowerPoint are ...
Can I lock a shape, image or object in PowerPoint? Yes!
With PPT Productivity add-in for PowerPoint you can now lock shapes, images or other objects in ...

Can I unlock a locked shape in PowerPoint? Yes!
How to unlock shapes that have been locked in PowerPoint? Shapes that have been locked in your ...
How-To Geek
How to lock an object's position in microsoft powerpoint.

Your changes have been saved
Email is sent
Email has already been sent
Please verify your email address.
You’ve reached your account maximum for followed topics.
How 3D Printing Is Changing the Nerf Hobby
5 ways your 3d printer can hurt you (and how to avoid it), i tried switching to fedora linux, but it wasn't for me, quick links, how to lock an object in powerpoint, unlock an object.
Have you ever accidentally moved an item in your slide and then had to spend time putting it where it was? In Microsoft PowerPoint, you can lock an object in position. This prevents those mistaken moves and wasted time.
As of this writing in January 2022, The Lock object feature is only available in PowerPoint for Windows .
You have two easy ways to lock an object on your PowerPoint slide . The first is handy if you only have a small number of items on your slide while the second works best for multiple items.
Related: How to Change Slide Size in Powerpoint
To quickly lock an object, right-click it and choose "Lock" from the shortcut menu.

If you have many items, it can be beneficial to use the Selection Pane. This lets you view, lock, and unlock items from a list.
Open this sidebar by going to the Home tab and Drawing section of the ribbon. Click the Arrange drop-down arrow and pick "Selection Pane" at the bottom of the list.

When the pane opens, you'll see all of your slide items listed. To lock one, simply click the Padlock icon to the right of it. You can lock multiple items which is convenient if you want to make sure nothing moves while you work on one specific object.

And, you'll notice each item has the lock option, from images and videos to icons and title boxes.
Related: How to Add a Video to a Microsoft PowerPoint Presentation
Depending on the type of item you lock, you may see a more distinctive border around it once it's locked. As an example, you can see below that the title text box has a prominent border when you lock and select it.

You cannot move a locked object, but you can still make changes to it using the ribbon, shortcut menu, or format sidebar. Below you can see our title is locked, but we can still change the font color.

You can unlock an item on your slide just as easily as you can lock one. Either right-click the object and select "Unlock" or click the Padlock in the Selection Pane to unlock it.

Keep your slide objects and items save from accidental moves with the Lock feature in PowerPoint. For more, learn how to make a PowerPoint presentation read-only to prevent other types of changes.
- Microsoft Office
- Microsoft PowerPoint
- Password Recovery Password Refixer Bundle Windows Password Refixer Windows 7 Password Refixer Office Password Refixer Word Password Refixer Excel Password Refixer PowerPoint Password Refixer RAR Password Refixer ZIP Password Refixer PDF Password Refixer Access Password Refixer Outlook Password Refixer SQL Password Refixer WiFi Password Refixer iTunes Password Refixer
- Support Support Center FAQs & Technical Support Download Free Download Center Resources How-to Articles Blog iSumsoft IT Blog
- How to Protect PowerPoint Presentation from Editing and Modifying

Updated: January 11, 2024
If you don't want others to open and modify your PowerPoint presentation, you can lock the presentation. Here, this guide will introduce several ways to protect a presentation file from being copied, edited, and changed by unauthorized others.
- Option 1: Marking as final
- Option 2: Restrict Access
- Option 3: Encrypt with Password
Option 1: Make the presentation read-only
If you want to let people know that a presentation shouldn't be changed, you can use the Mark as Final feature. When a presentation is marked as final, typing, editing, commands, and proofing marks are disabled or turned off and the presentation becomes read-only .
Step 1: Click the File tab to go to Backstage view.
Step 2: From the Info pane, click the Protect Presentation command.
Step 3: In the drop-down menu, choose the option that best suits your needs. select Mark as Final .

Step 4: A dialog box will appear prompting you to save, click OK .

Step 5: Another dialog box will appear, click OK .
When you mark a presentation as final, PowerPoint asks you to save the file. The next time you open it, you will see a yellow MARKED AS FINAL message at the top of the file. If you click Edit Anyway , the presentation will no longer be marked as final.

Option 2: Set Restrict Access to Prevent Others from Editing
If you want to prevent people from editing it, you can use the Restrict Access option:
Step 1: Click on File tab to go to Backstage view.
Step 2: In Info tab, click Protect Document button. And then select Restrict Access option.

Option 3: Set a Password for Modify Presentation
To protect PowerPoint 2010/2013/2016 presentation, use these steps as follows:
Step 1: Click on the File tab, choose Save As option. Select one location you will save this *.pptx file.

Step 2: In the Save As dialog, click the Tools button at the bottom and then select General Options .

Step 3: Type a password in the Password to modify box and click OK . Reenter the password to modify and click OK to confirm. When you return back to the Save As dialog, click Save to save this presentation.

Then the password to modify will lock this PowerPoint 2016 presentation and prevent it from being edited or modified. Keep your password in a safe place. If you lose or forget the password, Microsoft won't help recover it and you have to remove the password with a third-party utility like PowerPoint Protection Refixer .
Related Articles

Latest Articles
- 4 Ways to Encrypt/Password Protect an Email Attachment in Outlook or Gmail
- 3 easy ways to find out what Microsoft Word version you have on Windows
- 8 ways to make a Word Document containing images smaller without losing quality
- How to Repair Excel File Corrupted by Virus
- [Solved] Word Experienced an Error Trying to Open the File Windows 10
- How to Fix "PowerPoint Found a Problem with Content in .PPTX"
Hot Articles
- How to See Saved Passwords in MS Outlook 2016
- How to Remove Red and Green Wavy Underlines in Word Document
- Fix Picture is Blurry When Inserted to Word Document Problem
- How to Activate Microsoft Office for Free
Support Team: support#isumsoft.com(Replace # with @) Sales Team: sales#isumsoft.com(Replace # with @)
- Unlock iPhone
- iPhone Tips
- Android Phone
- Windows Tips
- Windows Password
- Data Backup & Recovery
- Computer Tweaks
- PDF Document
- Top Products
- Windows Password Refixer
- iPhone Passcode Refixer
- RAR Password Refixer
- iOS Refixer
Copyright © 2024 iSumsoft Studio All Rights Reserved.
How to Lock a PowerPoint Presentation
Last updated on May 9th, 2024

If you need to share a PowerPoint presentation online but don’t want the people who get it to be able to edit or modify the content, then there are many different ways to lock PowerPoint presentation from editing.
In recent versions of PowerPoint you can configure the general options at the time you save a file as a given name and specify a file encryption setting to open the document or to modify the document.
For example, let’s say that we want to protect our business PPT PowerPoint template for editing when shared with others. Then, we will do the following:
How To Lock and Password Protect a PowerPoint Presentation
To lock a PowerPoint presentation from editing or saving, first go to File -> Save As and then look for the Tools button aside of Save button. Click here and then General Options from the popup menu.

Now, a new General Options dialog will appear with encryption settings.

Here you can specify a password to lock the PowerPoint presentation for editing mode or just to open the PowerPoint .PPT. Notice there are two options in this dialog box:
- File encryption settings for this document and specify a password to open the presentation.
- File sharing settings for this document , and specify a password to modify the presentation.
There are other ways to lock presentations or prevent users from editing them quickly. An excellent way to avoid a presentation from being edited is to save the presentation as a PDF.
The people who get the presentation file can open the PDF in Adobe PDF or other PDF tools to print handouts like NitroPDF but not edit them. Alternatively, you may choose to save the PowerPoint as a PPS slideshow. However, there are more secure ways to lock or protect your files since users may be able to rename the PPS to ppt and edit it as usual.
In Summary, how to lock a PowerPoint presentation from editing? Here are the steps to follow:
- Go to File -> Save As
- In the Dialog box, choose Tools (#1) and then General Options (#2)
- Next, you will be able to set a Password to open and to modify the presentation
If you intend to lock objects but not the entire presentation, then you can follow a different approach by learning how to lock objects in PowerPoint as we explained in a separate dedicated article. This way, you can lock certain shapes and objects in the presentation instead of the entire presentation.
Conclusions
You can use the approach described to lock PowerPoint PPT from editing and, for example, to prevent the removal of copyright notices in PowerPoint presentations. Additionally, you can use the lock PowerPoint approach to prevent the content from being overtly plagiarized in the short term. You can lock or password-protect a PowerPoint presentation using this method.
Leave a Comment Cancel reply
Your email address will not be published. Required fields are marked *
Save my name, email, and website in this browser for the next time I comment.
Sign up to our newsletter
We will send you our curated collections to your email weekly. No spam, promise!

How to Lock an Image, Shape or Other Object in PowerPoint

Lock Objects in PowerPoint to Prevent Moving and Resizing
by Avantix Learning Team | Updated August 25, 2023
Applies to: Microsoft ® PowerPoint ® 365 (Windows)
You can now lock an image, shape or other object in PowerPoint. Objects can be locked in Normal View or Slide Master View. Only PowerPoint 365 users can lock objects to prevent moving and resizing. This is helpful if you want to select and move other objects on the slide or prevent others from moving or resizing an object. You can lock items using the context menu or the Selection Pane.
Recommended article: PowerPoint vs Google Slides (Full Feature Comparison + Benefits)
Do you want to learn more about PowerPoint? Check out our virtual classroom or in-person PowerPoint courses >
In this article, we'll review how to:
Lock an image, shape or other object using a drop-down menu
Unlock an image, shape or other object using a drop-down menu, lock an image, shape or other object using the selection pane, unlock an image, shape or other object using the selection pane, lock an image, shape or other object using third-party tools.
Although you cannot move (change position) or resize a locked object, you can still make editing changes to some objects such as changing the font color of text, changing the fill color of a shape or adjusting brightness, color and contrast of an image. Some objects, like SmartArt, cannot be edited once they are locked.
You can also lock video and audio files, SmartArt, tables and charts.
Background images (created using Format Background) cannot be moved by dragging so they don't need to be locked.
When you lock an image, shape or other object, a different type of border appears when you select it if it's locked. In the following example, note the border around the locked image:

To lock an image, shape or other object by right-clicking:
- In Normal View, select the object on the slide that you want to lock. If you want to select a text placeholder or text box, click its edge. You can also select an object on the Slide Master or on a slide layout in Slide Master View.
- Right-click the object and select Lock from the drop-down menu.
To lock an image, shape or other object using a keyboard shortcut:
- Press the Context button on your keyboard or press Shift + F10 to display the drop-down menu. Some users may also need to press Fn at the same time as Shift + F10.
- Press the down arrow key to select Lock.
- Press Enter.
The context menu appears as follows when you right-click an unlocked object (or use the keyboard shortcut method above):

To unlock an image, shape or other object using a drop-down menu:
- In Normal View, select the object on the slide that you want to unlock. If you want to select a text placeholder or text box, click its edge. You can also select an object on the Slide Master or on a slide layout in Slide Master View.
- Right-click the object and select Unlock from the drop-down menu. Alternatively, press the Context button or press Shift + F10 to display the drop-down menu, use your arrow keys to select Unlock and press Enter.
The context menu appears as follows when you right-click a locked object:

The Selection Pane is a fantastic tool in PowerPoint for selecting and manipulating objects.
To lock an image, shape or other object using the Selection Pane:
- If the Selection Pane is not displayed, click the Home tab in the Ribbon and click Select in the Editing group. You can also display the Selection Pane using the Format tab in the Ribbon if a Picture or Shape is selected.
- From the drop-down menu, click Selection Pane. The Selection Pane appears on the right side of the screen. You can also display the Selection Pane by pressing Alt + F10 (some users may need to press Fn + Alt + F10).
- In Normal View, display the slide with the object(s) you want to lock. Alternatively, display the Slide Master or slide layout with the object(s) you want to lock.
- Click the Lock icon that appears to the right of the object you want to lock until is appears as a closed lock.
- Repeat for other objects.
The Selection Pane appears as follows with locked and unlocked objects:
To unlock an image, shape or other object using the Selection Pane:
- If the Selection Pane is not displayed, click the Home tab in the Ribbon and click Select in the Editing group.
- In Normal View, display the slide with the object(s) you want to unlock. Alternatively, display the Slide Master or slide layout with the object(s) you want to unlock.
- Click the Lock icon that appears to the right of the object you want to unlock until is appears as an open lock.
The Selection Pane appears as follows with unlocked objects:
If you have an older version of PowerPoint, there are some third-party add-ins you can get to lock objects. Since they are add-ins, you would need to install them.
To get add-ins:
- Click the Insert tab in the Ribbon.
- In the Add-Ins group, select Get Add-ins. A Microsoft Store dialog box appears.
- In the Store dialog box, enter PowerPoint in the Search box and press Enter. PowerPoint add-ins will appear on the right.
- Click the add-in you want and then click Add.
- Select the option to agree to the terms.
Installed add-ins will be listed under My Add-Ins on the Insert tab in the Ribbon. When using an add-in, you may be prompted to set up an account with the add-in developer.
Some add-ins are premium and you will need to pay an additional charge.
You can also search for PowerPoint add-ins online.
Subscribe to get more articles like this one
Did you find this article helpful? If you would like to receive new articles, JOIN our email list.
More resources
How to Print a PowerPoint Presentation with Notes
How to Remove the Background of an Image in PowerPoint
How to Make a Picture Transparent in PowerPoint (3 Ways)
How to Add Animation in PowerPoint (Animate Text, Images and Other Objects)
How to Use the Selection Pane in PowerPoint to Select, Reorder, Rename and Hide Objects
Related courses
Microsoft PowerPoint: Intermediate / Advanced
Microsoft PowerPoint: Design for Non-Designers
Microsoft PowerPoint: Animations Bootcamp
Microsoft Excel: Intermediate / Advanced
Microsoft Word: Intermediate / Advanced
VIEW MORE COURSES >
Our instructor-led courses are delivered in virtual classroom format or at our downtown Toronto location at 18 King Street East, Suite 1400, Toronto, Ontario, Canada (some in-person classroom courses may also be delivered at an alternate downtown Toronto location). Contact us at [email protected] if you'd like to arrange custom instructor-led virtual classroom or onsite training on a date that's convenient for you.
Copyright 2024 Avantix ® Learning
You may also like

How to Insert or Type E with an Accent Mark in PowerPoint (È, É, Ê, Ë, è, é, ê, or ë)
You can insert or type e with an accent mark in PowerPoint using built-in tools or keyboard shortcuts (including Alt code shortcuts). The letter e can be inserted with an accent in both upper or lower case in text boxes or placeholders on slides, the slide master or layouts. The following are common accents in upper or lower case – È, É, Ê, Ë, è, é, ê, or ë.

How to Fade a Picture or Part of a Picture in PowerPoint (Using a Gradient)
You can fade a picture in PowerPoint by drawing a rectangle shape on top of the picture and then filling the rectangle with a gradient from opaque to transparent. This technique is often used to fade an image into the background of a slide. Since the rectangle is placed on top of the image and then text may be placed on top of the rectangle, you may need to reorder the objects.

PowerPoint vs Google Slides (Full Feature Comparison + Benefits)
When comparing PowerPoint vs Google Slides (and trying to decide which is the better choice for your needs), you will need to consider versions when you compare the two applications. In this article, we'll compare the desktop or downloadable version of PowerPoint vs Google Slides, an online program that works in a browser. The key difference then if you are comparing PowerPoint vs Google Slides is that PowerPoint must be downloaded and runs on your desktop and Google Slides runs online. The desktop version of PowerPoint is a robust, full-featured program with many advanced features. You can buy PowerPoint as a stand-alone version or as part of a Microsoft 365 subscription. If you are a 365 subscriber, new features roll out on a regular basis.
Microsoft, the Microsoft logo, Microsoft Office and related Microsoft applications and logos are registered trademarks of Microsoft Corporation in Canada, US and other countries. All other trademarks are the property of the registered owners.
Avantix Learning |18 King Street East, Suite 1400, Toronto, Ontario, Canada M5C 1C4 | Contact us at [email protected]
Our Courses
Avantix Learning courses are offered online in virtual classroom format or as in-person classroom training. Our hands-on, instructor-led courses are available both as public scheduled courses or on demand as a custom training solution.
All Avantix Learning courses include a comprehensive course manual including tips, tricks and shortcuts as well as sample and exercise files.
VIEW COURSES >
Contact us at [email protected] for more information about any of our courses or to arrange custom training.
Privacy Overview
Pin it on pinterest.
- Print Friendly

Our expert, award-winning staff selects the products we cover and rigorously researches and tests our top picks. If you buy through our links, we may get a commission. Reviews ethics statement
- Services & Software
Subscriptions Can Add Up. Here’s How You Can Get Microsoft 365 for Free
A Microsoft 365 subscription gets you Word, Excel, PowerPoint and other apps, but could set you back $100 a year. Here's how to get Microsoft 365 for free.

- National Silver Azbee Award for Impact/Investigative Journalism; National Gold Azbee Award for Online Single Topic Coverage by a Team; National Bronze Azbee Award for Web Feature Series

- Apple software beta tester, "Helps make our computers and phones work!" - Zach's grandparents

You can use Microsoft Office apps for free.
Microsoft 365 is a productivity suite that includes Word for writing, PowerPoint for creating presentations, Outlook for email and OneDrive for cloud storage. Whether for work, school, personal use or all of the above, chances are you’ll want access to these apps -- we definitely find them helpful.
A paid Microsoft 365 membership starts at $2 a month or $20 a year for Microsoft 365 Basic tier, so you’ll pay anywhere from $20 to $100 annually, depending on the plan you pick. While that may not sound too bank-breaking, subscription services can add up. Luckily, you can get Microsoft 365 at no cost if you're a student or teacher. If you don't have a school email address, you've got options, including a free trial or relying on the zero-dollar but limited functionality online-only versions of apps like Word.
Here’s how you can get Microsoft 365 for free.
Students and teachers can easily get Microsoft Office 365 Education for free

Microsoft Excel can be a great tool for crunching data sets, tracking grades and other applications in the classroom -- for teachers or students
Say you're a student, teacher or faculty member with an active school email address. You're probably eligible to get access to Office 365 for free through Microsoft, with access to Word, Excel, PowerPoint, OneNote and Teams, plus other classroom tools.
All you have to do is punch in your school email address on this page on Microsoft's website: Office 365 Education . In many cases, you'll be instantly granted access thanks to an automated verification process. If you attend an institution that needs to be verified, it might take up to a month to confirm your eligibility.
College students can also get Microsoft 365 Personal for $3 a month with a valid school email address.

More Tech Tips
- The Best Windows 11 Features
- Ways to Help Your Old Laptop Last Longer
- 5 Ways to Make Your Chromebook More Secure
You can still use many Microsoft 365 apps for free if you're not a student or faculty member
Not everyone can take advantage of an email address through an academic institution to get the Microsoft Office suite at no cost. Thankfully, anyone can get a one-month free trial of Microsoft 365. You do need to enter a credit card number. If you don't cancel your subscription before the month is up, you'll be charged $100 for a one-year subscription to Microsoft 365 Family (formerly called Office 365 Home).
The good news is that you can access a number of apps online for free, including Word, Excel, PowerPoint, OneDrive, Outlook, Calendar, My Content, Skype, Designer and Clipchamp as long as you don't need the full suite of Microsoft 365 tools. Here's how to get them:
1 . Go to Microsoft365.com .
2 . Click Sign up for the free version of Office under the "Sign in" button.
3 . Log in to your Microsoft account or create one for free . If you already have a Windows, Skype or Xbox Live login, you have an active Microsoft account.
4 . Select the app you want to use and save your work in the cloud with OneDrive.

Use the browser-based version of the Microsoft Word app for free.
So what's the catch for the free version?
You might be saying, "Wait a minute, if I can get all of those apps for free, why pay for Microsoft 365 in the first place?" The functionality of the free apps is limited, so they only run in your web browser and you can only use them while you're actively connected to the internet -- there’s no offline version. They also have fewer features than the full Microsoft 365 versions. For instance, Microsoft Teams calls are limited to group calls of 100 participants for 60 minutes per month with the free app, and calls of up to 300 participants with a 30 hour monthly allowance for the paid version of Microsoft 365 Personal or Family.
There are still benefits to the free version, including the ability to share links to your work and collaborate in real-time, similar to what the Google Workspace (formerly G Suite) productivity tools allow. If you're looking for basic versions of each of these apps, the free version should work well for you.
For more productivity coverage, check out what Microsoft 365 Basic offers customers , all of the best features in Windows 11 and how to take screenshots in Windows 10 or 11 . You can also take a look at CNET's list of the best Windows laptops .
How to get Microsoft 365 for free
Can i get office 365 for free.
Yes, you can get Microsoft 365 for free. Students and teachers can get Microsoft Office 365 Education at no cost with a school email address. If you're not a student of faculty member, you can use the online versions of many apps like Word for free, or sign up for a one-month Microsoft 365 free trial.
Can I still use Office 365 without a subscription?
You can use several Microsoft Office apps, including Word, without a paid subscription. However, you'll be limited to online-only versions of these apps instead of having the ability to work offline as well.

- Yes, You Really Need a Password Manager. Here's How to Set One Up Today
- If You Value Your Privacy, Change These Browser Settings ASAP
- Low Storage on Windows 11? Here's How to Free Up Disk Space on Your PC
Services and Software Guides
- Best iPhone VPN
- Best Free VPN
- Best Android VPN
- Best Mac VPN
- Best Mobile VPN
- Best VPN for Firestick
- Best VPN for Windows
- Fastest VPN
- Best Cheap VPN
- Best Password Manager
- Best Antivirus
- Best Identity Theft Protection
- Best LastPass Alternative
- Best Live TV Streaming Service
- Best Streaming Service
- Best Free TV Streaming Service
- Best Music Streaming Services
- Best Web Hosting
- Best Minecraft Server Hosting
- Best Website Builder
- Best Dating Sites
- Best Language Learning Apps
- Best Weather App
- Best Stargazing Apps
- Best Cloud Storage
- Best Resume Writing Services
- New Coverage on Operating Systems
PowerPoint 문서에서 워터마크를 성공적으로 제거할 수 있나요?
18 년 2024 월 XNUMX 일 최종 업데이트 by 피터 우드
역동적인 프레젠테이션 세계에서 PowerPoint는 재능과 전문성을 바탕으로 아이디어를 전달하는 데 도움이 되는 강력한 도구입니다. 그러나 유비쿼터스 워터마크는 때로는 창의성의 원활한 흐름을 방해할 수 있습니다. 방해가 되는 워터마크가 있는 프레젠테이션을 상속받았든 실수로 직접 추가했든 걱정하지 마세요. 해결책이 있습니다. 이 가이드에서는 이해하기 쉽게 설명하겠습니다. PowerPoint에서 워터마크 제거 불필요한 방해 요소 없이 시각적으로 매력적인 프레젠테이션을 만들 수 있습니다.

1부: PowerPoint에서 워터마크를 제거하는 방법
2부: ppt 사진에서 워터마크를 제거하는 방법, 파트 3: powerpoint에서 워터마크 제거에 대한 faq, 방법 1: 배경 포맷.
PowerPoint의 배경 서식 기능을 사용하면 워터마크 수정 및 편집을 포함하여 슬라이드의 배경을 사용자 지정할 수 있습니다. 워터마크의 투명도를 배경으로 설정하여 PPT에 있는 워터마크를 제거하고 워터마크가 없는 새 PPT 파일을 얻을 수 있습니다.
1단계 : Microsoft PowerPoint를 실행합니다. 입양 부모로서의 귀하의 적합성을 결정하기 위해 미국 이민국에 탭에서 워터마크가 있는 PPT를 선택하고 소프트웨어로 가져옵니다. 가져오기가 성공적으로 완료되면 파일을 편집할 수 있습니다. PPT에서 워터마크를 제거하려면 다음을 클릭해야 합니다. 형식 배경 버튼의 디자인 탭을 클릭하고 해당 사이드바 도구를 엽니다.

2단계 : 작성 온 버튼 도구 페이지에서는 배경 편집을 위한 일련의 도구를 볼 수 있습니다. 을 클릭하세요 솔리드 채우기 버튼을 눌러 PPT의 배경색을 설정할 수 있으며, PPT에서 원하는 색상을 설정할 수도 있습니다. 색상 . 슬라이더를 조정하여 투명도 , 투명도를 100%로 설정하면 이때 워터마크가 사라진 것을 확인할 수 있습니다.

3단계 : 하지만 사라진 것은 아닙니다. 다만 투명도 100%의 경우에는 워터마크가 보이지 않게 되어 PPT의 워터마크를 제거하는 목적으로 사용됩니다. 마지막으로 모두 적용 버튼을 누르면 PPT의 모든 워터마크를 보이지 않게 할 수 있습니다.

방법 2: 슬라이드 마스터
더 많은 PPT의 콘텐츠에 더 많은 워터마크가 포함되어 있는 경우 일괄 삭제가 유용하지 않을 수 있으며, 이때 워터마크에서 동일한 유형의 PPT 콘텐츠를 한 번에 제거하는 빠른 방법이 필요할 수 있습니다. 슬라이드마스터를 통해 하실 수 있습니다. Slide Master는 슬라이드의 레이아웃과 서식을 전체적으로 변경할 수 있는 강력한 기능입니다.
1단계 : PPT 파일을 편집 중일 때 관측 상단 도구 모음의 탭에는 PPT의 다양한 보기를 보고 편집할 수 있는 일련의 도구가 있습니다.

2단계 : 고르다 슬라이드 마스터 in 관측 탭을 눌러 슬라이드 마스터 보기로 들어갑니다. 이 상태에서는 PPT의 모든 유형의 레이아웃을 볼 수 있습니다.
3단계 : 페이지 왼쪽에서 워터마크를 제거하려는 PPT 레이아웃의 썸네일을 클릭하면, 이때 미리보기 페이지 오른쪽에서 워터마크가 PPT에 나타나는 것을 볼 수 있습니다. 워터마크를 선택하고 사용하세요. 백 스페이스 키 or . 이 레이아웃의 워터마크를 삭제하려면

4단계 : 삭제가 완료되면 마스터 보기 닫기 버튼을 클릭하고 마스터 보기를 닫으면 현재 레이아웃의 일부에 참여할 수 있으며 워터마크가 제거되는 것을 확인할 수 있습니다.

PowerPoint 슬라이드의 워터마크 대부분을 제거할 수 있지만 PPT 사진에 워터마크가 있을 경우 위의 방법으로는 제거할 수 없는 경우가 많습니다. 우선, Slide Master는 워터마크의 존재를 감지할 수 없으며, 디자인의 투명도 설정을 사용하면 아름다운 이미지를 잃게 됩니다. 하지만 걱정하지 마십시오. 이 기사에서는 여전히 PPT 이미지에서 워터마크를 제거하는 방법을 제공합니다. WidsMob 워터마크 클리너 . WidsMob Watermark Cleaner는 워터마크용으로 특별히 설계된 소프트웨어로, 워터마크를 완벽하게 제거할 수 있습니다.
1. JPG, PNG, BMP 및 기타 다양한 형식의 이미지 가져오기를 지원합니다.
2. 워터마크 없는 이미지를 실시간으로 미리 보고 조정하세요.
3. 이미지의 저장 주소를 사용자 정의하십시오.
4. AI 기술이 워터마크를 제거하고 지능적으로 채워줍니다.
1단계 : 컴퓨터에 WidsMob Watermark Cleaner를 설치하고 설치가 완료된 후 소프트웨어를 실행합니다. 이때 소프트웨어 홈페이지에는 이미지의 워터마크 제거를 포함하여 많은 기능이 있습니다. 다음을 클릭하세요. 사진 워터마크 제거 버튼을 눌러 이미지에서 워터마크를 제거하는 기능 페이지로 들어갑니다.

2단계 : 파일 추가 이 페이지의 버튼을 클릭하고 팝업 대화 상자에서 PPT에서 변환된 이미지를 선택하세요. 온라인 이미지 워터마크 제거 프로그램과 달리 이미지를 일괄 선택하여 소프트웨어로 가져올 수 있습니다. 성공적으로 가져오면 왼쪽 목록에서 모든 PPT 콘텐츠를 볼 수 있고 탐색으로 전환할 수 있습니다.

3단계 : 그 중 하나를 선택하면 미리보기 상자에서 볼 수 있습니다. 미리보기 상자 오른쪽에는 이미지에서 워터마크를 제거하는 일련의 도구가 있습니다. ~ 안에 선택 , 도구를 사용하여 워터마크를 강조 표시하도록 선택할 수 있습니다. 브러시 및 구형 . 대부분의 경우 규칙적인 모양의 워터마크에는 Rectangle이 사용되고, 불규칙한 모양의 워터마크에는 Brush가 사용됩니다.

4단계 : 워터마크를 선택하면 워터마크를 사용할 수 있습니다. 삭제 워터마크가 있는 부분이 원본 이미지와 더 잘 섞이도록 가장자리를 다듬는 도구입니다. ~ 안에 출력 위치 , 워터마크 없는 이미지의 저장 주소를 선택할 수 있습니다. 맞춤형 or 같은 폴더 , 마지막으로 수출 버튼을 눌러 워터마크 없는 이미지를 내보냅니다.

워터마크와 작별하세요! PowerPoint에서 워터마크를 제거하는 지식과 기술을 갖춘 귀하는 이제 프레젠테이션을 향상시킬 수 있는 귀중한 도구를 갖게 되었습니다. PowerPoint의 진정한 힘은 기능뿐 아니라 설득력 있는 이야기를 만들 수 있는 자유로움에도 있다는 점을 기억하십시오. 워터마크 없는 여행을 시작하면서 창의력이 솟아오르고 메시지가 공감을 불러일으키도록 하세요. 슬라이드가 명확하고 매력적이며 워터마크 제한의 미묘한 효과가 없기를 바랍니다. 발표를 즐기세요!
관심이있을 수 있습니다
- 워터 마크없이 동영상으로 Instagram에 GIF를 업로드하는 방법
- 사진에서 워터마크를 제거하는 3가지 방법 [궁극적인 가이드]
- 2024 년 워터 마크 사진 상세 가이드
Poate fi eliminat cu succes un filigran dintr-un document PowerPoint
Actualizată ultima dată la 18 august 2024 by Peter Wood
În lumea dinamică a prezentărilor, PowerPoint este un instrument puternic care ne ajută să comunicăm ideile cu talent și profesionalism. Cu toate acestea, filigranul omniprezent poate împiedica uneori fluxul perfect al creativității. Indiferent dacă ați moștenit o prezentare cu un filigran intruziv sau ați adăugat una din greșeală, nu vă faceți griji, există o soluție. În acest ghid, vom demistifica eliminarea filigranelor din PowerPoint astfel încât să puteți crea prezentări atrăgătoare din punct de vedere vizual fără distrageri nedorite.
Partea 1: Cum să eliminați filigranul pe PowerPoint
Partea 2: cum să eliminați filigranul din imaginile ppt, partea 3: întrebări frecvente despre eliminarea filigranului din powerpoint, metoda 1: formatați fundal.
Caracteristica Formatare fundal din PowerPoint vă permite să personalizați fundalul diapozitivelor, inclusiv modificarea și editarea filigranului. Puteți seta transparența filigranului ca fundal pentru a elimina filigranul de pe PPT și pentru a obține un nou fișier PPT fără filigran.
Etapa 1 : Lansați Microsoft PowerPoint, în Fișier fila, selectați PPT-ul cu filigran și importați-l în software. După importarea cu succes, veți putea edita fișierul. Când doriți să eliminați filigranul din PPT, atunci trebuie să faceți clic pe Formatați fundalul buton în Amenajări fila și deschideți instrumentul corespunzător barei laterale.
Etapa 2 : Apasă pe Umple Butonul de pe Instrumente pagina, veți putea vedea o serie de instrumente pentru editarea fundalului. faceți clic pe Umplere solidă butonul pentru a seta culoarea de fundal a PPT-ului, puteți, de asemenea, să setați orice culoare Culori . Prin reglarea cursorului de Transparență , pentru a seta transparența la 100%, în acest moment veți constata că filigranul a dispărut.
Etapa 3 : Dar nu a dispărut, doar în cazul transparenței 100%, filigranul nu se va vedea, pentru a face scopul de a elimina filigranul din PPT. În cele din urmă, faceți clic pe Aplica tot butonul și puteți face toate filigranele din PPT invizibile.
Metoda 2: Slide Master
Când conținutul mai multor PPT conține mai multe filigrane, ștergerea lotului poate să nu fie utilă, în acest moment este posibil să aveți nevoie de o modalitate rapidă de a elimina același tip de conținut PPT dintr-o dată din filigran. Puteți face acest lucru prin Slide Master. Slide Master este o caracteristică puternică care vă permite să faceți modificări globale la aspectul și formatarea diapozitivelor.
Etapa 1 : Când fișierul PPT este editat, comutați la Vizualizare din bara de instrumente de sus, vor exista o serie de instrumente pentru a vizualiza diferite vizualizări ale PPT și a-l edita.
Etapa 2 : Selectați Slide Master in Vizualizare pentru a intra în vizualizarea diapozitivelor master. În această stare, veți putea vedea toate tipurile de machete în PPT.
Etapa 3 : Faceți clic pe miniatura aspectului PPT din care doriți să eliminați filigranul din partea stângă a paginii, în acest moment, în partea dreaptă a paginii de previzualizare, puteți vedea filigranul care apare pe PPT. Selectați filigranul și utilizați backspace or Șterge pentru a șterge filigranul din acest aspect.
Etapa 4 : După ștergerea cu succes, faceți clic pe Închideți vizualizarea principală butonul și închideți vizualizarea principală, veți putea descoperi că în acest moment puteți face parte din aspect, iar filigranul va fi eliminat.
Deși puteți elimina majoritatea filigranelor din diapozitive din PowerPoint, de foarte multe ori veți constata că atunci când filigranul există în imaginile PPT, nu îl veți putea elimina folosind metodele de mai sus. În primul rând, Slide Master nu poate detecta existența filigranelor și veți pierde imaginile frumoase folosind setările de transparență din Design. Dar nu vă faceți griji, articolul vă oferă în continuare o modalitate de a elimina filigranele din imaginile PPT, adică prin utilizarea WidsMob Watermark Cleaner . WidsMob Watermark Cleaner este un software special conceput pentru filigrane, care poate elimina perfect filigranele.
1. Suportă importarea imaginilor în JPG, PNG, BMP și multe alte formate.
2. Previzualizați imaginile fără filigran în timp real și faceți ajustări.
3. Personalizați adresa de stocare a imaginii.
4. Tehnologia AI elimină filigranul și îl umple inteligent.
Etapa 1 : Instalați WidsMob Watermark Cleaner pe computer și lansați software-ul după finalizarea instalării. În acest moment, vor exista o mulțime de funcții pe pagina de pornire a software-ului, inclusiv eliminarea filigranelor din imagini. Faceți clic pe Îndepărtarea filigranului foto butonul pentru a intra în pagina de funcții pentru eliminarea filigranelor din imagini.
Etapa 2 : Apasă pe Adăugați fișiere butonul de pe această pagină și selectați imaginile convertite din PPT în caseta de dialog pop-up, spre deosebire de dispozitivul de îndepărtare a filigranelor de imagini online, puteți selecta imagini în loturi și le puteți importa în software. După importarea cu succes, veți putea vizualiza tot conținutul PPT din lista din stânga și veți putea comuta pentru a le răsfoi.
Etapa 3 : Selectați una dintre ele pentru a o face vizibilă în caseta de previzualizare. În partea dreaptă a casetei de previzualizare, există o serie de instrumente pentru a elimina filigranele din imagini. În Selecţie , puteți alege să evidențiați filigranul cu instrumentele Perie și Dreptunghi . În cele mai multe cazuri, Rectangle este folosit pentru filigrane cu formă regulată, în timp ce Pensula este folosită pentru filigrane cu formă neregulată.
Etapa 4 : După ce filigranul este selectat, puteți utiliza Şterge instrument pentru a tăia marginile, astfel încât porțiunea cu filigran să se integreze mai bine cu imaginea originală. În Locație de ieșire , puteți alege adresa de stocare a imaginii fără filigran Particularizarea or Același folder și, în cele din urmă, faceți clic pe Export butonul pentru a exporta imaginea fără filigran.
Spune la revedere filigranelor! Înarmat cu cunoștințele și abilitățile necesare pentru a elimina filigranele din PowerPoint, aveți acum un instrument neprețuit pentru a vă îmbunătăți prezentările. Amintiți-vă, adevărata putere a PowerPoint nu constă numai în funcționalitatea sa, ci și în libertatea pe care ți-o oferă de a crea narațiuni convingătoare. Lăsați-vă creativitatea să se ridice și mesajul dvs. să rezoneze în timp ce porniți într-o călătorie fără filigran. Fie ca diapozitivele dvs. să fie clare, captivante și lipsite de efectele subtile ale restricțiilor de filigran. Prezentare fericită!
S-ar putea să fiți interesat
- Cum să încărcați GIF pe Instagram ca videoclip fără filigran
- 3 metode de a elimina filigranul din fotografii [Ghid final]
- Ghidul de detaliu al fotografiilor cu filigran în 2024
COMMENTS
Keep your PowerPoint presentations secure and confidential. Learn how to keep the information in your presentations safe by password-protecting your files.
The process to password protect a PowerPoint presentation is elaborately explained in method 4 of the previous section of this article. Simply follow the steps explained in the earlier section and you will be able to add a password to your PowerPoint file. 3. How to Remove Password from a PowerPoint Presentation?
Select Protect Presentation > Encrypt with Password. In the Password box, enter the password you'd like to use. Select OK. PowerPoint prompts you to confirm the password by entering it once more. Save the file to ensure the password takes effect. Password protection isn't supported in PowerPoint for ODP (Open Document Presentation) files.
Learn how to Lock a PowerPoint Presentation from editing. Protect your presentation when sharing by using a password. Share your PowerPoint files without any restriction with others.
Restrict changes to PowerPoint presentations If you don't want content reviewers to accidentally change your PowerPoint presentation, you can use formatting and editing restrictions. Note: To further restrict reviewers from making changes to your document or spreadsheet, you can make the file read-only or you can password protect it.
In this Microsoft PowerPoint 2021/365 tutorial video, learn how to protect a PowerPoint presentation to avoid unwanted changes.
Learn how to password protect your PowerPoint presentations using two different methods and see which is our favorite one.
Prevent unwanted changes with PowerPoint password protection! Password protecting PowerPoint presentations is smart - plus, it's fast and easy. (Image source: Envato Elements.) In this tutorial, you'll learn how to lock a PowerPoint from editing. We'll explore how to use password protect PowerPoint features to secure your slides.
Microsoft PowerPoint offers multiple methods to protect your presentation. We can set passwords, mark the presentation as final, or even save it in a read-only format.
One effective way to lock your PowerPoint presentation is by setting a password. This can either be a password to open the presentation, which restricts access to authorized users, or a password to modify, allowing viewers to open but not edit the presentation.
To protect your document, go to the file tab in PowerPoint, select Info, then click 'Protect Presentation'. In the drop-down menu, you will find 4 or 5 options for protecting presentations in PowerPoint (options available depend on which version of PowerPoint you are running): 'Always Open Read-Only', 'Encrypt with Password ...
Learn how to lock a PowerPoint presentation so you can share your slideshow while preventing unwanted edits, then review FAQs about this feature.
In this Microsoft PowerPoint 2019 tutorial you are going to learn how to protect a PowerPoint presentation with a password , so you can lock your PPT / PPTX presentation file so no one can view or ...
Keep your slide objects and items save from accidental moves with the Lock feature in PowerPoint. For more, learn how to make a PowerPoint presentation read-only to prevent other types of changes.
Option 3: Set a Password for Modify Presentation. To protect PowerPoint 2010/2013/2016 presentation, use these steps as follows: Step 1: Click on the File tab, choose Save As option. Select one location you will save this *.pptx file. Step 2: In the Save As dialog, click the Tools button at the bottom and then select General Options.
Learn how to protect your presentations with a password, so only authorized people can open the presentation.
Sophia. I can't seem to stop people from editing certain slides in PowerPoint, version 2307. Open the PowerPoint presentation where you want to lock individual slides. Click on the slide that you want to lock, or select multiple slides by holding down the "Ctrl" key while clicking on them. From the "Review" tab at the top, click on "Restrict ...
You can now lock an image, shape or other object in PowerPoint. Objects can be locked in Normal View or Slide Master View. Only PowerPoint 365 users can lock objects to prevent moving and resizing. This is helpful if you want to select and move other objects on the slide or prevent others from moving or resizing an object. You can lock items using the context menu or the Selection Pane.
Are you worried about someone altering your presentation? With this video, you'll learn how to easily lock slides and ensure your PowerPoint presentation is always protected from unwanted changes.
If you make slide presentations often, then you probably know about Microsoft PowerPoint. However, there are several free alternatives that are worth trying.
A Microsoft 365 subscription gets you Word, Excel, PowerPoint and other apps, but could set you back $100 a year. Here's how to get Microsoft 365 for free.
How can I lock a Power Point slide while presenting? Hi! So my problem is this. I'm looking to try and lock pp slides until I'm ready for it to progress (whether through a specific spot on the screen, a certain key, whatever). I'm trying to make boards for young students where they have to touch certain spots to help with counting (they touch little circles and the animations move them into ...
Microsoft PowerPoint has been the most popular way to create presentations for years. If you don't want to buy Office, though, there are some free options.
You can set the transparency of the watermark as the background to remove the watermark on the PPT and get a new PPT file without a watermark. 1단계: Launch Microsoft PowerPoint, in the 입양 부모로서의 귀하의 적합성을 결정하기 위해 미국 이민국에 tab, select the PPT with the watermark and import it into the software ...
On PowerPoint for the PC, you can lock an item/object on a slide by going to the Selection Pane and click the Lock button or right click on a selected object and click lock.
Etapa 1: Launch Microsoft PowerPoint, in the Fișier tab, select the PPT with the watermark and import it into the software. After importing successfully, you will be able to edit the file. When you want to remove the watermark in PPT, then you need to click the Formatați fundalul buton în Amenajări tab and open the corresponding sidebar tool.
Dear Braid A, Good day! Thank you for posting to Microsoft Community. We are happy to help you. As per your description, it seems that you are having issue with linked chart from Excel to PowerPoint.
In this article, I'll demonstrate how to build a Power Apps canvas application from within SharePoint that integrates a SharePoint list backend for storing and..
Try to start your PC in Safe Mode and open PowerPoint in Safe Mode to view the issue, by running PowerPoint in Safe Mode, you can determine if the issue is due to any other programs or services loaded at system startup.
Insert outline text into a PowerPoint presentation. You need to format the Word document before converting, save the Word document as an .rtf files, run PowerPoint for Mac, create a new presentation, click Insert> the down arrow of the New Slide button> Outline.