- Research Process
- Manuscript Preparation
- Manuscript Review
- Publication Process
- Publication Recognition
- Language Editing Services
- Translation Services


How to Make a PowerPoint Presentation of Your Research Paper
- 4 minute read
- 142.7K views
Table of Contents
A research paper presentation is often used at conferences and in other settings where you have an opportunity to share your research, and get feedback from your colleagues. Although it may seem as simple as summarizing your research and sharing your knowledge, successful research paper PowerPoint presentation examples show us that there’s a little bit more than that involved.
In this article, we’ll highlight how to make a PowerPoint presentation from a research paper, and what to include (as well as what NOT to include). We’ll also touch on how to present a research paper at a conference.
Purpose of a Research Paper Presentation
The purpose of presenting your paper at a conference or forum is different from the purpose of conducting your research and writing up your paper. In this setting, you want to highlight your work instead of including every detail of your research. Likewise, a presentation is an excellent opportunity to get direct feedback from your colleagues in the field. But, perhaps the main reason for presenting your research is to spark interest in your work, and entice the audience to read your research paper.
So, yes, your presentation should summarize your work, but it needs to do so in a way that encourages your audience to seek out your work, and share their interest in your work with others. It’s not enough just to present your research dryly, to get information out there. More important is to encourage engagement with you, your research, and your work.
Tips for Creating Your Research Paper Presentation
In addition to basic PowerPoint presentation recommendations, which we’ll cover later in this article, think about the following when you’re putting together your research paper presentation:
- Know your audience : First and foremost, who are you presenting to? Students? Experts in your field? Potential funders? Non-experts? The truth is that your audience will probably have a bit of a mix of all of the above. So, make sure you keep that in mind as you prepare your presentation.
Know more about: Discover the Target Audience .
- Your audience is human : In other words, they may be tired, they might be wondering why they’re there, and they will, at some point, be tuning out. So, take steps to help them stay interested in your presentation. You can do that by utilizing effective visuals, summarize your conclusions early, and keep your research easy to understand.
- Running outline : It’s not IF your audience will drift off, or get lost…it’s WHEN. Keep a running outline, either within the presentation or via a handout. Use visual and verbal clues to highlight where you are in the presentation.
- Where does your research fit in? You should know of work related to your research, but you don’t have to cite every example. In addition, keep references in your presentation to the end, or in the handout. Your audience is there to hear about your work.
- Plan B : Anticipate possible questions for your presentation, and prepare slides that answer those specific questions in more detail, but have them at the END of your presentation. You can then jump to them, IF needed.
What Makes a PowerPoint Presentation Effective?
You’ve probably attended a presentation where the presenter reads off of their PowerPoint outline, word for word. Or where the presentation is busy, disorganized, or includes too much information. Here are some simple tips for creating an effective PowerPoint Presentation.
- Less is more: You want to give enough information to make your audience want to read your paper. So include details, but not too many, and avoid too many formulas and technical jargon.
- Clean and professional : Avoid excessive colors, distracting backgrounds, font changes, animations, and too many words. Instead of whole paragraphs, bullet points with just a few words to summarize and highlight are best.
- Know your real-estate : Each slide has a limited amount of space. Use it wisely. Typically one, no more than two points per slide. Balance each slide visually. Utilize illustrations when needed; not extraneously.
- Keep things visual : Remember, a PowerPoint presentation is a powerful tool to present things visually. Use visual graphs over tables and scientific illustrations over long text. Keep your visuals clean and professional, just like any text you include in your presentation.
Know more about our Scientific Illustrations Services .
Another key to an effective presentation is to practice, practice, and then practice some more. When you’re done with your PowerPoint, go through it with friends and colleagues to see if you need to add (or delete excessive) information. Double and triple check for typos and errors. Know the presentation inside and out, so when you’re in front of your audience, you’ll feel confident and comfortable.
How to Present a Research Paper
If your PowerPoint presentation is solid, and you’ve practiced your presentation, that’s half the battle. Follow the basic advice to keep your audience engaged and interested by making eye contact, encouraging questions, and presenting your information with enthusiasm.
We encourage you to read our articles on how to present a scientific journal article and tips on giving good scientific presentations .
Language Editing Plus
Improve the flow and writing of your research paper with Language Editing Plus. This service includes unlimited editing, manuscript formatting for the journal of your choice, reference check and even a customized cover letter. Learn more here , and get started today!

Know How to Structure Your PhD Thesis

Systematic Literature Review or Literature Review?
You may also like.

What is a Good H-index?

What is a Corresponding Author?

How to Submit a Paper for Publication in a Journal
Input your search keywords and press Enter.
Princeton Correspondents on Undergraduate Research
How to Make a Successful Research Presentation
Turning a research paper into a visual presentation is difficult; there are pitfalls, and navigating the path to a brief, informative presentation takes time and practice. As a TA for GEO/WRI 201: Methods in Data Analysis & Scientific Writing this past fall, I saw how this process works from an instructor’s standpoint. I’ve presented my own research before, but helping others present theirs taught me a bit more about the process. Here are some tips I learned that may help you with your next research presentation:
More is more
In general, your presentation will always benefit from more practice, more feedback, and more revision. By practicing in front of friends, you can get comfortable with presenting your work while receiving feedback. It is hard to know how to revise your presentation if you never practice. If you are presenting to a general audience, getting feedback from someone outside of your discipline is crucial. Terms and ideas that seem intuitive to you may be completely foreign to someone else, and your well-crafted presentation could fall flat.
Less is more
Limit the scope of your presentation, the number of slides, and the text on each slide. In my experience, text works well for organizing slides, orienting the audience to key terms, and annotating important figures–not for explaining complex ideas. Having fewer slides is usually better as well. In general, about one slide per minute of presentation is an appropriate budget. Too many slides is usually a sign that your topic is too broad.

Limit the scope of your presentation
Don’t present your paper. Presentations are usually around 10 min long. You will not have time to explain all of the research you did in a semester (or a year!) in such a short span of time. Instead, focus on the highlight(s). Identify a single compelling research question which your work addressed, and craft a succinct but complete narrative around it.
You will not have time to explain all of the research you did. Instead, focus on the highlights. Identify a single compelling research question which your work addressed, and craft a succinct but complete narrative around it.
Craft a compelling research narrative
After identifying the focused research question, walk your audience through your research as if it were a story. Presentations with strong narrative arcs are clear, captivating, and compelling.
- Introduction (exposition — rising action)
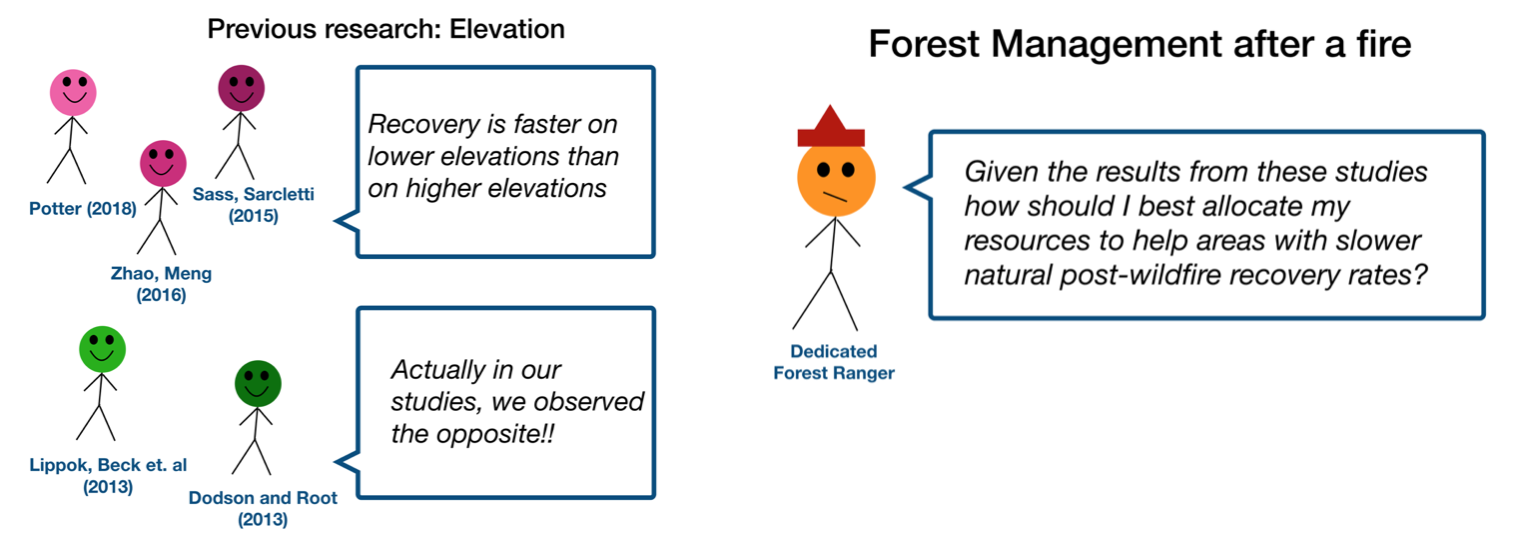
Orient the audience and draw them in by demonstrating the relevance and importance of your research story with strong global motive. Provide them with the necessary vocabulary and background knowledge to understand the plot of your story. Introduce the key studies (characters) relevant in your story and build tension and conflict with scholarly and data motive. By the end of your introduction, your audience should clearly understand your research question and be dying to know how you resolve the tension built through motive.
- Methods (rising action)
The methods section should transition smoothly and logically from the introduction. Beware of presenting your methods in a boring, arc-killing, ‘this is what I did.’ Focus on the details that set your story apart from the stories other people have already told. Keep the audience interested by clearly motivating your decisions based on your original research question or the tension built in your introduction.
- Results (climax)
Less is usually more here. Only present results which are clearly related to the focused research question you are presenting. Make sure you explain the results clearly so that your audience understands what your research found. This is the peak of tension in your narrative arc, so don’t undercut it by quickly clicking through to your discussion.
- Discussion (falling action)
By now your audience should be dying for a satisfying resolution. Here is where you contextualize your results and begin resolving the tension between past research. Be thorough. If you have too many conflicts left unresolved, or you don’t have enough time to present all of the resolutions, you probably need to further narrow the scope of your presentation.
- Conclusion (denouement)
Return back to your initial research question and motive, resolving any final conflicts and tying up loose ends. Leave the audience with a clear resolution of your focus research question, and use unresolved tension to set up potential sequels (i.e. further research).
Use your medium to enhance the narrative
Visual presentations should be dominated by clear, intentional graphics. Subtle animation in key moments (usually during the results or discussion) can add drama to the narrative arc and make conflict resolutions more satisfying. You are narrating a story written in images, videos, cartoons, and graphs. While your paper is mostly text, with graphics to highlight crucial points, your slides should be the opposite. Adapting to the new medium may require you to create or acquire far more graphics than you included in your paper, but it is necessary to create an engaging presentation.
The most important thing you can do for your presentation is to practice and revise. Bother your friends, your roommates, TAs–anybody who will sit down and listen to your work. Beyond that, think about presentations you have found compelling and try to incorporate some of those elements into your own. Remember you want your work to be comprehensible; you aren’t creating experts in 10 minutes. Above all, try to stay passionate about what you did and why. You put the time in, so show your audience that it’s worth it.
For more insight into research presentations, check out these past PCUR posts written by Emma and Ellie .
— Alec Getraer, Natural Sciences Correspondent
Share this:
- Share on Tumblr

Purdue Online Writing Lab Purdue OWL® College of Liberal Arts
APA PowerPoint Slide Presentation

Welcome to the Purdue OWL
This page is brought to you by the OWL at Purdue University. When printing this page, you must include the entire legal notice.
Copyright ©1995-2018 by The Writing Lab & The OWL at Purdue and Purdue University. All rights reserved. This material may not be published, reproduced, broadcast, rewritten, or redistributed without permission. Use of this site constitutes acceptance of our terms and conditions of fair use.
Note: This page reflects the latest version of the APA Publication Manual (i.e., APA 7), which released in October 2019. The equivalent resource for the older APA 6 style can be found here .
Media File: APA PowerPoint Slide Presentation
This resource is enhanced by a PowerPoint file. If you have a Microsoft Account, you can view this file with PowerPoint Online .
Select the APA PowerPoint Presentation link above to download slides that provide a detailed review of the APA citation style.
Reference management. Clean and simple.
How to make a scientific presentation

Scientific presentation outlines
Questions to ask yourself before you write your talk, 1. how much time do you have, 2. who will you speak to, 3. what do you want the audience to learn from your talk, step 1: outline your presentation, step 2: plan your presentation slides, step 3: make the presentation slides, slide design, text elements, animations and transitions, step 4: practice your presentation, final thoughts, frequently asked questions about preparing scientific presentations, related articles.
A good scientific presentation achieves three things: you communicate the science clearly, your research leaves a lasting impression on your audience, and you enhance your reputation as a scientist.
But, what is the best way to prepare for a scientific presentation? How do you start writing a talk? What details do you include, and what do you leave out?
It’s tempting to launch into making lots of slides. But, starting with the slides can mean you neglect the narrative of your presentation, resulting in an overly detailed, boring talk.
The key to making an engaging scientific presentation is to prepare the narrative of your talk before beginning to construct your presentation slides. Planning your talk will ensure that you tell a clear, compelling scientific story that will engage the audience.
In this guide, you’ll find everything you need to know to make a good oral scientific presentation, including:
- The different types of oral scientific presentations and how they are delivered;
- How to outline a scientific presentation;
- How to make slides for a scientific presentation.
Our advice results from delving into the literature on writing scientific talks and from our own experiences as scientists in giving and listening to presentations. We provide tips and best practices for giving scientific talks in a separate post.
There are two main types of scientific talks:
- Your talk focuses on a single study . Typically, you tell the story of a single scientific paper. This format is common for short talks at contributed sessions in conferences.
- Your talk describes multiple studies. You tell the story of multiple scientific papers. It is crucial to have a theme that unites the studies, for example, an overarching question or problem statement, with each study representing specific but different variations of the same theme. Typically, PhD defenses, invited seminars, lectures, or talks for a prospective employer (i.e., “job talks”) fall into this category.
➡️ Learn how to prepare an excellent thesis defense
The length of time you are allotted for your talk will determine whether you will discuss a single study or multiple studies, and which details to include in your story.
The background and interests of your audience will determine the narrative direction of your talk, and what devices you will use to get their attention. Will you be speaking to people specializing in your field, or will the audience also contain people from disciplines other than your own? To reach non-specialists, you will need to discuss the broader implications of your study outside your field.
The needs of the audience will also determine what technical details you will include, and the language you will use. For example, an undergraduate audience will have different needs than an audience of seasoned academics. Students will require a more comprehensive overview of background information and explanations of jargon but will need less technical methodological details.
Your goal is to speak to the majority. But, make your talk accessible to the least knowledgeable person in the room.
This is called the thesis statement, or simply the “take-home message”. Having listened to your talk, what message do you want the audience to take away from your presentation? Describe the main idea in one or two sentences. You want this theme to be present throughout your presentation. Again, the thesis statement will depend on the audience and the type of talk you are giving.
Your thesis statement will drive the narrative for your talk. By deciding the take-home message you want to convince the audience of as a result of listening to your talk, you decide how the story of your talk will flow and how you will navigate its twists and turns. The thesis statement tells you the results you need to show, which subsequently tells you the methods or studies you need to describe, which decides the angle you take in your introduction.
➡️ Learn how to write a thesis statement
The goal of your talk is that the audience leaves afterward with a clear understanding of the key take-away message of your research. To achieve that goal, you need to tell a coherent, logical story that conveys your thesis statement throughout the presentation. You can tell your story through careful preparation of your talk.
Preparation of a scientific presentation involves three separate stages: outlining the scientific narrative, preparing slides, and practicing your delivery. Making the slides of your talk without first planning what you are going to say is inefficient.
Here, we provide a 4 step guide to writing your scientific presentation:
- Outline your presentation
- Plan your presentation slides
- Make the presentation slides
- Practice your presentation

Writing an outline helps you consider the key pieces of your talk and how they fit together from the beginning, preventing you from forgetting any important details. It also means you avoid changing the order of your slides multiple times, saving you time.
Plan your talk as discrete sections. In the table below, we describe the sections for a single study talk vs. a talk discussing multiple studies:
The following tips apply when writing the outline of a single study talk. You can easily adapt this framework if you are writing a talk discussing multiple studies.
Introduction: Writing the introduction can be the hardest part of writing a talk. And when giving it, it’s the point where you might be at your most nervous. But preparing a good, concise introduction will settle your nerves.
The introduction tells the audience the story of why you studied your topic. A good introduction succinctly achieves four things, in the following order.
- It gives a broad perspective on the problem or topic for people in the audience who may be outside your discipline (i.e., it explains the big-picture problem motivating your study).
- It describes why you did the study, and why the audience should care.
- It gives a brief indication of how your study addressed the problem and provides the necessary background information that the audience needs to understand your work.
- It indicates what the audience will learn from the talk, and prepares them for what will come next.
A good introduction not only gives the big picture and motivations behind your study but also concisely sets the stage for what the audience will learn from the talk (e.g., the questions your work answers, and/or the hypotheses that your work tests). The end of the introduction will lead to a natural transition to the methods.
Give a broad perspective on the problem. The easiest way to start with the big picture is to think of a hook for the first slide of your presentation. A hook is an opening that gets the audience’s attention and gets them interested in your story. In science, this might take the form of a why, or a how question, or it could be a statement about a major problem or open question in your field. Other examples of hooks include quotes, short anecdotes, or interesting statistics.
Why should the audience care? Next, decide on the angle you are going to take on your hook that links to the thesis of your talk. In other words, you need to set the context, i.e., explain why the audience should care. For example, you may introduce an observation from nature, a pattern in experimental data, or a theory that you want to test. The audience must understand your motivations for the study.
Supplementary details. Once you have established the hook and angle, you need to include supplementary details to support them. For example, you might state your hypothesis. Then go into previous work and the current state of knowledge. Include citations of these studies. If you need to introduce some technical methodological details, theory, or jargon, do it here.
Conclude your introduction. The motivation for the work and background information should set the stage for the conclusion of the introduction, where you describe the goals of your study, and any hypotheses or predictions. Let the audience know what they are going to learn.
Methods: The audience will use your description of the methods to assess the approach you took in your study and to decide whether your findings are credible. Tell the story of your methods in chronological order. Use visuals to describe your methods as much as possible. If you have equations, make sure to take the time to explain them. Decide what methods to include and how you will show them. You need enough detail so that your audience will understand what you did and therefore can evaluate your approach, but avoid including superfluous details that do not support your main idea. You want to avoid the common mistake of including too much data, as the audience can read the paper(s) later.
Results: This is the evidence you present for your thesis. The audience will use the results to evaluate the support for your main idea. Choose the most important and interesting results—those that support your thesis. You don’t need to present all the results from your study (indeed, you most likely won’t have time to present them all). Break down complex results into digestible pieces, e.g., comparisons over multiple slides (more tips in the next section).
Summary: Summarize your main findings. Displaying your main findings through visuals can be effective. Emphasize the new contributions to scientific knowledge that your work makes.
Conclusion: Complete the circle by relating your conclusions to the big picture topic in your introduction—and your hook, if possible. It’s important to describe any alternative explanations for your findings. You might also speculate on future directions arising from your research. The slides that comprise your conclusion do not need to state “conclusion”. Rather, the concluding slide title should be a declarative sentence linking back to the big picture problem and your main idea.
It’s important to end well by planning a strong closure to your talk, after which you will thank the audience. Your closing statement should relate to your thesis, perhaps by stating it differently or memorably. Avoid ending awkwardly by memorizing your closing sentence.
By now, you have an outline of the story of your talk, which you can use to plan your slides. Your slides should complement and enhance what you will say. Use the following steps to prepare your slides.
- Write the slide titles to match your talk outline. These should be clear and informative declarative sentences that succinctly give the main idea of the slide (e.g., don’t use “Methods” as a slide title). Have one major idea per slide. In a YouTube talk on designing effective slides , researcher Michael Alley shows examples of instructive slide titles.
- Decide how you will convey the main idea of the slide (e.g., what figures, photographs, equations, statistics, references, or other elements you will need). The body of the slide should support the slide’s main idea.
- Under each slide title, outline what you want to say, in bullet points.
In sum, for each slide, prepare a title that summarizes its major idea, a list of visual elements, and a summary of the points you will make. Ensure each slide connects to your thesis. If it doesn’t, then you don’t need the slide.
Slides for scientific presentations have three major components: text (including labels and legends), graphics, and equations. Here, we give tips on how to present each of these components.
- Have an informative title slide. Include the names of all coauthors and their affiliations. Include an attractive image relating to your study.
- Make the foreground content of your slides “pop” by using an appropriate background. Slides that have white backgrounds with black text work well for small rooms, whereas slides with black backgrounds and white text are suitable for large rooms.
- The layout of your slides should be simple. Pay attention to how and where you lay the visual and text elements on each slide. It’s tempting to cram information, but you need lots of empty space. Retain space at the sides and bottom of your slides.
- Use sans serif fonts with a font size of at least 20 for text, and up to 40 for slide titles. Citations can be in 14 font and should be included at the bottom of the slide.
- Use bold or italics to emphasize words, not underlines or caps. Keep these effects to a minimum.
- Use concise text . You don’t need full sentences. Convey the essence of your message in as few words as possible. Write down what you’d like to say, and then shorten it for the slide. Remove unnecessary filler words.
- Text blocks should be limited to two lines. This will prevent you from crowding too much information on the slide.
- Include names of technical terms in your talk slides, especially if they are not familiar to everyone in the audience.
- Proofread your slides. Typos and grammatical errors are distracting for your audience.
- Include citations for the hypotheses or observations of other scientists.
- Good figures and graphics are essential to sustain audience interest. Use graphics and photographs to show the experiment or study system in action and to explain abstract concepts.
- Don’t use figures straight from your paper as they may be too detailed for your talk, and details like axes may be too small. Make new versions if necessary. Make them large enough to be visible from the back of the room.
- Use graphs to show your results, not tables. Tables are difficult for your audience to digest! If you must present a table, keep it simple.
- Label the axes of graphs and indicate the units. Label important components of graphics and photographs and include captions. Include sources for graphics that are not your own.
- Explain all the elements of a graph. This includes the axes, what the colors and markers mean, and patterns in the data.
- Use colors in figures and text in a meaningful, not random, way. For example, contrasting colors can be effective for pointing out comparisons and/or differences. Don’t use neon colors or pastels.
- Use thick lines in figures, and use color to create contrasts in the figures you present. Don’t use red/green or red/blue combinations, as color-blind audience members can’t distinguish between them.
- Arrows or circles can be effective for drawing attention to key details in graphs and equations. Add some text annotations along with them.
- Write your summary and conclusion slides using graphics, rather than showing a slide with a list of bullet points. Showing some of your results again can be helpful to remind the audience of your message.
- If your talk has equations, take time to explain them. Include text boxes to explain variables and mathematical terms, and put them under each term in the equation.
- Combine equations with a graphic that shows the scientific principle, or include a diagram of the mathematical model.
- Use animations judiciously. They are helpful to reveal complex ideas gradually, for example, if you need to make a comparison or contrast or to build a complicated argument or figure. For lists, reveal one bullet point at a time. New ideas appearing sequentially will help your audience follow your logic.
- Slide transitions should be simple. Silly ones distract from your message.
- Decide how you will make the transition as you move from one section of your talk to the next. For example, if you spend time talking through details, provide a summary afterward, especially in a long talk. Another common tactic is to have a “home slide” that you return to multiple times during the talk that reinforces your main idea or message. In her YouTube talk on designing effective scientific presentations , Stanford biologist Susan McConnell suggests using the approach of home slides to build a cohesive narrative.
To deliver a polished presentation, it is essential to practice it. Here are some tips.
- For your first run-through, practice alone. Pay attention to your narrative. Does your story flow naturally? Do you know how you will start and end? Are there any awkward transitions? Do animations help you tell your story? Do your slides help to convey what you are saying or are they missing components?
- Next, practice in front of your advisor, and/or your peers (e.g., your lab group). Ask someone to time your talk. Take note of their feedback and the questions that they ask you (you might be asked similar questions during your real talk).
- Edit your talk, taking into account the feedback you’ve received. Eliminate superfluous slides that don’t contribute to your takeaway message.
- Practice as many times as needed to memorize the order of your slides and the key transition points of your talk. However, don’t try to learn your talk word for word. Instead, memorize opening and closing statements, and sentences at key junctures in the presentation. Your presentation should resemble a serious but spontaneous conversation with the audience.
- Practicing multiple times also helps you hone the delivery of your talk. While rehearsing, pay attention to your vocal intonations and speed. Make sure to take pauses while you speak, and make eye contact with your imaginary audience.
- Make sure your talk finishes within the allotted time, and remember to leave time for questions. Conferences are particularly strict on run time.
- Anticipate questions and challenges from the audience, and clarify ambiguities within your slides and/or speech in response.
- If you anticipate that you could be asked questions about details but you don’t have time to include them, or they detract from the main message of your talk, you can prepare slides that address these questions and place them after the final slide of your talk.
➡️ More tips for giving scientific presentations
An organized presentation with a clear narrative will help you communicate your ideas effectively, which is essential for engaging your audience and conveying the importance of your work. Taking time to plan and outline your scientific presentation before writing the slides will help you manage your nerves and feel more confident during the presentation, which will improve your overall performance.
A good scientific presentation has an engaging scientific narrative with a memorable take-home message. It has clear, informative slides that enhance what the speaker says. You need to practice your talk many times to ensure you deliver a polished presentation.
First, consider who will attend your presentation, and what you want the audience to learn about your research. Tailor your content to their level of knowledge and interests. Second, create an outline for your presentation, including the key points you want to make and the evidence you will use to support those points. Finally, practice your presentation several times to ensure that it flows smoothly and that you are comfortable with the material.
Prepare an opening that immediately gets the audience’s attention. A common device is a why or a how question, or a statement of a major open problem in your field, but you could also start with a quote, interesting statistic, or case study from your field.
Scientific presentations typically either focus on a single study (e.g., a 15-minute conference presentation) or tell the story of multiple studies (e.g., a PhD defense or 50-minute conference keynote talk). For a single study talk, the structure follows the scientific paper format: Introduction, Methods, Results, Summary, and Conclusion, whereas the format of a talk discussing multiple studies is more complex, but a theme unifies the studies.
Ensure you have one major idea per slide, and convey that idea clearly (through images, equations, statistics, citations, video, etc.). The slide should include a title that summarizes the major point of the slide, should not contain too much text or too many graphics, and color should be used meaningfully.

Loading metrics
Open Access
Ten simple rules for effective presentation slides
* E-mail: [email protected]
Affiliation Biomedical Engineering and the Center for Public Health Genomics, University of Virginia, Charlottesville, Virginia, United States of America
- Kristen M. Naegle
Published: December 2, 2021
- https://doi.org/10.1371/journal.pcbi.1009554
- Reader Comments
Citation: Naegle KM (2021) Ten simple rules for effective presentation slides. PLoS Comput Biol 17(12): e1009554. https://doi.org/10.1371/journal.pcbi.1009554
Copyright: © 2021 Kristen M. Naegle. This is an open access article distributed under the terms of the Creative Commons Attribution License , which permits unrestricted use, distribution, and reproduction in any medium, provided the original author and source are credited.
Funding: The author received no specific funding for this work.
Competing interests: The author has declared no competing interests exist.
Introduction
The “presentation slide” is the building block of all academic presentations, whether they are journal clubs, thesis committee meetings, short conference talks, or hour-long seminars. A slide is a single page projected on a screen, usually built on the premise of a title, body, and figures or tables and includes both what is shown and what is spoken about that slide. Multiple slides are strung together to tell the larger story of the presentation. While there have been excellent 10 simple rules on giving entire presentations [ 1 , 2 ], there was an absence in the fine details of how to design a slide for optimal effect—such as the design elements that allow slides to convey meaningful information, to keep the audience engaged and informed, and to deliver the information intended and in the time frame allowed. As all research presentations seek to teach, effective slide design borrows from the same principles as effective teaching, including the consideration of cognitive processing your audience is relying on to organize, process, and retain information. This is written for anyone who needs to prepare slides from any length scale and for most purposes of conveying research to broad audiences. The rules are broken into 3 primary areas. Rules 1 to 5 are about optimizing the scope of each slide. Rules 6 to 8 are about principles around designing elements of the slide. Rules 9 to 10 are about preparing for your presentation, with the slides as the central focus of that preparation.
Rule 1: Include only one idea per slide
Each slide should have one central objective to deliver—the main idea or question [ 3 – 5 ]. Often, this means breaking complex ideas down into manageable pieces (see Fig 1 , where “background” information has been split into 2 key concepts). In another example, if you are presenting a complex computational approach in a large flow diagram, introduce it in smaller units, building it up until you finish with the entire diagram. The progressive buildup of complex information means that audiences are prepared to understand the whole picture, once you have dedicated time to each of the parts. You can accomplish the buildup of components in several ways—for example, using presentation software to cover/uncover information. Personally, I choose to create separate slides for each piece of information content I introduce—where the final slide has the entire diagram, and I use cropping or a cover on duplicated slides that come before to hide what I’m not yet ready to include. I use this method in order to ensure that each slide in my deck truly presents one specific idea (the new content) and the amount of the new information on that slide can be described in 1 minute (Rule 2), but it comes with the trade-off—a change to the format of one of the slides in the series often means changes to all slides.
- PPT PowerPoint slide
- PNG larger image
- TIFF original image
Top left: A background slide that describes the background material on a project from my lab. The slide was created using a PowerPoint Design Template, which had to be modified to increase default text sizes for this figure (i.e., the default text sizes are even worse than shown here). Bottom row: The 2 new slides that break up the content into 2 explicit ideas about the background, using a central graphic. In the first slide, the graphic is an explicit example of the SH2 domain of PI3-kinase interacting with a phosphorylation site (Y754) on the PDGFR to describe the important details of what an SH2 domain and phosphotyrosine ligand are and how they interact. I use that same graphic in the second slide to generalize all binding events and include redundant text to drive home the central message (a lot of possible interactions might occur in the human proteome, more than we can currently measure). Top right highlights which rules were used to move from the original slide to the new slide. Specific changes as highlighted by Rule 7 include increasing contrast by changing the background color, increasing font size, changing to sans serif fonts, and removing all capital text and underlining (using bold to draw attention). PDGFR, platelet-derived growth factor receptor.
https://doi.org/10.1371/journal.pcbi.1009554.g001
Rule 2: Spend only 1 minute per slide
When you present your slide in the talk, it should take 1 minute or less to discuss. This rule is really helpful for planning purposes—a 20-minute presentation should have somewhere around 20 slides. Also, frequently giving your audience new information to feast on helps keep them engaged. During practice, if you find yourself spending more than a minute on a slide, there’s too much for that one slide—it’s time to break up the content into multiple slides or even remove information that is not wholly central to the story you are trying to tell. Reduce, reduce, reduce, until you get to a single message, clearly described, which takes less than 1 minute to present.
Rule 3: Make use of your heading
When each slide conveys only one message, use the heading of that slide to write exactly the message you are trying to deliver. Instead of titling the slide “Results,” try “CTNND1 is central to metastasis” or “False-positive rates are highly sample specific.” Use this landmark signpost to ensure that all the content on that slide is related exactly to the heading and only the heading. Think of the slide heading as the introductory or concluding sentence of a paragraph and the slide content the rest of the paragraph that supports the main point of the paragraph. An audience member should be able to follow along with you in the “paragraph” and come to the same conclusion sentence as your header at the end of the slide.
Rule 4: Include only essential points
While you are speaking, audience members’ eyes and minds will be wandering over your slide. If you have a comment, detail, or figure on a slide, have a plan to explicitly identify and talk about it. If you don’t think it’s important enough to spend time on, then don’t have it on your slide. This is especially important when faculty are present. I often tell students that thesis committee members are like cats: If you put a shiny bauble in front of them, they’ll go after it. Be sure to only put the shiny baubles on slides that you want them to focus on. Putting together a thesis meeting for only faculty is really an exercise in herding cats (if you have cats, you know this is no easy feat). Clear and concise slide design will go a long way in helping you corral those easily distracted faculty members.
Rule 5: Give credit, where credit is due
An exception to Rule 4 is to include proper citations or references to work on your slide. When adding citations, names of other researchers, or other types of credit, use a consistent style and method for adding this information to your slides. Your audience will then be able to easily partition this information from the other content. A common mistake people make is to think “I’ll add that reference later,” but I highly recommend you put the proper reference on the slide at the time you make it, before you forget where it came from. Finally, in certain kinds of presentations, credits can make it clear who did the work. For the faculty members heading labs, it is an effective way to connect your audience with the personnel in the lab who did the work, which is a great career booster for that person. For graduate students, it is an effective way to delineate your contribution to the work, especially in meetings where the goal is to establish your credentials for meeting the rigors of a PhD checkpoint.
Rule 6: Use graphics effectively
As a rule, you should almost never have slides that only contain text. Build your slides around good visualizations. It is a visual presentation after all, and as they say, a picture is worth a thousand words. However, on the flip side, don’t muddy the point of the slide by putting too many complex graphics on a single slide. A multipanel figure that you might include in a manuscript should often be broken into 1 panel per slide (see Rule 1 ). One way to ensure that you use the graphics effectively is to make a point to introduce the figure and its elements to the audience verbally, especially for data figures. For example, you might say the following: “This graph here shows the measured false-positive rate for an experiment and each point is a replicate of the experiment, the graph demonstrates …” If you have put too much on one slide to present in 1 minute (see Rule 2 ), then the complexity or number of the visualizations is too much for just one slide.
Rule 7: Design to avoid cognitive overload
The type of slide elements, the number of them, and how you present them all impact the ability for the audience to intake, organize, and remember the content. For example, a frequent mistake in slide design is to include full sentences, but reading and verbal processing use the same cognitive channels—therefore, an audience member can either read the slide, listen to you, or do some part of both (each poorly), as a result of cognitive overload [ 4 ]. The visual channel is separate, allowing images/videos to be processed with auditory information without cognitive overload [ 6 ] (Rule 6). As presentations are an exercise in listening, and not reading, do what you can to optimize the ability of the audience to listen. Use words sparingly as “guide posts” to you and the audience about major points of the slide. In fact, you can add short text fragments, redundant with the verbal component of the presentation, which has been shown to improve retention [ 7 ] (see Fig 1 for an example of redundant text that avoids cognitive overload). Be careful in the selection of a slide template to minimize accidentally adding elements that the audience must process, but are unimportant. David JP Phillips argues (and effectively demonstrates in his TEDx talk [ 5 ]) that the human brain can easily interpret 6 elements and more than that requires a 500% increase in human cognition load—so keep the total number of elements on the slide to 6 or less. Finally, in addition to the use of short text, white space, and the effective use of graphics/images, you can improve ease of cognitive processing further by considering color choices and font type and size. Here are a few suggestions for improving the experience for your audience, highlighting the importance of these elements for some specific groups:
- Use high contrast colors and simple backgrounds with low to no color—for persons with dyslexia or visual impairment.
- Use sans serif fonts and large font sizes (including figure legends), avoid italics, underlining (use bold font instead for emphasis), and all capital letters—for persons with dyslexia or visual impairment [ 8 ].
- Use color combinations and palettes that can be understood by those with different forms of color blindness [ 9 ]. There are excellent tools available to identify colors to use and ways to simulate your presentation or figures as they might be seen by a person with color blindness (easily found by a web search).
- In this increasing world of virtual presentation tools, consider practicing your talk with a closed captioning system capture your words. Use this to identify how to improve your speaking pace, volume, and annunciation to improve understanding by all members of your audience, but especially those with a hearing impairment.
Rule 8: Design the slide so that a distracted person gets the main takeaway
It is very difficult to stay focused on a presentation, especially if it is long or if it is part of a longer series of talks at a conference. Audience members may get distracted by an important email, or they may start dreaming of lunch. So, it’s important to look at your slide and ask “If they heard nothing I said, will they understand the key concept of this slide?” The other rules are set up to help with this, including clarity of the single point of the slide (Rule 1), titling it with a major conclusion (Rule 3), and the use of figures (Rule 6) and short text redundant to your verbal description (Rule 7). However, with each slide, step back and ask whether its main conclusion is conveyed, even if someone didn’t hear your accompanying dialog. Importantly, ask if the information on the slide is at the right level of abstraction. For example, do you have too many details about the experiment, which hides the conclusion of the experiment (i.e., breaking Rule 1)? If you are worried about not having enough details, keep a slide at the end of your slide deck (after your conclusions and acknowledgments) with the more detailed information that you can refer to during a question and answer period.
Rule 9: Iteratively improve slide design through practice
Well-designed slides that follow the first 8 rules are intended to help you deliver the message you intend and in the amount of time you intend to deliver it in. The best way to ensure that you nailed slide design for your presentation is to practice, typically a lot. The most important aspects of practicing a new presentation, with an eye toward slide design, are the following 2 key points: (1) practice to ensure that you hit, each time through, the most important points (for example, the text guide posts you left yourself and the title of the slide); and (2) practice to ensure that as you conclude the end of one slide, it leads directly to the next slide. Slide transitions, what you say as you end one slide and begin the next, are important to keeping the flow of the “story.” Practice is when I discover that the order of my presentation is poor or that I left myself too few guideposts to remember what was coming next. Additionally, during practice, the most frequent things I have to improve relate to Rule 2 (the slide takes too long to present, usually because I broke Rule 1, and I’m delivering too much information for one slide), Rule 4 (I have a nonessential detail on the slide), and Rule 5 (I forgot to give a key reference). The very best type of practice is in front of an audience (for example, your lab or peers), where, with fresh perspectives, they can help you identify places for improving slide content, design, and connections across the entirety of your talk.
Rule 10: Design to mitigate the impact of technical disasters
The real presentation almost never goes as we planned in our heads or during our practice. Maybe the speaker before you went over time and now you need to adjust. Maybe the computer the organizer is having you use won’t show your video. Maybe your internet is poor on the day you are giving a virtual presentation at a conference. Technical problems are routinely part of the practice of sharing your work through presentations. Hence, you can design your slides to limit the impact certain kinds of technical disasters create and also prepare alternate approaches. Here are just a few examples of the preparation you can do that will take you a long way toward avoiding a complete fiasco:
- Save your presentation as a PDF—if the version of Keynote or PowerPoint on a host computer cause issues, you still have a functional copy that has a higher guarantee of compatibility.
- In using videos, create a backup slide with screen shots of key results. For example, if I have a video of cell migration, I’ll be sure to have a copy of the start and end of the video, in case the video doesn’t play. Even if the video worked, you can pause on this backup slide and take the time to highlight the key results in words if someone could not see or understand the video.
- Avoid animations, such as figures or text that flash/fly-in/etc. Surveys suggest that no one likes movement in presentations [ 3 , 4 ]. There is likely a cognitive underpinning to the almost universal distaste of pointless animations that relates to the idea proposed by Kosslyn and colleagues that animations are salient perceptual units that captures direct attention [ 4 ]. Although perceptual salience can be used to draw attention to and improve retention of specific points, if you use this approach for unnecessary/unimportant things (like animation of your bullet point text, fly-ins of figures, etc.), then you will distract your audience from the important content. Finally, animations cause additional processing burdens for people with visual impairments [ 10 ] and create opportunities for technical disasters if the software on the host system is not compatible with your planned animation.
Conclusions
These rules are just a start in creating more engaging presentations that increase audience retention of your material. However, there are wonderful resources on continuing on the journey of becoming an amazing public speaker, which includes understanding the psychology and neuroscience behind human perception and learning. For example, as highlighted in Rule 7, David JP Phillips has a wonderful TEDx talk on the subject [ 5 ], and “PowerPoint presentation flaws and failures: A psychological analysis,” by Kosslyn and colleagues is deeply detailed about a number of aspects of human cognition and presentation style [ 4 ]. There are many books on the topic, including the popular “Presentation Zen” by Garr Reynolds [ 11 ]. Finally, although briefly touched on here, the visualization of data is an entire topic of its own that is worth perfecting for both written and oral presentations of work, with fantastic resources like Edward Tufte’s “The Visual Display of Quantitative Information” [ 12 ] or the article “Visualization of Biomedical Data” by O’Donoghue and colleagues [ 13 ].
Acknowledgments
I would like to thank the countless presenters, colleagues, students, and mentors from which I have learned a great deal from on effective presentations. Also, a thank you to the wonderful resources published by organizations on how to increase inclusivity. A special thanks to Dr. Jason Papin and Dr. Michael Guertin on early feedback of this editorial.
- View Article
- PubMed/NCBI
- Google Scholar
- 3. Teaching VUC for Making Better PowerPoint Presentations. n.d. Available from: https://cft.vanderbilt.edu/guides-sub-pages/making-better-powerpoint-presentations/#baddeley .
- 8. Creating a dyslexia friendly workplace. Dyslexia friendly style guide. nd. Available from: https://www.bdadyslexia.org.uk/advice/employers/creating-a-dyslexia-friendly-workplace/dyslexia-friendly-style-guide .
- 9. Cravit R. How to Use Color Blind Friendly Palettes to Make Your Charts Accessible. 2019. Available from: https://venngage.com/blog/color-blind-friendly-palette/ .
- 10. Making your conference presentation more accessible to blind and partially sighted people. n.d. Available from: https://vocaleyes.co.uk/services/resources/guidelines-for-making-your-conference-presentation-more-accessible-to-blind-and-partially-sighted-people/ .
- 11. Reynolds G. Presentation Zen: Simple Ideas on Presentation Design and Delivery. 2nd ed. New Riders Pub; 2011.
- 12. Tufte ER. The Visual Display of Quantitative Information. 2nd ed. Graphics Press; 2001.
- SUGGESTED TOPICS
- The Magazine
- Newsletters
- Managing Yourself
- Managing Teams
- Work-life Balance
- The Big Idea
- Data & Visuals
- Case Selections
- HBR Learning
- Topic Feeds
- Account Settings
- Email Preferences
How to Make a “Good” Presentation “Great”
- Guy Kawasaki

Remember: Less is more.
A strong presentation is so much more than information pasted onto a series of slides with fancy backgrounds. Whether you’re pitching an idea, reporting market research, or sharing something else, a great presentation can give you a competitive advantage, and be a powerful tool when aiming to persuade, educate, or inspire others. Here are some unique elements that make a presentation stand out.
- Fonts: Sans Serif fonts such as Helvetica or Arial are preferred for their clean lines, which make them easy to digest at various sizes and distances. Limit the number of font styles to two: one for headings and another for body text, to avoid visual confusion or distractions.
- Colors: Colors can evoke emotions and highlight critical points, but their overuse can lead to a cluttered and confusing presentation. A limited palette of two to three main colors, complemented by a simple background, can help you draw attention to key elements without overwhelming the audience.
- Pictures: Pictures can communicate complex ideas quickly and memorably but choosing the right images is key. Images or pictures should be big (perhaps 20-25% of the page), bold, and have a clear purpose that complements the slide’s text.
- Layout: Don’t overcrowd your slides with too much information. When in doubt, adhere to the principle of simplicity, and aim for a clean and uncluttered layout with plenty of white space around text and images. Think phrases and bullets, not sentences.
As an intern or early career professional, chances are that you’ll be tasked with making or giving a presentation in the near future. Whether you’re pitching an idea, reporting market research, or sharing something else, a great presentation can give you a competitive advantage, and be a powerful tool when aiming to persuade, educate, or inspire others.
- Guy Kawasaki is the chief evangelist at Canva and was the former chief evangelist at Apple. Guy is the author of 16 books including Think Remarkable : 9 Paths to Transform Your Life and Make a Difference.
Partner Center
- Google Slides Presentation Design
- Pitch Deck Design
- Powerpoint Redesign
- Other Design Services

- Guide & How to's
- How to present a research paper in PPT: best practices
A research paper presentation is frequently used at conferences and other events where you have a chance to share the results of your research and receive feedback from colleagues. Although it may appear as simple as summarizing the findings, successful examples of research paper presentations show that there is a little bit more to it.
In this article, we’ll walk you through the basic outline and steps to create a good research paper presentation. We’ll also explain what to include and what not to include in your presentation of research paper and share some of the most effective tips you can use to take your slides to the next level.
Research paper PowerPoint presentation outline
Creating a PowerPoint presentation for a research paper involves organizing and summarizing your key findings, methodology, and conclusions in a way that encourages your audience to interact with your work and share their interest in it with others. Here’s a basic research paper outline PowerPoint you can follow:
1. Title (1 slide)
Typically, your title slide should contain the following information:
- Title of the research paper
- Affiliation or institution
- Date of presentation
2. Introduction (1-3 slides)
On this slide of your presentation, briefly introduce the research topic and its significance and state the research question or objective.
3. Research questions or hypothesis (1 slide)
This slide should emphasize the objectives of your research or present the hypothesis.
4. Literature review (1 slide)
Your literature review has to provide context for your research by summarizing relevant literature. Additionally, it should highlight gaps or areas where your research contributes.
5. Methodology and data collection (1-2 slides)
This slide of your research paper PowerPoint has to explain the research design, methods, and procedures. It must also Include details about participants, materials, and data collection and emphasize special equipment you have used in your work.
6. Results (3-5 slides)
On this slide, you must present the results of your data analysis and discuss any trends, patterns, or significant findings. Moreover, you should use charts, graphs, and tables to illustrate data and highlight something novel in your results (if applicable).
7. Conclusion (1 slide)
Your conclusion slide has to summarize the main findings and their implications, as well as discuss the broader impact of your research. Usually, a single statement is enough.
8. Recommendations (1 slide)
If applicable, provide recommendations for future research or actions on this slide.
9. References (1-2 slides)
The references slide is where you list all the sources cited in your research paper.
10. Acknowledgments (1 slide)
On this presentation slide, acknowledge any individuals, organizations, or funding sources that contributed to your research.
11. Appendix (1 slide)
If applicable, include any supplementary materials, such as additional data or detailed charts, in your appendix slide.
The above outline is just a general guideline, so make sure to adjust it based on your specific research paper and the time allotted for the presentation.
Steps to creating a memorable research paper presentation
Creating a PowerPoint presentation for a research paper involves several critical steps needed to convey your findings and engage your audience effectively, and these steps are as follows:
Step 1. Understand your audience:
- Identify the audience for your presentation.
- Tailor your content and level of detail to match the audience’s background and knowledge.
Step 2. Define your key messages:
- Clearly articulate the main messages or findings of your research.
- Identify the key points you want your audience to remember.
Step 3. Design your research paper PPT presentation:
- Use a clean and professional design that complements your research topic.
- Choose readable fonts, consistent formatting, and a limited color palette.
- Opt for PowerPoint presentation services if slide design is not your strong side.
Step 4. Put content on slides:
- Follow the outline above to structure your presentation effectively; include key sections and topics.
- Organize your content logically, following the flow of your research paper.
Step 5. Final check:
- Proofread your slides for typos, errors, and inconsistencies.
- Ensure all visuals are clear, high-quality, and properly labeled.
Step 6. Save and share:
- Save your presentation and ensure compatibility with the equipment you’ll be using.
- If necessary, share a copy of your presentation with the audience.
By following these steps, you can create a well-organized and visually appealing research paper presentation PowerPoint that effectively conveys your research findings to the audience.
What to include and what not to include in your presentation
In addition to the must-know PowerPoint presentation recommendations, which we’ll cover later in this article, consider the following do’s and don’ts when you’re putting together your research paper presentation:
- Focus on the topic.
- Be brief and to the point.
- Attract the audience’s attention and highlight interesting details.
- Use only relevant visuals (maps, charts, pictures, graphs, etc.).
- Use numbers and bullet points to structure the content.
- Make clear statements regarding the essence and results of your research.
Don’ts:
- Don’t write down the whole outline of your paper and nothing else.
- Don’t put long, full sentences on your slides; split them into smaller ones.
- Don’t use distracting patterns, colors, pictures, and other visuals on your slides; the simpler, the better.
- Don’t use too complicated graphs or charts; only the ones that are easy to understand.
- Now that we’ve discussed the basics, let’s move on to the top tips for making a powerful presentation of your research paper.
8 tips on how to make research paper presentation that achieves its goals
You’ve probably been to a presentation where the presenter reads word for word from their PowerPoint outline. Or where the presentation is cluttered, chaotic, or contains too much data. The simple tips below will help you summarize a 10 to 15-page paper for a 15 to 20-minute talk and succeed, so read on!
Tip #1: Less is more
You want to provide enough information to make your audience want to know more. Including details but not too many and avoiding technical jargon, formulas, and long sentences are always good ways to achieve this.
Tip #2: Be professional
Avoid using too many colors, font changes, distracting backgrounds, animations, etc. Bullet points with a few words to highlight the important information are preferable to lengthy paragraphs. Additionally, include slide numbers on all PowerPoint slides except for the title slide, and make sure it is followed by a table of contents, offering a brief overview of the entire research paper.
Tip #3: Strive for balance
PowerPoint slides have limited space, so use it carefully. Typically, one to two points per slide or 5 lines for 5 words in a sentence are enough to present your ideas.
Tip #4: Use proper fonts and text size
The font you use should be easy to read and consistent throughout the slides. You can go with Arial, Times New Roman, Calibri, or a combination of these three. An ideal text size is 32 points, while a heading size is 44.
Tip #5: Concentrate on the visual side
A PowerPoint presentation is one of the best tools for presenting information visually. Use graphs instead of tables and topic-relevant illustrations instead of walls of text. Keep your visuals as clean and professional as the content of your presentation.
Tip #6: Practice your delivery
Always go through your presentation when you’re done to ensure a smooth and confident delivery and time yourself to stay within the allotted limit.
Tip #7: Get ready for questions
Anticipate potential questions from your audience and prepare thoughtful responses. Also, be ready to engage in discussions about your research.
Tip #8: Don’t be afraid to utilize professional help
If the mere thought of designing a presentation overwhelms you or you’re pressed for time, consider leveraging professional PowerPoint redesign services . A dedicated design team can transform your content or old presentation into effective slides, ensuring your message is communicated clearly and captivates your audience. This way, you can focus on refining your delivery and preparing for the presentation.
Lastly, remember that even experienced presenters get nervous before delivering research paper PowerPoint presentations in front of the audience. You cannot know everything; some things can be beyond your control, which is completely fine. You are at the event not only to share what you know but also to learn from others. So, no matter what, dress appropriately, look straight into the audience’s eyes, try to speak and move naturally, present your information enthusiastically, and have fun!
If you need help with slide design, get in touch with our dedicated design team and let qualified professionals turn your research findings into a visually appealing, polished presentation that leaves a lasting impression on your audience. Our experienced designers specialize in creating engaging layouts, incorporating compelling graphics, and ensuring a cohesive visual narrative that complements content on any subject.
#ezw_tco-2 .ez-toc-widget-container ul.ez-toc-list li.active::before { background-color: #ededed; } Table of contents
- Presenting techniques
- 50 tips on how to improve PowerPoint presentations in 2022-2023 [Updated]
- Present financial information visually in PowerPoint to drive results
- Keynote VS PowerPoint

- Design Tips
8 rules of effective presentation

- Business Slides
Employee training and onboarding presentation: why and how

How to structure, design, write, and finally present executive summary presentation?
- - Google Chrome
Intended for healthcare professionals
- Access provided by Google Indexer
- My email alerts
- BMA member login
- Username * Password * Forgot your log in details? Need to activate BMA Member Log In Log in via OpenAthens Log in via your institution
Search form
- Advanced search
- Search responses
- Search blogs
- How to prepare and...
How to prepare and deliver an effective oral presentation
- Related content
- Peer review
- Lucia Hartigan , registrar 1 ,
- Fionnuala Mone , fellow in maternal fetal medicine 1 ,
- Mary Higgins , consultant obstetrician 2
- 1 National Maternity Hospital, Dublin, Ireland
- 2 National Maternity Hospital, Dublin; Obstetrics and Gynaecology, Medicine and Medical Sciences, University College Dublin
- luciahartigan{at}hotmail.com
The success of an oral presentation lies in the speaker’s ability to transmit information to the audience. Lucia Hartigan and colleagues describe what they have learnt about delivering an effective scientific oral presentation from their own experiences, and their mistakes
The objective of an oral presentation is to portray large amounts of often complex information in a clear, bite sized fashion. Although some of the success lies in the content, the rest lies in the speaker’s skills in transmitting the information to the audience. 1
Preparation
It is important to be as well prepared as possible. Look at the venue in person, and find out the time allowed for your presentation and for questions, and the size of the audience and their backgrounds, which will allow the presentation to be pitched at the appropriate level.
See what the ambience and temperature are like and check that the format of your presentation is compatible with the available computer. This is particularly important when embedding videos. Before you begin, look at the video on stand-by and make sure the lights are dimmed and the speakers are functioning.
For visual aids, Microsoft PowerPoint or Apple Mac Keynote programmes are usual, although Prezi is increasing in popularity. Save the presentation on a USB stick, with email or cloud storage backup to avoid last minute disasters.
When preparing the presentation, start with an opening slide containing the title of the study, your name, and the date. Begin by addressing and thanking the audience and the organisation that has invited you to speak. Typically, the format includes background, study aims, methodology, results, strengths and weaknesses of the study, and conclusions.
If the study takes a lecturing format, consider including “any questions?” on a slide before you conclude, which will allow the audience to remember the take home messages. Ideally, the audience should remember three of the main points from the presentation. 2
Have a maximum of four short points per slide. If you can display something as a diagram, video, or a graph, use this instead of text and talk around it.
Animation is available in both Microsoft PowerPoint and the Apple Mac Keynote programme, and its use in presentations has been demonstrated to assist in the retention and recall of facts. 3 Do not overuse it, though, as it could make you appear unprofessional. If you show a video or diagram don’t just sit back—use a laser pointer to explain what is happening.
Rehearse your presentation in front of at least one person. Request feedback and amend accordingly. If possible, practise in the venue itself so things will not be unfamiliar on the day. If you appear comfortable, the audience will feel comfortable. Ask colleagues and seniors what questions they would ask and prepare responses to these questions.
It is important to dress appropriately, stand up straight, and project your voice towards the back of the room. Practise using a microphone, or any other presentation aids, in advance. If you don’t have your own presenting style, think of the style of inspirational scientific speakers you have seen and imitate it.
Try to present slides at the rate of around one slide a minute. If you talk too much, you will lose your audience’s attention. The slides or videos should be an adjunct to your presentation, so do not hide behind them, and be proud of the work you are presenting. You should avoid reading the wording on the slides, but instead talk around the content on them.
Maintain eye contact with the audience and remember to smile and pause after each comment, giving your nerves time to settle. Speak slowly and concisely, highlighting key points.
Do not assume that the audience is completely familiar with the topic you are passionate about, but don’t patronise them either. Use every presentation as an opportunity to teach, even your seniors. The information you are presenting may be new to them, but it is always important to know your audience’s background. You can then ensure you do not patronise world experts.
To maintain the audience’s attention, vary the tone and inflection of your voice. If appropriate, use humour, though you should run any comments or jokes past others beforehand and make sure they are culturally appropriate. Check every now and again that the audience is following and offer them the opportunity to ask questions.
Finishing up is the most important part, as this is when you send your take home message with the audience. Slow down, even though time is important at this stage. Conclude with the three key points from the study and leave the slide up for a further few seconds. Do not ramble on. Give the audience a chance to digest the presentation. Conclude by acknowledging those who assisted you in the study, and thank the audience and organisation. If you are presenting in North America, it is usual practice to conclude with an image of the team. If you wish to show references, insert a text box on the appropriate slide with the primary author, year, and paper, although this is not always required.
Answering questions can often feel like the most daunting part, but don’t look upon this as negative. Assume that the audience has listened and is interested in your research. Listen carefully, and if you are unsure about what someone is saying, ask for the question to be rephrased. Thank the audience member for asking the question and keep responses brief and concise. If you are unsure of the answer you can say that the questioner has raised an interesting point that you will have to investigate further. Have someone in the audience who will write down the questions for you, and remember that this is effectively free peer review.
Be proud of your achievements and try to do justice to the work that you and the rest of your group have done. You deserve to be up on that stage, so show off what you have achieved.
Competing interests: We have read and understood the BMJ Group policy on declaration of interests and declare the following interests: None.
- ↵ Rovira A, Auger C, Naidich TP. How to prepare an oral presentation and a conference. Radiologica 2013 ; 55 (suppl 1): 2 -7S. OpenUrl
- ↵ Bourne PE. Ten simple rules for making good oral presentations. PLos Comput Biol 2007 ; 3 : e77 . OpenUrl PubMed
- ↵ Naqvi SH, Mobasher F, Afzal MA, Umair M, Kohli AN, Bukhari MH. Effectiveness of teaching methods in a medical institute: perceptions of medical students to teaching aids. J Pak Med Assoc 2013 ; 63 : 859 -64. OpenUrl
IMAGES
VIDEO
COMMENTS
In this article, we’ll highlight how to make a PowerPoint presentation from a research paper, and what to include (as well as what NOT to include). We’ll also touch on how to present a research paper at a conference.
Introduce the key studies (characters) relevant in your story and build tension and conflict with scholarly and data motive. By the end of your introduction, your audience should clearly understand your research question and be dying to know how you resolve the tension built through motive.
APA PowerPoint Slide Presentation. Note: This page reflects the latest version of the APA Publication Manual (i.e., APA 7), which released in October 2019. The equivalent resource for the older APA 6 style can be found here.
This guide provides a 4-step process for making a good scientific presentation: outlining the scientific narrative, preparing slide outlines, constructing slides, and practicing the talk. We give advice on how to make effective slides, including tips for text, graphics, and equations, and how to use rehearsals of your talk to refine your ...
The rules are broken into 3 primary areas. Rules 1 to 5 are about optimizing the scope of each slide. Rules 6 to 8 are about principles around designing elements of the slide. Rules 9 to 10 are about preparing for your presentation, with the slides as the central focus of that preparation.
Whether you’re pitching an idea, reporting market research, or sharing something else, a great presentation can give you a competitive advantage, and be a powerful tool when aiming to persuade ...
Creating a PowerPoint presentation for a research paper involves organizing and summarizing your key findings, methodology, and conclusions in a way that encourages your audience to interact with your work and share their interest in it with others.
Begin by addressing and thanking the audience and the organisation that has invited you to speak. Typically, the format includes background, study aims, methodology, results, strengths and weaknesses of the study, and conclusions.
Formatting a PowerPoint in APA Style. APA style for PowerPoints is similar to APA style for essays with a few exceptions. This resource will address common questions regarding citations within slides, citations for photos, the title slide, and the reference slide.
A strong presentation should thoroughly describe the relevance and validity of the study, offer a critique, suggest how further research might address the issue, and discuss the implications for patient care. Selecting the right article is crucial.