
Microsoft 365 Life Hacks > Presentations > How to password protect your PowerPoint presentations

How to password protect your PowerPoint presentations
Learn how to password protect a PowerPoint presentation and get additional tips for keeping your online files safe even as you share them with your colleagues and contributors.

As the most versatile and widely used presentation software, Microsoft PowerPoint presentations often contain valuable content that requires protection. From company earnings results to trade secrets, students’ projects, or the questions and answers to a quiz, it’s essential for PowerPoint users to safeguard their sensitive data and confidential information, so that they won’t be easily accessed by hackers or unauthorized parties in general.
Why should you add password protection to your PowerPoint files?
A password is the easiest way to add a layer of protection to any of your files, and it’s an effective deterrent to ward off those who aren’t supposed to access them. If you’re sharing sensitive information at your work, or delivering a confidential presentation, a password will reduce the chance of a data breach or the misuse of your presentation’s contents.

Tell your story with captivating presentations
Powerpoint empowers you to develop well-designed content across all your devices
There are many ways in which your files can fall into the wrong hands: whether you store them on a removable USB drive, which can be easily lost, or email an unencrypted file to a compromised account, adding a password adds an extra layer of security. If you’re sharing a PowerPoint presentation online with multiple collaborators, consider using secure cloud storage like Microsoft OneDrive .
By taking a few minutes to implement password protection, you gain peace of mind knowing that your data is safeguarded. Be sure to share your file access with only the people who are authorized to see it.
How to add a password to your PowerPoint presentation
Adding a password to protect your PowerPoint file is easy! Follow these steps to password protect your presentation :
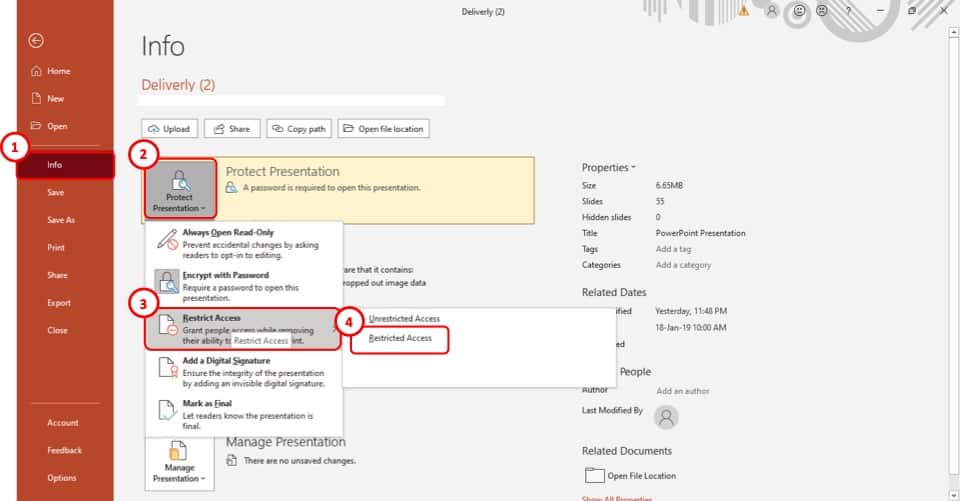
- Open your PowerPoint presentation and select File , then Info .
- Select Protect Presentation . Here, you have multiple options on who can access, view, or edit your presentation.
- Always Open Read-Only prevents viewers from accidentally making changes. Restrict Access allows you to select who can read, copy, or edit. Add a Digital Signature secures your file with proof that someone has opened it. Mark as Final lets your viewers know that they’re looking at the final draft of your presentation.
- To add a password, select Encrypt with Password , the second option in the drop-down menu.
- A dialog box will open. Enter your password and select OK .
Be sure to remember what your password is, as PowerPoint’s powerful encryption abilities will lock you out if you’re not able to remember your own password. You can use any word or combination of letters and numbers to secure your file and remember that all passwords are case-sensitive. When sharing your password-protected PowerPoint files via email, use encrypted emailing ( which Outlook offers ) for an added layer of security.
Taking a few moments to easily add this security layer can save you from unauthorized access and the potentially damaging impact of a data breach. Whether it’s a presentation in a corporate environment, an academic project, or some personal content, adding password protection ensures that your files will remain confidential and secure.
But don’t just stop there: PowerPoint’s advanced presentation features are effective for all subjects and audiences! If you’re looking to get the most out of conveying information, read these additional tips and tricks on how to ace your upcoming presentation , whether you’re looking to dazzle your audience , improving your public speaking skills , or you’re curious about the 30+year history of PowerPoint .
Get started with Microsoft 365
It’s the Office you know, plus the tools to help you work better together, so you can get more done—anytime, anywhere.
Topics in this article
More articles like this one.

How to introduce yourself in a presentation
Gain your audience’s attention at the onset of a presentation. Craft an impressionable introduction to establish tone, presentation topic, and more.

How to add citations to your presentation
Conduct research and appropriately credit work for your presentation. Understand the importance of citing sources and how to add them to your presentation.

How to work on a group presentation
Group presentations can go smoothly with these essential tips on how to deliver a compelling one.

How to create a sales presentation
Engage your audience and get them interested in your product with this guide to creating a sales presentation.
Everything you need to achieve more in less time
Get powerful productivity and security apps with Microsoft 365

Explore Other Categories
Critical PowerPoint Shortcuts – Claim Your FREE Training Module and Get Your Time Back!
How to Password Protect PowerPoint (Step-by-Step)
- PowerPoint Tutorials
- Shortcuts & Hacks
- February 27, 2019
Are you ready to learn how to password protect PowerPoint presentations so that others cannot edit or copy and paste your content?
Before you get started though, please remember this. If you forget the password you created in the steps below, you will not be able to recover your password, or unlock your presentation.
Now before password protect your presentation, it’s important to first understand the difference between the two types of Passwords you can use to protect your PowerPoint presentations.
Two Types of PowerPoint Passwords
PowerPoint has two different styles or types of passwords you can add to your presentation which determine what someone can and can’t do with your presentation.
While the difference between the two pop-up windows as you can see in the picture below appears small, the difference is big.

1. Password to Open
Adding a password to open forces you (or whoever opens your presentation) to input a password to be able to not only see but edit the content of your presentation.
If they do not know the correct (case-sensitive) password, they cannot open, review or modify your presentation in any way. Just keep in mind that there is NO WAY to recover a forgotten password.
So if you password protect your presentation AND forget your password, you too will not be able to open or edit your presentation.
2. Password to Modify
Adding a password to Modify gives your clients and colleagues two different ways to access your presentation.
- They can enter the correct password and get full editing rights to your document (just like a normal presentation).
- They can choose to open your file in a Read-Only format, allowing them to view (but not edit) your PowerPoint presentation.
To give someone the Read-Only option pictured below to access your presentation, you must use the password to Modify option.

In the Read-Only version of your presentation, people can still print, save your file as a PDF and run your presentation in the Slideshow modes. To see all the slideshow shortcuts and techniques, check out our ultimate slideshow guide here.
On top of that, all of your PowerPoint animations, effects, hyperlinks, etc. will still work in the Read-Only version of your document. But other than reviewing your document, people will NOT be able to edit, modify or copy and paste any of your content.
How to add a password to PowerPoint
To password protect your PowerPoint presentation using either the Password to Open or Password to Modify options, follow the steps below.
1. Open the PowerPoint presentation you want to password protect
The only way to add a password to a specific presentation is from within the presentation itself. So as a first step, find and open the presentation that you want to password-protect.
As a best practice, I recommend creating a non-password-protected copy of your presentation and saving it on your computer. That way if you forget your password, you can always open the non-password-protected version on your computer.
To create a copy of your presentation, simply Ctrl + C to copy and Ctrl + V to paste it inside a File Explorer window.

2. Open the Save As dialog box

The FASTEST way to access the Save As dialog box from within PowerPoint is using your keyboard shortcuts. You can use either of the two keyboard shortcuts (whichever is easier for you to remember):
- F12 for Save As
- Ctrl + Shift + S for Save As
If you hit F12 and nothing happens, that means that your function keys are reversed. In this case, try adding the Function key to the sequence: Fn + F12 .
3. Open the Tools dropdown

Inside the Save As dialog box, open the Tools dropdown (it is right next to the Save button as pictured above).
Note : The Save As dialog box is also the trick to converting PowerPoint to PDF .
4. Select General Options

Inside the Tools dropdown, select General Options . This is where you can add/remove passwords to your PowerPoint presentations.
5. Enter your password (Open or Modify)

Inside the General Options dialog box, decide which type of password to add to your presentation (see my explanation of both types at the top of this page).
Your two options are:
- Password to Open
- Password to Modify
To get started, simply click into the input box for the type of password you want to protect PowerPoint with (Open or Modify) and type your password.
Remember too that passwords are case-sensitive, so be careful you don’t have the Caps Lock key on when you enter your password. Thankfully, you get the chance to confirm your password in the next step.
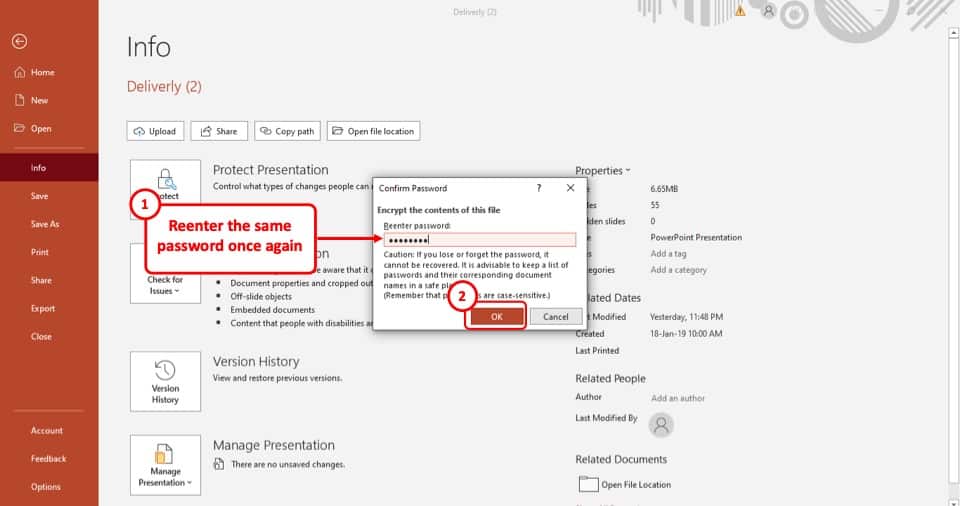
6. Confirm your Password

This is your chance to confirm you have typed the correct password for your presentation. As there is no way to view the password you have typed, I recommend taking care here to make sure you type what you think you typed.
If you make a mistake and the two passwords are not the same, you get the following error notification.

Clicking OK , you can either re-type your password correctly or select Cancel to exit out of the Confirm Password dialog box.
PowerPoint will not allow you to add a password to your presentation unless you can first confirm your password.
7. Rename your Presentation (Recommended)

While renaming your password-protected presentation is optional, to me this is a critical best practice.
I personally like to add “- with Password” or “PW” or “Password to Open” to identify the document as having a password. This also helps you distinguish it from your original (non-password protected) document that you hopefully saved in step #1 above.
In this step, you can also choose where to save your password-protected document on your computer by navigating between your folders.
8. Save and Close your document

Once you have selected a location on your computer to save your password-protected presentation, click Save and then close out of your document to trigger the password.
As long as you have your document open, you will not need to enter the password to open it (as it is already open). Closing the document triggers the password gate to close, requiring a password to open it again.
9. Double-check your password works properly

Before you send off your document as final, double-check that your password properly works. This is especially important if you created a non-password-protected version of your presentation, to make sure you are working with the correct file.
Find your protected presentation on your computer and double-click it to open it up. If the document immediately opens without asking you to enter a password, it means that:
- You selected the non-password-protected version of your document
- You never closed your PowerPoint presentation after adding your password (see step #8 above)
- You made a mistake somewhere along the way and should start over
Either way, double-checking this now will save you from accidentally sending your client the wrong file.
Once your password is properly added to your presentation, opening the document forces you to enter a password to continue. Once you see the dialog box, try entering your password to make sure you have the right one.
How to remove a password from PowerPoint
Tired of always having to enter in a password to edit your presentation? Well, let’s look at how to remove a password from your presentation.
For example, you added a password to your presentation to work with a specific client, and now that project is over. So you want to remove the password so you and your team can access it without always having to enter a password.
Removing a password is very similar to adding a password. Simply follow these steps.
1. Find and open the password-protected presentation

The only way to remove a password from PowerPoint is from within the password-protected presentation.
Navigate to the file on your computer, and double-click it to open it. If a dialog box does not pop open asking you for a password to continue, it means one of two things:
- You have selected the wrong presentation
- Your presentation is not password-protected
Notice how easy it is to see which presentation is password-protected in the picture above? That is why I recommend adding a qualifier in the name of any PowerPoint presentation you password protect.
2. Enter the correct password and click OK

Regardless of whether you have a Password to Open or a Password to Modify, enter the correct password and click OK to get full editing rights to your document.
You cannot remove a password in the Read-Only version of PowerPoint that you can access with the Password to Modify .
If you do not know the password to the presentation, you cannot remove the password from the document (sorry). This is why I recommend saving a non-password-protected version of your file first.
3. Open the Save As dialog box

Once you have successfully opened the password-protected presentation, now you can remove the password. To get started, hit F12 or Ctrl + Shift + S to open the Save As dialog box.
4. Open the Tools dropdown
Inside the Save As dialog box, click to open the Tools dropdown.

5. Select General Options
Inside the Tools dropdown, select General Options to remove the password from your presentation.

6. Select and delete the password
Depending on what type of password was added to your presentation, you should see a sequence of circles or asterisks marks in either the Password to Open or Password to Modify option as pictured below.

Simply select the password in the dialog box and hit either Delete or Backspace on your keyboard.
Two things you cannot do in this dialog box are:
- You cannot view the password. So if you open a password-protected presentation on your computer, your colleague cannot sneak a peek at the password when you are not looking.
- You cannot password-protect your presentation with both types of passwords. You will either have a Password to open or a Password to modify , never both (it is impossible).
7. Click OK and then Save
After deleting the password, click OK and then click Save .
This saves your presentation without the password, allowing you to open the file without having to use a password in the future. If you like, you can also choose to rename your file now that it is no longer password-protected.
8. Double-check the password is removed
Before you forget, double-check that the password has been removed from your presentation.
Close your PowerPoint presentation (Ctrl + W on your keyboard) and then reopen. If you are again asked to enter a password to open or modify the presentation then something went wrong along the way.
If this happens to you, don’t sweat it. It is better to figure this out now (and fix the problem) rather than having your client or colleague email you about the issue.
PowerPoint Password Tips
I cannot stress this enough, DO NOT forget your password.
A number of people have asked whether it is possible to recover a password they have forgotten. Unfortunately, there is no way to retrieve a forgotten password like this that I know of.
This is why I recommend saving a copy of your original presentation (a non-password protected version) before adding a password to it. That way if you forget your password, you can always go back to the original (non-password protected) document, without having to recreate the wheel.
A few additional PowerPoint password tips are:
Tip #1. Passwords are case sensitive, so watch out for upper case letters.
That means that locking PowerPoint with the uppercase password ‘OPEN SESAME’ is treated differently than the lowercase password ‘open sesame.’
Tip #2. Make your passwords easy to remember
One way to make your passwords easy to remember is to either reference the client’s name in the password or just used the first four letters of the document.
An example using the client’s name could be m icrosoft open (I recommend using lower-case) if your client is Microsoft
An example using the first four letters for a file called “Quarterly Report” would be quar open (again making it all lower case so it is easier to remember).
Tip #3. Don’t use the same password for all of your presentations
Just like you shouldn’t use the same password for all your personal things, you don’t want to use the same password to open all of your presentations. That is because if someone figures that out, they will be able to open all of your password-protected presentations.
Tip #4. Develop a naming convention that makes sense for you
For help developing a naming convention for your passwords so they are always easy to remember, check out the following tips by GrowMap here .
Now you know how to both add and remove passwords to your PowerPoint presentations.
Two important things to remember about password protecting your presentations are:
#1. Most people are not familiar with having to add a password to open a presentation. So, if your password-protect your presentation, warn your clients and colleagues in advance.
#2. There is no way to recover your password if you forget it. So, use an easy to remember password, write it down and better yet, save a non-password-protected version of your presentation that you can always refer to it if necessary.
If you enjoyed this article and want to learn more about our PowerPoint training products and services, visit us here .
What’s Next?
Related articles, about the author.

This Post Has 2 Comments

Thanks for the article! So there is no way to recover the password? I had this problem once and tried googling for it, there are a lot of sites that claim it’s possible. Fortunately it was just an edit password and a simple ppt, so ended up making a new presentation with the same text and pictures.

To my knowledge, there is no way to recover a password. That is why I recommend saving a copy of your presentation without a password before adding one. Sorry I don’t have a better answer for you.
Comments are closed.
Popular Tutorials
- How to Strikethrough Text (l̶i̶k̶e̶ ̶t̶h̶i̶s̶) in Word, Excel & PowerPoint
- How to Make Animated Fireworks in PowerPoint (Step-by-Step)
- Strikethrough Shortcut (l̶i̶k̶e̶ ̶t̶h̶i̶s̶) for Word, Excel & PowerPoint
- How to Create a Flash Card Memory Game in PowerPoint (Like Jeopardy)
- Keyboard Shortcuts Not Working: Solved
PowerPoint Tutorial Categories
- Strategies & Opinions
- Presentation Design
- Pictures, Icons, Videos, Etc.
- New Features
- Miscellaneous
- Charts & Data Viz
We help busy professionals save hours and gain peace of mind, with corporate workshops, self-paced courses and tutorials for PowerPoint and Word.
Work With Us
- Corporate Training
- Presentation & Template Design
- Courses & Downloads
- PowerPoint Articles
- Word Articles
- Productivity Resources
Find a Tutorial
- Free Training
- For Businesses
We help busy office workers save hours and gain peace of mind, with tips, training and tutorials for Microsoft PowerPoint and Word.
Master Critical PowerPoint Shortcuts – Secure Your FREE Training Module and Save Valuable Time!
⌛ Master time-saving expert techniques.
🔥 Create powerful presentations.
🚀 Propel your career to new heights.
We value your privacy – we keep your info safe.
Discover PowerPoint Hacks Loved by Industry Giants - KKR, AmEx, HSBC!
Over 114,880 professionals in finance, marketing and sales have revolutionized their PPT skills with our proven methods.
Gain FREE access to a full module of our premium PowerPoint training program – Get started today!
We hate spam too and promise to keep your information safe.
You are currently viewing a placeholder content from Facebook . To access the actual content, click the button below. Please note that doing so will share data with third-party providers.
How To Password Protect PowerPoint
When we say PowerPoint presentation, we normally think of presenting our slides in front of a room full of people. But what if you only want a select few to have access to your file?
What if you’re presenting sensitive information to, say for example, a high-value client or your company’s board of directors, and you want to keep your presentation safe from prying eyes?
The best way to secure your super-secret or private PowerPoint file is by password protecting it. This means that only you, and the people you share the password with, will have access to the file.
This is precisely what you’re going to learn in this article today – you’re going to learn not just how to password protect your PowerPoint, but also to delete the password when you no longer need to protect your file. Let’s begin!
How To Password Protect PowerPoint Files
- On the PowerPoint ribbon, click on File .

- In the Info section, click on the first option, Protect Presentation . Then choose Encrypt with Password .

- You’ll then see the Encrypt Document pop-up:

- The next step for you to do is to type in the password you’d like to assign for your PowerPoint file and click on the OK button. Remember: Keep your password in a safe place as losing or forgetting it will mean permanent loss of access to your encrypted file!
- After you’ve typed your password, PowerPoint will ask you to confirm and re-enter your password. Hit OK again.

Note that if you type in an incorrect password, you’ll get the following error message:

- When you’ve successfully confirmed your password, you will notice that the Protect Presentation icon has changed and you will see the message “ A password is required to open this presentation. ”

- The next time you open your password-protected PowerPoint file, you’ll be asked to enter the password:

- Simply type your password, click OK, and you’re good to go!
Now that you know how to password protect your PowerPoint file, it’s time to learn how to disable password protection for when you no longer need to protect your file.
How To Disable Password Protection In PowerPoint
Disabling password protection in PowerPoint is a simple affair. You’d simply need to reverse the steps we took in the first part of this article and delete the password you’ve previously nominated. Here’s how you do it:
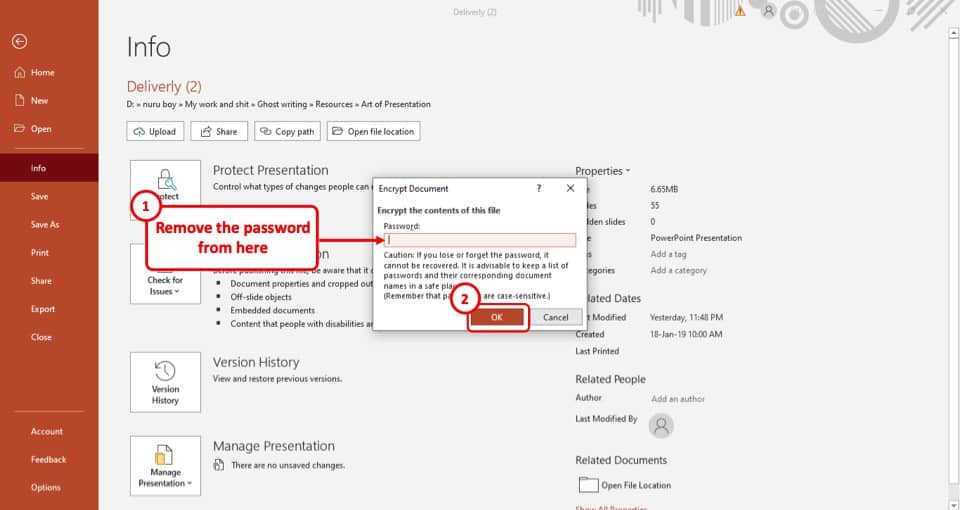
- Go to the File menu, click on Info > Protect Presentation > Encrypt with Password .

- When the Encrypt Document pop-up appears, you will see your old password in the password box. All you have to do is just DELETE the password, then hit OK .

- That’s it! Your PowerPoint file will no longer be password protected.
Other Ways To Protect Your PowerPoint File
Password protection is not the only way to protect your PowerPoint file. If you go to File > Info > Protect Presentation , you will see 4 different options. We’ve already covered the Encrypt With Password option in the first section so we will only cover the remaining 3 methods:
Mark as Final
Choose this option if you want to let other people know the file is the final version. This makes the file a read-only file which means other people can’t edit the file.

You will see this dialog box when you choose to mark a PowerPoint file as Final.

When you click OK, you’ll be able to have access to the file, but a yellow bar will appear at the top, like this:

If you click on Edit Anyway , the file will no longer be the final version. If you want to make the edited file the final version, you can go through the same steps and select Mark as Final again.
Restrict Access
You can specify who gets to have access to your PowerPoint file. To enable this, you need to have Windows Rights Management installed on your computer.

If you don’t have Windows Rights Management installed, you’ll get this error message:

Add a Digital Signature
You can use this option to add a visible or invisible digital signature .

If you don’t have a digital ID, you’ll get this prompt asking you to get a digital ID. Click on Yes if you’d like to get one.

For more information about digital ID or digital certificate services, read this page to know more.
Final Words
Keeping important files safe is very important. In this article, you learned not just how to password protect PowerPoint files, but you also learned other methods as well. The next time you’re working on a top-secret presentation, remember to set a secure password and keep it in a safe location.
You might also find this interesting: How To Design Custom Slides For Your Business PowerPoint Presentation
Create professional presentations online
Other people also read

Tutorial: Save your PowerPoint as a Video

How To Convert Google Slides To PowerPoint and Vice Versa

How To Add Animations To PowerPoint
Byte Bite Bit
How to Password Protect a PowerPoint: Step-by-Step Guide for Secure Presentations
When it comes to protecting our hard work and sensitive information within our PowerPoint presentations, adding a password is a no-brainer. Imagine preparing a crucial business proposal or a personal project that you’d rather keep away from prying eyes— setting a password can be a lifesaver . By utilizing Microsoft Office’s built-in features, we can add an extra layer of security to our presentations without breaking a sweat.

The process is surprisingly simple and highly effective. Navigating through PowerPoint’s settings, we can encrypt our presentations and ensure that only authorized individuals have access. This not only safeguards our content from unauthorized edits but also from unwanted distribution. Remember, peace of mind is just a few clicks away.
Various methods, such as marking the presentation as final or restricting editing permissions, complement password protection. These steps help us meticulously control how our presentations are accessed and modified, enhancing overall security. So, let’s dive in and explore how we can swiftly secure our PowerPoint presentations, giving us the confidence to share our work without worries.
- 1.1 Understanding the Importance of Passwords
- 1.2 Accessing General Options to Encrypt with Password
- 1.3 Creating a Strong and Secure Password
- 2.1 How to Effectively Lock and Unlock Slides
- 2.2 Forgetting Your Password: Recovery Tips
- 2.3 Editing and Read-Only Options for Collaboration
- 3.1 Digital Signatures and Their Role
- 3.2 Mark as Final: Preventing Unauthorized Edits
- 3.3 Control Access Through Encryption Technologies
- 4 Conclusion
Setting Up Password Protection in PowerPoint
Password protecting a PowerPoint presentation is essential for safeguarding your content, especially when dealing with sensitive or confidential information. We will guide you through why passwords are vital, how to access the encryption options and tips for setting a secure password.
Understanding the Importance of Passwords
Passwords act as the first line of defense against unauthorized access. By adding a password to your PowerPoint, you protect your data from prying eyes.
Consider the risks of leaving your presentations unprotected, such as data breaches or intellectual property theft. In professional environments, especially, ensuring that only intended recipients access your content is critical.
We must prioritize encryption to enhance security further, reflecting how seriously we take data protection.
Accessing General Options to Encrypt with Password
To add a password to your PowerPoint, follow these simple steps.
First, open the presentation you want to secure. Click on the File tab in the ribbon. This takes you to the backstage view.
Next, navigate to the Info section. Here, select Protect Presentation and choose Encrypt with Password .
A dialog box will prompt you to enter a password. After typing it, you will need to confirm it to ensure there are no mistakes.
Creating a Strong and Secure Password
Creating a strong password is crucial for effective protection. Avoid simple or common passwords as they are easy to guess.
Make sure to use a mix of uppercase letters, lowercase letters, numbers, and special characters . For example, instead of “password123”, something like “$ecuR3_P@ssw0rd!” is much harder to crack.
Also, ensure your password is at least 12 characters long. The longer and more complex it is, the better.
Keep your password stored in a secure place, as forgetting it can lock you out of your presentation permanently. Programs like password managers can help keep track of your passwords securely and efficiently.
Using these steps, we can significantly enhance the security of our presentations and protect our valuable information from unwanted access.
Managing Your Protected Presentation
Managing your protected PowerPoint presentation involves locking and unlocking slides, recovering forgotten passwords, and setting up editing permission for collaborative work. Knowing these steps ensures your content remains secure and accessible.
How to Effectively Lock and Unlock Slides
When we lock slides , we prevent unauthorized access and changes. To do this:
- Navigate to File > Info .
- Select Protect Presentation .
- Choose Encrypt with Password .
- Enter a strong password and confirm it.
To unlock ,:
- Open the presentation and input the password when prompted.
It’s like locking and unlocking a digital filing cabinet. Secure your content but also remember those passwords!
Forgetting Your Password: Recovery Tips
Forgetting a password can be worrisome. Unfortunately, if we forget a PowerPoint password, Microsoft doesn’t offer a straightforward recovery option. Here are some tips:
- Use password management tools to store and retrieve passwords.
- Try guessing common passwords you might have used.
- Check for any backup versions of your presentation.
Password recovery software can sometimes help, but be cautious to avoid compromising the file.
Editing and Read-Only Options for Collaboration
Balancing security and collaboration is crucial. PowerPoint provides:
Read-Only Access : Others can view but not edit your presentation. Navigate to File > Info > Protect Presentation > Always Open Read-Only .
To grant edit permissions :
- Share the file and set access levels via OneDrive or SharePoint.
These options help maintain control while allowing others to contribute. By effectively managing these settings, we ensure our collaborations are both productive and secure.
Enhancing Presentation Security
Securing your PowerPoint presentation goes beyond just adding a password. We cover digital signatures, marking files as final to prevent edits, and utilizing encryption for control over access.
Digital Signatures and Their Role
A digital signature serves as an electronic fingerprint, verifying the document’s authenticity and integrity. By attaching a digital signature, we ensure the recipient can confirm the author and that the content has not been altered since the signature was applied.
Steps to Add a Digital Signature:
- Open your PowerPoint file.
- Go to the File tab.
- Select Info > Protect Presentation .
- Choose Add a Digital Signature .
Digital signatures use encryption based on public-key infrastructure (PKI), offering strong protection against tampering.
Mark as Final: Preventing Unauthorized Edits
Marking a presentation as final locks it from further edits, signaling to viewers that the file is complete. This feature reduces the risk of accidental or unauthorized modifications.
How to Mark a Presentation as Final:
- Go to File .
- Navigate to Info .
- Select Protect Presentation > Mark as Final .
- Confirm the action.
When marked as final, PowerPoint notifies users with a message, disallowing further changes unless they actively choose to edit.
Control Access Through Encryption Technologies
Encryption ensures that only those with the correct password can open or modify the presentation. This method is effective for safeguarding sensitive information.
Steps for Encrypting a Presentation:
- Open your presentation.
- Click on File .
- Select Info > Protect Presentation > Encrypt with Password .
- Enter and confirm a strong password.
Make your password robust by using a mix of uppercase, lowercase letters, numbers, and special characters. This adds a layer of security by preventing unauthorized access even if the file is shared inadvertently.
| File > Info > Protect Presentation > Add Digital Signature | ||
| File > Info > Protect Presentation > Mark as Final | ||
| File > Info > Protect Presentation > Encrypt with Password |
Protecting our PowerPoint presentations with a password is a crucial step toward ensuring their security. Imagine spending hours crafting the perfect slide deck, only for it to be accessed or altered by unauthorized individuals. By following the simple steps outlined:
- Opening the presentation : We start by opening the file we want to protect.
- Navigating to the Info section : Click on File , then Info .
- Selecting Protect Presentation : Choose the Protect Presentation option.
- Encrypting with a Password : Select Encrypt with Password , enter a secure password, and confirm it.
This method helps us control who can access, modify, or view our slides. It’s like putting a lock on our front door, ensuring only those with the key can enter.
We should also take extra care in choosing a strong and unique password. Avoid common phrases or easily guessable passwords – aim for a mix of letters, numbers, and special characters.
Creating secure PowerPoint templates and slide decks is not just about aesthetics and functionality. Security adds an essential layer that keeps our work safe. Imagine presenting sensitive information to a client without any worry about unauthorized access. It gives us peace of mind and lets us focus on delivering impactful presentations.
In the fast-paced world of business and education, the value of our presentations can’t be overstated. They hold our ideas, strategies, and knowledge. Protecting them is not just an option; it’s a necessity.
Related posts:
- How to Do Hanging Indent on PowerPoint: Step-by-Step Formatting Guide
- How to Embed a YouTube Video in PowerPoint: Step-by-Step Guide
- How to Add a Video to PowerPoint: Step-by-Step Tutorial
- How to Add Speaker Notes in PowerPoint for Effective Presentations
- How to Add Music to PowerPoint: A Step-by-Step Guide for Seamless Presentations
- How to Curve Text in PowerPoint: Step-by-Step Guide
- How to Record a PowerPoint Presentation: Step-by-Step Guide for Professionals
- How to Crop a Picture into a Circle in PowerPoint: A Step-by-Step Guide
- How to Copy a Slide from One PowerPoint to Another: A Step-by-Step Guide
- How to Save PowerPoint as Video: Step-by-Step Guide for Beginners
- How to Make a Picture a Circle in PowerPoint: Step-by-Step Guide
- How to Print Notes in PowerPoint: A Step-by-Step Guide
Leave a Comment Cancel reply
Save my name, email, and website in this browser for the next time I comment.
7 Ways to Protect PowerPoint Presentation from Editing!
By: Author Shrot Katewa

Isn’t it annoying when you spend hours and hours creating a visually appealing presentation and do all the hard work, only to find out that your colleague or your manager has made changes to the presentation!
Intentional or not, now you’ve got to make the changes to your presentation again; some of which could have been easily avoided if you were able to prevent the presentation file from editing.
Here’s how to protect a PowerPoint presentation file –
- Mark the presentation as “Final”
- Restrict permission to PowerPoint
- Save the presentation as a PowerPoint Show file
- Set a password to modify PowerPoint
- Convert PowerPoint to pictures
- Convert PowerPoint to a PDF
- Convert PowerPoint to a video
There are many applications of knowing how to protect your PowerPoint presentation.
So, in this article, let’s understand the 7 different ways to protect PowerPoint in further detail such that you can ensure that the person you are sharing your presentation with, will not be able to make changes to it.
Let’s get started!
1. How to Protect PowerPoint presentation from Editing?
We shall divide the 7 ways into two groups –
- Prevent PowerPoint file from editing
- Convert PowerPoint to make it uneditable
Prevent PowerPoint File from Editing
There are actually 4 ways in which you can prevent users from editing your PowerPoint presentation.
You can either mark the presentation as final, restrict the presentation by allowing access to specific users, save the presentation as a PPS file or set a password for your presentation.
All the 4 methods and the process to use them are explained elaborately in the following section –
Method 1 – Mark the Presentation as Final
By marking the PowerPoint presentation as final, the PowerPoint file will become “Read-only” .
Although this method doesn’t restrict people from editing your file. However, they will not be able to save changes to the original file. When using this method, PowerPoint will force users to save another copy of the presentation file; thereby protecting your presentation.
This method is especially helpful when you share the presentation over the same network within your organization or even when the presentation is saved on a cloud. It is also helpful when more than one person is working on the same presentation.
It is not a perfect fix, but a quick fix to the problem for sure.
The process of marking your PowerPoint presentation as final is given below –
Step-1: Click on the “File” tab
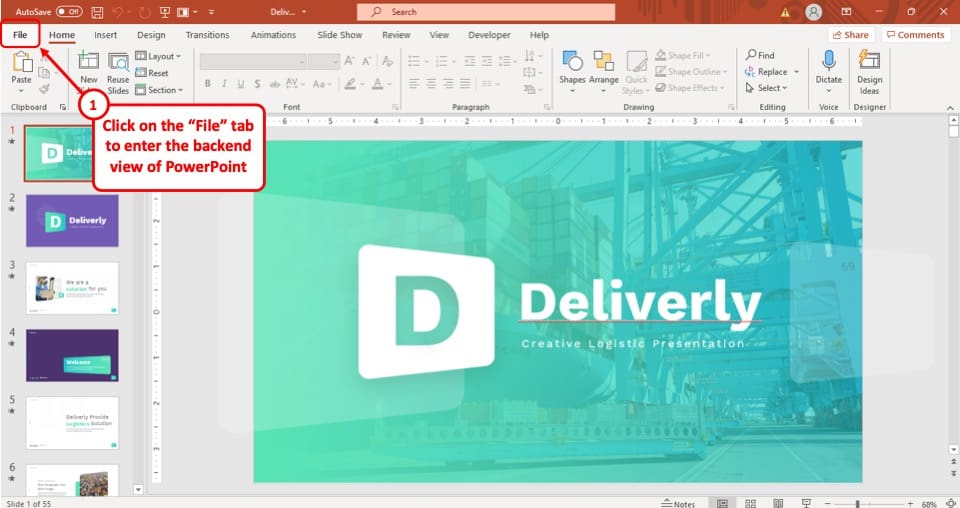
The first step of the process is to click on the “ File ” tab, which is the first option in the ribbon of your PowerPoint presentation. This will take you to the backend view of the PowerPoint.
Step-2: Select the “Info” option
After you have accessed the “ File ” tab, select the “ Info ” option which is the 4 th option in the tab. This will take you to a new page in the “ File ” tab.
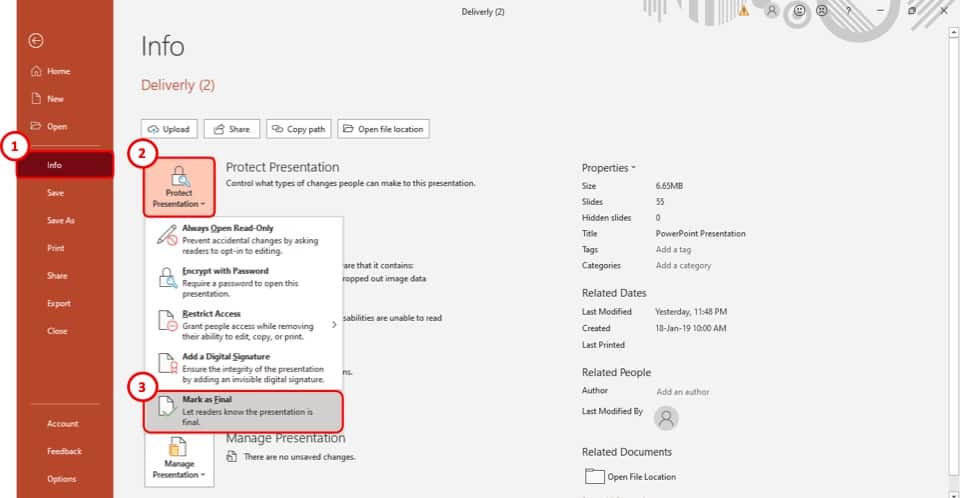
Step-3: Select the “Protect Presentation” option
The third step is to select the “ Protect Presentation ” option in the “ Info ” section (as shown in the image in step 2). It is the first of the four boxes on the “ Info ” page.
After you click on the “ Protect Presentation ” option, a drop-down menu will appear on your screen.
Step-4: Click on “Mark as Final”
From the drop-down menu, select the “ Mark as Final ” option. It is located at the very bottom of the dropdown menu (as shown in the image in step 2).
Step-5: Hit the “OK” button
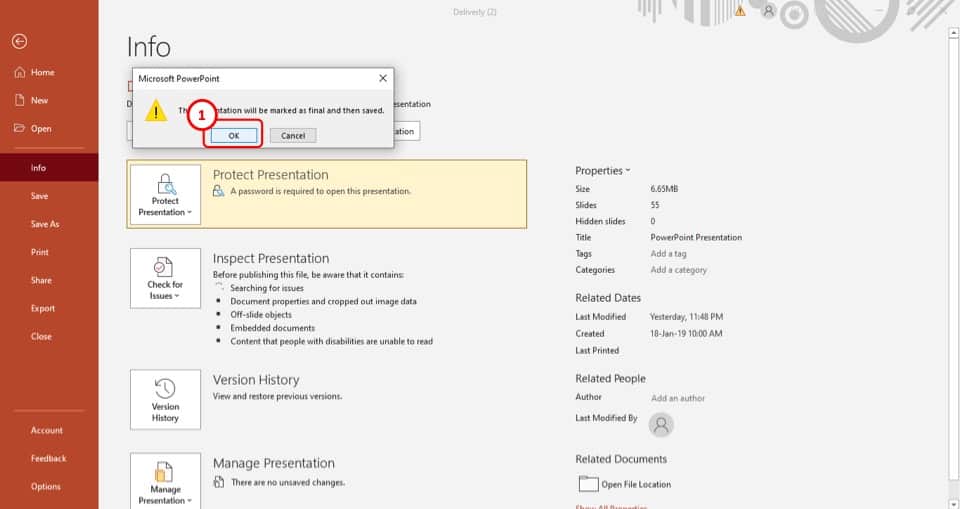
After you click on the “ Mark as Final ” option, a pop-up window will appear on your screen.
Simply click on the “ O K” button and the presentation will be saved as final. Once your presentation is “Saved as Final”, you won’t be able to edit this presentation going forward.
Thus, I recommend that you make this change once you’ve finished your presentation.
Method 2 – Restrict Permission
The next method is to restrict the permissions to edit a PowerPoint presentation.
In my opinion, this is one of the best ways to protect a PowerPoint presentation and to prevent users from editing the PowerPoint file!
By restricting permission, you will be able to allow specific users to access your PowerPoint presentation.
To use this feature in your presentation, follow step-1 through step-3 from the previous section and then follow the easy steps described below.
The first step is to click on the “ File ” tab to enter the backend view of your PowerPoint presentation.
Step-2: Click on the “Info” option
Now, click on the “Info” tab from the options in the left part of your screen.
Step-3: Select the “Restricted Access” option
The next step is to select the “ Restrict Access ” option from the drop-down menu of the “ Protect Presentation ” option. It is the 3 rd option in the drop-down menu (as shown in the image in step 2)
Once you click on the “ Restrict Access ” option, another drop-down menu will appear on your screen. Select the “ Restricted Access ” option which is the second option in the menu.
Step-4: Click on the checkbox

After you click on the “ Restricted Access ” option, a pop-up window will appear on your screen.
From the pop-up window, click on the “ Restrict permission to this presentation ” checkbox. It is located at the top of the pop-up window.
Step-5: Add the email address of the users
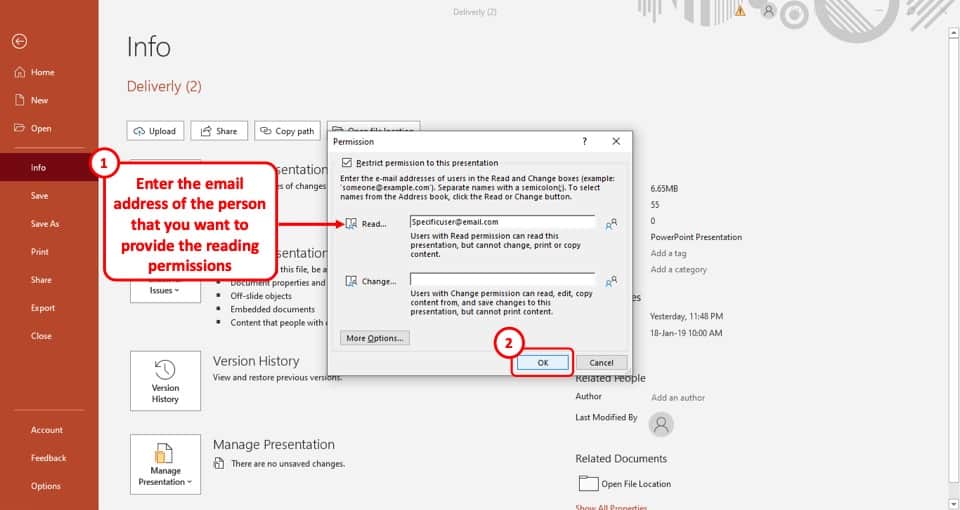
In the final step, all you have to do is type in the email addresses of the users with whom you want to share the presentation, in the “ Read ” option.
This will ensure that the users can only view the presentation file and not edit it. After that just click on the “ OK ” button located in the bottom right of the pop-up window.
Now, only the specified users will get permission to view the PowerPoint presentation.
Method 3 – Save the Presentation as a PPS file
Another method to prevent your PowerPoint presentation from editing and thus protecting it is to save the presentation as a PowerPoint Show file or a PPS file.
Saving a presentation as a PPS or PPSX will open the file directly in the presentation show mode when you open the file. Furthermore, when you exit the presentation show mode, the file will close and the user will not be able to access the content on the slides.
To save the presentation as a PPSX file, simply use the file “ Save As ” option, and choose the “ PPS ” file format from the “ File Format ” option.
I’ve written a detailed article on how to use the PPSX file in PowerPoint . If you need the step-by-step guide for the process, click on the link and check out the article for detailed guidance!
Method 4 – Set a Password to Modify PowerPoint
You can also set a password in order to prevent users from modifying a PowerPoint presentation. This method will prompt a password before opening a presentation.
Although this method will not help if you want to prevent people from editing the file as you will need to provide the password even to view the file. And, once the password is entered, the users will be able to make the changes.
However, this method is super helpful when you want to protect a PowerPoint presentation and prevent it from being access by unintended users.
To set a password to modify your PowerPoint presentation, follow the easy steps given below –
As before, click on the “ File ” tab in PowerPoint. This will open the backend view in PowerPoint from where you can enable additional settings.
Step-2: Select the “Encrypt with Password” option
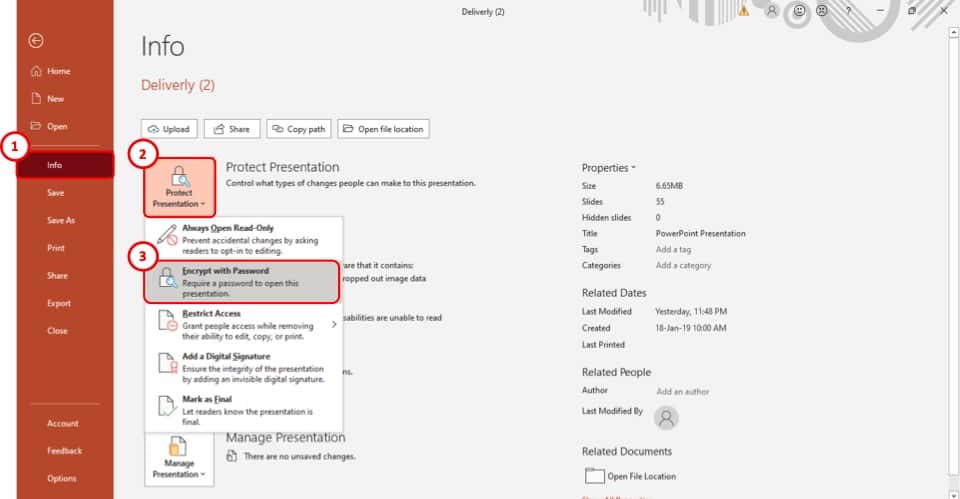
The first step is to select the “ Encrypt with Password ” option from the drop-down menu. It is the 2 nd option on the menu.
Step-3: Enter your preferred password
After you select the “ Encrypt with Password ” option, a pop-up window will appear on your screen. In that pop-up window, type in your preferred password in the “ Password ” box. After that, click on the “ Ok ” button.
Once you click on the “ OK ” button, you will be taken to a new page in the pop-up window.
Step-4: Re-enter the password
Now, all you have to do is to re-enter the password on this page and then select the “ OK ” button again.
Once done, your PowerPoint presentation will be password protected and users will have to enter the password to access your PowerPoint presentation.
Make PowerPoint Uneditable Permanently?
In the 4 methods described above, you will be able to prevent or protect your PowerPoint presentation file. More importantly, you will be able to share the PowerPoint presentation with the intended users.
However, if sharing a PowerPoint file is not important, there are other ways in which you can protect your presentation and prevent it from being edited further!
Interestingly, the methods described below will allow you to make a copy of your presentation and make it completely uneditable!
There are 3 ways in which you can make your PowerPoint presentation uneditable permanently.
You can either convert the presentation into a picture or convert it into a PDF file or you can convert it into a video. Let’s take a look at the 3 methods below –
Method 1 – Convert PowerPoint to Picture
The first way to protect your PowerPoint presentation is to convert it to pictures.
To convert your PowerPoint presentation as a picture, you will have to use the “ Save As ” option from the “ File ” tab. Simply choose a picture file format from the “ File Type ” options in the “save as” window.
If you need further guidance on how to carry out this process, check out my other article on how to save PowerPoint as an image for full details.
Method 2 – Convert PowerPoint to a PDF
You can also convert your PowerPoint file to a PDF. This is actually one of the most common methods used when you want to prevent your client or colleague from editing the presentation.
The advantage to save PowerPoint as a PDF over saving it as an image is that when you save your PowerPoint presentation as a PDF file, it is saved all the slides in one file just as the case would be in a presentation.
However, when you save a presentation as a Picture, the slides usually get saved as individual images.
Although the process to save a PowerPoint as a PDF is quite similar to that of saving it as an image, but if you are unsure how to do this, check out our other article on how to convert PowerPoint as PDF that details the process in an easy manner!
Method 3 – Convert PowerPoint to a Video
You can also convert your PowerPoint to a Video in order to protect your PowerPoint file!
If you have a lot of animations in your presentation, and you want to retain the animations when you show it to your colleagues or the audience, but you don’t want them to edit the file, then you can convert the presentation to a video format.
This will allow you to retain the animations, and make the presentation uneditable.
Converting a PowerPoint to a video requires you to use the “ Save As ” function. However, there are a few additional things that you may need to keep in mind.
Check out our article on how to convert PowerPoint to Video for a full guide with helpful tips.
2. How to Password Protect a PowerPoint Presentation from Opening?
You can set a password that users will have to enter before they can access your PowerPoint presentation.
The process to password protect a PowerPoint presentation is elaborately explained in method 4 of the previous section of this article. Simply follow the steps explained in the earlier section and you will be able to add a password to your PowerPoint file.
3. How to Remove Password from a PowerPoint Presentation?
The process of removing the password from a PowerPoint file is quite straightforward. However, it is important to know the password in order to change or remove the password protection in PowerPoint.
Let’s take a look at how to remove a password from a protected PowerPoint presentation –
3a. If You Know the Password
If you remember the password to your PowerPoint presentation, open the PowerPoint file, go to the “ Encrypt Presentation ” option in the “Info” section of the “ File ” tab and follow the steps given below.
Step-1: Open the “Encrypt Password” option
The first step is to click on the “ File ” tab. Then, from the backend view, click on the “ Info ” option.
Next, click on the “ Protect Presentation ” option, and from the dropdown, select the “ Encrypt with Password ” option.
Step-2: Clear the Password from the box
Once you’ve clicked on the “ Encrypt Presentation ” option, clear the password from the “ Password ” box.
After you’ve cleared the password, simply hit the “ OK ” button, located at the bottom right corner of the pop-up window and the password will be removed immediately.
3b. If You Forget the Password
Unfortunately, there is no direct way of removing a password from your PowerPoint file.
To do this, you will have to use third-party software that will unlock the encrypted PowerPoint file for you.
The software that we would recommend is “iSunshare” . It is free to use, and you will be able to unlock more than just PPT files. To download the software from their website, click here .
Credit to cookie_studio (on Freepik) for the featured image of this article (further edited).
PowerPoint Ninja
The PowerPoint Ninja Blog covers practical PowerPoint topics, tips, and tricks.
- Bullet Point Therapy
- Design Tips
- PowerPoint 2007
- PowerPoint 2010
- Presentation Books
- Presentation Delivery
- Presentation Planning
- January 2013
- October 2012
- February 2012
- December 2011
- November 2011
- February 2011
May 09 2009
Password Protect Your PowerPoint Slides

The Dharma Initiative might want to mix up their passwords for their top secret PPT presentations.
If you share your PowerPoint slides with other people inside or outside your organization, you may want to control or lock your slides so that they can only be viewed or edited by select people .
Nothing can be more painful than seeing your carefully designed PowerPoint presentation being butchered by random individuals within your company. PowerPoint provides a couple of options to control what happens to your slides after you’ve built them.
Two Options for Password Protecting Your Slides
When it comes to password protecting your PowerPoint slides, you have two key options:
- Password to open: Restrict who can view your presentation file. Use this option when you want to prevent people from seeing confidential or sensitive slides.
- Password to modify: Control who can edit your PowerPoint slides. Use this option when you’re okay with letting people see your slides as long as they can’t edit them without your permission.
How to Password Protect Your PowerPoint File
In order to access these options, you’ll need to follow these steps:
- Go to save your file and on the “Save As” menu you’ll notice a Tools button on the bottom left.
- Click on the Tools button and select “General Options” .
- Enter a password for the option(s) that are most appropriate to your circumstances.

When you save your file, go into the General Options via the Tools button to add passwords to your PowerPoint file.
Words of Caution

This is what users will see depending on what you specified.
PowerPoint’s password protection features are not intended as security features. They are primarily designed to prevent unintentional viewing and editing of PowerPoint files. Your PowerPoint presentation will not be encrypted , and it can still be edited by malicious users. If you forget or lose your password, you won’t be able to retrieve the password to access the file so be careful. Also be aware that the passwords are case sensitive .
No related posts.
Tags: password protection , passwords , security
Comments (9)
9 Responses to “Password Protect Your PowerPoint Slides”
My PowerPoint is used for training a group. Each individual receives a cd with the presentation. They must review all the slides. I need each person to review the slides in the appropriate amount of time it takes to learn from the slides and not just fast forward through the course. I can put it in kiosk mode and put a time in for automatic forward. The problem is that if they want to return to a previous slide for review they cannot. If they want to exit or pause the slides they cannot. Is there a way for the student to return to a previous slide or return to where they left off? The bottom line is that the curriculum requires the presentation to take atleast 6 hours to complete, but students must be able to access previous slides without starting the presentation from the start, again.
Thank you for your assistance.
All I can think of is creating a sort of table of content or menu on the first slide and add a hyperlink to it on the slide master so if they need to navigate back to a previous chapter they can do it that way…
i need to know how to lock a specific slide because i wand everyone to acess some of the slides but only select people to acess the rest
As far as I know, that’s not possible. I believe the password-protection is for the entire presentation and not for specific slides. Could you split up the presentation to address the different permissions? That’s the only workaround I can think of.
My powerpoint presentation is on mac Microsoft 2011. and it does not give me those options. in file, under “save as” its says “restricted access” and when i click it i get” Enter your fully qualified network user name and password”. What do I do to lock my microsoft powerpoint presentation 2011 on mac? hope you can help. thanks
With PowerPoint 2010 for PC, can I lock the slides but not the speaking notes so that 18 different presenters do show all the same content but each one of them can add their own speaking notes that will not appear on the screen to the audience?
I’m not aware of a way to lock specific parts of PowerPoint such as the slide content but not the notes. It’s an all or nothing thing.
One option that’s coming to my mind is to create static images of each slide. The presenters will not be able to edit the slide content but will be able to add their own notes. The limitation of this approach is that it won’t allow animations if all of the slide content is one image. That’s all I can think of.
how do you lock a template only if you already have it drafted?
Leave a Reply
Name (required)
Mail (will not be published) (required)
Comment text
The PowerPoint Ninja Blog covers practical PowerPoint topics, tips, and tricks. If you’re looking to move from PowerPoint apprentice to ninja, subscribe to this RSS today!
| Subscribe via RSS | Subscribe via Email |
- Choose Your PowerPoint Fonts Wisely
- PowerPoint Design Principle #3: Contrast
- Tips for Removing the Background from Images in PowerPoint 2010
- How Recover an Unsaved PowerPoint 2010 File
- 10 Ways to Spot a Lame Corporate PowerPoint Template
Home Blog PowerPoint Tutorials PowerPoint Password Protection
PowerPoint Password Protection

PowerPoint password protection adds a layer of protection to your presentations to ensure no one can access the slide deck without authorization. This can help protect confidential presentations and the organization’s branded PowerPoint templates from misuse.
How to Password Protect a PowerPoint
For password-protecting PowerPoint or applying PowerPoint encryption, go to File -> Info -> Protect Presentation -> Encrypt with Password . The same section also provides other options for protecting your PowerPoint, including making it read-only, adding a digital signature, and marking the presentation as final.

Enter a password to proceed further. It is advised to keep your password or hint for the password securely saved somewhere since you cannot recover the PowerPoint file if you cannot enter the password.

You will require reentering the password to ensure both password entries match.

Once your PowerPoint file is password protected, the Protect Presentation dropdown menu will turn yellow. A message will also be that you must enter a password to access the file. This is a sign that your file is now password protected.

Whenever you open the PowerPoint presentation, you will require entering the password to access it unless the password protection is removed.

How to Remove Password from PowerPoint
To remove password protection, go to File -> Info -> Protect Presentation -> Encrypt with Password .

When the password dialog box appears, empty the password field and click OK to apply changes.

Your file will no longer be password protected, and the Protect Presentation menu will turn white again, indicating that a password no longer protects the file.

Final Words
Password protection and encryption of PowerPoint files help add a layer of security to presentations that can be useful for both confidential PowerPoint files and to ensure the files are safe in case they are accidentally sent to an unintended recipient. You can remove the password anytime. However, it is important to remember the original password to unlock the file protection. It’s always a good idea to keep at least a hint for your password safely placed somewhere for memory recall in case you forget your password.
Like this article? Please share
Cyber Security, Microsoft PowerPoint Filed under PowerPoint Tutorials
Related Articles

Filed under PowerPoint Tutorials • July 30th, 2024
How to Add a Timer to PowerPoint
Generate expectations for your presentation introductions by mastering how to add a timer to PowerPoint. Step-by-step instructions + templates.

Filed under PowerPoint Tutorials • July 24th, 2024
How to Find Quick Access Toolbar in PowerPoint
Easily customize PowerPoint’s UI by locating and editing the Quick Access Toolbar in PowerPoint

How to Translate in PowerPoint
Unlock the experience of PowerPoint translation! Learn methods, tools, and expert tips for smooth Spanish conversions. Make your presentations global.
Leave a Reply
How to set, change or delete a password for a PowerPoint presentation
Password-protect a powerpoint presentation, set a password for a powerpoint presentation.
On the Backstage View , click Info .
Change the password of a PowerPoint presentation
Delete the password of a powerpoint presentation, shantelanderson@twc.
Login with confidence. Protect your passwords and accounts with LogMeOnce rich features.
- Top Features
- Free Mobile Security
- PasswordLess QR Login
- PasswordLess Photo Login
- Two-Factor Authentication
- Scheduled Login ©

Scan Dark Web for stolen passwords. Stop hackers from attacking your online activity. Collect hacker’s metadata!
- Anti-Hacker Protecter
- Mugshot (patented)
- Password SHOCK ©

Encrypt files, images, and documents stored on your favorite cloud storage sites with your own password!

Our award-winning software helps to effectively protect and manage passwords for teams of 50 or less.
- Cloud Encrypter
- Identity Theft Protection
- Pricing & Comparison

Secure employees, contractors, and partners’ access with Single Sign-On, MFA and more rich security features.
- Passwordless MFA
Protecting your government agency requires threats awareness of external and internal elements.

As an MSP, you need to manage your company’s internal passwords and your customers' passwords too.
- Become a Partner
- MSP Password Manager
- How LogmeOnce Works
- How Secure is Logmeonce ?
- Dangers of Weak Password
- Teams / Business / Enterprise
- Personal / Family
- Students – 50% off on total bundle
- Student – 50% off everything
Bethany is a seasoned content creator with a rich academic background, blending the art of language with the precision of commerce. She holds a Master of Arts in English Language and Literature/Letters from Bahauddin Zakariya University, a testament to her profound grasp of language and its nuances. Complementing her literary prowess, Bethany also possesses a Bachelor of Commerce from the University of the Punjab, equipping her with a keen understanding of business and commerce dynamics. Her unique educational blend empowers her to craft content that resonates deeply with diverse audiences.
- Applications
- Cloud Security
- Password Manager
- Single Sign On
- Social Media
- Two Factor Authentication
Protect your passwords, for FREE
How convenient can passwords be? Download LogMeOnce Password Manager for FREE now and be more secure than ever.

- LogMeOnce, HQ, USA, Washington DC
- 1 (800) 935-4619
- Corporate: [email protected]
- Sales: [email protected] Media Contact: [email protected] Careers: [email protected]
- Pricing and Comparison
More Security
- Anti-Hacker
- Cloud Storage Encryption
- Password Shock ©
- Schedule Login ©
- Dark Web Monitoring
- How LogMeOnce Works
- Why Use LogMeOnce
- How Secure is LogMeOnce ?
- NIST 800 Information Security Policies
- Your LogMeOnce Password Management Benefits
- Support Center
- Password Generator
- Partner Login
- Company Overview
- Executive Team
- Patents & Licensing
- Media Coverage
- Online Media Kit
LogMeOnce is a US based company, operating globally with offices in Washington DC, USA,. All other company, product , service names and trademarks used in this website are for identification purposes only, and are property of their respective owners . Use of these names, trademarks and brands does not imply endorsement.
This content is intended to provide general information. While we strive for accuracy and reliability, it may contain errors or outdated information. It should not be considered professional or personalized advice. Please use this content as a starting point for further research and consult relevant experts when needed. We do not assume any responsibility or liability for the use or interpretation of this content.
How to Protect your PowerPoint Document with a Password
Let’s say you have a PowerPoint document that has huge lots of confidential information. And your colleagues use your system for some of their work. Obviously, you wouldn’t want them to have access to the confidential information you have in your PowerPoint document. Or let’s say you are in college and you have a surprise PowerPoint presentation planned for the freshers’ day. If someone sees it before the actual day, then it’s going to spoil the surprise for sure.
Whatever be your reason, if you are looking for ways to password protect your PowerPoint document without the help of any external application, we can’t be happier for you as you have come to the right place. Read on, to learn how you can quickly and easily set a password to your PowerPoint document such that every time it is attempted to be opened, a password prompt blocks the way! Hope you enjoy reading!
Section 1: How to Protect your PowerPoint Document with a Password
Step 1 : Open the PowerPoint document that you want to protect with a password.
Once the document is opened, click on the FILE tab from the top ribbon.

Step 2 : Now on the left pane of the window, click on the Info tab.
The Info tab options would now be listed on the right side of the window. Click on the dropdown button named Protect Presentation .

Step 3 : From the list of options that get expanded out, click on the one that says Encrypt with Password.

Step 4 : Now a window named Encrypt Document would be open. Under the Password field, type in any password as per your choice.
Once done, hit the OK button to proceed.
Step 5 : When the Confirm Password window opens up after that, retype the password that you typed in the previous step under the section Reenter password .
Once the password is reentered, simply hit the OK button.
Step 6 : Against the Protect Presentation dropdown button, you will now be able to see a message saying that a password is now required to open the presentation.
Let’s close the document now. Make sure you Save the document before you proceed to hit the Close button at the top right corner of the PowerPoint window.
Step 7 : Now if you launch the document again, you will be prompted with a Password window that asks for the password using which the document was encrypted. You have to type in the exact same password that you typed in at Step 4 to open the document.
Once the password is typed in, you can hit the OK button.
Step 8 : That’s it. Your document would now open, and it is well protected with a password.
Note: If you enter the wrong password to open the file, you would get a message saying that the password you entered is not correct.
Section 2: How to Remove the Password from a Protected PowerPoint Document
Definitely, you might have a change of mind and would want to remove the password that you set for your PowerPoint document. Let’s see how the password can be removed in the following steps.
Step 1 : Once again, open the document and then click on the FILE tab at the top.
Note : To remove the password from a password-protected document, you should know the password using which the document is encrypted. Otherwise, you will not be able to click on the FILE tab as the document wouldn’t even open without entering the password.
Step 2 : Now, click on the Info tab from the left ribbon.
As next, click on the Protect Presentation dropdown button and then click on the Encrypt with Password option once again.
Step 3 : This time, delete the contents in the Password field and leave it empty.
Once you are all done, hit the OK button.
Step 4 : Don’t forget to hit the Save button before you close the presentation.
That’s it. You can try opening the document and this time the document would open easily, without prompting for a password. Enjoy!
Do tell us in the comments section if you are stuck at any of the steps, we are always just a comment away!
Please do come back as there are a lot more articles on the way, all on your favorite topics and queries!
- How to Quickly Reduce the Size of a PowerPoint Document
- PowerPoint document font changed after printing or…
- FIX: Microsoft Excel opening blank document instead…
- How to PROTECT Xbox Series X / S by setting passkeys
- Remove Password from a password protected PDF File
- How to Add ScreenTip to MS Word Document
- Password Recovery Password Refixer Bundle Windows Password Refixer Windows 7 Password Refixer Office Password Refixer Word Password Refixer Excel Password Refixer PowerPoint Password Refixer RAR Password Refixer ZIP Password Refixer PDF Password Refixer Access Password Refixer Outlook Password Refixer SQL Password Refixer WiFi Password Refixer iTunes Password Refixer
- Support Support Center FAQs & Technical Support Download Free Download Center Resources How-to Articles Blog iSumsoft IT Blog
- How to Protect PowerPoint Presentation from Editing and Modifying

Updated: January 11, 2024
If you don't want others to open and modify your PowerPoint presentation, you can lock the presentation. Here, this guide will introduce several ways to protect a presentation file from being copied, edited, and changed by unauthorized others.
- Option 1: Marking as final
- Option 2: Restrict Access
- Option 3: Encrypt with Password
Option 1: Make the presentation read-only
If you want to let people know that a presentation shouldn't be changed, you can use the Mark as Final feature. When a presentation is marked as final, typing, editing, commands, and proofing marks are disabled or turned off and the presentation becomes read-only .
Step 1: Click the File tab to go to Backstage view.
Step 2: From the Info pane, click the Protect Presentation command.
Step 3: In the drop-down menu, choose the option that best suits your needs. select Mark as Final .

Step 4: A dialog box will appear prompting you to save, click OK .

Step 5: Another dialog box will appear, click OK .
When you mark a presentation as final, PowerPoint asks you to save the file. The next time you open it, you will see a yellow MARKED AS FINAL message at the top of the file. If you click Edit Anyway , the presentation will no longer be marked as final.

Option 2: Set Restrict Access to Prevent Others from Editing
If you want to prevent people from editing it, you can use the Restrict Access option:
Step 1: Click on File tab to go to Backstage view.
Step 2: In Info tab, click Protect Document button. And then select Restrict Access option.

Option 3: Set a Password for Modify Presentation
To protect PowerPoint 2010/2013/2016 presentation, use these steps as follows:
Step 1: Click on the File tab, choose Save As option. Select one location you will save this *.pptx file.

Step 2: In the Save As dialog, click the Tools button at the bottom and then select General Options .

Step 3: Type a password in the Password to modify box and click OK . Reenter the password to modify and click OK to confirm. When you return back to the Save As dialog, click Save to save this presentation.

Then the password to modify will lock this PowerPoint 2016 presentation and prevent it from being edited or modified. Keep your password in a safe place. If you lose or forget the password, Microsoft won't help recover it and you have to remove the password with a third-party utility like PowerPoint Protection Refixer .
Related Articles

Latest Articles
- 4 Ways to Encrypt/Password Protect an Email Attachment in Outlook or Gmail
- 3 easy ways to find out what Microsoft Word version you have on Windows
- 8 ways to make a Word Document containing images smaller without losing quality
- How to Repair Excel File Corrupted by Virus
- [Solved] Word Experienced an Error Trying to Open the File Windows 10
- How to Fix "PowerPoint Found a Problem with Content in .PPTX"
Hot Articles
- How to See Saved Passwords in MS Outlook 2016
- How to Remove Red and Green Wavy Underlines in Word Document
- Fix Picture is Blurry When Inserted to Word Document Problem
- How to Activate Microsoft Office for Free
Support Team: support#isumsoft.com(Replace # with @) Sales Team: sales#isumsoft.com(Replace # with @)
- Unlock iPhone
- iPhone Tips
- Android Phone
- Windows Tips
- Windows Password
- Data Backup & Recovery
- Computer Tweaks
- PDF Document
- Top Products
- Windows Password Refixer
- iPhone Passcode Refixer
- RAR Password Refixer
- iOS Refixer
Copyright © 2024 iSumsoft Studio All Rights Reserved.
Password protection for presentations in PowerPoint
A password helps to prevent other people from opening or modifying a presentation.
Caution: When you create a password for a presentation, record the password and keep it in a secure place. If you lose the password, it can't be retrieved and you won't be able open or gain access to the presentation.
Add password protection to a file
Select File > Info .
Select Protect Presentation > Encrypt with Password .
In the Password box, enter the password you'd like to use. Select OK .
PowerPoint prompts you to confirm the password by entering it once more.
Save the file to ensure the password takes effect.
Password protection isn't supported in PowerPoint for ODP (Open Document Presentation) files.
Remove a password from a file
Removing a password from a document is a simple process, but you have to know the original password.
Open the presentation whose password you want to remove.
Clear the password in the Password box, and then click OK .
Co-authoring a password-protected file
If you attempt to open a password-protected file that someone else is currently working on, you'll be able to open it, but you won't be able to edit it. You'll see the file in read-only mode.
Add or remove protection in your document, workbook, or presentation
Require a password to open a presentation
Click File > Passwords .
Under Password to open , select the Encrypt this presentation and require a password to open check box.
In the New password box, type a password.
Note: To create a strong password, use at least seven characters and include a combination of uppercase and lowercase letters, numbers, and non-alphabetic characters such as !,$, #, and %. Do not include your account name or other personal information.
In the Verify box, type the password again, and then click Set Password .
Click OK , and then save your presentation.
Tip: To remove the password, clear the Encrypt this presentation and require a password to open check box, click OK , and then save your presentation.
Require a password to modify a presentation
You can add a password so that only authorized users can modify a presentation. Unauthorized users can still open the presentation and then save it by using a different file name.
Under Password to modify , select the Require a password to modify the presentation check box.
Tip: To remove the password, clear the Require a password to modify the presentation check box, click OK , and then save your presentation.
Change a password to open or modify a presentation
Under Password to open or Password to modify , click Change Password .
In the New password box, type the new password.
To open a password-protected presentation: Enter the password for the file in the box.
Passwords are case-sensitive. Make sure you don't accidentally have Caps Lock turned on.
You can try again if you enter an incorrect password.
The file can't be opened without the password. If you don't know the password, you'll have to check with the person that encrypted the file.
For ODP (Open Document Presentation) files, password protection isn't supported in PowerPoint for the web.

Need more help?
Want more options.
Explore subscription benefits, browse training courses, learn how to secure your device, and more.

Microsoft 365 subscription benefits

Microsoft 365 training

Microsoft security

Accessibility center
Communities help you ask and answer questions, give feedback, and hear from experts with rich knowledge.

Ask the Microsoft Community

Microsoft Tech Community

Windows Insiders
Microsoft 365 Insiders
Was this information helpful?
Thank you for your feedback.
How to Lock a PowerPoint Presentation
Last updated on May 9th, 2024

If you need to share a PowerPoint presentation online but don’t want the people who get it to be able to edit or modify the content, then there are many different ways to lock PowerPoint presentation from editing.
In recent versions of PowerPoint you can configure the general options at the time you save a file as a given name and specify a file encryption setting to open the document or to modify the document.
For example, let’s say that we want to protect our business PPT PowerPoint template for editing when shared with others. Then, we will do the following:
How To Lock and Password Protect a PowerPoint Presentation
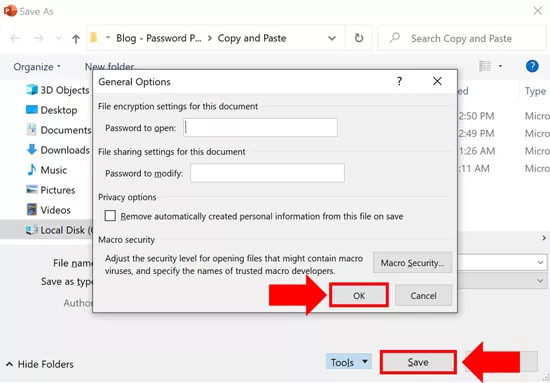
To lock a PowerPoint presentation from editing or saving, first go to File -> Save As and then look for the Tools button aside of Save button. Click here and then General Options from the popup menu.

Now, a new General Options dialog will appear with encryption settings.

Here you can specify a password to lock the PowerPoint presentation for editing mode or just to open the PowerPoint .PPT. Notice there are two options in this dialog box:
- File encryption settings for this document and specify a password to open the presentation.
- File sharing settings for this document , and specify a password to modify the presentation.
There are other ways to lock presentations or prevent users from editing them quickly. An excellent way to avoid a presentation from being edited is to save the presentation as a PDF.
The people who get the presentation file can open the PDF in Adobe PDF or other PDF tools to print handouts like NitroPDF but not edit them. Alternatively, you may choose to save the PowerPoint as a PPS slideshow. However, there are more secure ways to lock or protect your files since users may be able to rename the PPS to ppt and edit it as usual.
In Summary, how to lock a PowerPoint presentation from editing? Here are the steps to follow:
- Go to File -> Save As
- In the Dialog box, choose Tools (#1) and then General Options (#2)
- Next, you will be able to set a Password to open and to modify the presentation
If you intend to lock objects but not the entire presentation, then you can follow a different approach by learning how to lock objects in PowerPoint as we explained in a separate dedicated article. This way, you can lock certain shapes and objects in the presentation instead of the entire presentation.
Conclusions
You can use the approach described to lock PowerPoint PPT from editing and, for example, to prevent the removal of copyright notices in PowerPoint presentations. Additionally, you can use the lock PowerPoint approach to prevent the content from being overtly plagiarized in the short term. You can lock or password-protect a PowerPoint presentation using this method.
Leave a Comment Cancel reply
Your email address will not be published. Required fields are marked *
Save my name, email, and website in this browser for the next time I comment.
Sign up to our newsletter
We will send you our curated collections to your email weekly. No spam, promise!
Office Bytes
Bite sized tips and tricks for WSU Microsoft Office Power Users

PowerPoint: Restrict Editing with a Password
You have probably password protected documents in Word or Excel . In Excel Advanced Formulas , we even talk about how you can protect individual cells from being altered, while leaving the rest open to changes. Microsoft does not make it as obvious in PowerPoint that password protection is a possibility is it does in its other programs… but you actually have several options, including the ability to restrict editing while still allowing users to view your presentation. Let’s take a look.

Exercise File
No Exercise File today! You can open up PowerPoint into any random template if you would like to follow along.
Be Cautious with Microsoft Passwords
The usual password disclaimer applies…
- Be very careful applying passwords in any Microsoft program.
- If you lose the password, neither Microsoft nor ITS can reset it for you (trust me, I have been there).
- You may want to save an copy of your original file without a password for your personal use.
Password Protecting Documents in Word and Excel
Password protection in Word and Excel is fairly obvious; you even have a special button in the Review tab to guide you through Restrict Editing features or Protect Sheet/Workbook in the case of Excel.

With both Word and Excel, there are also a variety of Protect Workbook features in backstage ( File ) view.

On the other hand… in PowerPoint , the protection features are absent in the Review tab, though there are a lot of the same options for encryption in backstage view as Word or Excel…

Encrypt with Password would require someone to have a password to open your document, but maybe you only want to restrict editing . This is where people become frustrated.
For many people, Restrict Access looks like the right place to go, but for many it directs them to Connect to Rights Management Servers, which errors out when selected. There is a better way to do this…
“Save As” Password Options
1. With your presentation open, go to File , Save As (or remember my favorite shortcut, F12 ).
2. In the lower right, click on Tools dropdown and select General Options.

3. A screen will appear prompting you to either:
- Require a password to Open , or
- Require a password to Modify . Let’s stick with Modify for now.
4. Enter a password for Modify , and click OK . You may be prompted to reenter the password.
5. Save and close your PowerPoint file. Open the file again, and you should be prompted to either enter a password , or open a read only version.

Your users will still be able to view and print the document, but they will not be able to make changes.
Remove the Password
Later, if you would like to remove the password:
1. Open the file, entering the password when prompted.
2. Revisit the Save As screen to find the Tools, General Options where you first set the password.
3. Here you can remove the password you originally created and press OK

What do you think? Did you know about this feature in PowerPoint?
Congratulations, Power Users!
Congratulations to our newest Power Users! For the full gallery, and more information about the WSU Microsoft Office Power User Program, please visit: wichita.edu/poweruser
- Rosemary Hedrick

- Presentation creation
- PowerPoint templates
- Presentation training
- Print design
- Pitch deck example
- PPT Template example
- Investor deck example
- Product deck example
- Presentation services
- Infographic design
- Pitch decks
- Investor presentations
- Marketing presentations
- Conference presentations
- Finance presentations
- Product presentations
- CPD presentations
- Training overview
- Virtual presentation skills training
- PowerPoint template training
- Storytelling training
- Our showreel
- Charity presentation example
- Conference presentation example
- CPD presentation example
- Investor deck example – Seed stage
- Investor deck example – Series C
- Marketing presentation example
- PowerPoint template example
- Product presentation example
Blog / PowerPoint Tips / How to password protect PowerPoint.

How to password protect PowerPoint.
Sick of people stealing all your bright ideas, or just want to make sure your confidential information remains confidential? Password protect your PowerPoints and rest easy.
One of the questions that we are most frequently asked is, “How do I stop people from copying or editing my presentation?”.
Everyone loves how easy it is to make quick edits to their own presentations in PowerPoint, but a lot of people don’t want to allow the same freedom to others.
By following the easy steps below, you can protect the assets you’ve worked so hard to put together. Here’s how to password protect your PowerPoint presentations.
Password protect your entire PowerPoint presentation
The most secure way to ensure your content only reaches the people you want it to reach, is to password protect the whole PowerPoint file. This means that whenever someone tries to open the file, the first thing they’ll see is an alert, and a field to insert your chosen password. They won’t even get a sneak preview of the presentation.
Adding this level of security to your presentations is really easy.
Password protect PowerPoint on a PC
- At the top of your screen, select File , then Save as …
- Click the Tools dropdown and choose General Options
- This will launch the General Options window, the first field will be labelled Password to open , which is where you should insert your password
- Write it down. Keep it safe. Be smart, kids
- Reconfirm your password in the pop-up window
If you close your document, then re-open and you’ll see for yourself.
Password protect PowerPoint on a Mac
- At the top of your screen, select File , then scroll directly down to Passwords …
- Tick the first option, under Password to open
- In the pop up, enter your new password in both fields
- Click Set password
Stop people from editing your PowerPoint
But, what if you want them to be able to see your beautiful presentation , just not change anything?
Easy. Follow the exact instructions above (for either Mac or PC), however, instead of selecting Password to open , select Password to modify and continue from there.

This will allow you to share your genius around, without people distorting or ruining it.
Whether you need a full lock down, or just a hands-off approach, password protecting your PowerPoint can help you to safeguard your important information.
LIKE WHAT YOU'VE READ? WHY NOT share
Work Can wait
Put off writing that email just a little longer. Send your incoming calls to voicemail. Put your feet up, grab a brew and explore more presentation insight in the Buffalo 7 Library
Passper Pro
Supports password recovery for all files
Passper for Excel
Excel password remover
Passper for Word
Word password remover
Passper for PowerPoint
Powerpoint password remover
Passper for PDF
PDF password remover
Passper for RAR
Rar password unlocker
Passper for ZIP
Zip password unlocker
- Windows Password Recovery
- Efficient Tool
2 Free Methods to Password Protect PowerPoint
There are times when you lose a lot of confidential information, just because you were not careful about protection when you share your PowerPoint Presentation. Well, you can easily add a password to protect your PowerPoint presentation from unauthorized access or modification.
There are various methods that you can use to password-protect PowerPoint files. Here we introduce two free methods that you can use to add security layers to your PowerPoint presentation.
Part 1: 2 Types of Password Protection in PowerPoint
Part 2: how to password protect powerpoint, bonus tip: how to remove password protection from powerpoint.
To be very specific, there are two password options for you to add security layers to your PowerPoint presentation. The first one is the password to open PowerPoint files. No one can open or read the PowerPoint presentation without first entering the correct password. The other is the password to modify PowerPoint files. Protected by password to modify, the PowerPoint presentation can be read only.
There are two free options that you can use to add password to protect your PowerPoint presentation. Just few simple steps and you can easily password protect your PowerPoint files in almost no time. The best thing is, you do not need to be an expert to do the procedure, as you can do this yourself. Take a look at the below-mentioned steps of adding passwords to your PowerPoint presentation files.
Method 1. Use File Menu to Add Password Protection to PowerPoint
From File menu, you can only add password to protect your PowerPoint from unauthorized access. Anyone who tries to open that particular file will be required to enter the password first.
Please follow the steps below to encryp your PowerPoint Presentation:
Step 1: Run Microsoft PowerPoint and open the presentation file that wants to add password. Click on the File menu at the top left corner, then click on the Info tab from the left navigation panel.
Step 2: Find the Protect Presentation option and click on it. You will get a drop-down menu list. Select Encrypt with Password to encrypt the PowerPoint file.

Step 3: Type the password in the Password dialogue box and click on the OK button.

Step 4: Re-enter the password in the box to confirm it and click the OK button again. Save your PowerPoint presentation and now your file is protected with a password.
Method 2. Use General Option to Add Password Protection to PowerPoint
Another free and better way to add a password to your PowerPoint presentation is using General Option:
Step 1: After you finish your PowerPoint presentation, click F12 to recall the Save as dialog. You can also click on the File menu and choose Save as.
Step 2: Open the drop-down Tool. Select and click on the General Options. Here, you can both set password to open and password to modify.

Step 3: Enter a new password as you wish and then click OK to reconfirm it.

People usually panic and feel helpless when they have an encrypted PowerPoint file and forgot the password. And it becomes worse when they are about to go into a client meet and have no way to access the files. But what if I tell you that there is a way out to this situation and that you can recover the password and then remove the password protection?
Passper for PowerPoint is such an tool that can be used to recover password and remove password protection on your PowerPoint presentation. It’s a tool with user-friendly interface and it can be easily used even if you are a computer novice.
Some other features of Passper for PowerPoint:
Multifunctional: It can recover password to open PowerPoint and remove password to modify it. It is useful when you are unable to view or edit your presentation.
High success rate: It offers 4 attack types to highly increase the success rate of recovery.
Fast speed: Advanced algorithms are used to largely accelerate the recovery speed. And the password to modify can be removed within seconds.
Compatibility: It supports operating system Windows and macOS. And supports PowerPoint version from 97-2021.
Free Download Buy Now
Recover Password to Open
First of all, download and install the program Passper for PowerPoint on your computer, and launch it.
Step 1 Choose Recover Passwords on the main interface.

Step 2 Click on the “+” button to import your password-protected PowerPoint files to the program. And choose one suitable attack types out of four.

Step 3 Once you have finished all the settings, click on the Recovery button and the process will be initiated automatically. The program will take some time based on password complexity. It will later configure the password and you can get access to your file.

Remove Password to Modify
Remove password to modify is much easier and faster than recovering. You can check the following simple steps:
Step 1 In order to remove the password to modify in your PowerPoint file, please choose Remove Restrictions on the main window.

Step 2 Click on the Select a File to add your password protected PowerPoint.

Step 3 Now, click Remove button to start the process. The password that restricts you from modifying will be removes within seconds.

Drawing A Conclusion
If you don’t want to lose your confidential documents, pay attention to the above-mentioned ways and get rid of such problems. They keep your PowerPoint safe and secure from any type of unauthorized access or modification. Therefore, you ever get into the wrong foot, where you need such kind of help, this article can be a savior. Keep your files protected by taking care of simple password managing ideas.
Related Articles:
- 6 Free Ways to Lock PowerPoint from Editing
- 3 Methods to Crack PowerPoint Password
- How to Secure PowerPoint Presentation 2010/2016
- Top 5 PowerPoint Password Remover Tools

By William Wilson to PowerPoint
Posted on Mar 17, 2023 ( Updated: Mar 17, 2023)
William Wilson, a blogger who is interested in MS Office software. In the past three years, William has been trying to write articles to help people better understand MS Office software.
IMAGES
COMMENTS
Select Protect Presentation > Encrypt with Password. In the Password box, enter the password you'd like to use. Select OK. PowerPoint prompts you to confirm the password by entering it once more. Save the file to ensure the password takes effect. Password protection isn't supported in PowerPoint for ODP (Open Document Presentation) files.
Keep your PowerPoint presentations secure and confidential. Learn how to keep the information in your presentations safe by password-protecting your files.
Learn how to password protect your PowerPoint presentations using two different methods and see which is our favorite one.
How to Password Protect a PowerPoint Presentation [Tutorial] A password helps to prevent other people from opening or modifying a presentation. Issues addressed in this tutorial: password protect ...
How To Password Protect PowerPoint Files. On the PowerPoint ribbon, click on File. In the Info section, click on the first option, Protect Presentation. Then choose Encrypt with Password. The next step for you to do is to type in the password you'd like to assign for your PowerPoint file and click on the OK button.
To add a password to your PowerPoint, follow these simple steps. First, open the presentation you want to secure. Click on the File tab in the ribbon. This takes you to the backstage view. Next, navigate to the Info section. Here, select Protect Presentation and choose Encrypt with Password.
Mark the presentation as "Final" Restrict permission to PowerPoint Save the presentation as a PowerPoint Show file Set a password to modify PowerPoint Convert PowerPoint to pictures Convert PowerPoint to a PDF Convert PowerPoint to a video There are many applications of knowing how to protect your PowerPoint presentation. So, in this article, let's understand the 7 different ways to ...
In this Microsoft PowerPoint 2019 tutorial you are going to learn how to protect a PowerPoint presentation with a password , so you can lock your PPT / PPTX presentation file so no one can view or ...
When it comes to password protecting your PowerPoint slides, you have two key options: Password to open: Restrict who can view your presentation file. Use this option when you want to prevent people from seeing confidential or sensitive slides. Password to modify: Control who can edit your PowerPoint slides.
How to Password Protect a PowerPoint For password-protecting PowerPoint or applying PowerPoint encryption, go to File -> Info -> Protect Presentation -> Encrypt with Password. The same section also provides other options for protecting your PowerPoint, including making it read-only, adding a digital signature, and marking the presentation as final.
In this video, we'll show you how to add a password to your PowerPoint file to ensure that only authorized users can view or edit your content.
In PowerPoint, creating a password encrypts the presentation. Learn how to set, change or delete a password for a PowerPoint presentation.
Whether you need to control access to the final version of your slideshow for a business proposal or just want added security for your personal use, protecting your PowerPoint is easy with a simple password. A password-protected PowerPoint presentation allows you to keep sensitive information within your business or household secure.
Whatever be your reason, if you are looking for ways to password protect your PowerPoint document without the help of any external application, we can't be happier for you as you have come to the right place. Read on, to learn how you can quickly and easily set a password to your PowerPoint document such that every time it is attempted to be opened, a password prompt blocks the way! Hope you ...
Option 3: Set a Password for Modify Presentation. To protect PowerPoint 2010/2013/2016 presentation, use these steps as follows: Step 1: Click on the File tab, choose Save As option. Select one location you will save this *.pptx file. Step 2: In the Save As dialog, click the Tools button at the bottom and then select General Options.
Learn how to Lock a PowerPoint Presentation from editing. Protect your presentation when sharing by using a password. Share your PowerPoint files without any restriction with others.
Select Protect Presentation > Encrypt with Password. In the Password box, enter the password you'd like to use. Select OK. PowerPoint prompts you to confirm the password by entering it once more. Save the file to ensure the password takes effect. Password protection isn't supported in PowerPoint for ODP (Open Document Presentation) files.
Learn how to protect your presentations with a password, so only authorized people can open the presentation.
Microsoft does not make it as obvious in PowerPoint that password protection is a possibility is it does in its other programs… but you actually have several options, including the ability to restrict editing while still allowing users to view your presentation. Let's take a look.
The most secure way to ensure your content only reaches the people you want it to reach, is to password protect the whole PowerPoint file. This means that whenever someone tries to open the file, the first thing they'll see is an alert, and a field to insert your chosen password. They won't even get a sneak preview of the presentation.
Do you want to add password to your PowerPoint so that other people cannot open or change your PowerPoint presentation? This article will tell you 2 free ways.
In this video, I will show you guys how to create a password protected PowerPoint PPTs in your windows 10 computer. Note:- This video has followed all the YouTube community guideline rules.
Protect document options disabled in Powerpoint Wading through the jumbled Msft interfaces to try and come up with best practice to disable non admin editing on select files. When I create a new file from a Sharepoint library, and open it in Ppt, the protect document options are disabled so can't be set.