How to loop a sequence of PowerPoint animations
- Written by: Jamie Garroch
- Categories: PowerPoint animation
- Comments: 23

Loops are like buses. You wait ages for one then a bunch of them arrive at the same time! In our last looping article you discovered how to create infinite Motion Paths in PowerPoint. Now you’re going to learn a simple technique to loop sequences of animations in PowerPoint.
Animation effects in presentations aren’t just decorative, they’re a great way to pace your content so you can explain your story step-by-step. We’ve got lots of articles about how to use simple animations effectively (like this beginner’s guide to Morph and this introduction to PowerPoint animation ), but today we’re going to look at something a little more sophisticated. Sometimes you might want to play a sequence of animation effects in a loop, over and over again to illustrate a particular point. PowerPoint allows you to loop a single animation effect but not a sequence of multiple effects. Our neat hack solves that limitation and, as an added bonus, gives you a warm fuzzy sensation because you know loops inside out.

How to loop one animation effect in PowerPoint
Let’s start at the very beginning as I’ve heard it’s a very good place to start! If you’re sitting there thinking, ‘Hang on a second, I have no idea how to loop a single animation!’ – fear not! Take a look at the slide below. Let’s say you wanted the computer icon in column E to blink repeatedly until you move to the next slide.

To do this you would add the Blink emphasis effect from the Animations tab ( Animations > Add Animation > More Emphasis effects… ). Then open the Animation Pane , right click on the blink animation you just added and select Effect Options . Then set up the animation as follows:

How to loop a sequence of animation effects in PowerPoint
Okay, one animation successfully looped! But what would you do if you wanted a sequence of animation affects to play in a specified order and then repeat, as in this example:
This is just one PowerPoint slide with a fairly complex animation sequence used to show the production line process. This is what the Animation Pane looks like:

You can download this file to see how the animation sequence was created: Download looping animation file . What we want to do now is to set this whole sequence to repeat until the next slide. How? With our audio bookmark hack!
Hover your mouse over the last animation effect in the sequence and make a note of the time it ends. In our example, it’s 13.5 seconds.

Record a sound file that’s a bit longer than the time you just noted down. This may seem odd but stick with it! To do this, go to the Insert tab in PowerPoint and – way over on the right-hand side of the ribbon – click Audio followed by Record Audio .

Top tip: Name your recording using the target time so you remember when to stop recording!

If you want, you can mute your microphone. Otherwise, keep completely silent and press the record button. Wait until the recording is the right length, then press the stop button.
Wait! Hold the phone. Why are we telling you to record a silent audio file?! All will become clear.
Select your new audio file then set it up in the Playback tab as follows:
- Click Add Bookmark (this will add a bookmark at 0 seconds)
- Click Volume > Mute
- Click Start > Automatically
- Click Loop until Stopped
- Click Hide During Show
Your audio file options should now look like this:

Finally, click the Trim Audio button and set the End Time to the exact time you want the animation sequence to repeat. In our example, the sequence lasts 13.5 seconds so we’ll set the audio end time to 14.00 seconds.
Note: in some versions of PowerPoint this may cause an auto transition to be added to the slide. Check in the Transitions tab and deselect this check box if that happens:

Open the Animation Pane (download our free quick access toolbar customisation for Windows or macOS to open the Animation Pane with just one click). Then select the first animation effect in the sequence, hold down the shift key and select the last effect in the sequence. With the whole sequence selected, go back to the Animations tab and in the Advanced Animation group, click the Trigger menu followed by On Bookmark and then Bookmark 1 .
And you’re done! You should now see two zones in the Animation Pane. The top part in the main timeline sequence just has the audio file in it, set to start automatically and repeatedly fire its single bookmark trigger event every 14 seconds. The main animation sequence has moved to what’s known as the interactive or trigger sequence. This sequence will now start every time the bookmark in the audio file is reached.

And as the audio file is set to loop until you advance the slide, the animation sequence will repeat from when you start the Slide Show until you move to the next slide or quit the show. And it doesn’t stop there. Imagine what effects you could achieve by adding different sequences to different audio files with multiple bookmarks. One audio file triggering another that triggers a sequence of effects that triggers another audio file. Welcome to mind-blowing PowerPoint that makes your brain ache and your heart sing! No? Just us then!
Got a thirst for PowerPoint loops?
If you’re now looping mad, then you might want to check out this blog post: How to create infinite Motion Paths in PowerPoint . And our free BrightSlide add-in for PowerPoint includes lots of new ways to enhance your creativity, including some very cool animation tools that’ll have your boss, colleagues and audiences jumping for joy. Download BrightSlide!

Jamie Garroch
Principal technical consultant, related articles, powerpoint memory game.
- PowerPoint design / PowerPoint animation
- Comments: 4
We love PowerPoint at BrightCarbon. It’s such a versatile application which can be used for so much more than ‘just’ designing presentations. You can create videos, printed collateral, interactive eLearning, even animated GIFs and so much more. But did you know you can even create games? We’ve built one for you, using VBA, and it’s free to download and adapt.

3 ways to create slide backgrounds in PowerPoint
- Comments: 1
If you’ve used BrightCarbon’s guides before, we have no doubt that you can make your content look incredible. But something you might not have dabbled in yet is changing up the slide background in PowerPoint. The right presentation backdrop can do a lot, from keeping everything on brand to adding…

How to create infinite Motion Paths in PowerPoint
All the best things in life do loop-the-loops. Rollercoasters, fancy planes, and… PowerPoint! Learn how to make a loop-the-loop-ing infinite Motion Path in PowerPoint for silky smooth repeating image carousels, never-ending animations, and more!

Absolutely brilliant! Thank you for sharing
Thank you very much, It’s very useful.
Very useful. Worked like a charm
Thank you so much for sharing this knowledge!
Brilliant! Thank you so much
Thank you – works like a charm. I would never have thought that I’ve have to record an audio to make a animation loop!
Great idea!
had to repeat list of animations on a slide – this works perfect! Thanks much for sharing
It doesn’t loop. It just plays once even though I have “loop until stopped selected”. I applied all the steps you suggested. What am I doing wrong?
I’m having the same problem! I’ve followed this guide a few times with no problems but this time I just can’t get it to work.
The most bizarre thing is that a previous slideshow I did still works perfectly and I’ve compared all the settings and all the checkboxes and they all match. But the new slideshows just repeat once and stop. Very annoying. I suspect there’s been an ‘improvement’ by Microsoft – that’s normally what breaks useful things in the office apps!
It seems that in current versions of Office 365 there is a strange bug. I just ran into the same problem, but I figured out its cause and a solution. Here’s how:
Apparently, PowerPoint adds a slide transition timer when you add the audio. It is set so the exact duration of the audio. So when the loop is ready to repeat the transition kicks in and switches to the next slide. To solve it just go to the Transitions tab and clear the check box next to the slide timer (usually the last item on the ribbon).
Works perfectly! I looked for this option for a while and finally learned how to do it. It is explained easily step by step.
Thank you so much.
Where in the heck is the Playback tab? I recorded the video but it’s nowhere to be seen. Clicking it in the Animation pane just brings up Animation options. Why do these articles skimp on screenshots? Be better for us dumb ones.
Found it–have to select the “recording” icon dead center in the slide. Missed it because I had assets masking it. Seriously–screenshots are signposts for your readers. Shouldn’t have to explain that for technical content.
Thanks for the feedback JD. Which step(s) do you believe requires additional screenshot(s)?
All the options I need to do this are greyed out. How do I make them so I can actually click on them?
Really appreciated the effort to put this tip up, and also for the correction on comments on how to fix on Office 365 – just made it work on 7th July 2024 after removing the auto-transiction!
works like a charm! thank you for explaining so clearly
Thank you everyone for the feedback. It appears that there may be a Microsoft regression bug in the way that audio files set to loop until end of slide behave (irrespective of the slide transition setting). We’ve reported this to Microsoft.
Just tried this out and it works very nicely, it was very frustrating not being able to loop my animation flow. Thank you very much for taking the time to post this, itbhelped very much! I still think, PP should be able to do this out-of-the-box, but this is a workaround I can live with.
Thanks for this! Very helpful!
Thanks for this tip. I found it somewhere else as well, but kept coming back to yours because this is where it was explained the best. I am wondering if there is a way to pause the animation once the loop has started… I initially looked at how to pause the sound file, but a. I did not find out to do it and b. it should not do anything to the animation (unless there is 1 bookmark every second or so and each bookmark triggers a different section of the animation… Tricky to sync, I guess). Anyway, any chance you figured out how to pause a 40-ish secs animation that loops thanks to your trick?
Leave a Reply Cancel reply
Save my name and email in this browser for the next time I comment.
Join the BrightCarbon mailing list for monthly invites and resources
It provides us with powerful presentation material to use again and again. This helps us get our message across and enhances our professional image. Joe Critchley Trade Extensions


- PowerPoint Tips
- Office Tips
- Privacy Policy
- Submit Guest Post
How to Loop an Animation Effect in Microsoft PowerPoint
When you add an animation in PowerPoint presentation, you may want it to disappear when it’s over, or play repeatedly on the slide as an accessory. For the latter, how to make it happen specifically?
1. To add an animaiton, you should select specific text or shape at first.
2. Go to Animations tab, click Add Animation and choose an effect in the drop-down menu.

3. Click Animation Pane to evoke the side pane. Right-click the animation you just added and choose Timing… in the menu.

4. In the Timing tab of the popping out window, click the small down arrow beside the choice box of Repeat to expand the menu. Choose the number of times you want the animation to repeat, or you can also choose Until Next Click or Until End of Slide .
Then hit OK to confirm the setting, and you can press [F5] to preview the effect.

Leave a Reply Cancel reply
Your email address will not be published. Required fields are marked *
Save my name, email, and website in this browser for the next time I comment.
Copyright © 2020 My Microsoft Office Tips All Rights Reserved
- Skip to primary navigation
- Skip to main content
- Skip to footer

Laura M. Foley Design
Cheat Death by PowerPoint!
How to create looping animations in PowerPoint
October 2, 2018 by Laura Foley 8 Comments
PowerPoint has some incredible animation tools. Incredibly frustrating, that is. One thing that’s eluded PowerPoint animators for years has been a way to loop an animation sequence on a slide. Friends, I’m happy to announce that the wait is over. I’ve learned of a way to cheat the system!
The problem with looping animations in PPT
A looped sequence is a repeating sequence. For example, a looping animation would go through Effect #1, then Effect #2, then Effect #3, then go back to Effect #1 and keep going until you tell it to stop. It seems like it would be super-simple to set something like this up in PowerPoint. Trust me, without knowing the trick I’m about to teach you, it’s a huge pain in the tuchus.
You see, the animation timeline in PowerPoint is stupid. It only travels from left to right, ever forward. There’s no way to isolate a set of animations, group them, and cause them to loop. So to create the illusion of looping, you’d have to repeat the animation sequence however many times you want it to loop. It can be a real drag, especially if you have a number of complicated animations, exact positioning, etc.
The answer? Bookmarks.
I’m a member of the Presentation Guild . One of the many benefits I enjoy as a member is access to the forum pages, where the best presentation designers share their ideas and inspirations. One of the Alpha Nerds, Jamie Garroch , developed an ingenious method of creating looping animations within PowerPoint by using something I’d never been aware existed: bookmarks.
A bookmark can be added to a video or audio file. Like bookmarks IRL, you can use these to mark interesting parts of the media. You can also use them to…wait for it…trigger animations! And the way to do it is to use bookmarks on an audio file you create that’s the same length as your desired animation loop.
How to create looping animations
Don’t be put off by the number of steps below. As with anything, writing out instructions takes much longer than actually doing it. If you’d rather learn by watching me do it, then watch this video.
Step 1: Create your animations
Create the animations you want on your slide. Wherever you want a bookmark to trigger an animation, select Start On Click . Use animation tools like After Previous , With Previous , Duration , Delay , etc., as you normally would.
Step 2: Make the audio file
- Under Media on the Insert tab, click Audio then Record audio .
- Click on the red dot (record) and remain silent for the length of your recording. The recording length is determined by how long you want the looping animation to be. When finished, click on the square (stop).
- Click on the audio file. Under Audio Options on the Playback tab, select Volume then select Mute . Also select Hide During Show, Start Automatically , and Loop Until Stopped .
Step 3: Add bookmarks
- Click on the audio clip.
- In the audio controls below the clip, click Play .
- When you reach the point where you want to make a bookmark, click Pause .
- Under Audio Tools , on the Playback tab, in the Bookmarks group, click Add Bookmark . Note that these bookmarks cannot be changed, only deleted and remade, so choose wisely!
- Make as many bookmarks as you have Start On Click animations.
Step 4: Use bookmarks to trigger animations
- In the Animation Pane , move your audio file to the top.
- Select the first animation that starts on click, then select On play…Recorded Sound – Bookmark 1 under Triggers .
- In the Animation Pane , move all of the animations that follow up until the next Start On Click animation to be after the triggered animation.
- Repeat steps 1–3 for as many Start On Click animations you have.
Step 5: Breaking the animation cycle
To get the animation cycle to stop and advance to the next slide, follow these steps:
- Click on the Transitions tab in the Ribbon .
- In the Timing section of the Transitions tab, deselect On Mouse Click
- Select After and set the amount of time you want to stay on the slide.

Share this:

How to Loop Animations in PowerPoint? (The Easy Way)
Trish Dixon
Are you looking to loop animations in PowerPoint to make your presentations more engaging and dynamic? Looping animations can be a great way to add visual interest, emphasize key points, and keep your audience’s attention focused.
In this comprehensive guide, we’ll cover everything you need to know about creating looping animations in PowerPoint , including types of animations, step-by-step instructions, best practices, troubleshooting tips, and more.
What are Looping Animations in PowerPoint?
Before we dive into the process of creating looping animations, let’s define what they are. Looping animations in PowerPoint refer to animations that repeat continuously, either for a set number of times or until you move to the next slide. These can be applied to any object on a slide, such as text, shapes, images, charts, or videos.
Looping animations are useful for:
- Emphasizing important information and key points
- Creating visual interest and engagement
- Guiding the audience’s focus to specific elements
- Making presentations more dynamic and interactive
- Enhancing storytelling and narrative flow
When used effectively, PowerPoint looping animations can take your presentations to the next level and leave a lasting impact on your audience.
Types of Looping Animations in PowerPoint
PowerPoint offers a wide range of animations that can be looped , each with its own unique effect and purpose. Here are the main types of looping animations:
| Animation Type | Description | Example Uses |
|---|---|---|
| Entrance | Objects enter the slide in a particular way, such as flying in, fading in, or appearing | Introducing new points, revealing answers |
| Emphasis | Calls attention to an object, such as by making it larger, changing its color, or adding a shape | Highlighting key words, data, or images |
| Exit | Objects leave the slide in a particular way, such as flying out, fading out, or disappearing | Removing completed points, clearing space |
| Motion Paths | Objects move along a specified path, such as a line, curve, or custom path | Showing process flow, connecting ideas |
Understanding the different types of animations available for looping will help you choose the most effective ones for your content and goals.
How to Create a Looping Animation in PowerPoint
Now that we’ve covered the basics of looping animations, let’s walk through the steps to create one in PowerPoint.
Step 1: Select the Object to Animate
The first step is to select the object you want to animate on your PowerPoint slide. This can be text, a shape, an image, a chart, SmartArt, or any other element. Click on the object to select it.
Step 2: Open the Animations Tab
Next, go to the Animations tab in the PowerPoint ribbon. Here you’ll find all the tools and options you need for creating and modifying animations.
Step 3: Choose an Animation
In the Animations tab, choose the type of animation you want to apply to your selected object. Click on the More arrow in the Animations gallery to see all available animations, organized by type: Entrance, Emphasis, Exit, and Motion Paths. Hover over an animation to preview how it will look.
Step 4: Adjust Animation Settings
Once you’ve chosen an animation, click the small arrow in the bottom right corner of the Animations group to open the Animation Pane. Here you can modify the animation settings, such as:
- Start: Choose when the animation starts – on click, with previous, or after previous
- Duration: Set how long the animation takes to complete in seconds
- Delay: Add a delay in seconds before the animation begins
- Repeat: Choose how many times the animation repeats, or select “Until End of Slide”
To create a looping animation , set the Repeat option to “Until End of Slide”. This will make the animation continue repeating until you advance to the next slide. Alternatively, you can specify a large number of repeats, such as 999.
Step 5: Preview and Adjust
After configuring your animation settings, preview the animation to see how it looks. You can do this by clicking the Preview button in the Animations tab, or by clicking the Play button next to the animation in the Animation Pane.
Watch the preview closely and make note of any adjustments you want to make. You may need to fine-tune the animation timing, effects, or trajectory for the best results. Experiment with different options until you’re satisfied with how the looping animation looks and feels.
Some additional adjustments you can make include:
- Effect Options: Customize the specific settings for each animation effect, such as direction, amount, or style
- Timing: Further refine the start, duration, and delay settings to precisely control the animation playback
- Trigger: Set the animation to start when you click a specific object, providing more interactive control
Step 6: Apply to Other Objects (Optional)
If you want to apply the same looping animation to other objects on your slide or in your presentation, you can easily do so using the Animation Painter.
- Click on the object with the animation you want to copy
- Go to the Animations tab and click the Animation Painter button (it looks like a paintbrush)
- Click on the object or objects you want to apply the same animation to
This will instantly copy all the animation settings, including the looping settings, to the new objects.
Best Practices for Looping Animations
To make your looping animations in PowerPoint as effective and professional as possible, follow these tips and best practices:
1. Keep It Simple and Subtle
Avoid overusing looping animations or making them too complex or flashy. Stick to simple, subtle animations that enhance your content without distracting or overwhelming your audience. A little bit of animation goes a long way.
2. Use Appropriate Timing and Pacing
Make sure your looping animations are timed appropriately so they synchronize well with your presentation flow and don’t interfere with your speaking or other elements. Consider the pacing of your slides and adjust animation durations and delays accordingly. Well-timed animations can complement your points and keep your audience engaged.
3. Be Consistent and Purposeful
Use looping animations consistently throughout your presentation for a polished, cohesive look and feel. Stick to a few key animation styles that match your theme and brand. Avoid mixing too many different types of animations, as this can look disjointed. Choose animations with purpose that align with your content and communication goals.
4. Align Animations with Content
Choose looping animations that meaningfully align with and support your slide content and overall message. For example:
- A subtle pulsing highlight animation can draw attention to key words or data points
- An orbit motion path can illustrate a cyclical or continuous process
- A repeating fade entrance can gradually reveal a list of points or steps
5. Test and Revise for Perfection
Always test your presentation with the looping animations to ensure they work as intended and have the desired effect. Play through your slides, clicking and advancing as an audience member would. Make note of any animations that need adjusting and revise until everything looks and flows smoothly. Get feedback from colleagues or friends if possible.
How to Remove Looping Animations
Sometimes you may need to remove a looping animation in PowerPoint , either because it’s not working as desired or your presentation goals have changed. To remove an animation:
- Select the animated object on the slide
- Go to the Animations tab in the ribbon
- Click “None” in the Animations gallery to remove all animations from the object
Alternatively, you can open the Animation Pane, select the specific animation you want to remove, and press the Delete key on your keyboard.
Troubleshooting Looping Animations
If your PowerPoint looping animations aren’t working as expected, try these troubleshooting tips:
- Make sure the animation is applied to the correct object(s)
- Double-check that the Repeat setting is configured to “Until End of Slide” or your desired number
- Ensure there are no conflicting or overlapping animations on the same object
- Test your presentation on the actual device and software version you’ll be using to present
- Save your presentation and restart PowerPoint, then recheck the animations
- If all else fails, try recreating the animation from scratch
By following these steps and tips, you can create professional, engaging looping animations in PowerPoint that elevate your presentations and captivate your audience. Harness the power of PowerPoint animation loops to emphasize key information, enhance storytelling, and make your slides more dynamic and memorable. Practice makes perfect, so don’t hesitate to experiment and refine your looping animation skills.
- Recent Posts
- How to Embed Power BI in PowerPoint: A Step-by-Step Guide – October 14, 2024
- 10 Easy Ways to Fix “Cannot Play Media” Error in PowerPoint – October 13, 2024
- How to Change the Background in PowerPoint: Expert Guide – October 12, 2024
Leave a Reply Cancel reply
Your email address will not be published. Required fields are marked *
Save my name, email, and website in this browser for the next time I comment.
Latest Posts
How to embed power bi in powerpoint: a step-by-step guide.
Learn how to embed Power BI in PowerPoint with this detailed guide. Integrate live data updates and interactive visuals for engaging presentations.
10 Easy Ways to Fix “Cannot Play Media” Error in PowerPoint
Fix the “cannot play media” error in PowerPoint with easy steps, including checking formats, installing codecs, and embedding media for flawless presentations.
How to Change the Background in PowerPoint: Expert Guide
Learn how to easily change the background in PowerPoint with our step-by-step guide. Customize your slides using colors, images, gradients, patterns, and more.
How To Loop Animation In PowerPoint
Have you ever wondered how to create loop animation in PowerPoint to make your presentations more engaging and dynamic?
We will also provide step-by-step instructions on how to create loop animation in PowerPoint, along with tips for using it effectively and common mistakes to avoid.
Key Takeaways:
What is loop animation.
Loop Animation in PowerPoint refers to a technique where a sequence of effects or slides repeats continuously to create a dynamic and engaging visual presentation.
How Does Loop Animation Work in PowerPoint?
Loop Animation in PowerPoint functions by setting up a sequence of effects on slides that repeat in a continuous loop during the presentation, offering a visually appealing way to convey information.
Why Use Loop Animation in PowerPoint?
Loop animation in PowerPoint provides a seamless way to display continuous motion graphics, keeping viewers captivated and interested throughout the presentation. This feature can be especially impactful when presenting complex concepts or processes, as the repetitive motion aids in retention and understanding.
Benefits of Loop Animation in PowerPoint Presentations
By incorporating loop animations into your slides, you can captivate your audience by creating dynamic and eye-catching visual effects that hold their attention throughout the presentation. These animations can help reinforce key points, keep the audience focused, and enhance comprehension of complex concepts. The repetitive nature of loop animations can aid in reinforcing important messages, ensuring that your audience retains the information even after the presentation ends.
How to Create Loop Animation in PowerPoint?
Once the animation effect is applied, adjust the duration and timing by accessing the ‘Effect Options’ and ‘Timing’ tabs. This allows you to customize how and when the animation occurs on each slide.
Step 1: Choose the Object to Animate
Lastly, audience engagement should be at the forefront of your mind when deciding on the object to animate. Choose elements that will captivate your viewers and keep them interested throughout the presentation.
Step 2: Add Animation to the Object
Timing is crucial when setting up these effects; ensure that the duration and delay are appropriate to sync with your narration. Utilizing animation judiciously can not only capture the audience’s attention but also convey information effectively. Remember, each effect should contribute to the visual storytelling you want to convey through your presentation.
Step 3: Set the Animation to Loop
These steps will ensure that your animations play on a loop, enhancing the engagement of your PowerPoint presentation. Remember to preview your slideshow to confirm that the animation loop is working as intended.
Tips for Using Loop Animation in PowerPoint
Remember to use animations to emphasize key points. Highlighting crucial information through strategic animation can help reinforce concepts and capture the audience’s attention.
Keep the Animation Simple
By embracing simplicity in loop animations, presenters can create a more user-friendly and engaging experience for their viewers. Clutter-free visuals help the audience to focus on the core message without getting distracted by unnecessary embellishments. With clear messaging, viewers can easily grasp the information being conveyed, leading to better retention and understanding of the content. Minimal distractions ensure that the audience remains attentive and receptive throughout the presentation, enhancing overall engagement and impact.
Use Loop Animation for Emphasis
When used judiciously, looping animations bring a dynamic element to your slides, enhancing storytelling and captivating your audience’s attention. To maximize the impact, consider using loop animation sparingly, primarily focusing on essential information that you want your audience to retain long after the presentation has concluded.
Use Loop Animation for Interactive Presentations
Incorporating interactive elements such as clickable hotspots or trigger animations can encourage user interaction and enable hands-on exploration of content. This not only makes the presentation more immersive but also fosters a sense of participation and personal connection with the material being presented.
Common Mistakes to Avoid when Using Loop Animation in PowerPoint
Overusing loop animation.
One common mistake to avoid in PowerPoint presentations is overusing loop animation, as excessive repetitive effects can distract the audience, diminish message clarity, and detract from the overall presentation quality.
This can result in a message dilution, where the core content gets overshadowed by unnecessary visual embellishments, undermining the effectiveness of the presentation as a whole.
Using Inappropriate Animation Effects
Not previewing the animation.
Ensure a seamless presentation flow by always previewing the loop animations in PowerPoint before the actual showcase, as overlooking this step can lead to unexpected visual discrepancies, timing errors, or technical glitches.
In conclusion, Loop Animation in PowerPoint offers a versatile tool for creating engaging, dynamic presentations that captivate audiences and elevate the visual storytelling experience to new heights.
Additional Resources
If you are looking to elevate your presentation game and captivate your audience with impactful animations, BrightCarbon is a go-to destination. Their comprehensive tutorials cover everything from basic animation principles to advanced techniques, ensuring you have all the tools at your disposal to create visually stunning slides.

Frequently Asked Questions
How to loop animation in powerpoint, can i loop multiple animations in one slide, how do i stop the looped animation, can i loop an animation on a specific part of a slide.
Yes, you can loop an animation on a specific part of a slide. Follow these steps:

Is there a keyboard shortcut to loop animations in PowerPoint?
Can i loop an animation in powerpoint online, similar posts, how to group text boxes in powerpoint, how to download fonts in powerpoint, how to sign in powerpoint, how to click to make text appear in powerpoint, how to align text under bullets in powerpoint, how to put a squared symbol in powerpoint.
How to Loop a PowerPoint Presentation?
Table of Contents
PowerPoint presentations are a go-to for clear and informative content delivery. But what if you want your presentation to run on repeat, like at a kiosk or digital sign? The good news is, that PowerPoint has a built-in feature to loop your slideshow, ensuring your message stays on display without interruption.
This blog post will guide you through the simple steps to set your presentation on a loop, keeping your audience engaged and informed around the clock.
What is PowerPoint Looping?
Normally, in a PowerPoint presentation, you have to manually move from one slide to the next by pressing keys on the keyboard or clicking buttons on a mouse or presentation remote.
However, when you enable looping in PowerPoint, the presentation progresses automatically from one slide to the next without requiring manual input. This eliminates the need for the presenter to interact with the computer or mouse during the presentation.
With PowerPoint looping, you can also set each slide to display automatically for a specified duration, determined by you. Once the preset time elapses, the next slide seamlessly appears. Additionally, upon reaching the final slide, the slideshow automatically starts over from the beginning.
Why Do You Need to Loop Your Slideshow in PowerPoint?
There are several reasons why you might want to loop your slideshow in PowerPoint:
- Unattended Presentations: Looping is ideal for situations where the presentation runs without a presenter. This could be at a kiosk, trade show booth, or in a waiting room. Looping ensures the information is continuously displayed for viewers to come and go as they please.
- Automated Playback: Looping allows for a hands-off presentation experience. Once started, the presentation progresses automatically, freeing you up to greet attendees or answer questions.
- Self-Paced Learning: Looping can be useful for self-paced learning environments. Viewers can revisit slides or take breaks without needing someone to control the flow.
- Continuous Engagement: Looping keeps the audience engaged with a constant stream of information. This can be beneficial for displaying menus, directions, or other ongoing updates.
Create presentation slides with AI in Seconds in Google Slides
10M+ Installs
Works with Google Slides

How to Make a PowerPoint Presentation loop?
Ready to loop your presentation? Here’s how it’s done:
Step 1: Open your PowerPoint and head over to the “Slide Show” tab.
Step 2: Click the button that says “Set Up Slide Show.” A new window will pop up.
Step 3: Under “Show options,” find the magic checkbox that says “Loop continuously until ‘Esc’.” Check that box to make your presentation run on repeat.
Step 4: Want to control how long each slide shows? Look for the option “Automatically advance slides” and check it. Then, use the up and down arrows to set the display time for each slide.
Step 5: Once you’re happy with the settings, click “OK” to save them.
Step 6: Time to loop! Go back to the “Slide Show” tab and click “From Beginning” (or “From Start”). Your presentation will start playing and keep going until you press the “Esc” key.
How To Loop a PowerPoint SlideShow from Selected Slides?
PowerPoint lets you loop a customized selection of slides, creating engaging presentations that run unattended. This eliminates the need for manual slide changes while maintaining audience interest. Here’s how to loop specific slides:
Step 1: Select Slides: In the Slide Sorter view, hold “Shift” and click the first and last slides you want to loop.
Step 2: Enable Looping: Go to the “Slide Show” tab and click “Set Up Show.” Check the box for “Loop continuously until ‘Esc'” and choose “Show slides” from the dropdown menu. Select “From” and enter the slide number where your loop should begin.
Step 3: Create Custom Show (Optional): For easier access, name your looped sequence as a “Custom Show” within the “Set Up Show” dialog.
Step 4: Start Looping: Navigate back to the “Slide Show” tab and choose “Custom Slide Show” to launch your looped presentation.
Closing Thoughts
Looping your PowerPoint presentation is a simple yet powerful technique that unlocks a variety of use cases. By following these steps, you can ensure your message runs continuously, keeping your audience informed and engaged, whether it’s at a kiosk, trade show booth, waiting room, or any other scenario that demands unattended playback.
- No design skills required
- 3 presentations/month free
- Don’t need to learn a new software

Frequently Asked Questions
My presentation has animations and transitions. will they loop as well.
Absolutely! When you loop your presentation, animations and transitions will also repeat continuously, regardless of the looping method you choose.
Does looping affect animation timing?
There’s a possibility. Looping might affect how your animations play out, especially if they have specific timings set. To avoid any hiccups, be sure to thoroughly test your looped presentation. This will ensure your animations sync smoothly with the slide transitions.
Can I loop specific slides in my PowerPoint presentation?
Yes! PowerPoint gives you the flexibility to loop a selected group of slides, creating engaging presentations that run unattended.
How do I stop or pause a looped slideshow in PowerPoint?
Need a break? Simply press the “Esc” key on your keyboard to interrupt the looped slideshow at any time.
Can I customize the duration of each slide in a looped PowerPoint presentation?
Yes, you can! PowerPoint allows you to adjust the slide transition settings for each slide. This lets you control how long each slide displays, creating a tailored and dynamic looping experience.
Related Posts

How to Create Agenda Slide in Powerpoint?
Ever feel like your PowerPoint presentations could benefit from a strong start? Using an agenda slide at the beginning can be a helpful way to take charge of your presentation from the get-go.

How to End a PowerPoint Presentation?
Picture this: The lights dim, the room hushes, and your presentation is in full swing. But as you near the end, there’s a sense of anticipation, not boredom. Your audience leans in, hungry for that final spark to ignite their minds. That’s the power of a captivating conclusion. The secret sauce that leaves your audience […]
7X7 Rule in PPT (PowerPoint Presentation)
Captivate your audience with impactful presentations using the 7×7 rule. This design principle encourages a clear and focused approach by limiting slides to a mere 7 lines of text, each containing a maximum of 7 words. By adhering to this format, you can craft presentations that are not only easy to digest but also leave a lasting impression on your viewers. Let’s jump into the article and find out how it works.
Save Time and Effortlessly Create Presentations with SlidesAI


How to Loop a PowerPoint Slide Show to Repeat Automatically

Set up a PowerPoint Presentation That Loops or Repeats Continuously
by Avantix Learning Team | Updated November 12, 2021
Applies to: Microsoft ® PowerPoint ® 2013, 2016, 2019 and 365 (Windows)
You can set up a PowerPoint slide show to loop or repeat automatically. A looping presentation can be used at events, trade shows or even in a reception area in an office. The easiest way to set up a slide show to loop or replay continuously is to apply automatic transitions and then configure Slide Show settings.
Recommended article: 5 PowerPoint Keyboard Shortcuts to Run a Slide Show
Do you want to learn more about PowerPoint? Check out our virtual classroom or in-person PowerPoint courses >
Screenshots in this article are from PowerPoint 365 but are similar in older versions of PowerPoint.
Step 1: Apply transitions to automatically advance slides during a slide show
Transitions occur between slides when you run a slide show.
To apply transitions to automatically advance slides during a slide show:
- In Normal View or Slide Sorter View, display or select a slide.
- Click the Transitions tab in the Ribbon.
- Select a transition in the Transitions gallery (such as Fade).
- Click Effect Options and choose the desired option. Effect Options change depending on the transition you selected.
- In the Timing group, click the arrows beside Duration to set the timing you want (in seconds) for the transition. You may also type a duration.
- In the Timing group, under Advance Slides, deselect or uncheck On mouse click and beside After, select or click the up and down arrows to set the timing to transition to the next slide. You may also type a duration.
- In the Timing group, click Apply to All.
In the Transitions tab in PowerPoint, you can select the type of transition (such as Fade) as well as timing options:

Step 2: Set up a presentation to loop during a slide show
To set up a PowerPoint presentation to loop during a slide show:
- Click the Slide Show tab in the Ribbon and then click Set Up Slide Show. A dialog box appears.
- Under Show type, if you select Presented by a speaker (full screen), the speaker or those watching the slide show will have control over when they advance slides. This is the default setting for slide shows. If you select Browsed by an individual (window), those watching the slide show do NOT have control over when slides advance. If you select Browsed at kiosk (full screen), those watching the slide show do NOT have control over when slides advance and the presentation automatically loops until those watching press Escape (Esc).
- Under Show options, select Loop continuously until 'Esc'. You will be able to select this option if you selected one of the first two options under Show type.
Below is the Set Up Show dialog box with Presented by speaker selected and looping enabled:

If you want to set specific timings for slides to advance or to add narration, check out the article How to Run a PowerPoint Slide Show Automatically (Set Up a Self-Running Presentation) . If you have audio or video in the presentation, you'll need to set the media to play automatically (on the Playback tab in the Ribbon) and animations will also need to be set to run automatically.
Subscribe to get more articles like this one
Did you find this article helpful? If you would like to receive new articles, JOIN our email list.
More resources
How to Embed a YouTube Video in PowerPoint
How to Hide and Unhide Slides in PowerPoint (with Shortcuts)
How to Insert Video in PowerPoint (from a File on Your PC or a Shared Drive)
PowerPoint Keyboard Shortcuts to Play and Control Video During a Slide Show
How to Add Animation in PowerPoint (Animate Images, Text and Other Objects)
Related courses
Microsoft PowerPoint: Intermediate / Advanced
Microsoft PowerPoint: Design for Non-Designers
Microsoft PowerPoint: Animations Bootcamp
Microsoft Excel: Intermediate / Advanced
VIEW MORE COURSES >
Our instructor-led courses are delivered in virtual classroom format or at our downtown Toronto location at 18 King Street East, Suite 1400, Toronto, Ontario, Canada (some in-person classroom courses may also be delivered at an alternate downtown Toronto location). Contact us at [email protected] if you'd like to arrange custom instructor-led virtual classroom or onsite training on a date that's convenient for you.
Copyright 2024 Avantix ® Learning
You may also like

How to Insert or Type U with an Accent Mark in PowerPoint (Ù, Ú, Û, Ü, ù, ú, û, or ü)
You can insert or type u with an accent mark in PowerPoint using built-in tools or keyboard shortcuts (including Alt code shortcuts). The letter u can be inserted with an accent in both upper or lower case. The following are common accented characters that you can insert or type in PowerPoint in upper or lower case: grave (Ù or ù), acute (Ú or ú), circumflex (Û or û) and umlaut (Ü or ü).

How to Insert or Type O with an Accent Mark in PowerPoint (Ò, Ó, Ô, Õ, Ö, ò, ó, ô, õ or ö)
You can insert or type o with an accent mark in PowerPoint using built-in tools or keyboard shortcuts (including Alt code shortcuts). The letter o can be inserted with an accent in both upper or lower case. The following are common accented characters that you can insert or type in PowerPoint in upper or lower case: grave (Ò or ò), acute (Ó or ó), circumflex (Ô or ô), tilde (Õ or õ) and umlaut (Ö or ö).

How to Insert or Type E with an Accent Mark in PowerPoint (È, É, Ê, Ë, è, é, ê, or ë)
You can insert or type e with an accent mark in PowerPoint using built-in tools or keyboard shortcuts (including Alt code shortcuts). The letter e can be inserted with an accent in both upper or lower case. The following are common accented characters that you can insert or type in PowerPoint in upper or lower case: grave (È or è), acute (É or é), circumflex (Ê or ê) and umlaut (Ë or ë).
Microsoft, the Microsoft logo, Microsoft Office and related Microsoft applications and logos are registered trademarks of Microsoft Corporation in Canada, US and other countries. All other trademarks are the property of the registered owners.
Avantix Learning |18 King Street East, Suite 1400, Toronto, Ontario, Canada M5C 1C4 | Contact us at [email protected]

Our Courses
Avantix Learning courses are offered online in virtual classroom format or as in-person classroom training. Our hands-on, instructor-led courses are available both as public scheduled courses or on demand as a custom training solution.
All Avantix Learning courses include a comprehensive course manual including tips, tricks and shortcuts as well as sample and exercise files.
VIEW COURSES >
Contact us at [email protected] for more information about any of our courses or to arrange custom training.
Privacy Overview
Pin it on pinterest.
- Print Friendly
How To Loop a PowerPoint Presentation

Learn how to loop a PowerPoint in 3 easy steps! Usually, once you’re finished with your presentation, PowerPoint goes back to the slide editor. But if you want your presentation to go back to the start, this quick tutorial will show you how to loop any PowerPoint presentation and set it to run automatically.
Why Learn How to Loop a PowerPoint
It can be very awkward to have your audience looking at the black screen after going through all your slides. Or even worse, at the slide editor. If you’re planning on going back on some of your previous points, learning how to loop your PowerPoint presentation can be a useful tool. Sure, you can go back using the Back key. But this way can make it easier and more polished, especially if you have a long presentation with many slides.
Learning how to loop a PowerPoint can also be extremely useful for those making a pictured-based presentation. Slides don’t necessarily have to have a lot of information on them. PowerPoint can also be used just to present images and examples or to provide a background for the speaker. Looping your presentation will make sure that you’re never left with an empty screen.
In short, it’s a nice detail to make your presentation look more clean and polished. So, are you ready to learn how to loop a PowerPoint presentation?
How to Loop a PowerPoint Presentation
Luckily, learning how to loop a PowerPoint is very easy! Just follow these 3 steps:
1. Open your presentation and go to the Slide Show tab.

2. Select the Set Up Slide Show option for the Set-Up Options window to appear.

3. In this window, go to the “Show options group” and tick the Loop continuously until ‘Esc’ (the first option). Don’t forget to click OK to apply the new set-up!
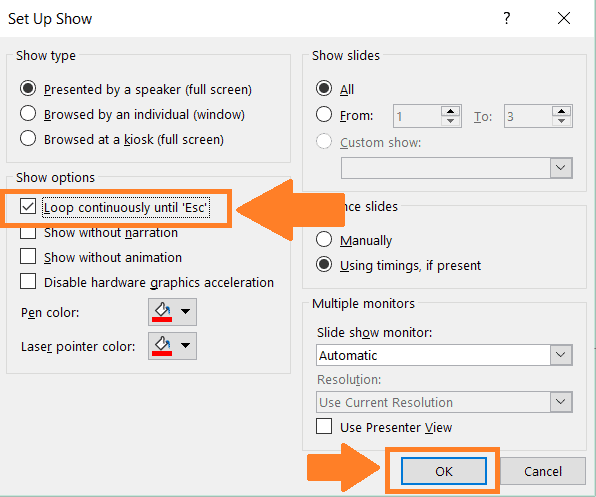
And that’s all! Try putting your presentation on Slide Show mode. You’ll see that your presentation keeps going on until you press the ESC key in your keyboard.
How To Make a Self-Running PowerPoint Presentation
If you’re making a PowerPoint presentation to be used only as a background, then this information might be useful too. Usually, PowerPoint presentations only advance to the next slide when a mouse click occurs. But you can set your presentation to run automatically. This way, you don’t have to keep worrying about moving to the next slide since your presentation will do it on itself!
This is a great option for presentations that are only images on a loop, like in a Pecha Kucha presentation . You will be able to focus much better on what you have to say rather than in clicking on your slides to avoid boring your audience with only one picture.
1. Go to the Transitions tab.
2. In the “Timing” group (in the far right), tick the After option. In the timer on its side, enter how much time you want between slide and slide.

3. Select the Apply To All option so every slide follows the same set-up.
If you want different times for each slide, you can also customize it like so. You just have to go one at a time changing how much time you want to spend on each slide and ignore the last step. Don’t forget to practice before your presentation! Only then you’ll know if the times you set for each slide are right. Good luck!
Create professional presentations online
Other people also read

Tutorial: Save your PowerPoint as a Video

How To Convert Google Slides To PowerPoint and Vice Versa

How To Add Animations To PowerPoint

Add a motion path animation effect
You can apply motion path animation effects to move slide objects in a sequence that tells an effective story.
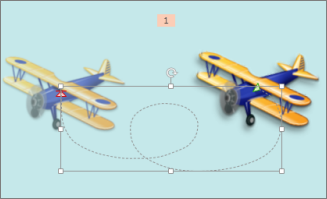
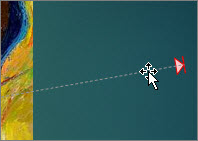
For example, the plane on the right (below) shows the starting point of the plane, and the dotted line between the two planes shows the path it will take when the animation plays. The transparent image on the left is where the plane will end up when the motion path animation is done.

Microsoft 365 subscribers have a time-saving option for motion-based animation effects: Morph
Add a motion path to an object
Click the object you want to animate.
On the Animations tab, click Add Animation .

Scroll down to Motion Paths, and pick one.

Tip: If you choose the Custom path option, you will draw the path that you want the object to take.

To stop drawing a custom path, press Esc.
Advanced motion path options
If you don’t see a motion path that you want, at the bottom of the gallery, click More Motion Paths .
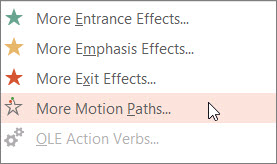
Click an animation to see a preview of how the object will move on your slide.
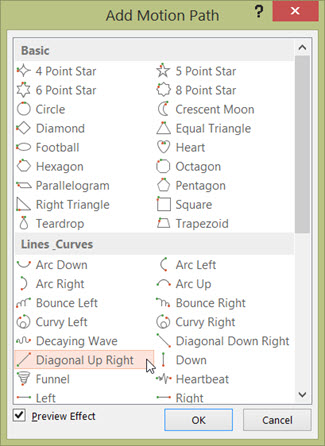
Once you pick the motion path you want, click OK .
To remove and animation, on the slide, click the motion path (dotted line with arrow), and then press Delete.
Editing motion paths
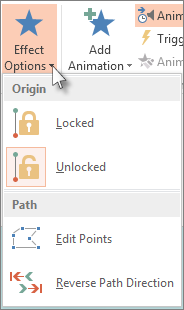
To do things like change the direction of the motion path, edit the individual points of the motion path, or to lock (make it so others can’t change the animation) or unlock the animation, click Effect Options .
To preview the motion path, click the object on the slide, and then click Animations > Preview .
Tip: Preview is located on the Animations tab, just below the File tab on the far left.

Using predefined paths
In most cases, using one of the basic path animations is a perfect choice for adding interest to your slide. In the following example, we'll apply a Turn path animation to a graphic, use Effect Options to change the direction of the path, and then we'll use Reverse Path Direction to get the final look we want.
Example: applying a predefined path animation to a graphic
On a blank slide, click Insert > Shapes > Rectangle (or another shape if you prefer), and then click in the upper-left corner of the slide to insert it.
With the rectangle still selected, click Animations > Path Animation , and then under Basic , click Turn .
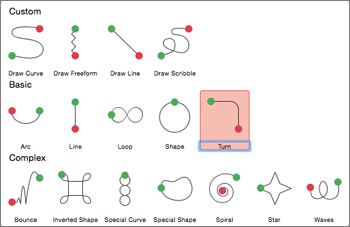
After the animation preview is finished and click Effect Options on the Animations tab, and then click Down Right .
Move your cursor over the animation end-point until it changes to a double arrow with a line through it, and then click and drag to the lower-right corner of the slide.
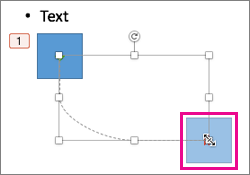
Finally, click Effect Options > Reverse Path Direction .
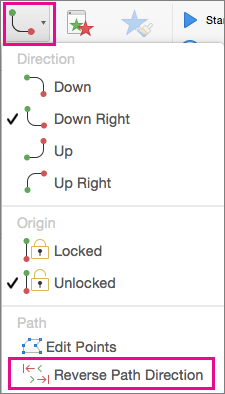
The animation now moves the graphic from the least visible place on the slide (lower right) to the most visible (upper left).
Using custom paths
To draw a custom path animation, select the object you want to animate and click Animations > Path Animations , and then select an option under Custom . The drawing method is different depending on the type of path you choose.

Click the start point, and then click each time you want to begin a change of direction.
Double-click to finish.

Click and hold the mouse button to trace the shape you want, and then release the button when you're done.
To change a custom path once you've drawn it:
Control+click or right-click the custom path and click Edit Points .
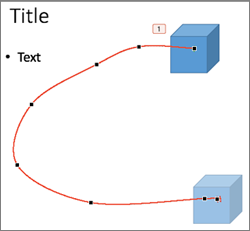
Tip: If you've never worked with editing paths in a graphics program before, you may find it easier to delete the effect and draw it again.

Need more help?
Want more options.
Explore subscription benefits, browse training courses, learn how to secure your device, and more.

Microsoft 365 subscription benefits

Microsoft 365 training

Microsoft security

Accessibility center
Communities help you ask and answer questions, give feedback, and hear from experts with rich knowledge.

Ask the Microsoft Community

Microsoft Tech Community

Windows Insiders
Microsoft 365 Insiders
Was this information helpful?
Thank you for your feedback.
- Programming
- Virtualization
- Productivity
Looping PowerPoint animation sequences within a slide

Setting the Scene
Building a Looping Slide

- https://www.experts-exchange.com/articles/18021/Looping-PowerPoint-animation-sequences-within-a-slide.html copy
- Microsoft PowerPoint
Comments (9)

Have a question about something in this article? You can receive help directly from the article author. Sign up for a free trial to get started.
The Original Tech Community
How-To Geek
How to use motion path animations in microsoft powerpoint.

Your changes have been saved
Email is sent
Email has already been sent
Please verify your email address.
You’ve reached your account maximum for followed topics.
Quick Links
Add a motion path animation, customize the motion path.
Microsoft PowerPoint offers many types of animations . You can add effects to text , images, and shapes. But if you want to create your own, you can select a motion path animation to move your object wherever you like.
With motion path animations in PowerPoint, you can make your object zigzag, loop, spiral, or swoosh. Once you select the motion path you want to use, you can customize the points to create the exact path you want your object to take.
Open your PowerPoint presentation and select the slide where you want to create the animation. Either insert the object you want to animate or select it if you've already added it to the slide.
Related: How to Hide an Object Before Animation in PowerPoint
Go to the Animations tab and click the arrow at the bottom of the Animation selection box. This opens the full collection.

Scroll toward the bottom and you'll see a few options in the Motion Paths section. If you want to use one of these, simply select it to apply it to your object. Notice you can choose Custom Path which allows you to draw the path yourself.
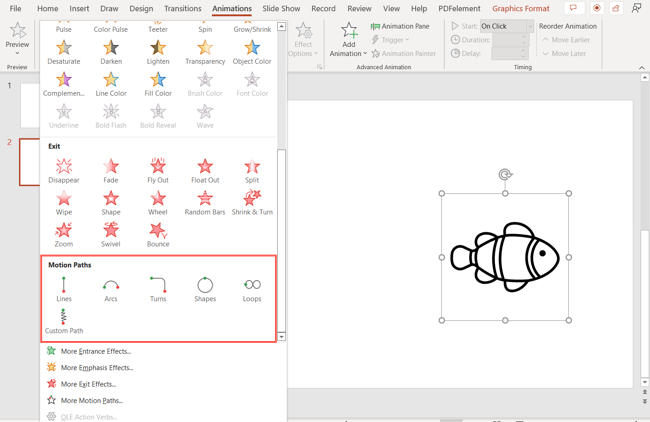
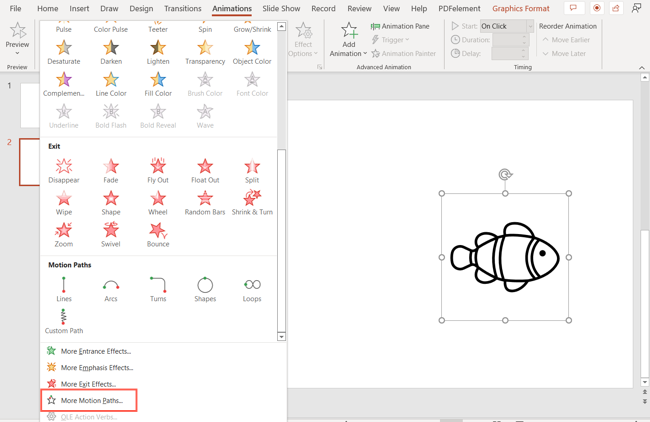
For additional options, click "More Motion Paths" at the bottom of the window.
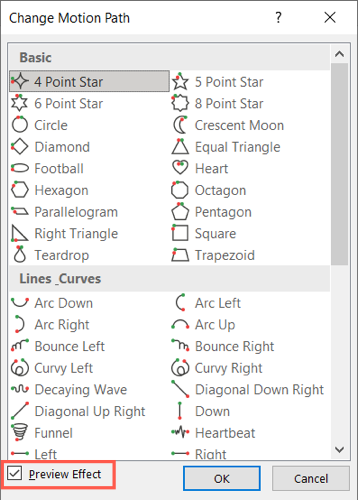
In the Change Motion Path box, you'll see Basic, Lines and Curves, and Special paths. To see a preview before you apply it, check the box for Preview Effect at the bottom. Then, choose one to see it in action.
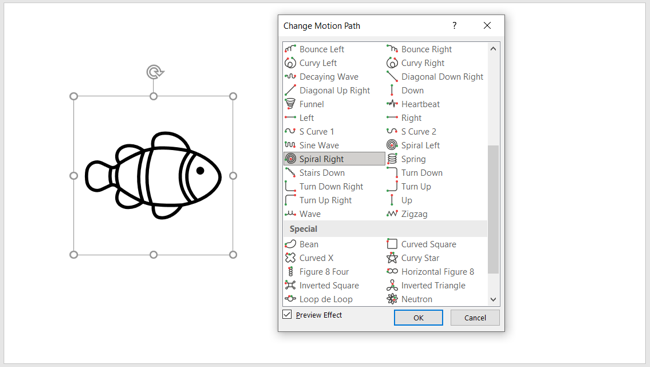
When you find the path you want to use, select it and click "OK."
If you want to combine motion paths so that your object ends in a certain spot, check out our how-to.
Related: How to Combine Motion Paths in Microsoft PowerPoint
After you apply the motion path, you may have options to change the direction. Select the animated object and go to the Animations tab. Click the Effect Options drop-down arrow to view your choices. Note that not all paths offer extra effects, but most let you reverse the path direction.
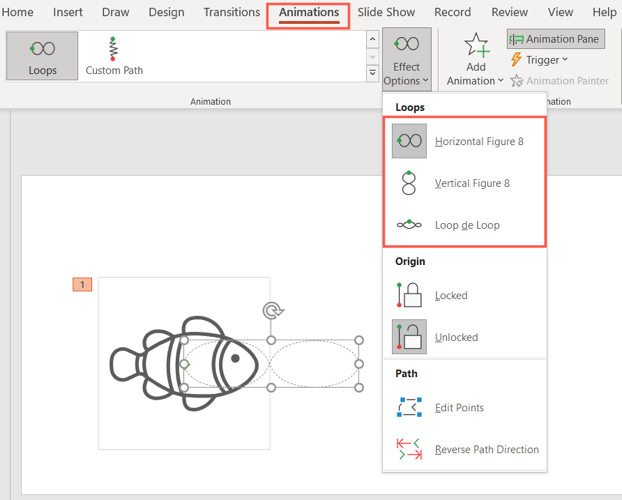
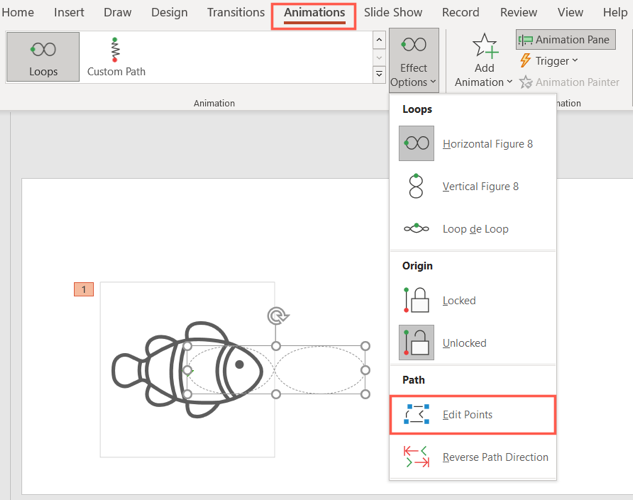
Along with changing the direction of your motion path, you can edit the points. Click the Effect Options drop-down arrow and pick "Edit Points."
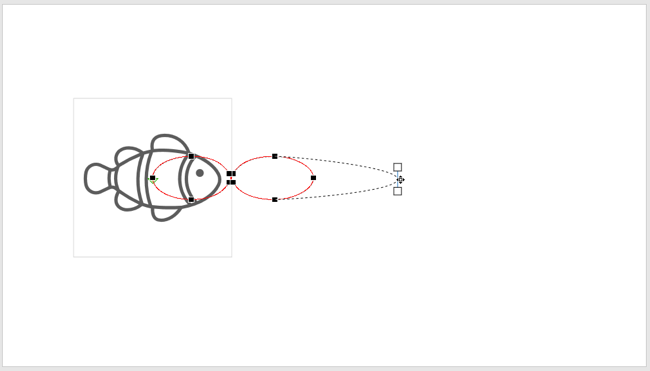
You'll then see the motion path with the points as squares. Select and drag a point to move it.
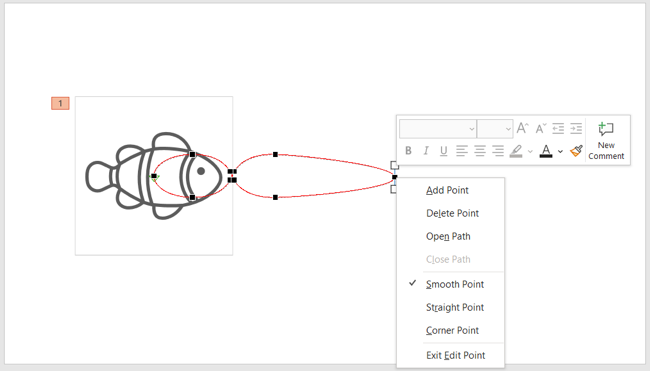
You can also right-click a point for options like making it a smooth, straight, or corner point. Additionally, you can add more points or remove one.
If you want to change the start action or duration , or add a delay, select the animation and use the tools on the Animations tab.

Remember, you can preview your animation as you make edits to it using the Preview button on the left side of the ribbon on the Animations tab. This helps to see if you need more adjustments or want to reorder the animations .
Animations can spruce up your slideshow . So if a motion path animation is what you need, you have plenty of options in PowerPoint.
Related: 8 Tips to Make the Best PowerPoint Presentations
- Microsoft Office
- Microsoft PowerPoint
- Stack Overflow for Teams Where developers & technologists share private knowledge with coworkers
- Advertising & Talent Reach devs & technologists worldwide about your product, service or employer brand
- OverflowAI GenAI features for Teams
- OverflowAPI Train & fine-tune LLMs
- Labs The future of collective knowledge sharing
- About the company Visit the blog
Collectives™ on Stack Overflow
Find centralized, trusted content and collaborate around the technologies you use most.
Q&A for work
Connect and share knowledge within a single location that is structured and easy to search.
Get early access and see previews of new features.
Staging Ground badges
Earn badges by improving or asking questions in Staging Ground.
powerpoint loop a series of animation
I am currently working on a slide with an animation of sunrise to sunset as a background. Then there are some pictures fade in and fade out.
Now, I am having difficult to loop the series of animation that repeat the pictures fade in and fade out until sunset.
I am trying to avoid manual timing setting because the duration from sunrise to sunset is 1 hour and there are only 5 pictures to repeat the fade in and fade out that takes only 10 secs for each picture.
Appreciate your help!
Unfortunately you're probably done with the animation and presentation already. In the hopes this answer can help future questioners, however, this blog post has a walkthrough of steps that can loop a single slide as a sort of sub-presentation.
First, click Slide Show > Set Up Show. Put a checkmark to Loop continuously until 'Esc'. Click Ok. Now, Click Slide Show > Custom Shows. Click New. Select the slide you are looping, click Add. Click Ok and Close. Click on the slide you are looping. Click Slide Show > Slide Transition. Under Advance slide, put a checkmark to Automatically After. This will allow the slide to loop automatically. Do NOT Apply to all slides. Right click on the thumbnail of the current slide, select Hide Slide. Now, you will need to insert a new slide just before the slide you are looping. On the new slide, insert an action button. Set the hyperlink to the custom show you have created. Put a checkmark on "Show and Return"
This has worked for me.
- Works great, thanks! Helpful hint: for the hyperlink portion: Cutom Show can be found under the Place In This Document section. – user3191107 Commented Jan 13, 2014 at 16:57
- Great but how you advance to the second slide. My first slide is looping no matter what i press ? – Anonymous Commented Oct 15, 2016 at 20:02
- @Anonymous Press Escape and it should break you out – Erica Commented Sep 20, 2017 at 14:35
- still works great in 2022. the hyperlink of the action button should be set to a custom show (and not the hidden slide). I missed that part and it took me a while to figure out what it was. thanks – nivniv Commented Mar 25, 2022 at 8:22
Not the answer you're looking for? Browse other questions tagged loops animation powerpoint or ask your own question .
- The Overflow Blog
- Is this the real life? Training autonomous cars with simulations
- What launching rockets taught this CTO about hardware observability
- Featured on Meta
- Preventing unauthorized automated access to the network
- Upcoming initiatives on Stack Overflow and across the Stack Exchange network...
- Feedback Requested: How do you use the tagged questions page?
- Proposed designs to update the homepage for logged-in users
Hot Network Questions
- Rename files with non-Latin characters
- Under what circumstances is the observation of X proof of the existence of X?
- What separates numbers from other mathematical objects and what justifies e.g. the quaternions to be called a number system?
- Why the title The Silver Chair?
- "Riiiight," he said. What synonym of said can be used here?
- What type of radiation does Io experience?
- SSH client does not offer public key to SSH server
- Crocodile paradox
- Does anyone know what the Starship 5 fins are made of?
- No service for type 'Sitecore.ContentSearch.Abstractions.IMediaFileTextExtractor' has been registered
- If the categorical variable is retained in my final model in R, then why does the post hoc analysis say the levels do not differ?
- What expressions (verbs) are used for the actions of adding ingredients (solid, fluid, powdery) into a container, specifically while cooking?
- PCB design review of my line following robot
- What was Adam Smith's position on the American Revolution?
- How can patients afford expensive surgeries but not lawsuits in the U.S. medical system in "Dr. Death"?
- Inserting special characters like x̄ X̄ that aren't in the digraph table?
- How to cover up a kitchen pass-through window without permanent changes?
- Running air handler in fan-only mode
- Recursively move subtitle files into subdirectories
- What challenge did Jesus put before the rich young man in Mtt19?
- Simple console calculator app. Looking for structure/best practices tips
- Expected number of cards that are larger than both of their neighbors
- Unclear points regarding ROC curve in machine learning
- Would radar/sonar/other spy technology be able to penetrate space station walls?

IMAGES
VIDEO
COMMENTS
Click Loop until Stopped. Click Hide During Show. Your audio file options should now look like this: Finally, click the Trim Audio button and set the End Time to the exact time you want the animation sequence to repeat. In our example, the sequence lasts 13.5 seconds so we'll set the audio end time to 14.00 seconds.
2. Go to Animations tab, click Add Animation and choose an effect in the drop-down menu. 3. Click Animation Pane to evoke the side pane. Right-click the animation you just added and choose Timing… in the menu. 4. In the Timing tab of the popping out window, click the small down arrow beside the choice box of Repeat to expand the menu.
Learn how to loop and repeat animations in PowerPoint.How to Loop an Animation in PowerPointSoftware used: Microsoft PowerPoint Office 365Presenter: Alex Cha...
Here is the process: 1. Create your animation in a slide (or even series of slides if you want to use the Morph transition) 2. Create your other slides in the presentation. 3. In the Slide Show tab, use the Custom Show option to make one custom slideshow for your animation slide (s), and one for the slides after. 4.
How to Create a Looping Animation in PowerPoint. Step 1: Select the Object to Animate. Step 2: Open the Animations Tab. Step 3: Choose an Animation. Step 4: Adjust Animation Settings. Step 5: Preview and Adjust. Step 6: Apply to Other Objects (Optional) Best Practices for Looping Animations. 1.
Hello powerPoint users.!Animation effects in presentations are a great way to pace your content so you can explain your story step-by-step. We have already s...
In the "Add Animation" dropdown menu, select the animation you want to loop. Click on the animation and select "Effect Options" from the dropdown menu. In the "Effect Options" window, select "Timing" from the top menu. Under "Repeat," choose "Until End of Slide" to loop the animation until the end of the slide.
Tutorial Slides 👉 https://pptskill.com (attached to the second chapter of PowerPoint Animation Mastery) Order a Custom Presentation 👉https://pptskills.c...
Ready to loop your presentation? Here's how it's done: Step 1: Open your PowerPoint and head over to the "Slide Show" tab. Step 2: Click the button that says "Set Up Slide Show.". A new window will pop up. Step 3: Under "Show options," find the magic checkbox that says "Loop continuously until 'Esc'.".
Set your PowerPoint presentation to run itself, advance when viewers click, or play in a loop. ... Next: Animation, video & audio Create a self-running presentation. You can use a self-running presentation to run unattended in a booth or kiosk at a trade show or convention, or you can save it as a video and send it to a client. ...
First, open your PowerPoint presentation in which you would like to loop. Once open, navigate to the "Set Up" group of the "Slide Show" tab and then select the "Set Up Slide Show" button. The "Set Up Show" window will appear. In the "Show options" group, check the box next to "Loop Continuously until Esc.".
In the Transitions tab in PowerPoint, you can select the type of transition (such as Fade) as well as timing options: Step 2: Set up a presentation to loop during a slide show. To set up a PowerPoint presentation to loop during a slide show: Click the Slide Show tab in the Ribbon and then click Set Up Slide Show. A dialog box appears.
If using Office 365, go to 'File,' click 'Export,' and select 'Create an Animated GIF.'. Adjust the GIF quality settings and click 'Create GIF.'. Type a name and choose a location to save the animated GIF. Now you have an engaging infinite loop animation! For a more in-depth visual guide, watch the tutorial video here.
Luckily, learning how to loop a PowerPoint is very easy! Just follow these 3 steps: 1. Open your presentation and go to the Slide Show tab. 2. Select the Set Up Slide Show option for the Set-Up Options window to appear. 3. In this window, go to the "Show options group" and tick the Loop continuously until 'Esc' (the first option).
In this Microsoft PowerPoint Tutorial video, you will learn that how you can use a little trick to loop animation with a pause between each repeat. This tric...
Incorporating animations into your presentations can breathe life into your content and engage your audience on a deeper level. This tutorial unlocks the potential of simple shapes and the power of timing to create captivating infinite loops. Give it a try, and your next PowerPoint presentation will surely leave a lasting impression.
Add a motion path to an object. Click the object you want to animate. On the Animations tab, click Add Animation. Scroll down to Motion Paths, and pick one. Tip: If you choose the Custom path option, you will draw the path that you want the object to take. To stop drawing a custom path, press Esc.
Next, insert your silent sound file into PowerPoint on the slide that you're animating and set it to Loop until Stopped and Hide During Show: 3. Now add Bookmarks to the audio file at intervals as per your desired sequence timing. So, if we want to do things at 1 second intervals, we add bookmarks at each 1 second.
By default, animations only play once unless you restart them. This tutorial will teach you how to loop an animation to always playback till you stop it.. The first step is to open Microsoft PowerPoint Desktop.. Click on the Slide to enable animation at the tool bar.. Click the Animations tab.. Click Animation Pane.. Click on the Animation you want to edit.. Click Timing.. Click Rewind when ...
Learn how to design a mesmerizing loop animation in PowerPoint where an oval seamlessly transforms into star shapes. In this step-by-step tutorial, we break ...
Open your PowerPoint presentation and select the slide where you want to create the animation. Either insert the object you want to animate or select it if you've already added it to the slide. Related: How to Hide an Object Before Animation in PowerPoint. Go to the Animations tab and click the arrow at the bottom of the Animation selection box.
Click Ok. Now, Click Slide Show > Custom Shows. Click New. Select the slide you are looping, click Add. Click Ok and Close. Click on the slide you are looping. Click Slide Show > Slide Transition. Under Advance slide, put a checkmark to Automatically After. This will allow the slide to loop automatically.
Learn to craft a mesmerizing Infinite Loop Animation in PowerPoint in this comprehensive tutorial. You'll discover how to create a captivating loader animati...
Hello PowerPoint Users.! I am a PowerPoint designer using office 365 latest version in all my Graphic design Illustrations. In this Tutorial we will see how ...