How Do I Insert a Text Box in OpenOffice?
OpenOffice 4 Writer has two ways to insert an area of text into a specific location on a page. The basic text box on the Drawing toolbar has only a few options, such as border thickness and background color. If you need additional settings, insert a frame instead. Frames can contain formatting, such as columns, and you can flow text between multiple frames on separate pages.
Advertisement

Draw a Text Box
Video of the Day
Click the "T" icon on the Drawing toolbar, then click and drag in a document to create a text box. If you don't see the toolbar, open the "View" menu, choose "Toolbars" and click "Drawing." After you place a text box, begin typing to enter text. Click anywhere outside the box to return to typing in the main document. To return to typing inside the box, double-click it. If you single-click the box, the sidebar opens to the Area panel, which has options for changing the box's background, transparency and border. Click a text box once and drag it to move the box, or drag the handles around the edge to resize the box.
Insert a Frame
Open the "Insert" menu and pick "Frame" to open the Frame dialog box. Enter a size for the frame on the first tab, then look through the remaining tabs for any other formatting options you need. For example, you can create columns on the "Columns" tab, change how the frame fits in the page on the "Wrap" tab, and set the frame's outline on the "Borders" tab. To have text flow between multiple frames, pick another frame as the "Next Link" on the "Options" tab. After creating a frame, you can drag the handles on its edge to resize it. To alter any other settings, right-click the frame and choose "Frame."
- Apache OpenOffice Wiki: Working With Text Boxes
- Apache OpenOffice Wiki: Working With Frames on Writer
- Apache OpenOffice Wiki: Sidebar
- Apache OpenOffice Wiki: Using Frames for Page Layout
Report an Issue
Screenshot loading...
Adding text If the slide layout already includes textboxes, simply click on the textbox to add text. To add a text box to the slide, choose textbox option from the main toolbar and draw the text box with the mouse.
Formatting text Select the text that will be formatted by highlighting the text on the slide. Specify the desired font, font size, color, and font style (bold, italic, underline) from the object toolbar.
Changing case You may want to change the case of the text to uppercase or lowercase by highlighting the text you want to change and choose Format - Case/Characters - Uppercase OR lowercase from the menu bar.
Spellcheck To check the spelling of your presentation, choose Tools - Spellcheck - Check from the menu bar.
- If the word is spelled correctly, click Ignore or Ignore All if the word appears many times through out the presenation.
- If the word is spelled wrong, highlight one of the suggestions to correct it or manually correct it yourself by typing in the correct word in the Word box. Click Replace to make the correction or Replace Always if there may be multiple instances of the misspelled word through out the presentation.
- To end the spellcheck early, simply click Close.
Inserting a hyperlink If a slide layout already includes text boxes, simply click on the textbox and then choose Insert - Hyperlink from the menu toolbar.
If you would like to link to a Website on the Internet, make sure the Internet radio button is selected and then enter the complete URL address in the Target box. It will automatically begin filling in the Text box for you. If you would like a different name other than the URL on the slide, then just type it in the Text and that will show up on the slide instead of the URL address. Click Apply and then Close to exit the dialog box. You may also insert a hyperlink without selecting on an existing textbox. This method will create a hyperlink in a brand new textbox. You may format the hyperlink just like any text.
- Using slide animation effects
- Putting together a slide show
- Using slide transitions
- Using interactions
- Running a slide show
Slide animations are similar to transitions, but they are applied to individual elements on a single slide—a title, chart, image, or individual bullet point. Animations can make a presentation more lively and memorable. Just as with transitions, heavy use of animations can be fun, but distracting and even annoying for an audience expecting a professional presentation.
Animation effects need to be applied from Normal View so that you can select individual objects on a single slide.
- 1.1 Starting an animation effect
- 1.2 Choosing additional properties of an animation effect
- 1.3 Example: Using multiple animation effects
- 1.4 Example: Setting up a motion path
- 2 Advanced animation effects
- 3 Removing animation effects
Applying an animation effect
In Normal View, display the desired slide. Select the text or object you want to animate. An object such as a graphic or an entire text box will have green handles around it when selected. If you choose only a portion of the text in a text box, you may not see any green handles.
In the Tasks pane, choose Custom Animation .

Click Add . The Custom Animation dialog appears. Choose an effect from one of the pages of this dialog, and choose the speed or duration of that effect. See this example for some hints on how to combine multiple effects.

To choose the animation to be applied when the object is placed on the screen, use an effect from the Entrance page, for example Fly In or Dissolve In .
Use the Emphasis page to apply an effect that changes the font color or applies special effects to the text such as blinking text.
To choose the effect to be applied when the object is leaving the page, use the Exit page.
If you want the object to move along a line or curve, select an animation from the Motion Paths page. An example of this type of animation is provided here .
Click OK to save the effect and return to the Custom Animation page on the Task pane. Here you can choose how to start the animation, change the speed, and some additional properties of the selected effect.
Starting an animation effect
You have three choices for starting an animation effect:
On click —the animation stops at this effect until the next mouse click.
With previous —the animation runs at the same time as the previous animation.
After previous —the animation runs as soon as the previous animation ends.
Choosing additional properties of an animation effect
Many animations have properties that you can set or change. For example, if you chose the Change Font Color effect on the Emphasis page, you can specify the font color. If you chose Fly In on the Entrance page, you can specify the direction from which the object flies in.
The label on the properties box changes depending on the choices available for each effect. For example, a Fly In effect has a box labelled Direction and a Change Font Color effect has a box labelled Font color .
Example: Using multiple animation effects
To illustrate how you can set up multiple effects, let’s look at a common animation: list items fly in one at a time from the bottom of the slide, and as each new item appears, the previous items change to a different color. Here is how to create these effects.
Step 1. Apply the “fly in” effect to individual list items.
- Display the Custom Animation page of the Task pane.
- Create a slide with several items in a bullet list. Our example slide has four.

- Select all four items. Click Add on the Custom Animation pane.
- On the Entrance page of the Custom Animation dialog, select Fly In , optionally change the Speed to Medium , and click OK .

- The four effects you have just set up are listed in the animations list on the Custom Animation page, as shown below.

Step 2. Apply the “change font color” effect to some list items.
Now we want to set each of the first three list items to change color when the following item appears on the slide. To do this:
- Select the first three items on the slide (not the animations list) and click Add in the Custom Animation pane. This time we go to the Emphasis page of the Custom Animation dialog and choose Change Font Color , as shown below. Click OK to save this effect.

- Notice that the three new animations are listed at the bottom of the animations list, and the “type of effect” icon for these three effects (in the second column) is different from the icon for the first four effects.

- You could, if you wish, select any of the last three items and choose a different color from the Font color list on the Custom Animation pane.
- Use the Change order: up-arrow button to move each of the last three items up the list to just under the other item with the same name. The animation list will now look like the figure below.

Step 3. Change the timing for some list items from With previous to On click.
Notice that all of the items on the animations list (except for the two “Point one” items) are set to start at the same time as the previous item. However, we want the second “Point two” animation and the second “Point three” animation to also occur On click.
- Select these items, and then choose On click from the Start list. The animation list now looks like the figure below.

- Save the file.
- Test this set of animations by clicking the Slide Show button.
Example: Setting up a motion path
The Motion path effect moves an object along a path consisting of a combination of straight and curved lines. Several pre-packaged paths are provided in OOo, but it is not difficult to create your own custom path. Start by selecting the object you want to animate and select a pre-packaged motion path animation which is similar to the effect you want to obtain. Alternatively use the Polygon or Curve animation to create a new path.
Select the object to show the animation path, which will be displayed as a thin gray line with a triangle showing the starting point and another indicating the end point. Click on any point on the line so that blue handles are displayed around it. When the blue handles around the path are shown, you can move or resize the path in the same way as you would perform these operations on a graphic object.
Once a point is selected, you can add an additional point, delete it, move it and so on. For a detailed explanation on how to manipulate the points on a curve, see the Draw Guide . Once you are satisfied with the shape of the curve and its speed, click anywhere on the screen to deselect the object and continue normal editing.
The figure below shows a polygon motion path with a curved section.
You can combine a motion with other effects such as spinning or changing of size or colors to obtain dramatic effects.

Advanced animation effects
Click the Effect Options button [...] next to the properties drop-down list to display the Effect Options dialog.

On the Effect page of the Effect Options dialog (shown above) you can choose a sound to play, whether to dim or hide the object after animation, and (in the case of text objects) whether to animate the text all at once or word-by-word or letter-by-letter.
On the Text Animation page of the Effect Options dialog (shown below), you can group text in other ways: as one object, all paragraphs at once, or by first-level paragraphs (that is, one list item together with its sub-items, if any).

The choices on the Timing page of the Effect Options dialog, shown below, should be self-explanatory.

Removing animation effects
- On the Custom Animation page of the Task pane, select the desired object.
- Click the Remove button.
- CC-BY License
- Impress Guide (Documentation)
- View source
Personal tools
- Recent changes
- Download AOO
- Documentation
- What links here
- Related changes
- Special pages
- Permanent link
- Page information
- This page was last modified on 6 July 2018, at 19:21.
- Content is available under ALv2 unless otherwise noted.
- Privacy policy
- About Apache OpenOffice Wiki
- Disclaimers
Text Box in PowerPoint [Add, Resize, Copy, Delete & More!]
By: Author Shrot Katewa
![Text Box in PowerPoint [Add, Resize, Copy, Delete & More!]](https://artofpresentations.com/wp-content/uploads/2022/09/Featured-Image-Textbox-in-Powerpoint.webp "how to insert text box in openoffice presentation")
The first thing that MOST presentations open with are a title slide that usually has the title of the presentation, the date, or the organization name! But, do you ever wonder how the creator put these in? The answer is using “Text Boxes”!
Although presentations can be completely image-based, however, that is rarely the case. For most presentation creators, you need to have at least some text on your slides!
Using a text box in your PowerPoint presentation allows you to resize the text and make large or small, add color, and other customization options. But, how do you add a text box in PowerPoint?
The simplest way to add a text box to a PowerPoint presentation is to click on the “Insert Tab” on the menu ribbon and click on the “Text Box” option under the “Text” group. After this, simply drag your mouse to create the text box in the slide in the preferred position.
There are so many things you can do with that simple text box. My goal with this article is to share with you everything you need to know while working with a text box in PowerPoint. We shall cover some basics such as how to add a text box, cut, copy and paste them, and some advanced topics such as how to rotate a text box or make them scrollable!
Read on in this article to learn some other tricks using the text box.
1. How to Insert a Text Box in PowerPoint?
A text box in Microsoft PowerPoint is an object that contains texts that can be edited into different font faces, sizes, colors, positions, etc. To insert a text box in Powerpoint, follow the 2 simple steps.
Step-1: Click on the “Insert” tab
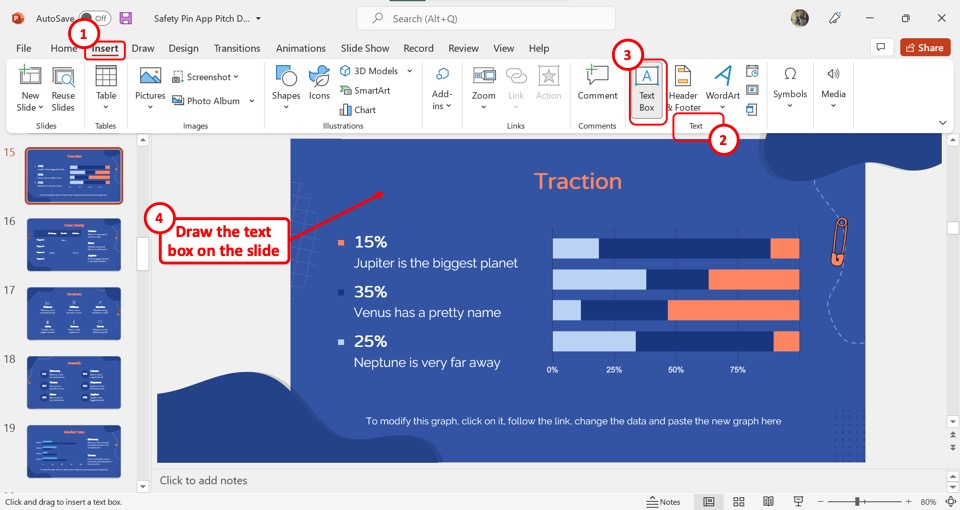
The first step is to open the “Insert” menu. To do so, click on the “Insert” tab in the menu ribbon located at the top of the screen.
Step-2: Click on the “Text Box” option
In the “Insert” menu, click on the “Text Box” option which is the first option in the “Text” section. The “Text Box” icon looks like the letter A. Now all you have to do is draw the text box on the slide. (as shown in Step 1 diagram)
1a. Shortcut to Insert Text Box in PowerPoint
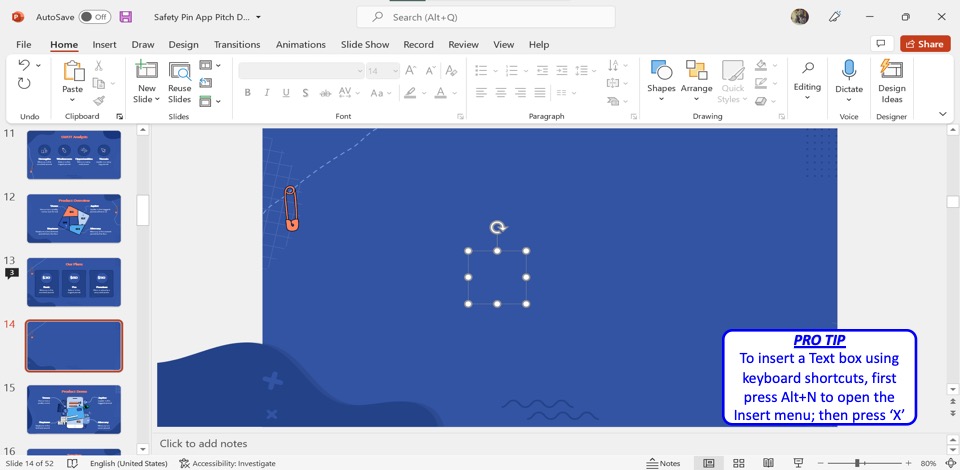
In Microsoft PowerPoint, you can also insert a text box using the keyboard shortcuts. To do so, you have to first press the “Alt+N” keys on your keyboard. This will open the “Insert” menu. Then press the “X” key on your keyboard to insert the text box in the slide.
2. How to Add or Edit Text in a Text Box in PowerPoint?
You can add or edit the text in a text box in a PowerPoint slide with only one click. All you have to do is select the text box and then type in the preferred text.
2a. How to Add Text in a Text Box in PowerPoint?
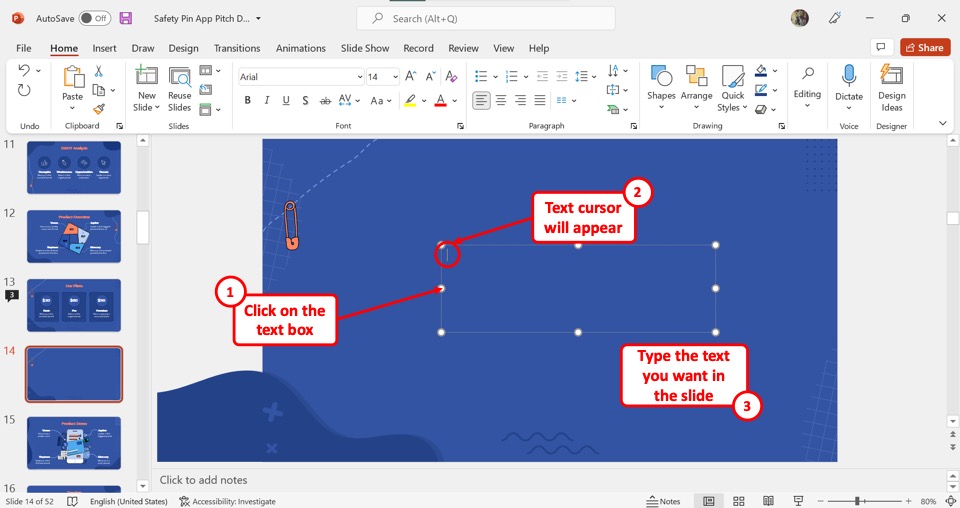
To add text in a textbox, all you have to do is simply click on the text box. A text cursor will appear inside the text box. You can then type in the text in the text box in the PowerPoint slide.
2b. How to Edit Text in a Text Box in PowerPoint?
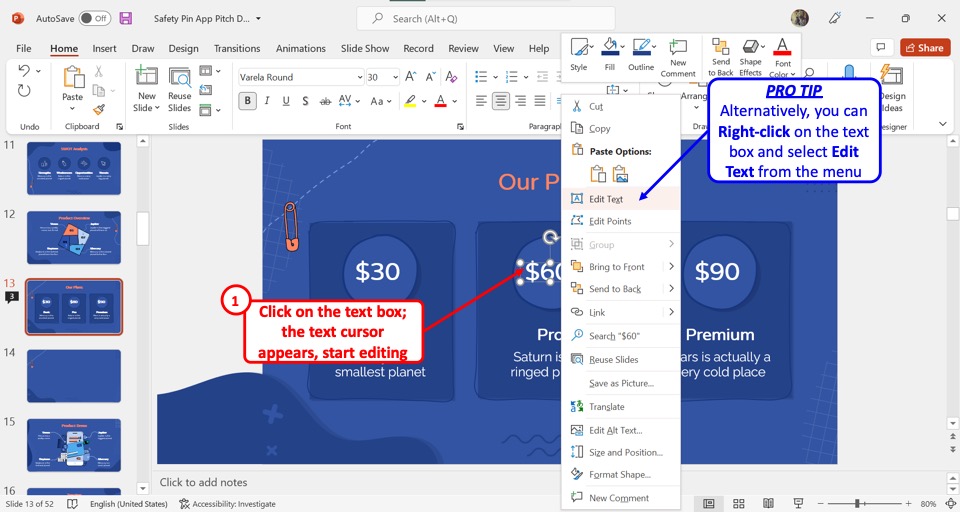
To edit the text in a textbox in PowerPoint, click on the textbox. You will see a text cursor appear inside the textbox. You can now edit the text. Alternatively, you can “Right Click” on the textbox and select the “Edit Text” option from the pop-up menu.
3. How to Resize Text Box in PowerPoint?
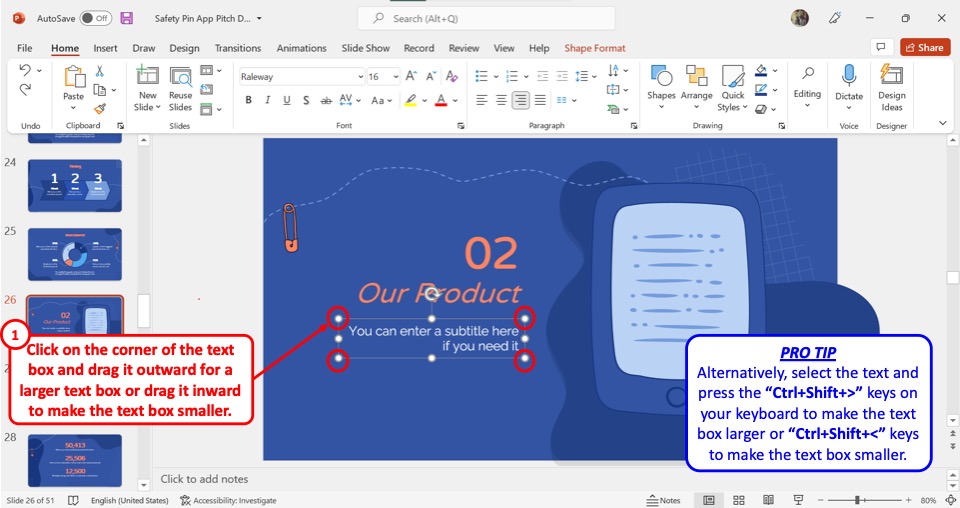
To resize a text box in PowerPoint, all you have to do is click on the corner of the text box and drag it outward for a larger text box or drag it inward to make the text box smaller.
Alternatively, you can select the text inside the text box and press the “Ctrl+Shift+>” keys on your keyboard to make the text box larger. Press the “Ctrl+Shift+<” keys to make the text box smaller.
3a. How to Resize Multiple Text Boxes in PowerPoint?
To resize multiple text boxes in PowerPoint, follow the 3 simple steps.
Step-1: Select multiple text boxes
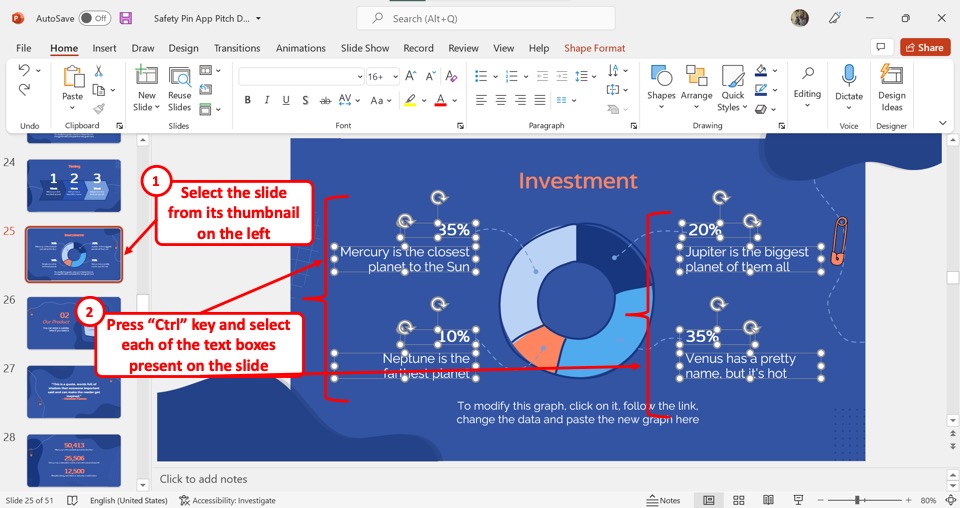
The first step is to select all the text boxes within a slide that you want to resize. To do so, you have to first open the slide from the slide thumbnail panel on the left side of the screen. Then press and hold the “Ctrl” key on your keyboard and click on each of the text boxes.
Step-2: Click on the “Size and Position” option
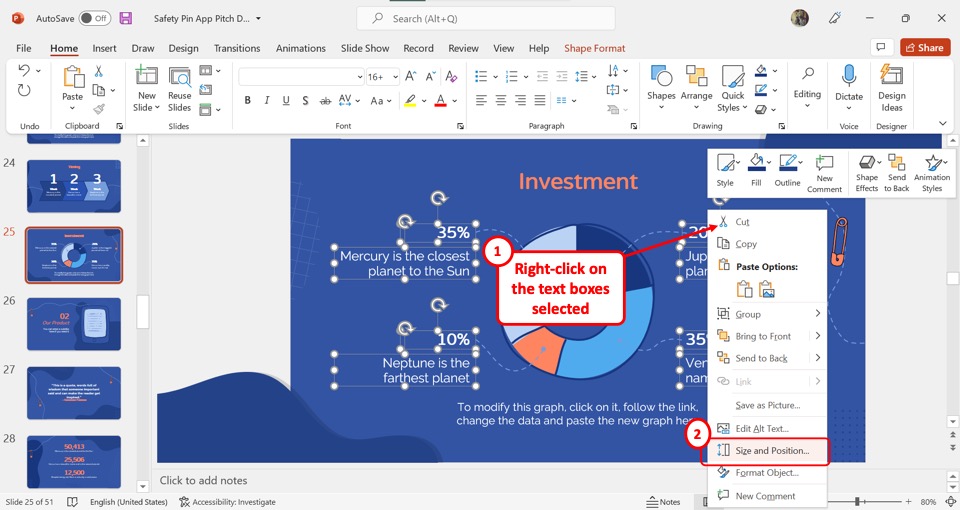
The next step is to “Right Click” on the selected text boxes. Then click on the “Size and Position” option from the right-click menu. This will open the “ Format Shape ” sidebar on the right side of the screen.
Step-3: Click on the “Height” and “Width” boxes
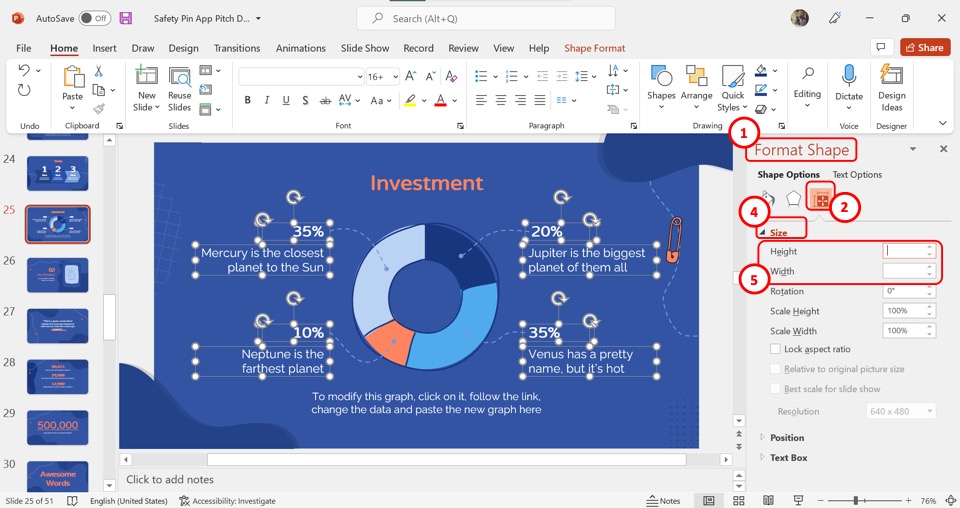
Under the “Size” section in the “Format Shape” sidebar, click on the box next to “Height” . Now you can enter your preferred height for the selected text boxes. Similarly, you can click on the “Width” box to change the width of the text box.
4. How to Create Multiple Text Boxes in PowerPoint?
To create multiple text boxes in PowerPoint, you can click on the “Text Box” option in the “Insert” tab. Alternatively, you can follow the other mentioned methods to quickly create multiple text boxes.
4a. Using the Duplicate Function
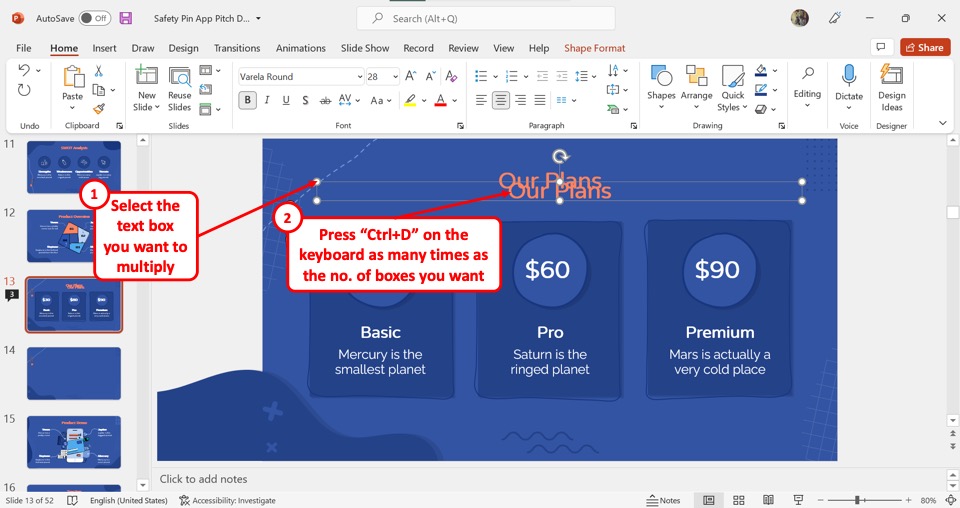
After inserting a text box, you can duplicate it into multiple text boxes. To do so, you have to first click on the text box. Then press the “Ctrl+D” keys on your keyboard to duplicate the text boxes. You can repeatedly press the “Ctrl+D” keys on your keyboard until you have created the preferred number of text boxes.
4b. Using Copy and Paste
To create multiple text boxes using copy and paste, you have to first insert a text box from the “Insert” tab. Then follow the 2 easy steps.
Step-1: Click on the “Copy” option
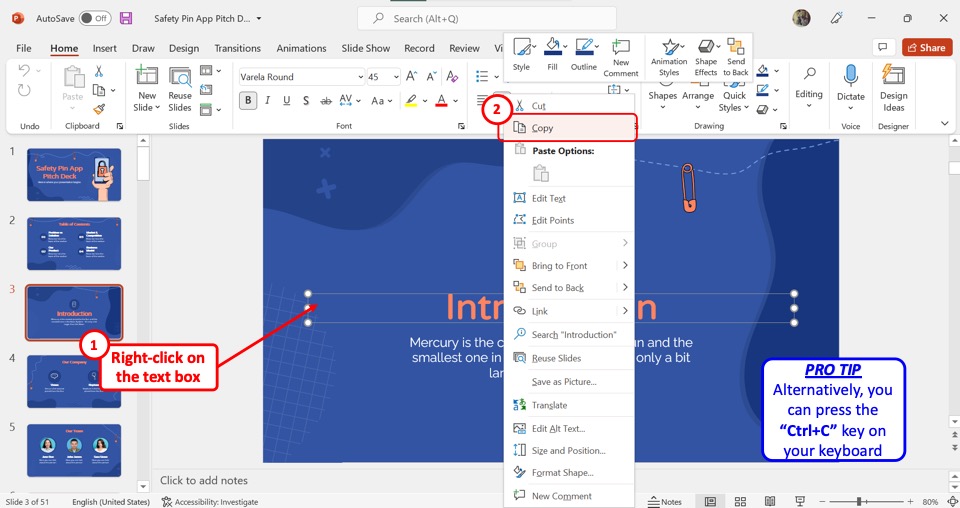
In the open slide where you want to create multiple text boxes, “Right Click” on the text box. Then click on the “Copy” option from the right-click menu. You can alternatively press the “Ctrl+C” keys on your keyboard to copy the text box.
Step-2: Click on “Paste”
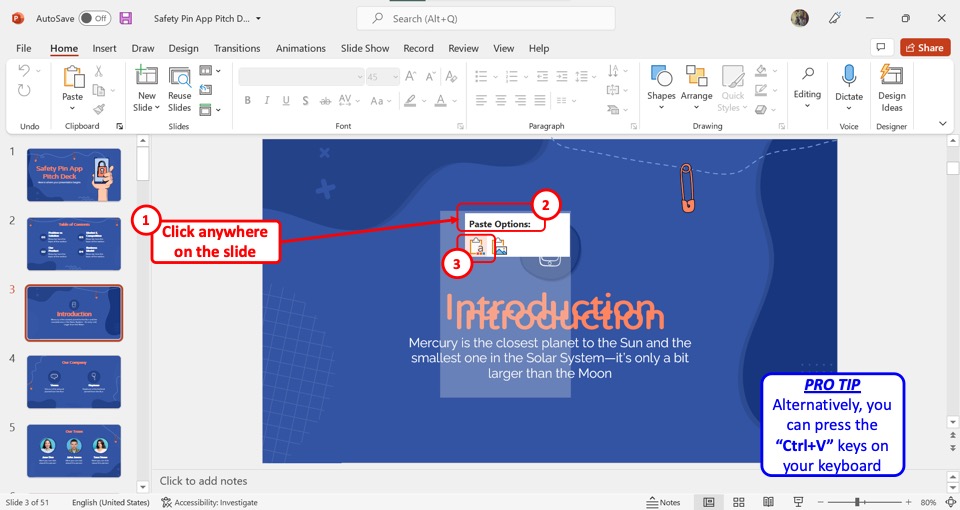
Now all you have to do is “Right Click” anywhere on the slide and select the “Use Destination Theme” option under the “Paste Options” . This will paste the copied text box onto the slide. Alternatively, you can press the “Ctrl+V” keys on your keyboard. Repeat this step until you have created the preferred number of text boxes.
4c. Using Control and Shift Keys
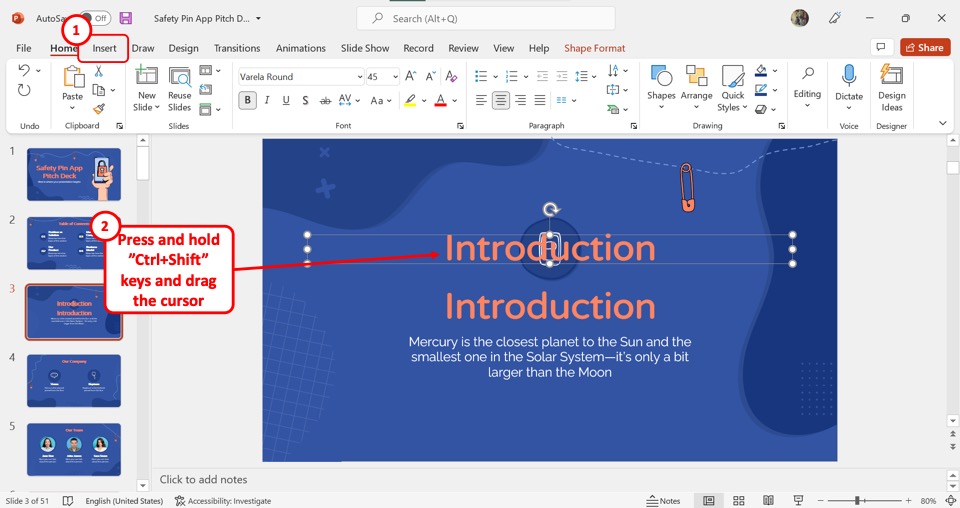
You can also create multiple text boxes quickly using the Control and Shift keys. First, you have to insert a text box from the “Insert” tab. Then press and hold the “Ctrl+Shift” keys on your keyboard and use your cursor to drag the text box. You will see a new duplicate text box appear. You can repeat the process as many times as you need.
5. How to Align and Reposition Text Boxes in PowerPoint?
In Microsoft PowerPoint, you can align the text boxes with the left, right, or center of the slide. Besides, you can also drag the text box to reposition it. I’ve covered the topic of aligning in PowerPoint in more detail in another article. Do make sure to check that out as well.
5a. How to Align Text Boxes in PowerPoint?
To align text boxes in PowerPoint, all you have to do is follow the 2 easy steps.
Step-1: Click on the “Shape Format” tab
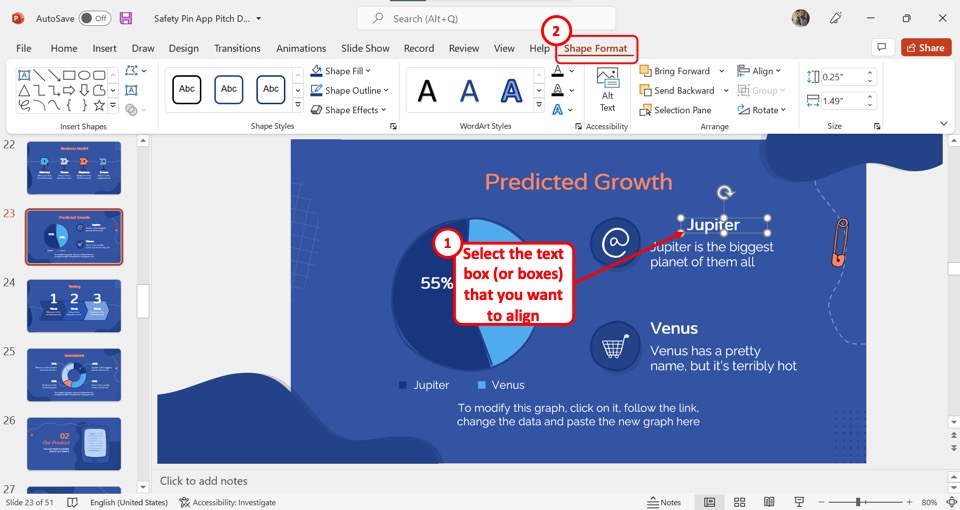
In the open slide, click on the text box or multiple text boxes which you want to align. Then click on the “Shape Format” tab in the menu ribbon located at the top of the screen.
Step-2: Click on the “Align” option
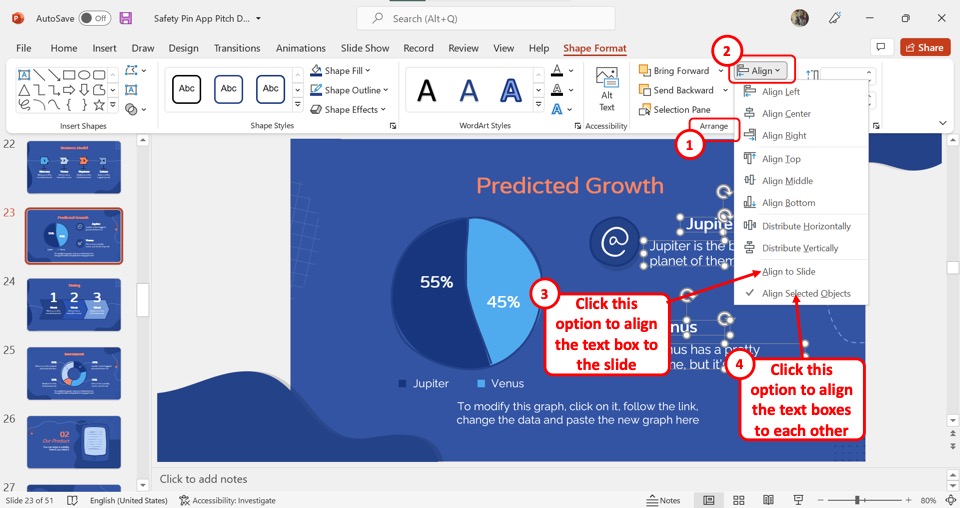
In the “Arrange” section of the “Shape Format” tab, click on the “Align” option. This will open a dropdown menu with various alignment options. Now all you have to do is click on your preferred alignment option.
Click on the “Align to Slide” option to align the text box with the slide. You can also click on the “Align Selected Objects” option to align multiple text boxes to each other.
5b. How to Reposition Text Boxes in PowerPoint?
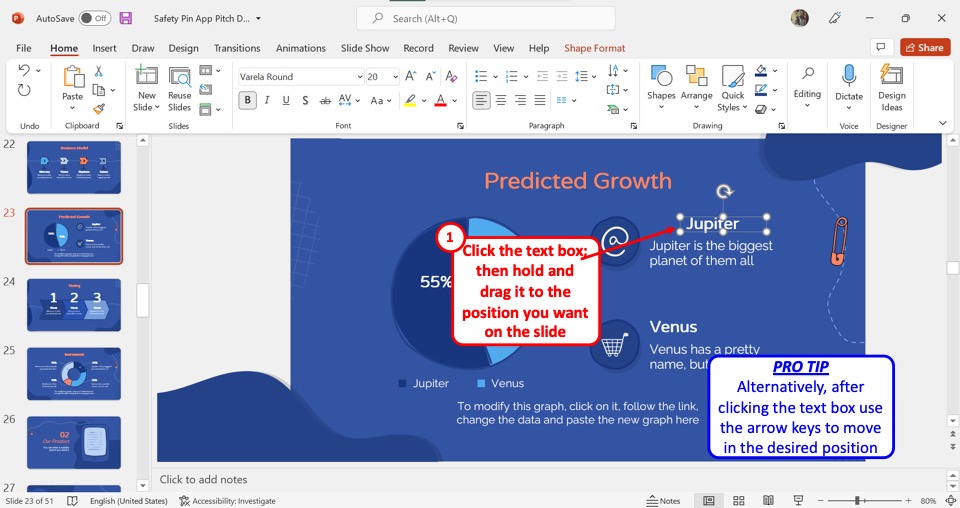
To reposition a text box in PowerPoint, all you have to do is click on the text box and drag it to a different position in the slide. Alternatively, you can press and hold the arrow keys on your keyboard to move the text boxes in a certain direction.
6. How to Add Color to a Text Box in PowerPoint?
By default, the text boxes in Microsoft PowerPoint are transparent. Adding color to a text box can add emphasis to a certain text and grab more attention. To add color to a text box in PowerPoint, follow the 3 quick steps.

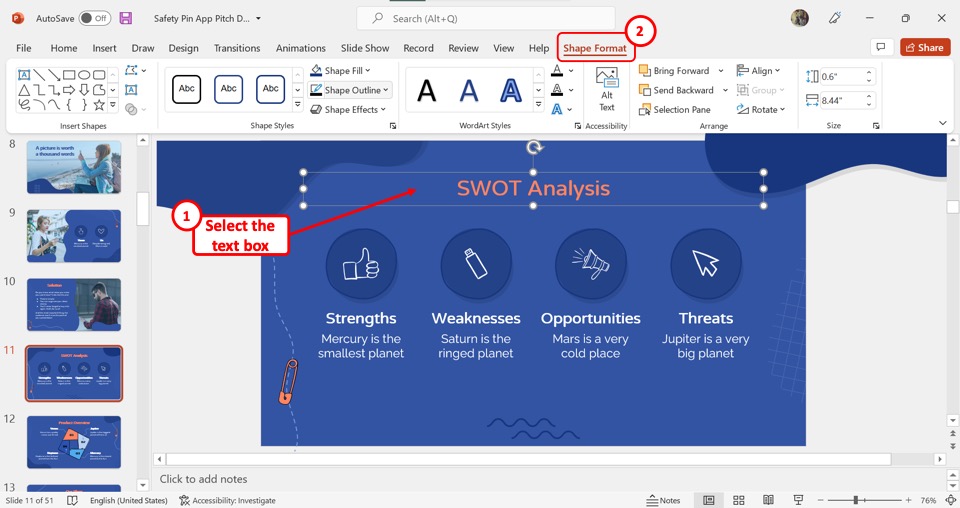
To add color to a text box in PowerPoint, you have to first select the text box. Then click on the “Shape Format” tab which is the last tab in the menu ribbon located at the top of the screen.
Step-2: Click on the “Shape Fill” option
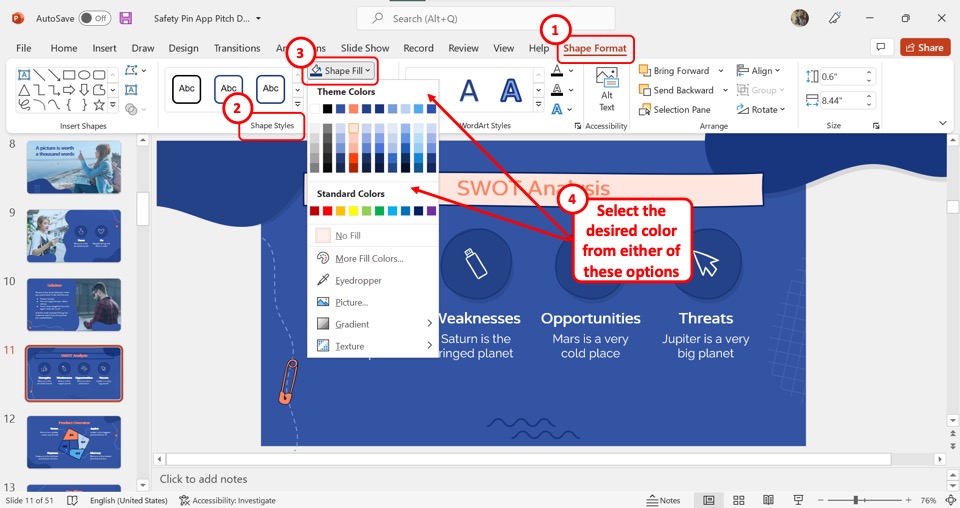
The next step is to click on the “Shape Fill” option from the “Shape Styles” section in the “Shape Format” menu. This will open a dropdown menu. Now all you have to do is click on the preferred color from the “Theme Color” section or the “Standard Colors” section.
Step-3: Click on the “More Fill Colors” option
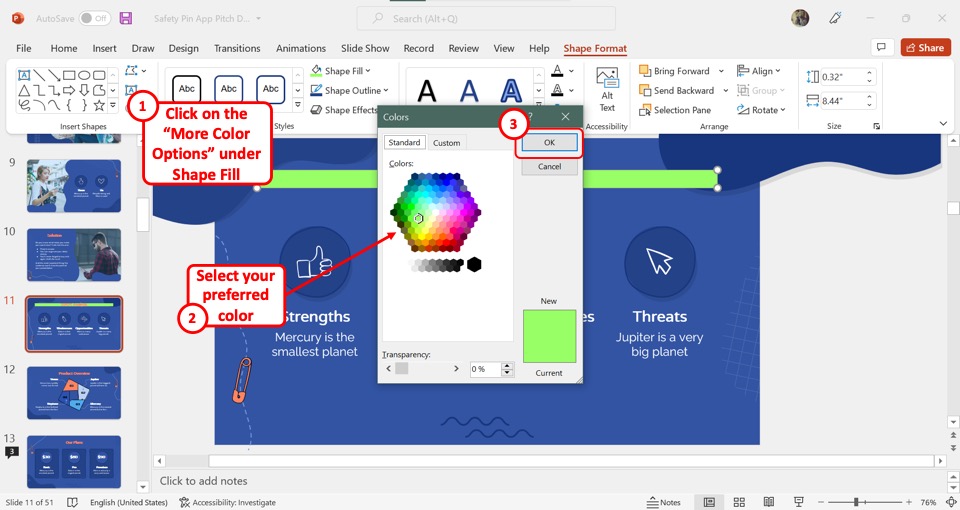
If you cannot find the color you want in neither the “Theme Color” section nor the “Standard Colors” section, you can click on the “More Fill Colors” option. This will open the “Colors” dialog box. Select your preferred color and then click on the “OK” button on the right side of the dialog box.
7. How to Add a Border to a Text Box in PowerPoint?
In PowerPoint, you can easily add a border around the text, and also change the color and weight of the border. To add a border to a text box in PowerPoint, all you have to do is follow the 2 simple steps.
The first step is to open the “Shape Format” menu. To do so, you have to first select the text box. Then click on the “Shape Format” tab in the menu ribbon located at the top of the screen.
Step-2: Click on the “Shape Outline” option
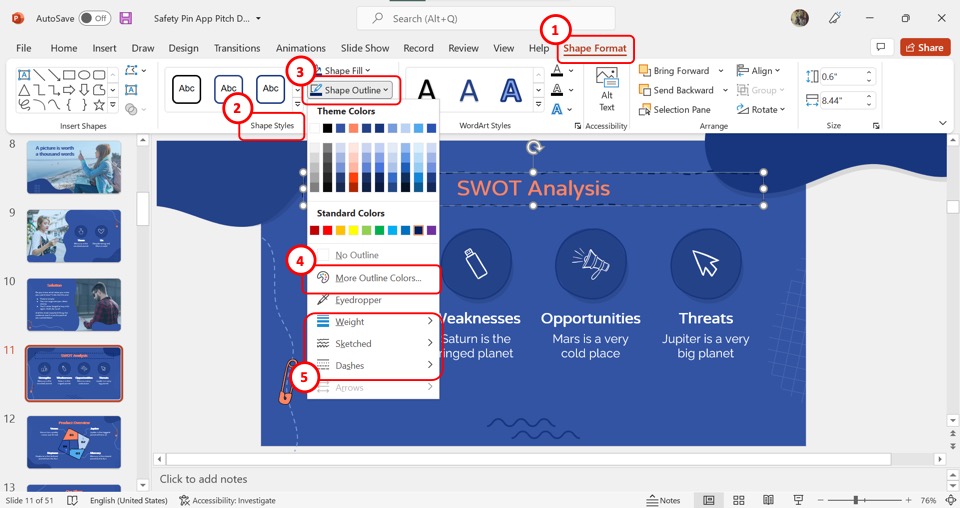
The next step is to click on the “Shape Outline” option from the “Shape Styles” section under the “Shape Format” tab. This will open a dropdown menu. You can click on the “More Outline Colors” option to select a border color. Click on the “Weight” option to select a border weight, and the “Sketched” and “Dashes” options for different border designs.
8. How to Rotate a Text Box?
Microsoft PowerPoint has a “Rotate” feature that allows you to rotate objects such as text, shape, image, etc. I’ve actually written a more in-depth tutorial on how to rotate text in PowerPoint . Make sure you check out that article to learn more!
Meanwhile, here’s a brief way to rotate a text box. You can follow the below-mentioned steps to do so –
Step-1: Click on the “Arrange” button
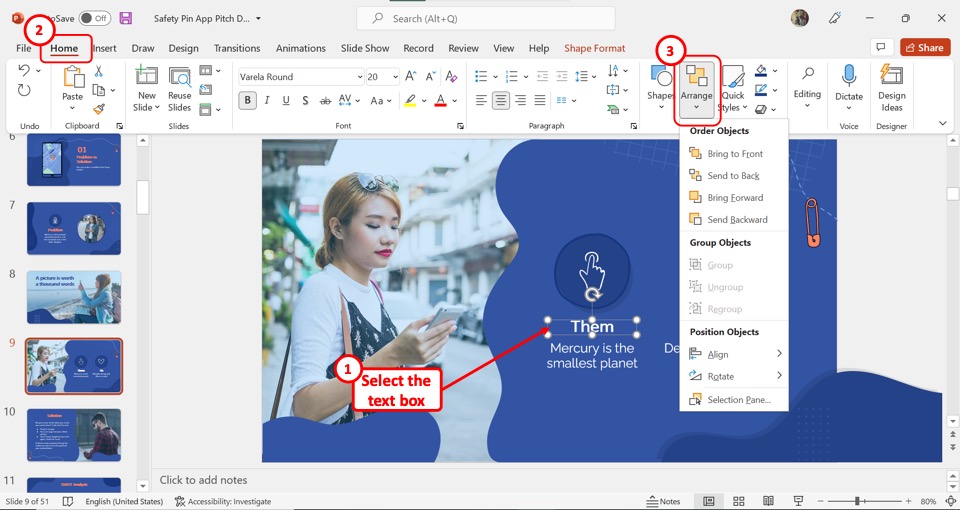
You have to first click on the text box which you want to rotate. Then click on the “Arrange” button which is the second option in the “Drawing” section under the “Home” tab. This will open a dropdown menu.
Step-2: Click on the “Rotate” option
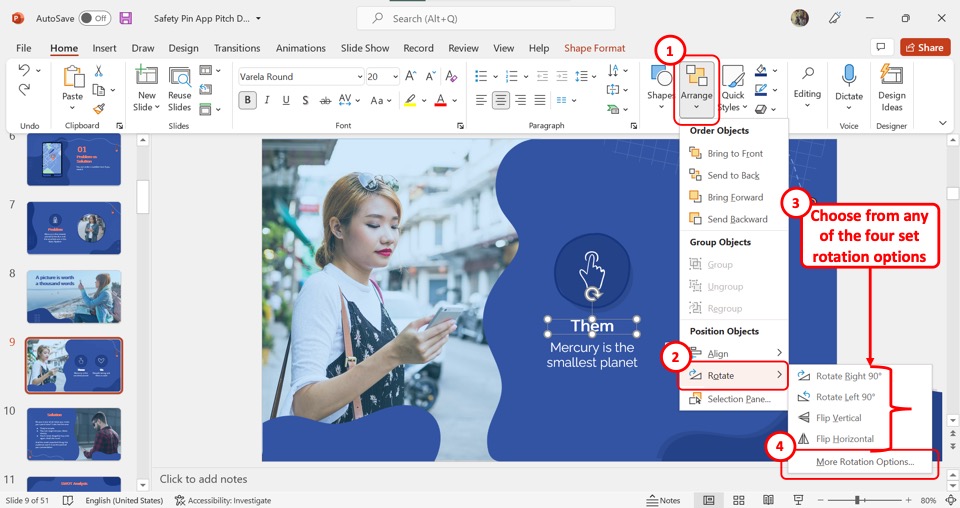
In the dropdown menu under the “Arrange” button, click on the “Rotate” option. This will open another menu. You can choose a rotation angle from the four options: “Rotate Right 90°” , “Rotate Left 90°” , “Flip Vertical” , and “Flip Horizontal” . You can also click on “More Rotation Options” for selecting any angle of rotation.
Step-3: Click on the “Rotation” box
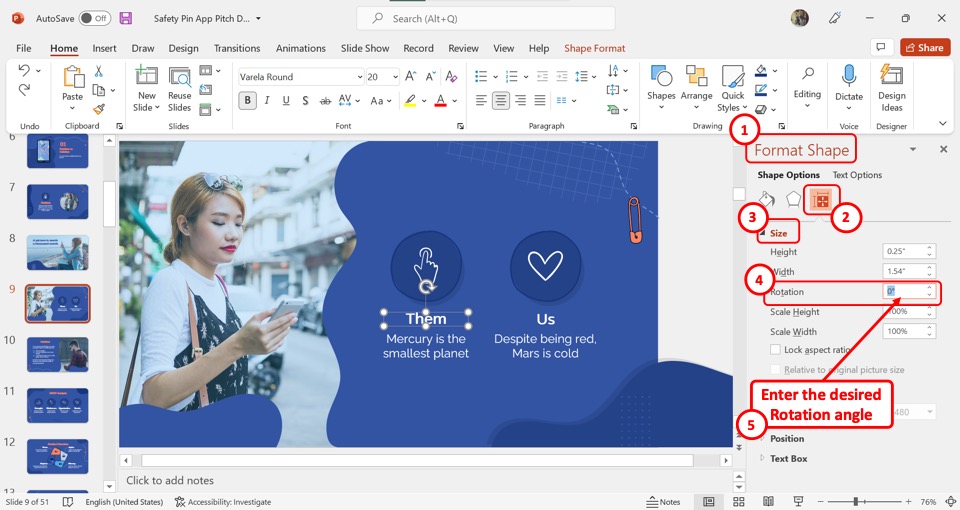
When you click on the “More Rotation Options” option, it will open the “Format Shape” sidebar on the right side of the screen. Under the “Size” section of the sidebar, click on the box next to the “Rotation” option. You can now type in your preferred angle of rotation.
9. How to Delete a Text Box in PowerPoint?
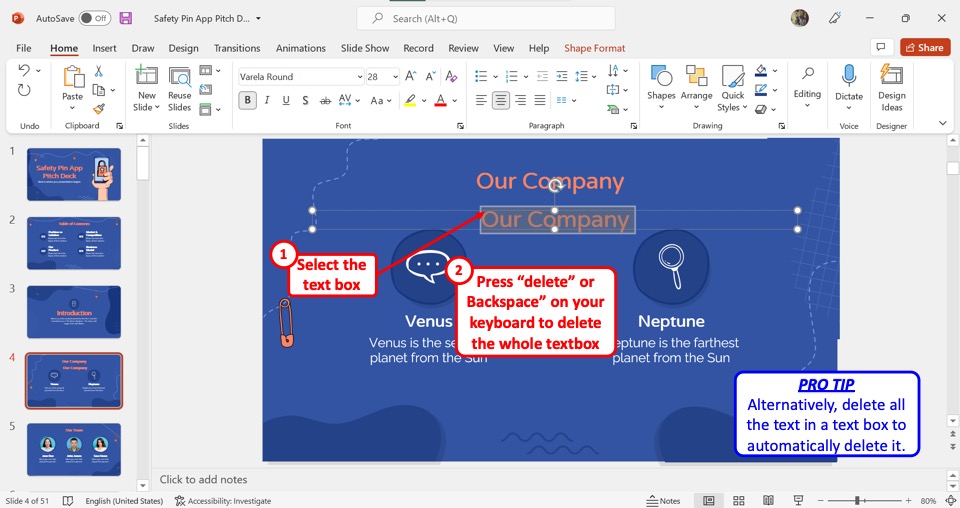
In Microsoft PowerPoint, you can delete a text box only with the help of your keyboard. First, you have to click on the text box you want to delete. Then press the “delete” key or the “backspace” key on your keyboard. This will delete the text box. Alternatively, you can delete all the text in a text box to automatically delete it.
10. How to Create a Scrolling Text Box in PowerPoint?
The scrolling text box in Microsoft PowerPoint gives your presentation a more interesting look. You can make your audience pay more attention to a large chunk of text by adding a scrolling text box in your presentation. All you have to do is follow the 9 simple steps.
Step-1: Click on the “File” tab
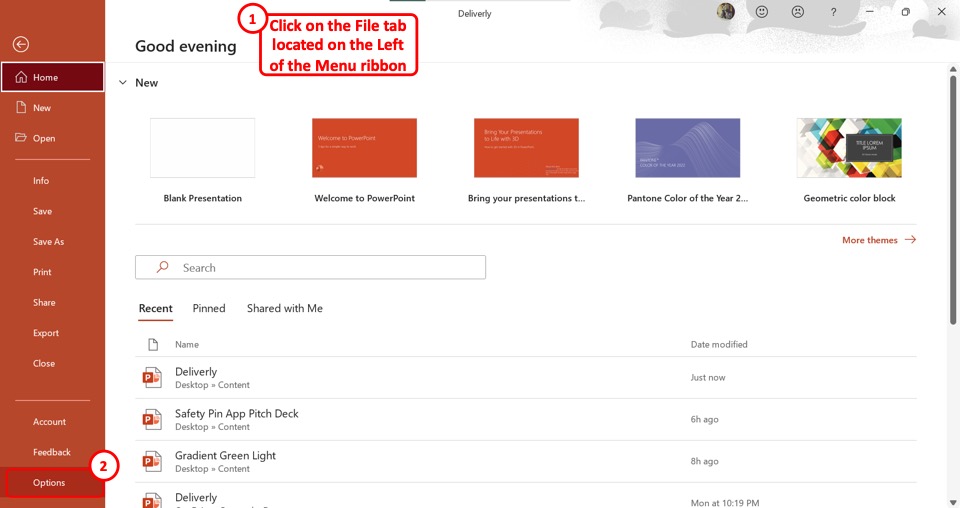
To add a scrolling text box, you have to first enable the “Developer” tab. To do so, click on the “File” tab located on the left corner of the menu ribbon at the top of the screen. In the sidebar on the left side of the screen in the “File” menu, click on the “Options” option at the bottom. This will open a dialog box.
Step-2: Click on the “Customize Ribbon” option
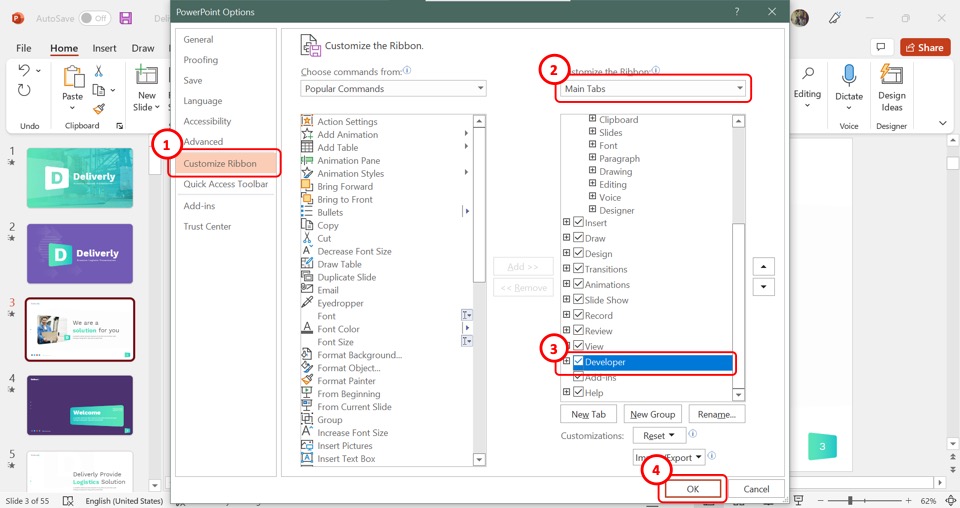
The second step is to click on the “Customize Ribbon” option. It is located in the sidebar on the left side of the “PowerPoint Options” dialog box. This will allow you to customize the tabs in the menu ribbon of the PowerPoint.
Step-3: Click on the “Developer” option
On the right side of the “PowerPoint Options” dialog box, you will see the “Main Tabs” option. Scroll down in the box under the “Main Tabs” option and click on the “Developer” option. A checkmark will appear on the box at the left side of the “Developer” option. (shown in the image above)
Step-4: Click on the “OK” button
To add the “Developer” tab to the PowerPoint menu ribbon, all you have to do now is to click on the “OK” button at the bottom of the “PowerPoint Options” dialog box. (shown in the image above)
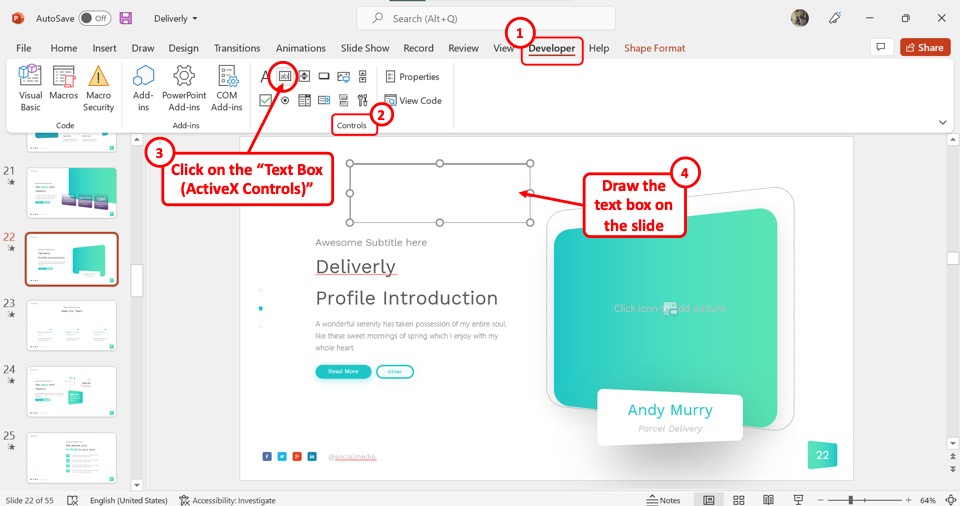
Step-5: Click on the “Developer” tab
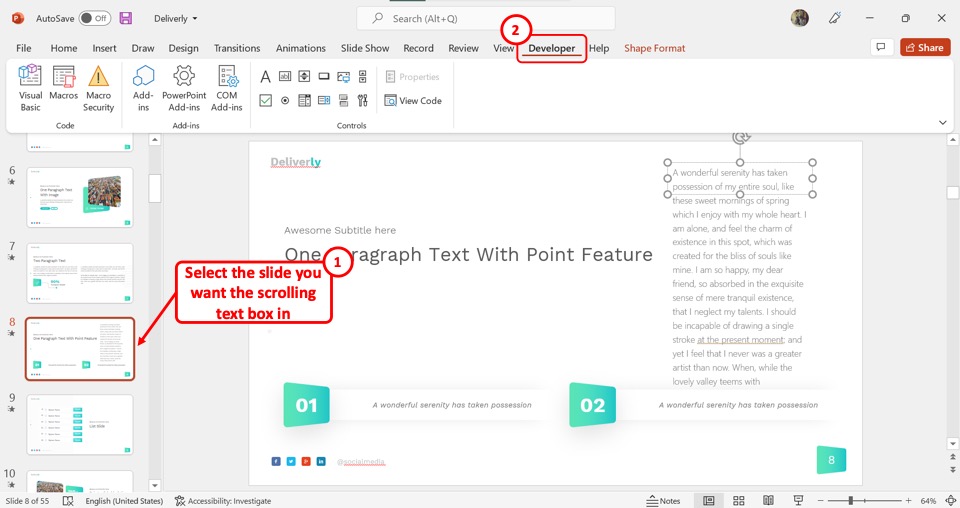
Now you can access the “Developer” tab. From the slide thumbnail pane, click on the slide where you want to add the scrolling text box. Then click on the “Developer” tab in the menu ribbon at the top of the screen.
Step-6: Click on the “Text Box (ActiveX Controls)” icon
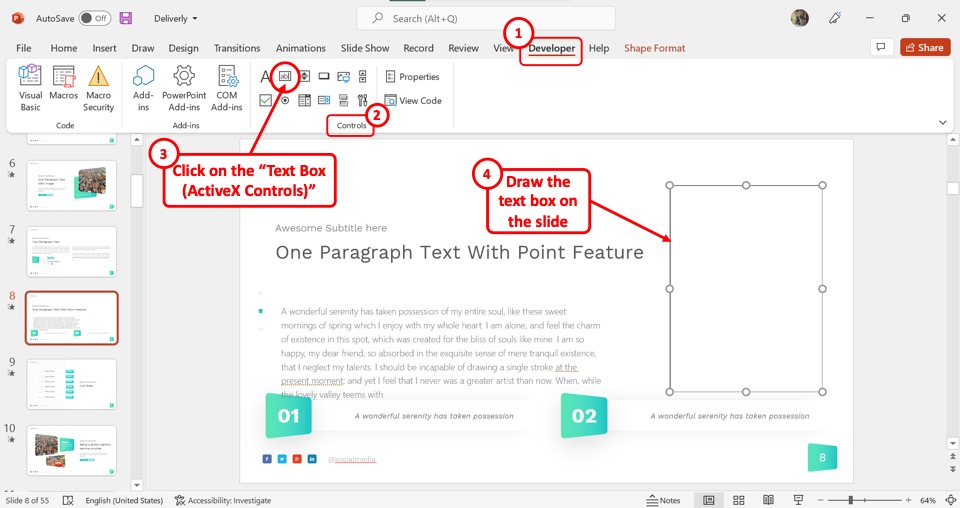
In the “Developer” menu, click on the “Text Box (ActiveX Controls)” icon from the “Controls” section. It is the icon that looks like a rectangle with the letters ab inside it. Then you have to draw the text box on the slide.
Step-7: Click on the “Properties” option
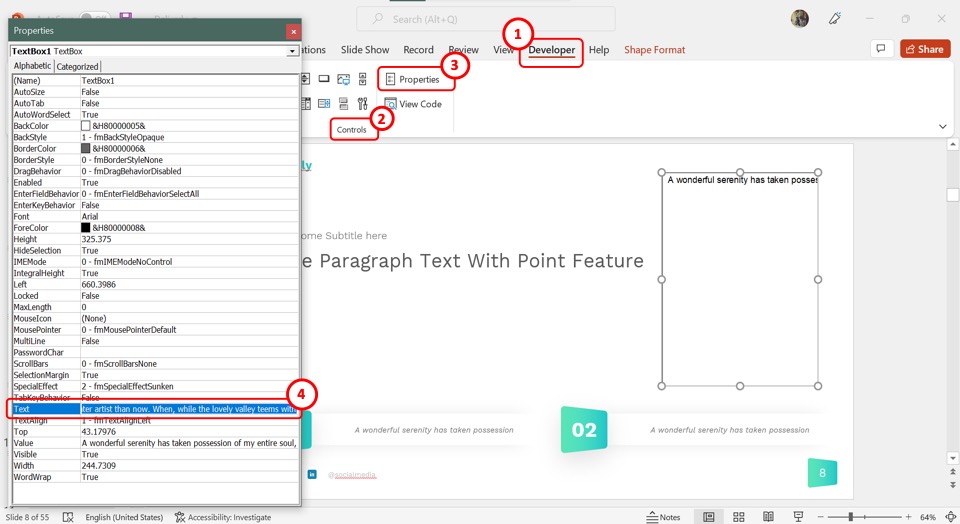
Since the newly inserted text box is a developer tool, you can directly add text to it. To add text, click on the “Properties” option from the “Controls” section of the “Developer” menu. In the “Properties” dialog box, click on the box next to the “Text” option and type in the text for the text box.
Step-8: Click on the “Multiline” option
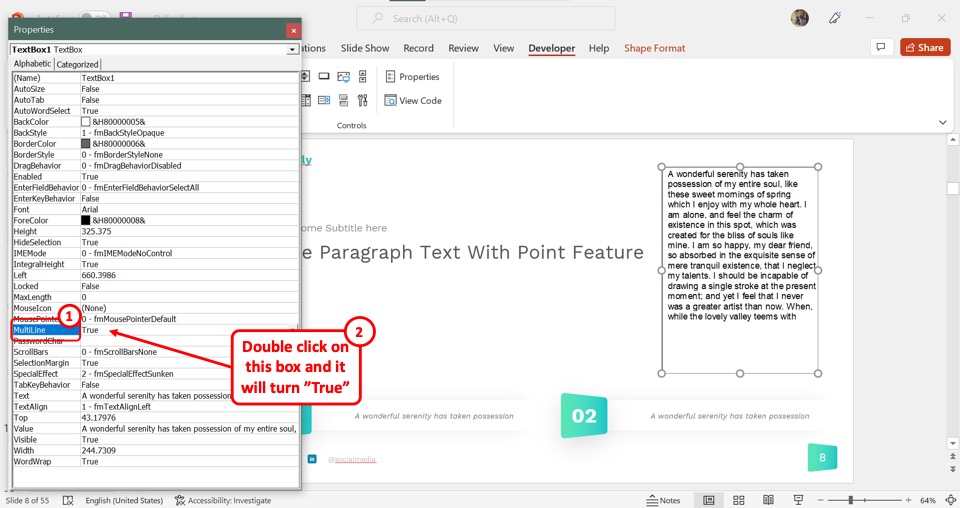
Now you have to “Double Click” on the box next to the “Multiline” option. This will change the “Multiline” value to “True” .
Step-9: Click on the “ScrollBars” option

Finally, click on the “ScrollBars” option and select the “3 – fmScrollBarsBoth” value. Then click on the red “X” on the upper right corner of the “Properties” dialog box. Now all you have to do is start the presentation where you can scroll through the text box.
11. How to Add an Interactive Text Box in PowerPoint?
An interactive text box in PowerPoint allows you to add or remove text in the text box while in the “Slide Show” view during the presentation. To add an interactive text box, follow the 4 quick steps.
Step-1: Click on the “Developer” tab
The first step is to click on the “Developer” tab from the menu ribbon. In the “Developer” menu, click on the “Text Box (ActiveX Control)” icon which looks like a box with the letters ab inside it. Then draw the text box on the slide.
Step-2: Click on the “Properties” option

Now you have to select the text box and then click on the “Properties” option in the “Developer” menu. In the “Properties” dialog box, keep the “Text” option empty so that you can add text later during the presentation.
Step-3: Click on the “BorderStyle” option
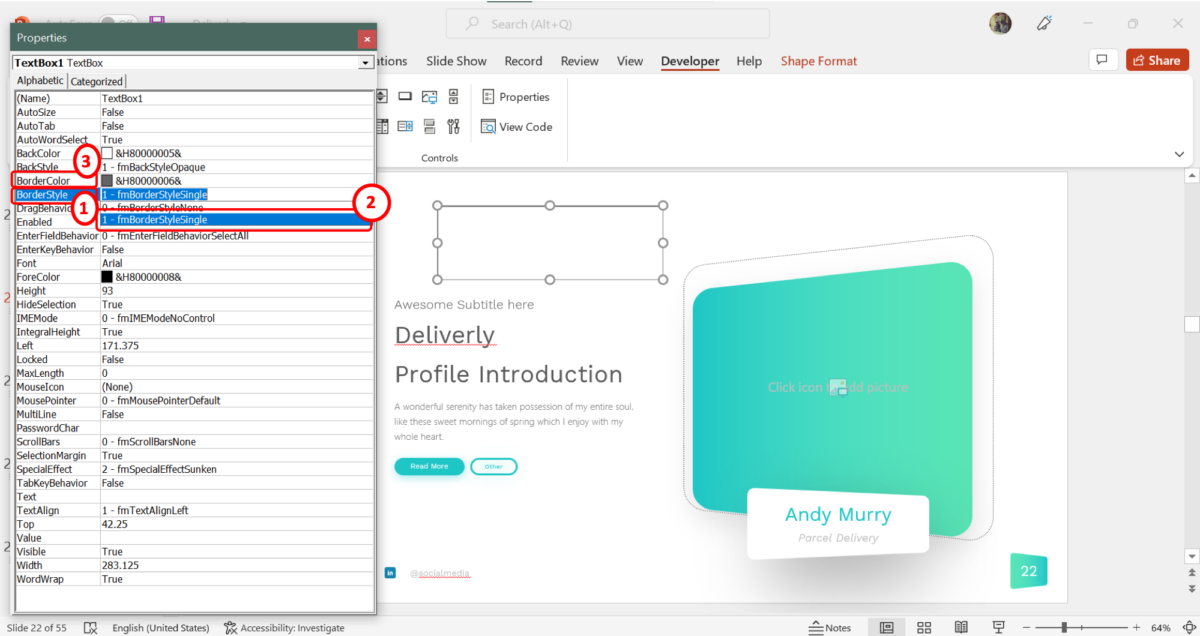
Since the text box will be empty, a dark bold border will help you to identify the text box during the presentation. To add a border, click on the “BorderStyle” box and select the “1-fmBorderStyleSingle” option. To edit the border color, click on the “BorderColor” option and select a dark color from the dropdown menu.
Step-4: Click on the “MultiLine” option

Click on the “Multiline” box and click on the “True” option from the dropdown menu. Finally, you have to click on the red “X” box in the top right corner of the “Properties” dialog box. Now you can add text in the text box during the presentation.
12. Can You Add a Curved Text Box in PowerPoint?
In a Microsoft PowerPoint presentation, you cannot add a curved text box. However, you can add text to a curved shape. All you have to do is follow the 3 easy steps.
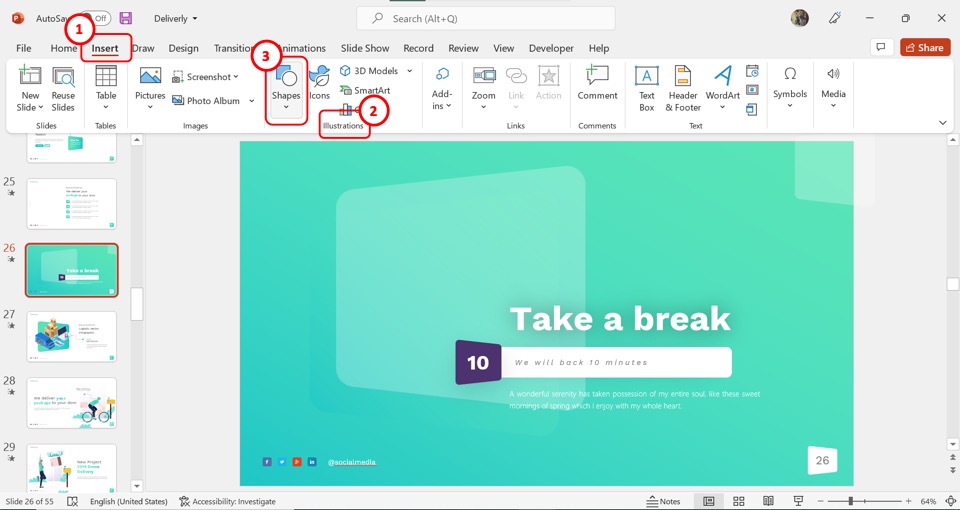
In the menu ribbon at the top of the screen, click on the “Insert” tab. Then click on the “Shapes” option in the “Illustrations” section of the “Insert” menu.
Step-2: Select a curved shape
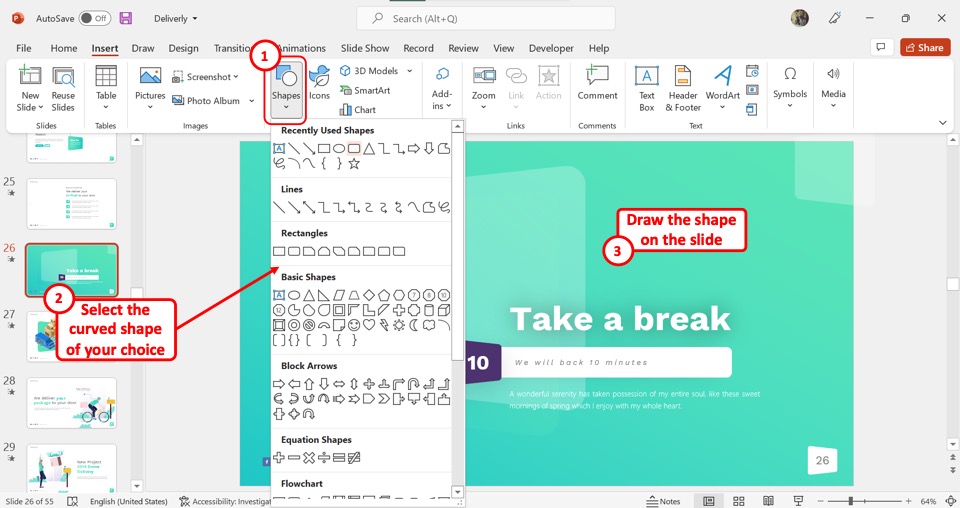
In the dropdown menu under the “Shapes” option, click on your preferred curved shape. Then draw the shape on the slide.
Step-3: Click on “Shape Styles”
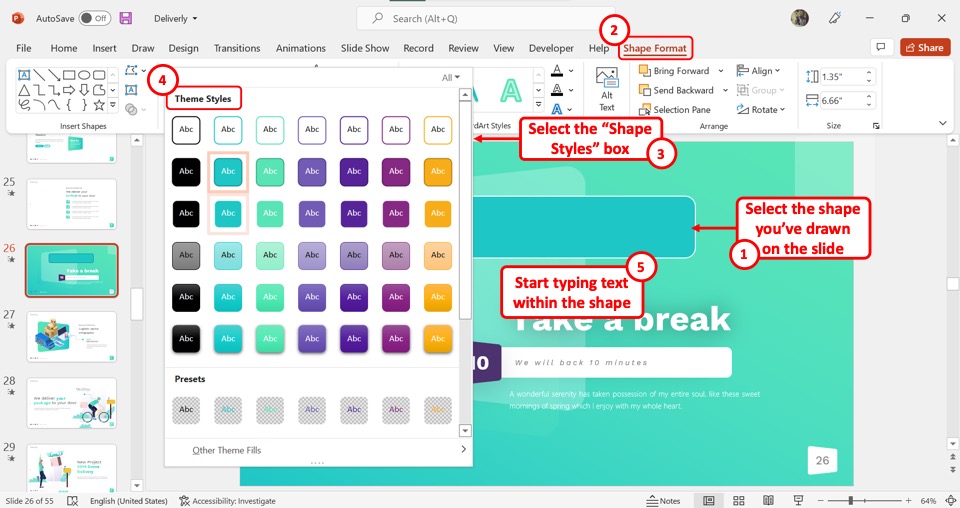
Now all you have to do is select the shape on the slide and click on the “Shape Styles” box in the “Shape Format” menu. Click on your preferred style from the “Theme Styles” . Then type in the text inside the shape.
13. Troubleshooting Text Within a Text Box –
When editing your Microsoft PowerPoint presentation, you may run into problems. You can easily troubleshoot to solve the common issues.
13a. Text Box Keeps Cutting Off Text
In Microsoft PowerPoint, third-party fonts can be cut off from the top or bottom in a text box. Sometimes, they are even cut off in the middle of a word. To fix this problem, follow the 3 easy steps.
Step-1: Click on the “Format Text Effects” option
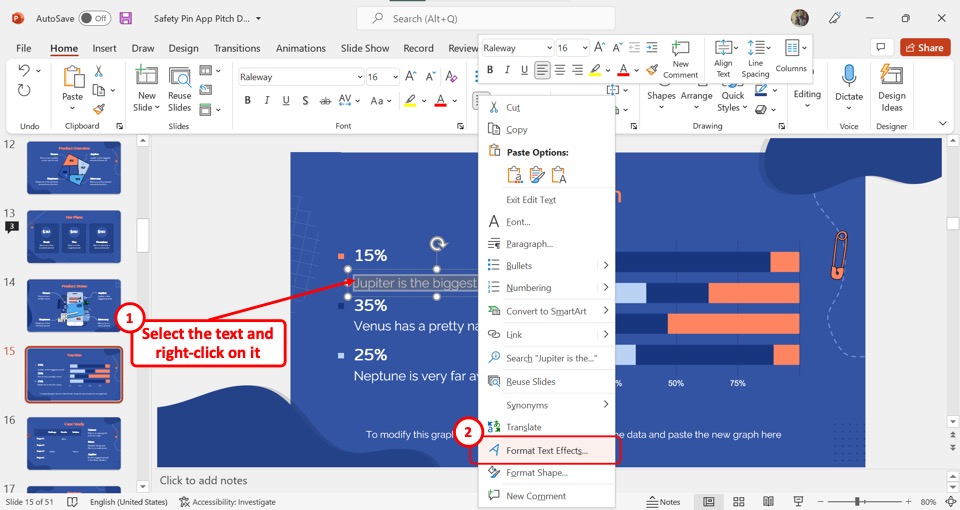
The first step is to select the text within the text box and then “Right Click” on it. In the right-click menu, click on the “Format Text Effects” option. This will open the “Text Options” tab in the “Format Shape” sidebar.
Step-2: Click on the “Textbox” icon
In the “Format Shape” sidebar located on the right side of the screen, click on the “Textbox” icon. The “Textbox” icon is the third icon under the “Text Options” tab and looks like the letter A in a paragraph.
Step-3: Click on the “Wrap text in shape” box
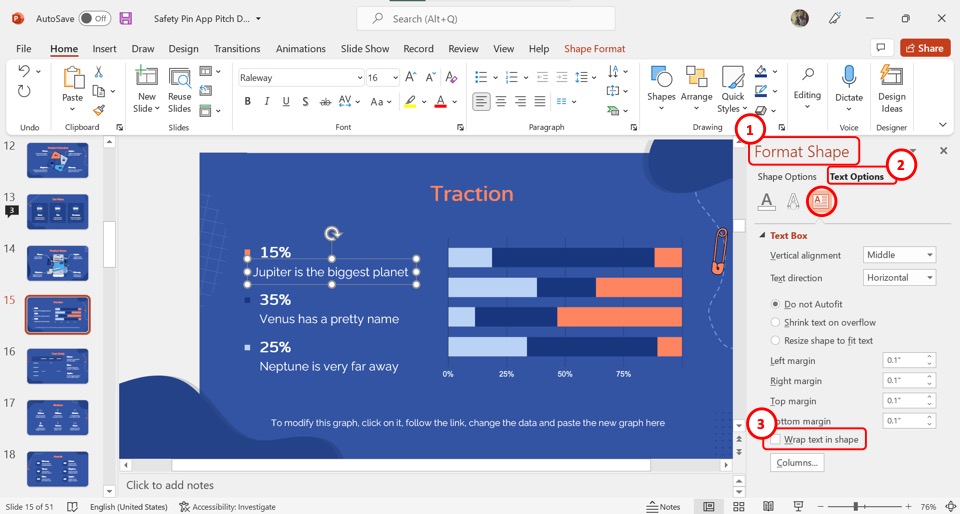
Under the “Text Box” section in the “Format Shape” sidebar, click on the “Wrap text in shape” option at the bottom. You will notice that the checkmark will disappear from the box at the left side of the “Wrap text in shape” option. The text box will not cut off texts now.
13b. Text Box Keep Resizing with Text
Microsoft PowerPoint has a default feature called “Resize shape to fit text” . This feature causes the text box to resize with the size of the text. In many cases, this may be inconvenient. To fix this problem, all you have to do is follow the 3 simple steps.
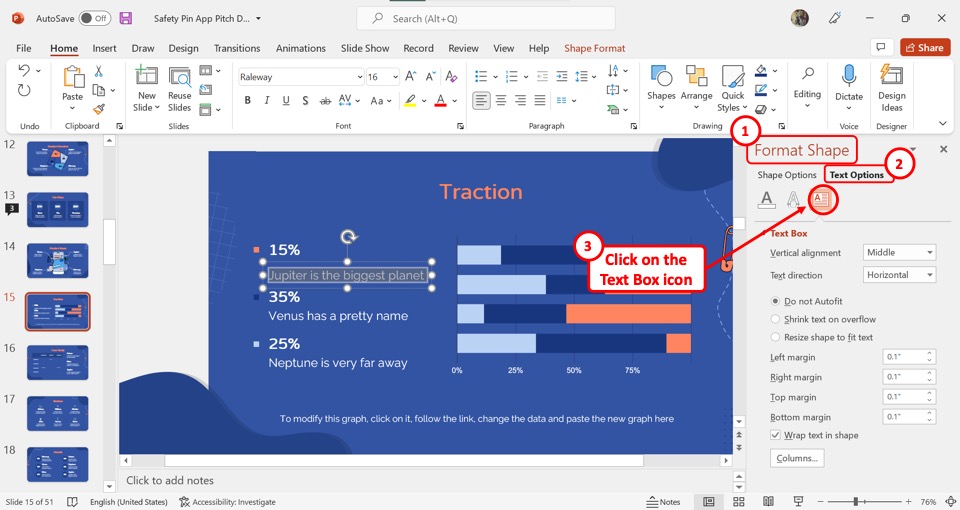
Step-1: Click on the “Format Shape” option
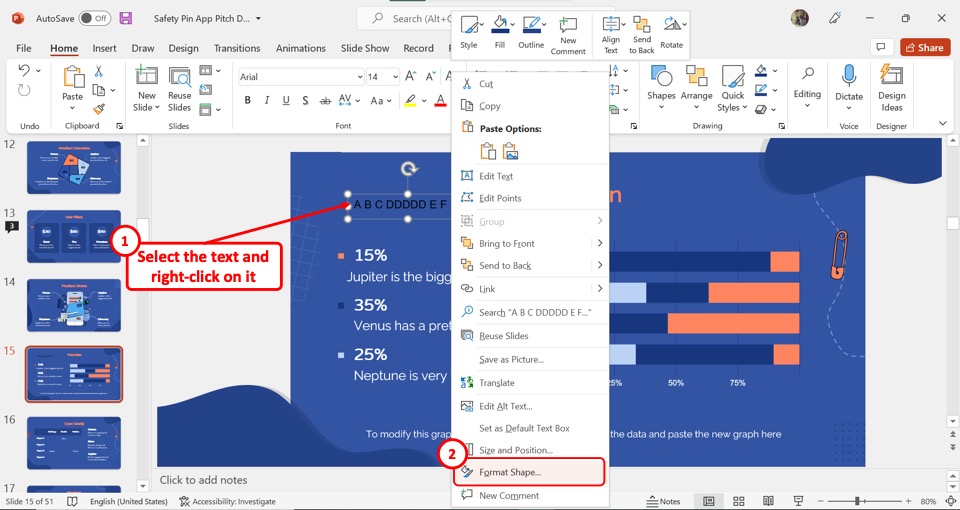
The first step is to select the text box that keeps resizing with the text. Then “Right Click” on it and click on the “Format Shape” option from the right-click menu. This will open a sidebar on the right side of the screen.
Step-2: Click on the “Text Options” tab
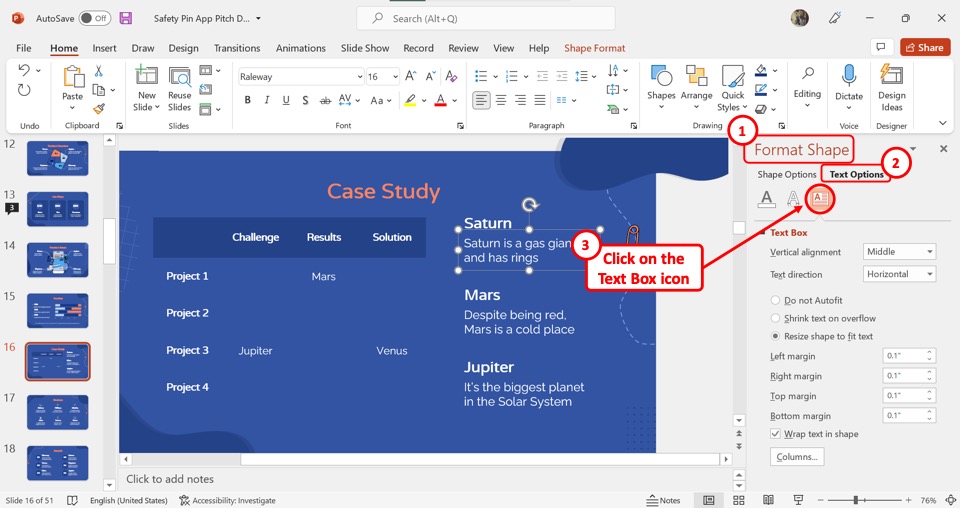
In the “Format Shape” sidebar located on the right side of the screen, click on the “Text Options” tab. Under the “Text Options” tab, click on the “Textbox” option which is the third icon. This will open the “Text Box” section in the “Format Shape” sidebar.
Step-3: Click on the “Do not Autofit” option
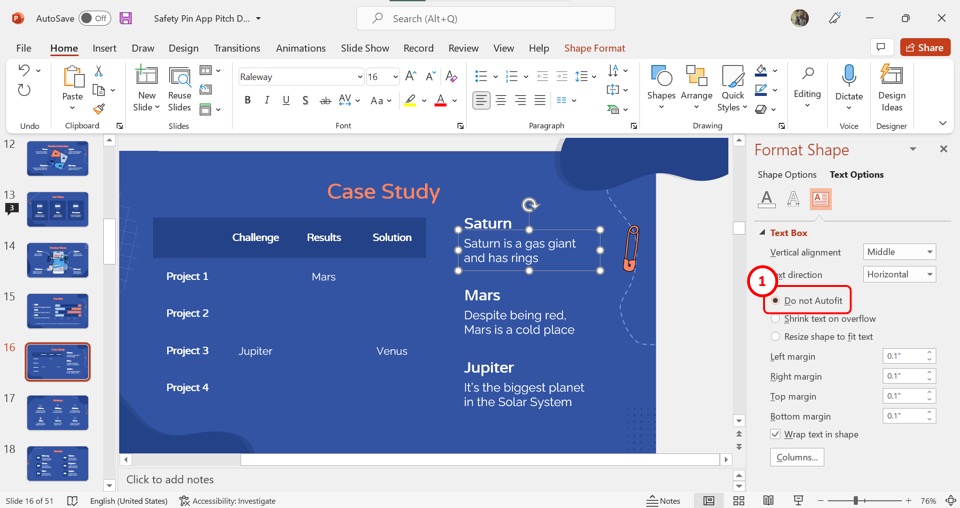
The final step is to click on the “Do not Autofit” option under the “Text Box” section. The circle at the left of the “Do Not Autofit” option will be filled. You can now resize the text and text box independently, and the text box will no longer resize with the texts.
13c. Text Box in PowerPoint is Locked
If the text box in a slide in your PowerPoint presentation is locked, this is because the text box is a part of the master slide rather than the editable slides. You can unlock the text box using the “Slide Master” view. All you have to do is follow the 3 quick steps.
Step-1: Click on the “Slide Master” option
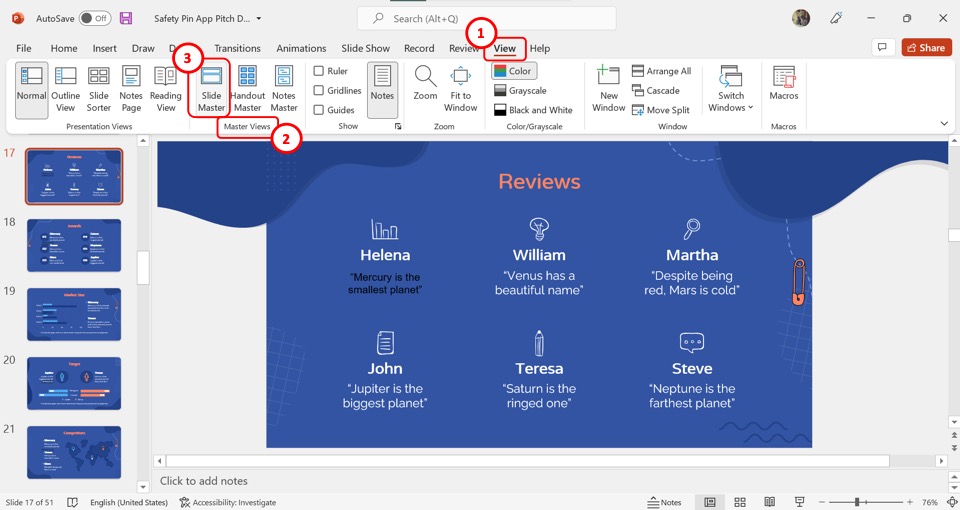
To be able to edit or delete the text box, you have to access the “Slide Master” view. To do so, click on the “View” tab from the menu ribbon which is located at the top of the screen. In the “Master Views” section of the “View” menu, click on the “Slide Master” option. This will open the “Slide Master” view.
Step-2: Click on the text box
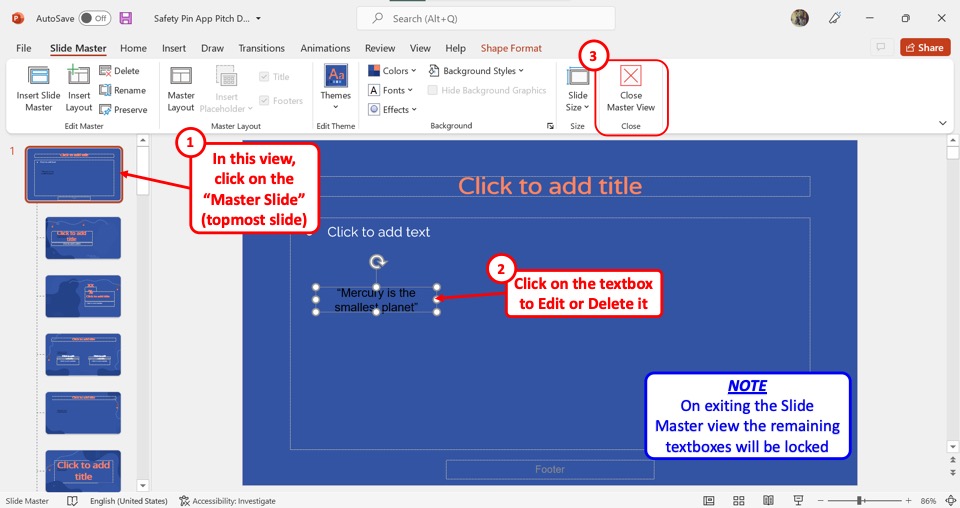
The next step is to edit the text box. In the slide layout panel on the left side of the screen. Click on the topmost slide which is the master slide. In the master slide, you can now click on the text box to edit or delete it. However, once you exit the “Slide Master” view, the text box will be locked again.
Step-3: Click on the “Close Master View” button
Once you have edited or deleted the text box, click on the “Close Master View” option under the “Slide Master” tab. This will return the screen to the “Normal” view where the text box is no longer editable. (as shown in the image above)
Credit to wayhomestudio (on Freepik) for the featured image of this article (further edited).
User community support forum for Apache OpenOffice, LibreOffice and all the OpenOffice.org derivatives
Skip to content
- Board index Applications Writer
[Solved] Inserting text in a text box
Post by ps67boy » Wed Dec 06, 2017 4:19 pm

Re: inserting text in a text box
Post by floris v » Wed Dec 06, 2017 4:33 pm
Post by FJCC » Wed Dec 06, 2017 5:30 pm
Post by ps67boy » Thu Dec 07, 2017 6:26 pm
Return to “Writer”
- Getting started
- ↳ Survival guide
- ↳ Beginners
- ↳ Getting Started Guide for 4.x
- ↳ Getting Started Guide for 3.x
- ↳ Install, Setup and Troubleshooting
- ↳ Admin Guide
- ↳ MS Windows
- ↳ Linux
- ↳ Mac OSX
- ↳ LibreOffice
- ↳ Tablets
- ↳ Tutorials
- ↳ Writer
- ↳ Calc
- ↳ Base
- Applications
- ↳ Writer Guide for 4.x
- ↳ Writer Guide for 3.x
- ↳ Writer Tutorials
- ↳ Templates
- ↳ Advanced Uses
- ↳ Calc Guide for 4.x
- ↳ Calc Guide for 3.x
- ↳ Calc Functions
- ↳ Calc Tutorials
- ↳ Impress
- ↳ Impress Guide for 4.x
- ↳ Impress Guide for 3.x
- ↳ Draw
- ↳ Draw Guide for 4.x
- ↳ Draw Guide for 3.x
- ↳ Math
- ↳ Math Guide for 4.x
- ↳ Math Guide for 3.x
- ↳ Base Guide for 4.x
- ↳ Wiki
- ↳ Base Tutorials
- ↳ Tables & Queries
- ↳ Forms
- ↳ External Data Sources
- ↳ Reporting
- ↳ Database Examples
- Customizing and Extending
- ↳ Macros and UNO API
- ↳ Basic Guide
- ↳ Code Snippets
- ↳ Extension Repository
- ↳ Macro Repository
- ↳ External Programs
- ↳ Extensions
- ↳ Extensions page
- ↳ General Discussion
- ↳ Site Feedback
- ↳ Forum Governance
- ↳ User Experience (UX)
- ↳ Announcements
- ↳ Institutions & Educational
- ↳ Paid support
- ↳ Consultants Directory
- Board index
- All times are UTC
Powered by phpBB ® Forum Software © phpBB Limited
Privacy | Terms
IMAGES
VIDEO
COMMENTS
Using text boxes created from the Layout pane. In Normal view: Click in the text box that reads Click to add text, Click to add an outline, or a similar notation. Type or paste your text in the text box. These text boxes are known as AutoLayout text boxes. See also Creating bulleted and numbered lists. Using text boxes created from the text box ...
Every text box included in the available layouts is already formatted as a bulleted list, therefore to create a bulleted list the only necessary steps are: From the Layout pane, choose a slide design that contains a text box. Those are easily recognizable from the thumbnail. Click in the text box that reads Click to add an outline.
Draw a Text Box. Click the "T" icon on the Drawing toolbar, then click and drag in a document to create a text box. If you don't see the toolbar, open the "View" menu, choose "Toolbars" and click "Drawing." After you place a text box, begin typing to enter text. Click anywhere outside the box to return to typing in the main document.
Make sure Normal view is selected: Click on the Text icon on the Drawing toolbar or press F2 . If the Drawing toolbar with the text icon is not visible, choose View → Toolbars → Drawing . Click and drag to draw a box for the text on the slide. Do not worry about the vertical size and position as the text box will expand if needed as you type.
There are two ways to add text boxes to a slide: Choose a predefined layout from the Layouts section of the Tasks pane, as described in Chapter 1. These text boxes are called AutoLayout text boxes. Create a text box using the text tool. This chapter describes how to create, modify, use, and delete text boxes; discusses the various types of text ...
There are two ways to insert text into presentation. One way is to use the AutoLayout as described in section 1.4-Format slides. Theother is to create a text box from scratch using the text tool. Insert aext with text boxes created by AutoLayout 1) Click in the text box that reads "Click here to..." 2) Type information into the text box.
The unformatted text will be formatted with the outline style at the cursor position in an AutoLayout text box or with the default graphic style in a normal text box. Formatting pasted text. If pasting the text into an AutoLayout area, then to give the pasted text the same look and feel of the rest of the presentation apply the appropriate ...
To add a text box to the slide, choose textbox option from the main toolbar and draw the text box with the mouse. Formatting text. Select the text that will be formatted by highlighting the text on the slide. Specify the desired font, font size, color, and font style (bold, italic, underline) from the object toolbar. Changing case.
3) In the text box below the slide, click on the words Click to add notes and begin typing. You can resize the Notes text box using the green resizing handles and move it by placing the pointer on the border, then clicking and dragging. To make changes in the text style, press the F11 key to open the Styles and Formatting window. Figure 4 ...
1) Making changes in the text of a slide: • Add and delete the text in a slide just as in the Normal view. • Move the paragraphs of text in the selected slide up or down by using the up and down arrow buttons (Move Up or Move Down) on the Text Formatting toolbar. • Change the outline level for any of the paragraphs in a slide using the left
Text "frame"s are best if you need the content of the box to match the formatting of your running text. Insert > Frame. Graphics "text box"es are best if you need some special graphics function (rotation is the main one): View > Toolbars > Drawing, then click the "T" button. You can also use the "Drawing functions On/Off" button on the main ...
If the text object is selected, click a different object in your presentation. Hold CTRL and right click the text object you would like to add text effects to. You should now see the text object selected with little boxes around it instead of a shaded grey line. Release CTRL and right click the text object. Click Effects from this menu. Category:
How to simply insert a text box in open office and change it etc.Brought to you by: http://www.adviceall.com
Select the text or object you want to animate. An object such as a graphic or an entire text box will have green handles around it when selected. If you choose only a portion of the text in a text box, you may not see any green handles. In the Tasks pane, choose Custom Animation. Task pane, showing Custom Animation page. Click Add. The Custom ...
Select the Text Box. Use your shortcut keys to execute the macro. LibreOffice Writer/Calc. Open LibreOffice Writer/Calc. Insert a Text Box (Insert -> Text Box). Copy and paste any code snippet into that Text Box. Right click on the Text Box and select 'Description'. Add a description in the following format: code-<language> Select the Text Box
About Press Copyright Contact us Creators Advertise Developers Terms Privacy Policy & Safety How YouTube works Test new features NFL Sunday Ticket Press Copyright ...
Step-1: Click on the "Copy" option. In the open slide where you want to create multiple text boxes, "Right Click" on the text box. Then click on the "Copy" option from the right-click menu. You can alternatively press the "Ctrl+C" keys on your keyboard to copy the text box. Step-2: Click on "Paste".
1. If you have not already done so, start OpenOffice and load your Impress presentation. 2. From the View menu select Notes Page. You now have a screen that looks similar to the one above. Selecting a slide from the Slides sidebar will show that slide and its note page. 3. To add a note, left click on the text "Click to add notes".
If it is the latter, you need to toggle the design mode to Off. The button for that is the second one on the Form Control tool bar. It shows a drawing triangle, pencil and ruler. When design mode is off, most of the buttons on the Form Control tool bar are grey. OpenOffice 4.1 on Windows 10 and Linux Mint If your question is answered, please go ...