December 4, 2023

How to create a presentation outline (with examples)
Four methods to create a presentation outline and example outlines for inspiration
Co-founder, CEO
Like it or not, if you work in an office environment or go to school, you'll probably have to make a presentation at some point. But creating a great presentation can be challenging, especially when you're short on time or suffering from writers' block.
Luckily, there are lots of ways to get a head start on your presentation outline, and in this article we'll walk through four options for creating a presentation outline and show you several examples of great presentation outlines.
Why should I write a presentation outline?
An outline helps you organize your ideas in a clear and logical way . Instead of getting bogged down on details like formatting or word choice, an outline presents the overarching story of your presentation with just a few main points. This helps to make sure you have a cohesive narrative before you dive in to the nitty gritty work of wordsmithing individual bullet points or selecting the perfect slide theme.
If this sounds like a lot of work, it often is! But spending time writing a great outline will save you time and effort down the road because it will be easier to organize your work and create each slide when you understand how it fits in to the broader presentation.
Here are four ways you can get a start on creating your next presentation outline.
Method 1: Create your outline from scratch
Creating an outline from scratch may sound intimidating if you have never written a presentation outline before, but this is the most straightforward way to get started.
Start by jotting down the three main points you want to make in your presentation. Once you have your main ideas in order, write down a few supporting details and examples for each point.
Then, add an introduction (find an interesting image, quote, or question to help grab the audience's audience) and a conclusion (decide on the best way to summarize the takeaways from your presentation) to the outline, and you are ready to go.
This method is great for those who prefer to have complete control over their presentation and want to create a custom outline that works best for their needs.
Method 2: Create a presentation outline using an AI presentation maker
If you're short on time or looking for a quick way to get a first draft of a presentation outline that you can then refine, using an AI presentation maker is a great option.
Plus AI lets you type a short prompt like "Create a presentation that provides an overview of the Norwegian oil industry," and it will automatically generate an outline of a presentation for you. After Plus creates the outline, you can change the titles of slides, rearrange slides, and remove any pieces of the outline that are not necessary.

From there, once your outline is created, you can click the "Generate presentation" button, choose a template, and let the AI create the first draft of your entire presentation.
This method is a good option for those who want to create a polished presentation without getting stuck with a blank piece of paper. Instead, it frees you up to take a first draft presentation and customize it for your needs.
Method 3: Create a presentation outline using ChatGPT
ChatGPT is an AI chatbot that can help with a wide variety of tasks - everything from acting as a therapist, to sharing recipes, to helping you come up with presentation ideas and creating content for a presentation .
To have ChatGPT help you generate a presentation, you can take two different approaches:
- Use a custom GPT that has been trained to help people create presentations or
- Ask the general ChatGPT interface to "Create a presentation outline for me on the topic of [XYZ]."
Both approaches will yield similar results, but a custom GPT like Plus AI presentation maker will be more fine-tuned to helping people create presentations. It will also provide additional functionality like providing a visual preview of the slides and feedback on how to improve your presentation.
Method 4: Create a presentation outline using a template
Last but not least, using a template is a good way to speed up the process of creating a new presentation outline. Similar to using an AI presentation maker, a template can give you a first draft of an outline that is easier to edit and refine than starting from scratch.
Presentation templates often come pre-designed with example text and images, so all you have to do is fill in your own content. For example, this TED Talk presentation template provides some instructions on how to create an outline for a TED Talk-style slide deck.
The secret to using this method is to find the closest template to the type of presentation you want to create. You should use detailed search terms to and look across multiple sites and resources to find one that matches the content and style that you would like.
Once you have your template, start by reviewing the overall outline or structure and tweak it to meet your needs. Then, you can fill in the specific content (e.g., text and images) with your materials to make it your own to quickly make a beautiful presentation.
Presentation outline examples
Basic presentation outline example.
Let's take a look at a presentation outline and accompanying notes for a persuasive presentation on encouraging people to meditate every day:
I. Introduction
- Hook - find a striking image and tell a story
- Thesis statement - everyone should meditate for 10 min per day
II. Main point 1 - Meditation is one of the easiest ways to improve your health
- Physical health
- Mental health
III. Main point 2 - Meditation is backed up by thousands of years of practice and research
- One anecdote from antiquity
- One anecdote from recent research
IV. Main point 3 - You can get started with meditation today
- Basic technique
- Tips for newcomers
V. Conclusion
- Summarize key points
- Call to action
As you can see, this is a relatively lightweight plan for the presentation, but it provides an easy-to-understand framework that we can fill in with slides.
There are rough notes on specific content for the different points in the presentation, but we don't need to write out everything in fine detail, just the broad strokes.
Pitch deck outline example
Now let's review an outline for a pitch deck that someone might use to present their startup idea to prospective investors. This is for a startup that uses autonomous food trucks to deliver meals to people's homes and workplaces.
I. Problem statement - "Food delivery sucks, and here's why"
- Hook - pictures of typical food delivery headaches (e.g., late/no show, bad selection, etc)
II. Value prop - "FoodDrive revolutionizes the food delivery model"
- Compare value chain of FoodDrive to traditional restaurant and delivery service
- Show how $50 order gets allocated to different people
III. The product - "Customers love our trucks"
- Picture of food truck and menu
- Customer quotes and reviews
IV. Why now? - "Our self-driving technology is ready for prime-time"
V. Business model - "Each truck can generate $2-3M of revenue per year with a 60% gross margin"
- Show high-level financial forecasts on unit basis
VI. Competitive landscape - "FoodDrive's closest competitors don't come close"
- Comparison table with delivery services, in-house delivery, eating out-of-home, etc.
VII. Go to market strategy - "We've tested FoodDrive in 2 markets so far. Here's how we win in new markets"
- Overview of social media strategy
- Case study on new market launch
VIII. Team - "Our team has experience in autonomous vehicles, food delivery, and quick service restaurants"
IX. Traction - "We generate $5M of revenue per year with our 2 trucks, and we can ramp up new trucks immediately"
- Show revenue growth chart with focus on time to ramp new trucks to productivity
X. Fundraising goal - "We are raising $50M to expand FoodDrive to 10 more markets"
- Highlight key milestones we aim to reach with additional funding
Even though a pitch deck is a specialized type of presentation that often requires specific content, it's helpful to start with an outline to build out the 'story' behind the content. That way, you have a cohesive story rather than a set of disparate slides.
How can I create a presentation from an outline?
Once you have your presentation outline written, it's time to start writing your slides. Since you already know the main points you are trying to make in your presentation, the main decisions here are
- What type of visual style you want to follow
- How many slides you want in your presentation
- How you will present or share the slides
To get a head start on creating a first draft of your presentation, you could enter your outline into an AI presentation maker.
This will provide a first draft of the slides so that you can focus on making sure they tell a cohesive story or tweaking individual slides to leave a memorable impression.
Other tips and tricks for great presentations
Here are some resources to help you create great presentations:
- Make slides look good - Here are six tips for making visually appealing slides.
- Number of slides - Here is a calculator that can help you calculate how many slides you need for a presentation depending on how long you need to present.
- Unique presentation ideas - Here are 250 ideas for presentation topics that will help you create a great presentation.
Creating a presentation outline can be one of the most time-consuming parts of the creative process for making a new slide deck. Luckily, there are many tools and templates that can help you kickstart this process.
With these four methods, you can choose the one that works best for your needs and get started on your presentation outline today.
And once you have your outline, make sure to try out a tool like Plus AI presentation maker to quickly get your slides as well!

Latest posts
Latest post.

How to use ChatGPT to create PowerPoint presentations
Step-by-step guide to using AI tools to create presentations. Looking for ChatGPT for PowerPoint? Here's a guide to using AI in PowerPoint and Google Slides
The Best GPT-4 Apps and Demos (so far, April 2024)
The best GPT-4 powered apps we have seen so far
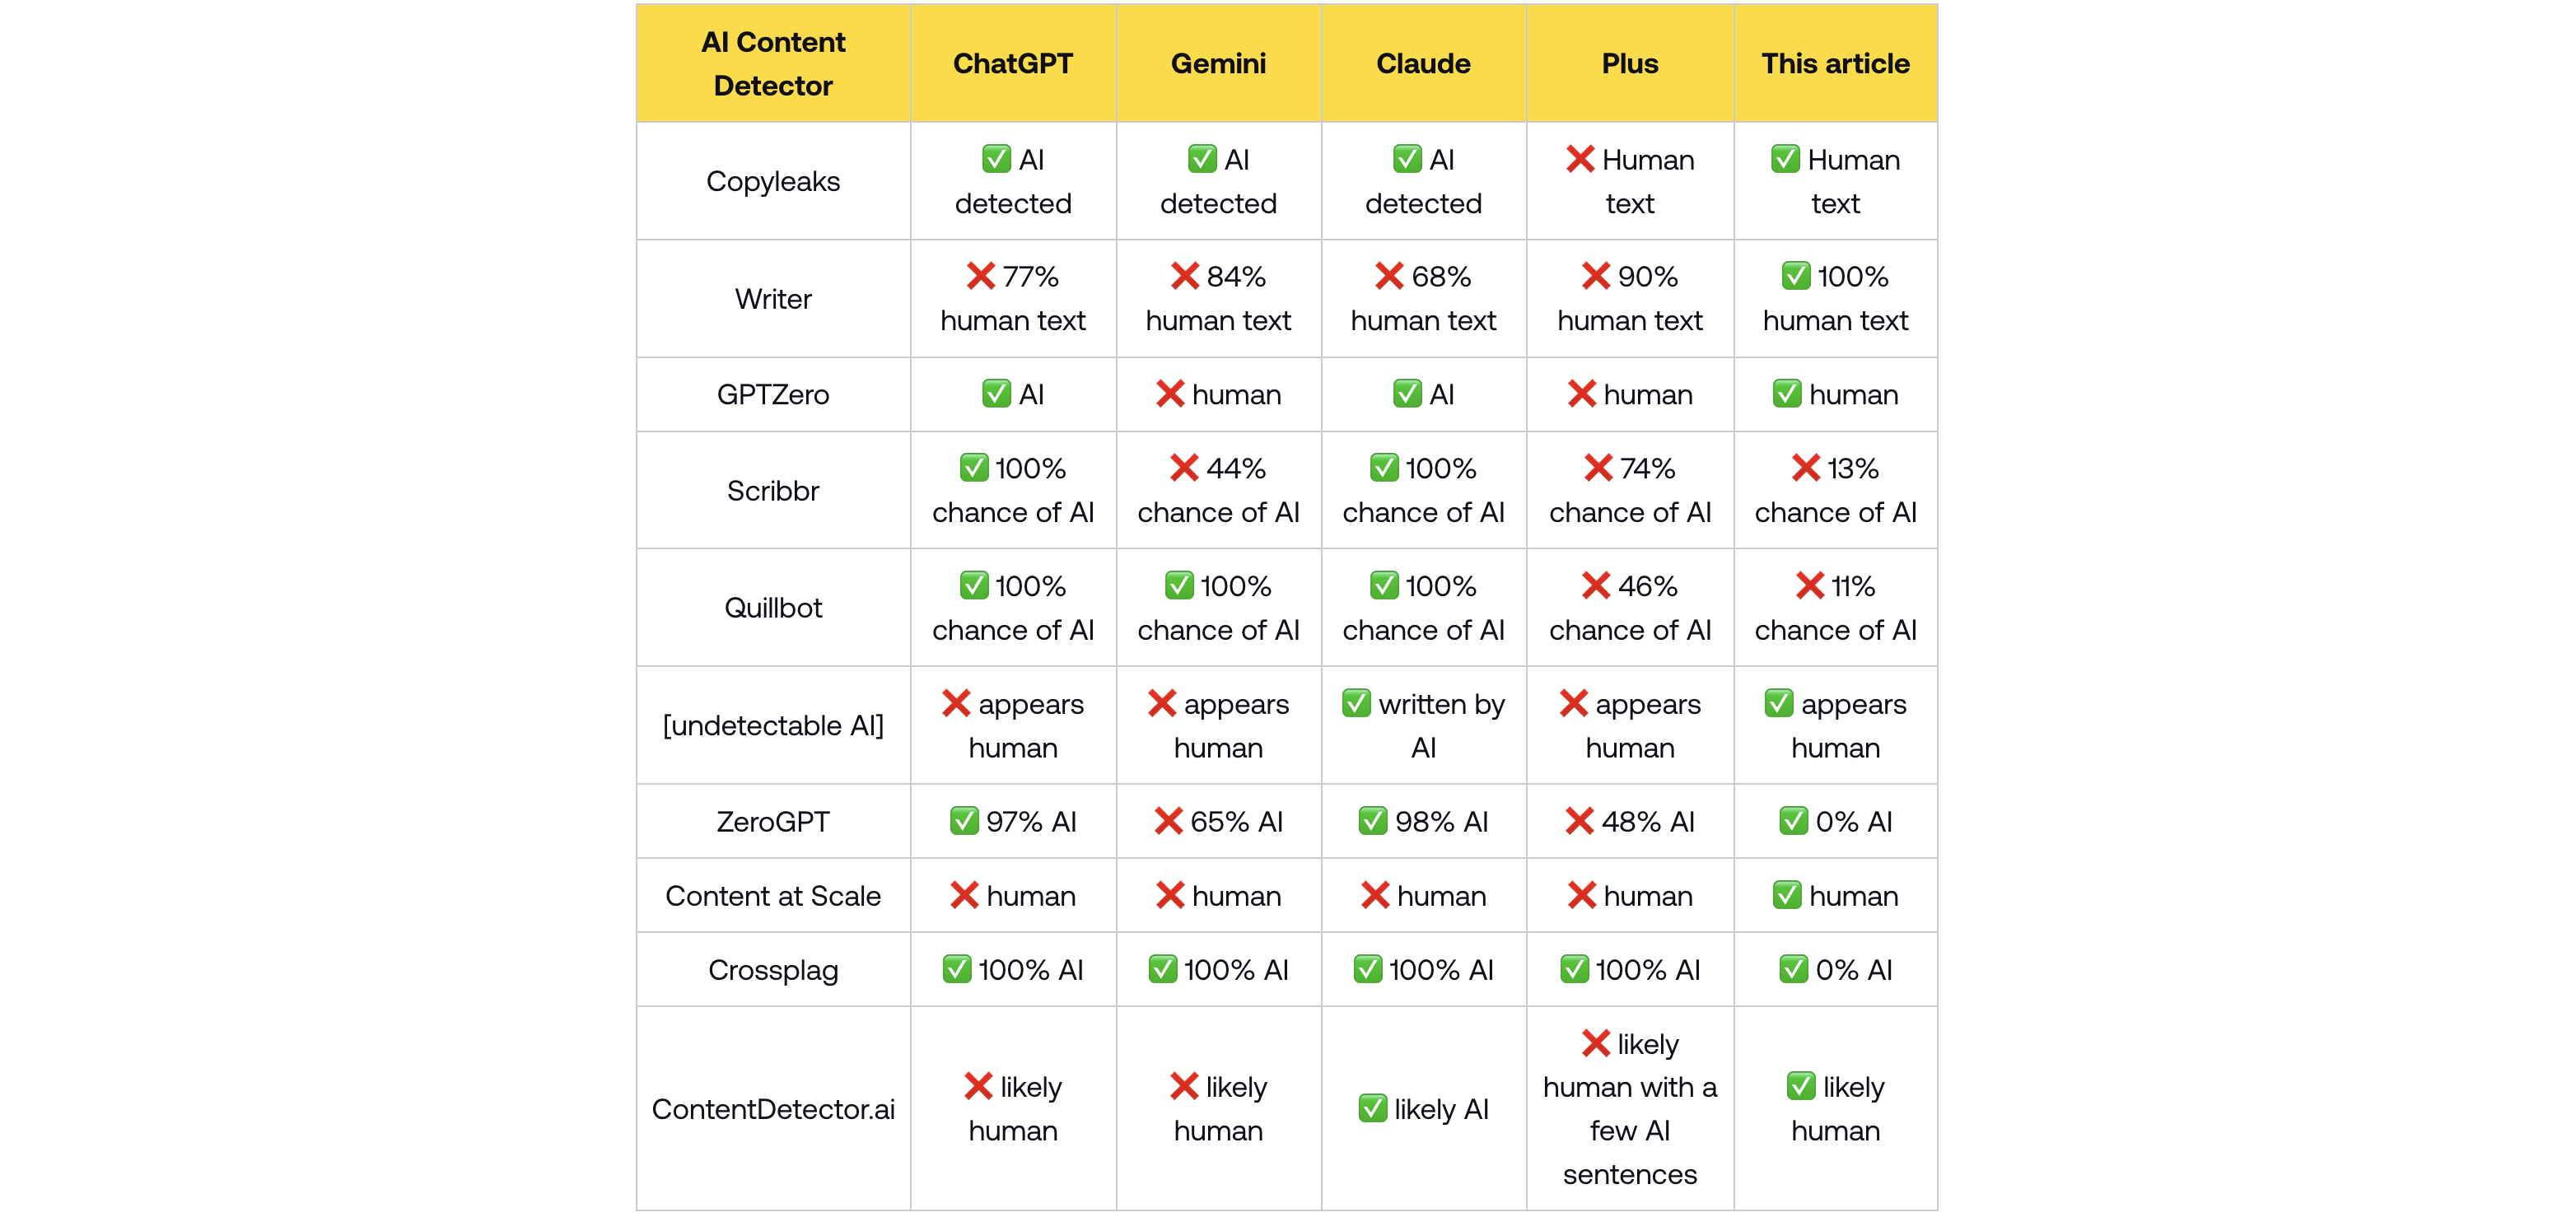
How do AI content detectors work — and can you trust them?
We tested 10 of the most popular AI content detector tools, their accuracy, whether they can be trusted — and how to bypass detection.

Tome vs. Gamma: In-depth comparison, pricing, and recommendations
In-depth comparison of Tome and Gamma with recommendations for which tool is right for you
More resources
How to use microsoft copilot in powerpoint.
Step-by-step guide to using Copilot for PowerPoint to make presentations, along with an alternative to create better slides
How to Use ChatGPT for Sales + 19 Free Prompts
Tips and tricks on using ChatGPT for sales, along with ready-to-use ChatGPT prompts for sales
How to compress a PowerPoint presentation
Wondering how to compress a PowerPoint file? Here are five simple ways to reduce the size of your ppt file.
How-To Geek
How to make a powerpoint presentation from an outline.
This is great if you like to start projects with an outline!
Quick Links
Compose your outline, create the powerpoint presentation.
When you plan out your slideshow ahead of time, you might use an outline. This helps determine the content for each slide. In Microsoft PowerPoint, you can pull that outline right into the application and transform it into a presentation.
If you already have an outline, you're one step ahead. If not, you can use an application like Microsoft Word or Notepad for your outline.
Related: How to Create and Work with Multilevel Lists in Microsoft Word
Each line in the outline displays on a separate slide even if you have a multilevel outline .
If you use numbering or bullets in an application like Word , those normally won't carry over to the slides. But with software like Notepad, they may. So, depending on the application you use for the outline, this is something to keep in mind.
You can add the outline to an existing presentation, new blank slideshow, or one with a template . Open PowerPoint and choose the slideshow or make a new one.
Related: How to Create a Custom Template in PowerPoint
On either the Home or Insert tab, select the New Slide drop-down menu. Pick "Slides From Outline."
Browse for the outline file on your computer, select it, and click "Insert."
After a moment, you'll see your outline load into PowerPoint. As mentioned, each line of the outline is its own slide.
From there, you can add text, include images, insert animated charts , and use videos as you normally would.
Creating a PowerPoint slideshow from an outline gives you a good jump-start on your presentation.
Google Slides
Create Effective Presentation Outlines: A Step-by-Step Guide with Tips & Examples

Table of Contents
What is a presentation outline .
A presentation outline is like a roadmap for organizing your thoughts and delivering your message smoothly during a presentation. It helps you structure your content logically, ensuring that your audience can follow along easily. By providing a clear framework, an outline enhances the clarity and effectiveness of your presentation.
Importance of Presentation Outline
1. Clarity and Focus
Using an outline keeps your presentation organized and focused, preventing you from going off track. It ensures that your presentation has a clear purpose and that all the information you share is relevant to your main points.
2. Logical Structure
A well-crafted outline ensures that your presentation flows logically, guiding your audience smoothly from one point to the next. This helps your audience follow your train of thought and understand your message more easily.
3. Enhanced Delivery
Having a clear outline can boost your confidence and make your delivery smoother. With a structured plan, you’re less likely to forget important points or ramble on, resulting in a more professional presentation.
4. Time Management
An outline helps you manage your time better by estimating how long each part of your presentation will take. This ensures that you stay within the allotted timeframe, keeping your presentation on track and engaging for your audience.

How to Build Strong Presentation Outline s?
1. Purpose of Presentation
Understanding why you’re giving your presentation is crucial for planning its structure. Identifying your goal means thinking about what you want your audience to get out of it. This clarity forms the basis of your whole presentation. There are six potential reasons you might be presenting:
- Sharing information
- Teaching something new
- Making it enjoyable
- Inspiring action
- Convincing people of something
- Motivating them
Thinking about your goal will help you make a presentation that really grabs attention. Answering these questions can help you figure out what your goal is:
- What do I want people to learn or understand from my presentation?
- How will my presentation make a difference to those listening?
- What do I want people to do after my presentation?
Once you have the answers, you’ll have a good idea of what your presentation should cover and where to start.
2. Consider Color and Design
How you present your pitch matters just as much as what you say. Take a moment to think about the fonts and colors you’ll use on your slides. Research suggests that red can convey excitement and grab your audience’s attention, while white gives off a sense of simplicity and clarity.
3. Establishing Structure: Arrange Your Ideas in a Logical Order
When crafting your presentation, it’s important to structure your ideas in a clear and logical sequence. Start with an introduction to set the stage, followed by the main body where you delve into your key points, and wrap it up with a conclusion to summarize your main ideas.
4. Engaging Your Audience
When you’re getting ready for your presentation, think about how you can start off in a way that grabs everyone’s attention. You could ask a thought-provoking question, share an interesting story, or begin with a meaningful quote. The main thing is to get your audience interested right from the beginning and set the tone for the rest of your talk.
5. Adding Visuals
Give some thought to whether you want to include pictures, videos, or other visual stuff in your presentation. Even if your outline doesn’t mention exactly what visuals to use, you can suggest where they might fit in to help explain your ideas.
6. Encouraging Action
Come up with a clear and compelling message to encourage your audience to take action. Whether it’s encouraging customers to try out a new product or inviting people to join a demo, make sure they understand what’s in it for them. And if your presentation doesn’t really need a specific call to action, just wrap up by summarizing your main points and saying thanks for listening.
Alternatively, you can skip the hassle of crafting a presentation outline manually – try SlidesAI for seamless assistance .

Strategies for Crafting an Engaging Presentation
1. Understanding Your Audience
Take some time to know your audience by researching beforehand. This helps you adjust your presentation to connect with them better.
2. Enhance with Quotes, Testimonials, or Data
Make your presentation more interesting by adding extra info like quotes, testimonials, or data. It can make your audience more engaged and reinforce your message.
3. Visualize Your Concepts
How you show your ideas matters a lot. Tools like SlidesAI can help you express your concepts clearly and effectively.
4. Highlight Key Takeaways
Figure out the most important points you want your audience to remember. This makes it easier for them to recall and understand your message.
5. Seek Feedback
Ask for feedback to improve your presentation. It’s a good way to make sure it connects better with your audience.
Presentation Outline Example
Topic: The Impact of Social Media on Mental Health
Target Audience: College students
Time Limit: 15 minutes
I. Introduction (2 minutes)
Attention Grabber : Briefly discuss a real-life example of how social media can negatively impact mental health (e.g., cyberbullying, unrealistic beauty standards).
Introduce the topic : Clearly state the topic and its significance (e.g., “Today, I’ll be talking about the increasing impact of social media on mental health, particularly among young adults like yourselves”).
Preview : Briefly outline the key points that will be covered (e.g., “We’ll explore the positive and negative aspects of social media use, discuss common mental health concerns associated with it, and offer some tips for healthy social media habits”).
II. Main Body (10 minutes)
Positive aspects of social media:
Connection and community : Highlight how social media can help people connect with friends and family, build communities based on shared interests, and combat feelings of loneliness.
Information and self-expression : Discuss how social media can be a source of information, news, and inspiration, and provide a platform for self-expression and creativity.
Negative aspects of social media:
Social comparison and envy : Explain how constant exposure to curated online profiles can lead to social comparison, feelings of inadequacy, and envy.
Cyberbullying and harassment : Discuss the prevalence of cyberbullying and online harassment, their potential to significantly impact mental health, and the importance of online safety.
Addiction and anxiety : Explain how excessive social media use can lead to addiction, anxiety, and sleep disturbances.
III. Conclusion (3 minutes)
Summary : Briefly recap the key takeaways discussed in the presentation.
Call to action : Encourage the audience to be mindful of their social media usage and offer practical tips for developing healthy habits, such as setting time limits, curating their feed, and prioritizing real-life interactions.
Question and Answer : Allocate time for audience questions and address them thoughtfully.
This is just a sample outline, and you can adapt and modify it based on your specific topic, audience, and time constraints. Remember, a well-structured and engaging presentation will effectively communicate your message and leave a lasting impression on your audience.
Frequently Asked Questions
How can ai help you create a presentation outline .
With the assistance of AI tools like ChatGPT and Gemini, crafting outlines becomes a breeze. Furthermore, you can utilize user-friendly online AI presentation tools such as SlidesAI to effortlessly generate your presentations.
Why is putting your outline on a slide a good idea?
Using a presentation outline can be helpful. It makes things clearer, boosts the speaker’s confidence, and helps manage information better. It also keeps the audience more engaged. But, if your presentation is fast-paced, casual, or focused on a specific area of expertise, you might want to keep the outline short and sweet. Just pick what works best for your situation and audience.
What is the format of the presentation outline?
There are various formats, but a common approach is using bullet points, numbered lists , or headings and subheadings. Choose the format that best suits your content and visualizes your information.
How can I adapt my presentation outline for different audiences?
Adapt your presentation outline by tailoring:
- Content : Depth, complexity, and examples based on audience expertise.
- Language : Formality, jargon, and storytelling to match audience and occasion.
- Visuals : Complexity and style to suit audience understanding.
- Delivery : Pace, volume, and even body language to audience energy.
- Focus : Highlight information most relevant to specific interests.
How long should a presentation outline be?
There’s no set rule; it depends on the complexity of your topic and presentation length.
Can I use a mind map to create a presentation outline?
Yes, mind maps can be a good way to visually brainstorm and organize presentation ideas.
What tools can I use to create a presentation outline?
You can use pen and paper, a word processing software like Microsoft Word, or dedicated outlining tools. Presentation software like PowerPoint also offers built-in outlining features.
Save Time and Effortlessly Create Presentations with SlidesAI

- Learn center
- Strategy & planning
How to make a presentation outline: a step-by-step guide

Georgina Guthrie
April 07, 2021
Whether you’re building a house, baking a cake, or writing an essay — having all the necessary pieces in place before you begin will make the task much easier.
It may seem counterproductive to spend time sorting things out when you’re in a rush… After all, why spend time organizing when you could dive straight in? But the fact is, the opposite is true: Planning saves time, and the same goes for creating a business presentation. Start with a presentation outline.
A presentation outline is a bare-bones version of your talk. It should take the general direction of your pitch, plus summaries of your key points. Its purpose is to help you shape your thinking, organize your thoughts, and make sure your material is presented logically.
In this article, we’re going to take a closer look at what a presentation outline is, how storytelling can help engage your audience, and how to create a flawless outline of your own. Let’s get stuck in.
What’s the purpose of your presentation?
This is the foundation on which you will build your whole presentation — so make sure you know the answer to this question. A good starting point is to think about the overall purpose. There are six possible purposes your presentation might have:
- Inspire action
- Inspire or motivate
In a business setting, it’ll usually be ‘to inform,’ along with one or two others. If you’re there to talk about quarterly results, then you’ll want to inform and motivate. If you’re a business coach, your goals will likely be to inspire, motivate, and entertain.
Once you’ve worked this out, you’ll be one step closer to working out the purpose of your pitch. Here are some questions to help you find an answer to this question:
- What do I want people to take away from my presentation?
- How will what I talk about help others in the room?
- What do I want people to do after my meeting?
Note down your ideas and start creating a topline summary of your presentation purpose. Summarize it into one or two sentences, then put that on your first slide. You can change it later, but this is a good starting point.
Create a story arc for your presentation
As humans, we love a good story. We’ve been doing it since, well, forever. The earliest cave paintings helped the painters and those who saw the paintings make sense of the world.
Interesting things happen when you start telling a story. Your brain’s auditory cortex (aka the bit that helps you listen) switches on. This helps you imagine the activities being described. Meanwhile, the frontal and parietal cortices are fired up, which helps us emotionally engage with what’s being said.

Stories have been, and will always be, a powerful tool for bringing people together. Great stories persuade and inform; the best stories inspire and stay with us. But we don’t often see this happening in the boardroom, where graphs and quarterly results preside.
Stats and numbers suck the life out of a presentation. We think these details will speak for themselves. But… they don’t because, well… they’re boring, and they make us switch off. If you want to inspire your audience, you need to weave those stats into a story . But where do you begin, and how do you start?
Storytelling isn’t something only a few select people are good at. Anyone can master the art with a little practice. It doesn’t even require heaps of creativity because the truth is, stories are formulaic, and once you’ve got the formula down, the rest runs on autopilot.
Let’s look at how to build your notes and ideas into a compelling story using one of the formulas below.
1.Fact and Story
Mixing storytelling with facts works in a kind of mutually supportive cycle. Facts add substance to the story; the story adds interest to the facts.
In this structure, you weave the two together and move back and forth between the two.
- Start with a ‘what if’ question. For example, if you were pitching a vacuum cleaner, your initial sales pitch might be ‘what if you didn’t have to lose suction?’
- From here, work in facts that illustrate the way things currently are. To continue with our example, it might be current stats on traditional vacuums losing suction. Keep alternating facts with fiction throughout the body of your presentation.
- End on a high note that makes the listeners feel like they learned something and want to move to action because of it. For example, to invest in your new product, or to sponsor your new app .
2. The hero’s journey
From Odysseus to Chihiro , adventure stories typically feature a hero who goes on a journey fraught with peril and learns a vital lesson at the end of it. It’s a formula employed by thousands of writers — and you can draw from it to add some drama to your presentation.
This structure works really well for inspirational personal stories, or tales about a company from its humble beginnings to the success it is today.
- Begin somewhere neutral. The situation is neither ideal nor unbearable.
- Introduce a challenge — one that needs to be solved.
- Present a worsening situation. The problem is being addressed, but things are still getting worse.
- Talk about rock bottom. The situation seems impossible; there is apparently no way forward and all seems lost. Until…
- Talk about a new discovery that offers hope.
- Armed with your new abilities, you can tackle the issue head-on.
- Talk about resolving the problem, but instead of returning to the way things were before, the hero (you) discovers an even better way of living.
- Finish with a lesson, which you can share to inspire your audience.
3. The Pitch
The ‘pitch’ style of presentation is commonly used by salespeople. The goal is to show how a product or idea can help an individual overcome a hurdle toward a positive outcome. The story should be relatable, so the audience can picture themselves in the situation and, therefore, benefitting from the solution.
- Start with a summary of the way things are in a way that’s easy to relate to.
- Introduce the problem or hurdle that you need to solve. Make it relatable to further help your audience put themselves in the situation.
- The solution: give your audience a glimpse into a possible solution.
- The fork in the road: Give your audience a couple of options for solving the problem. Offer an average option first, then follow up with a better one.
- Close: Choose the better option and explain why that’s the best one (and only real suitable choice).
- Finish up by telling the audience exactly how to solve the problem, step by step.
- But that’s not all: Before you finish, talk about extra benefits that extend beyond simply solving the problem. Finish on an uplifting high.
4. The explanation
This presentation format is for when you want to teach your audience something — whether that’s a process, a new skill, or a way to overcome a problem. It has similarities with the fact and story structure, insomuch as facts should weave into the story.
- Explain how things are at the moment, what the goal looks like, and how you plan to get there. You can even start with a story to add emotional interest from the get-go.
- Take your first step on the journey toward the final destination.
- Add more steps that build on this.
- Take a moment to recap on the points you’ve covered so far while tying them into the main point. This will help your audience visualize the ground you’ve covered and see where you’re heading.
- Add the finishing pieces to the puzzle and lead your audience to the end.
- By the end of your journey, your audience should feel as though they’ve learned something new.
5. The Opportunity
A close relative of the pitch, this three-part structure swaps a hurdle for an opportunity. Here, you want to show your audience that a problem they thought they had actually has an easy fix.
- Start with the situation as it is now.
- Next, add a ‘but’ — this could be a small hiccup that stops things from being as good as they could be. For example, our chocolate pudding company is doing really well. But we could be doing better if we changed supplier.
- Talk about the opportunity, with as many facts and stats as possible to make it feel achievable and real.
- Add a conclusion.
- Explain why the product or service meets the challenges raised. Add more stats and facts to support your point.
How to plan your presentation
Now you’ve worked out your structure, it’s time to start building your presentation, pulling in all your points and forming them into a story.
Storyboarding is the best way to do this. Directors use storyboards to map out their films scene-by-scene — you’re going to use it to map out your presentation, slide-by-slide.

(Don’t worry, you can do stick people and squiggles if drawing isn’t your strong point.) Image Source
The trick here is to use broad strokes without adding too much detail. Make it too wordy and you’ll lose your top-level view, which is important for assessing the arc of your story. Ideally, have one or two sentences on each slide summarizing what each one will address.
You can do this with pen and paper, but when it comes to final drafts and editing, it’s a good idea to move your drawings over to a digital format. It looks far neater, and it means that if you need to change something, it’s as simple as deleting or editing a cell or slide rather than you having to start over.
Once you’ve got your rough storyboard more or less ready, it’s time to start building your presentation.
Your presentation outline
Using a presentation template will be a big help here. First, choose your template — then start adding pre-made slides according to your storyboard. For those who didn’t plan, this can be a bit of a nightmare that usually ends up with you shuffling slides around indefinitely. For those who planned, it’s simply a matter of putting all your hard work in place, then spicing it up with pictures, video, and audio.
Top Tip : If your slides are there to support your spoken words, try not to make them too wordy. Talking too much will distract your audience, whose attention will be split between what’s on screen and your voice. Instead, opt for images and video. If you’re sharing your presentation slides without presenting them, keep your communication simple and succinct. A wall of text is never engaging.
Finally, rehearse your presentation. According to experts, 10 is the magic number when it comes to practicing speeches . The more you practice, the better it’ll flow, the easier it’ll be for your listeners to get sucked into your story. And when it comes to persuading, inspiring, informing, or selling — having a captive and engaged audience is half the battle.

5 ways to use diagrams to visualize your ideas

Using a SWOT analysis to develop core business strategies
Subscribe to our newsletter.
Learn with Nulab to bring your best ideas to life
How to Make a PowerPoint Presentation From an Outline

Creating an effective PowerPoint presentation starts with having a clear outline. Your outline serves as the backbone that will guide the content and flow of your slides.
By organizing your thoughts and ideas into an outline first, you can ensure your presentation tells a cohesive story that engages your audience. This article will walk you through the key steps for developing a compelling PowerPoint deck using an outline.
Gather Content and Brainstorm Ideas
Before creating your outline, you need to gather information related to your presentation topic. Good sources to review include:
- Relevant research and reports
- Articles, blogs, infographics
- Interviews and surveys
- Personal experiences and anecdotes
As you compile information, start brainstorming the key points and ideas you may want to cover in your presentation. Jot down things like:
- Main topics and themes
- Supporting facts, statistics, examples
- Potential visuals like charts or images
- Stories and quotes
Organize Ideas into an Outline
With your raw content in hand, you can now start structuring it into an outline format.
There are several outline structures you can follow such as chronological, hierarchical, or thematic. Select the approach that best fits your presentation objective and allows you to logically build up concepts.
Some tips for creating a strong outline:
- Use short phrases – Don’t write full sentences, just concise phrases to capture key ideas.
- Group related ideas – Organize supporting points under the main topics and themes.
- Limit outline to key points – Keep it high-level so you don’t get bogged down in too much detail.
- Use a consistent format – Follow the same structure for all sections to aid flow.
- Leave room for flexibility – Your outline should guide you but not constrain you if ideas change.
Craft a Compelling Introduction
With your outline established, now focus on developing a powerful introduction to hook your audience right from the start.
Your intro should clearly set the stage for what your presentation will cover. Essential elements to include:
- Attention-grabbing opening – Start with an interesting statistic, question, anecdote or quote that draws people in.
- Presentation objectives – Clearly state what you want the audience to learn or takeaway.
- Agenda overview – Provide a high-level summary of the key topics you’ll be covering to frame the discussion.
Keep your intro short, impactful and focused. You want to capture interest quickly before diving into the body of your presentation.
Develop the Body Section-by-Section
With your solid outline and introduction in place, you can now start building out the meat of your presentation slide-by-slide.
As you work through each section:
- Convert outline points to slides – Turn each major outline topic into a PowerPoint slide with the supporting details underneath as bullet points.
- Elaborate on ideas verbally – Your spoken narrative will provide greater explanation and context around items presented visually.
- Incorporate visuals – Use illustrations, charts, photos and other graphics to reinforce key data and ideas.
- Create smooth transitions – End each slide/section by foreshadowing what’s coming next to transition logically.
Continue expanding upon your outline section-by-section until you’ve covered all the main points.
Wrap Up with a Memorable Conclusion
Just as a strong intro grabs attention, an impactful conclusion leaves a lasting final impression.
An effective closing should:
- Summarize key takeaways – Recap the most important ideas, insights and concepts covered for memory retention.
- Tie back to introduction – Bookend by reconnecting back to your opening points or objectives.
- Add a call to action – End by motivating your audience to do something with what they just learned.
With these elements, your presentation will end on a high note that inspires future action.
Refine and Polish Content
With a complete first draft done, your last step is to refine and polish your slide deck content.
Key areas to review critically:
- Flow and transitions – Ensure there is cohesion between points with smooth shifts between concepts.
- Consistency – Review formatting, fonts, colors used so deck looks uniform.
- Length – Cut any unnecessary content so slides aren’t too text-heavy.
- Visual appeal – Check images are clear and text is readable on slides.
- Story – Verify the narrative flows logically and makes persuasive points.
Spend time fine-tuning the details so your presentation is impactful, easy-to-follow and visually appealing.
About The Author
Vegaslide staff, related posts.

How to Screen Share a PowerPoint Presentation in Zoom

How to Set a Custom Template as the Default in PowerPoint

How to Change Your PowerPoint Orientation to Portrait

PowerPoint 2013 – How to Hide the Toolbar in Fullscreen Mode

How To Make an Effective Presentation Outline
Edraw content team, do you want to make presentation outline.
EdrawMind helps move ideas forward, faster and better. Learn from this complete guide to know how to make a perfect Presentation Outline. Just try it free now!
1. What is a Presentation Outline?
A presentation outline presents a comprehensive idea of what you plan to share with the audience. It is a synopsis of a talk, pitch, or subject matter under discussion. It serves as a guide for writing a paper, publishing a study, or building a presentation and enables you to structure your information in a way that is easy to understand. Making a presentation outline is similar to having all the necessary pieces in place before building a house. It may appear counter-productive to spend time and resources sorting things in the form of an outline. However, outlining saves time and gives clarity on a particular topic.
2. Why Should You Create a Presentation Outline?
A presentation outline assists you in preparing for your pitch or speech. It provides a clear path to take your audience from where it is to where you want it to be. It plays an important role in positively shaping people's perspectives about your planning and execution skills. There are several other advantages associated with creating a presentation outline which includes:
- It helps in brainstorming your presentation and saves time by giving a clear idea of what you need to focus on.
- It helps structure ideas so that they appear in a logical order.
- It enables you to determine the main points you need to keep in your presentation.
- You can categorize ideas into groups and create separate slides for each group for further clarity.
- It helps you rehearse your presentation while going over the important points.
- It provides a visual aid to help people understand your topic in a better way.
3. How to Create a Presentation Outline?
The following steps will help you create a presentation outline:
1 Considering the Purpose of Presentation
Determination of your presentation goal is fundamental to creating an outline. To find the purpose, you need to think about what you want from your audience. Finding this out will enable you to build your whole presentation. There are six purposes your presentation possibly have:
- Entertaining
- Inspiring to act
Considering the purpose will help you build an impressive presentation. The following few questions will enable you to figure this out:
- What do I want people to take away or understand from my presentation?
- How will my talk help those attending the presentation?
- What do I want people to do after the presentation is over?
Answers to these questions will help you create a summary of your presentation and will serve as a fine starting point.
2 Creating Structure
Creating a structure implies considering where different points belong in your discussion and where to use the supporting material. There are three main components of a presentation:
- Introduction
Structuring your points and arguments in these parts will enable you to transition from one part of the presentation to another without creating any trouble.
3 Using an Attention Grabber
Thinking about how you want to open your topic is an integral part of planning a presentation. If you want your audience to get engaged with what you are talking about, you can ask an interesting question, share a related story or quote something entertaining. It sets the tone for the rest of your discussion.
4 Considering Visual Content
You can add images, videos, or other visual content to your presentation to convey what you want to. It helps you to communicate emotions, excitement, passion, and experiences effectively. You can also focus on using different fonts and colors to make your presentation more interactive and interesting.
5 Including a Call to Action
A creative call to action will inspire your audience to take appropriate action. It will show what you want your audience to do after the presentation. Let your audience know what it will get from performing the required action.
4. How to Make a Presentation Outline?
You can make a presentation outline in the following two ways:
With PowerPoint and Word
1 creating an outline in word.
- Open Word document.
- Select View > Outline. This will automatically generate an outline and open the Outlining tools.
- If there are headings in your document, you will witness those headings organized by level (from H1 to H9). If there are no headings in the document, the outline will appear as a bullet list. You can assign or edit headings, and heading levels. You can also set up the structure of your document.
- Select a bullet item.
- Select a heading Level 1 for slide titles, Level 2 for bullet points on that slide from the Outline Level box.
- When the work is done, select Outline View to edit your document.
- Select Save to save your document, name your file, and then select Save once more.
- Select Close to close the document.
2 Importing a Word Outline into PowerPoint
- Open PowerPoint and select Home > New Slide.
- Select Slides from Outline.
- In the Insert Outline dialog box, find and select your Word outline. Select Insert.
With EdrawMind

5. Presentation Outline Template

This presentation outline template describes three components of the outline: The introduction, the main body, and the conclusion. The introductory part opens the topic with an attention grabber and summarises the importance of the topic and its relevance of the topic to the audience. It also includes learning objectives that points out what the audience is going to learn from this presentation. The main body part constitutes the main idea of the topic. This idea is substantiated by supporting material. The concluding part constitutes a summary of the topic discussed and what the audience learned from it. It reviews the main points and calls the audience to take appropriate action.
6. Key Tips for Creating a More Effective Presentation
Here are some important points to consider to create an effective presentation:
- Know Your Audience. Get to know your audience by researching ahead of time so that you can make your presentation relatable.
- Add Quotes, Testimonials, or Data. Adding additional information to your presentation can help you engage your audience better.
- Visualize Your Ideas. The way you present your ideas is fundamental to the success of those ideas. EdrawMind helps you to create and present your ideas most effectively and efficiently.
- Identify Key Takeaways from Your Presentation. It will enable you to recall, review, and reassert what you want to communicate with your audience.
- Gather Feedback. Gathering honest feedback will help you make further improvements and adjustments to your presentation to make it more effective.
7. Key Takeaways
A presentation outline is a tool to communicate your ideas precisely. It helps you brainstorm and plan your presentation in a logical flow. Moreover, it helps to grab the attention of your audience by providing it with a visual depiction of what you are going to talk. If you want to create an impressive and creative presentation outline, EdrawMind will help you in this regard. It has a variety of functions and tools which enable you to create a dynamic outline suited to your topic. It enables you to brainstorm and present your ideas most effectively by using different diagrams, charts, graphs, clipart, etc. EdrawMind provides the best solution to your presentation problems.
You May Also Like
How to make a concept map.
HOW-TO & TIPS
How Do Humans Affect the Earth? Effective Ways to Save the Earth from Pollution
7 best earth day activities to enjoy | how to draw their mind map, get inspired: how to run a successful brainstorming session and boost your business, innovative solutions: learn how to brainstorm like a pro, how to make a creative mind map (with mind map templates).
- Frequently Asked Questions (FAQ)
PowerPoint Tip: Start Your Presentation with an Outline
PowerPoint presentations are much like college essays. They present cited, relevant information that is meant to educate and inform. They are made for a wide audience. Do you remember what your teachers used to advise you to do when they assigned an essay writing assignment?
“Don’t forget to make an outline before you write.”
You can use the same concept in your next presentation. Just because it contains pictures and encourages interactivity doesn’t mean that it can’t be approached in a similar fashion. Outlining key points is a powerful strategy, and PowerPoint 2013 has a very useful tool to help you do it. This article will explain the importance of outlining and how to use the PowerPoint Outline View .
Why Create an Outline?
The answer is fairly simple: outlining focuses your presentation. It acts as a sort of pre-first draft, giving you leeway to throw ideas on the table and figure out which ones work best for your presentation. By putting everything you’ve thought of in one space, you can see your ideas and points side-by-side and more efficiently eliminate ones that don’t contribute to your overall message. By tightening the screws and oiling the gears, you will have a more cohesive presentation that works well both in presenting (on your end) and receiving (on the audience’s end).
PowerPoint Outline View
When you switch to Outline View in PowerPoint, you will see all the text currently within your title and text placeholders in a document-style format that appears on the left side of the screen. This will allow you to go through all the text and edit it without having to locate your text boxes one by one, slide by slide. It is a very useful tool to use when you want to focus on both text and image in a single go, consolidating your work from different areas of the screen.

Outline View can easily be switched on and off by using the Ctrl+Shift+Tab key combination or via VIEW → Outline View .

Text typed in Outline View will appear in the title of the current slide. Press Enter to add a new slide. By pressing Tab the current item will be indented and become a subitem of the previous item. Shift+Tab removes the indentation. All of these features are also accessible via the context menu, which can be accessed by right-clicking an outline item.
Importing an Existing Outline
If you have already created an outline in Microsoft Word, you can easily convert it into PowerPoint slides. PowerPoint will use the heading styles that you assigned to your text in Word to determine which paragraphs are titles and which are content. Heading 1 lines will become slide titles, Heading 2 lines will become bulleted items on the slides, and Heading 3 lines will become sub-bulleted items.
To import an existing outline file, click the drop-down menu under New Slide on the HOME tab, and select Slides from Outline . Navigate to the outline file, and click Insert .

Another option is to create an outline in .txt format using Notepad (or any other text editor), as shown in the screenshot below.

Normal paragraphs will be converted into slide titles, whereas paragraphs indented by tabs will result in bulleted lists.
All of the best presentations include three things: research, quality, and purpose. PowerPoint’s Outline View can help you achieve the quality work you desire as you create your presentation and impress your audience with your vision. By consolidating all of your important content into a single segregated window, you can more easily weed out the text you don’t want and refine the text you do want. That way, by the end, you’ll achieve your goal.
- Presentation Tips and Techniques
- April 25, 2016
About ShapeChef

Blog Categories
- Slides and Objects
- Video and Audio
Copyright © 2024 Wulfsoft. All rights reserved.
- Terms of Service
- Legal Notice

How to Outline a Presentation: A Complete Guide From a Pro
- Filed under: Public speaking articles , Speaking tips , Speech preparation
When you’re writing an important speech, you must start with a clear outline. However, I find that many speakers are uncertain of how to write a good outline for their presentation. This is why I decided to write a guide for you, in hopes that learning to perfect your outlines will help you give better presentations in the future.
How do you outline a presentation? Always start with your introduction and end with your powerful closing. Flesh out the body by listing topics in the order that you want to cover them in. Never skimp on the important details of your speech. Remember that an outline is only a draft.
I know at this point that you still have questions, and that you still be confused at how to write the best outline for your speech. But writing a good outline for your presentation does not have to be stressful! This is my complete guide from a pro for you, in hopes that you can take the stress out of this important step.
Table of Contents
How to Outline a Presentation
Outlining a presentation can be done with a regular piece of paper, or on a word processing program on your computer. If you are hosting a PowerPoint presentation, you may prefer to do the entire thing from the comfort of your computer. But if you do decide to write your outline on a piece of paper, make sure you use a pencil and eraser so that you can make changes as you go along.
The very first step in creating an outline is to ask yourself what the purpose of your presentation is.
Write your main message or a one-sentence summary of your thesis at the top of your outline when you get started. This may help you stay on task, and it will keep the purpose of your speech right in your eye’s sight. After all, you don’t want to stray too far off the main topic of your presentation !
Remember, a quality outline is meant to enhance the purpose of your presentation. If you do not write a proper outline, you may risk not properly conveying the right message to your audience.
Or you may even forget to cover essential points that you wanted to talk about. A thorough outline is especially important if you are planning to speak without notes.
You should remember to properly summarize what you want to say with every sentence of your outline. After all, this is not a full script, so a summary is all you really need. Remember to rehearse and practice with your outline, so that you can remember what you have written.
Start With a Strong Beginning
Your introduction is where you start strong by grabbing your audience’s attention from the very beginning. But if that makes you feel stressed out, just remember to stay calm! Creating a great first impression from the beginning of your speech is not as difficult as you might be worrying.
When you create a strong beginning, you should try some of the following:
- Start with an attention-grabbing statement that captures your audience from the start. If you have a few ideas but are not sure what to use, try running your ideas by a trusted friend or mentor.
- Give a strong signal that you are beginning your speech. You don’t want your audience unsure of whether you’ve actually begun or not.
- Give the main thesis statement about the purpose of your presentation.
- You could start by giving a brief preview of all of the things that you are going to talk about in the body of your speech.
- Talk about your credentials at the beginning. However, you should make sure to find a way to do it that is entertaining. You don’t want to risk boring your audience from the very beginning of your speech!
- Thank your audience from the very beginning! This is not only a good way to begin your speech, but a good way to end it, as well.
- If there are any current events or famous historical events that relate to the purpose of your presentation, you can start by talking about these. However, pick only one so that you do not draw your introduction out too long.
- Ask your audience a question at the beginning. You could draw out their interest by answering this question at a later point in your speech.
- Whenever possible, make sure you begin your speech on a positive note . This sets a good tone for the rest of the presentation.
- Start by telling a story that relates to your presentation. A good reason to start with a story is that it helps you form a strong connection with your audience from the beginning. Write some of the main details of your story in your outline so that you remember them.
Be reminded thought, that sometimes it is wise to write your introduction last as only you know what you’ll be introducing. This way, you’ll also avoid including something in your introduction that you won’t be actually talking about.
Once you have written out your introduction, you have completed the first step in creating an excellent outline for your presentation.
Create a Powerful Ending
In my experience, it can be easier to create ending before you flesh out the body of your presentation. However, it is up to you if you prefer to create your outline in a different order.
If you are a regular reader, you might have realized that I already posted an in-depth article here about how to end a presentation in a powerful way . Right now we are going to talk about the same thing in somewhat less detail.
Recommended books
How to Deliver a TED Talk: Secrets of the World's Most Inspiring Presentations
Jeremy Donovan
Resonate: Present Visual Stories that Transform Audiences
Nancy Duarte
Confessions of a Public Speaker
Scott Berkun
Talk Like TED: The 9 Public-Speaking Secrets of the World's Top Minds
Carmine Gallo
The Checklist Manifesto: How to Get Things Right
Atul Gawande
The First 20 Hours: How to Learn Anything... Fast!
Josh Kaufman
Just like with your beginning, make sure that you’ve made it obvious you are ending. After all, few things are more awkward than your audience sitting there long after you’ve finished, feeling confused about whether they should leave or not.
If the point of your speech is to motivate your audience to do something, you might consider ending your speech with a call to action . A call to action is simply an instruction that you give your audience about something you want them to do.
You could also potentially end your presentation with a powerful quote or an entertaining story . And if you have a unique tagline that exists to help promote your personal brand, consider ending with it.
But if you are planning to have a question and answer period at all, make sure you are not directly ending with one. Plan to wrap up your question and answer period before delivering your speech’s closing at the end.
This is because ending with a question and answer period is not only not memorable, but a negative question from an audience member can leave a bad taste in everyone’s mouth . This is not the last thing you want your audience members to remember as they’re leaving!
And as always, you should thank your audience at the end of your speech. This will make them feel valued, and impressed with your gratefulness.
Flesh Out the Body of Your Presentation
So, you’ve got your beginning and ending all figured out, but now what else do you do with your outline? This is the stage where you work on the body of your speech. That is, you will want to think about what you want to say in between your beginning and end. Here are some speech writing tips I have written about previously.
Write the main points of your outline in order
It may be easier for you to write bullet points or even a numbered list. List your main points in order of what you want to talk about. If at first glance the topics don’t seem to flow, it is okay to re-arrange them.
You can also decide at this point if there is anything you want to add or subtract. If you feel like you’ve made a mistake, don’t worry! It is okay to make any changes along the way.
Add sub-points and transitions to your topics
Add sub-points to your main points in order to further flesh out your outline. Even if you want to keep it simple, sub-points may help you to stay on track and remember what you were going to say.
You can also add to the ideas that your main points present. Make sure that the transitions from one point to another flow smoothly from one thing to the next.
Don’t forget the essential details!
Are there any special details that you need to remember for your presentation? Put these in your outline so that you don’t forget them. This can include important names, dates, and locations that you need to remember.
Write down how long will it take
If your speech is supposed to cover a certain amount of time, try listing times for each of your main points. This may help you not go over or under your time.
Also, take a look at these articles:
- 11 Great Tips How to Write a Great Persuasive Speech
- How to Deliver a Perfect Elevator Speech
How to Outline a PowerPoint Presentation?
You may be thinking that you don’t need an outline for your PowerPoint presentation. However, don’t rely on your slides alone ; you need a proper outline, too. An outline for a PowerPoint presentation should also include images that you intend to use for your slides.
Fortunately, the PowerPoint program itself also allows you to view an outline of your slides. This can help give you a visual of your overall presentation.
Remember, This is Only a Draft!
If your outline isn’t the way you want it to be, remember that it is only your very first rough draft. Your outline doesn’t have to be perfect, because it is not your final product. While you should work hard to make your outline as good as possible, you don’t need to stress about it.
And remember that if you finish your outline, and you are not satisfied with how it looks? It is okay for you to scrap it and start all over again. There is no reason that you should stick with an outline that you don’t feel confident about.
An outline is a great place to start whether you intend to read from a full script, read from cue cards, or speak without notes. If you are an avid reader of Speak and Conquer, you’ll remember that I recommend creating an outline in many of my articles.
Get Feedback From Others About Your Outline
There is no reason that you have to go any of this by yourself. If you have a friend or mentor who is experienced with public speaking , why not ask them to take a look at your outline for you? They may see something that needs to be changed that never even occurred to you.
You could also give a practice round of your speech in front of a friend, family member, or mentor. Give them a chance to make suggestions about whether or not there’s anything that you should change. After all, it’s better for you to realize if something needs to be done differently before the actual day of the presentation.
If you don’t have someone who you can rehearse in front of in person, try recording your presentation in front of a video camera . Show it to someone you trust via email or social media. If they have any suggestions for change, you can alter your outline accordingly.
Why is a Presentation Outline so Important, Anyway?
While reading this article, you may be wondering why you even need an outline for your presentation. This may be especially puzzling to you if you are planning to give a speech without notes . But I find that an outline can be incredibly useful no matter what kind of presentation you are planning to give to your audience.
Like I said before, the main point of an outline is to enhance the main purpose of your speech further. But I’m also going to give you a list of some more reasons why I believe an outline is absolutely essential.
Some other good reasons for creating an outline for your presentation are:
- You will have an easy visual to look at the order of the topics you are talking about. This way, you can see if anything looks out of place.
- The proper outline will help to keep your speech organized.
- You will be able to look at the connections between your ideas . This may even help you realize you need to add or subtract certain things from your speech.
- A good outline will help you remember to t ouch on every important point that you need to cover in your presentation.
- Outlining helps you see whether or not your main points and sub-points flow smoothly . If you create your outline and realize that some of your points do not flow, you can easily re-write key parts.
- Using an outline instead of a full script will give you more freedom to improvise during your presentation. This is why creating an outline is a great first strategy if you are speaking without notes, or trying to memorize a speech in a short period of time.
- If you’re not sure where to start preparing for your speech, then writing a loose outline is a good first step to help you out.
- Practicing with an outline will help enhance your memory about the main points and sub-points of your presentation.
No matter what kind of presentation you are planning to give, a solid outline with help you be prepared and ready to go.
Conclusion: How do you make an outline for a talk?
Today, I have compiled a thorough guide about writing a quality outline. We discussed creating a good beginning, ending, and body of your presentation. We have even talked about why a good outline is important, too. If you have any other tips to share about creating an outline for your presentation, make sure to share them in the comments section.
If you are looking to improve your public speaking and presentation skills, check out the rest of my articles on Speak and Conquer. The purpose of my site is to help you succeed in becoming a better public speaker. For example, I have covered popular topics such as how to memorize a speech in less than an hour , and how to use hand gestures effectively during a presentation .
Related Questions
What software should I use to outline my speech? Preferably, you should have a program that allows you to use bullet points or numbered lists. Bullet points and lists are a good place to start when you are outlining. Microsoft Word, Word Processor, or Notepad are acceptable for basic outlines.
How do I decide what the purpose of my speech is? Decide if you are there to inform, educate, motivate, or entertain your audience. When you have narrowed it down to just one of those, you will be able to decide the main idea of your speech. You should preferably speak about a topic that you are well-educated about.
How do I write a speech? Start with a purpose, and then create a detailed outline. Flesh out the points and sub-points from your outline. Decide very early on if you want to give your speech with or without notes. Revise your drafts as much as possible until you have created a full speech. If you are going to speak with notes, write some of the information from your outline onto cue cards.
Useful reading
- 16 secret ways how to speak to a bored audience
- How to Use Your Voice Effectively in a Presentation?
- 13 Effective Ways How to Make Speech Pauses
Posts about public speaking you may also like

7 good public speaking tips you should use: A helpful guide
Public speaking is just like any other area that has its gurus. However, public speaking is also an area in which many fear to fail.

Audience analysis for public speaking: A comprehensive guide for the public speaker
The issue with so many public speakers is that they don’t prepare their speech in a listener-focussed manner, so they’re not aware of the needs,

How to Give a Speech Without Crying? 10 great tips
I am often asked for tips on how to give a speech without crying. At first, I assumed these people were just nervous or perhaps
- Tags: Effective speaking , Good speech , Pauses in speech , Speech preparation process , Speech skills , Speech tips , Unprepared speech , Unprepared speech topics
Recommended gear

Best Portable Speakers For The Presentations

Best Video Cameras for Public Speakers

Best rresenter remotes for public speakers

Best Portable Thumb Drives And Hard Drives for the Presentations
Who is janek tuttar.
My name is Janek Tuttar , and I am the founder and author of Speak and Conquer website.
I have been teaching public speaking at Estonian Entrepreneurship University of Applied Sciences
Here, I am sharing the wisdom of how to cope in different public speaking situations.
More information about Janek »

Share this post

Hi! My name is Janek Tuttar, and I am the founder and author of SpeakAndConquer.com.
I have been teaching and blogging about public speaking since spring 2007. Here, I am sharing the wisdom of how to cope in different public speaking situations.
Send me an e-mail: [email protected]
LEGAL INFORMATION
This site is owned and operated by Janek Tuttar. SpeakAndConquer.com is a participant in the Amazon Services LLC Associates Program, an affiliate advertising program designed to provide a means for sites to earn advertising fees by advertising and linking to Amazon.com.
This site also participates in other affiliate programs and is compensated for referring traffic and business to these companies.

Best teleprompters

Best Computer Mice for the Presentations

Best Laptop Backpacks for Public Speakers
Outline View in PowerPoint – Everything You Need to Know!
By: Author Shrot Katewa

Not a lot of people are aware that you can actually make a presentation by outlining your key points in a simple bulleted list format! This is where the Outline View in PowerPoint comes in handy!
In today’s article, we will take a look at the “Outline View” in PowerPoint, how to access it, and how to work with your presentation in the outline view!
So, let’s get started!
1. What is Outline View and Why is it Used?
The “Outline View” in Microsoft PowerPoint is a way of accessing the slides in a more simplistic manner. It removes the clutter of images and other infographics from your slides and helps you focus specifically on the text present on the slides.
In the outline view, you can see a list of the titles, subtitles as well as text on each slide. Using the outline view you can easily organize key information on your slides. You can also export or import the outline to and from other documents.
Furthermore, the outline view is also editable, which makes it easier to add or remove any text from the PowerPoint presentation.
2. How to Access the Outline View in PowerPoint?
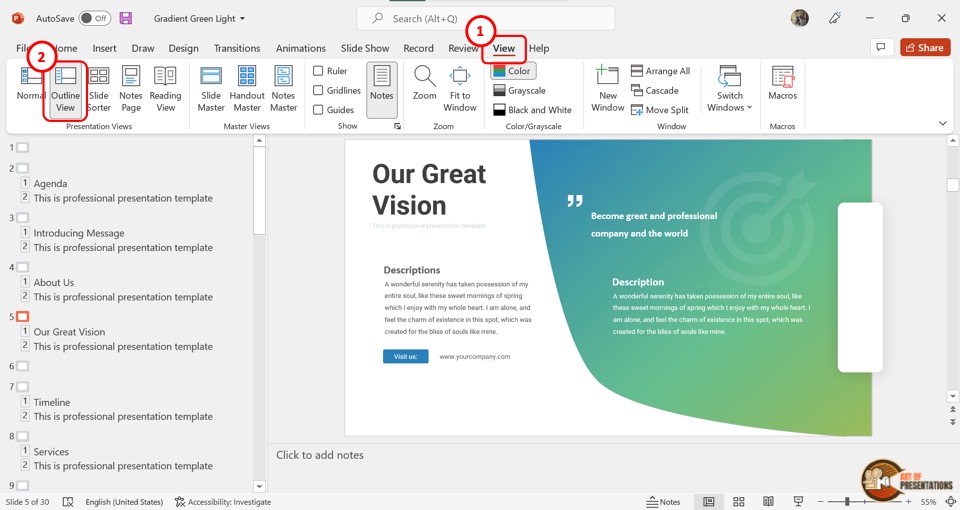
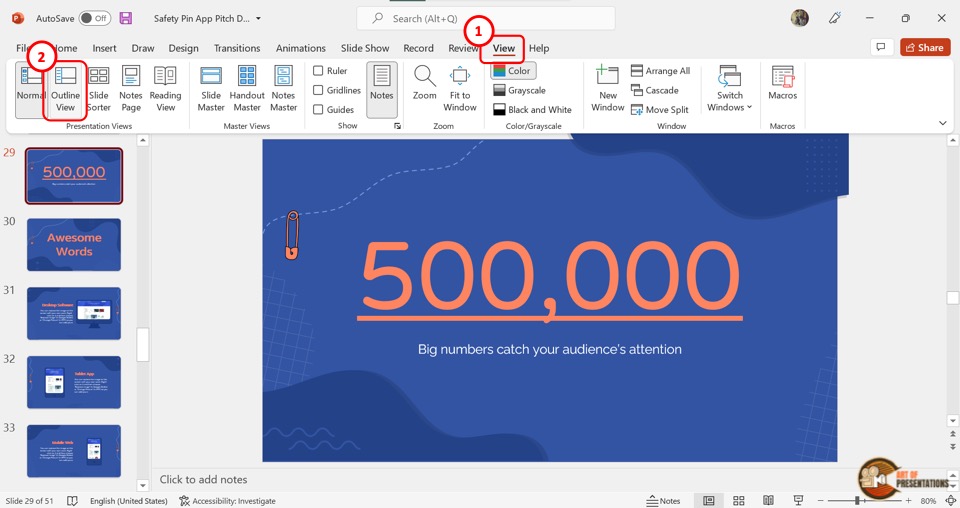
In Microsoft PowerPoint, you can very easily access the outline view and navigate it.
To access the outline view in PowerPoint, first, click on the “View” tab in the menu bar located at the top of the screen. In the “View” menu, click on “Outline View” which is the second option in the “Presentation Views” section.
This will show the presentation outline in a sidebar on the left side of the screen.
3. How to Expand Slides in Outline View?
In the “Outline View” , you can expand any or all slides to view all the content within the slide. There are 3 different methods you can use to expand the slides in the outline view.
3a. Method 1 – Using Right-Click
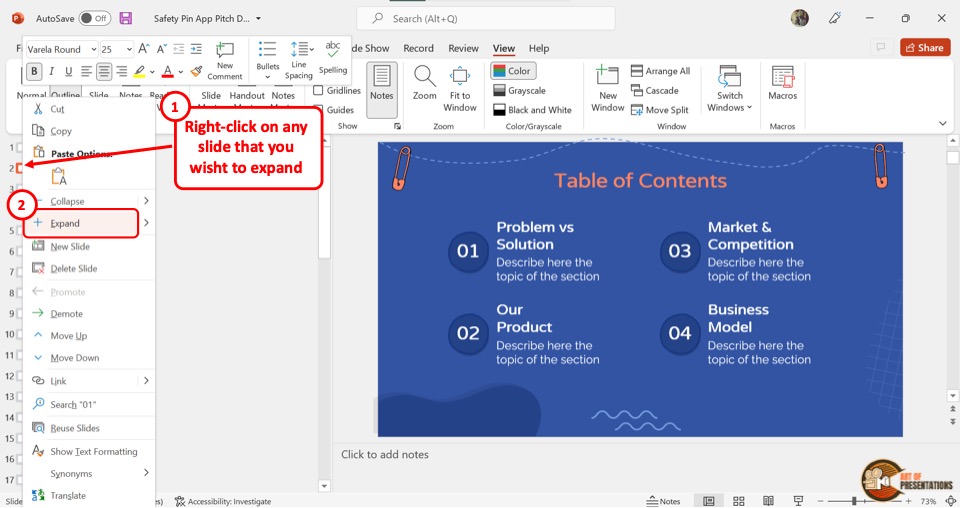
You have to first open the “Outline View” from the “View” menu. In the outline sidebar located at the left side of the screen, “Right Click” on the box beside the slide number which you want to expand.
Then click on the “Expand” option from the right-click menu.
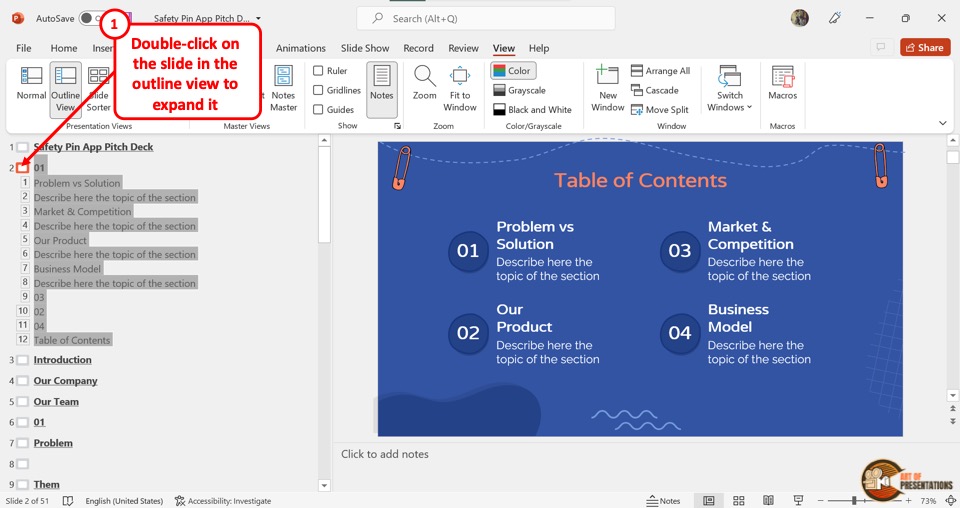
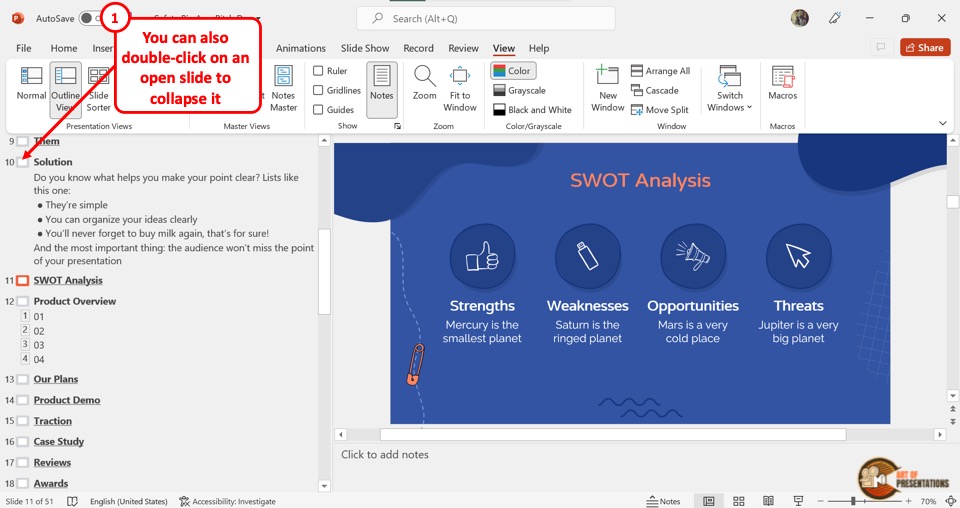
3b. Method 2 – Using Double-Click
You can use the double-click method to quickly expand the slide outline. All you have to do is “Double Click” on the box located between the slide number and the slide title.
3c. Expand All Slides Using Expand All Feature
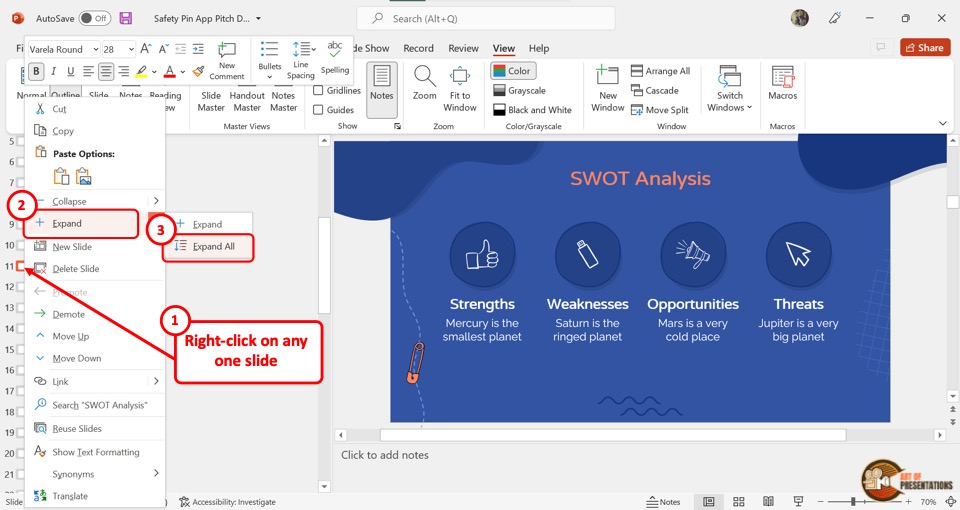
In the “Outline View” , you can also expand all the slides at once. To do so, “Right Click” on the box next to any slide. In the right-click menu, click on the arrow beside the “Expand” option to open another dropdown menu.
Then click on the “Expand All” option to expand all the slides.
4. How to Collapse Slides in Outline View?
Microsoft PowerPoint offers various methods to collapse slides in the “Outline View” . Collapsing the slides can help you see the list of the slides in a presentation easily.
4a. Using Right-Click
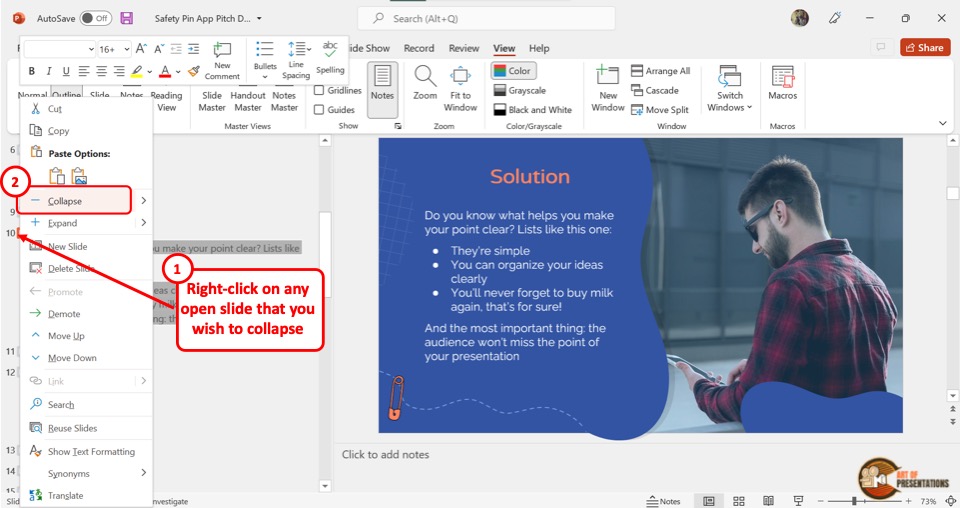
In the “Outline View” , locate the expanded slide from the sidebar on the left side of the screen. Then “Right Click” on the box next to the slide number and click on the “Collapse” option from the pop-up menu.
4b. Using Double-Click
To collapse a slide using the double-click method, all you have to do is “Double Click” on the box at the left side of the expanded slide. The slide will immediately collapse hiding all the text except the heading.
4c. Collapse All Feature
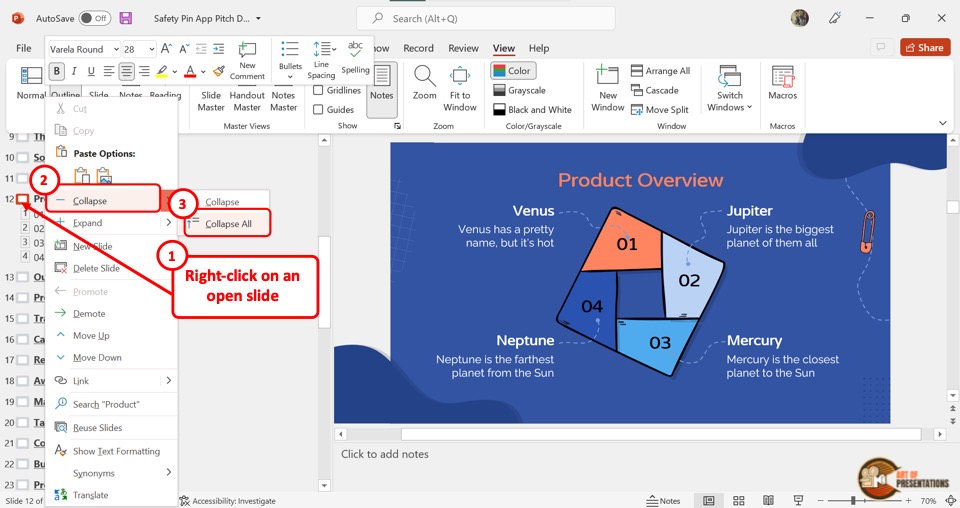
You can also collapse all the slides at once. To do so, “Right Click” on any slide in the outline. Then click on the arrow beside the “Collapse” option.
Finally, you have to click on the “Collapse All” option from the secondary pop-up menu.
5. How to Rearrange Slides in Outline View?
When reviewing the outline of a PowerPoint presentation, you may need to rearrange some slides based on their contents.
In the “Outline View” , you can move a slide in between the contents of another slide. You can also simply move a slide up or down.
5a. How to Move Up Slides in Outline View?
In the “Outline View” , you can move a slide up by one or even more slides. There are different methods to move up slides in PowerPoint. The first step is to click on the “Outline View” option from the “View” menu.
Method 1 – Using Right-Click
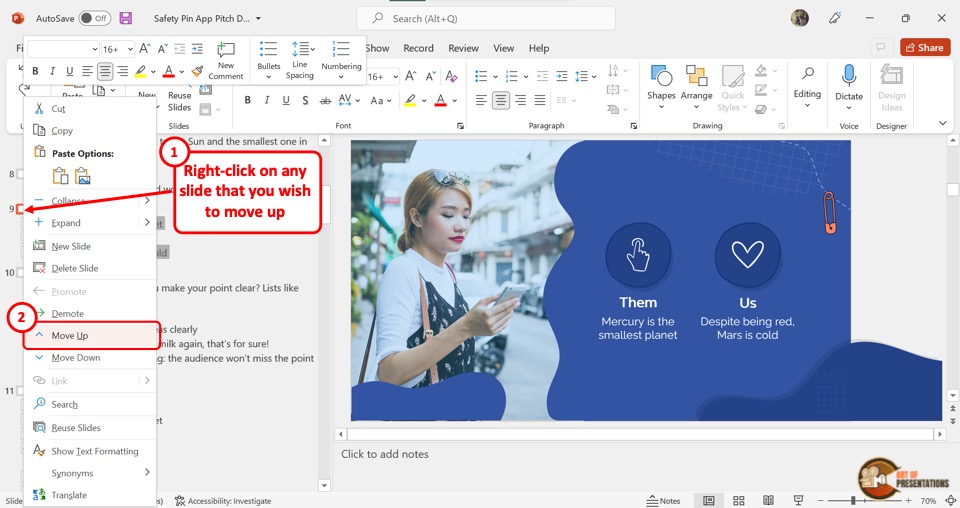
In the “Outline View” sidebar at the left side of the screen, “Right Click” on the slide you want to move up. Then click on the “Move Up” option from the right-click menu.
To move up the slide further, repeat the process until the slide reaches the preferred position in the outline.
Method 2 – Using Drag & Drop
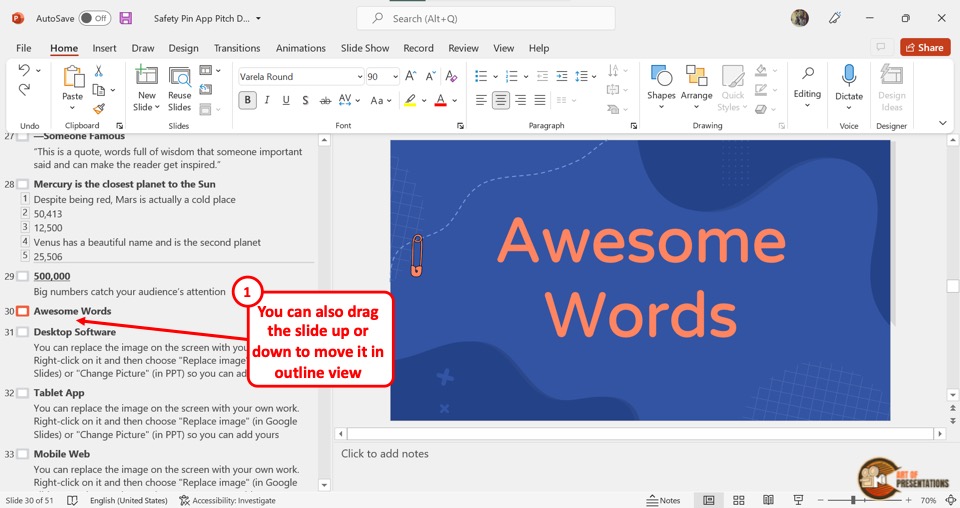
You can also move up a slide quickly by using the drag and drop method. All you have to do is click and hold on to the box next to the slide number and then drag the slide up as much as you need.
5b. How to Move Down Slides in Outline View in PowerPoint?
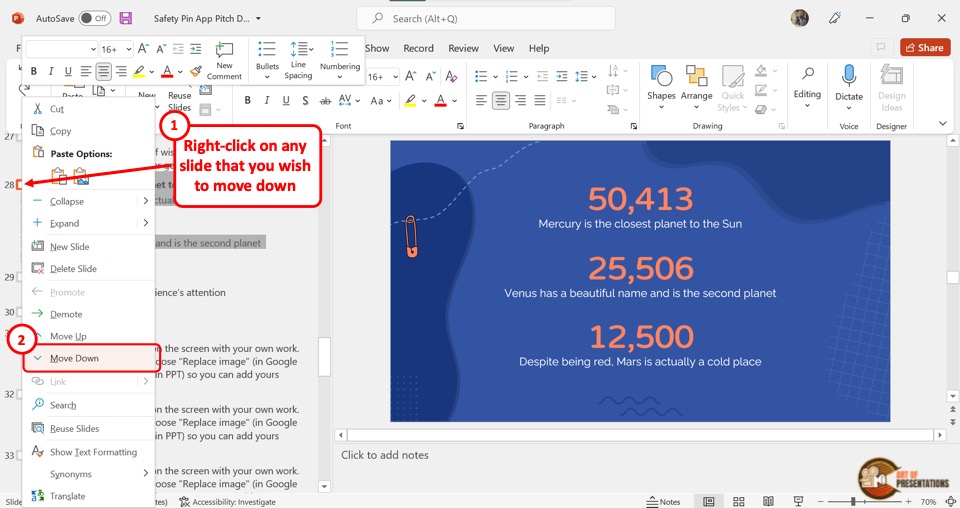
Similar to the process of moving up a slide, you can easily move down a slide. All you have to do is “Right Click” on the slide from the outlines on the left side of the screen.
Then click on the “Move Down” option from the pop-up menu. Alternatively, you can drag and drop the slide to the preferred position.
6. How to Add Content on Slides Using Outline View?
The presentation outline in the “Outline View” is editable. Thus, you can edit the content of a slide by editing the outline. To add content on slides using the “Outline View” , follow the 2 simple steps.
Step-1: Open the Outline View
In the menu ribbon located at the top of the screen, click on the “View” tab. You have to then click on the “Outline View” option which is the second option in the “Presentation Views” section of the “View” menu.
Step-2: Click on the slide and add content to the outline
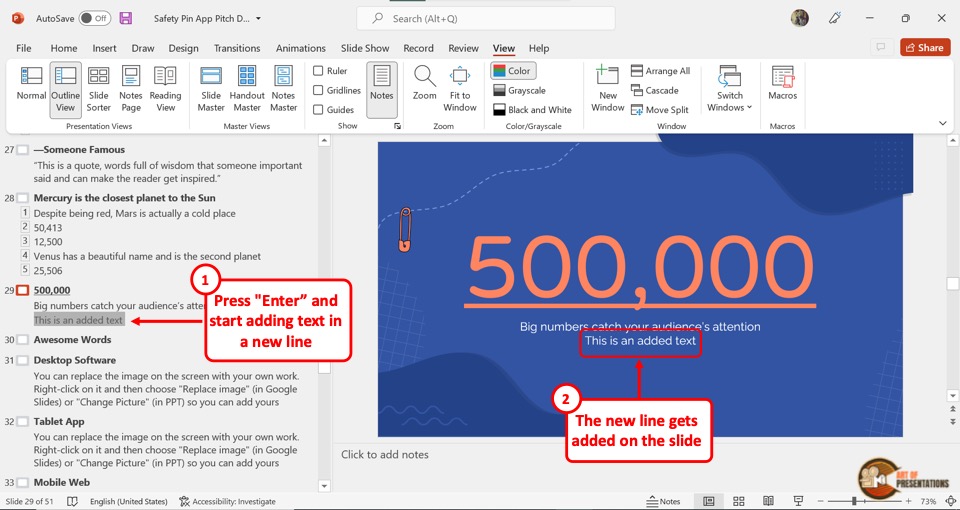
In the outline sidebar at the left side of the screen, click on the slide and heading level where you want to add content. Then type in the content. You will see the text being added to the presentation slide.
If you want to add text in a new line, simply press “Enter” and start adding the content. It will be visible separately on the slide.
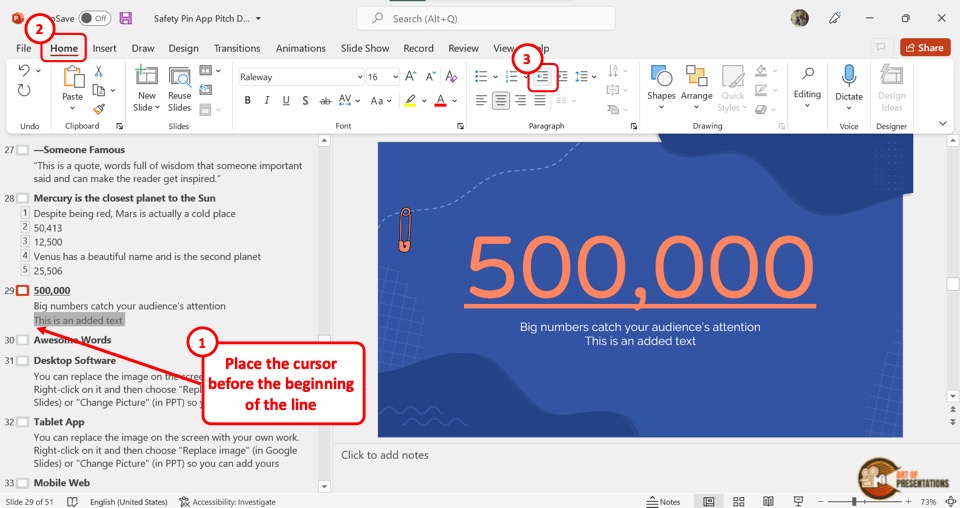
6a. How to Increase or Decrease Indent of Content in Outline View?
To increase or decrease the indent of content in the “Outline View” , click on the “Home” tab in PowerPoint . Next, you have to click on the content in the outline sidebar for which you want to change the indentation.
Increase Indentation
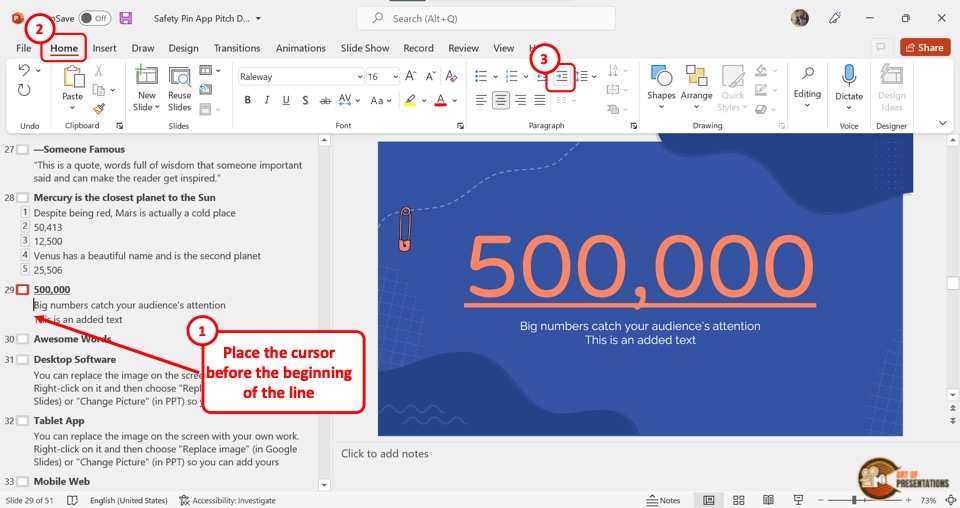
By increasing the indent level, you push the content to the right. The content is thus moved to a higher list level. To increase the indentation, click on the “Increase List Level” option in the “Paragraph” section of the “Home” tab in PowerPoint.
Decrease Indentation
By decreasing the indent level, you can push the content to the left, and decrease the list level. To do so, click on the “Decrease List Level” option in the “Paragraph” section of the “Home” menu.
7. How to Change Content Hierarchy Using Outline View in PowerPoint?
In the “Outline View” , you can change the content hierarchy of the contents within a slide.
Content hierarchy is the order of the content in a slide. The top of the hierarchy is the heading and then the “List level 1” , “List level 2” and so on.
7a. Promote Content in Outline View in PowerPoint
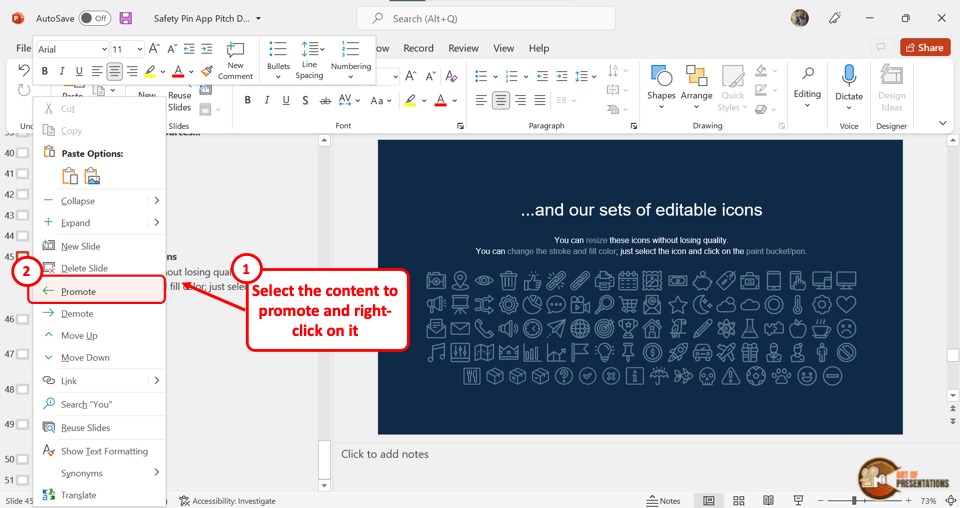
Promoting content pushes the content up the hierarchy.
To promote content in outline view in PowerPoint, you have to first “Right Click” on the content in the outline sidebar. Then click on the “Promote” option from the right-click menu.
You can repeat this process to promote the content up to a few hierarchy levels. However, you cannot promote a “Heading” since it is the highest level in the hierarchy.
7b. Demote Content in Outline View in PowerPoint
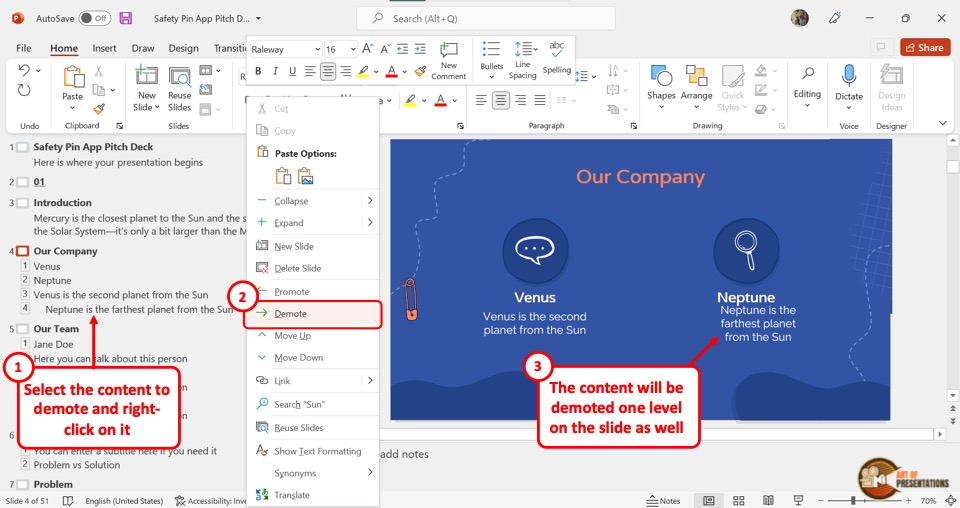
When you demote content, it is pushed down the hierarchy.
To demote content in outline view in PowerPoint, “Right Click” on the content in the outline that you want to demote. Then click on the “Demote” option.
You can repeat the process to move the content further down the hierarchy. For headings, you can only demote the heading of a text-only slide.
8. How to Go Back to Normal View from Outline View in PowerPoint?
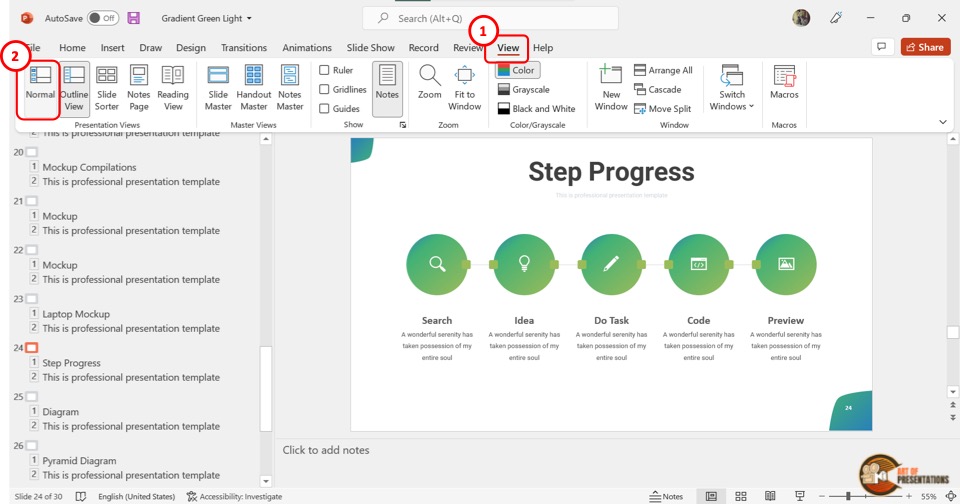
If you want to exit the “Outline View” , you can easily return to the “Normal View” in PowerPoint.
To go back to “Normal View” from “Outline View” , all you have to do is click on the “View” tab in the menu ribbon. Then click on the “Normal” option which is the first option in the “View” menu.
9. How to Save Your PowerPoint Presentation as an Outline?
Besides viewing the presentation outline, you can also save your PowerPoint Presentation as an outline. All you have to do is follow the 4 easy steps.
Step-1: Click on the “Save As” option
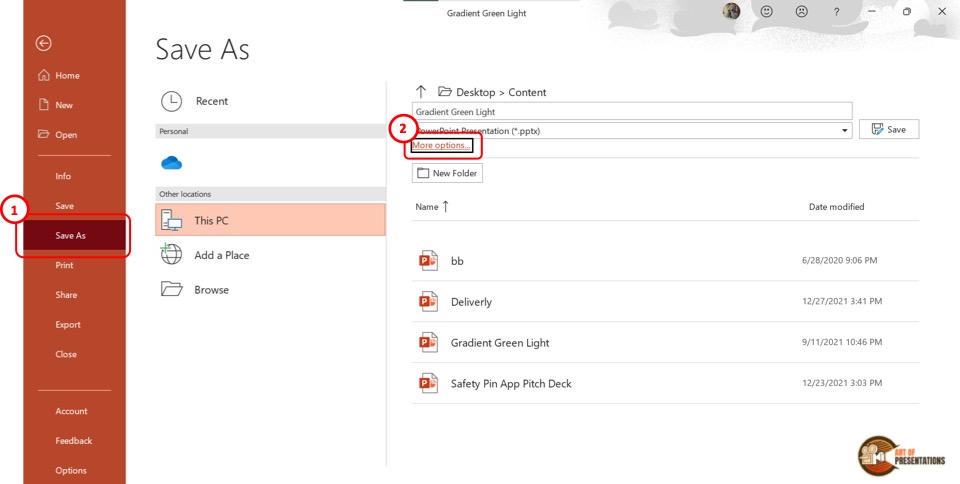
In the menu ribbon at the top of the screen, click on the “File” tab to open the “File” menu. Then click on the “Save As” option in the “File” menu.
Step-2: Click on “More options”
In the “Save As” screen, click on the “More options” option which is above the “New Folder” button (as shown in the image in step 1). This will open a dialog box.
Step-3: Click on “Outline/RTF”
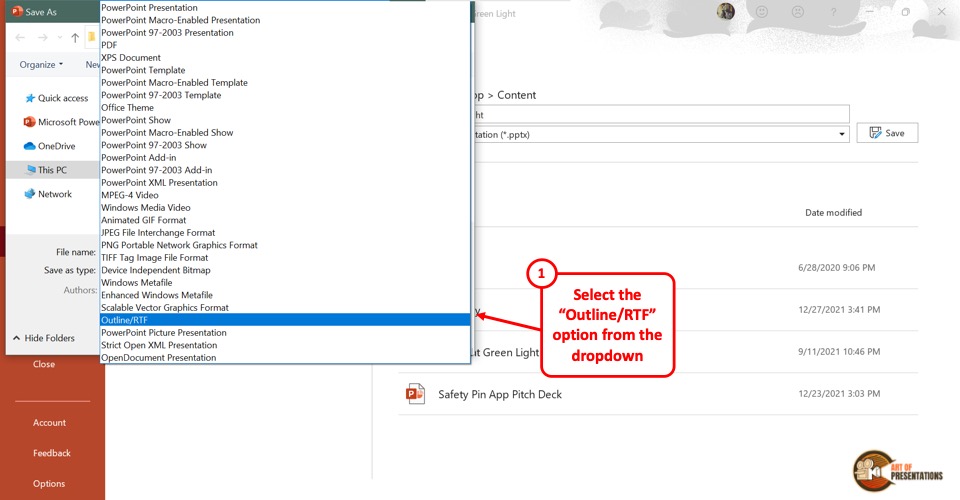
In the “Save As” dialog box, click on the “Save as type” box at the bottom. Then click on the “Outline/RTF” option from the pop-up menu.
Step-4: Click on the “Save” option
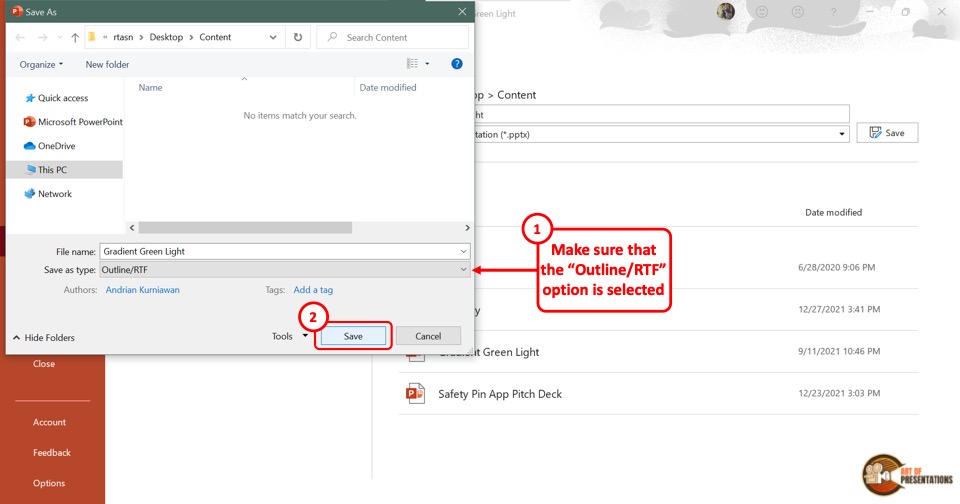
Now all you have to do is click on the “Save” button at the bottom of the “Save As” dialog box. This will save the PowerPoint presentation as an outline.
10. How to Print Outline View in PowerPoint?
Microsoft PowerPoint allows you to print the outline of the presentation only. All you have to do is follow the 3 simple steps.
Step-1: Click on the “File” tab
In the open PowerPoint presentation, click on the “File” tab from the menu ribbon located at the top of the screen. In the sidebar of the “File” menu, click on the “Print” option.
Step-2: Click on the “Print Layout” option
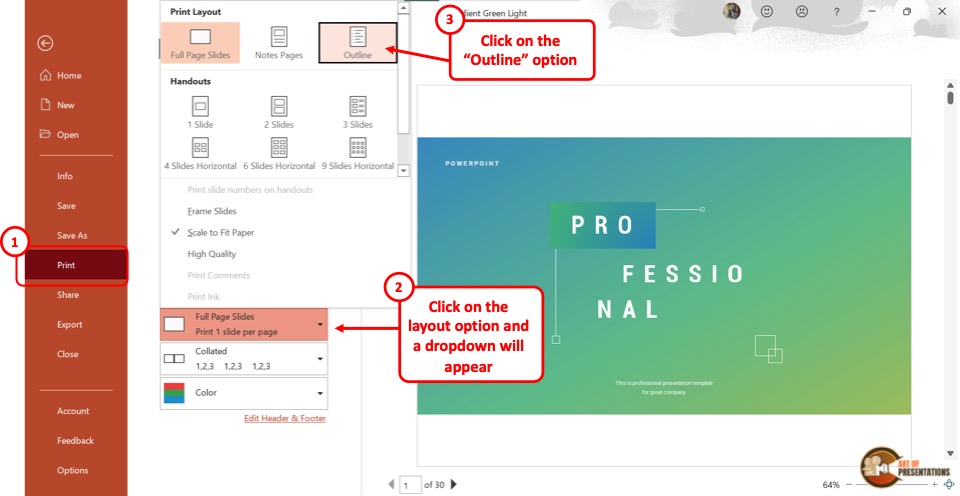
Under the “Settings” section, click on the box that says “Full Page Slides” . It will open a “Print Layout” pop-up menu. In the pop-up menu, click on the “Outline” option.
The presentation outline will appear on the preview screen.
Step-3: Click on the “Print” option
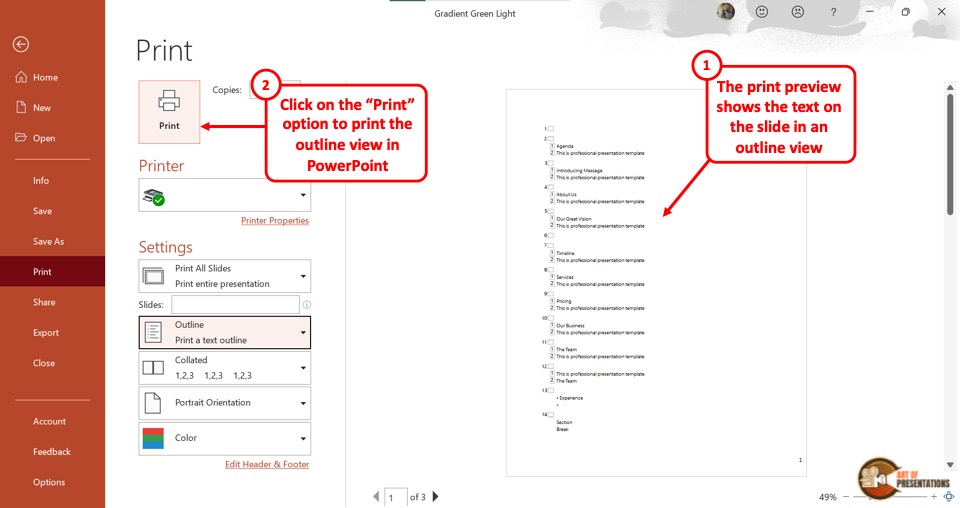
Finally, you have to make sure the device is connected to a printer. Then all you have to do is click on the “Print” button at the top of the screen.
11. How to Convert a Word Outline into a PowerPoint Presentation Using Outline View?
Microsoft PowerPoint allows you to import the outline from a Microsoft Word file. Importing an outline will automatically create slides for you. All you have to do is follow the 3 easy steps.
Step-1: Click on the “Slides from Outline” option
The first step is to click on the “Home” tab in the menu ribbon. In the “Slides” section of the “Home” menu, click on the “New Slide” option to open a dropdown menu.
Click on the “Slides from Outline” option from the bottom of the dropdown menu.
Step-2: Click on the “Insert” button
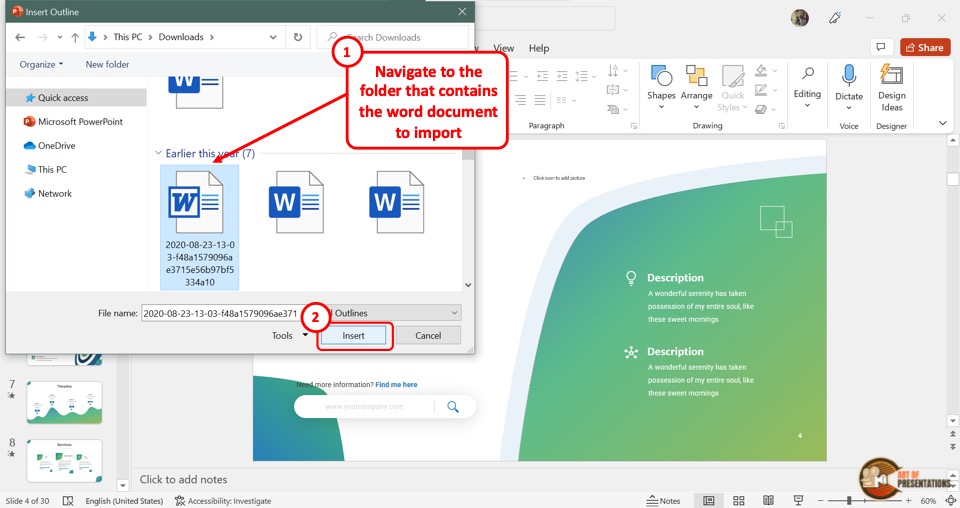
In the “Insert Outline” dialog box, click on the Microsoft Word document which you want to import. Then click on the “Insert” button at the bottom of the dialog box.
Step-3: Arrange the content
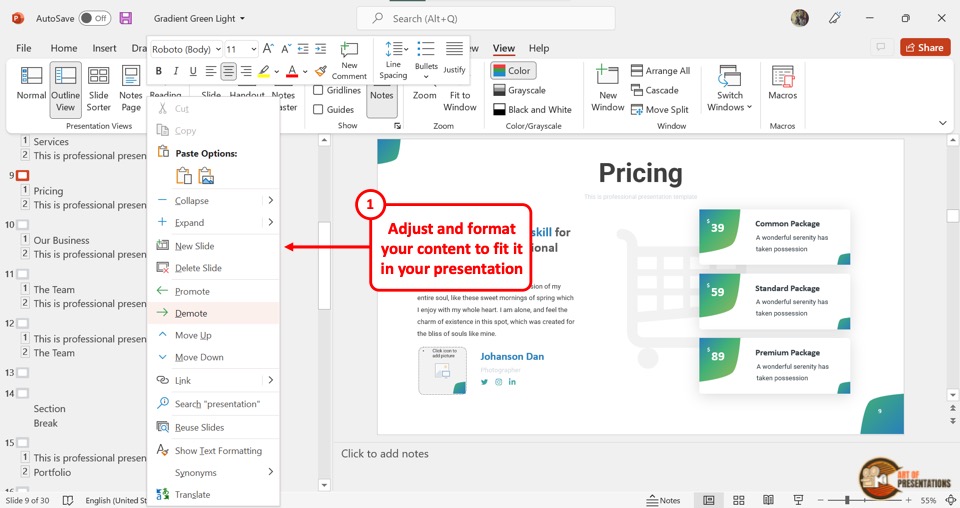
Since the process automatically transforms the Word outline into a PowerPoint outline, the content may need some adjustments. If the Word outline does not have any headings, each paragraph will be converted into a slide.
To arrange them, “Right Click” on the content, and then click on the preferred option from the “Move Up” , “Move Down” , “Promote” and “Demote” options in the right-click menu.
12. Outline View Not Showing Text? Here’s Why!
In Microsoft PowerPoint “Outline View” , the text in the content placeholder is automatically shown in the outline. So when a slide has no content placeholder, the outline will not show any text.
To solve the problem, you will first need to add a placeholder in PowerPoint . Follow the steps mentioned below –
Step-1: Click on the “Slide Master” option
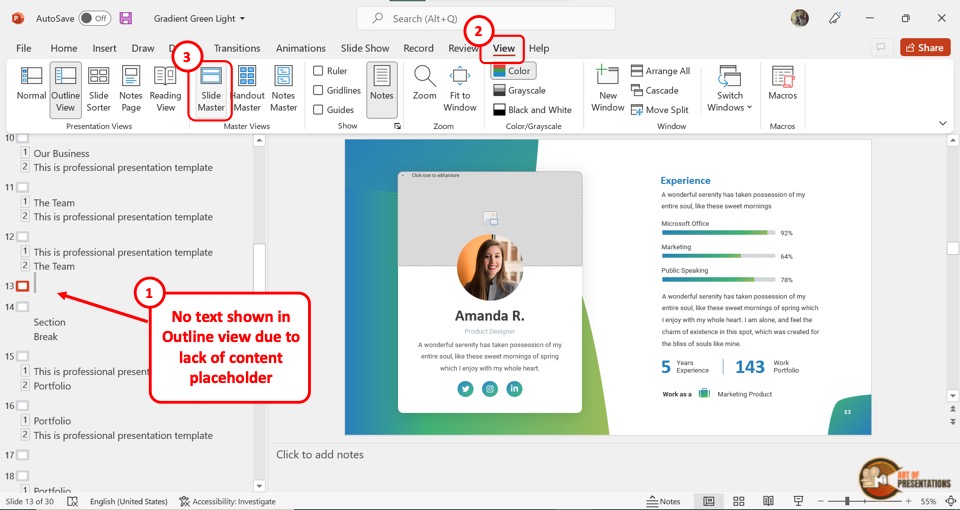
The first step is to open the slide where the “Outline View” is not showing any text. Then click on the “View” tab from the menu ribbon. In the “Master Views” section of the “View” menu, click on the “Slide Master” option.
Step-2: Click on the “Insert Placeholder” button
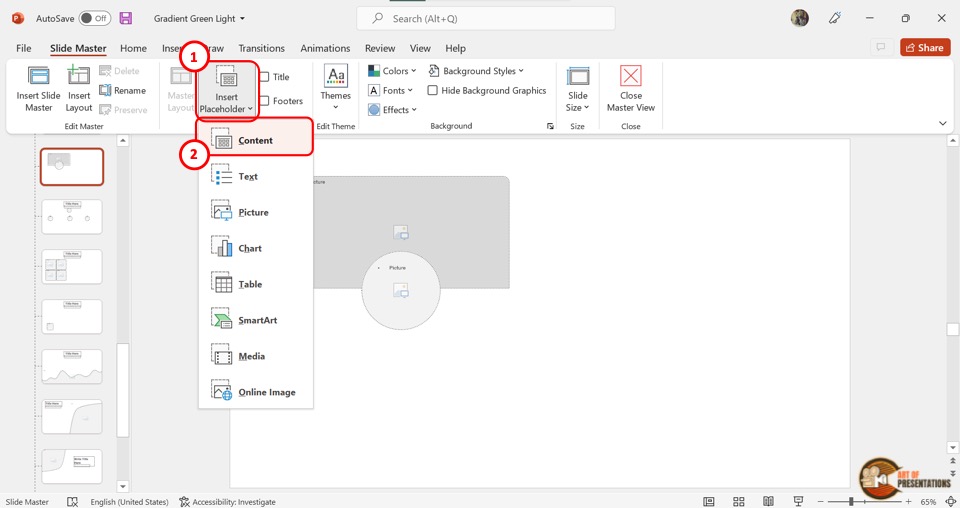
The next step is to click on the “Insert Placeholder” option in the “Master Layout” section of the “Slide Master” view. Then click on the “Content” option from the dropdown menu.
Step-3: Draw the “Content Placeholder”
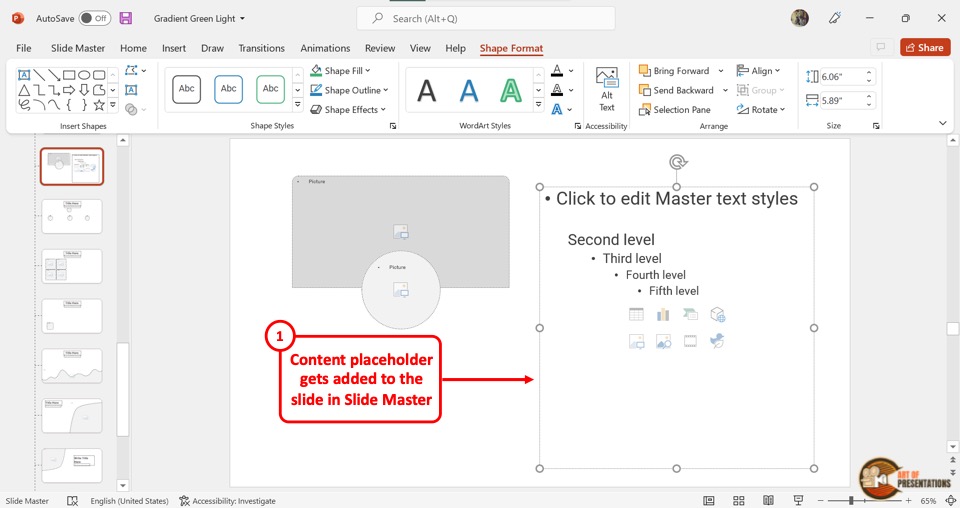
Now all you have to do is draw the “Content Placeholder” into the slide layout. You can also resize and reposition the placeholder.
Click on the “Shape Format” tab in the menu ribbon to access more options to edit the content placeholder.
Step-4: Click on the “Close Master View” option
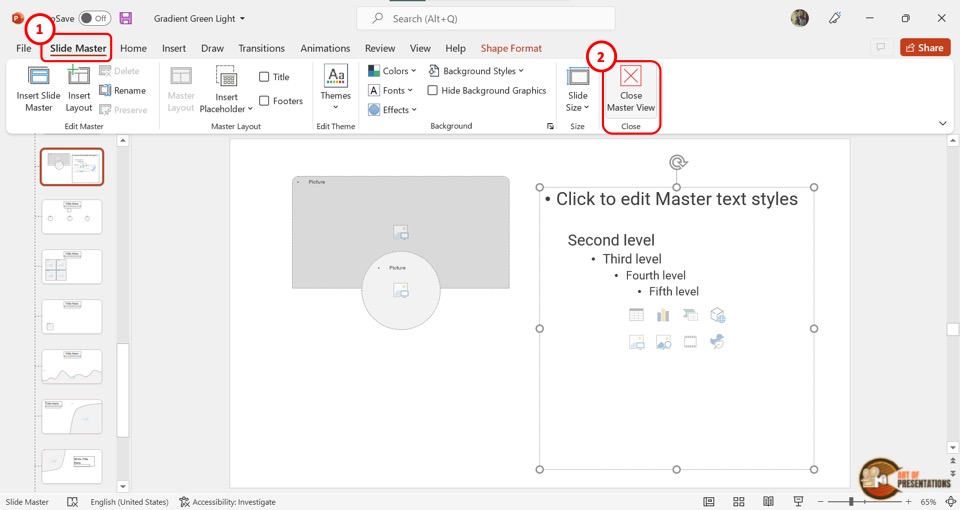
To save the content placeholder, click on the “Close Master View” option under the “Slide Master” tab. The screen will return to “Normal View” .
Step-5: Paste the text to the “Content Placeholder”
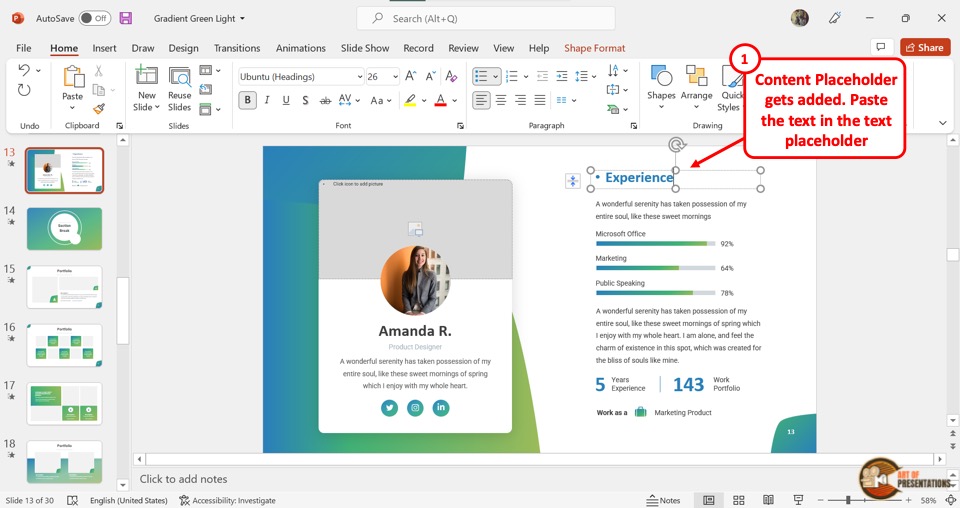
The final step is to cut the text in the slide and paste it into the “Content Placeholder” . To do so, select the text and press the “Ctrl+X” keys on your keyboard. Then click on the “Content Placeholder” and press the “Ctrl+V” keys.
Step-6: Click on the “Outline View” option
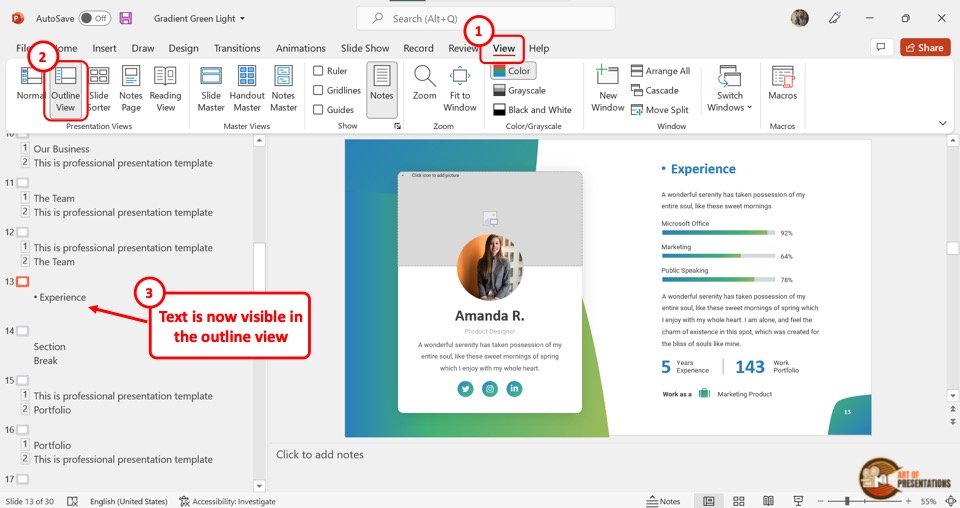
In the menu ribbon, click on the “View” tab and then click on the “Outline View” option. You will see that the text is now showing in the outline view.
Credit to Katemangostar (on Freepik) for the featured image of this article (further edited)

- SUGGESTED TOPICS
- The Magazine
- Newsletters
- Managing Yourself
- Managing Teams
- Work-life Balance
- The Big Idea
- Data & Visuals
- Reading Lists
- Case Selections
- HBR Learning
- Topic Feeds
- Account Settings
- Email Preferences
How to Make a “Good” Presentation “Great”
- Guy Kawasaki

Remember: Less is more.
A strong presentation is so much more than information pasted onto a series of slides with fancy backgrounds. Whether you’re pitching an idea, reporting market research, or sharing something else, a great presentation can give you a competitive advantage, and be a powerful tool when aiming to persuade, educate, or inspire others. Here are some unique elements that make a presentation stand out.
- Fonts: Sans Serif fonts such as Helvetica or Arial are preferred for their clean lines, which make them easy to digest at various sizes and distances. Limit the number of font styles to two: one for headings and another for body text, to avoid visual confusion or distractions.
- Colors: Colors can evoke emotions and highlight critical points, but their overuse can lead to a cluttered and confusing presentation. A limited palette of two to three main colors, complemented by a simple background, can help you draw attention to key elements without overwhelming the audience.
- Pictures: Pictures can communicate complex ideas quickly and memorably but choosing the right images is key. Images or pictures should be big (perhaps 20-25% of the page), bold, and have a clear purpose that complements the slide’s text.
- Layout: Don’t overcrowd your slides with too much information. When in doubt, adhere to the principle of simplicity, and aim for a clean and uncluttered layout with plenty of white space around text and images. Think phrases and bullets, not sentences.
As an intern or early career professional, chances are that you’ll be tasked with making or giving a presentation in the near future. Whether you’re pitching an idea, reporting market research, or sharing something else, a great presentation can give you a competitive advantage, and be a powerful tool when aiming to persuade, educate, or inspire others.
- Guy Kawasaki is the chief evangelist at Canva and was the former chief evangelist at Apple. Guy is the author of 16 books including Think Remarkable : 9 Paths to Transform Your Life and Make a Difference.
Partner Center
How To Turn Powerpoint Into Outline

Do you want to turn your PowerPoint presentation into an outline? You can do it easily by utilizing a built-in feature in PowerPoint. Keep reading to find out the steps to creating an outline from your PowerPoint presentation.
Step 1: Click On The “File” Tab
First, you will need to open up the PowerPoint presentation from which you want to create an outline. Click on the “File” tab in the upper left-hand corner of the screen.

Step 2: Select “Export”
Upon clicking “File”, new options will appear. Click on “Export” from the options in the File tab.

Step 3: Create Handouts
Click “Create Handouts” under the Export tab then press the “Create Handouts” icon.

Step 4: Select “Outline Only”
A popup will appear after clicking on the “create handouts” button. Select the “Outline Only” option and press “Ok”.

That’s it! Once you do so, PowerPoint will generate an outline, and it will open in the MS Word program. If you want to make edits to the outline, simply make them in Word and then save the document. We hope you found this helpful. Thanks for reading!
As you see, it’s quite easy to turn your presentation into an outline using PowerPoint’s built-in feature. All you need to do is follow the steps that are outlined in this article. Thanks for reading!
Related Posts:

How to Outline Text in Powerpoint: A Step-by-Step Guide
Outlining text in PowerPoint is a breeze once you know where to look. Simply select the text you wish to outline, then navigate to the “Format” tab. Click on “Text Effects”, followed by “Outline”, and choose your desired outline color and weight. And voilà, your text now stands out with a sleek outline!
After you outline your text, it will appear more prominent and eye-catching on your slides, which can be particularly useful for titles, headings, or any text you want to emphasize.
Introduction
Have you ever found yourself squinting at a PowerPoint presentation, trying to read the text that just seems to blend into the background? Or maybe you’re the one giving the presentation, and you want to make sure your audience can clearly see and understand each point you’re making. Enter the art of outlining text in PowerPoint.
Outlining text can make your words pop off the screen, providing a clear distinction from the background and ensuring your message is received loud and clear. It’s a simple yet powerful tool in making your presentation look professional and polished. Whether you’re a student presenting a project, a business professional pitching to clients, or a teacher trying to engage your class, knowing how to outline text can make all the difference. So, let’s dive in and learn how to make your words stand out!
Step by Step Tutorial: How to Outline Text in PowerPoint
Before we get into the nitty-gritty, let’s first understand what these steps will help you achieve. By following the steps below, you will be able to add an outline to your text, making it more visible and impactful on your PowerPoint slides.
Step 1: Select the Text
Begin by clicking on the text box containing the text you want to outline.
Selecting the text is the first step because you need to tell PowerPoint which text you want to modify. Make sure you click on the actual text box and not just somewhere on the slide. If you’re working with multiple text boxes, you’ll need to repeat these steps for each one you want to outline.
Step 2: Navigate to the Format Tab
After selecting the text, go to the “Format” tab on the PowerPoint ribbon.
This step is where the magic begins. The “Format” tab is your gateway to all the text formatting options PowerPoint has to offer, including the outline feature.
Step 3: Click on Text Effects
In the “Format” tab, look for the “Text Effects” button and click on it.
The “Text Effects” button is a little treasure trove of options that can make your text do some pretty cool things. But for now, we’re focused on the outlining part.
Step 4: Choose Outline
In the “Text Effects” menu, hover over “Outline” to see the outline options, and then click on your choice of outline color and weight.
The outline color is the color of the outline itself, while the weight is how thick or thin you want that outline to be. You can choose from a range of colors and weights to find the perfect look for your text.
Additional Information
When it comes to outlining text in PowerPoint, there are a few extra tidbits that can enhance your experience. For instance, did you know that you can also create custom outline colors? If the default options don’t suit your fancy, simply click on “More Outline Colors” for a full spectrum of choices. Additionally, you can even apply gradient outlines for a more dynamic effect.
Another tip is to consider the background of your slides when choosing your outline color and weight. You want to create enough contrast to ensure readability but also maintain a harmonious color scheme. Also, don’t forget that you can apply transparency to your outline, which can sometimes result in a more subtle but equally effective emphasis.
Lastly, remember that less is often more. Outlining every piece of text on your slide might overwhelm your audience. Use outlines strategically to highlight the most crucial information or to make titles and headings stand out.
- Select the text you want to outline.
- Navigate to the “Format” tab.
- Click on “Text Effects”.
- Choose your desired outline color and weight from the “Outline” options.
Frequently Asked Questions
Can i apply an outline to text in all versions of powerpoint.
Yes, most versions of PowerPoint offer the ability to outline text, but the steps might differ slightly depending on your software version.
Is it possible to outline text in PowerPoint on a Mac?
Absolutely! The steps are essentially the same as on a PC, so Mac users can outline their text with ease.
Can I remove the outline from the text later?
Definitely. Just follow the same steps and choose “No Outline” from the outline options to remove it.
Will the outline show up when I print my slides?
Yes, the outline will be visible on printed slides, making your text stand out even on paper.
Can I save a text style with an outline as a default for future presentations?
While you can’t set it as a default, you can save a text box with the desired style as a template and copy it into future presentations.
Mastering the task of outlining text in PowerPoint can give your presentations that extra oomph they need to captivate your audience. It’s a tool that, when used wisely, can take your slides from mundane to memorable.
Remember, the key to successful text outlining lies in balance. Use it to highlight, not to overshadow. With this newfound knowledge, your next presentation is sure to be a hit. Happy outlining!

Matt Jacobs has been working as an IT consultant for small businesses since receiving his Master’s degree in 2003. While he still does some consulting work, his primary focus now is on creating technology support content for SupportYourTech.com.
His work can be found on many websites and focuses on topics such as Microsoft Office, Apple devices, Android devices, Photoshop, and more.
Share this:
- Click to share on Twitter (Opens in new window)
- Click to share on Facebook (Opens in new window)
Related Posts
- How to Download a Google Slides Presentation as a Powerpoint File
- How to Outline Font in Word 2013: A Step-by-Step Guide
- How to Add a Text Box Outline in Excel 2013: A Step-by-Step Guide
- How to Do a Powerpoint Google Slides Presentation Conversion
- How to Outline a Selection in Photoshop CS5: A Step-by-Step Guide
- How to Hide Background Graphics in Powerpoint 2013: A Step-by-Step Guide
- Can You Save a Powerpoint as a Video in Powerpoint 2013? Find Out Here!
- How to Rotate a Powerpoint Slide Presentation
- How to Delete Multiple Slides in Google Slides: A Step-by-Step Guide
- How to Save Powerpoint as PDF with Notes: A Step-by-Step Guide
- How to Make Text Vertical in Google Docs
- How to Make Google Slides Vertical (5 Quick Steps)
- How to Remove Background Color in Google Docs
- How to Add a Hyperlink on Google Slides
- How to Set Google Docs Background Image
- How to Mirror Image in PPT Files (An Easy 6 Step Guide)
- How to Insert a Google Slides Page Number: Step-by-Step Guide
- How to Make a Powerpoint Slide Vertical in Powerpoint 2013: A Step-by-Step Guide
- How to Add a Border to a Picture in Google Slides: A Step-by-Step Guide
- How to Delete a Slide in Powerpoint 2010: Step-by-Step Guide
Get Our Free Newsletter
How-to guides and tech deals
You may opt out at any time. Read our Privacy Policy

Create and print a presentation in Outline view
Outline view in PowerPoint displays your presentation as an outline made up of the titles and main text from each slide. Each title appears on the left side of the pane that contains the Outline tab, along with a slide icon and slide number. The main text is indented under the slide title. Graphic objects appear only as small notations on the slide icon in Outline view.
Working in Outline view is particularly handy if you want to make global edits, get an overview of your presentation, change the sequence of bullets or slides, or apply formatting changes.
When you're creating your outline, think about how many slides you need. You probably want at least:
A main title slide
An introductory slide that lists the major points or areas in your presentation
One slide for each point or area that is listed on the introductory slide
A summary slide that repeats the list of major points or areas in your presentation
By using this basic structure, if you have three major points or areas to present, you can plan to have a minimum of six slides: a title slide, an introductory slide, one slide for each of the three major points or areas, and a concluding summary slide.
If you have a large amount of information to present in any of your main points or areas, you may want to create a sub-grouping of slides for that material by using the same basic outline structure.
Consider how much time each slide should be visible on the screen during your presentation. A good standard estimate is from two to five minutes per slide.
Create a presentation in Outline view
On the View tab, in the Presentation Views group, click Outline .
In the slide thumbnail pane, place the pointer, and then either paste your content or begin typing text.
The first text you type will be a title, indicated by boldface type. Press ENTER when you've completed the title.
PowerPoint uses the Enter key on the keyboard to start a new line in an outline. The new line is automatically at the same hierarchical level as the one you just typed. To change that hierarchical level:
Press the Tab key on the keyboard to move the current line downward one level in the outline hierarchy.
Press Shift+Tab to move the current line upward one level in the outline hierarchy.
View a presentation in Outline view
Print a presentation in outline view.
Open the presentation that you want to print.
Click File > Print .
In the Print dialog box, under Settings , select the second box (which by default is set to Full Page Slides ) to expand the list of options. Then, under Print Layout , select Outline .

You can choose a page orientation (Portrait or Landscape) in the Printer Properties dialog box.
Click Print .
(For more complete information on printing, see the article Print your PowerPoint slides or handouts .)

Need more help?
Want more options.
Explore subscription benefits, browse training courses, learn how to secure your device, and more.

Microsoft 365 subscription benefits

Microsoft 365 training

Microsoft security

Accessibility center
Communities help you ask and answer questions, give feedback, and hear from experts with rich knowledge.

Ask the Microsoft Community

Microsoft Tech Community

Windows Insiders
Microsoft 365 Insiders
Was this information helpful?
Thank you for your feedback.

The Smartest Way to Use AI at Work
D ay by day, there’s growing pressure at the office. Do you respond to all those clients—or let AI do it? Do you attend that meeting—or do you send a bot?
About 20% of employed adults said they have used OpenAI’s ChatGPT for work as of February 2024, up from 8% a year ago, according to Pew Research Center. The most popular uses for AI at work are research and brainstorming, writing first-draft emails and creating visuals and presentations, according to an Adobe survey.
Productivity boosts from AI are estimated to be worth trillions of dollars over the next decade, say consultants. Many companies are encouraging their workers to embrace and learn the new tools. The industries that will benefit most are sales and marketing, customer care, software engineering and product development. For most workers, it can make your day-to-day a bit less annoying.
“If you’re going to use it as a work tool,” said Lareina Yee, a senior partner at the consulting firm McKinsey and chair of its Technology Council, “you need to think of all the ways it can change your own productivity equation.”
Using AI at work could get you fired—or at least in hot water. A judge last year sanctioned a lawyer who relied on fake cases generated by ChatGPT, and some companies have restricted AI’s usage.
Other companies and bosses are pushing staff to do more with AI, but you’ll need to follow guidelines. Rule No. 1: Don’t put any company data into a tool without permission. And Rule No. 2: Only use AI to do work you can easily verify, and be sure to check its work.
ChatGPT is easy to play around with. For one, version 3.5 is free—though the $20-a-month ChatGPT Plus (which includes GPT-4) delivers better results. Your company might already pay for AI tools from Google or Microsoft, so start there.
Whether you’re self-employed or working at a Fortune 500 company, these are four areas where AI can help. We’ve gathered the best starting phrases (aka “prompts”) and the neatest tricks to try in each category. (In this guide, we’re avoiding scenarios where AI gives advice or makes up its own information.)
Coolest Trick: Summarize lengthy email threads.Do: Add your own touches to drafts so they sound more natural. Don’t: Use vague prompts that go nowhere—and don’t overdo the proofreading tools.
Email is annoying, but it isn’t going away. AI can make responding to messages easier.
Using a free version of Microsoft Copilot or Google’s Gemini chatbots, prompt the tool to write words of encouragement, a time-off request or some other email premise. In seconds, you’ll get a workable, if bland, draft. Based on our tests, ChatGPT Plus delivered impressive results on the first try. The free ChatGPT did fine, but gave less detail than its subscription counterpart.
To get AI inside your email service, you or your employer has to pay. For $20 a month, Copilot Pro lets Outlook users draft, proofread and reply to emails, and summarize long email threads. If your company pays for Microsoft’s enterprise version, Copilot can reference files saved in your corporate cloud.
The Google One AI Premium plan, also $20 a month, integrates Google Gemini in personal Gmail accounts. Email thread summarization is coming soon, but for now, the Help Me Write feature helps you draft and tweak emails. We got better results entering prompts in the stand-alone Gemini chatbot.
For $30 a month, or $144 a year, Grammarly’s premium generative-AI service can appear in most text windows on your Windows or Mac computer. You can write prompts, personalize your voice and set your preferences for later.
SAMPLE PROMPT: Write an email to my direct report, Steve, asking him to find time on my calendar to discuss the projects he’ll work on while I’m away next week. Write in a friendly but assertive way and keep it short, no more than two paragraphs.
Presentations
Coolest Trick: Turn your notes into PowerPoints with Copilot for Microsoft 365.Do: Include enough slide elements in PowerPoint for fun, unique layout options.Don’t: Get discouraged by bad PowerPoint images—Microsoft’s Designer is better.
Copilot Pro helps users generate, organize and understand PowerPoint presentations. While only enterprise users can feed it files to create richer presentations on the fly, Copilot Pro users can still prompt the bot to add images to slides.
Caveats: You have to add images one at a time, and you get better results if you use Microsoft’s stand-alone Designer to generate images, then bring them over.
Designer in PowerPoint offers unique slide layouts based on information in the presentation. If you have a list of dates on a slide, for example, Designer might suggest a timeline with those dates already inserted.
Personal account users who pay for Google Gemini can have the bot generate unique backgrounds and images within Google’s Slides app. (Just don’t ask for people since Google disabled that feature following backlash over its inaccurate depictions of race and ethnicity.) Users of Gemini for Google Workspace will soon be able to prompt the bot to create slides based on Gmail and Drive content, a Google spokeswoman said.
ChatGPT won’t construct full presentations, but it can provide slide text based on prompts. ChatGPT Plus can create slide segments from uploaded documents. We asked it to turn a 25-page PDF file into seven slides, and it wrote text for each slide, including two suggested titles and a bullet list of key points.
SAMPLE PROMPT: Generate a watercolor image of a pink robot dancing in the rain.
Coolest Trick: Get key points from YouTube videos without having to watch them.Do: Ask chatbots to explain complex topics or findings in a way that you understand. Don’t: Overload the bot with long videos or files.
Wordy, boring documents? Chatbots love them. Free tools like Copilot in Microsoft’s Edge browser can summarize webpages, articles, PDFs or other sources you only have time to skim.
ChatGPT only allows Plus subscribers to upload files. Other AI tools such as Perplexity and Anthropic’s Claude let you upload a few limited-size files free. Turning on the Google Workspace extension in Gemini chat lets you refer to emails and files in Docs and Drive, so you can ask it to summarize information you already have saved there. (Beware: In our testing, it made some mistakes like making up names for people.)
Copilot, Gemini and other bots can summarize and provide timestamps for videos with transcripts. Gemini users need to turn on the YouTube extension in settings. Copilot in Edge can answer questions alongside open YouTube or Vimeo pages.
Video summarization can be hit or miss, especially when the videos are more than 30 minutes long.
SAMPLE PROMPT: List the five key points discussed in this video in a bulleted list.
Coolest Trick: Send your bot to meetings for you.Do: Cross-check confusing notes and ask bots about previous meetings.Don’t: Use external monitoring services in company meetings without permission.
Otter.ai’s OtterPilot can join meetings on Zoom or Google Meet and take notes for you, even if you can’t attend. The AI generates a transcript and notes, which include a brief summary, an outline and a to-do list. Its chat function can catch you up on what you missed if you arrive late, and recall notes from previous meetings. The free version only gives you 300 transcription minutes and 20 chat queries a month. The premium starts at $17 a month, or $110 a year.
In our test of the paid version, Otter didn’t always know who said what, and it forgot names and misidentified people. You can review recorded transcripts to check on questionable points.
Zoom now has an AI Companion for paying users. It summarizes meetings and lengthy chat threads, brainstorms ideas, and organizes meeting highlights by topics. Only the host can enable these AI Companion summaries, so if you’re not running the meeting, you’ll have to ask the host to turn it on.
For Microsoft enterprise customers, Copilot is embedded in Teams and can take notes, summarize chats and answer questions. Gemini for Google Workspace accounts with the Gemini Enterprise or AI Meetings and Messaging add-on can also take notes and summarize them during and after meetings.
If your colleagues notice you missed the meeting and sent a bot instead, your best response may be: “Welcome to the future.”
—For more WSJ Technology analysis, reviews, advice and headlines, sign up for our weekly newsletter.
Write to Cordilia James at [email protected]

IMAGES
VIDEO
COMMENTS
Insert outline text into a PowerPoint presentation. In a new PowerPoint presentation file, click the first slide. Or, in an existing presentation file, click the slide that you want the outline to appear after. On the Home tab, click the arrow next to New Slide, and then click Outline.
Follow these steps when creating an outline for your presentation: 1. Consider the purpose of your presentation. When creating a presentation outline, determine your goal. To find this, think about what you want your audience to obtain or support after your discussion. For example, a nonprofit that builds wells for impoverished communities may ...
When you're creating a PowerPoint, writing a presentation outline first is the best way to break the project into easy-to-conquer tasks. 5. Open PowerPoint and Add Your Outline. Once you've finished writing your PowerPoint presentation outline, it's time to jump back to the app finally. You've laid the groundwork for writing a presentation rapidly.
Method 1: Create your outline from scratch. Method 2: Create a presentation outline using an AI presentation maker. Method 3: Create a presentation outline using ChatGPT. Method 4: Create a presentation outline using a template. Presentation outline examples.
On either the Home or Insert tab, select the New Slide drop-down menu. Pick "Slides From Outline." Browse for the outline file on your computer, select it, and click "Insert." After a moment, you'll see your outline load into PowerPoint. As mentioned, each line of the outline is its own slide.
Body. Create a skeleton outline of your presentation by breaking down this main message into smaller parts. Use bullet points or headings to organize these bits of information. Think of the main points as the big chapters and the subpoints as the smaller sections within those chapters.
Open the presentation that you want to print. Click File > Print. In the Print dialog box, under Settings, select the second box (which by default is set to Full Page Slides) to expand the list of options. Then, under Print Layout, select Outline. You can choose a page orientation (Portrait or Landscape) in the Printer Properties dialog box.
In order to prove your authority and the validity of your main point, you'll need to argument your position. There should be no more than four main points or statements per presentation. Each statement is supported by multiple arguments. There are usually 3-4 for arguments per main point. Arguments are your research.
Make your presentation more interesting by adding extra info like quotes, testimonials, or data. It can make your audience more engaged and reinforce your message. 3. Visualize Your Concepts. How you show your ideas matters a lot. Tools like SlidesAI can help you express your concepts clearly and effectively. 4.
A presentation outline is a bare-bones version of your talk. It should take the general direction of your pitch, plus summaries of your key points. Its purpose is to help you shape your thinking, organize your thoughts, and make sure your material is presented logically. In this article, we're going to take a closer look at what a ...
Use short phrases - Don't write full sentences, just concise phrases to capture key ideas. Group related ideas - Organize supporting points under the main topics and themes. Limit outline to key points - Keep it high-level so you don't get bogged down in too much detail. Use a consistent format - Follow the same structure for all ...
Open Microsoft PowerPoint on your computer. Go to the Insert tab. Click on the New Slide option. Select the Slides from Outline option. Choose the outline file and click the Insert button. To ...
Step 1. Develop Your PowerPoint Presentation's 'Thesis'. Right now, before you get any further in the process, write out what your topic is in one sentence. Think of it as a mini thesis for your presentation. To be effective, your single sentence "thesis" must be specific, relevant, and debatable.
Open Word document. Select View > Outline. This will automatically generate an outline and open the Outlining tools. If there are headings in your document, you will witness those headings organized by level (from H1 to H9). If there are no headings in the document, the outline will appear as a bullet list.
Structure Your Outline: Organize your main points into a logical flow. This typically follows a three-act structure: Introduction: Grab your audience's attention, introduce yourself and the topic, and clearly state your objective. Main Body: Present your key points in a clear and concise manner. Use storytelling techniques and visuals to ...
To import an existing outline file, click the drop-down menu under New Slide on the HOME tab, and select Slides from Outline. Navigate to the outline file, and click Insert. Another option is to create an outline in .txt format using Notepad (or any other text editor), as shown in the screenshot below. Normal paragraphs will be converted into ...
Flesh out the points and sub-points from your outline. Decide very early on if you want to give your speech with or without notes. Revise your drafts as much as possible until you have created a full speech. If you are going to speak with notes, write some of the information from your outline onto cue cards.
All you have to do is follow the 3 simple steps. Step-1: Click on the "File" tab. In the open PowerPoint presentation, click on the "File" tab from the menu ribbon located at the top of the screen. In the sidebar of the "File" menu, click on the "Print" option. Step-2: Click on the "Print Layout" option.
When in doubt, adhere to the principle of simplicity, and aim for a clean and uncluttered layout with plenty of white space around text and images. Think phrases and bullets, not sentences. As an ...
Click on the "File" tab in the upper left-hand corner of the screen. Step 2: Select "Export". Upon clicking "File", new options will appear. Click on "Export" from the options in the File tab. Step 3: Create Handouts. Click "Create Handouts" under the Export tab then press the "Create Handouts" icon. Step 4: Select ...
Step 1: Select the Text. Begin by clicking on the text box containing the text you want to outline. Selecting the text is the first step because you need to tell PowerPoint which text you want to modify. Make sure you click on the actual text box and not just somewhere on the slide.
Insert outline text into a PowerPoint presentation. In a new PowerPoint presentation file, click the first slide. Or, in an existing presentation file, click the slide that you want the outline to appear after. On the Home tab, click the arrow next to New Slide, and then click Outline.
Open a new Microsoft PowerPoint. Click the Copilot button from the top bar. This will open a Copilot section from the left pane. Now, you can start creating a presentation by asking Copilot to ...
Open PowerPoint, and select Home > New Slide. Select Slides from Outline. In the Insert Outline dialog box, find and select your Word outline and select Insert. Note: If your Word document contains no Heading 1 or Heading 2 styles, PowerPoint will create a slide for each paragraph in your content.
Open the presentation that you want to print. Click File > Print. In the Print dialog box, under Settings, select the second box (which by default is set to Full Page Slides) to expand the list of options. Then, under Print Layout, select Outline. You can choose a page orientation (Portrait or Landscape) in the Printer Properties dialog box.
The most popular uses for AI at work are research and brainstorming, writing first-draft emails and creating visuals and presentations, according to an Adobe survey. Productivity boosts from AI ...