
- Search the community and support articles
- Microsoft 365 and Office
- Search Community member
Ask a new question

Slideshows within a Powerpoint presentation - possible?
I would like to have a series of photos cycling for a period of time while I talk, then I will click to the next powerpoint slide and talk, then click to another series of photos that will cycle while I talk. I want the photos to keep cycling (repeating) until I am finished talking about that section.
This is like slideshows within the powerpoint presentation.
Report abuse
Create a separate presentation for each of the cycling series of photos. Set it to loop until esc.
On your main presentation, insert the looped presentations as icons (Insert > Object > Create from File > Browse to [File Name] > Check Display as Icon (change icon name if you want an identifier) >OK). Insert one object/presentation on each slide from which you wish to launch the "series of photos." Once inserted, go to Animations > Custom Animation > Add Effect > Object Action Show.
You can either keep the icon on the slide (place it somewhere where it won't interfere with the rest of your presentation) and launch your pres by clicking on the icon or move the icon off the screen and set it to launch on a trigger click of another more actractive object.
Once the series of images is launched and you're ready to return to your main presentation just hit esc. and you'll return...
14 people found this reply helpful
Was this reply helpful? Yes No
Sorry this didn't help.
Great! Thanks for your feedback.
How satisfied are you with this reply?
Thanks for your feedback, it helps us improve the site.
Thanks for your feedback.
Hi FredChicken,
Here's one way you can do it with custom shows.
Create your talking point slides and place them at the beginning of the presentation (let's call them Section 1, Section 2, Section 3, etc.)
Add a solid black slide at the end of the sections slides, then add all your picture slides. Set the transitions on your picture slides to automatically advance after XX seconds.
Create custom shows to match each Section slide and name them to match the Section slide (i.e. Custom Show 1, Custom Show 2, etc.) See this link for how to create a custom show: http://office.microsoft.com/en-us/powerpoint-help/create-and-present-a-custom-show-HA010096698.aspx?CTT=1
Add an object (like a square) to each Section Slide and use it as the link to start the appropriate Custom Show (also explained in the link above.) So on Section 1 slide you'll have a link to Custom Show 1, on Section 2 slide, you'll have a link to Custom Show 2, etc. Make sure you select Show & Return.
If you don't want the link object to be seen, make it 99% transparent but remember where it is so you can click on it.
Click Slide Show, Set Up Show and check the box for Loop continuously until ESC.
Run the slide show, on Section 1 slide click the object to start the pictures, hit ESC when you're ready to go to the next Section, click to advance to Section Slide 2, click the object to start Custom Show 2, hit Esc when you're ready, repeat as needed.
2 people found this reply helpful
Replies (9)
Question info.
- Norsk Bokmål
- Ελληνικά
- Русский
- עברית
- العربية
- ไทย
- 한국어
- 中文(简体)
- 中文(繁體)
- 日本語
How to Name Slides in PowerPoint [A Step-by-Step Guide!]
By: Author Shrot Katewa
![How to Name Slides in PowerPoint [A Step-by-Step Guide!]](https://artofpresentations.com/wp-content/uploads/2021/09/Featured-Image-How-to-Name-Slides-in-PowerPoint-optimize.jpg "a slideshow is another name for a powerpoint presentation")
Giving a name to a slide in PowerPoint is one of those things that will not make or break your presentation. However, naming slides in PowerPoint can be really helpful in streamlining your process of presentation design and it will optimize things for you!
To name slides in PowerPoint, click on the “View” tab in PowerPoint. Then, click on the “Outline View” option from the ribbon. Now, in the slide preview section, click on the slide to add the name and start typing. This will add a title name to the slide.
In this article, we shall do a deep-dive in naming slides in PowerPoint. I’ll also share with you a trick wherein you can name all slides together. Plus, we shall also take a look at how naming a slide is different from naming a slide layout!
So, let’s get started!
1. Why Do You Need to Name Slides in PowerPoint?
Let’s begin with the basics. You may wonder, why do you even need to name slides in PowerPoint?
Naming slides in PowerPoint can help you structure your presentation better. It can help you re-organize your slides when using the slide sorter view . Moreover, the slide name helps you know the type of information present on the slide even without opening it.
So yes, naming slides won’t make your presentation look pretty. But, it will surely make it look more organized and help you save quite some time while designing it!
Plus, when creating a hyperlink within the presentation, it is easier to link to the specific slide when the slides have a name assigned to them.
1. How to Name a Slide in PowerPoint?
Now that we have established that naming slides in PowerPoint can be helpful, let us take a look at the process of how to name a slide in PowerPoint.
To name a slide in PowerPoint, you have to go to the “ Outline view ” option and add the name of the slides in the slide navigation sidebar. The whole process is described in easy steps below.
Step-1: Click on the “View” tab
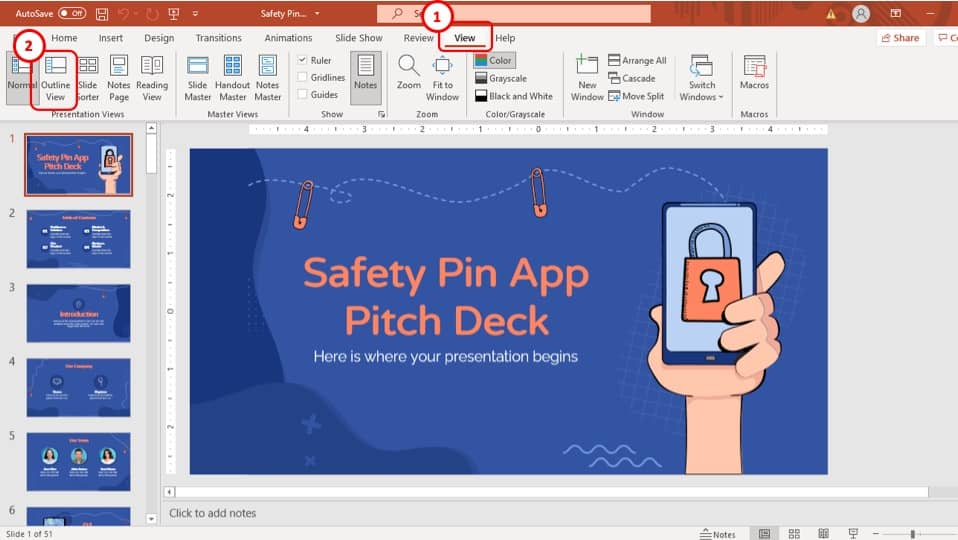
The first step of the process is to click on the “ View ” tab which is located in the ribbon of your PowerPoint presentation. It is the second to last tab.
Step-2: Select a Slide to Name from the “Outline view”
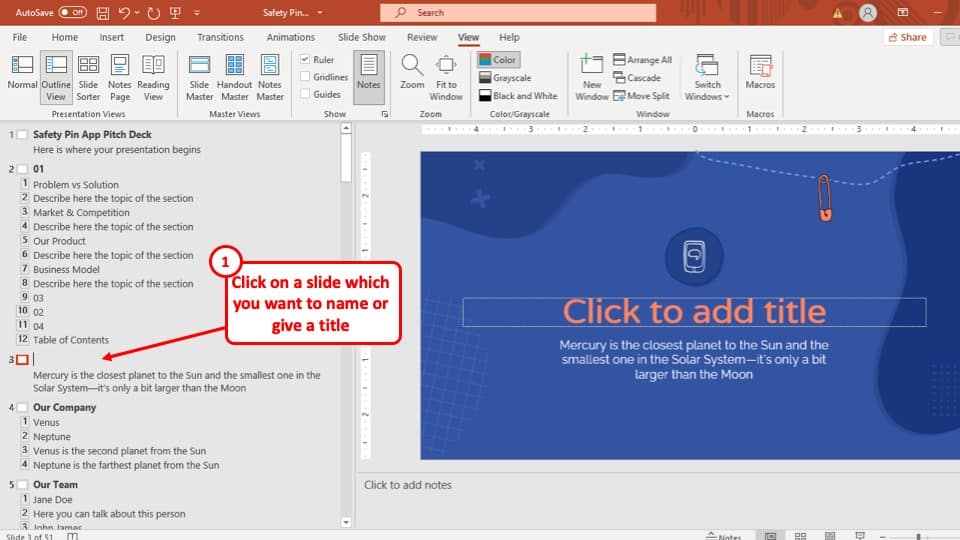
After you have clicked on the “ View ” tab, click on the “ Outline View ” option which is located in the “ Presentation Views ” section of the “ View ” tab.
Then, choose a slide to which you want to add a name.
Step-3: Add a name to the slide
After you select the “ Outline View ” option in the “ View ” tab, the slide navigation sidebar to the left of your screen will change and the outline of the PowerPoint presentation will appear instead.
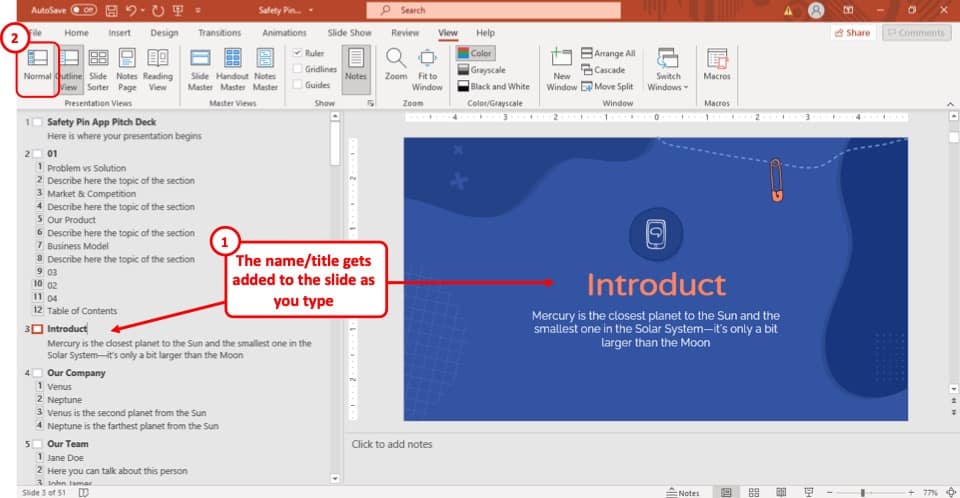
Simply type in the name of the slide in the “ Outline view ”, and the slide will be named accordingly.
To go back to the default view of your presentation, click on the “ Normal View ” option under the “ View ” tab.
2. How to Rename a Slide in PowerPoint?
If you want to rename a slide in PowerPoint, all you have to do is go back to the “Outline view” and change the name of the slide in the slide navigation bar as described in the previous section.
Follow the steps described in the above section and rewrite the name of your preferred slide.
One thing to remember is that when you name a slide, by default a slide title will be added to the slide. You can also edit the text in the “ Slide Title ” of the slide, and it will automatically rename the name of the slide.
3. How to Name All Slides in PowerPoint?
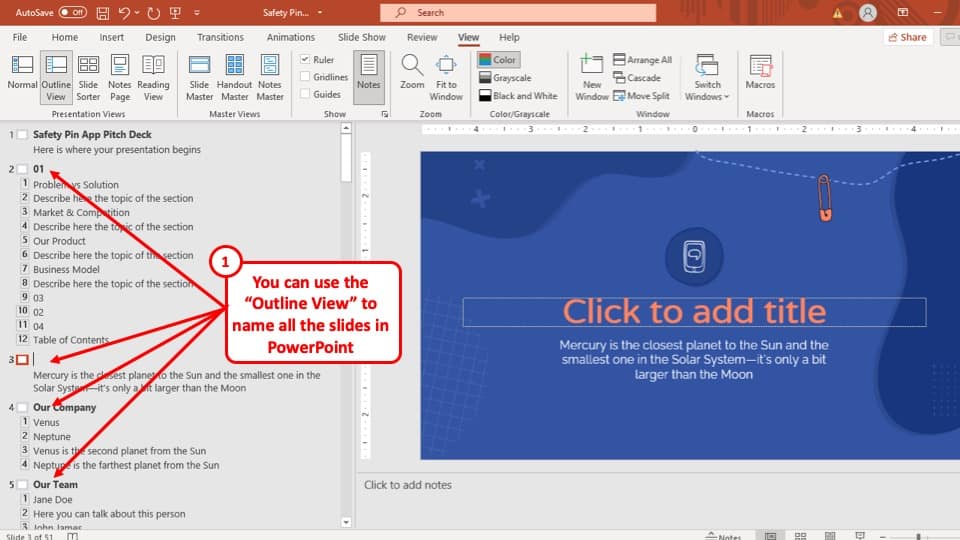
With the help of the “ Outline view ” option in PowerPoint, you can name all the slides in PowerPoint.
In fact, you can make an entire presentation (content only) using only the slide navigation sidebar of the “ Outline view ” option!
4. How to Name a Slide Layout in PowerPoint?
A slide layout is different from a simple slide. Slide layouts in PowerPoint are basically preformatted layouts or containers that determine the design of the slide.
Slides layouts are used to create a design template and make it easier for the user to maintain design consistency when adding content.
That said, you can always create your own slide layouts or even rename a layout at your convenience.
This section is going to focus on how to name a slide layout. If you are interested in learning more about slide layouts, check out this article that I wrote earlier.
To name a slide layout in your PowerPoint presentation, you have to go to the “ Slide Master ” view option from the “ View ” tab and change the name of the slide.
The entire process is described step-by-step below.
Step-1: Go to the “Slide Master” view
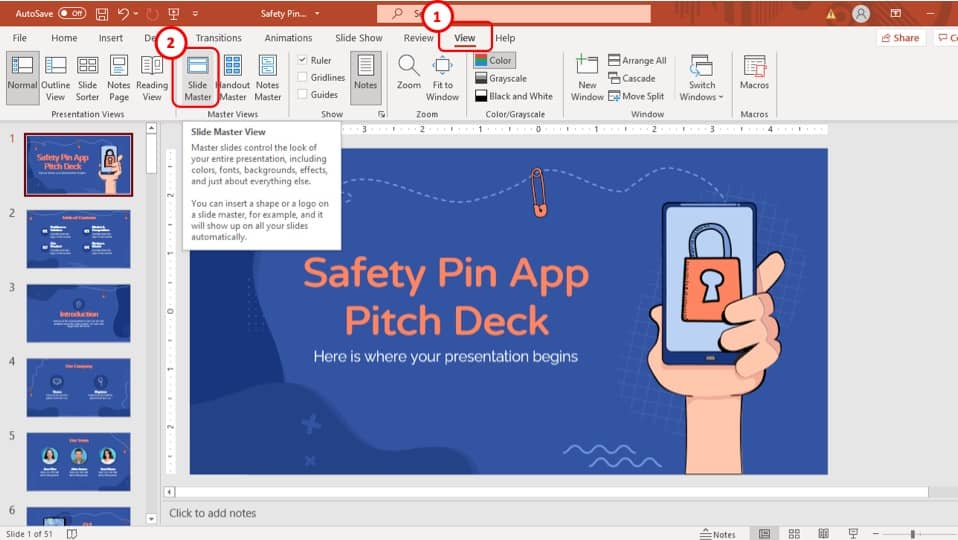
The first step of this process is to select the “ Slide Master ” view, which is located in the “ Master Views ” section of the “ View ” tab.
The “ Slide Master ” view is the first option in the “ Master Views ” section of the “ View ” tab.
Step-2: Click on the “Rename” option

In this step, select the layout that you want to rename and then click on the “ Rename ” button in the “ Edit master ” section of the “ Slide Master ” tab.
The “ Edit Master ” section is the first section of the “ Slide Master ” view.
Step-3: Give a name to the layout
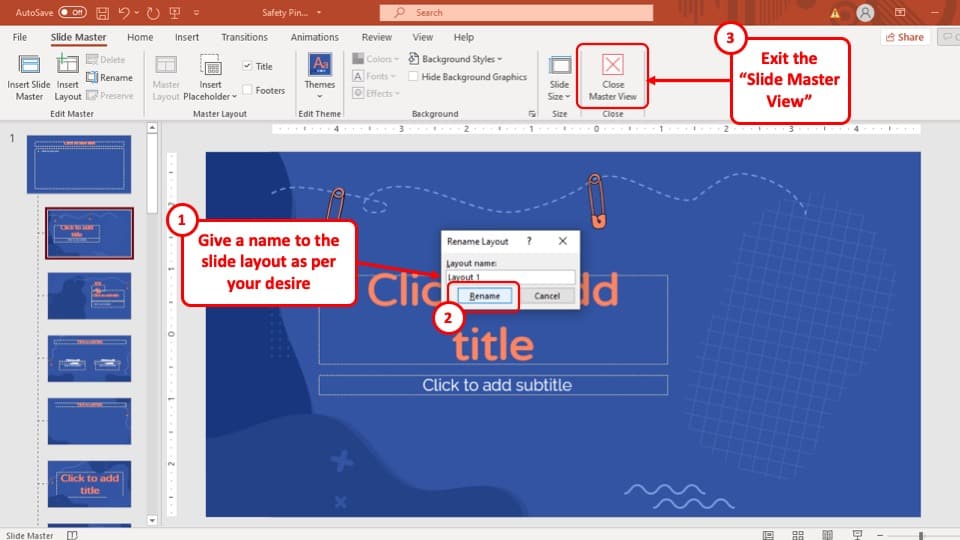
After you click on the “ Rename ” button, a pop-up window called “ Rename Layout ” will appear at the center of your screen.
Simply type in the preferred name for the layout and then hit the “ Rename ” button and the layout will be named accordingly.
5. How to Display the Slide Name during Slideshow?
Unfortunately, there is no direct way to display the slide name of the slide while in the presentation mode.
However, you can use a simple VBA code to make sure all the slides are displayed with their respective slide name. The whole process is described in simple steps below.
Step-1: Place the footers in the slides
The VBA code that you will be using during this method will cycle through the entire slide and insert the name of the slide in any shape that starts with the word ‘footer’.
So, the first step of this process is to add a footer to the slides that you want the slide name to be displayed in.
If you are not familiar with adding footers in PowerPoint, check out this article where I go in-depth into this topic. You will be able to learn everything about adding and editing a footer.
Once you’re done, you can come back to reading this article.
Step-2: Enable the Developer Mode
As a next step, you want to make sure that you have the developer tab enabled as we will need to use the visual basic editor in the remaining steps and then run the macros.
If you don’t know what it is or whether it is enabled, check out my complete guide on how to enable developer tab in PowerPoint .
Follow the process in that article, enable the developer tab, and come back to this article to continue with the next steps.
Step-3: Open the Visual Basic Editor in PowerPoint
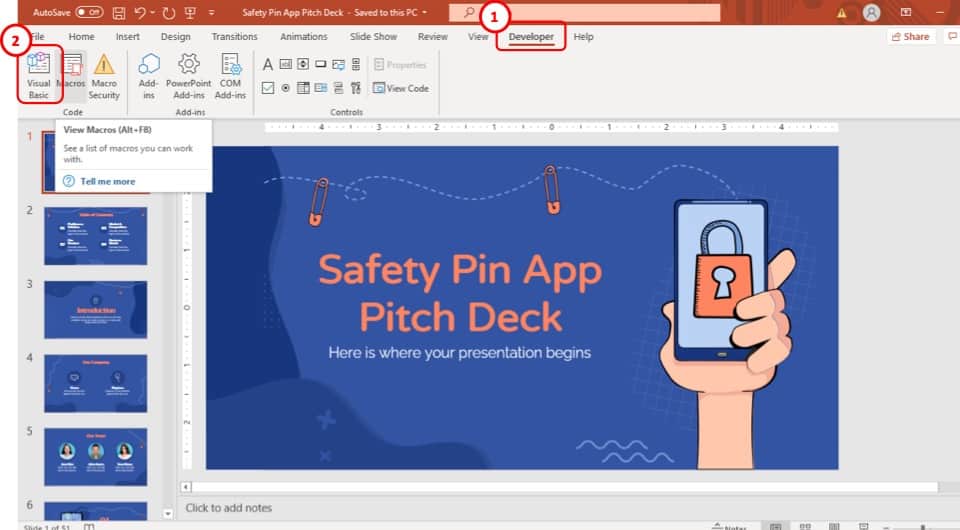
Once you have enabled the developer tab, click on the “ Developer ” tab, and then click on the “Visual Basic” button.
You can also press the “ Alt+F11 ” keys simultaneously. This will open the visual basic editor window directly.
Step-4: Click on the “Module” option
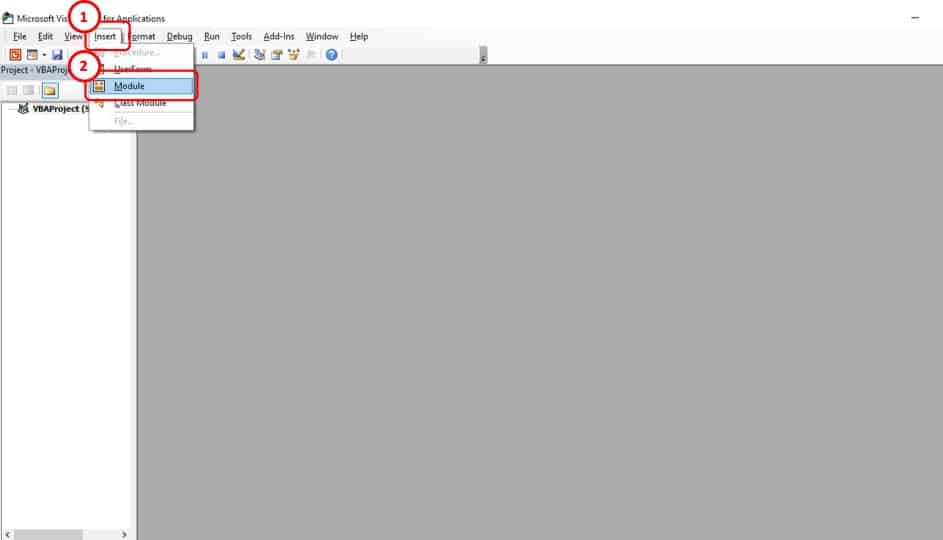
From the Visual Basics Editor window, click on the “ Module ” option which is located in the “ Insert ” tab.
Step-5: Paste the Macro code
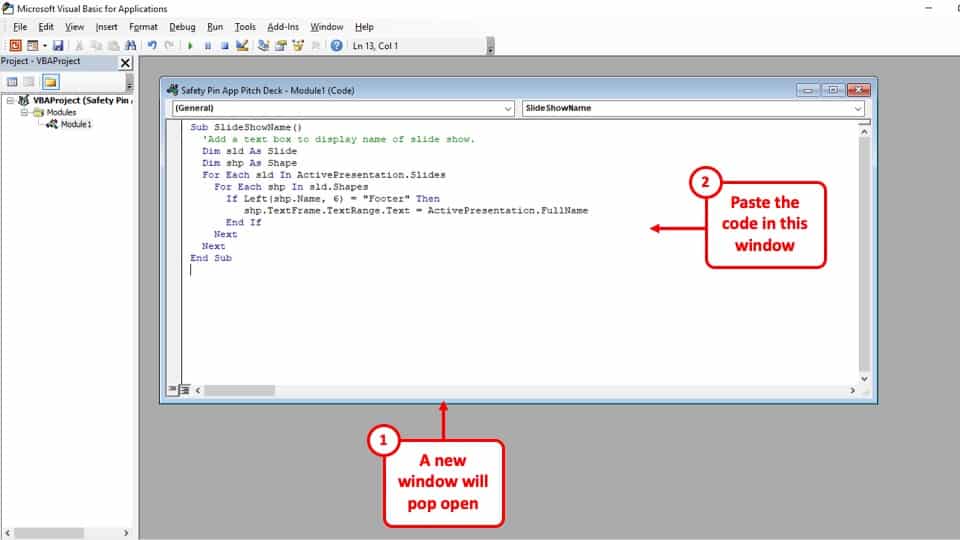
Once you’ve opened the pop-up window that appears when you click on the “ Module ” option, simply paste the code given below in that window.
Sub SlideShowName() ‘Add a text box to display name of slide show. Dim sld As Slide Dim shp As Shape For Each sld In ActivePresentation.Slides For Each shp In sld.Shapes If Left(shp.Name, 6) = “Footer” Then shp.TextFrame.TextRange.Text = ActivePresentation.FullName End If Next Next End Sub
Step-6: Save the presentation
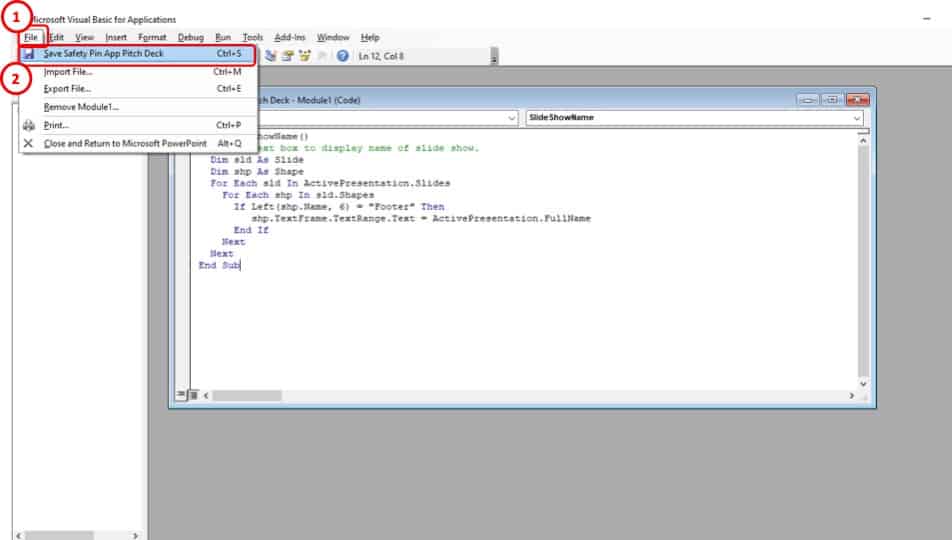
After you have inserted the code for the slide name, simply save the presentation from the “ File ” tab.
Step-7: Click on the “Macros” option
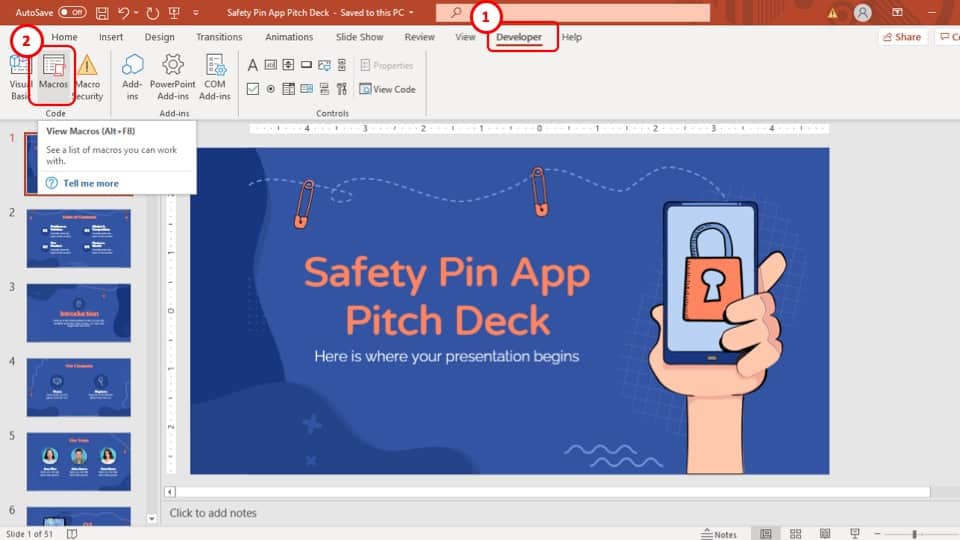
After you have saved the presentation as a ‘.pptm’ file, go to the “ Developer ” tab and select the “ Macros ” option in the “ Code ” section.
Step-8: Click on the “SlideShowName” option
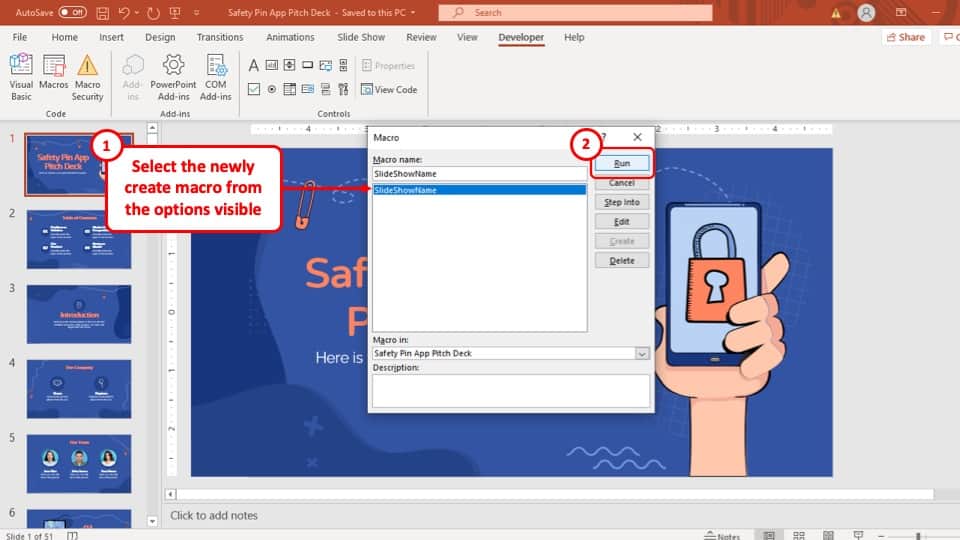
In the last step, all you have to do is to select the “ SlideShowName ” option in the pop-up window and then hit the “ Run ” button. After that, the slide name will be displayed during the presentation mode.
6. How to Name a PowerPoint Presentation?
To name a PowerPoint presentation, you have to go to the “ Save as ” option in the “ File ” tab. The whole process is described in 2 easy steps below.
Step-1: Go to the “File” tab
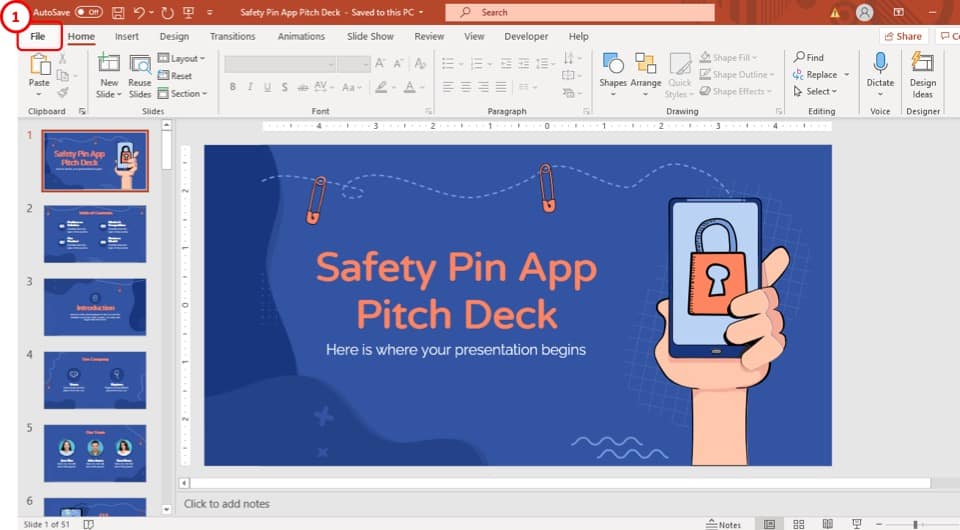
The first step of the process is to select the “ File ” tab, which is the first tab in the ribbon of your PowerPoint presentation.
Step-2: Type in the name of the presentation
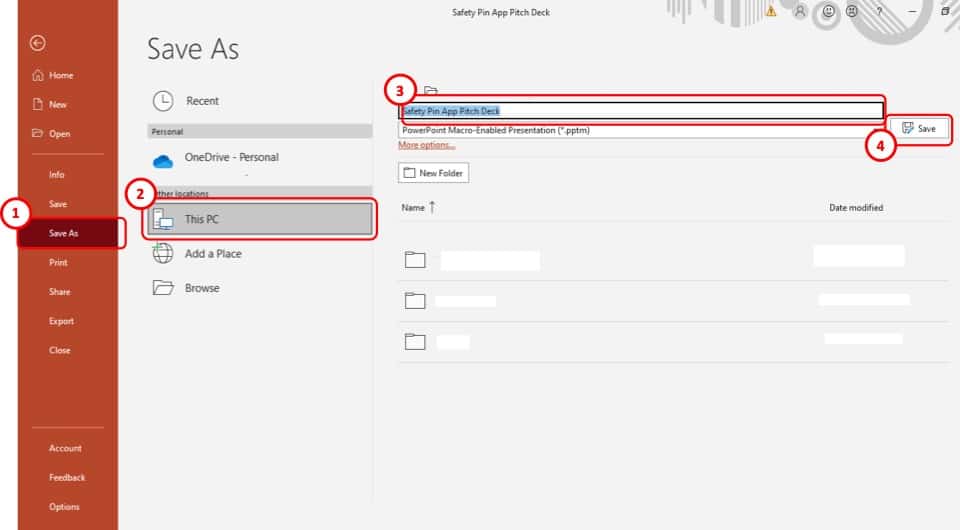
After you have clicked on the “ File ” tab, you will be taken to a new window. Click on the “ Save As ” option and type in the name of the presentation in the top dialogue box.
After that just hit the “ Save ” button to the right of the dialogue box and the name of the presentation will be saved accordingly.
7. How to Add Your Name as an Author to a PowerPoint Presentation?
The process of adding your name as an author to a PowerPoint presentation is explained in easy steps below.
Step-1: Click on the “File” Tab
The first step of the process is to go to the “ File ” tab as explained in the previous section
Step-2: Type your name in the “Author” box in the “Info” section
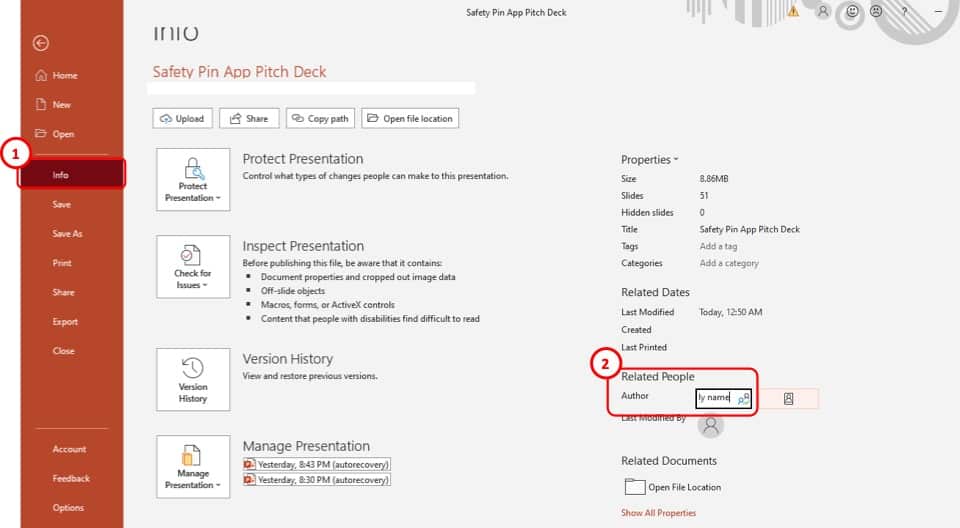
In the “ Info ” tab, you will find an option to the right of the screen that says “ Author ” with a box written, “ Add an author ” on it.
Simply type in your name in the “ Author ” box and hit “ Enter ” on your keyboard. After that, your name will be added as an author in that PowerPoint presentation.
More Related Articles
- Working with Slides in PowerPoint! [A Complete Guide!]
- How to Save a Slide as an Image in PowerPoint? [A Quick Tip!]
- Design Ideas Feature in PowerPoint [You Need to Know This Feature!]
- Notes Master in PowerPoint [Know How to Use It Properly!]
- PowerPoint vs Google Slides: Which is Better? [The Ultimate Guide! ]
Credit to benzoix (on Freepik) for the featured image of the article (further edited).
How to make a slide show
Learn how to make a slide show with photos, videos, music, and custom settings using a slide show maker.
Learn how to make a slide show with PowerPoint
Discover how to make a slide show with photos, videos, music, and custom settings using a slide show app like PowerPoint.
What is a slide show maker?
To create a slide show, you’ll want to use a slide show maker—or slide show app—which is a software program or online service that enables you create digital slide shows with text, photos, videos, music, and other special effects. The full range of slide show features and functionality varies from program to program.
Once you’ve created a slide show, it can be published on the internet or shared with others as a video file. Additionally, you can use slide shows to create dynamic, interactive content on websites.
Slide show software can be used for a variety of purposes, such as creating presentations for work, school, and even your personal life. For instance, slide shows are often used to:

Display photos during an event
Slide shows are a great way to share photos and videos with guests at a wedding, birthday, or other special event.
Create a digital photo album
Some slide shows are created for personal reasons, such as sharing important memories with family or friends.

Highlight products or services
Businesses can use slide shows to showcase their products, promote special offers and sales, or pitch their services to potential clients.
Enhance teaching, training, and public speaking
Slide shows can also provide helpful visuals in educational settings, classroom presentations, and public speaking forums.
What you need to make a slide show
When it comes to creating a slide show, there are a few things you'll need to get started. First and foremost, you'll need a device equipped with presentation software or access to an online slide show app. Secondly, you’ll need a way to display your slide show, which usually means connecting your device to a projector or big screen TV. Beyond that, you’ll need some visual aids and other media to bring your slide show to life.
Explore each of these slide show requirements in more detail:
Devices and equipment —To create a slide show, you’ll use a computer or other device—such as a tablet or mobile phone—with PowerPoint or a similar program installed. You will also need a way to project the slides onto a screen or wall. This can be done with a projector, but if you don't have one available, you can use your TV or computer monitor. Simply connect your device to the TV or monitor using an HDMI cable and select the correct input. Your slides will now be projected onto the screen.
Media —Of course, creating a slide show requires media that adds visual and even audio elements to your presentation. This can be anything from photos and videos to music and text. You can use search engines to find copyright-free media to use in your slide show.
Another option is to purchase royalty-free stock footage, images, and audio files from online media libraries. This could be a bit more expensive, but it guarantees that you have the legal right to use the media in your presentation.
Finally, you can also use your own videos, images, and even music. While this can be a time-consuming process, it does allow you to create custom content specifically for your slide show.
Slide show creator —To bring your slide show together, you’ll need a slide show creator. The slide show software you choose will depend on your presentation requirements and preferences. There are many slide show makers on the market, with Microsoft PowerPoint being one of the most popular and widely used programs globally.
How to choose a slide show maker
When choosing slide show software, it's important to consider the features and specifications that are most important to you. Some of the questions you might ask when choosing a slide show maker include:
- How easy is the software to use?
- Is the software Mac or PC compatible?
- Can I access and edit my slide show on the cloud?
- What kind of slide shows can be created with the software?
- How many photos and/or videos can be included in a slide show?
- Can text and other elements be added to slide shows?
- Are transitions and effects available for slide shows?
- Is music accompaniment an option?
- What are the options for saving and sharing your slide show?
Building a slide show doesn't have to be difficult. With the right software, you can create an engaging presentation in no time.
Six steps for creating a slide show

1. Plan your slide show
Before getting too deep into your slide show project, it’s a good idea to select and save the photos and videos you want to use. This helps you create a slide show more efficiently and purposefully, ensuring a better outcome.
4. Import media
Start adding photos, videos, and other desired media to your slides. You can upload these from your device or online media libraries. If you planned your slide show in advance, you should have all your media saved in one place.

2. Launch your slide show app
Once you’ve decided on a slide show maker, you’ll want to launch the app from whatever device you’ll be using to create your presentation.
5. Add text, music, and transitions
After you’ve arranged the visuals in your slide show, you can provide additional information and communicate sentiment using custom text, music, and timed slide transitions.

3. Choose your theme
Most slide show software offers a variety of pre-set themes, colors, and designs. You can choose one that best suits your slide show or create a custom theme using the program’s various tools and features.
6. Record, save, and share your slide show
Now you’re ready to record your slide show, which can include a voiceover or Cameo . Once your slide show is complete, you can save it as a video to your device or to the cloud, such as OneDrive . You can access your saved slide show at any time to display at events, use in meetings, share online, or send directly to other people.
How to make a slide show with photos
Adding photos to your slide show is a great way to enliven your presentation and make it more visually interesting. Here are a few different ways you can add photos to your slide show in PowerPoint.

Add photos from your device
Whether you’re using a computer, tablet, phone, or other device, you can use photos that are saved to your device to create your slide show. In PowerPoint, simply select “Insert” then “Pictures” from the program menu, then choose “This Device.” This will open your photo library and allow you to find the photos you want to use. Once you’ve selected the photos that you want to import, just click on the "Insert" button and they will be added to your slide show. If you’re using a pre-made theme, you can also right-click the image in the slide show and select “Change Picture.” Again, you will choose “This Device” to access your photo library. After inserting your photo, you can reposition it on your slide or resize it however you like.

Use stock photos
Another way to add photos in PowerPoint is to follow the same process you would when adding photos from your device, but when prompted to choose your photo source, select “From Stock Images” instead of “This Device.” This will display a library of photos that you can use in your slide show without worrying about copyright infringement. There are thousands of stock images available in most slide show maker programs. Once the library is open, you can explore existing photo categories or use keywords to search for photos that fit your needs.

Explore online photo sources
Online photos are images you can insert into a PowerPoint slide show directly from the internet, as opposed to using those you have saved on your device. This is a convenient option if you don't have photos already prepared for your slide show, or if you can’t find the right kind of photo in the stock image library. However, there are some potential risks associated with using online photos, namely that you must be careful to use royalty-free images so not to infringe on any copyrights. In PowerPoint, there is a filtering option to ensure your search results only show royalty-free photos. Inserting photos from online sources follows the same process as the previous two methods, but this time, you’ll select “From Online Sources.”
How to add videos, music, and text

How to add videos to PowerPoint slide shows
Adding videos to your slide show involves accessing videos from your device, a stock video library, or online video sources—just as you would when adding photos. In this case, however, you’ll navigate to the menu in PowerPoint and select “Insert,” followed by “Media,” then “Video.” Once your video appears on your slide, you can resize or reposition it to fit your presentation needs. You can also set your video to play automatically in the slide show by selecting “Playback” on the menu and choosing “Start Automatically.”

How to add music to PowerPoint slide shows
Much like adding videos, you can add music to individual slides in PowerPoint by navigating to “Insert” on the menu, then “Media,” and finally “Audio.” You can then import music from your device, or you can record your own audio directly in PowerPoint. However, if you want your audio to play across multiple slides in your presentation—for example, as background music for a slide show—you’ll have to take a couple of extra steps. Once you’ve imported your audio file, select “Playback” from the menu and choose the “Play in Background” option. Your music will now play across all slides. You can set one song to loop for the duration of the slide show, or you can add more songs to play continuously throughout the slide show.

How to add text to PowerPoint slide shows
Premade themes in PowerPoint make adding text slide shows easy. On slides that already have templated content, you can simply click on the text and begin editing. In addition to changing what the text says, you can resize, recolor, reposition, and add special effects to the text. Of course, you can also change the font—or style—of the text. Most of this can be done from the “Home” tab on the menu while certain effects, such as shadows, can be found on the “Shape Format” tab. If you’re designing your presentation slides from scratch, or want to create additional text, find “Insert” on the menu, then choose “Text Box” or “Word Art,” depending on your desired text effect.
Discover custom slide show settings
Add even more effects to your PowerPoint slide show with custom settings like timing, transitions, and looping.

Set slide show timing
Adding timing to your slide show is a great way to control the pacing and flow of your presentation. To add timing in PowerPoint, go to the "Transitions" tab on the menu and find the "Advance Slide" area. Make sure the box next to “After:” is checked, then input the amount of time you’d like each slide to appear on-screen. The slides will automatically advance, creating a movie-like effect that’s great for events and special occasions.

Create slide show transitions
Now that you’ve added automatic timing to your slide show, you can make it more visually appealing by creating slide transitions. Transitions are special effects that allow you to animate the way your slides change from one to the next, and there are a variety of different transitions in PowerPoint that you can choose from. You can add these transitions to your slide show from the "Transitions” tab. From there, you’ll select the transition you want to add. To preview the transition, simply click on it. You can click “Apply To All” to automatically add the same transition to every slide in your slide show, or you can manually add different transitions to different slides.

Loop your slide show
If you want your slide show to play continuously until you choose to turn it off, you can set your PowerPoint presentation to loop. This will ensure your slide show automatically starts over from the beginning once it reaches the end. To get started, navigate to the “Slide Show” tab on the menu and select “Set Up Slide Show.” When the settings window opens, check the box next to “Loop continuously until ‘ESC’” and then click “OK.” When you’re ready to turn your slide show off, simply press the Esc key on your keyboard.
Slide show template and theme tips
Search themes and templates online.
With numerous slide show themes and templates available, it’s easy to find one that fits your needs.
Customize your design
If you can’t find the perfect theme or template, you can change things like colors and fonts.
Build a custom template
If you want a blueprint to use with future slide shows, you can create your own template.
Add new slides
If you need more slides, you can choose a specific layout and your theme will be carried over.
Edit your slide layouts
Even when using a theme or template, you can rearrange slide content to highlight key information.
Add photos, videos, and text
Themes and templates make adding media easy since most slides have designated content areas.
Change or resize your fonts
If your theme’s font is too small, you can resize it or choose a new font to make it easy to read.
Reorder your slide show
Some themes and templates have a predefined sequence, but you can reorder slides to meet your needs.
Create your own slide show
Slide shows are a great way to engage your audience and present important information. Whether you're creating a slide show for personal or professional reasons, slide shows are an essential tool for anyone who wants to share information in a visually appealing manner.
Discover more ways to improve your slide show
What options are available to create a slide show?
Slide show makers come in many forms. Some slide show software can only be used on specific devices, while other slide show creators can be accessed via the cloud from any device at any time.
It’s a good idea to evaluate a variety of slide show makers to ensure that you find one with all the features you need. For instance, some slide show software skews toward business use cases and others toward personal.
Microsoft PowerPoint is a popular slide show app that allows you to save presentations to your device or the cloud, and is widely used for personal, professional, and educational purposes.
Frequently asked questions
What are slide show apps and software.
Slide show apps and software are used to create and share slide shows. Slide show programs are typically used to communicate information, diagrams, plans, or processes. They can also be used to display photos and videos at events or retail stores. Usually, slide show makers have a range of built-in features and layouts, making them easy to use, regardless of technical skill levels.
What should a slide show include?
An effective slide show should be engaging, visually appealing, and informative. To achieve this, you'll want to make sure to include the following elements:
- A catchy headline or title. This will help grab your audience's attention and set the tone for the rest of your presentation.
- A variety of images. Don't just rely on text—incorporate photos, illustrations, or even video to maximize viewership.
- Bullet points or short blocks of text. Keep your slide content concise and easy to digest; too much information will only overwhelm your viewers.
How do I make a picture slide show?
There are a few different ways to make picture slide shows. You can use online programs, or you can create a slide show directly on your computer, phone, tablet, or other device using slide show software. Some programs, such as Microsoft PowerPoint, can be accessed on your personal device and on the cloud.
How long should a slide show be?
The length of your slide show will depend on several factors, such as the topic of your presentation, the audience you're presenting to, and the amount of time you have. That said, slide shows are generally between five and ten minutes long.
How can I make a slide show better?
Here are a few tips to make your slide show more engaging:
- Add images, videos, and music to bring your slide show to life.
- Use a font that is easy to read from a distance.
- Try not to use too many words on each slide.
- Use custom transitions and timing to make your slide show flow.
- Ensure a cohesive slide show by using a theme or template.
- For live presentations, practice with the Speaker Coach feature .
Follow Microsoft 365
- Get Great Eclipse Photos with Your Phone
- The Best Noise-Canceling Headphones to Buy
How to Make a Slideshow on PowerPoint
Whether for work or private, use slideshows to get your message across
:max_bytes(150000):strip_icc():format(webp)/ColettaTeske-af57404a91b342578a97252b7dbd720f.jpg "a slideshow is another name for a powerpoint presentation")
- Central Washington University
In This Article
Jump to a Section
Before You Begin
- Step-by-Step: Make a Slideshow on PowerPoint
- Play Music During the Slideshow
- Set up the Slideshow
- Add Timings to Each Slide
- Edit Timings on a Slide
- Create a Video Slideshow
- Save a Slideshow to a CD or Other Removeable Media
When you're ready to present your PowerPoint slides to others, look no further than PowerPoint's slideshow feature. Use this tool for all kinds of slides, but those containing photos work best for most viewers.
Instructions in this article apply to PowerPoint for Microsoft 365 , PowerPoint 2019, PowerPoint 2016, PowerPoint 2013, PowerPoint 2010, and PowerPoint for Mac.
Before you create slides for your slideshow presentation, decide how long to make the slideshow, how it should flow, and the pictures you’ll use.
- Length : A slideshow can be as long or as short as you need. The length of the slideshow should be appropriate for the topic and for your audience’s attention span.
- Outline : It’s always smart to start with an outline; it helps you visualize your slideshow. An outline can be as simple as the list of topics you want to cover.
- Pictures : Choose photos that are clear and tell a story.
With PowerPoint's Photo Album , select the pictures and PowerPoint creates the basic slideshow. Fill your slides with informative text and harmonizing background music, then turn your collection of slides into a self-running photo slideshow with music that can play as a video or be stored on a CD.
When you’re ready to make a photo slideshow with music, PowerPoint gets you up and running quickly. To get started, select Insert > Photo Album > New Photo Album .
Here’s how to add and format pictures for the slideshow using the Photo Album:
Add pictures
Select File/Disk and select the images you want in the picture slideshow.
Enhance photos
Place a checkmark next to the picture you want to enhance and change the orientation, contrast, and brightness. You’ll see the changes in the Preview window.
Add text boxes
To add a slide for text, select the image in the album list you want the text to follow and select New Text Box .
Rearrange slides
Place a checkmark next to the picture you want to move and select the Move Up or Move Down arrows.
Choose a picture layout
Select the Picture layout down arrow and choose how you want the pictures to appear in the slideshow.
Frame the pictures
Select the Frame shape down arrow and choose a frame style. You’ll see a preview in the Album Layout area. This option will not be selectable if the picture layout Fit to slide is enabled.
Select Create when you’re finished.
Your photo slideshow is created in a new file. Add text to the slides and change the look of each slide.
How to Play Music During the Slideshow
Play music in the background during your slideshow to offer an audio counterpoint to all the visuals. The background music starts automatically with the slideshow and plays during all the slides.
To add background music to your presentation, select Insert > Audio > Audio on My PC , choose a music file, then select OK .
The audio icon appears in the middle of the current slide. To move it, drag it to a different place on the slide. When the audio icon is selected, the Playback tab appears. Select Play in Background and make changes to the audio file . Here are some suggestions.
- Preview the music : Select Play to hear what the music will sound like during your slideshow.
- Shorten the duration : Select Trim Audio to remove parts of the beginning and end of the music file.
- Adjust the volume : Select Volume to make the background music louder or softer.
How to Set up the Slideshow
Once your slides are finished, it’s time to set up the slideshow. Start by deciding whether to show the slideshow in a window or full screen.
To set up the slideshow, select Slide Show > Set Up Slide Show and choose one of the following:
- Browsed by an individual (window) : Run the slideshow automatically and inside a window. This option works best when you save the slideshow to a CD.
- Browsed at a kiosk (full screen) : Run the slideshow automatically and at full-screen size. This option works best when you convert the slideshow to a video.
Select OK when you’re finished.
How to Add Timings to Each Slide in the Slideshow
Now it’s time to decide how long each slide will appear in the slideshow. To begin, select Slide Show > Rehearse Timings . The slideshow displays in full screen with a Recording toolbar and a timer.
While timing your presentation, use the Recording toolbar to advance through the presentation.
Select Next (arrow pointing to the right) to go to the next slide when the desired timing has been reached.
Select Pause to start and stop the timing.
Select Repeat to restart recording the time for the selected slide.
When you’re finished and have set the time for the last slide, close the Recording toolbar.
Select Yes to keep the recorded slide timings.
How to Edit Timings on a Slide
If you need to increase or decrease the time for your slideshow, change how long slides appear during the slideshow.
To change the timing for a slide:
Select View > Slide Sorter .
Select Transitions .
Select a slide.
In the Advance Slide After text box, enter how long the slide should appear in the slideshow before proceeding to the next slide, then press Enter .
The new timing applies to the slide.
How to Create a PowerPoint Video Slideshow
The easiest way to distribute and play your slideshow is in video format. This way, anyone can view your slideshow no matter what computer or device they use.
To convert a slideshow into a video:
Save the file.
Select File > Export .
Select Create a Video .
To force a smaller file size, select the Full HD drop-down list and choose a lower quality.
Select Create Video .
Select the destination folder and give the video a descriptive file name.
Select Save . It may take a few minutes to process the file and create the video.
How to Save a Slideshow to a CD or Other Removeable Media
To create a presentation that can be watched on any computer and can be stored on a CD or other removable media:
Select Package Presentation for CD > Package for CD .
Type a name for the CD.
Select Copy to Folder or Copy to CD and follow the on-screen directions.
When you’re finished, select Close .
Get the Latest Tech News Delivered Every Day
- The 8 Best Slideshow Apps of 2024
- How to Create Digital Photo Albums in PowerPoint
- How to Do a Voiceover on PowerPoint
- How to Add Music to PowerPoint
- Loop a PowerPoint Slide Show
- Adding Sounds, Music or Narration to PowerPoint Slide Shows
- Tips for Memorial PowerPoint Presentations
- How to Change a Black-and-White Picture to Color in PowerPoint
- How to Use Speaker Notes in PowerPoint
- Edit Music, Sound, or Other Audio Settings in PowerPoint
- How to Hide and Unhide a Slide in PowerPoint
- How to Print PowerPoint Slides
- Create a Wedding PowerPoint Presentation
- How to Create a Slideshow With Google Photos
- How to Add Audio to PowerPoint
- How to Make a PowerPoint Presentation
How to Name a Slide in PowerPoint

If you’re creating a PowerPoint presentation, it’s crucial to give each slide a descriptive and concise name to help with organization and navigation. In this article, we’ll explore the importance of slide naming and provide tips for choosing effective names, common mistakes to avoid, and strategies for automating the process.
Table of Contents
Why Slide Naming is Important in PowerPoint Presentations
Slide naming helps you keep track of your content and structure, making it easier to navigate your presentation both during and after creation. It allows you to quickly find the slide you need, and also helps your audience engage more effectively with your content.
Additionally, slide naming can also improve the accessibility of your presentation. By giving each slide a descriptive and unique name, individuals with visual impairments who use screen readers can better understand the content on each slide. This can make your presentation more inclusive and accessible to a wider audience.
Best Practices for Naming Slides in PowerPoint
When naming your slides, it’s important to keep it short and to the point. Try to use descriptive words that are both relevant and memorable to your audience. Avoid using jargon or overly technical language, as this can be off-putting for your viewers.
Also, consider creating a consistent naming convention to make it easier for your audience to follow along. For example, you may want to use numbers to indicate the order of your slides, or use specific prefixes to group slides together.
Another important consideration when naming your slides is to ensure that the titles accurately reflect the content of each slide. This will help your audience to quickly understand the purpose of each slide and how it fits into the overall presentation. Additionally, you may want to consider using action-oriented titles that clearly communicate the key message or takeaway from each slide.
Finally, it’s important to review and revise your slide names as needed. As you develop your presentation, you may find that certain slide names no longer accurately reflect the content or that new slides need to be added. By regularly reviewing and updating your slide names, you can ensure that your presentation remains clear, concise, and easy to follow.
Understanding the Structure of a Slide Name in PowerPoint
Typically, a slide name should consist of between 1-3 words that succinctly describe the content on the slide. It’s important to keep in mind that the slide name will be visible to both the presenter and the audience, so aim for clarity above all else.
Another important consideration when creating slide names is to ensure that they are consistent throughout the presentation. This helps to create a sense of cohesion and makes it easier for the audience to follow along. Additionally, using a consistent naming convention can also make it easier for the presenter to navigate the presentation and find specific slides quickly.
Finally, it’s worth noting that slide names can also be used to provide context and guide the audience through the presentation. For example, if you are presenting a series of case studies, you could use slide names to indicate which case study is being discussed on each slide. This can help to keep the audience engaged and ensure that they are following along with the presentation.
Tips for Choosing Effective Slide Names in PowerPoint
Here are some tips to help you choose effective slide names:
- Think about your audience: What language and terminology will they be familiar with?
- Identify what’s most important: Focus on the main point or takeaway for each slide rather than trying to include every detail.
- Consider the “so what?” factor: Why is this slide important to the overall message of your presentation? Make sure your slide name reflects this.
- Make it memorable: Consider using catchy phrases or rhetorical questions to make your slide names stand out.
Another important factor to consider when choosing slide names is the length. Keep your slide names short and concise, ideally no more than 3-5 words. This will make it easier for your audience to quickly understand the content of each slide and follow along with your presentation. Additionally, try to use active verbs in your slide names to make them more engaging and impactful.
Common Mistakes to Avoid When Naming Slides in PowerPoint
Here are some common mistakes to avoid when naming your slides:
- Using vague or general names like “Overview” or “Introduction”.
- Being too wordy or complicated.
- Using irrelevant or confusing keywords.
- Not using a consistent naming convention across all slides.
However, there are other mistakes that you should also avoid when naming your slides. One of them is using abbreviations or acronyms that are not commonly known or understood by your audience. This can lead to confusion and make it difficult for your audience to follow your presentation.
Another mistake to avoid is using names that are too similar to each other. This can make it hard to differentiate between slides and can cause confusion for both you and your audience. It is important to use names that are unique and descriptive of the content on each slide.
How to Use Keywords in Slide Names for Better SEO Performance
Adding relevant keywords to your slide names can help your presentation perform better in search engine results, making it easier for people to find and engage with your content. If you’re creating a presentation for a website or online publication, be sure to research relevant search terms and incorporate them into your slide names.
It’s important to note that while adding keywords to your slide names can improve your SEO performance, it’s also important to avoid overusing them. Keyword stuffing can actually harm your search engine rankings and make your content appear spammy. Instead, focus on using keywords naturally and in a way that accurately reflects the content of your presentation.
In addition to using keywords in your slide names, you can also optimize your presentation for SEO by including relevant alt text for images, using descriptive titles and meta descriptions, and ensuring that your content is high-quality and valuable to your audience. By taking these steps, you can improve your search engine rankings and attract more traffic to your presentation.
Creating a Consistent and Easy-to-Follow Naming Convention for Slides in PowerPoint
To create a consistent naming convention for your slides, you may want to start by identifying specific prefixes or suffixes that make sense for your presentation. These could include numbers for slide order, or specific letters or abbreviations to differentiate between sections or topics within your presentation.
Another important aspect to consider when creating a naming convention for your slides is to keep it simple and easy to follow. Avoid using complex or lengthy names that may confuse your audience or make it difficult for you to navigate through your presentation. Additionally, make sure to use a consistent naming convention throughout your entire presentation to maintain clarity and organization.
How to Rename and Reorder Slides in Your Presentation
If you need to rename or reorder slides, PowerPoint makes it easy to do so. Simply select the slide you want to rename, right-click on the name in the slide navigation pane, and choose “Rename Slide”. From there, you can type in the new slide name. To reorder slides, simply drag and drop them to the desired position in the slide navigation pane.
It’s important to note that when you rename a slide, any hyperlinks or references to that slide within your presentation will also need to be updated. This can be done manually, or you can use PowerPoint’s “Update Links” feature to automatically update all links and references to the renamed slide.
Automating the Process of Naming Slides in PowerPoint Using Macros and Add-ins
If you’re creating a large presentation with many slides, you may want to consider automating the process of slide naming. PowerPoint allows you to create macros and add-ins that can help streamline the process. These can be created using VBA (Visual Basic for Applications) or other programming languages.
One benefit of automating slide naming is that it can save you a significant amount of time. Instead of manually typing in slide names for each slide, you can use a macro or add-in to automatically generate names based on the content of the slide. This can be especially useful if you’re working on a tight deadline or have a large number of slides to create.
Another advantage of using macros and add-ins for slide naming is that it can help ensure consistency across your presentation. By using a standardized naming convention, you can make it easier for your audience to follow along and understand the flow of your presentation. This can also help you stay organized and keep track of your content more easily.
Examples of Great Slide Names for Different Types of Presentations
Here are some examples of great slide names for different types of presentations:
- For a business presentation: “Key Performance Indicators” or “Sales Projections”
- For an educational presentation: “Evolution of the Universe” or “The Civil Rights Movement”
- For a creative presentation: “The Art of Typography” or “Music and Emotion”
Collaborating on Slide Naming with Your Team or Co-Authors
If you’re working on a presentation with a team or co-authors, it’s important to establish a clear naming convention from the outset. This can help ensure consistency across all slides, and prevent confusion or duplication of effort down the line.
Using Descriptive Phrases and Adjectives to Make Your Slide Names More Engaging
Consider using descriptive phrases and adjectives to add more depth and interest to your slide names. For example, instead of “Sales Statistics”, you could use “Impressive Sales Statistics that will Blow Your Mind”. Just be careful not to go overboard – keep your slide names concise and relevant.
The Impact of Good Slide Names on Audience Engagement and Retention
Choosing effective slide names can make a big impact on how engaged your audience is throughout your presentation. By using clear, descriptive names, you can give your audience a better idea of what to expect from each slide, and keep them focused on your message. Additionally, studies have shown that providing visual and textual reinforcement of information can improve retention rates, so choosing the right slide names can be an important part of this process.
Conclusion: Mastering the Art of Slide Naming in PowerPoint
Naming your slides is a small but critical part of creating a great presentation. By following the tips and best practices outlined here, you’ll be able to create effective, clear, and engaging names for all of your slides. Remember to keep it short and to the point, and use descriptive language that reflects the most important information on each slide. Happy presenting!
By humans, for humans - Best rated articles:
Excel report templates: build better reports faster, top 9 power bi dashboard examples, excel waterfall charts: how to create one that doesn't suck, beyond ai - discover our handpicked bi resources.
Explore Zebra BI's expert-selected resources combining technology and insight for practical, in-depth BI strategies.

We’ve been experimenting with AI-generated content, and sometimes it gets carried away. Give us a feedback and help us learn and improve! 🤍
Note: This is an experimental AI-generated article. Your help is welcome. Share your feedback with us and help us improve.


- Get started with computers
- Learn Microsoft Office
- Apply for a job
- Improve my work skills
- Design nice-looking docs
- Getting Started
- Smartphones & Tablets
- Typing Tutorial
- Online Learning
- Basic Internet Skills
- Online Safety
- Social Media
- Zoom Basics
- Google Docs
- Google Sheets
- Career Planning
- Resume Writing
- Cover Letters
- Job Search and Networking
- Business Communication
- Entrepreneurship 101
- Careers without College
- Job Hunt for Today
- 3D Printing
- Freelancing 101
- Personal Finance
- Sharing Economy
- Decision-Making
- Graphic Design
- Photography
- Image Editing
- Learning WordPress
- Language Learning
- Critical Thinking
- For Educators
- Translations
- Staff Picks
- English expand_more expand_less
PowerPoint - Presenting Your Slide Show
Powerpoint -, presenting your slide show, powerpoint presenting your slide show.

PowerPoint: Presenting Your Slide Show
Lesson 12: presenting your slide show.
/en/powerpoint/printing/content/
Introduction
Once your slide show is complete, you'll need to learn how to present it to an audience. PowerPoint offers several tools and features to help make your presentation smooth, engaging, and professional.
Optional: Download our practice presentation .
Watch the video below to learn more about presenting your slide show.
Presenting a slide show
Before presenting your slide show, you'll need to think about the type of equipment that will be available for your presentation. Many presenters use projectors during presentations, so you might want to consider using one as well. This allows you to control and preview slides on one monitor while presenting them to an audience on another screen.
To start a slide show:
There are several ways you can begin your presentation:

To advance and reverse slides:
You can advance to the next slide by clicking your mouse or pressing the spacebar on your keyboard. You can also use the arrow keys on your keyboard to move forward or backward through the presentation.
You can also hover your mouse over the bottom-left and click the arrows to move forward or backward.

To stop a slide show:
You can exit presentation mode by pressing the Esc key on your keyboard. You can also click the Slide Show Options button in the bottom-left and select End Show .

The presentation will also end after the last slide . You can click the mouse or press the spacebar to return to Normal view.

Presentation tools and features
PowerPoint provides convenient tools you can use while presenting your slide show. For example, you can change your mouse pointer to a pen or highlighter to draw attention to items in your slides. In addition, you can jump around to slides in your presentation or access other programs from your taskbar if needed.
To show the taskbar:
Sometimes you may need to access the Internet or other files and programs on your computer during your presentation. PowerPoint allows you to access your taskbar without ending the presentation.
- Locate and select the Slide Options button in the bottom-left corner.

Slide options
You can also access any of the menu items above by right-clicking anywhere on the screen during your slide show.

To skip to a nonadjacent slide:
You can jump to slides out of order if needed.

- The selected slide will appear.
To access drawing tools:
Your mouse pointer can act as pen or highlighter to draw attention to items in your slides.
- Locate and select the Pen Tools button in the bottom-left corner.

You can also use the laser pointer feature to draw attention to certain parts of your slide. Unlike the pen and highlighter, the laser pointer will not leave markings on your slides. To use the laser pointer, select it from Pen Tools, or press and hold the Ctrl key and the left mouse button.

To erase ink markings:

When you end a slide show, you'll also have the option to Keep or Discard any ink annotations made during your presentation. If you keep ink markings, they'll appear as objects on your slides in Normal view.

Presenter view
If you're presenting your slide show with a second display—like a projector—you can use Presenter view . Presenter view gives you access to a special set of controls on your screen that the audience won't see, allowing you to easily reference slide notes , preview the upcoming slide , and much more.
To access Presenter view:
Start your slide show as you normally would, then click the Slide Options button and select Presenter View . You can also press Alt+F5 on your keyboard to start the slide show in Presenter view.

Click the buttons in the interactive below to learn more about using Presenter view.

End Slide Show
Click here to end the presentation.
Display Settings
From here, you can customize your d isplay settings , including the option to duplicate—or mirror—the slide show on two screens and swap the monitors if Presenter view is appearing on the wrong screen.
Show Taskbar
Click here to show the taskbar and access other programs without closing the presentation.
Here, you can see how long you've been giving the presentation. You can also pause and restart the timer if necessary.
Current Slide
This is the current slide being shown to the audience.
Slide Options
Here, you can access the same slide options you would find in normal presentation mode, including the Pen Tools and See All Slides buttons.
Advance and Reverse Slides
Use the arrows to move forward and backward through your presentation.
Here, you'll see any speaker notes for the current slide. You can use the Increase and Decrease buttons below to make the notes larger or smaller.
Here, you can preview the next slide that will appear in the presentation.
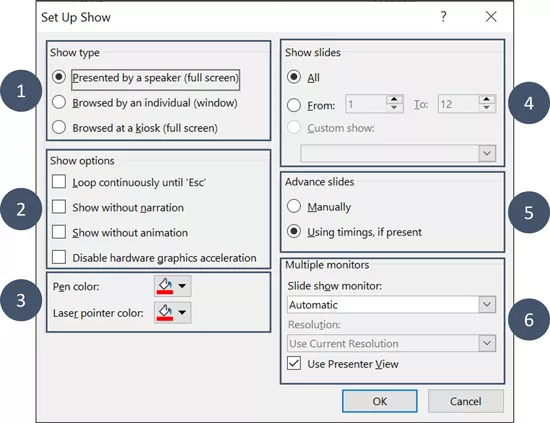
Slide show setup options
PowerPoint has various options for setting up and playing a slide show. For example, you can set up an unattended presentation that can be displayed at a kiosk and make your slide show repeat with continuous looping.
To access slide show setup options:

- The Set Up Show dialog box will appear. From here, you can select the desired options for your presentation.
Click the buttons in the interactive below to learn about various options for setting up and playing a slide show.

Here, you can choose a show type .
Show Options
Here, you choose playback settings and disable certain features if desired.
Show Slides
Here, you can choose which slides you want to show during the presentation. All is selected by default, but you can choose to show only certain slides or use any custom shows you have created from your original presentation.
Advance Slides
If you have set timings in your slide show, they will play automatically. However, if you want to disable the timings and control the slides yourself, select Manually .
Multiple Monitors
If you have more than one monitor, you can choose which one to display the slide show on. It's usually best to leave this setting on Automatic .
To advance slides automatically, you'll need to customize the slide timing on the Transitions tab. Review our lesson on Applying Transitions to learn how.

- Open our practice presentation .
- In the Set Up Slide Show options, change the pen color to purple.
- Start your slideshow, then access Presenter view .
- Advance to slide 8.
- Use the pen tool to circle the fundraising amounts for the 2015-2016 school year. These are the amounts over the green bars.

/en/powerpoint/lists/content/
Blog > 10 creative Ideas for your Title- and End-Slides in Presentations
10 creative Ideas for your Title- and End-Slides in Presentations
11.13.19 • #powerpointtips #presentation.
Of all the slides in a PowerPoint presentation, the ones that are without a doubt the most important ones are the first and the last one. It makes perfect sense – the title slide sets the general tone. Make it boring and you’ll loose your audience’s attention within the first few minutes. If you’re making it exciting and innovative on the other hand, you’re taking a big step towards giving an amazing presentation and having an engaged audience. It is very similar with the final slide. It will be the one that people are going to remember most, the one that is supposed to make people leave the room thinking ‘Wow! What a great presentation!’ A bad ending could even mess up what would otherwise be a good performance overall (just think of a good TV show with a bad ending…).
The most common mistakes for title and final slides
If you asked 100 people what belongs on your PowerPoint’s title slide, the majority would answer ‘The title, maybe a subtitle, the presenter’s name and company, the date’. That kind of title slide is alright, but you usually say all of these things in the beginning of a presentation anyway. Also, it is very likely that most of your attendees know these things – they usually signed up for it after all. So what’s the point in listing all of that information on your title slide, when you could also use it for making a stunning first impression? Not only the title slide is commonly designed in an uncreative and conventional way. Too often, you can see PowerPoint presentations ending with the ‘Any Questions?’ or even worse – the ‘Thank you for your attention’ slide. ‘Thank you for your attention’ is a set phrase that has been said so many times it can’t possibly be delivered in an authentic way anymore. Therefore, it’s better to think of something else for your grand final. Finding an unconventional ending that suits your presentation style makes you seem much more charismatic and authentic than using an empty phrase.

1. An inspiring quote
An inspiring quote on your slide is a perfect way to both start and finish your presentation. Well, it does not have to be inspiring. It could be any quote that is somehow connected to your presented topic. Just have fun looking through books and the internet to find interesting quotes that you want your audience to hear. Good pages to look at for inspiration are goodreads and brainyquotes.com .

2. A blank slide
This might seem strange to some people, but a blank slide can be really powerful if you want to have your audience’s full attention. You can use the advantage of blank slides by incorporating them at the beginning, in the end or even in between your regular slides. You can either use a blank slide of your regular template (so there will still be some design elements on it) or go all in and make the slide completely black (or white).
3. A call to action
If the goal of your presentation is to really make your audience act in some kind of way, there is no better way to start – or better yet end your presentation than with a call to action. This can be literally anything from little trivial things like “Drink enough water during the presentation so your brain stays intact!” – which will lighten up the mood – to more serious calls like “Help reducing waste by recycling whenever possible!”.

4. A question
Usually, it is the audience that asks questions after a presentation. However, you can also turn that around and ask your attendees instead. However, it’s important to ask a question that can be answered easily and individually – the best questions involve previous experiences and personal opinions (asking about facts or questions that are hard to understand can often lead to silence and no one wanting to answer).

5. An interactive poll
Nothing engages the audience like a live poll. Conduct one right at the beginning to get everybody envolved, and/or wait until the end to get your audience’s opinion on something. Icebreaker polls are the perfect way to start, as they lighten the mood. You can easily create polls for free with interactive software tools such as SlideLizard .

6. A funny picture, meme, or quote
I’m pretty sure that every student nowadays has that teacher that just tries a little too hard to be cool by throwing in a meme on literally every single slide. That may be a bit too much. But just a little comedy at the beginning or in the end can make you seem very charismatic and entertaining and catch the attention of your listeners. Open (or close) with a joke, a funny picture or a quote – whichever you feel comfortable with. It is usually best if it has something to do with the topic you’re presenting.

7. An interesting fact
Catch the audience’s attention by putting an interesting fact concerning the topic on one of your slides – ideally at the beginning, but maybe also in the end (to keep up the audience’s interest even after the presentation is done).

8. The title, but with a twist
If you feel like you need to put the presentations name/topic on the front slide, but still want that little creative twist, just change the title slightly. According to what I’m proposing, rather dull presentation titles like e.g. “Marine Biology – An Introduction to Organisms in the sea” can be transformed to “Marine Biology – Diving Deep” (or something less cheesy if you prefer). Make it either funny or over-the-top spectacular and catch the audience’s attention!

9. A bold statement, opinion, or piece of information
This is probably the best way to capture your audience from the beginning on. Start with a radical, crazy opinion or statement and then get your attendees hooked by telling them that during the presentation, they will learn why you’re right. It could be anything, really, as long as it goes well with your presented topic – from the statement “Everybody has the time to read 5 books a month” to “Going to college is a waste of time” or “The human species is not the most intelligent on earth” – Take whatever crazy, unpopular theory or opinion you have, throw it out there and (very important!) explain why you’re right. You’ll have your audience’s attention for sure and might even change some of their opinions about certain things.

10. No title and end slide at all
Yes, that’s a possibility as well. If you absolutely can’t think of any creative or otherwise good way to start and end your presentation – even after reading the tips mentioned above – then simply don’t. That’s right - no title and end slide at all. You can pull that of by simply introducing yourself in the beginning, then getting right into the topic (which makes a good impression, long introductions are usually rather tedious) and when you’re at your last slide just saying a simple ‘Goodbye, thank you and feel free to ask questions’.
Related articles
About the author.

Pia Lehner-Mittermaier
Pia works in Marketing as a graphic designer and writer at SlideLizard. She uses her vivid imagination and creativity to produce good content.

Get 1 Month for free!
Do you want to make your presentations more interactive.
With SlideLizard you can engage your audience with live polls, questions and feedback . Directly within your PowerPoint Presentation. Learn more
Top blog articles More posts

Create advanced Chart Animations in PowerPoint

The future of presenting: SlideLizard's AI-based functions

Get started with Live Polls, Q&A and slides
for your PowerPoint Presentations
The big SlideLizard presentation glossary
.ppsx file extension.
A ppsx file is a presentation file. When you open the file the slide show opens and not the editing mode like in ppt files.
Slide Layouts
PowerPoint has different types of Slide Layouts. Depending on which type of presentation you make, you will use more or less different slide layouts. Some Slide Types are: title slides, section heading slides, picture with caption slides, blank slides.
Audience Demographics
Audience Demographics are the characteristics of listeners like age, gender, cultural backgrounds, group affiliations and educational level. The speaker has to consider all these characteristics when adapting to an audience.
Verbal Communication
Communication is verbal if it includes talking with other people. This can be face-to-face but also over the telephone or via Skype
Be the first to know!
The latest SlideLizard news, articles, and resources, sent straight to your inbox.
- or follow us on -
We use cookies to personalize content and analyze traffic to our website. You can choose to accept only cookies that are necessary for the website to function or to also allow tracking cookies. For more information, please see our privacy policy .
Cookie Settings
Necessary cookies are required for the proper functioning of the website. These cookies ensure basic functionalities and security features of the website.
Analytical cookies are used to understand how visitors interact with the website. These cookies help provide information about the number of visitors, etc.
Critical PowerPoint Shortcuts – Claim Your FREE Training Module and Get Your Time Back!
How to Present a PowerPoint Slideshow (w/ Shortcuts)
- PowerPoint Tutorials
- Shortcuts & Hacks
- May 11, 2019
There are a variety of ways to start a PowerPoint presention, depending on:
- Where you start your presentation (from beginning or from current)
- Which PowerPoint view you prefer to present in (Slide Show view or Presenter view)
- How comfortable you are with keyboard shortcuts
Why would Microsoft include so many ways to present a presentation? My guess is that everyone learns PowerPoint differently, and has personal presentation styles. The more options you have, the easier your life will be as there will always be a way to start your presentation the way you want to (or jump back into it when you need to).
See all the options below and find the method that works best for you and let the slide show begin !
NOTE: If you are running two presentations side-by-side, each presentation needs to be started as it’s own slide show. To see how to set up two PowerPoint presentations to run side-by-side like this before you start your slide show, read my guide here .
Table of Contents
Start slide show from beginning.

To start a slideshow from the beginning of your presentation using the ribbon, simply.
- Navigate to the Slide Show tab
- Select From Beginning
Selecting From Beginning starts your presentation from the very first non-hidden slide in your presentation, regardless of which slide you are currently inside of your deck.

You can also start your slide from the beginning of your presentation by hitting the Slideshow From Beginning keyboard shortcut, F5 .
Regardless of which method you use, this is the classic way to start your presentation in full screen from your first title slide (regardless of where you are in your slide deck).
Let the slide show begin!
NOTE: To expand your knowledge and learn how to use PowerPoint’s FREE and HIDDEN built-in laser pointer to point things out during your presentation, read my guide here .
Take your PPT skills to the next level
Start slide show from current.

To begin your slide show from the slide you are currently on using the ribbon, simply
- Navigate to the Slide Show tab
- Select From Current Slide
Selecting From Current Slide starts your slide show from whatever slide you are currently on, even if the slide is hidden.

You can also start your slide from the current slide you are on by hitting the Shift+F5 keyboard shortcut.
Because it’s often easiest to catch errors when building your slides in this full screen mode, I highly recommend learning the Shift+F5 shortcut and using it frequently as you build your slides to spot them for errors.

If you don’t want to bother learning the From Current Slide shortcut, you can also start your slideshow by clicking the Slide Show icon at the bottom of your screen.
This is a fantastic way to spot check your slides as you are building them. On top of that, it’s a fast and uncomplicated way to re-start your presentation from where you left off after demoing something on screen.
Start a mini-slide show in PowerPoint
You can also use the following hidden PowerPoint shortcut to run a mini slide show over the top of your current deck.

To run a mini slide show, simply:
- Hold down the Alt key on your keyboard
- With your mouse, click the Slide Show icon
Doing so starts a small slide show of your presentation that you can see below, from the current slide you are on.

Presenter View
The Presenter View is an alternate way to run your presentation in PowerPoint. In this view, your slides are projected on screen, and the details of your presentation are displayed on your computer as pictured below.

The presenter view includes your next (non-hidden) slides that is coming up, your current slide projected on screen, how long you’ve been talking and your speaker notes.

To launch the Presenter View from the beginning of your presentation using your Ribbon, simply:
- Navigate to the Slide Show tab
- Hold down the Alt key on your keyboard
- Click From Beginning
Holding down the Alt key and clicking From Beginning , the Presenter View will launch from the very first (non-hidden) slide in your presentation.

You can also launch the presenter view from the beginning of your presentation at any time by clicking Alt + F5 on your keyboard.
Start Presenter View in PowerPoint From Current Slide

Did you know that you can access different views in PowerPoint by adding keys as you click commands in the PowerPoint ribbon?
To start the Presenter view from your current slide using your Ribbon, simply:
- Hold down the Alt key on your keyboard
- Click From Current Slide
Holding the Alt key and clicking From Current Slide launches the Presenter View from your current slide. So, this is another way you can quickly practice your presentation, see your speaker notes and see what’s coming up next.
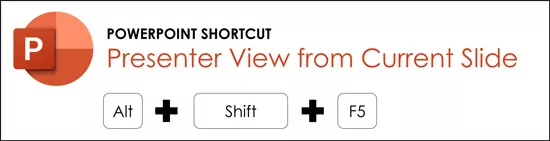
You can also launch the Presenter View from the beginning of your presentation at any time by hitting Alt+F5 on your keyboard.
Showing and Hiding Presenter View
Regardless of which view you start your PowerPoint slide show; you can switch between the two different slide show views without exiting presentation.

To switch between the two slideshow views (while giving your presentation), simply:
- Right-click your slide in whichever presentation view you are currently in
- Select either Show Presenter View or Hide Presenter View
When would you use a feature like this during a presentation? One example is if you want to view your notes without leaving the slide show mode.
NOTE: The letter r for both Show Presenter View and Hide Presenter View is underlined. This means that it is a keyboard shortcut. So, if you want to quickly flip between these two presentation views, you can simply right-click your slide and hit the letter r on your keyboard. Doing so automatically switches the view you are in.
Controlling how your presentation runs
Another way to control how your presentation runs (including the default laser pointer and pen color), is the Set Up Slide Show dialog box.

To open the Set Up Slide Show dialog box, simply:
- Select the Set Up Slide Show command
Doing so, opens all your PowerPoint slide show settings and options as pictured below.
Inside the slide show settings dialog box, you can select:
- How your presentation runs (full screen, window or in kiosk mode).
- Your default pen and laser pointer color options ( see our laser pointer article here ).
- Which slide you want start from, or which slides you want to show. You can also setup a custom show here.
- How your slides progress (manually or using slide timings).
- Which of your computer monitors (or screens) your slide show runs on.
The Set Up Slide Show dialog box is also the secret to running multiple presentations at the same time in PowerPoint. To expand your knowledge and learn how to set this up, read our guide here .
Setup Slide Show SECRET Shortcut

To use the SECRET shortcut to open the Set Up Slide Show dialog box, simply:
- Hold down the Shift key on your keyboard
- With your mouse, click the Reading View icon at the bottom of your screen
This is useful when you need to quickly cycle through lots of PowerPoint presentations and change how those presentations run. Instead of wasting time clicking through the Ribbon, simply hold the Shift key and click the Reading View icon. This is also a friendly conversation starter with a fellow PowerPoint enthusiast at Happy Hour.
NOTE: The color of your Reading View icon might be different than in the picture above, as it is dependent on the Office Theme you selected for PowerPoint.
How to exit a PowerPoint presentation early?

Regardless of how you start your full screen presentation, you can end your presentation at any time by hitting the Esc key on your keyboard.
Hitting Esc immediately takes you out of the PowerPoint presentation mode and back to the normal editing view of your slides, on whatever slide you were last presenting.
Here is how you can use a combination of all the different keyboard shortcuts to spot check and practice your presentation in full screen before you finalize your presentation.
- Hit F5 on your keyboard to start your presentation in full screen from the very first slide in your presentation. You can then use your arrow keys to advance, spot checking your slides for errors.
- When you find an error, simply hit Esc key to return to the normal PowerPoint editing view to fix your slide.
- When you are done, hit Shift + F5 to return the full screen presentation mode from the slide you just updated. You can then continue spot checking your presentation (without having to start over from the beginning).
In this way you can quickly work your way through your slides and practice your presentation, fixing and adjusting your content as you go.
Understanding how to run your presentations is CRITICAL to the success of your presentation. Not only in presenting them live, but also in knowing how to spot check your slides as you build them.
I personally find it easiest to spot check your slides and quickly fix errors by running your presentation in slide show mode (or full screen). The last place you want to discover an error is during your presentation.
Using the commands and shortcuts above, you can quickly start, exit and step back into your slide show. Once you have these commands and features down, you will also look like a whiz during your presentations.
If you enjoyed the depth of this article, you will love our other PowerPoint training courses and free resources. To learn more, visit us here .
🔒 Unlock the PowerPoint Shortcuts Trusted by Industry Leaders KKR, American Express, HSBC, and More!
Join over 114,880 professionals from diverse fields including consulting, investment banking, advertising, marketing, sales, and business development who have supercharged their PowerPoint game with our proven methods.
✅ Customize compelling presentations effortlessly.
✅ Master time-saving techniques for faster deck creation.
✅ Boost your career prospects with top-notch PowerPoint skills.
Get FREE access to the Critical PowerPoint Shortcuts module of our premium training course by entering your name and email below.
DISCLAIMER: PC Users Only!
We respect your privacy and will keep your info safe and confidential.
Related Articles
About the author.

Popular Tutorials
- How to Strikethrough Text (l̶i̶k̶e̶ ̶t̶h̶i̶s̶) in Word, Excel & PowerPoint
- How to Make Animated Fireworks in PowerPoint (Step-by-Step)
- Strikethrough Shortcut (l̶i̶k̶e̶ ̶t̶h̶i̶s̶) for Word, Excel & PowerPoint
- How to Create a Flash Card Memory Game in PowerPoint (Like Jeopardy)
- Keyboard Shortcuts Not Working: Solved
PowerPoint Tutorial Categories
- Strategies & Opinions
- Presentation Design
- Pictures, Icons, Videos, Etc.
- New Features
- Miscellaneous
- Charts & Data Viz
We help busy professionals save hours and gain peace of mind, with corporate workshops, self-paced courses and tutorials for PowerPoint and Word.
Work With Us
- Corporate Training
- Presentation & Template Design
- Courses & Downloads
- PowerPoint Articles
- Word Articles
- Productivity Resources
Find a Tutorial
- Free Training
- For Businesses
We help busy office workers save hours and gain peace of mind, with tips, training and tutorials for Microsoft PowerPoint and Word.
Master Critical PowerPoint Shortcuts – Secure Your FREE Training Module and Save Valuable Time!
⌛ Master time-saving expert techniques.
🔥 Create powerful presentations.
🚀 Propel your career to new heights.
We value your privacy – we keep your info safe.
Discover PowerPoint Hacks Loved by Industry Giants - KKR, AmEx, HSBC!
Over 114,880 professionals in finance, marketing and sales have revolutionized their PPT skills with our proven methods.
Gain FREE access to a full module of our premium PowerPoint training program – Get started today!
We hate spam too and promise to keep your information safe.
You are currently viewing a placeholder content from Facebook . To access the actual content, click the button below. Please note that doing so will share data with third-party providers.
- Start the presentation and see your notes in Presenter view Article
- Add speaker notes to your slides Article
- Rehearse and time the delivery of a presentation Article
- Record a slide show with narration and slide timings Article
- Print your PowerPoint slides, handouts, or notes Article
- Create a self-running presentation Article
Record a slide show with narration and slide timings
You can record your PowerPoint presentation—or a single slide—and capture voice, ink gestures, and your video presence. When completed, it’s like any other presentation. You can play it for your audience in a Slide Show or you can save the presentation as a video file. So, instead of just “handing the deck” to someone, people can see your presentation with the passion and personality intact.
A new feature for Microsoft 365 was rolled out in early 2022. Exactly when your business has this feature is also based on when your admin distributes new features in Microsoft 365.
This article contains procedures for both the new experience and the classic experience:
New experience
Classic experience

All recording tools are in the Record tab in the ribbon, but you can start by selecting the Record button.

You can also record by selecting one of the options in the Record section of the Record tab.

If you have notes in your presentation, they’re turned into text at the top of the screen so you can use them like a teleprompter as you record.
Tip: Use the auto-scroll feature in teleprompter and set it to scroll at your preferred speed.

There are several options you can use when you record a presentation. You can turn your camera and microphone on or off by selecting the icons at the top. There are several options you can use when you record a presentation. You can turn your camera and microphone on or off by selecting the icons at the top. To change your camera or microphone, choose the Select more options <···> icon. You can even add a customizable camera that can be resized, repositioned, and formatted to go with your slide content. Select Edit , then select Cameo . Adjust the formatting for the camera, then select Record again to return to the recording environment.
In the Select the camera mode menu, you can select Show Background or Blur Background .

You can also change the layout in the Views menu to switch between Teleprompter , Presenter View , or Slide View .

When you’re ready, select Start recording and a countdown will begin.
Use the onscreen laser, colored pens, or highlighters in the tray below markup slides and it’ll record as well.
To record narration for a specific slide, use the previous or next arrows.
Note: Narration won’t record during slide transitions so let those play first before you start speaking.
Pause the recording as needed or select Stop if you’re done.
To review the video, select the Play button.
To quickly delete and re-record your video on current slide or on all slides, select Delete . While Clear will delete the recorded narration, Reset to Cameo additionally replaces the recorded narration with the camera feed for an easy retake.

When you’re done, select Export > Export Video .
After you successfully export the video, you can view the video by selecting View and share video .

At any time, you can return to your document by selecting the Edit button.
Want more?
About Record in PowerPoint
Create a self-running presentation
Export or turn your presentation into a video
Classic experience
Turn on the Recording tab of the ribbon: On the File tab of the ribbon, click Options . In the Options dialog box, click the Customize Ribbon tab on the left. Then, in the right-hand box that lists the available ribbon tabs, select the Recording check box. Click OK .

To get ready to record, select Record on either the Recording tab or the Slide Show tab of the ribbon.
Clicking the upper half of the button starts you on the current slide.
Clicking the lower half of the button gives you the option to start from the beginning or from the current slide.

(The Clear command deletes narrations or timings, so be careful when you use it. Clear is grayed out unless you have previously recorded some slides.)
The slide show opens in the Recording window (which looks similar to Presenter view), with buttons at the top left for starting, pausing, and stopping the recording. Click the round, red button (or press R on your keyboard) when you are ready to start the recording. A three-second countdown ensues, then the recording begins.

The current slide is shown in the main pane of the Recording window.
You can stop the recording any time by pressing Alt + S on your keyboard.
Navigation arrows on either side of the current slide allow you to move to the previous and next slides.
PowerPoint for Microsoft 365 automatically records the time you spend on each slide, including any Animate text or objects steps that occur, and the use of any triggers on each slide.
You can record audio or video narration as you run through your presentation. The buttons at the lower-right corner of the window allow you to toggle on or off the microphone, camera, and camera preview:

If you use the pen, highlighter, or eraser, PowerPoint records those actions for playback also.

If you re-record your narration (including audio and ink), PowerPoint erases your previously recorded narration (including audio and ink) before you start recording again on the same slide.
You can also re-record by going to Slide Show > Record .
You can pick a pointer tool (pen, eraser, or highlighter) from the array of tools just below the current slide. There are also color selection boxes for changing the color of the ink. ( Eraser is grayed out unless you have previously added ink to some slides.)
To end your recording, select the square Stop button (or press S on your keyboard).
When you finish recording your narration, a small picture appears in the lower-right corner of the recorded slides. The picture is an audio icon, or, if the web camera was on during the recording, a still image from the webcam.

The recorded slide show timing is automatically saved. (In Slide Sorter view, the timings are listed beneath each slide.)
In this process, what you record is embedded in each slide, and the recording can be played back in Slide Show. A video file is not created by this recording process. However, if you need one, you can save your presentation as a video with a few extra steps.
Preview the recorded slide show
On the Slide Show tab, click From Beginning or From Current Slide .
During playback, your animations, inking actions, audio and video will play in sync.

Preview the recorded sound
In the Recording window, the triangular Play button near the top left corner lets you preview the recording of the slide that currently has the focus in that window.

In Normal view, click the sound icon or picture in the lower-right corner of the slide, and then click Play . (When you preview individual audio in this way, you won't see recorded animation or inking.)

You can pause playback while previewing the audio.
Set the slide timings manually
PowerPoint for Microsoft 365 automatically records your slide timings when you add narrations, or you can manually set the slide timings to accompany your narrations.
In Normal view, click the slide that you want to set the timing for.
On the Transitions tab, in the Timing group, under Advance Slide , select the After check box, and then enter the number of seconds that you want the slide to appear on the screen. Repeat the process for each slide that you want to set the timing for.
If you want the next slide to appear either when you click the mouse or automatically after the number of seconds that you enter—whichever comes first—select both the On Mouse Click and the After check boxes.
You can use manual slide timings to the trim the end of a recorded slide segment. For example, if the end of a slide segment concludes with two seconds of unnecessary audio, simply set the timing for advancing to the next slide so that it happens before the unnecessary audio. That way you don't have to re-record the audio for that slide.
Delete timings or narration
The Clear command is for deleting timings or narration from your recording that you don't want or that you want to replace.
In the Recording window, the Clear command in the top margin of the window allows you to:
Clear recordings on the current slide
Clear recordings on all slides
In Normal view, there are four different Clear commands that allow you to:
Delete the timings on the currently selected slide
Delete the timings on all slides at once
Delete the narration on the currently selected slide
Delete the narration on all slides at once
If you do not want to delete all the timings or narration in your presentation, open a specific slide that has a timing or narration that you do want to delete.
On the Recording tab of the PowerPoint for Microsoft 365 ribbon, on the Record Slide Show button, click the down arrow, point to Clear , and then choose the appropriate Clear command for your situation.

Turn off timings or turn off narrations, and ink
After you've recorded your PowerPoint for Microsoft 365 presentation, any timings, gestures, and audio you performed are saved on the individual slides. But you can turn them all off if you want to view the slide show without them:
To turn off recorded slide timings: On the Slide Show tab, clear the Use Timings box.
To turn off recorded narrations and ink: On the Slide Show tab, clear the Play Narrations box.
Publish the recording to share it with others
Once you've edited the recording to your satisfaction, you can make it available to others by publishing to Microsoft Stream.
With the presentation open, on the Recording tab, select Publish to Stream .
Type a title and a description for the video.
Set other options, including whether you want others in your organization to have permission to see the video.
Select the Publish button.
The upload process can take several minutes, depending on the length of the video. A status bar at the bottom of the PowerPoint window tracks the progress, and PowerPoint shows a message when the upload is finished:

Click the message to go directly to the video playback page on Microsoft Stream.
Create closed captions
To make your video more accessible by including closed captions, choose from these options, which are described in separate Help articles:
Manually write a closed caption file yourself
Get a closed-caption file automatically generated by Microsoft Stream
Once you have a closed-caption file, you can add it to your video file by using PowerPoint .
Record a slide show
With your presentation open, on the Slide Show tab, click Record Slide Show .
(The Clear command deletes narrations or timings, so be careful when you use it. Clear is grayed out unless you have previously recorded some slides.)
In the Record Slide Show box, check or clear the boxes for your recording, and click Start Recording .

More about these options:
Slide and animation timings : PowerPoint automatically records the time you spend on each slide, including any animation steps that occur, and the use of any triggers on each slide.
Narrations, ink, and laser pointer: Record your voice as you run through your presentation. If you use the pen, highlighter, eraser, or laser pointer, PowerPoint records those for playback as well.
Important: Pen, highlighter, and eraser recording are available only if you have the February 16, 2015 update for PowerPoint 2013 or a later version of PowerPoint installed. In earlier versions of PowerPoint, pen and highlighter strokes are saved as ink annotation shapes.
At the top left corner of the window is the Recording toolbar, which you can use to:

If you re-record your narration (including audio, ink, and laser pointer), PowerPoint erases your previously recorded narration (including audio, ink, and laser pointer) when you start recording again on the same slide.
You can also re-record by going to Slide Show > Record Slide Show .
To use ink, eraser, or the laser pointer in your recording, right-click the slide, click Pointer options , and pick your tool:
Laser Pointer
Highlighter
Eraser (This option is grayed out unless you have previously added ink to some slides.)
To change the color of the ink, click Ink Color .
To end your recording, right-click the final slide, and click End Show .
Tip: When you finish recording your narration, a sound icon appears in the lower-right corner of each slide that has narration.
The recorded slide show timings are automatically saved. Timings are shown in Slide Sorter view just beneath each slide.
In this process, what you record is embedded in each slide, and the recording can be played back in Slide Show. A video file is not created by this recording process. However, if you want a video file, you can save your presentation as a video with a few extra steps.
On the Slide Show tab, click From Beginning or From Current Slide.
During playback, your animations, inking actions, laser pointer, audio and video play in sync.
Preview the recorded audio
In Normal view, click the sound icon in the lower-right corner of the slide, and then click Play.
PowerPoint automatically records your slide timings when you add narrations, or you can manually set the slide timings to accompany your narrations.
On the Transitions tab, in the Timing group, under Advance Slide , select the After check box, and then enter the number of seconds indicating how long the slide should appear on the screen. Repeat the process for each slide that you want to set the timing for.
Tip: If you want the next slide to appear either when you click the mouse or automatically after the number of seconds that you enter—whichever comes first—select both the On Mouse Click and the After check boxes.
The Clear command is for deleting timings or narration from your recording that you don't want or that you want to replace. There are four different Clear commands that allow you to:
On the Slide Show tab of the PowerPoint ribbon, on the Record Slide Show button, click the down arrow, point to Clear, and then choose the appropriate Clear command for your situation.
Turn off timings or turn off narrations, ink, and laser pointer
After you've recorded your PowerPoint presentation, any timings, gestures, and audio you performed are saved on the individual slides. But you can turn them all off if you want to view the slide show without them:
To turn off recorded narrations, ink, and the laser pointer: On the Slide Show tab, clear the Play Narrations box.
Turn your mouse into a laser pointer
Animate text or objects
Turn your presentation into a video
Create a self-running presentation
Record your presentation

Toggle video and audio options in the options dropdowns in the recording toolbar.

Note: Your video will be re-recorded just as you had styled.
After you exit Recording Studio with the Esc key (or by clicking End show ) you will see narration (audio/video) applied to your slide along with the proper slide timings and ink animations.
Tip: Audio, video, and inking elements can all be resized and moved in edit view after recording.

Reset to Cameo
To delete your recording and retain your camera style, do the following:
On the Record tab, select Reset to Cameo .

Clear timings or narration
On the Record tab, select Clear Recording

Keyboard shortcuts during the recording process
Related information.
Present with Cameo
Save a presentation as a movie file or MP4
Record audio in PowerPoint for Mac
Add or delete audio in your presentation
Prepare to record
To begin, open the presentation you want and click the Slide Show tab.
Tip: If your presentation has a lot of slides, you might find it more convenient to work in Slide Sorter view. Click View > Slide Sorter to try it out.
Here are some things to check before you begin recording:
If you want to record only part of your slide deck, do one of the following before you begin:
Select the slides you don't want to include, and click Hide Slide .
Click Custom Show > Custom Slide Show > + (add).

Use the Rehearse button to change the timing between slides without affecting the narration or gestures you've already recorded.

Make sure your microphone is set up correctly. On the Mac, go to System Preferences > Sound .
Record your slide show
If you want to add narration or commentary to the slide show, make sure your microphone is set up and working.
To start recording:
Click the Slide Show tab, select the slide where you want the recording to begin, and then click Record Slide Show .

During recording, use Ctrl+click to access the recording commands that let you navigate through the slides, change cursors, or trigger screen blackouts or whiteouts.

Click End Show to stop recording.
A Save dialog box appears. Click Yes to save your recording, or No if you want to record it again.
Saving overwrites anything you've previously recorded. If you want to record another slide show with the same set of slides, save your presentation file with a different name.
Click Play from Start to preview your recording.
You may want to print this list of keyboard shortcuts to refer to while you're recording:
Set playback options
When you've finished recording and are ready to distribute the presentation, click Set up Slide Show and choose the options that are right for your audience.

Show type Show full screen or windowed.
Show options Turn off narration or animations.
Slides Choose a subset of slides, or a Custom show if you've set one up.
Advance slides Set up this version of the slide show so someone can page through it manually.
Add, change, or remove transitions between slides
Start the presentation and see your notes in Presenter view
We're sorry. PowerPoint for the web doesn't support recording a slide show.

Need more help?
Want more options.
Explore subscription benefits, browse training courses, learn how to secure your device, and more.

Microsoft 365 subscription benefits

Microsoft 365 training

Microsoft security

Accessibility center
Communities help you ask and answer questions, give feedback, and hear from experts with rich knowledge.

Ask the Microsoft Community

Microsoft Tech Community

Windows Insiders
Microsoft 365 Insiders
Was this information helpful?
Thank you for your feedback.
Home / Guides / Citation Guides / How to Cite Sources / How to Cite a PowerPoint Presentation in APA, MLA or Chicago
How to Cite a PowerPoint Presentation in APA, MLA or Chicago
Let’s be honest: Sometimes the best information for a paper comes straight from a professor’s PowerPoint presentation. But did you know that source needs to be cited?
Whether you’re making use of your instructor’s lecture materials or pulling information from a Powerpoint found online, you need to make sure to cite your sources if you use information from it in a project or paper.
Here’s a run -t hrough of everything this page includes:
- Cite a PowerPoint Presentation in MLA format
- Cite a PowerPoint Presentation in APA format
- Cite a PowerPoint Presentation in Chicago Style
By now, you’re probably familiar with how to cite websites, books or journal articles, but not as knowledgeable about how to cite a Powerpoint presentation. In actuality, citing PowerPoint presentations aren’t all that different from citing written materials, so don’t let yourself be phased! It’s not too hard and compiling an MLA works cited or APA reference page doesn’t take too long—each one should take just a few minutes to create.
To help you with the process, we’ve put together a handy guide demonstrating how to cite a PowerPoint presentation in three commonly used citation styles: MLA, APA and Chicago.
Let’s start by looking for basic information you’ll need for the citation.
Information you may need to cite a PowerPoint Presentation:
- Author or authors of the presentation
- Presentation title
- Date of publication/presentation
- Place of publication/where the presentation was given
- URL (if used to locate the presentation)
Cite a PowerPoint Presentation in MLA format:
MLA format citation structure:
Author Last Name, First Name. Presentation Title. Month Year, URL. PowerPoint Presentation.
Example citation :
Park, Lisa. Effective Working Teams . Jan. 2011, https://www.company.meetings/teams. PowerPoint Presentation.
In-text citation structure:
(Last Name)
Example in-text citation:
Cite a PowerPoint Presentation in APA format:
APA reference structure:
Author or Presenter Last Name, Middle Initial. First Initial. (Date of publication). Title of presentation [PowerPoint presentation]. Conference Name, Location. URL
Example reference:
Park, L. (2011, March 24-28). Effective working teams [PowerPoint presentation]. Regional Dairy Workers National Conference, New York, NY, United States. https://www.company.meetings/teams
Cite a PowerPoint Presentation in Chicago Style:
Chicago citation structure:
Author Last Name, First Name. “Presentation Title.” Lecture, Location of Lecture, Month Day, Year.
Example citation:
Park, Lisa. “Effective Working Teams.” Lecture, The Plaza Hotel, New York, NY, January 11, 2011.
Troubleshooting
Solution #1: how to cite a powerpoint that has multiple authors..
For a presentation with multiple authors, list the authors alphabetically by last name for the full reference citation. The citation will list each author by Last Name, First Initial.
If the PowerPoint has just two authors, separate them with a comma and an ampersand (&). If the PowerPoint has more than two authors, list the authors separated by commas.
Reference examples:
Felner, D., & Nguy, A. (2021 April 10-12). The history of Claymation [Slideshow]. Animation Now, Los Angeles, CA, United States.
Felner, D., Nguy, A., Becham, G. (2021 April 10-12). The history of Claymation [Slideshow]. Animation Now, Los Angeles, CA, United States.
For an in-text citation for two authors, give both surnames separated by an ampersand (&) followed by a comma and the year of publication or presentation.
For an in-text citation for three or more authors, list the first author’s surname followed by “et al.” followed by a comma and the year of publication or presentation.
In-text citation examples:
(Felner & Nguy, 2021)
(Felner et al., 2021)
For a PowerPoint with two presenters or authors, include both names in the full works-cited citation. The names need to be written as follows: First presenter’s Last Name, First Name, and then the second presenter’s First Name and Last Name.
For an in-text citation, simply list the surnames of both presenters.
In-text citation example:
(Nguy and Felner)
Work-cited entry example:
Nguy, Anna and Dominic Felner. The History of Claymation. Apr. 2021. PowerPoint Presentation.
For a PowerPoint with three or more presenters, only list one presenter’s name followed by a comma and “et al.”
For an in-text citation for three or more authors or presenters , list the surname given in the full works-cited citation followed by “et al.”
(Nguy et al.)
Nguy, Anna et al. The History of Claymation. Apr. 2021. PowerPoint Presentation.
Solution #2 How to cite a slideshow that wasn’t made with PowerPoint
If making a full works-cited citation for a slideshow that was made with another program other than PowerPoint, include the medium in brackets instead of PowerPoint.
If the presentation is not in PowerPoint, and you can’t determine what software was used, include the word “slideshow” in brackets in place of PowerPoint.
Nguy, A. (2021 April 10-12). The history of Claymation [Prezi presentation]. Animation Now, Los Angeles, CA, United States.
Nguy, A. (2021 April 10-12). The history of Claymation [Slideshow]. Animation Now, Los Angeles, CA, United States.
The in-text citation will be formatted like any other APA in-text citation (author last name, year).
(Nguy, 2021)
At the end of your full works-cited citation, include the program the slideshow was made with, formatted as: ______ Presentation.
If you are uncertain of the program used, end your citation with “slideshow” followed by a period. Nguy, Anna. The history of Claymation. Apr. 2021. Prezi Presentation. Nguy, Anna. The history of Claymation . Apr. 2021. Slideshow.
The in-text citation will be formatted like any other MLA in-text citation (author last name).
Hello all paper writers! Take a moment to try our spell checker , or refresh your knowledge on English basics with our EasyBib grammar guides ! Discover a determiner definition , learn what is an adverb , review an interjection list , and more.
Updated April 26, 2021.
Citation Guides
- Annotated Bibliography
- Block Quotes
- Citation Examples
- et al Usage
- In-text Citations
- Page Numbers
- Reference Page
- Sample Paper
- APA 7 Updates
- View APA Guide
- Bibliography
- Works Cited
- MLA 8 Updates
- View MLA Guide
How useful was this post?
Click on a star to rate it!
We are sorry that this post was not useful for you!
Let us improve this post!
Tell us how we can improve this post?
To cite PowerPoint presentation slides, include the author name, year/date of presentation, the title, the source description, the website and/or university name, and the URL where the source can be found.
If the PowerPoint presentation is not accessible to the reader, cite the slides as personal communication.
If you want to cite a PowerPoint in MLA or APA style, you need to have basic information including the name of the author(s), title of the presentation, date and place of publication, and URL. For in-text citations, you need to include only the author name(s) in MLA style and author name(s) and year in APA style.
APA in-text citations
(Author Surname, publication year)
(Dhanalakshmi, 2004)
MLA in-text citations
(Author Surname)
(Dhanalakshmi)
Citation Basics
Harvard Referencing
Plagiarism Basics
Plagiarism Checker
Upload a paper to check for plagiarism against billions of sources and get advanced writing suggestions for clarity and style.
Get Started
Top searches
Trending searches

solar eclipse
25 templates

16 templates

12 templates

18 templates

41 templates

thanksgiving
38 templates
Create your presentation
Writing tone, number of slides.

AI presentation maker
When lack of inspiration or time constraints are something you’re worried about, it’s a good idea to seek help. Slidesgo comes to the rescue with its latest functionality—the AI presentation maker! With a few clicks, you’ll have wonderful slideshows that suit your own needs . And it’s totally free!

Generate presentations in minutes
We humans make the world move, but we need to sleep, rest and so on. What if there were someone available 24/7 for you? It’s time to get out of your comfort zone and ask the AI presentation maker to give you a hand. The possibilities are endless : you choose the topic, the tone and the style, and the AI will do the rest. Now we’re talking!
Customize your AI-generated presentation online
Alright, your robotic pal has generated a presentation for you. But, for the time being, AIs can’t read minds, so it’s likely that you’ll want to modify the slides. Please do! We didn’t forget about those time constraints you’re facing, so thanks to the editing tools provided by one of our sister projects —shoutouts to Wepik — you can make changes on the fly without resorting to other programs or software. Add text, choose your own colors, rearrange elements, it’s up to you! Oh, and since we are a big family, you’ll be able to access many resources from big names, that is, Freepik and Flaticon . That means having a lot of images and icons at your disposal!

How does it work?
Think of your topic.
First things first, you’ll be talking about something in particular, right? A business meeting, a new medical breakthrough, the weather, your favorite songs, a basketball game, a pink elephant you saw last Sunday—you name it. Just type it out and let the AI know what the topic is.
Choose your preferred style and tone
They say that variety is the spice of life. That’s why we let you choose between different design styles, including doodle, simple, abstract, geometric, and elegant . What about the tone? Several of them: fun, creative, casual, professional, and formal. Each one will give you something unique, so which way of impressing your audience will it be this time? Mix and match!
Make any desired changes
You’ve got freshly generated slides. Oh, you wish they were in a different color? That text box would look better if it were placed on the right side? Run the online editor and use the tools to have the slides exactly your way.
Download the final result for free
Yes, just as envisioned those slides deserve to be on your storage device at once! You can export the presentation in .pdf format and download it for free . Can’t wait to show it to your best friend because you think they will love it? Generate a shareable link!
What is an AI-generated presentation?
It’s exactly “what it says on the cover”. AIs, or artificial intelligences, are in constant evolution, and they are now able to generate presentations in a short time, based on inputs from the user. This technology allows you to get a satisfactory presentation much faster by doing a big chunk of the work.
Can I customize the presentation generated by the AI?
Of course! That’s the point! Slidesgo is all for customization since day one, so you’ll be able to make any changes to presentations generated by the AI. We humans are irreplaceable, after all! Thanks to the online editor, you can do whatever modifications you may need, without having to install any software. Colors, text, images, icons, placement, the final decision concerning all of the elements is up to you.
Can I add my own images?
Absolutely. That’s a basic function, and we made sure to have it available. Would it make sense to have a portfolio template generated by an AI without a single picture of your own work? In any case, we also offer the possibility of asking the AI to generate images for you via prompts. Additionally, you can also check out the integrated gallery of images from Freepik and use them. If making an impression is your goal, you’ll have an easy time!
Is this new functionality free? As in “free of charge”? Do you mean it?
Yes, it is, and we mean it. We even asked our buddies at Wepik, who are the ones hosting this AI presentation maker, and they told us “yup, it’s on the house”.
Are there more presentation designs available?
From time to time, we’ll be adding more designs. The cool thing is that you’ll have at your disposal a lot of content from Freepik and Flaticon when using the AI presentation maker. Oh, and just as a reminder, if you feel like you want to do things yourself and don’t want to rely on an AI, you’re on Slidesgo, the leading website when it comes to presentation templates. We have thousands of them, and counting!.
How can I download my presentation?
The easiest way is to click on “Download” to get your presentation in .pdf format. But there are other options! You can click on “Present” to enter the presenter view and start presenting right away! There’s also the “Share” option, which gives you a shareable link. This way, any friend, relative, colleague—anyone, really—will be able to access your presentation in a moment.
Discover more content
This is just the beginning! Slidesgo has thousands of customizable templates for Google Slides and PowerPoint. Our designers have created them with much care and love, and the variety of topics, themes and styles is, how to put it, immense! We also have a blog, in which we post articles for those who want to find inspiration or need to learn a bit more about Google Slides or PowerPoint. Do you have kids? We’ve got a section dedicated to printable coloring pages! Have a look around and make the most of our site!

Forget PowerPoint: This is the AI presentation app of the future
I t’s tough to think of two words that seem more at odds with each other than “beautiful” and “presentation.” I mean, have you seen a PowerPoint slide deck lately?
That disconnect is something Mitch Grasso’s been grappling with for years. In fact, it wouldn’t be a stretch to describe it as motivating his life mission at this point—to achieve the impossible-seeming feat of turning mundane digital presentations into something both beautiful to behold and enjoyable to create.
“‘I love PowerPoint’ is not something you hear a lot of people say,” Grasso deadpans. “People hate PowerPoint, and they’re always frustrated . . . but it’s not really PowerPoint that’s the problem.”
Grasso firmly believes the issue is less the tool itself and more the process it puts you through—something that applies equally, he says, to Google Slides and other PowerPoint alternatives. And that’s why he’s come up with a web-based and native desktop presentation platform called Beautiful.ai , which he describes as the “anti-PowerPoint.”
This is actually Grasso’s second stab at solving the presentation puzzle. In 2007, he founded SlideRocket , a startup he sold to VMware a few years later. But before you jump to conclusions, hang on a sec: While his latest creation does sport two increasingly common letters at the end of its name, Beautiful.ai isn’t yet another rushed-out generative AI also-ran. Beautiful.ai has been around for nearly a decade now. And the seeds of its soul stretch back to Grasso’s earlier creation, when he first started exploring how presentations could be reinvented.
As someone who’s used the service for a while, let me tell you: Even if you’re late to the Beautiful.ai party, you’ll be very glad you got there.
The Beautiful.ai presentation philosophy
The first thing you notice when you get into Beautiful.ai is almost shocking: The service is, dare I say it, actually delightful to use. Grasso really did identify an area ripe for reinvention: Beautiful.ai takes all the typical pain points out of presentation creation and turns it into a simple process that’s surprisingly swift and pleasant.
The crux of the whole experience revolves around Beautiful.ai’s intelligent algorithms for helping you find the best way to format and design whatever type of presentation you’re building. If you’re starting from a blank slate, the app gives you a handful of suggested themes to get things going—motifs like “Minimal,” “Classic,” “Bold,” and even “Cheeky.” Or, if you’d rather, you can pick from a library of starter templates for everything from sales pitch presentations to marketing reports and all sorts of other common company needs.
But it’s once you get into the presentation that the magic really becomes apparent.
With each new slide you create, Beautiful.ai encourages you to pick from a sprawling menu of common slide design frameworks, all of which are available as part of the service’s $144-a-year Pro-level subscription (which includes a 14-day free trial). You could use simple text boxes, for instance, or a fancy photo grid. You could build all sorts of data-centric charts and visual info representations. You could create a timeline graphic of a company’s journey, with key moments highlighted along the way. Or you could give yourself blueprints for org charts, quote showcases, team member introductions, and even slick-looking product screenshots—all with a single click.
And then, as you’re working on slides, Beautiful.ai intelligently adapts the design at every step along the way—putting formatting on “autopilot,” as Grasso describes it. As you add additional elements, the software instantly shifts other elements around and makes everything look good—with virtually no time or effort required. You absolutely can take control and customize things as you see fit, if the urge strikes, but in my experience, very little adjustment needs to be done.
This automation is where the AI in Beautiful.ai’s name comes into play. While AI has now colloquially come to be understood as involving generative chatbot-like technology—à la ChatGPT or Google Gemini —Grasso latched onto the term in the pre-GPT days, when it referenced all manners of algorithm-driven adaptation.
“I was less concerned with the set of technologies that were behind us and more about the experience of automating and influencing the way your presentations are created,” he says.
It’s something the Beautiful.ai team has come to refer to as “design AI,” a fancy way of referencing the logic surrounding how elements on the screen are automatically laid out and optimized for you as you work. And that’s the most important value Beautiful.ai provides. It’s what drew me to the service a few years ago and has kept me coming back to it ever since.
Reimagining the ‘AI’ element
As simple as it already was to start a new Beautiful.ai presentation, the relatively recent addition of generative AI into the service adds even more convenience into the equation, for anyone wanting to go down that path.
Now, I don’t want to overhype it: This part of the service is probably its least unique and useful element. But it works admirably well as an extra option, and it presents some intriguing possibilities for going beyond the standard gen-AI capabilities present in so many tools these days.
When creating a new Beautiful.ai presentation, for instance, you can now opt to start by providing a plain-text description of what you need—”a presentation on the workplace transformation and the future of work,” “an investor pitch deck for a Series A SaaS company in the B2C FinTech space,” or “a board deck for Q1 revenue, growth, and new customers,” to use a few of the service’s sample prompts. Beautiful.ai will then pull in publicly available data and build a complete presentation for you. You’ll almost certainly need to edit and refine it, but you’ll start with something , at least—and you might just find a fair amount of your legwork finished before you even begin.
You can also provide extra context for training the AI around your specific info and data—by uploading a file, referencing a web link, or pasting in text—and once you’re in the midst of editing a presentation, you can click a special AI button to summon tools for generating text, shortening or lengthening text, and rewriting text to all sorts of other specifications.
The beauty, though—as it were—is how this is just a first step with Beautiful.ai. It’s what happens next , with the software’s design smarts, that makes it all matter.
“Generative AI is great for getting you started,” Grasso explains. “But the continued editing and the continued manipulation of the content that it’s created is the important part and why we’ve continued to be successful.”
Grasso says only about 20% of the service’s one-million-plus users are regularly accessing the generative AI features, but their presence alongside the public fascination with AI at the moment has absolutely led lots of new people to find Beautiful.ai lately. The service’s active user base increased three times over in 2023, in what Grasso describes as an “unprecedented” level of growth. And many of those explorers have ended up sticking around for the long haul—not because of the generative AI elements, Grasso believes, but because of Beautiful’s longer-standing central advantages.
“It made us more powerful kind of overnight and added this great functionality, but it doesn’t really change the core reason for why Beautiful exists,” Grasso says. “You can’t just wrap ChatGPT in an interface and call it a day.”
That realization makes Grasso especially optimistic about Beautiful.ai’s future, even at a time when the term “AI” is getting tossed around endlessly and everyone from Microsoft and Google to smaller startups are experimenting with inserting extra smarts into presentation software.
“What it really comes down to: Is it something that you’re going to use again and again and [that] really provides value?” Grasso asks. “And at least so far . . . I haven’t really seen that so much from the competitors yet.”
Grasso is focused next on both expanding Beautiful.ai’s generative AI capabilities even further and finding other places where the service’s approach could be beneficial—whether that’s within documents or other visual creations where design and knowledge work intersect.
“Productivity is about making people more productive [and] making their work beautiful, whether that means how they work or the output of their work,” he says. “And there are a lot of opportunities to take this technology that we’ve been perfecting over the last half dozen or so years and apply it to these other mediums.”
For now, Grasso is content with the knowledge that he’s building on the dream he’s been chasing since 2007 and—for the moment, at least—leaving tech’s traditional presentation titans in the dust behind him.
Discover all sorts of exceptional tech tools with my free Cool Tools newsletter at The Intelligence . You’ll get a new off-the-beaten-path treasure in your inbox every Wednesday!

How-To Geek
Forget the powerpoint app for animations, use powerpoint for the web instead.
The PowerPoint app animation pane can be... a pain!
Quick Links
Why the powerpoint app is bad for animations, why powerpoint for the web is much better, tips for using animations in powerpoint for the web.
Using PowerPoint's animations increases your presentation's professionalism and helps you to emphasize certain elements within your slides. However, compared to the online version of PowerPoint, the animation pane in the Microsoft 365 app is confusing, unclear, and difficult to manage.
The main drawback of the animation pane on the Microsoft 365 PowerPoint app is its lack of clarity. When you add animations, you are offered a mixture of symbols and icons that—unless you're a seasoned PowerPoint expert—are confusing and unclear.
As you can see in the screenshot below, there are numbers and vague icons to the left of each animation, and different colored boxes in varying positions to the right. And if you have animations grouped together, you have to click on the gray bar to see them individually.
What's more, to make changes to the animation—such as the timing or the type of effect—you have to click on the drop-down box and then decide which is the best option (from the many available) to take you where you want to go.
It's also not immediately clear exactly what each animation is when you glance at the animation pane—you have to take the time to hover over the animation in the pane or click on the description to remind yourself of what you've chosen for each element on your slide. And when you do, you're only given minimal details.
Finally, all of the above confusions become even worse if you have dozens of animations on each slide.
It seems that Microsoft recognized that the Animation Pane in the app was substandard, so they took the opportunity to improve these features in the web-based version of the program.
First, you don't have to decode the confusing symbols and icons anymore. The words On Click have replaced the mouse icon, the name of the animation (in this case, Fly In) has replaced the colored star icon, and the duration of the animation is also displayed (in the app version, you'd have to go through two clicks to find this important information). Microsoft has also done away with the pointless colored boxes that were supposed to tell you the timing sequence of the animations.
However, the best feature of the web-based workflow is that you can click on any of the animations in the Animation Pane to view more details, so viewing and changing your animation options is much easier than in the app.
After you've clicked on an animation in the Animation Pane, you can:
- See and change the animation type.
- Decide whether the animation should appear when you click or after a certain time following the previous animation.
- Change the animation duration
- Add a delay.
In the app-based version of PowerPoint, these options were all accessible via a lottery of drop-down options and dialog boxes, so the PowerPoint for the web's Animation Pane saves you time and presents everything to you much more clearly.
It's also much easier to add more than one animation to an item when using the web version of PowerPoint. Simply select the element you want to add another animation to, and click "Add" at the top of the Animation Pane. Likewise, you can easily delete an existing animation by clicking the trash icon next to the relevant item in the Animation Pane.
To animate an item that doesn't already have animations, just select the item on your slide and the same "Add" button will become active for you to click.
Overall, the web-based interface is much more user-friendly and a huge improvement on the PowerPoint app, especially when it comes to using the Animation Pane.
We have a few quick tips to know when you start using animations.
Reorder Your Animations
To reorder your animations in the Animation Pane, click and drag the animation card up or down via the six dots next to the relevant animation.
View More Animations
By default, the Animation Pane offers some of the more commonly-used entrance animations when you want to animate an item. However, to see more animations, click "View More Animations," which will show more entrance, exit, and emphasis animations.
Animate Items Together
To apply the same animation to multiple items on your slide, click the first item, hold Ctrl, and then select the other items. Then, click "Add" in the Animation Pane, and choose the animation you want to use. When you present your slideshow, all the items you selected will appear, exit, or be emphasized in the same way and at the same time.
Now that you can master animations on PowerPoint for the web, check out these PowerPoint tips to make sure your presentation is professional and easy for your audience to follow.
IMAGES
VIDEO
COMMENTS
Click Slide Show, Set Up Show and check the box for Loop continuously until ESC. Run the slide show, on Section 1 slide click the object to start the pictures, hit ESC when you're ready to go to the next Section, click to advance to Section Slide 2, click the object to start Custom Show 2, hit Esc when you're ready, repeat as needed. Thanks,
True. Study with Quizlet and memorize flashcards containing terms like A slide show is another name for a PowerPoint presentation., You easily can give slides in a presentation a professional and integrated appearance by using a placeholder., The default slide layouts are set up in portrait orientation. and more.
PowerPoint Show. When a PowerPoint is saved as a Show instead of a Presentation, then the file opens in slideshow mode. This completely bypasses the editor view and allows you to jump right into the presentation. This adds a touch of professionalism when presenting in a class, at a conference, in a department meeting, or to a board of directors.
Step-2: Select a Slide to Name from the "Outline view". After you have clicked on the " View " tab, click on the " Outline View " option which is located in the " Presentation Views " section of the " View " tab. Then, choose a slide to which you want to add a name. Step-3: Add a name to the slide.
Six steps for creating a slide show. 1. Plan your slide show. Before getting too deep into your slide show project, it's a good idea to select and save the photos and videos you want to use. This helps you create a slide show more efficiently and purposefully, ensuring a better outcome. 4.
PowerPoint Slideshow: A PowerPoint slideshow (PPT) is a presentation created on software from Microsoft that allows users to add audio, visual and audio/visual features to a presentation. It is considered to be a multimedia technology and also acts as a tool for collaboration and content sharing. PowerPoint is included in Microsoft Office, ...
Start by deciding whether to show the slideshow in a window or full screen. To set up the slideshow, select Slide Show > Set Up Slide Show and choose one of the following: Browsed by an individual (window): Run the slideshow automatically and inside a window. This option works best when you save the slideshow to a CD.
Understanding the Structure of a Slide Name in PowerPoint. Typically, a slide name should consist of between 1-3 words that succinctly describe the content on the slide. ... This can lead to confusion and make it difficult for your audience to follow your presentation. Another mistake to avoid is using names that are too similar to each other ...
Slide show setup options. PowerPoint has various options for setting up and playing a slide show. For example, you can set up an unattended presentation that can be displayed at a kiosk and make your slide show repeat with continuous looping. To access slide show setup options: Select the Slide Show tab, then click the Set Up Slide Show command.
To do that, simply go up to the Home tab and click on New Slide. This inserts a new slide in your presentation right after the one you were on. You can alternatively hit Ctrl+M on your keyboard to insert a new blank slide in PowerPoint. To learn more about this shortcut, see my guide on using Ctrl+M in PowerPoint.
7. An interesting fact. Catch the audience's attention by putting an interesting fact concerning the topic on one of your slides - ideally at the beginning, but maybe also in the end (to keep up the audience's interest even after the presentation is done). 8. The title, but with a twist.
A slide show is another name for a PowerPoint presentation. true. ... When you open a new presentation, a slide with the default ____ layout appears. title slide. You easily can give slides in a presentation a professional and integrated appearance by using a placeholder. false.
Click From Beginning. Holding down the Alt key and clicking From Beginning, the Presenter View will launch from the very first (non-hidden) slide in your presentation. You can also launch the presenter view from the beginning of your presentation at any time by clicking Alt + F5 on your keyboard.
a slide show is another name for a powerpoint presentation. True. Examples of how you can modify or format text include changing shape, size, color, and position on the slide. ... When making a presentation to an audience using PowerPoint, you use notes page view. False. The best starting point to developing a presentation is to.
In Normal view, click the slide that you want to set the timing for. On the Transitions tab, in the Timing group, under Advance Slide, select the After check box, and then enter the number of seconds that you want the slide to appear on the screen. Repeat the process for each slide that you want to set the timing for.
To cite PowerPoint presentation slides, include the author name, year/date of presentation, the title, the source description, the website and/or university name, and the URL where the source can be found. Author Surname, X. Y. (Year, Month Day). Title of the presentation [PowerPoint slides]. Publisher.
Upload your PPT file to a file sharing service (method #4) Use a slide hosting service (method #5) Upload your converted PPT-to-video file to YouTube (method #6) Once your file is uploaded to the cloud, then sharing it to the rest of the world wide web becomes a much simpler job.
Linking to Another Slide in the Same Presentation. Open your presentation and navigate to the slide that will contain the hyperlink. Once there, highlight the text, object, shape, or image to which you want to attach the link. Next, head over to the "Insert" tab and click the "Link" button. In the Insert Hyperlink window that opens ...
what specifies the arrangement of placeholders on a slide? layout. what's the default slide layout? title and content. how many standard layouts are included in the layout gallery? 9. what is a level within power point? how many levels does power point allow? position w/in structure that indicates magnitude of importance, 5. list three text ...
AI presentation maker. When lack of inspiration or time constraints are something you're worried about, it's a good idea to seek help. Slidesgo comes to the rescue with its latest functionality—the AI presentation maker! With a few clicks, you'll have wonderful slideshows that suit your own needs. And it's totally free!
We will also cover how to use Copilot to help you create amazing presentations, drafting presentations from scratch based on text prompts. Since its release late last year Microsoft 365 Copilot AI ...
With each new slide you create, Beautiful.ai encourages you to pick from a sprawling menu of common slide design frameworks, all of which are available as part of the service's $144-a-year Pro ...
The box on a slide that has a dotted or hatch-marked border and that contains the insertion point is a text ______. font. Text ______ defines the appearance and shape of letters, numbers, punctuation marks, and symbols. Title and Content. When you add a new slide following the title slide, PowerPoint uses the ____________ slide layout for the ...
Animate Items Together. To apply the same animation to multiple items on your slide, click the first item, hold Ctrl, and then select the other items. Then, click "Add" in the Animation Pane, and choose the animation you want to use. When you present your slideshow, all the items you selected will appear, exit, or be emphasized in the same way ...