
Suggestions

How To Make a Good PowerPoint Presentation for College

A must-unlock skill of every college student is creating PowerPoint presentations. Whether you’re a freshman, sophomore or senior, you’re sure to come across an assignment that requires you to create a PowerPoint presentation.
Not only does it help you impress lectures and get straight As on your transcript, but it is also key to thriving in the corporate world.
Creating PowerPoint presentations enables you to hone creativity, build public speaking abilities, improve body language and boost confidence. Those interpersonal qualities are required, not only in classes but also in workplaces.
The study says that 77% agree that presentation skills are crucial for one’s career success. It becomes a plus when you join a company. But, developing presentation skills doesn’t happen overnight. College years are an ideal time to build and hone this skill.
To start off, you can train yourself to create eye-catching and attention-grabbing slides for tasks and exams. Below are practical steps for doing a good PowerPoint presentation for college students.
1. Identify the key points
Before anything else, a good comprehension of the topic you want to deliver is necessary. Understanding your materials helps you be more confident when presenting and providing better slides.
Those who aren’t knowledgeable about the topic they talk about most likely put a long string of words, leading to wordy slides. However, if you comprehend the discussion well, you can put short phrases in bullet points.
Choose the points you want to elaborate in short phrases. If possible, rewrite them interestingly to capture audiences. The points are like cue cards that will assist you throughout the presentation.
2. Choose an interesting template
Never present PowerPoint with plain slides because it’s the first step to a boring performance. Besides, finding PowerPoint templates online is a piece of cake.
Many online platforms provide downloadable and free PowerPoint templates. Some websites to dive into are Slide Carnival, Powerpointify, Slides and AllPPT. They have various categories, such as education, technology, business, medical, etc.
For college students, choosing a template depends on the topic they cover and personal taste. The best and safest way to decide on a template is to stay simple. Aim for a simple template with a good color combination.
Moreover, mind the background of your slides. You should use the same background for the entire slide. Ensure that your background and font color are in good contrast to present clear and readable slides.
3. Write impactfully
Now that you’ve decided on the points you want to deliver, put them into slides. Spread your points and use bullet points if possible. You can also mark some slides to add images , graphs or tables later.
There are rules of thumb that students must be aware of when creating PowerPoint presentations. The overall idea is to keep your slides concise. Here are some points worth taking notes on.
- Include up to five points with a margin error (+/-2) on each slide.
- If possible, discuss only one idea per slide.
- Include up to 30 words per slide (6 – 8 lines).
- Use a simple and clean font, such as Montserrat, Verdana, Calibri, Bentham and Roboto
- Keep your font to a minimum 18-point size.
- Use active and concise language.
- A presentation with no more than 15 slides is preferable.
If you have segmented your points, continue your work by making your slides more captivating and engaging by adding visual aids.
4. Add visuals
It’s vital to have visual aids on your slides to emphasize points better and engage audiences effectively. Use related images, graphs or tables to support your points. You can also embed a video if needed.
Create a good balance of visual aids and text on your slide. Commonly, a slide with a visual representation only carries one idea written in short. Consider some points below when embedding visual aids on your slides:
- Use photos instead of clipart.
- Use high-quality photos.
- Avoid using watermarked photos.
- Don’t clutter images on a slide.
You can go to Unsplash and Freepik to search for free photos. Remember to add credit for your photos to inform audiences.
5. Edit and tidy up your slides
The next step is editing your slides and ensuring that all elements blend well. Pay attention to your slides, especially those with images, graphs or tables.
Check again in case you put too many words on them. Here are some guides on editing and tidying up your slides:
- Use consistent font type, size and color.
- Size text and images for a distance view.
- Limit the colors use to one to three colors.
- Ensure the background has good contrast with your font color.
6. Add transitions and do a final check
The final step to complete your PowerPoint is adding transitions such as entrance, emphasis, exit and motion paths. Adding transitions makes your slides more dynamic and helps emphasize points.
Some recommendations include Fade, Push, Cut, Cover and Uncover. Consider using one type of entrance transition to begin each slide. Add emphasis transition to highlight crucial points, images or other elements.
Using entrance and emphasis transitions is enough for a good educational presentation. Don’t overdo it because too much animation can be distracting for audiences. Lastly, run a final check before presenting it.
Final Thoughts
As college students are a step away from joining corporate life, having the skill to create a good PowerPoint presentation becomes vital.
Do rehearsals before presenting your PowerPoint slides to maximize your performance. Pen down some notes if necessary to support you during the zero hours. Lastly, train yourself to develop good speaking skills, body language and eye contact to captivate your audience.
Daniel Reed
Impressive insights into the importance of mastering PowerPoint presentations for college students! The article provides valuable tips that are not only applicable for academic success but also crucial for future professional endeavors.
The emphasis on understanding the key points, choosing engaging templates, and writing impactfully is fundamental for creating effective presentations. The suggestion to keep slides concise, use simple fonts, and maintain a good contrast between background and font colors enhances readability.
The inclusion of visuals, such as images, graphs, or tables, adds a dynamic element to the presentations. The recommendation to use high-quality photos from platforms like Unsplash and Freepik while giving due credit is a thoughtful touch.
The steps for editing and tidying up slides, including consistent font usage and color schemes, contribute to a polished and professional presentation. The guidance on adding transitions for a dynamic effect without overdoing it is practical.
Lastly, the reminder to do rehearsals and focus on speaking skills, body language, and eye contact underscores the holistic approach to effective presentations.
For those seeking further assistance or professional help in creating impactful PowerPoint presentations, I recommend checking out domypowerpoin.net for reliable services.
Thank you for sharing these comprehensive tips! They will undoubtedly benefit college students aiming for success in both academic and professional realms.
Leave a Reply
Your email address will not be published.
Save my name, email, and website in this browser for the next time I comment.
Don't Miss

The Parallels Between ‘The Talented Mr. Ripley’ and ‘Saltburn’

Dark Cafes and Big Yellow Taxis—The Everlasting World of Joni Mitchell

Who Are P1Harmony?

Shakespeare, ‘Coriolanus’ and ‘The Ballad of Songbirds and Snakes’
The impact of listening to indigenous voices in 2024 america.
Center for Teaching
Making better powerpoint presentations.
Print Version
Baddeley and Hitch’s model of working memory.
Research about student preferences for powerpoint, resources for making better powerpoint presentations, bibliography.
We have all experienced the pain of a bad PowerPoint presentation. And even though we promise ourselves never to make the same mistakes, we can still fall prey to common design pitfalls. The good news is that your PowerPoint presentation doesn’t have to be ordinary. By keeping in mind a few guidelines, your classroom presentations can stand above the crowd!
“It is easy to dismiss design – to relegate it to mere ornament, the prettifying of places and objects to disguise their banality. But that is a serious misunderstanding of what design is and why it matters.” Daniel Pink
One framework that can be useful when making design decisions about your PowerPoint slide design is Baddeley and Hitch’s model of working memory .
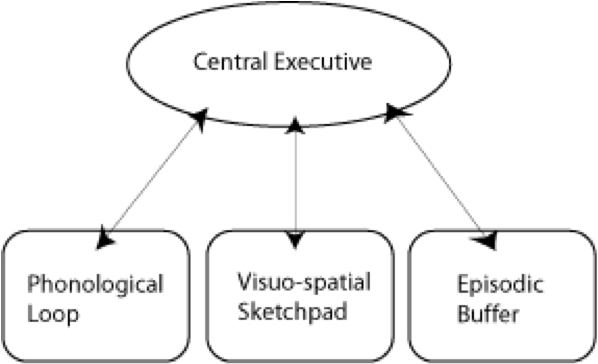
As illustrated in the diagram above, the Central Executive coordinates the work of three systems by organizing the information we hear, see, and store into working memory.
The Phonological Loop deals with any auditory information. Students in a classroom are potentially listening to a variety of things: the instructor, questions from their peers, sound effects or audio from the PowerPoint presentation, and their own “inner voice.”
The Visuo-Spatial Sketchpad deals with information we see. This involves such aspects as form, color, size, space between objects, and their movement. For students this would include: the size and color of fonts, the relationship between images and text on the screen, the motion path of text animation and slide transitions, as well as any hand gestures, facial expressions, or classroom demonstrations made by the instructor.
The Episodic Buffer integrates the information across these sensory domains and communicates with long-term memory. All of these elements are being deposited into a holding tank called the “episodic buffer.” This buffer has a limited capacity and can become “overloaded” thereby, setting limits on how much information students can take in at once.
Laura Edelman and Kathleen Harring from Muhlenberg College , Allentown, Pennsylvania have developed an approach to PowerPoint design using Baddeley and Hitch’s model. During the course of their work, they conducted a survey of students at the college asking what they liked and didn’t like about their professor’s PowerPoint presentations. They discovered the following:
Characteristics students don’t like about professors’ PowerPoint slides
- Too many words on a slide
- Movement (slide transitions or word animations)
- Templates with too many colors
Characteristics students like like about professors’ PowerPoint slides
- Graphs increase understanding of content
- Bulleted lists help them organize ideas
- PowerPoint can help to structure lectures
- Verbal explanations of pictures/graphs help more than written clarifications
According to Edelman and Harring, some conclusions from the research at Muhlenberg are that students learn more when:
- material is presented in short phrases rather than full paragraphs.
- the professor talks about the information on the slide rather than having students read it on their own.
- relevant pictures are used. Irrelevant pictures decrease learning compared to PowerPoint slides with no picture
- they take notes (if the professor is not talking). But if the professor is lecturing, note-taking and listening decreased learning.
- they are given the PowerPoint slides before the class.
Advice from Edelman and Harring on leveraging the working memory with PowerPoint:
- Leverage the working memory by dividing the information between the visual and auditory modality. Doing this reduces the likelihood of one system becoming overloaded. For instance, spoken words with pictures are better than pictures with text, as integrating an image and narration takes less cognitive effort than integrating an image and text.
- Minimize the opportunity for distraction by removing any irrelevant material such as music, sound effects, animations, and background images.
- Use simple cues to direct learners to important points or content. Using text size, bolding, italics, or placing content in a highlighted or shaded text box is all that is required to convey the significance of key ideas in your presentation.
- Don’t put every word you intend to speak on your PowerPoint slide. Instead, keep information displayed in short chunks that are easily read and comprehended.
- One of the mostly widely accessed websites about PowerPoint design is Garr Reynolds’ blog, Presentation Zen . In his blog entry: “ What is Good PowerPoint Design? ” Reynolds explains how to keep the slide design simple, yet not simplistic, and includes a few slide examples that he has ‘made-over’ to demonstrate how to improve its readability and effectiveness. He also includes sample slides from his own presentation about PowerPoint slide design.
- Another presentation guru, David Paradi, author of “ The Visual Slide Revolution: Transforming Overloaded Text Slides into Persuasive Presentations ” maintains a video podcast series called “ Think Outside the Slide ” where he also demonstrates PowerPoint slide makeovers. Examples on this site are typically from the corporate perspective, but the process by which content decisions are made is still relevant for higher education. Paradi has also developed a five step method, called KWICK , that can be used as a simple guide when designing PowerPoint presentations.
- In the video clip below, Comedian Don McMillan talks about some of the common misuses of PowerPoint in his routine called “Life After Death by PowerPoint.”
- This article from The Chronicle of Higher Education highlights a blog moderated by Microsoft’s Doug Thomas that compiles practical PowerPoint advice gathered from presentation masters like Seth Godin , Guy Kawasaki , and Garr Reynolds .
Presenting to Win: The Art of Telling Your Story , by Jerry Weissman, Prentice Hall, 2006
Presentation Zen: Simple Ideas on Presentation Design and Delivery , by Garr Reynolds, New Riders Press, 2008
Solving the PowerPoint Predicament: using digital media for effective communication , by Tom Bunzel , Que, 2006
The Cognitive Style of Power Point , by Edward R. Tufte, Graphics Pr, 2003
The Visual Slide Revolution: Transforming Overloaded Text Slides into Persuasive Presentations , by Dave Paradi, Communications Skills Press, 2000
Why Most PowerPoint Presentations Suck: And How You Can Make Them Better , by Rick Altman, Harvest Books, 2007

Teaching Guides
- Online Course Development Resources
- Principles & Frameworks
- Pedagogies & Strategies
- Reflecting & Assessing
- Challenges & Opportunities
- Populations & Contexts
Quick Links
- Services for Departments and Schools
- Examples of Online Instructional Modules

How to Create a PowerPoint Presentation for College Class

How to Do a Paper Review Presentation
Gone are the days when every professor demanded a term paper at the end of the semester. Now, many professors accept or even require you to create a PowerPoint presentation for the the class. Even if you know how to use the software program, it is especially important in college to put on a professional presentation.
Research your topic extensively. Using the Internet can be a good place to start, but you might also want to consult your school's library for more resources. Utilizing a wide variety of resources can ensure that your presentation is well-researched so that you can speak intelligently about your topic.
Write an outline for your presentation that includes all of the relevant information and speaking points you want to include. Thinking through your presentation ahead of time will make it easier to compose your slides. By writing the outline in a word processing application, you can copy and paste directly from your outline into PowerPoint.
Design your presentation in PowerPoint. Choose a professional and easy-to-read style for your presentation. On each slide, you should have a picture, a graphic or a few text points you want to emphasize. You should plan to speak for only 30 to 60 seconds on each slide, so don't try to cram too much information onto any one slide. Also, remember that you are the presenter and that you want your audience to focus on you and not the PowerPoint. The PowerPoint should serve only to enhance the presentation.
Rehearse your presentation. You should run through your presentation at least a few times before you present it for the class. It is important to stand and speak out loud when rehearsing. This helps you solidify what you will say, nail down your pacing and work out your transitions from slide to slide. If you have a few friends or family members willing to listen to your presentation, get them together for a dry run. This can help ease any anxiety you might have about presenting in front of the whole class.
Related Articles

Creative Presentation Ideas for Middle School

Dramatic Reading Speech Ideas

How to Ace Speech Class
How to structure a presentation.

How to Talk in My First Class Seminar

How To Write A Salutatorian Speech
Ideas for 4h posters.

How to Write a Conclusion for PowerPoint Presentation
- Bates College: Powerpoint Presentation Tips
- George Mason University: Creating an Effective PowerPoint Presentation
Collier Jackson has been writing professionally since 2010. Writing for various websites, he specializes in topics related to foreign languages, linguistics and Asian cultures. Jackson holds a Bachelor of Arts in Chinese from The Ohio State University.
🎁 Disc. 25% off for sevice special on Before Holiday Program Today! 🎁
#startwithpower
Our designers just create something for you. Show your love with downloading their works for free.
- Presentation Skill
How to Prepare an A+ College PowerPoint Presentation

Guest Writer
- Published on August 25, 2022

Table of Contents
How do we Prepare an A+ College PowerPoint Presentation?
College students have myriads of assignments, and creating a perfect PowerPoint Presentation is one of them. It is one major assignment that drops your grades if not properly done. PowerPoint isn’t only useful for college students. It is also an essential skill in the professional world. It boosts your critical thinking and writing skills. The experience in creating college PowerPoint presentations develops your public speaking. Also, you need to be painstaking in preparing your presentation. It should be engaging enough for your audience.
However, college Presentation slides are much better and easier to do than research works. It is an engaging and more fun task to do aside from research. You can consult a PowerPoint writing service. You can consult a PowerPoint writing service if you don’t know the appropriate way to do it, you can consult a PowerPoint writing service . They write to ensure all the rules and guidelines in your slides are met. They make sure the font size and color align with your concept. You do not have worries aside from you doing a thorough practice for your assignment.
Although, it is much easier than a research paper. You will still be faced with some challenges. To scale through that, this piece gives the necessary to make you do it like a professional.
Tips on how to prepare a college PowerPoint presentation
These tips entail steps to make a good PowerPoint Presentation for College. You must follow these actionable steps in detail to create a winning proposal.
1. Research the topic
You must conduct in-depth research before you start your college ppt. If it has the necessary sounds, but the information isn’t worthwhile, it’s more like you haven’t done anything. Make sure you do research on your local libraries, the internet, and any other source you can get vital information.
2. Keep track of the information
Make sure your researched information is presented orderly. Know which information is meant to come first and which to come last. You need to organize the information you’ve gathered for your topic. In every piece of information you gather, consider your audience. Know if it will resonate with them and answer your topic appropriately.
See also: The Ultimate Guide to 20 Introduction Ideas for Presentation That Work
3. Be creative about your presentation
The main reason you’re saddled with the responsibility of creating a PowerPoint is not to be either right or wrong. Regardless, you must be creative about it. Create unique designs that’ll surprise everyone and mesmerize your instructors. To ensure creativity, you may decide to choose a design template. Also, an important tip that’ll make it creative is to choose a theme that connects to the idea you want to translate. It should suit your topic and be attractive to your audience.
4. Add high-quality fonts and media
It should have a decorative theme that’ll make it enticing to your audience. Any font you intend to use should match college or professional use. Graphics plays a significant role in your college PowerPoint Presentation. Good graphics make your content relevant and engaging.
See also: PowerPoint Night Ideas to Try That Will Steal Audience’s Attention
5. Stuck to one or two colors
Don’t over-decorate your PowerPoint; else, it’ll look unprofessional. You are expected to choose colors that’ll make it organic and harmonic. Using 2-3 colors all through your topic will create harmony. Also, Dark fonts should be used on light backgrounds and vice versa. It’ll make it look simple yet classy.
6. Limit your sides and cut too many texts
Too many texts in your presentation will kill the attention span of your audience. A PowerPoint is meant to be catchy and brief. It requires your hard work to achieve. Wordiness will only ruin your professionalism. Add statistics, facts, charts videos, s, and pictures. Be concise; it goes a long way to determine if your audience will listen to your topic or not. Charts and diagrams will enable you to explain the points you intend to deliver without the slides being too clumsy for your audience. They are much better than texts in your slides, but you must be creative. If not properly done, you might make mistakes.
See also: You Won’t Be Able to Memorize Your Presentation Material in 2022
7. The less the slide, the better it is
You don’t have to include too many slides in your presentation before considering it worthy of a college assignment. Make sure you don’t include more than 19 slides in your project. The presentation time should not be more than 20 minutes. Anything more than that will bore your audience. Also, your font size should be much easier to read. A 30 font size is much better for easy readability.
8. Highlight your keywords
The necessary keywords should be in bold fonts or texts. This will help keep your audience focused on your piece. It’ll make it easier for them to catch a glimpse of the main idea. You can have a peek here at how to determine your important keywords. You can choose a contrasting color to highlight the most important element of your topic. Apart from the fact that it attracts viewers’ attention, it’ll also ensure they remember the core fact of your presentation.
See also: 20 Books about Presentation Design
9. Be consistent with transitions
Transitions make your slides attractive. You are open to variants of transitions you can use. You should avoid overusing a transition or changing transitions. It’ll distract your audience. To make your transition catchy and attractive, stick to one or two.
10. Practice your presentation
College ppt presentations require grit and hard work, and you need to practice to perform better. Rehearse and run the few slides from time to time. Make sure you can easily turn in the videos in your slides without delay. You should also practice how to switch slides. It’ll make the presentation as smooth as possible.
See also: The Effectiveness of MS PowerPoint: Take Your Presentation to the Next Level
It is a true story that we must prepare a college PowerPoint Presentation to get an A+. Not only is it beneficial to you as a student, but you also get to utilize the knowledge in your professional life. These tips are easier to know and use. If you utilize them properly, your presentation will be hitch-free. It will also enable you to create an amazing and persuasive PowerPoint. Also, you should know that you can consult a professional to help you if you find it difficult to achieve.
Let’s visit RRPicks to download free PowerPoint templates . But wait, don’t go anywhere and stay here with our RRGraph Design Blog to keep up-to-date on the best pitch deck template collections and design advice from our PowerPoint experts .
More Articles

RRGraph Design Signs CSR Partnership, Starting from Poverty Reduction to Land Ecosystems Preservation
RRGraph Design Signs CSR Partnership, Starting from Poverty Reduction to Land Ecosystems Preservation This is …

5 Ways of Using Your Digital Presence to Grow Your Business in 2023
Increasing visibility is among the main aims of businesses in today’s chaotic markets. In this …

Simple Ways to Make Your Office Run Smoother
Running a successful office is no easy feat. With so many moving parts and people …
Reliable place to create PowerPoint slides.
- Testimonial
Marketplace
- All products
- Subcription
Office Address
Simpang L.A. Sucipto Gg. 22A No.85, Malang 65126
+6281 334 783 938 [email protected]
Business Hours
Monday – Saturday 07:00 – 18.00 WIB GMT+9
People Also View
- 30+ Best PowerPoint Template for 2021
- 50+ Best Pitch Deck Template by Top Startups
- How Much Does It Cost for PowerPoint Presentation Services?
- How to be PowerPoint Experts?
© 2021 by RRGraph Design. All rights reserved.
- Terms of Use
- Privacy Policy
- Product Delivery Policy
Join our community

You will receive monthly tips, stories, and exclusive freebies!
- How It Works
- Prices & Discounts
Create a Standout College PowerPoint: 9 Expert Tips and 15 Creative Topic Ideas
Table of contents
Creating PowerPoint presentations is a common assignment for high school and college students. They have become an important part of evaluating students for their final grades, much like coursework or research papers.
But unlike the two, you don’t have to present information in MS Word or another word processing software, but as PowerPoint slides. The power of PowerPoint lies in the ability to incorporate oral, visual, and written elements of communication.
As a student, you must create well-written and well-designed slides to get good grades. Well-written and well-designed college PowerPoint presentations are engaging and informative and encourage collaboration and content sharing–critical things that your examiner will look for when grading your PowerPoint presentation.
Impress Your Professors: 9 Tips for a Top-Notch College PowerPoint Presentation
As a result, there are important tips to keep in mind as a student writing and designing college PowerPoint presentations. Below are nine of the most important tips.
1. Start with an outline
To put forward well-written and well-designed presentations, outline what you want to be included in your PowerPoint slides.
Make a rough note of what will go in the introduction section, body, and conclusion. By defining the order of how things will flow, you will easily get your message across with the right words, layout, graphics, and colors.
2. Choose a good template
The good thing about PowerPoint is that there is a whale of (free and paid) templates you can use to create your college PowerPoint presentation. However, the trick is to choose one template throughout your presentation and not use different templates at the same time.
Note that it should also blend well with the font and colors you will be using. It should not be outdated or have a basic design.
Choosing a good template saves you time when creating your presentation, as it will be easy to modify and also present information conveniently. But most importantly, it makes your presentation look professional, and this easily captures the examiner’s or viewer’s attention and keeps them focused on your presentation.
3. Choose a reasonable number of slides
There is no limit to the number of slides you can use for your presentation, especially in the corporate world. However, since this is a college assignment, it would be more prudent to keep your presentation at a reasonable length.
Too many slides, and you risk killing the attention of the viewer/examiner. Too few slides will make your presentation look cheap. So to maintain your presentation at a reasonable length, ensure the information you put in your slides is relevant and helpful to the reader.
4. Make it easy to read
The easiest way to kill your college PowerPoint presentation is to clutter it with chunky blocks of text. It will overwhelm your readers. As a result, make your PowerPoint presentation easy to read by avoiding text-heavy slides and including paragraph breaks.
Besides, use simple language and sentences. As for writing essays and research papers, always avoid jargon, filler words, or words that only you understand. Every word you put on a slide should support your topic.
An excellent writing tip that will help you along the way is to edit thoroughly, to remove any redundancy or extra information in the text, leaving only what is useful to the audience.
Where you have used words that your reader might not understand, provide their definition in the reference section so readers don’t have to leave your slide to look for its meaning.
Moreover, make your presentation concise. Too much information and graphics lead to cognitive overload.
Apart from that, it makes your presentation less interactive and attractive. So limit the amount of evidence, argument, banners, headers, footers, page numbers, and messages you put on your slide.
Ensure Your Presentation is Easy to Read: Additional Tips for Slide Design
- Each slide should have one point and three to five sub-points.
- Avoid long sentences. Each line should have 6-8 words.
- Avoid italicized fonts.
- All caps should only be used in the title.
- Separate text and visual elements with white spaces.
- Split your content into columns.
- Keep your slides to five lines of text.
- Make visuals large (it can occupy an entire slide with the text coming below or above the visual).
- Use a transparent background.
- Highlight important points or use contrast and call-out.
- Use arrows, circles, and pointers to illustrate photos or graphs.
- You don’t need to use complete sentences.
These are the ways to ensure your reader gets the key message you are trying to pass across, remember more in a few words, and avoid getting distracted or quickly win them back if they do as they aid in the retention of the information.
5. Use images and rich media to communicate
Images and rich media also help to communicate your message better and remember what you are saying since they are visual memory triggers. As a result, they need to be engaging.
When you incorporate charts, graphs, drawings, and diagrams in your presentation, don’t just use any image, but high-quality ones, and if possible, ensure their backgrounds are consistent with the color scheme and template you are using.
The same applies to rich media and animation. Videos, songs, and animation are very useful in capturing your reader’s attention and keeping them focused on the text. But don’t overuse them, as you will distract the reader. The rich media and images you use need to enhance your presentation and not cause distraction.
6. Highlight keywords
Keywords guide your reader along with the text or slides as they convey a message clearly. They are also useful when creating the flow of your presentation. Your primary keyword needs to be derived from the topic of your presentation. Other sets of keywords can be got from the structure of your presentation.
Note that you need to highlight your keywords using boldface or contrasting color so the reader can quickly and easily take crucial information.
7. Transition changes
As we have mentioned before, it is recommended to be consistent with your slides. Besides, the slides should also blend well with the fonts and colors. However, when your slides, colors, and fonts look similar, the user/examiner may not recognize change when transitioning between slides.
Since most humans suffer from change blindness , it may be hard for them to see the change, unless you establish a clear transition between the slides.
As a result, include a transition between the slides or important elements in the slides that will signal transition. Are you talking about the recent flooding in European countries? Use water transition. If you are talking about gun violence, use gun transition.
The work of transition is to reduce change blindness and improve memory retention of the information.
8. Consistent formatting and citation
Consistency in formatting and structure is one of the most important elements your examiner will look at when going through your PowerPoint presentation. As a result, try sticking to one font and color scheme to score more points.
The recommended font types are Ariel, Tahoma, or Veranda. Standardize it throughout the presentation. Your font size also needs to be large or readable. For example, if you are using the font type Veranda, the font size of your title needs to be 40 points, subtitles, and bullets at 32 points, and content 24 points. Leave smaller fonts for the footer.
Another important factor to consider is that each slide should have the same background. Using multiple backgrounds or changing styling is distracting. Besides, don’t overload your text/slides with colors. This will make the examiner shun your presentation, as it is distracting.
Instead, pick 2-3 color schemes to use throughout your slides, for example, white on black background. Avoid color combinations like green on blue, purple on pink, or red on green. The color combination you use should be clearer and sharper to help the reader easily read the information.
Lastly, in-text and image citations need to be the same. That is, if you are using MLA or APA style guide, stick to that throughout the presentation. But always counter-check with your instructor or assignment requirements for the right style guide to use.
9. Create a mock presentation for practice
To ensure that you have incorporated all that we have discussed above, make sure you create a mock presentation that you can go through to single out sections that may need reworking.
Once you have seen that all your ideas come through and everything is in order, rewrite the presentation considering your audience, purpose, and occasion (in our case, it is a classroom presentation).
Get Inspired with these 15 Unique College PowerPoint Presentation Topics
1. The Future of Artificial Intelligence.
2. The Importance of Mental Health Awareness.
3. Climate Change and its Effects on the Planet.
4. The Power of Positive Thinking.
5. The Psychology of Social Media.
6. Innovations in Renewable Energy.
7. The Benefits and Risks of Gene Editing.
8. Ethics in Business: Balancing Profit and Social Responsibility.
9. The Art and Science of Effective Communication.
10. The History and Significance of Jazz Music.
11. The Intersection of Technology and Healthcare.
12. The Evolution of Fashion Throughout History.
13. The Secrets of Successful Entrepreneurship.
14. The Science of Sleep: Strategies for Better Rest.
15. The Art of Mindfulness: Achieving Inner Peace in a Chaotic World.
The good thing about doing college PowerPoint presentations is that you acquire skills and knowledge that will help you in your professional life. It is not merely for amassing good grades.
So every time you are tasked with creating PowerPoint presentations, remember to plan carefully, make it easy to read, add useful graphics, choose the right template, and polish your writing and layout with a mock presentation before submitting a final piece. With these, you will score more points than other students or presenters.
The good news is that at Writers Per Hour, we have writing experts who can help you draft your slides and create a lasting impact. All you have to do is send us your brief, and we will take care of research, outlining, writing and revising .
The next time you’re met with a PowerPoint presentation for college, write to us, and we’ll get it sorted.
Share this article
Achieve Academic Success with Expert Assistance!
Crafted from Scratch for You.
Ensuring Your Work’s Originality.
Transform Your Draft into Excellence.
Perfecting Your Paper’s Grammar, Style, and Format (APA, MLA, etc.).
Calculate the cost of your paper
Get ideas for your essay
Critical PowerPoint Shortcuts – Claim Your FREE Training Module and Get Your Time Back!
How to Make a PowerPoint Presentation (Step-by-Step)
- PowerPoint Tutorials
- Presentation Design
- January 22, 2024
In this beginner’s guide, you will learn step-by-step how to make a PowerPoint presentation from scratch.
While PowerPoint is designed to be intuitive and accessible, it can be overwhelming if you’ve never gotten any training on it before. As you progress through this guide, you’ll will learn how to move from blank slides to PowerPoint slides that look like these.

Table of Contents
Additionally, as you create your presentation, you’ll also learn tricks for working more efficiently in PowerPoint, including how to:
- Change the slide order
- Reset your layout
- Change the slide dimensions
- Use PowerPoint Designer
- Format text
- Format objects
- Play a presentation (slide show)
With this knowledge under your belt, you’ll be ready to start creating PowerPoint presentations. Moreover, you’ll have taken your skills from beginner to proficient in no time at all. I will also include links to more advanced PowerPoint topics.
Ready to start learning how to make a PowerPoint presentation?
Take your PPT skills to the next level
Start with a blank presentation.
Note: Before you open PowerPoint and start creating your presentation, make sure you’ve collected your thoughts. If you’re going to make your slides compelling, you need to spend some time brainstorming.
For help with this, see our article with tips for nailing your business presentation here .
The first thing you’ll need to do is to open PowerPoint. When you do, you are shown the Start Menu , with the Home tab open.
This is where you can choose either a blank theme (1) or a pre-built theme (2). You can also choose to open an existing presentation (3).
For now, go ahead and click on the Blank Presentation (1) thumbnail.

Doing so launches a brand new and blank presentation for you to work with. Before you start adding content to your presentation, let’s first familiarize ourselves with the PowerPoint interface.
The PowerPoint interface

Here is how the program is laid out:
- The Application Header
- The Ribbon (including the Ribbon tabs)
- The Quick Access Toolbar (either above or below the Ribbon)
- The Slides Pane (slide thumbnails)
The Slide Area
The notes pane.
- The Status Bar (including the View Buttons)
Each one of these areas has options for viewing certain parts of the PowerPoint environment and formatting your presentation.
Below are the important things to know about certain elements of the PowerPoint interface.
The PowerPoint Ribbon

The Ribbon is contextual. That means that it will adapt to what you’re doing in the program.
For example, the Font, Paragraph and Drawing options are greyed out until you select something that has text in it, as in the example below (A).

Furthermore, if you start manipulating certain objects, the Ribbon will display additional tabs, as seen above (B), with more commands and features to help you work with those objects. The following objects have their own additional tabs in the Ribbon which are hidden until you select them:
- Online Pictures
- Screenshots
- Screen Recording
The Slides Pane

This is where you can preview and rearrange all the slides in your presentation.
Right-clicking on a slide in the pane gives you additional options on the slide level that you won’t find on the Ribbon, such as Duplicate Slide , Delete Slide , and Hide Slide .

In addition, you can add sections to your presentation by right-clicking anywhere in this Pane and selecting Add Section . Sections are extremely helpful in large presentations, as they allow you to organize your slides into chunks that you can then rearrange, print or display differently from other slides.

The Slide Area (A) is where you will build out your slides. Anything within the bounds of this area will be visible when you present or print your presentation.
Anything outside of this area (B) will be hidden from view. This means that you can place things here, such as instructions for each slide, without worrying about them being shown to your audience.

The Notes Pane is the space beneath the Slide Area where you can type in the speaker notes for each slide. It’s designed as a fast way to add and edit your slides’ talking points.
To expand your knowledge and learn more about adding, printing, and exporting your PowerPoint speaker notes, read our guide here .
Your speaker notes are visible when you print your slides using the Notes Pages option and when you use the Presenter View . To expand your knowledge and learn the ins and outs of using the Presenter View , read our guide here .

You can resize the Notes Pane by clicking on its edge and dragging it up or down (A). You can also minimize or reopen it by clicking on the Notes button in the Status Bar (B).
Note: Not all text formatting displays in the Notes Pane, even though it will show up when printing your speaker notes. To learn more about printing PowerPoint with notes, read our guide here .
Now that you have a basic grasp of the PowerPoint interface at your disposal, it’s time to make your presentation.
Adding Content to Your PowerPoint Presentation
Notice that in the Slide Area , there are two rectangles with dotted outlines. These are called Placeholders and they’re set on the template in the Slide Master View .
To expand your knowledge and learn how to create a PowerPoint template of your own (which is no small task), read our guide here .

As the prompt text suggests, you can click into each placeholder and start typing text. These types of placeholder prompts are customizable too. That means that if you are using a company template, it might say something different, but the functionality is the same.

Note: For the purposes of this example, I will create a presentation based on the content in the Starbucks 2018 Global Social Impact Report, which is available to the public on their website.
If you type in more text than there is room for, PowerPoint will automatically reduce its font size. You can stop this behavior by clicking on the Autofit Options icon to the left of the placeholder and selecting Stop Fitting Text to this Placeholder .
Next, you can make formatting adjustments to your text by selecting the commands in the Font area and the Paragraph area of the Home tab of the Ribbon.

The Reset Command: If you make any changes to your title and decide you want to go back to how it was originally, you can use the Reset button up in the Home tab .

Insert More Slides into Your Presentation
Now that you have your title slide filled in, it’s time to add more slides. To do that, simply go up to the Home tab and click on New Slide . This inserts a new slide in your presentation right after the one you were on.

You can alternatively hit Ctrl+M on your keyboard to insert a new blank slide in PowerPoint. To learn more about this shortcut, see my guide on using Ctrl+M in PowerPoint .
Instead of clicking the New Slide command, you can also open the New Slide dropdown to see all the slide layouts in your PowerPoint template. Depending on who created your template, your layouts in this dropdown can be radically different.

If you insert a layout and later want to change it to a different layout, you can use the Layout dropdown instead of the New Slide dropdown.
After inserting a few different slide layouts, your presentation might look like the following picture. Don’t worry that it looks blank, next we will start adding content to your presentation.

If you want to follow along exactly with me, your five slides should be as follows:
- Title Slide
- Title and Content
- Section Header
- Two Content
- Picture with Caption
Adding Content to Your Slides
Now let’s go into each slide and start adding our content. You’ll notice some new types of placeholders.

On slide 2 we have a Content Placeholder , which allows you to add any kind of content. That includes:
- A SmartArt graphic,
- A 3D object,
- A picture from the web,
- Or an icon.
To insert text, simply type it in or hit Ctrl+C to Copy and Ctrl+V to Paste from elsewhere. To insert any of the other objects, click on the appropriate icon and follow the steps to insert it.
For my example, I’ll simply type in some text as you can see in the picture below.

Slides 3 and 4 only have text placeholders, so I’ll go ahead and add in my text into each one.

On slide 5 we have a Picture Placeholder . That means that the only elements that can go into it are:
- A picture from the web

To insert a picture into the picture placeholder, simply:
- Click on the Picture icon
- Find a picture on your computer and select it
- Click on Insert
Alternatively, if you already have a picture open somewhere else, you can select the placeholder and paste in (shortcut: Ctrl+V ) the picture. You can also drag the picture in from a file explorer window.

If you do not like the background of the picture you inserted onto your slide, you can remove the background here in PowerPoint. To see how to do this, read my guide here .
Placeholders aren’t the only way to add content to your slides. At any point, you can use the Insert tab to add elements to your slides.
You can use either the Title Only or the Blank slide layout to create slides for content that’s different. For example, a three-layout content slide, or a single picture divider slide, as shown below.

In the first example above, I’ve inserted 6 text boxes, 3 icons, and 3 circles to create this layout. In the second example, I’ve inserted a full-sized picture and then 2 shapes and 2 text boxes.
The Reset Command: Because these slides are built with shapes and text boxes (and not placeholders), hitting the Reset button up in the Home tab won’t do anything.
That is a good thing if you don’t want your layouts to adjust. However, it does mean that it falls on you to make sure everything is aligned and positioned correctly.
For more on how to add and manipulate the different objects in PowerPoint, check out our step-by-step articles here:
- Using graphics in PowerPoint
- Inserting icons onto slides
- Adding pictures to your PowerPoint
- How to embed a video in PowerPoint
- How to add music to your presentation
Using Designer to generate more layouts ideas
If you have Office 365, your version of PowerPoint comes with a new feature called Designer (or Design Ideas). This is a feature that generates slide layout ideas for you. The coolest thing about this feature is that it uses the content you already have.
To use Designer , simply navigate to the Design tab in your Ribbon, and click on Design Ideas .

NOTE: If the PowerPoint Designer is not working for you (it is grey out), see my troubleshooting guide for Designer .
Change the Overall Design (optional)
When you make a PowerPoint presentation, you’ll want to think about the overall design. Now that you have some content in your presentation, you can use the Design tab to change the look and feel of your slides.
For additional help thinking through the design of your presentation, read my guide here .
A. Picking your PowerPoint slide size
If you have PowerPoint 2013 or later, when you create a blank document in PowerPoint, you automatically start with a widescreen layout with a 16:9 ratio. These dimensions are suitable for most presentations as they match the screens of most computers and projectors.
However, you do have the option to change the dimensions.
For example, your presentation might not be presented, but instead converted into a PDF or printed and distributed. In that case, you can easily switch to the standard dimensions with a 4:3 ratio by selecting from the dropdown (A).
You can also choose a custom slide size or change the slide orientation from landscape to portrait in the Custom Slide Size dialog box (B).

To learn all about the different PowerPoint slide sizes, and some of the issues you will face when changing the slide size of a non-blank presentation, read my guide here .
B. Selecting a PowerPoint theme
The next thing you can do is change the theme of your presentation to a pre-built one. For a detailed explanation of what a PowerPoint theme is, and how to best use it, read my article here .
In the beginning of this tutorial, we started with a blank presentation, which uses the default Office theme as you can see in the picture below.

That gives you the most flexibility because it has a blank background and quite simple layouts that work for most presentations. However, it also means that it’s your responsibility to enhance the design.
If you’re comfortable with this, you can stay with the default theme or create your own custom theme ( read my guide here ). But if you would rather not have to think about design, then you can choose a pre-designed theme.
Microsoft provides 46 other pre-built themes, which include slide layouts, color variants and palettes, and fonts. Each one varies quite significantly, so make sure you look through them carefully.
To select a different theme, go to the Design tab in the Ribbon, and click on the dropdown arrow in the Themes section .

For this tutorial, let’s select the Frame theme and then choose the third Variant in the theme. Doing so changes the layout, colors, and fonts of your presentation.

Note: The theme dropdown area is also where you can import or save custom themes. To see my favorite places to find professional PowerPoint templates and themes (and recommendations for why I like them), read my guide here .
C. How to change a slide background in PowerPoint
The next thing to decide is how you want your background to look for the entire presentation. In the Variants area, you can see four background options.

For this example, we want our presentation to have a dark background, so let’s select Style 3. When you do so, you’ll notice that:
- The background color automatically changes across all slides
- The color of the text on most of the slides automatically changes to white so that it’s visible on the dark background
- The colors of the objects on slides #6 and #7 also adjust, in a way we may not want (we’ll likely have to make some manual adjustments to these slides)

Note: If you want to change the slide background for just that one slide, don’t left-click the style. Instead, right-click it and select Apply to Selected Slides .
After you change the background for your entire presentation, you can easily adjust the background for an individual slide.

Inside the Format Background pane, you can see you have the following options:
- Gradient fill
- Picture or texture fill
- Pattern fill
- Hide background
You can explore these options to find the PowerPoint background that best fits your presentation.
D. How to change your color palette in PowerPoint
Another thing you may want to adjust in your presentation, is the color scheme. In the picture below you can see the Theme Colors we are currently using for this presentation.

Each PowerPoint theme comes with its own color palette. By default, the Office theme includes the Office color palette. This affects the colors you are presented with when you format any element within your presentation (text, shapes, SmartArt, etc.).

The good news is that the colors here are easy to change. To switch color palettes, simply:
- Go to the Design tab in the Ribbon
- In the Variants area, click on the dropdown arrow and select Colors
- Select the color palette (or theme colors) you want
You can choose among the pre-built color palettes from Office, or you can customize them to create your own.
As you build your presentation, make sure you use the colors from your theme to format objects. That way, changing the color palette adjusts all the colors in your presentation automatically.
E. How to change your fonts in PowerPoint
Just as we changed the color palette, you can do the same for the fonts.

Each PowerPoint theme comes with its own font combination. By default, the Office theme includes the Office font pairing. This affects the fonts that are automatically assigned to all text in your presentation.

The good news is that the font pairings are easy to change. To switch your Theme Fonts, simply:
- Go to the Design tab in the Ribbon
- Click on the dropdown arrow in the Variants area
- Select Fonts
- Select the font pairing you want
You can choose among the pre-built fonts from Office, or you can customize them to create your own.
If you are working with PowerPoint presentations on both Mac and PC computers, make sure you choose a safe PowerPoint font. To see a list of the safest PowerPoint fonts, read our guide here .
If you receive a PowerPoint presentation and the wrong fonts were used, you can use the Replace Fonts dialog box to change the fonts across your entire presentation. For details, read our guide here .
Adding Animations & Transitions (optional)
The final step to make a PowerPoint presentation compelling, is to consider using animations and transitions. These are by no means necessary to a good presentation, but they may be helpful in your situation.
A. Adding PowerPoint animations
PowerPoint has an incredibly robust animations engine designed to power your creativity. That being said, it’s also easy to get started with basic animations.
Animations are movements that you can apply to individual objects on your slide.

To add a PowerPoint animation to an element of your slide, simply:
- Select the element
- Go to the Animations tab in the Ribbon
- Click on the dropdown arrow to view your options
- Select the animation you want
You can add animations to multiple objects at one time by selecting them all first and then applying the animation.
B. How to preview a PowerPoint animation

There are three ways to preview a PowerPoint animation:
- Click on the Preview button in the Animations tab
- Click on the little star next to the slide
- Play the slide in Slide Show Mode
To learn other ways to run your slide show, see our guide on presenting a PowerPoint slide show with shortcuts .
To adjust the settings of your animations, explore the options in the Effect Options , Advanced Animation and the Timing areas of the Animation tab .

Note: To see how to make objects appear and disappear in your slides by clicking a button, read our guide here .
C. How to manage your animations in PowerPoint

The best way to manage lots of animations on your slide is with the Animation Pane . To open it, simply:
- Navigate to the Animations tab
- Select the Animation Pane
Inside the Animation Pane, you’ll see all of the different animations that have been applied to objects on your slide, with their numbers marked as pictured above.
Note: To see examples of PowerPoint animations that can use in PowerPoint, see our list of PowerPoint animation tutorials here .
D. How to add transitions to your PowerPoint presentation
PowerPoint has an incredibly robust transition engine so that you can dictate how your slides change from one to the other. It is also extremely easy to add transitions to your slides.
In PowerPoint, transitions are the movements (or effects) you see as you move between two slides.

To add a transition to a PowerPoint slide, simply:
- Select the slide
- Go to the Transitions tab in the Ribbon
- In the Transitions to This Slide area, click on the dropdown arrow to view your options
- Select the transition you want
To adjust the settings of the transition, explore the options in the Timing area of the Transitions tab.
You can also add the same transition to multiple slides. To do that, select them in the Slides Pane and apply the transition.
E. How to preview a transition in PowerPoint

There are three ways to preview your PowerPoint transitions (just like your animations):
- Click on the Preview button in the Transitions tab
- Click on the little star beneath the slide number in the thumbnail view
Note: In 2016, PowerPoint added a cool new transition, called Morph. It operates a bit differently from other transitions. For a detailed tutorial on how to use the cool Morph transition, see our step-by-step article here .
Save Your PowerPoint Presentation
After you’ve built your presentation and made all the adjustments to your slides, you’ll want to save your presentation. YOu can do this several different ways.

To save a PowerPoint presentation using your Ribbon, simply:
- Navigate to the File tab
- Select Save As on the left
- Choose where you want to save your presentation
- Name your presentation and/or adjust your file type settings
- Click Save
You can alternatively use the Ctrl+S keyboard shortcut to save your presentation. I recommend using this shortcut frequently as you build your presentation to make sure you don’t lose any of your work.

This is the standard way to save a presentation. However, there may be a situation where you want to save your presentation as a different file type.
To learn how to save your presentation as a PDF, see our guide on converting PowerPoint to a PDF .
How to save your PowerPoint presentation as a template
Once you’ve created a presentation that you like, you may want to turn it into a template. The easiest – but not technically correct – way, is to simply create a copy of your current presentation and then change the content.
But be careful! A PowerPoint template is a special type of document and it has its own parameters and behaviors.
If you’re interested in learning about how to create your own PowerPoint template from scratch, see our guide on how to create a PowerPoint template .
Printing Your PowerPoint Presentation
After finishing your PowerPoint presentation, you may want to print it out on paper. Printing your slides is relatively easy.

To open the Print dialog box, you can either:
- Hit Ctrl+P on your keyboard
- Or go to the Ribbon and click on File and then Print

Inside the Print dialog box, you can choose from the various printing settings:
- Printer: Select a printer to use (or print to PDF or OneNote)
- Slides: Choose which slides you want to print
- Layout: Determine how many slides you want per page (this is where you can print the notes, outline, and handouts)
- Collated or uncollated (learn what collated printing means here )
- Color: Choose to print in color, grayscale or black & white
There are many more options for printing your PowerPoint presentations. Here are links to more in-depth articles:
- How to print multiple slides per page
- How to print your speaker notes in PowerPoint
- How to save PowerPoint as a picture presentation
So that’s how to create a PowerPoint presentation if you are brand new to it. We’ve also included a ton of links to helpful resources to boost your PowerPoint skills further.
When you are creating your presentation, it is critical to first focus on the content (what you are trying to say) before getting lost inserting and playing with elements. The clearer you are on what you want to present, the easier it will be to build it out in PowerPoint.
If you enjoyed this article, you can learn more about our PowerPoint training courses and other presentation resources by visiting us here .
🔒 Unlock the PowerPoint Shortcuts Trusted by Industry Leaders KKR, American Express, HSBC, and More!
Join over 114,880 professionals from diverse fields including consulting, investment banking, advertising, marketing, sales, and business development who have supercharged their PowerPoint game with our proven methods.
✅ Customize compelling presentations effortlessly.
✅ Master time-saving techniques for faster deck creation.
✅ Boost your career prospects with top-notch PowerPoint skills.
Get FREE access to the Critical PowerPoint Shortcuts module of our premium training course by entering your name and email below.
DISCLAIMER: PC Users Only!
We respect your privacy and will keep your info safe and confidential.
About The Author

Popular Tutorials
- How to Strikethrough Text (l̶i̶k̶e̶ ̶t̶h̶i̶s̶) in Word, Excel & PowerPoint
- How to Make Animated Fireworks in PowerPoint (Step-by-Step)
- Strikethrough Shortcut (l̶i̶k̶e̶ ̶t̶h̶i̶s̶) for Word, Excel & PowerPoint
- How to Create a Flash Card Memory Game in PowerPoint (Like Jeopardy)
- Keyboard Shortcuts Not Working: Solved
PowerPoint Tutorial Categories
- Strategies & Opinions
- Shortcuts & Hacks
- Pictures, Icons, Videos, Etc.
- New Features
- Miscellaneous
- Charts & Data Viz
We help busy professionals save hours and gain peace of mind, with corporate workshops, self-paced courses and tutorials for PowerPoint and Word.
Work With Us
- Corporate Training
- Presentation & Template Design
- Courses & Downloads
- PowerPoint Articles
- Word Articles
- Productivity Resources
Find a Tutorial
- Free Training
- For Businesses
We help busy office workers save hours and gain peace of mind, with tips, training and tutorials for Microsoft PowerPoint and Word.
Master Critical PowerPoint Shortcuts – Secure Your FREE Training Module and Save Valuable Time!
⌛ Master time-saving expert techniques.
🔥 Create powerful presentations.
🚀 Propel your career to new heights.
We value your privacy – we keep your info safe.
Discover PowerPoint Hacks Loved by Industry Giants - KKR, AmEx, HSBC!
Over 114,880 professionals in finance, marketing and sales have revolutionized their PPT skills with our proven methods.
Gain FREE access to a full module of our premium PowerPoint training program – Get started today!
We hate spam too and promise to keep your information safe.
You are currently viewing a placeholder content from Facebook . To access the actual content, click the button below. Please note that doing so will share data with third-party providers.
How to Make Really Good Presentations in College with A Few Tips
Last Updated on May 22, 2023
It happens within the first few minutes of sitting down in a new class. You realize you will have to give a presentation to pass. It is a must for many college classes and to get a good grade and pass you will have to do it. Better get used to it because it doesn’t end after college. Most professional careers in an office setting will require presentations. The skill of making and presenting a clear and informative presentation can be acquired with practice. It is also a very good idea to follow some guidelines when working on your presentation to make it really stand out.
Know your audience
Knowing who you are presenting to is a must if you want to do well. Make the presentation directed to them. This may not be too difficult to do when everyone in class is basically on the same page, but it still helps to focus on the interests of your audience and expound on those interests in your presentation.
Use a maximum of 3 – 4 points per slide
It is easy to jam too much information into a slide and not even realize it. You should have 3 – 4 points per slide, maximum. While you present the information on the slide you should talk about the slide and not read the slide. The 3 – 4 points per slide are just that, talking points. The meat of the information comes from your mouth not the text on the slide.
Incorporate images on your slides
The point of a presentation with slides is to provide a visual aid for what you are saying. This can be accomplished well with Images. Too many words can be overwhelming, but adding a few crisp and clean looking images which add to the point you’re making on each slide your message will be very good. Find images that are professional looking and give credit to the source if you are using someone else’s work.
Consider using video clips
Short video clips are another powerful way to convey your message. It adds variety to the potential monotony of what you are saying. There are a few ways to get the clips into the presentation. First you can make the clips yourself either from your own footage or from footage you have borrowed. Editing skills will be handy but it you can’t edit then just being able to crop some of the clip to your liking should be enough.
Select easy to read fonts
The golden rule for font is that it shouldn’t be smaller than 30pt. Stick with conservative color schemes that are easy to read with nice contrasting colors. Lighter backgrounds with a matching darker font is a simple rule that works for most cases. Simply share a few pieces of important information per slide with nice large font.
Create PDF version of your presentation
You might want to use a word to PDF converter or a PowerPoint to PDF conversion if you need to handout or email the presentation to the professor or classmates. PDF maintains the integrity of the document so it will look the same on the other end. This is very important because the professor or class may want to go back and revisit your ideas and if they look different from what you originally created the message will be lost. Make sure it doesn’t get changed when you send it, use PDF.
Making a great presentation in college takes preparation, planning, and some dos and don’ts to follow. Making simple, clean, and professional looking slides with great video or images will help self confidence to really make the grade.
Jared Jaureguy is an independent Technology Consultant. You can follow Jared on Twitter @JaredJaureguy .
Photo Courtesy of BIGSTOCK
Share this:
Related posts, celebrating 35 years of genius moves: hcasc and honda’s epic hbcu legacy, transforming vision into victory: how ‘moguls in the making’ shapes the future of hbcu talent, the future of hbcus: leading with pioneering trends and innovations, 2 thoughts on “how to make really good presentations in college with a few tips”.
Interesting article. It seems that people that have given presentations in the past agree with some of the main points in presenting. Check my article out. http://wp.me/p2Fps7-44
Comments are closed.
- PRO Courses Guides New Tech Help Pro Expert Videos About wikiHow Pro Upgrade Sign In
- EDIT Edit this Article
- EXPLORE Tech Help Pro About Us Random Article Quizzes Request a New Article Community Dashboard This Or That Game Popular Categories Arts and Entertainment Artwork Books Movies Computers and Electronics Computers Phone Skills Technology Hacks Health Men's Health Mental Health Women's Health Relationships Dating Love Relationship Issues Hobbies and Crafts Crafts Drawing Games Education & Communication Communication Skills Personal Development Studying Personal Care and Style Fashion Hair Care Personal Hygiene Youth Personal Care School Stuff Dating All Categories Arts and Entertainment Finance and Business Home and Garden Relationship Quizzes Cars & Other Vehicles Food and Entertaining Personal Care and Style Sports and Fitness Computers and Electronics Health Pets and Animals Travel Education & Communication Hobbies and Crafts Philosophy and Religion Work World Family Life Holidays and Traditions Relationships Youth
- Browse Articles
- Learn Something New
- Quizzes Hot
- This Or That Game New
- Train Your Brain
- Explore More
- Support wikiHow
- About wikiHow
- Log in / Sign up
- Education and Communications
- Presentations
How to Give an Excellent Presentation (College Students)
Last Updated: March 3, 2024 Approved
This article was co-authored by Patrick Muñoz . Patrick is an internationally recognized Voice & Speech Coach, focusing on public speaking, vocal power, accent and dialects, accent reduction, voiceover, acting and speech therapy. He has worked with clients such as Penelope Cruz, Eva Longoria, and Roselyn Sanchez. He was voted LA's Favorite Voice and Dialect Coach by BACKSTAGE, is the voice and speech coach for Disney and Turner Classic Movies, and is a member of Voice and Speech Trainers Association. wikiHow marks an article as reader-approved once it receives enough positive feedback. In this case, 86% of readers who voted found the article helpful, earning it our reader-approved status. This article has been viewed 128,405 times.
College seminars are conducted to test the presentation skills of a student or a group and also allow the student to convey their knowledge to the audience. When students don't come prepared, the presentation may become disorganized, unclear, and dull. It would make them confused during the presentation and lead to vague answers during the questionnaires.

- Think of your main topic and break it down into 3 specific ideas. This will help you to focus your discussion and remain clear. Keep the 3 ideas simple and have them in your mind. Write out your main points, then picture what you're talking about so you can visualize what you're going to talk about.
- To help you create the "soft humor," don't take yourself too seriously. Second, identify the fears and insecurities around the topic so you can address these in a way that shows we all have these fears, insecurities and taboos and that our feelings are normal. This helps keep you in the moment and present with the audience and allows you to recognize the reality of the effect of your topic on yourself and the audience.
- Tell the audience you're excited about what you're talking about. This can make your excited mood infectious and lead them to be willing to come on this journey with you.

- You could try doing something fun, like bringing with you a relevant object, doing a magic trick or a dance move to take things out of the ordinary and add some life to your talk.
- Another fun approach is to try a meditation and ask the audience to relax - feel your toes relax, your feet, etc.
- If you want the audience to move around, don't hesitate to ask. Ask them to stand up and stretch, to shake hands with the person next to them, or to do a twirl on the spot.
- You could try asking the audience to say a bunch of affirmations out loud with you, to get them caught up in the mood you're creating and help them to see its relevance to them too.

- You can ask the audience to imagine something along with you, asking them to close their eyes and think about something with you, then resume with eye contact following this.

What Is The Best Way To Start a Presentation?
Community Q&A
- Take 10 belly breaths if you have last minute stage fright. Thanks Helpful 0 Not Helpful 0
- Use images in your slides. Thanks Helpful 0 Not Helpful 0
- Come early to the venue where you will be presenting. Thanks Helpful 0 Not Helpful 0

- Answer the questions asked after the presentation. Do not divert or change the topic. Thanks Helpful 2 Not Helpful 0
You Might Also Like

- ↑ https://education.seattlepi.com/give-good-speech-presentations-college-1147.html
- ↑ https://www.princeton.edu/~archss/webpdfs08/BaharMartonosi.pdf
About This Article

- Send fan mail to authors
Reader Success Stories
Mohammad Shamshad
Oct 8, 2016
Did this article help you?

Sandip Kulkarni
Apr 2, 2019
Robbin Singh
Sep 19, 2016
Nandini Soni
Mar 16, 2016

Featured Articles

Trending Articles

Watch Articles

- Terms of Use
- Privacy Policy
- Do Not Sell or Share My Info
- Not Selling Info
Don’t miss out! Sign up for
wikiHow’s newsletter

- SUGGESTED TOPICS
- The Magazine
- Newsletters
- Managing Yourself
- Managing Teams
- Work-life Balance
- The Big Idea
- Data & Visuals
- Reading Lists
- Case Selections
- HBR Learning
- Topic Feeds
- Account Settings
- Email Preferences
How to Make a “Good” Presentation “Great”
- Guy Kawasaki

Remember: Less is more.
A strong presentation is so much more than information pasted onto a series of slides with fancy backgrounds. Whether you’re pitching an idea, reporting market research, or sharing something else, a great presentation can give you a competitive advantage, and be a powerful tool when aiming to persuade, educate, or inspire others. Here are some unique elements that make a presentation stand out.
- Fonts: Sans Serif fonts such as Helvetica or Arial are preferred for their clean lines, which make them easy to digest at various sizes and distances. Limit the number of font styles to two: one for headings and another for body text, to avoid visual confusion or distractions.
- Colors: Colors can evoke emotions and highlight critical points, but their overuse can lead to a cluttered and confusing presentation. A limited palette of two to three main colors, complemented by a simple background, can help you draw attention to key elements without overwhelming the audience.
- Pictures: Pictures can communicate complex ideas quickly and memorably but choosing the right images is key. Images or pictures should be big (perhaps 20-25% of the page), bold, and have a clear purpose that complements the slide’s text.
- Layout: Don’t overcrowd your slides with too much information. When in doubt, adhere to the principle of simplicity, and aim for a clean and uncluttered layout with plenty of white space around text and images. Think phrases and bullets, not sentences.
As an intern or early career professional, chances are that you’ll be tasked with making or giving a presentation in the near future. Whether you’re pitching an idea, reporting market research, or sharing something else, a great presentation can give you a competitive advantage, and be a powerful tool when aiming to persuade, educate, or inspire others.
- Guy Kawasaki is the chief evangelist at Canva and was the former chief evangelist at Apple. Guy is the author of 16 books including Think Remarkable : 9 Paths to Transform Your Life and Make a Difference.
Partner Center
- Slidesgo School
- PowerPoint Tutorials
How to make a Collage on PowerPoint

Presentations don’t only offer you the possibility to share your business ideas and your educational content in a visual way, they are also a white canvas where you can give your creativity a free pass! Do you want to know how to create collages in your slides and surprise your audience? In this tutorial you will learn how to make a photo collage from scratch , you only need to follow a few simple steps.
Steps to create a collage on PowerPoint
- First, you must choose the presentation where you want to start your piece. For this tutorial we have chosen the template How to write a Marketing Plan . Create a new slide and get ready to create!
- Choose the pictures you want to add. You can find lots of free pictures in our sister webpage Freepik !
- Insert them and go to Picture Format > Picture Layout. If you hover over each design, you will see a preview of the collage. Once you have decided which one better fits your slide, click on it.

- Now it’s time for you to resize it and adapt it. You can add text to describe the images you just added, but we believe an image is worth a thousand words, so we have decided not to add anything. If you want the text boxes to disappear, ungroup the design by pressing Ctrl + Shift + G. Learn how to group and ungroup elements in PowerPoint .
That’s all! PowerPoint offers lots of creative designs for collages, and each of them is customizable and adaptable to your presentation. If you need some inspiration for your next creation, take a look at our templates Beautiful Intimate Collage Theme for Marketing and Formal Blue Feeling Collage MK Campaign and then put into practise your new skills!
Do you find this article useful?
Related tutorials.

How to print PowerPoint notes
Crafting an impactful PowerPoint slideshow and delivering a captivating presentation are distinct skills. The first focuses on designing appealing visuals to convey a clear message, while the second involves employing effective presentation techniques to ensure the audience grasps the idea. The content of this article will help you with the latter part of this process, guiding future presenters on how to print PowerPoint with speaker notes to enhance your presentations success and effectiveness.

7 tips to create a positive classroom culture
No matter if it's been ages since you last stepped into a classroom or just a long time ago―there’s probably a particular learning experience you often find yourself thinking about. Maybe it was a passionate teacher who kept the whole class engaged, or perhaps a classmate who lent you a hand with a tricky topic. Positive classroom experiences do leave a lasting mark on us, so it makes perfect sense that people leading a classroom aim to create the finest possible learning setting. In this article, we’ll share some tips to help you turn a regular classroom into a positive space.

Discover Our Online Presentation Software for Free
We have great news for you today! If you’ve been a Slidesgo fan for years (or months, or weeks, or days, or mere hours, we welcome everyone!), you’ll probably know for now that our templates are available mostly in two formats: for use in Google Slides and PowerPoint.Google Slides is a free tool, since you only need a Google account in order to use it. PowerPoint, on the other hand, is part of the Microsoft Office suite, so it’s not a free program, but that didn’t stop it from being one of the most popular options in the world!What if we...

Webinar: Presentation Audit
With more than 15,000 templates released on Slidesgo and a user base composed of millions of people, we estimate that the total number of presentations created adds up to… um, a lot! Our team of professional designers work very hard to provide you with editable slides so that the only thing you need to do is, well, customize the elements to your liking. Starting from any given template, the results may vary a lot depending on the person who edited the contents.Have you ever wondered “Is my presentation good enough?” and wished that an expert on presentations looked at your template...
- Data, AI, & Machine Learning
- Managing Technology
- Social Responsibility
- Workplace, Teams, & Culture
- AI & Machine Learning
- Diversity & Inclusion
- Big ideas Research Projects
- Artificial Intelligence and Business Strategy
- Responsible AI
- Future of the Workforce
- Future of Leadership
- All Research Projects
- AI in Action
- Most Popular
- The Truth Behind the Nursing Crisis
- Work/23: The Big Shift
- Coaching for the Future-Forward Leader
- Measuring Culture

The spring 2024 issue’s special report looks at how to take advantage of market opportunities in the digital space, and provides advice on building culture and friendships at work; maximizing the benefits of LLMs, corporate venture capital initiatives, and innovation contests; and scaling automation and digital health platform.
- Past Issues
- Upcoming Events
- Video Archive
- Me, Myself, and AI
- Three Big Points
How to Create Slides That Suit Your Superiors: 11 Tips
When you’re pitching ideas or budgets to execs in your organization, you need to deliver slides that fit those particular people just right. This checklist identifies the key considerations.

- Workplace, Teams, & Culture
- Leadership Skills

Carolyn Geason-Beissel/MIT SMR | Getty Images
I recently interviewed 20 of my customers, all in senior roles at Fortune 100 companies, and asked them their biggest pain point in presenting to higher-ups and even colleagues. What I heard consistently was that it can feel like Goldilocks bouncing from one option to the next, testing to figure out what’s “just right.” Does the audience want deep reports? Sparse slides? Something in between? Like … what?
Teams often come to presentation meetings with vast amounts of backup content just in case an exec wants to take a deep dive on any given point. There’s often a struggle to anticipate every direction attendees might want to go. It’s frustrating, and it’s not efficient.
Get Updates on Transformative Leadership
Evidence-based resources that can help you lead your team more effectively, delivered to your inbox monthly.
Please enter a valid email address
Thank you for signing up
Privacy Policy
There are many ways to build slides. I’m not just talking about crafting them well versus poorly. I’m talking about all of the important decisions regarding how to organize them, how much text to use, when to lean into a chart, the best ways to use bullets and color, and whether to include an appendix with additional information. Before you make your next proposal or request of the executive team, use this list of 11 tips for your next set of slides as a guide.
Four Things You Must Have in Every Exec’s Slides
Before we drill down into the harder aspects, the ones where your executives’ tastes may vary widely, let’s quickly cover four aspects that you can consider the building blocks — the basics you should never proceed without.
Start with an executive summary. Begin the slide deck with a tight executive summary that follows a three-act structure. First, start with stating the current realities. Second, clearly state the problem or opportunity your idea addresses and its potential impact. Third, explain how your recommendation solves the problem or exploits the opportunity and the next steps you’re proposing.
Have a logical organization. The arc of the deck — the package from beginning to end — should make sense. If your audience reads only the headline of every slide, the order should be coherent and make most of the case for you. The content below each slide’s headline must support the statement made in the title. Remove everything that doesn’t support your point; as writers will tell you, you sometimes need to “kill your darlings” when you’re editing.
Begin the slide deck with a tight executive summary that follows a three-act structure.
Make it skimmable. Help your audience to quickly grasp the point without getting bogged down in details. Create a clear visual hierarchy. Guide the reader’s eye through the content: Use bold headings, bullet points, and numbered lists to break down information into digestible pieces. Highlight key takeaways or conclusions in a different color or font size to draw attention to these critical points.
Focus on concise insights. Succinct statements with clear insights are everyone’s jam. Every slide should serve a purpose and contribute directly to the decision-making process. Distill complex information. Don’t use 100 words when 20 words will nail it. If you’re having difficulty trimming, consider using company-approved AI tools to help you take out the fluff.
Five Preferences to Confirm With the Person You Want to Reach
Now we’ll delve into what your particular audience does and does not want. If you haven’t yet, start by asking the person you’re presenting to what they generally prefer. They probably know themselves well but have not been asked to articulate how they like to receive information.
Ask how dense is too dense. Some executives prefer detailed slides with comprehensive data. Others favor a more high-level approach. You’re weighing how to balance informative content with readability, ensuring that slides are not overloaded yet are sufficiently detailed to support decision-making.
Confirm the delivery format and timing. Some execs like information presented to them. Others prefer a pre-read of the material followed by a discussion. I always recommend our tool Slidedocs (I’ve written a free e-book on them), which are visual documents using both words and images. The templates help presenters organize their thoughts into a document for a pre-read or a read-along. They are designed to be skimmable and able to travel through your organization without the help of a presenter.
I’m a huge fan of pre-reads and prefer to use my time in meetings to ask questions and build alignment. If your audience didn’t review your material in advance, ask at the top of the meeting whether they would like you to present it or would prefer to read through it and then discuss it.
Find out how much data visualization they prefer. Charts, graphs, photos, and illustrations often communicate complex data more clearly than words alone. When execs can see what you’re saying, they often can better understand the impact of your idea. Does the exec want to understand exact numbers? Bar charts allow them to move their eyes across a series of specifics. Does the exec want to know the shape of a trend over time? Line charts can show the pattern. (See “Classic Charts Communicate Data Quickly.”) Some prefer charts with annotations that draw attention to what you think is the most important point. Others want to make their own conclusions from the data.
One of my clients, the CEO of a massive commercial real estate company, doesn’t want anything visualized. He prefers numbers, only in a table, and only in two colors — black and red. You might think this is archaic. But the fact that he’s clear to his teams about what he wants takes all the mystery out of how to communicate with him.
When the stakes are high, have a conceptual thinker help with diagrams and concepts. If you don’t have one on your team, and when it’s high stakes, find an internal designer to help you or hire one. You can’t afford to have the baby (your idea) thrown out with the bathwater (terrible slides).
Identify which details need spelling out. How well do the people you’re presenting to know the landscape and function of the company and products you’re talking about? For example, if your engineering team threw a slide into a deck about an issue that requires executive approval, do the execs all speak geek? Or do you need to explain the technology so that they will really understand the ask? Either eliminate internal jargon and acronyms or unpack those bits, especially if your proposal deeply involves expertise outside of the executives’ domain.
Ask whether appendices will be useful. When you’re organizing a presentation, you often troll data, read through complicated reports, and even hire external experts to figure out what’s best for the company. Do your execs want access to that supporting data? You can add a document to the end of the presentation as an appendix to show all of the data and source material. This allows the main content of the slides to remain focused and accessible while still providing comprehensive background information for those who want more.
Two Tips to Improve Your Presentation Skills
Getting materials in place is the biggest step. They will be your best tools for selling your ideas. But there are two extra areas to pay attention to as a presenter: how you handle questions and how you use every experience to improve.
Anticipate questions, and practice your answers. Before you have your meeting, gather a small team to challenge every point you make. Invite colleagues you trust to role-play as “a rapidly inquisitive exec” or “the doubting naysayer exec” so you are prepared to present your idea well. They’re gonna grill you, and practicing will help you remain unruffled when it happens.
Related Articles
Ask for feedback after the presentation. Establish a feedback loop with those you presented to. Ask what worked well and how you can improve. If attendees don’t have the time, find people who have had their ideas funded and talk to them about what they did that worked. Advice and some perspective will help you nail your performance even better next time.
Empathetically understanding your audience members and how they process information, whether it’s executives or peers, sets up your ideas for success. Clarity creates efficiency. When a presentation fits just right, you’ve given your great thinking the best chance of moving through your organization and having maximum impact.
About the Author
Nancy Duarte is CEO of Duarte Inc. , a communication company in the Silicon Valley. She’s the author of six books, including DataStory: Explain Data and Inspire Action Through Story (Ideapress Publishing, 2019).
More Like This
Add a comment cancel reply.
You must sign in to post a comment. First time here? Sign up for a free account : Comment on articles and get access to many more articles.
PowerPoint: How to Add Audio to Powerpoint on Windows 10 and Mac
Last Updated Thursday, August 31, 2023, at 5:00 am
Known Issue (August 14, 2023):
Some Windows 11 users are experiencing issues with PowerPoint exports when they are turned into .mp4 files. Visuals within the exported PowerPoint are appearing as flipped, or upside down. We are working with Microsoft to find a solution.
As a workaround, please convert the file as a .WMV file option and save it in My Media. The following are directions on how to convert a PowerPoint Presentation with audio to a .WMV file . For more support or to help troubleshoot issues, please reach out to the LTS Help Desk at [email protected] .
Microsoft PowerPoint offers features to record audio narration and export it as a video. PowerPoint records audio slide-by-slide rather than in one continuous file, allowing creators to easily re-record a slide if they make a mistake or need to change something later. Exporting as a video and uploading to Kaltura or Canvas for streaming is advantageous since it standardizes file types, doesn't require a download to view, is in a format that can be captioned, and allows viewers to navigate more efficiently.
A recent update has made the process comparable on a Mac, but the specifics vary. Windows 10 instructions follow; Mac users can click the link below to jump to the appropriate instructions.
- Instructions for Mac users
Windows 10 Instructions:
The following instructions explain how to add audio to your PowerPoint presentation on Windows 10 and export that PowerPoint as an MP4. The text instructions cover the same information as the embedded video below.
NOTE: If you have an older version of PowerPoint, you may need to update it to access the features described below. If you do not have PowerPoint, you can download it and other Microsoft Office products for free by going to office365.uwec.edu. If you have questions about updating or installing PowerPoint, contact the LTS Help Desk at [email protected] or 715-836-5711.
- Design your PowerPoint TIP: Use images and limit text to better engage viewers/listeners.
- Click Record Slide Show NOTE: Audio may start recording automatically if you have an older version of PowerPoint. It will still work, but this version offers reduced functionality.
- Record narration and avoid reading text on the slide out loud to viewers. Click the blue Replay button to listen to the recorded audio and ensure it was recording.
- Press [Escape] or the ‘X’ button located in the top right of the screen when the audio recordings are finished. You will see a speaker icon on slides that have audio.
- Select Export (steps 10-14 are shown in screenshot below).
- Select Create a Video .
- Optional: Select Full HD (1080p) for the video quality; it is unlikely a higher quality is needed.
- Select Use Recorded Timings and Narrations.
- Follow prompt/pop-up window to save the video in a memorable location.
- How to upload and share with Kaltura (Instructors should use Kaltura. Students will need to use it if the file is over 500 MB, which a PowerPoint probably won't be and they can use Canvas.)
- How to upload and share in a Canvas assignment (students)
- How to upload and share in a Canvas discussion (students) - the instructions refer to the "rich content editor" which is just the features in the top of the discussion post reply.
Elaboration on the Recording Features:
- Timing Feature – there is a rolling time feature for the individual slide and the overall presentation. Allows the speaker/presenter to monitor how long they are talking.
- Microphone Feature - Click on Settings and select Microphone and then the specific device to set up before recording.
- Replay Feature - Use to check that the audio is recording properly before starting additional slides.
- Clear Feature - Select Clear to delete/re-record audio.
- Don’t set the camera to record - Make sure this button has a diagonal slash through it to avoid the problem.
Mac Instructions:
The following instructions will teach you how to add audio to your PowerPoint presentation on a Mac and export that PowerPoint as an MP4. The text instructions cover the same information as the video embedded below.
NOTE: It is essential to have the Office 365 version of PowerPoint or you will not be able to save your PowerPoint as a video. If necessary, you can download it and other Microsoft Office products for free by going to office365.uwec.edu. If you have questions about updating or installing PowerPoint, contact the LTS Help Desk at [email protected] or 715-836-5711.
- TIP: Use images and limit text to better engage viewers/listeners.
- Click Record Slide Show
- TIP: Before you begin recording your full presentation, do a practice recording to verify your microphone and other settings are correct.
- NOTE: Avoid reading the text written directly on the slide; use the slide to elaborate on the material being presented.
- Stop speaking for a second to prevent the audio from cutting out as slides change. Resume speaking when the time starts moving again under the Current slide timing feature to the left of the recording button.
- Click Stop or Pause at the top of the screen and then End Show in the top left corner when all the audio recordings have been finished.
- Check the audio by clicking on Play from Start under the Slide Show tab or the presenter mode icon at the bottom of the screen.
- Edit the name of the file and where you would like to save the video following PowerPoint's prompts.
- Click Export
- Upload your mp4 video to Kaltura or Canvas to share it:
- How to upload and share to My Media (Instructors should use My Media. Students will need to use it if the file is over 500 MB, which a PowerPoint probably won't be and they can use Canvas.)
- How to upload and share in a Canvas discussion (students) - the instructions refer to the "rich content editor" which is the tool at the top of the discussion post reply.
Additional Video Tool Options
For more information about recording options available, click here to view a comparison of each tool's features.
- Undergraduate Admission
- Graduate Admission
- Tuition & Financial Aid
- Communications
- Health Sciences and Human Performance
- Humanities and Sciences
- Music, Theatre, and Dance
- IC Resources
- Office of the President
- Ithaca College at a Glance
- Awards and Accolades
- Five-Year Strategic Plan
- Public Health
- Directories
- Course Catalog
- Undergraduate
PowerPoint Live and Teams Webinar | April 11
Powerpoint live and teams webinar.
In this webinar, Helina Kassa will teach you how to use PowerPoint Live in Microsoft Teams, and Live Presentations in PowerPoint to improve your presentations. Whether you’re a beginner or have some experience, this session will demonstrate ways to make your presentations awesome and communicate better. Join us on Thursday, April 11, from 3:30 pm – 4:00 pm , and learn some simple tips that will provide you with a different way to present your ideas.
Register for this free webinar: PowerPoint Live and Teams | 4/11/24 | 3:30 pm
This session will cover the following:
- Learn different features of PowerPoint Live such as sending live reactions, viewing slides in high contrast mode, and translating slide content to another language
- Explore PowerPoint Live in Teams with a streamlined presenter view
- Create slides with proper reading order
- Learn how to group objects such as complex diagrams or illustrations, making it easy for a screen-reader to navigate
Don’t miss this opportunity to discover how to optimize your use of PowerPoint Live in Microsoft Teams. Come learn how to use PowerPoint for the web to deliver your content, and to join Live Presentations from any device as an attendee.
More Information
- Present from PowerPoint Live in Teams – Get help from Microsoft on PowerPoint Live in Teams
- Engage your audience with Live Presentations – Get help from Microsoft on Live Presentations
- Create slides with an accessible reading order – Get help from Microsoft on Accessibility Tips
- PowerPoint Help & Learning – Get help from Microsoft’s help and learning page
- IT Knowledge Base Article – Information on PowerPoint from Information Technology & Analytics
Future Sessions
Join the Business Productivity Team for future sessions including:
- Navigating OneDrive | Register | April 25, 11:30 AM – 12 PM
- Using Whiteboard in Teams | Register | May 2, 2 PM – 2:30 PM
If you have any questions, please reach out to the Information Technology Service Desk for assistance or contact the Business Productivity Team for a consultation . Individuals with disabilities requiring accommodations should contact Sherman Cahal at [email protected] or reach out to the IT Service Desk at 607-274-1000. We ask that requests for accommodations be made as soon as possible.
Information Technology Service Desk ithaca.edu/itchat [email protected] 607-274-1000 104 Job Hall
Android Police
How to add bullet points to a google slides presentation.
Present your slide in an organized manner with bullet points
Google Slides is a feature-packed PowerPoint alternative. The free tool comes with style and formatting add-ons to elevate your presentation in no time. One such option is the ability to insert bullet points to simplify content on your slide. Whether you use Google Slides on the web, an iPhone, an iPad, or an Android phone , here's how to add bullet points to your presentation.
How to add bullet points to Google Slides for the web
We'll start with Google Slides for the web and then move to mobile and tablet apps to add bullet points. Since it's the web version, you can access it from a desktop browser on your Windows PC, Mac, or Chromebook.
1. Visit Google Slides on the web and open a presentation you want to edit.
2. Go to a slide and select the content to convert to a bullet list.
3. Select the Bulleted list icon at the top. You can also use Command + Shift + 8 (Mac) or Ctrl + Shift + 8 (Windows) to add a bullet list.
4. When you enter a bullet list on an empty slide, look for the first bullet point on the text field. Press Enter to add a second item to the list.
5. You can create a mini list beneath the main bullet point. This is an effective way to organize the listicle. To do so, press Enter on the main bullet point (or Return on Mac) and press Tab .
6. Add relevant points and press Enter to expand the secondary bullet list.
Change the bullet point color
By default, Google Slides uses black for bullet points. If it doesn't match your presentation theme, use the steps below to change it.
1. Launch a presentation in Google Slides.
2. Click any bullet point to select the entire list.
3. Click A at the top and change the bullet point color. You can use the same trick to change the bullet point color for the secondary list.
Change the bullet point style in Google Slides
Do the rounded-style bullet points feel repetitive? Use the tricks below to explore and add different bullet point styles for your presentation.
1. Open any slide and select the bullet points.
2. Click Format at the top. Expand Bullets and numbering .
3. Expand List options and select More bullets .
4. In the Insert special characters menu, pick a symbol from different categories, search by keyword, or draw one.
5. Select a relevant symbol and check the live changes.
What's the difference between Google Slides templates and themes?
Add bullet points in google slides for android.
Google also offers a robust Slides app on mobile platforms. It's helpful for making little tweaks on the go.
We use Google Slides for Android in the screenshots below. You can follow the same on Android tablets.
1. Launch Google Slides on your phone and select a presentation. Tap the slide you want to edit.
2. Select Edit slide
3. Tap any text area and select bullet list from the bottom menu.
4. Type your text and tap Enter to expand the list.
Use bullet points in Google Slides for iPhone and iPad
If you use Google Slides on an iPhone or iPad, use the steps below to add bullet points to it. Let's take the iPad as an example.
1. Open Google Slides and select a presentation.
2. Tap a slide and select Edit slide .
3. Select any text area and tap the Bulleted list icon at the top.
4. Tap Return to continue adding items to the list.
5. Tap Return and tap the indent icon next to the bullet point to add a bullet point within a bullet point list.
6. Tap the checkmark in the upper-left corner and you're set to deliver your presentation.
Does Google Slides bullet points work with PowerPoint?
Do you plan to open your Google Slides presentation in Microsoft PowerPoint? Your added bullet points show up exactly as they do on Microsoft's software. There won't be any formatting issues.
Make your presentation crisp and clear
Organizing relevant slide content in easy-to-understand bullet points leaves a positive impression on your audience. While you are at it, turn on autoplay to deliver your presentation effortlessly . If you want inspiration to get started with your upcoming presentation, check our dedicated Google Slides templates list for work, school, and home.
April 4, 2024
11 Best Websites for Making a Presentation (And How to Choose One For Your Needs)
Here are 11 of the best websites and programs to create free presentations online
Co-founder, CEO
The best websites for making presentations equip you with all the tools needed to build a professional, attractive, and informative slide deck quickly and efficiently. But with dozens of slide makers claiming to be the best, it’s hard to choose an app that suits your needs best.
We’ve done the legwork for you and scoured the web for the best presentation websites. We based our evaluation on factors such as functionality, ease of use, AI sophistication, collaboration tools, and value for money. Below is the result — a comprehensive overview of the 11 best web-based slide creation apps based on our findings.
Short on time? Summary of the best sites for making a presentation
1. plus ai — best all-round presentation maker.

Key Features
- Adds easy-to-use AI to Google Slides
- Affords customization options for slide templates, colors, and logos
- Allows slide deck generation via different methods
- Facilitates collaboration within teams on Google Workspace
- Features a setting-rich but straightforward user interface
- $10/month for Basic and $20 for Pro versions when billed annually ($15 and $30, respectively, with monthly billing)
Plus AI is a powerful and user-friendly presentation maker that’s suitable for any purpose, whether you’re a professional, student, or amateur user.
Plus AI gives you a robust selection of AI slide creation methods. You can generate presentations straight from text, work on them slide-by-slide, design them from scratch, or use existing templates. Regardless of the method, the tool’s AI technology does all the heavy lifting design-wise and the interface is a breeze to navigate, so you can sit back and focus on the content.
Meanwhile, the customization options allow you to tailor the slides to your desired aesthetic, content type, and audience, and you can create your presentation in 80 languages. The resulting slide decks are elegant, professional, and appropriate for any use case.
Plus AI is an affordable presentation maker, with pricing that starts at $10 per month with annual billing, or $15 when billed monthly. Each of the plans includes an AI extension for Google Docs; this feature helps you compose and edit text. If you’d rather not spend money without taking the tool for a test drive, Plus AI offers you a 7-day free trial.
Here are the key pros and cons of Plus AI — they should help you decide if this presentation maker is right for you:
- Generates professional and visually appealing presentations in minutes — no design skills needed
- AI function allows you to edit and format slides without manual effort
- Lots of ways to customize the presentation
- Vast selection of templates and example presentations
- Text-to-slide and from-scratch creation
- Allows team collaboration in Google Workspace
- Integrates with Google Slides and Microsoft PowerPoint
- Budget-friendly plans and a 7-day free trial
- Plus creates presentations in Google Slides or PowerPoint format, which may be harder for newer users to edit
2. Canva — Best free presentation site

- Offers mobile presentation templates
- Web- or mobile-based Canva app supports collaboration
- Remote Control feature lets you run the presentation from your smartphone
- Canva live feature allows viewers to join QA sessions during a presentation
- Presenter mode lets you see your speaking notes and upcoming slides while you present
- AI assists in slide creation and can present on your behalf
- Individual Free Plan: $0 per month
- Individual Pro Plan: $14.99 per month
- Teams Plan: $29.99 per month
Canva is a web-based template editor with graphics creation tools and a powerful presentation builder in its free plan. Canva offers you an array of slide templates designed for virtually any purpose, along with a suite of customization tools to tailor the presentation to your topic and setting.
Canva has made a noticeable effort to optimize presentations for the smartphone. The app’s most striking feature is its selection of mobile presentation templates, which don’t lag their desktop-based peers in either aesthetics or utility. But whether or not your presentation is designed for a mobile screen, Canva lets you run it right from your smartphone, with a presenter view that shows your notes and upcoming slides. The audience can likewise engage with your presentation from their mobile devices during Q&A sessions.
Depending on your use case, you may be able to get away with Canva’s comprehensive free plan. The free Canva has presentation creation and editing tools and gives you access to a huge selection of professional templates. However, it’s the $14/month Pro plan that lets you unlock all the premium tools and graphic assets. And if you need Canva to collaborate with teams, you’re looking at $29.99 per month for the first 5 users.
To help you decide whether Canva is worth trying out, we’ve made this quick summary of the app’s pros and cons:
- Solid free plan with basic features and a large selection of graphic assets
- Optimized for mobile presentations
- Elegant templates for any use case
- Intermediate design skills required
- No direct integration with Google Workspace or Microsoft 365 (possible through third-party apps)
3. Prezi — Best slide tool for creative users

- Web-based tool for creating presentations, videos, and infographics
- Asset library includes templates, ready-to-use story blocks, and stock images from Unsplash and GIFs from
- Integrates with Webex, Zoom, Microsoft Teams, and other video conferencing apps to show presentations and the presenter on the same screen
- Lets you convert PowerPoint presentations to Prezi
Pricing (all plans are billed annually)
- For students/educators: $3-8 per month
- For individuals: $7-19 per month
- For businesses: $15-29 per month
Prezi is a web-based tool for creating presentations, videos, and infographics that are suitable for business and educational settings. The tool offers a wealth of image and icon assets, as well as templates to get you started on your slide deck. The templates do not constrain your creativity with linear slides the way PowerPoint does — you can create your presentations on an open canvas. Prezi even lets you import and customize PowerPoint presentations in its app. And, with the help of Prezi’s new AI tool, you can create and edit entire presentations quickly.
One of Prezi’s most defining features is its integration with popular video conferencing apps, such as Webex, Zoom, Teams, and Meet. Crucially, Prezi lets your slides appear on the same screen as your own video feed while you’re presenting.
Prezi offers three pricing tiers. Students and educators get the least expensive options, with plans that range between $3 and $8 per month. For individual users, plans cost $7-19 per month, while business users pay between $15 and $29 per month. All of Prezi’s plans are billed annually, but you can try the tool for 14 days without committing to a subscription.
If you’re not sure whether this presentation tool is right for you, consider Prezi’s pros and cons below:
- Design freedom and for creating unique and attractive slides
- Graphic assets are readily available
- Integrates with video conferencing apps
- AI assistant generates and edits presentations
- Inexpensive plans for students and educators
- Video and infographic creation part of each plan
- 14-day free trial
- Design skills required to create quality presentations
- Lack of integration with Google Slides and Microsoft PowerPoint
- No monthly billing options
4. Visme — Best for graphics and special effects

- Tools for creating special effects and animating graphics
- Ability to import and edit Microsoft PowerPoint presentations
- AI designer helps create a presentation draft
- Integration with Google Drive, DropBox, Mailchimp, Slack, and other apps
- Presentation analytics tools
- Basic package: $0/month
- Starter package (individual): $12.25/month
- Pro package (individual or team): $24.75-$79+/month
Visme is a web-based app for producing various types of visual content, including presentations. The app’s most distinct feature is its suite of special effects you can use to make the slides’ content and graphics more engaging. The app also lets you animate the images and insert video and audio features into the slides.
Visme integrates with a whole host of other platforms and apps. These integration options are largely designed to let you import content seamlessly into Visme. For example, you have the option of importing your PowerPoint files into Visme, enhancing them there, and exporting them back in the .ppt format if you like. That said, Visme does not work as an extension in popular slide makers, like Google Slides or PowerPoint.
You have three main pricing options with Visme. The Basic plan is free, but you’re limited in access to collaboration tools, assets, interactive, and AI features. The more comprehensive Starter plan costs $12.25 per month (billed annually), and equips you with Visme’s more premium tools. Finally, the Pro team plan sets you back $79/month for a team of 5 and lets you use Visme’s entire suite of interactivity and collaboration functions.
Here are a few vital pros and cons if you need help deciding whether Visme is right for you:
- Vast selection of special effects
- Ability to animate graphics on the slides
- Simple file movement between different web-based apps
- Free plan available
- Free plans extremely limiting
- No direct integration with Google or Microsoft slide tools
5. Powtoon — Best for slides with animation

- Templates with configurable graphics and animation
- Customizable fonts, colors, and logos
- Access to stock images, videos, and soundtracks
- Lite plan: $50/month ($15/month when billed annually)
- Professional plan: $190/month ($40/month when billed annually)
- Agency: $117/month (annual billing only)
Powtoon is a visual web-based content creation platform with tools for making videos, animations, and presentations. The app’s presentation function lets you build slides using professional templates, in which you’re free to customize the fonts, colors, logos, and graphics. You can even animate the graphics and build custom avatars to present on your behalf — it’s one of Powtoon’s unique selling features.
Powtoon’s suite of slide tools includes a database of royalty-free stock images, video footage, and music. You can use all of these assets in your slides, or upload your own as you see fit. However, how much of these shiny tools you can use in your slide decks depends on the chosen plan.
There are three pricing plans available, and the discrepancy between monthly and annual payments is striking. Most presentation sites charge a few dollars more if you opt for monthly instead of annual billing, but Powtoon’s monthly prices easily triple and quadruple. For example, the Lite plan costs $15/month with annual billing, but $50 if you wish to pay every month instead. You get very basic features with this plan, especially as far as animation and interactivity are concerned. Likewise, the Professional plan jumps from $40 to $190 if you choose monthly payments. You get a bit more for your buck, but some rudimentary features are still absent (like font uploads). Meanwhile, the Agency plan costs a whopping $1400 annually (no monthly option), and this plan gets you all of the app’s bells and whistles.
Not sure if investing in a product like Powtoon is worth it? Consider its pros and cons below:
- Comprehensive animation and video creation features
- Graphic and audio assets available with subscription
- Fonts and logos can be uploaded
- Most customization, animation, and AI features only come with the expensive Agency package
- Monthly payment options are not reasonable
6. Haiku Deck — Best site for image editing options

- Minimalistic interface
- Graphic design tools for improving slide aesthetics
- Pre-loaded templates and image assets
- Cloud-based file sharing for team collaboration
- AI presentation builder (Haiku Deck Zuru)
- Pro plan: $9.99 per month billed annually, or $19.99 monthly
- Premium plan: $29.99 per month, billed annually
Haiku Deck is a web, desktop, and mobile-based presentation builder with a significant focus on design aesthetics. The app’s design tools allow you to refine the graphics in the preloaded templates and images you’re using in the slides. You can source the images right from Haiku’s repository, which boasts over 40 million assets.
To help you create your slide decks, Haiku offers its AI assistant. The AI feature can create new presentations from your outline, or enhance your existing drafts. Since the AI learns from other Haiku users, its algorithms are now trained to outfit slides with contextually relevant imagery and graphics.
Haiku Deck’s pricing has two tiers: Pro and Premium. The Pro plan costs $9.99/month when billed annually and affords full access to the slide creation tools. Meanwhile, the Premium plan will set you back $29.99/month (again, billed annually), and equips you with features such as analytics, live web tracking, and priority support.
Here’s a summary of Haiku Deck’s most prominent pros and cons:
- Visually appealing slides
- Large database of graphic assets
- Advanced tools for editing images
- Capable AI-powered slide builder
- No free plan
- No integration with Google Slides or Microsoft PowerPoint
7. Zoho Show — Best presentation site for budget-minded users

- Clean interface with tools changing depending on the task
- Library for templates, slides, and fonts to facilitate team collaboration
- Over 100 templates
- Imports/exports PowerPoint files
- Presentations can be controlled from smartphone or smart watch
- For individuals: Free
- Professional Plan: $2.50/month and up (billed annually)
- With Zoho Workplace Standard: $3.00/month (billed annually)
Zoho is a web-based suite of business tools, and Zoho Show is its slide creation app. Zoho Show is a straightforward, inexpensive, yet fully functional slide maker that offers most of the same features you’ll get from pricier presentation sites. You can build your decks using over 100 preloaded templates, work on PowerPoint presentations before exporting them to their original file format, and run your slideshow from a smart device. Show’s most unique feature is its clean, contextual interface that only displays tools that are relevant to your current task (whether that’s handy or limiting depends on your preferences).
Zoho Show’s pricing has three tiers. First, there’s the Free plan. This package lets you build basic presentations, but you miss out on key collaboration features and have limited access to graphic assets. Next, you get the more comprehensive Professional Plan, which costs $2.50; you must sign up for Zoho WorkDrive and have a team of 3 people to get this plan. Finally, you can get the entire Zoho Workplace suite for $3/month — this option unlocks the full functionality of the Show app and lets you use other Zoho tools, such as their Office Suite, Mail, and Workdrive.
Have a look at Zoho Show’s pros and cons below to see if this presentation website is right for you:
- Interface automatically shows tools relevant to the task
- Ability to add custom fonts and embed files into slides
- Templates, graphic assets, and collaboration tools included
- Supports PowerPoint file formats
- Subscription to Zoho Workdrive or Workplace required to access paid plan — unnecessary if all you need is a presentation tool
- Some plans require a minimum of 3 users
- Free individual plan limits use of graphic assets, templates, and collaboration tools
- No direct integration with Google Slides
8. Pitch — Best presentation site for use in business and sales

- Lets you build presentations with AI, from a template, or from scratch
- Supports custom fonts and colors
- Provides team collaboration tools
- Allows you to embed presentations on the web
- Offers engagement analytics tools
- Pro plan: $25/month
- Business: $100/month
Pitch is a web-based presentation maker designed primarily for business use. The app helps streamline slide deck creation with its AI tool, which generates a first draft based on your prompts and leaves your team with the task of refining the slides to your liking. The slides have shareable links, so your entire team can collaborate on the slide deck. You can even invite consultants from outside your workplace to edit the presentations.
Once your slide deck is complete, Pitch allows you to embed it on the web in your CMS — much like you’d do with a YouTube video. And to give you a feel for how audiences engage with your presentation, Pitch equips you with engagement and analytics performance tools.
There are three pricing options with Pitch. The free plan comes with all the presentation creation functions, but you get no tracking and limited collaboration tools. The Pro plan costs $25/month (or $22 per month when billed annually), and gives you more freedom to use Pitch in a team environment. Finally, the Business plan costs $100/month (or $85/month with yearly billing) and gives you access to the full suite of features.
Can’t decide if Pitch is the best presentation website for your team? Have a look at its most vital pros and cons:
- AI slide creation feature
- Performance analytics tools
- Integration with various productivity and collaboration apps
- Media asset library
- Engagement tracking only available in paid plans
- No integration with Google Slides or Microsoft 365
9. Beautiful.ai — Best site for no-frills AI-generated presentations

- AI-powered presentation maker
- Slide creation from user’s prompts
- Automated slide formatting
- File sharing within the team (requires Team Plan)
- Graphic assets database
- Pro: $144 per year
- Team: $40/month per user with annual billing ($50 with monthly billing)
- Enterprise: Pricing available on request
Beautiful.ai is an AI-powered presentation builder that leverages full automation to make slide creation quick and easy. All you need to do is enter a prompt for your slide deck, and beautiful.ai will generate your first draft. These AI-generated drafts are quite simplistic in terms of both content and graphics, but they serve as a good starting point. Moreover, beautiful.ai’s presentations are formatted consistently, which should save you time as you edit each slide.
You get three pricing options with beautiful.ai — Pro, Team, and Enterprise. The Pro package is meant for individual use, and costs $144 per year (there’s no way to pay monthly). The plan equips you with the AI slide maker but limits your use of assets and team collaboration features. The Pro plan costs $50/month for each user, or $480 annual for each license you purchase. This plan affords access to more customization and teamwork functions and lets you use graphic assets. Finally, the Enterprise plan includes all the features of the Pro plan, but with more dedicated training and support for your team. You’d have to reach out to beautiful.ai’s sales team to get a quote for the Enterprise plan.
Beautiful.ai helps create slides quickly and with little skill. However, if you’re not sure this app is right for you, consider its most vital pros and cons below.
- Quick way to create and format slides
- Inexpensive plan for personal use
- Elegant slide templates
- No integration with Google Slides or Microsoft 365
- Slide content is very basic
- Limited customization and branding options
10. Google Slides — Best for Google Workspace Users With Basic Presentation Needs

- Basic presentation creation tool
- Limited selection of templates, fonts, and colors
- Supports import/export of PowerPoint files
- Allows collaboration within the Google Workspace
- Free with a Google account
Slides is the web-based presentation tool you get with your Google account. This rudimentary app features a limited library of templates, fonts, and colors, along with a basic suite of tools for formatting the text and graphics in your slides. You can insert your own image, video, and audio files into the slides, but there is no access to a library of royalty-free assets.
Despite its functional constraints, Google Slides is a useful app because it lets teams using Google Workspace collaborate easily on presentations. To get the most of Slides, though, you need to boost its functionality with a suitable extension. Google Gemini now works as an extension within the app, but for the $30 it costs you, the output is disappointing. All Gemini knows does is generate simple, low-quality images; it won’t help you produce, format, or edit presentations.
In contrast, an app like Plus AI leverages artificial intelligence algorithms to give Google Slides powers it lacks on its own. By using the Plus AI extension, you can create entire Slides presentations from a single prompt, automate slide editing and formatting, and access a rich library of templates and ready-made slide decks. Meanwhile, Plus AI’s customization features help you brand your presentations with custom fonts, colors, and your company logo.
Not sure if Google’s slide creation tool is right for you? Have a look at its pros and cons below.
- Allows collaboration in the Google Workspace
- Compatible with PowerPoint files
- Supports AI-powered slide-creation extensions, such as Plus AI
- Free to use with a Google account
- Limited capabilities without third-party apps
- No library with image, video, or audio assets
11. Microsoft PowerPoint — Best For Highly Skilled Presentation Designers

- Vast library of slide themes, variants, and layouts
- Database of stock images and videos
- Massive array of slide editing, formatting, and customization tools
- Supports collaboration in the Microsoft 365 ecosystem
- As a standalone product: $159.99 (one-time fee)
- With Microsoft 365 apps, for home use: $6.99-$9.99/month
- With Microsoft 365 apps, for business use: $6.00-22.00/user/month
PowerPoint is one of the world’s oldest presentation builders that’s been part of Microsoft’s arsenal since the early 1990s. To this day, PowerPoint has been the most commonly used presentation app. But there’s a reason we’ve ranked it last on our list. Buoyed by its popularity, PowerPoint hasn’t evolved much over time; you won’t get anything beyond the most basic and uninspired presentations out of it unless you’re an advanced user with lots of time on your hands.
The app’s user interface immediately overwhelms you with options and settings. Some of these seem similar in how they function, and you won’t know which tool to use until you’ve experimented with them all. Apart from the cluttered interface, PowerPoint disappoints with its simplistic selection of templates and designs.
You can use Microsoft’s Copilot to forgo the tedious task of creating your own PowerPoint presentation, but beware: like Gemini, Copilot is still limited in its slide-making abilities. You can get it to create a slide deck from a single prompt, but the output will feature basic and repetitive along with lifeless images.
PowerPoint’s pricing is a bit convoluted at a glance — you get different options whether you want the standalone product ($159.99) or the entire Microsoft 365 suite. If you choose the latter, the Home options range in price between $6.99 and $9.99 per month, while the Business plans cost between $6.00 and $22.00 per month per user.
We don’t believe that PowerPoint is worth your time considering the vast selection of more powerful and user-friendly presentation apps on the market. However, you can review the app’s pros and cons below and decide for yourself.
- Massive selection of design and customization tools
- Integrates with Microsoft Copilot
- Lets team members using Microsoft 365 work on the same presentation simultaneously
- Overwhelming user interface
- Very basic templates and designs
- Creating professional presentations is a challenge for novice users
- AI assistant cannot produce elegant, content-rich slide decks
How we ranked the best presentation sites
To make your selection process simple and effective, we ranked the best presentation websites based on these vital criteria:
- Functionality
- Level of AI sophistication
- Ease of use
- Collaboration options
Integration with popular slide creation tools
Value for money, functionality .
The best presentation sites are loaded with handy functions that enable you to make visually appealing, info-rich, and engaging presentations with little effort and minimal editing. These include customization tools, templates, image assets, and graphics refinement features.
Level of AI sophistication
AI technology is at the forefront of slide makers’ drive to create the best product for their clients. AI-powered presentation sites save you from spending long hours on writing content, digging up graphics, and then formatting every slide — AI handles these tasks for you. But not all AI slide creators are made equal. Some leave you with rudimentary decks that feature repetitive content and unrelated imagery. Others give you a solid starting point for an informative and captivating presentation.
Ease of use
The best presentation sites greet you with an intuitive and uncluttered interface that takes you minutes (if not seconds) to master. But usability goes beyond navigating the UI. That’s why we also assess the simplicity with which you can actually produce presentations. Simply put, how easy is it to create and edit slides? Do you need advanced design skills to manipulate the graphics and give the slide deck your desired aesthetic ? The best slide makers take these questions into account, so that their product makes presentations a breeze. You worry about the content, and let the app do the rest.
Collaboration options
High-quality presentation apps allow team members to create, edit, and give feedback on presentations remotely. That’s because today’s business needs, along with hybrid work arrangements, mean that more and more teams are forced to collaborate electronically. Features such as cloud-based file sharing and integration with communication platforms help different members of your team work on the presentation from wherever they are.
Google Slides and Microsoft PowerPoint are the most commonly used presentation programs in the world. These two giants are the natural, go-to option for slide creation in the corporate, educational, and institutional world. Any presentation app that’s worth its salt should integrate with at least one of these tools. At the very least, a quality independent slide app should be able to import and export files that can be used in Google Slides or PowerPoint.
The best presentation apps are usually not free, but the money you pay for them should be worth the features and benefits you get in return. That’s why we’ve evaluated each of the slide makers above based on the balance between their price point and their offerings.
How to choose the best presentation website for your needs?
You can’t really go wrong by opting for any of the 10 presentation sites above; however, to get a tool that’s tailored to your use-case, you’ll have to do a bit more research and analysis. The four steps below should help you zero in on the optimal presentation maker for your needs.
- Consider the purpose of the presentation. Some slide tools cater to sales teams (think Pitch), others to graphic-minded users (Haiku Deck comes to mind), while others, like Plus AI, are excellent all-rounders.
- Decide on the level of customization you need. How concerned are you with personalizing and branding your slide decks? If a generic, templated presentation is all you need for a school project, investing in a feature-rich, customizable tool may be overkill. But if you need your slide decks to feature custom colors, fonts, and convey your brand identity, opt for a tool (and pricing package) that has this functionality.
- Decide if you want AI help. Unless you’re a skilled designer with a passion for creating and formatting slides, AI can be incredibly useful. Consider this: would you rather spend hours on refining your slides and ensuring consistency, or have the AI tool produce a uniformly formatted first draft? Check out the best AI presentation makers here.
- Factor in your budget. Most presentation sites have similar pricing, with monthly plans ranging between $0 and $40. However, some charge more — much more. Of course, the higher price points generally translate into richer offerings that may include other apps for visual content creation. Consider whether you need these extras or if a capable slide creation tool will suffice.

Latest posts
Latest post.

The Best GPT-4 Apps and Demos (so far, April 2024)
The best GPT-4 powered apps we have seen so far
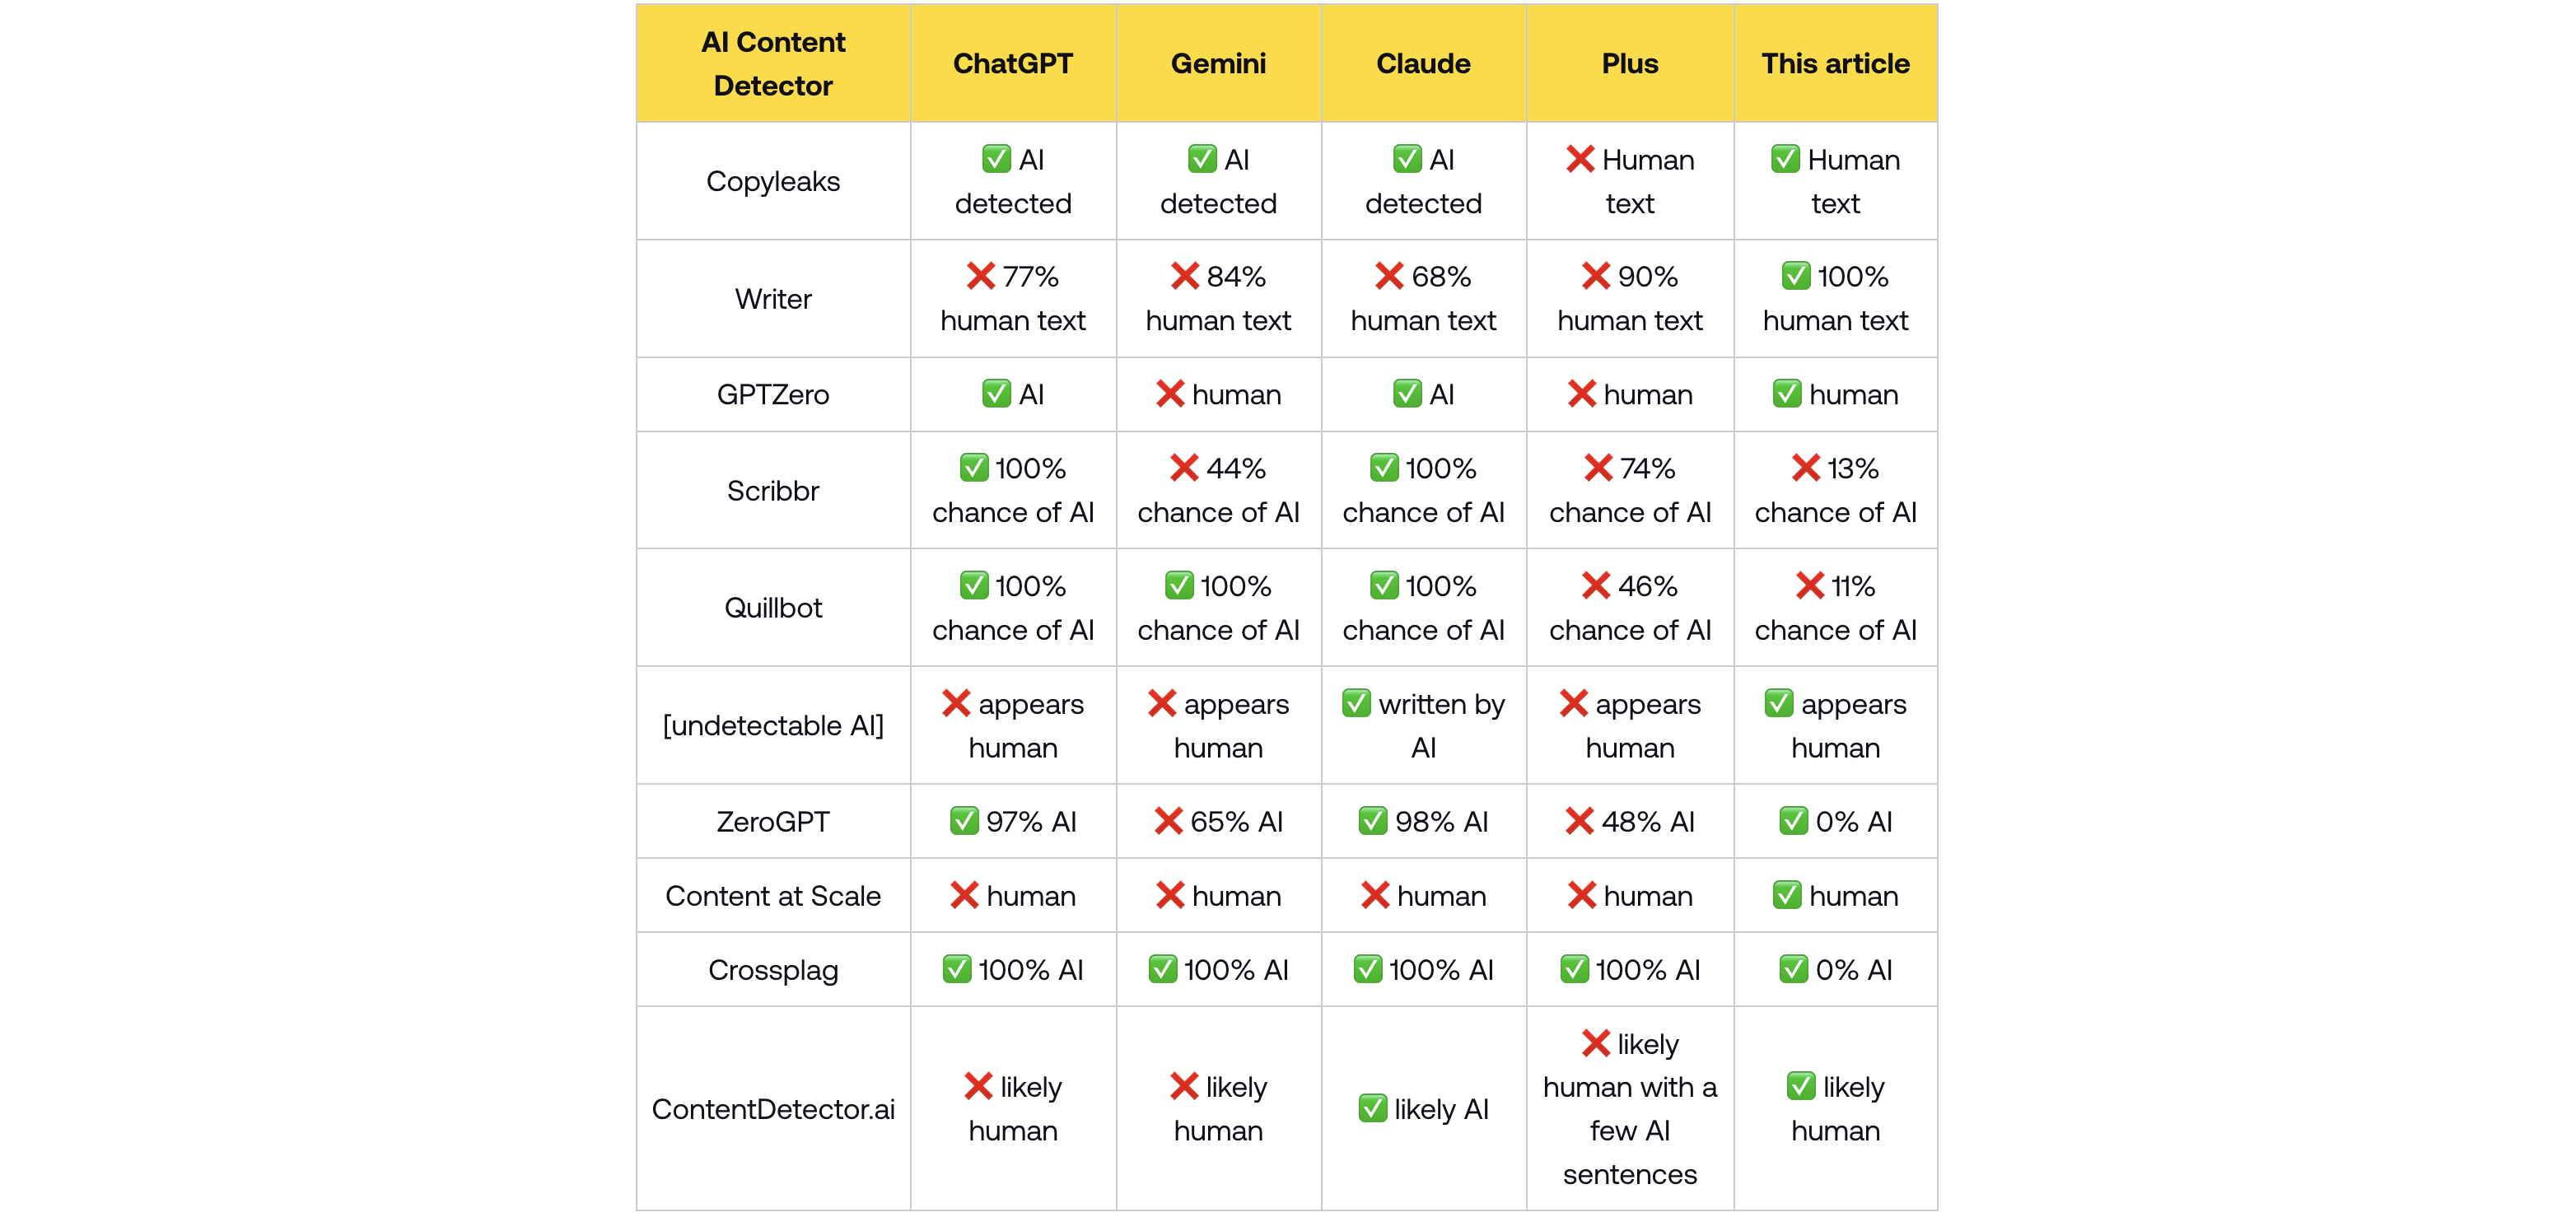
How do AI content detectors work — and can you trust them?
We tested 10 of the most popular AI content detector tools, their accuracy, whether they can be trusted — and how to bypass detection.

How to use ChatGPT to create PowerPoint presentations
Step-by-step guide to using AI tools to create presentations. Looking for ChatGPT for PowerPoint? Here's a guide to using AI in PowerPoint and Google Slides

Tome vs. Gamma: In-depth comparison, pricing, and recommendations
In-depth comparison of Tome and Gamma with recommendations for which tool is right for you
More resources
The best screenshot tools in 2024.
Comprehensive guide to choosing the best screenshot tool.
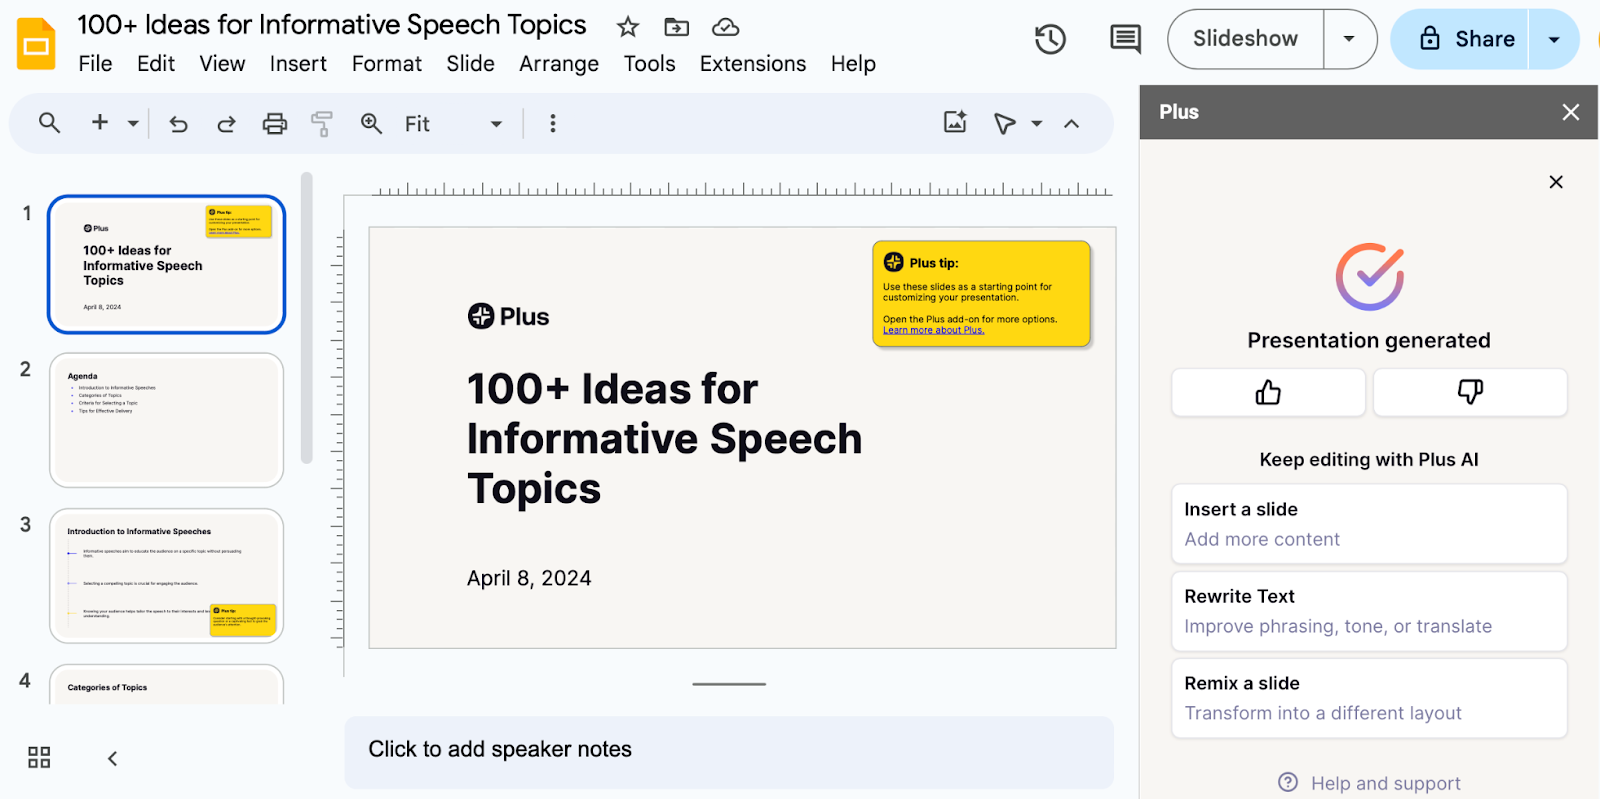
100+ Ideas for informative speech topics
Easy, fun, and educational ideas and inspiration for your next informative speech. Check out these starter topics and example presentations
How To Wrap Text In Google Slides: A Quick Guide
A step-by-step guide on how to wrap text in Google Slides and how to save time on formatting with Plus AI
IMAGES
VIDEO
COMMENTS
Tip 4: Make use of charts and graphs. We all love a good stat. Charts and graphs are a great way to present quantitative evidence and confirm the legitimacy of your claims. They make your presentation more visually appealing and make your data more memorable too. But don't delve too deep into the details.
In this video, learn how to make modern PowerPoint Presentations for college seminars and receive tips to deliver them with confidence. As a student, we want...
Making a PowerPoint. Follow these step-by-step guides on how to add certain elements to your PowerPoint presentation: Select a Design Theme. Add or Delete a Slide. Add an Image to a Slide. Add Notes to Your Slides. Add Animations.
Below are practical steps for doing a good PowerPoint presentation for college students. 1. Identify the key points. Before anything else, a good comprehension of the topic you want to deliver is necessary. Understanding your materials helps you be more confident when presenting and providing better slides.
Advice from Edelman and Harring on leveraging the working memory with PowerPoint: Leverage the working memory by dividing the information between the visual and auditory modality. Doing this reduces the likelihood of one system becoming overloaded. For instance, spoken words with pictures are better than pictures with text, as integrating an ...
While writing out a script can help you prepare, you shouldn't follow it word for word. Use images and text in your slides to remind you of key points you want to mention. You can also use note cards to prompt you along the way. Check. Make Eye Contact. Try to connect with your audience, not just your slides or notes.
Step 4. Teach With Visualizations. For the visual learners in the audience, it helps to have a chart or graph that illustrates the concept at hand. You might have the most eloquent speaking points in the rest of the presentation, but a well-made chart could be the key to driving your point home.
Design your presentation in PowerPoint. Choose a professional and easy-to-read style for your presentation. On each slide, you should have a picture, a graphic or a few text points you want to emphasize. You should plan to speak for only 30 to 60 seconds on each slide, so don't try to cram too much information onto any one slide.
Get your main point into the presentation as early as possible (this avoids any risk of audience fatigue or attention span waning), then substantiate your point with facts, figures etc and then reiterate your point at the end in a 'Summary'. 2. Practice Makes Perfect. Also, don't forget to practice your presentation.
To make your presentation easier, draft out steps that include your title slide, your topic introduction, your arguments (for and against), and conclusion. You can also have an expert to do your assignments. 2. Research Arguments to back your topic. The presentation can either be based around a narrative or you may be examining a discussion ...
4. Add high-quality fonts and media. It should have a decorative theme that'll make it enticing to your audience. Any font you intend to use should match college or professional use. Graphics plays a significant role in your college PowerPoint Presentation. Good graphics make your content relevant and engaging.
"Death by PowerPoint" PowerPoint Presentation Guidelines • Highlight key points or reinforce what the facilitator ... include only key words and phases for visual, reinforcement • In order for your presentation to fit on most screens, text and images should be placed within 95% of the PowerPoint slide. This "action safe" area is ...
As a result, there are important tips to keep in mind as a student writing and designing college PowerPoint presentations. Below are nine of the most important tips. 1. Start with an outline. To put forward well-written and well-designed presentations, outline what you want to be included in your PowerPoint slides.
1. Open PowerPoint. Click or double-click the PowerPoint app icon, which resembles an orange box with a white "P" on it. This will open the PowerPoint templates page. If you don't have a Microsoft Office 365 subscription, you can use the website instead of the desktop app.
To do that, simply go up to the Home tab and click on New Slide. This inserts a new slide in your presentation right after the one you were on. You can alternatively hit Ctrl+M on your keyboard to insert a new blank slide in PowerPoint. To learn more about this shortcut, see my guide on using Ctrl+M in PowerPoint.
Use a maximum of 3 - 4 points per slide. It is easy to jam too much information into a slide and not even realize it. You should have 3 - 4 points per slide, maximum. While you present the information on the slide you should talk about the slide and not read the slide. The 3 - 4 points per slide are just that, talking points.
Practice your presentation a handful of times to ensure your content and talking speed is under time. [2] 6. Encourage your peers. Helping your friends if they find it hard to give the presentation will boost your skills since you get to know the difference in a good and a bad presentation. 7.
Learn everything you need to know to get started using Microsoft PowerPoint! You'll learn all the basics plus more, including: how to choose a design theme...
In this video, learn how to make modern PowerPoint Presentations and receive some of the best tips to deliver presentations with confidence. Let's face it, w...
Learn how to use PowerPoint better, from setting up your slide designs to working with text, images, video, charts, multi-media, and more. Discover how to work with PowerPoint's core presentation tools to make great presentations quickly, while maximizing your presentation design workflow. If you only have a few minutes to spare, then be sure ...
When in doubt, adhere to the principle of simplicity, and aim for a clean and uncluttered layout with plenty of white space around text and images. Think phrases and bullets, not sentences. As an ...
This collection of diplomas and certificates is the perfect template for you to create something that you would feel proud to give to your students. Each slide is different, but every single design is elegant, geometric and contains some little details in gold color. It's great for college-level courses! Multi-purpose.
Free Google Slides theme and PowerPoint template. Going to college is a big step for some—they begin the studies that will grant them a degree, and later access to a job or to even higher education. Let's not panic! Use this template to help them prepare for college admissions. If you want them to listen to you, it's easy: just use these ...
Choose the pictures you want to add. You can find lots of free pictures in our sister webpage Freepik ! Insert them and go to Picture Format > Picture Layout. If you hover over each design, you will see a preview of the collage. Once you have decided which one better fits your slide, click on it. Inserting the images in your PowerPoint slides.
First, start with stating the current realities. Second, clearly state the problem or opportunity your idea addresses and its potential impact. Third, explain how your recommendation solves the problem or exploits the opportunity and the next steps you're proposing. Have a logical organization.
Click the Slide Show tab. NOTE: Do not add audio under Insert and Record Audio; this method will not allow you to save your PowerPoint as a video since it does not synchronize timings to automatically move the slides with the audio. Click Record Slide Show. Review the narration setup and navigation before recording.
PowerPoint Live and Teams Webinar In this webinar, Helina Kassa will teach you how to use PowerPoint Live in Microsoft Teams, and Live Presentations in PowerPoint to improve your presentations. Whether you're a beginner or have some experience, this session will demonstrate ways to make your presentations awesome and communicate better. Join us on Thursday, April 11, from 3:30 pm - 4:00 pm ...
With Copilot AI, you can bid farewell to the time-consuming process of manually creating slides from scratch. Simply provide your initial topics or ideas, and Copilot AI will generate a set of ...
3. Select any text area and tap the Bulleted list icon at the top. 4. Tap Return to continue adding items to the list. 5. Tap Return and tap the indent icon next to the bullet point to add a ...
For individuals: $7-19 per month. For businesses: $15-29 per month. Prezi is a web-based tool for creating presentations, videos, and infographics that are suitable for business and educational settings. The tool offers a wealth of image and icon assets, as well as templates to get you started on your slide deck.