Convert MP4 to PPT
With our free online converter, you can convert mp4 files to ppt as well as a variety of other formats.

How to convert mp4 to ppt?
How to convert ppt to mp4?
Upload mp4-file
Select «to ppt», download your ppt file, the security of your files is our priority.
Understanding the importance of the security of our users' data, we have implemented a number of measures to ensure reliable file conversion without the risk of information leakage or privacy violations.
Data encryption
Safe storage, harmless scripts, best tool to convert mp4 to ppt, mp4 to ppt fast and easy, secure mp4 to ppt conversion, no software installation required, mpeg-4 video file.
| Extension | .mp4 |
| Category | 🔵 |
| Programs | |
| Description | 🔵 .mp (MPEG- Part ) The .mp file format is a digital multimedia container format most commonly used to store video and audio, but it can also be used to store other data such as subtitles and still images. MP is based on the Apple MOV format, but adds support for various other MPEG features. It's a universally accepted format with high compatibility across all platforms and devices, widely used for streaming over the internet, for storing digital video and audio streams, and for video playback on mobile devices. |
| Technical details | 🔵 The `.mp4` format, or MPEG-4 Part 14, is a versatile multimedia container with these features: - **Standardization**: Standardized by ISO/IEC as ISO/IEC 14496-14. - **Versatility**: Stores video (including 4K), audio, text (subtitles), and 3D graphics. - **Compression**: Uses MPEG-4 lossy compression, reducing file size with minimal quality loss. - **Video/Audio Codecs**: Commonly uses H.264 (MPEG-4 Part 10) for video and AAC for audio. - **Compatibility**: Widely supported by media players, editing tools, and devices. - **Streaming**: Suitable for internet streaming and progressive download. - **Metadata**: Supports metadata like titles, artist, GPS data, and scene descriptions. - **Chapter Support**: Enables easy navigation within videos. - **Subtitles/Closed Captions**: Includes subtitles/closed captions, embedded or as separate tracks. - **DRM Support**: Can be protected with DRM systems. - **File Size**: Varies based on quality, length, and codecs used. - **Interactivity**: Supports DVD-like menus and user navigation. `.mp4` is popular for its high-quality compression and broad compatibility, used widely in streaming, video editing, and various digital applications. |
| Developer | 🔵 Moving Picture Experts Group |
| MIME type |
Microsoft PowerPoint
| Extension | .ppt |
| Category | 🔵 |
| Programs | |
| Main program | 🔵 Microsoft PowerPoint |
| Description | 🔵 .ppt (PowerPoint Presentation) The .ppt format is the default file format for presentations created in Microsoft PowerPoint, a popular software for creating slideshows and presentations. PPT files can contain text, images, videos, animations, and formatted dataThey are widely used in business, education, and training settings for presenting information in a structured and visually appealing mannerThe .ppt format was more common in versions of PowerPoint up to 00, after which it was largely replaced by the .pptx format. |
| Technical details | 🔵 The .ppt file format, used in Microsoft PowerPoint presentations, includes slides with text, images, animations, videos, and audio, often featuring embedded objects from other Office applications. Key points include: - File Type: ".ppt" stands for PowerPoint Presentation, used for creating slideshows. - Content and Structure: Contains individual slides with linear organization, capable of including hyperlinks for non-linear navigation. - Compatibility: Primarily for Microsoft PowerPoint, but also compatible with other presentation software like OpenOffice Impress, Google Slides, and Apple Keynote, with varying degrees of feature support. - Versions: Was the main format until PowerPoint 2007, which introduced .pptx based on Office Open XML. Older .ppt files are still compatible with newer PowerPoint versions, though some features may be missing. - Editing and Viewing: Editable in compatible software, and viewable in presentation mode with sequential slides, transitions, and animations. - Features: Supports multimedia, interactivity, templates, and themes, with file size varying based on content. - Security: Offers features like password protection. The .ppt format is essential for those involved in creating or delivering presentations in various professional settings. |
| Developer | 🔵 Microsoft |
| MIME type |
FAQs on mp4 to ppt Conversion
Mp4 converter, convert to ppt.
Easily Convert Video to PPT Slides Online

Featured In
Table of contents, can you convert a video to ppt slides online, what video formats can be converted to ppt, step 1: choose your online tool, step 2: upload your video file, step 3: customize settings (if needed), step 4: convert and download, what video file formats can be converted to ppt online, how to convert a youtube video to ppt, top 7 use cases for converting a video to ppt, onlineconverterfree, magicslides app, cloudconvert, powerpoint (microsoft office), movavi ppt to video converter, rz powerpoint converter, how do you insert a video into a powerpoint presentation, how do i convert a file to ppt.
Discover how to convert video to PPT slides online effortlessly. Explore top video to PPT converters and step-by-step instructions.In today's digital age,...
Discover how to convert video to PPT slides online effortlessly. Explore top video to PPT converters and step-by-step instructions.
In today's digital age, presentations have evolved beyond static slides. Incorporating videos into PowerPoint presentations can elevate your message and engage your audience like never before. But what if you need to convert a video to PPT slides online? In this comprehensive guide, we'll explore the tools, formats, and techniques to seamlessly integrate video content into your presentations.
Yes, you absolutely can! Converting a video to PowerPoint slides online is a game-changer, allowing you to harness the full potential of multimedia presentations. Whether you're a business professional, educator, or creative storyteller, this process empowers you to captivate your audience with dynamic content.
Before diving into the conversion process, it's essential to understand the compatible video formats. Common video formats that can be converted to PowerPoint slides include WMV, AVI, MOV, MPEG, and MP4. These formats offer versatility and seamless integration with PowerPoint.
How Do I Convert a Video to PPT Online?
Converting a video to PPT online is a straightforward process. Here's a step-by-step guide:
There are various online tools available for video to PPT conversion. We'll introduce you to the top 10 converters shortly.
Once you've chosen your converter, simply upload your video file. Most tools support a wide range of video formats.
Some converters allow you to customize settings like slide duration and transitions. Adjust these to fit your presentation style.
Click the conversion button, and your video will be transformed into a PowerPoint presentation. Download the PPT file to your device.
Video to PPT converters typically support a variety of file formats, including WMV, AVI, MOV, MPEG, MP4, and more. These tools are designed to ensure compatibility with your multimedia content.
Converting a YouTube video to PPT is a popular use case. Follow the same steps mentioned above, but first, use a YouTube video downloader to save the video to your device. Then, upload it to the online converter of your choice.
- Educational Enhancement: Enrich lectures and training sessions with video content.
- Bu siness Presentations: Create impactful sales pitches and reports.
- Storytelling: Craft compelling narratives with multimedia elements.
- Product Demos: Showcase products and services effectively.
- Event Highlights: Share event highlights with dynamic visuals.
- Online Tutorials: Enhance online tutorials with video explanations.
- Collaborative Projects: Collaborate on multimedia presentations with ease.
Best tools to convert Video to PPT online
OnlineConverterFree is a very popular tool that let’s you convert videos to PowerPoint slides online along with a host of other formats as well. Depending on the length you can convert video to even gifs.
MagicSlides App is another online tool that lets you easily convert YouTube videos to PowerPoint slides. Simply paste your YouTube URL and sign up to convert it to beautiful slides.
CloudConvert is a general file conversion online tool and its PPT converter supports video to PPT conversion as well. Check it out to see the host of other file conversions.
HeyGen offers two pricing tiers: Essential and Pro, allowing you to choose based on your monthly video minute requirements. The Pro edition, priced at $2 per minute, is cost-effective for frequent conversions and offers API access. There is also a FREE version with a one-minute video trial for experimentation.
HeyGen is an online video production tool that allows you to transform your PowerPoint presentations into video content featuring AI avatars as presenters. These avatars deliver dialogue based on the text or audio you provide. Here are the key points:
- Variety of AI Presenters: HeyGen offers over 100 realistic AI presenters, giving you plenty of options to choose from.
- Multilingual Support: You can have your presentation narrated in over 20 different languages, making it accessible to a global audience.
- File Format Compatibility: The platform supports both .ppt and .pptx file formats, providing flexibility in converting your PowerPoint to video.
- Customization: If the AI's voice doesn't suit your preferences, you can use your own voice or even incorporate your face with the AI's voice in the background.
- Limited Dramatic Capabilities: While HeyGen's AI is impressive, it may not deliver dramatic or heated speeches. However, it excels in standard presentations.
While many users find Canva's free version sufficient for standard presentations, the Pro edition, priced at $12.99 per month, is available for those who require access to all the platform's features.
Canva is a popular online tool for converting PowerPoint presentations into video format. It provides a wide range of templates and design features to create engaging presentations. Here are the key points:
- Templates and Design: Canva offers numerous appealing presentation templates and design features, even in its free version.
- Cloud Storage: You can save your presentations in Canva's cloud storage and convert your pptx files to video from different devices.
- Overwhelming for Some: Canva's abundance of options and features may be overwhelming for users who prefer minimalistic presentations.
Powerpoint is part of the Microsoft Office Suite and can also be purchased separately from Microsoft's official website for $159.99.
Microsoft Powerpoint is a well-established software for creating and converting PowerPoint presentations into video. Here are the key points:
- Familiarity: PowerPoint has been a staple in the business world for years, making it widely recognized and easy to use.
- Compatibility: It is compatible with various operating systems and integrates seamlessly with Microsoft Teams.
Movavi offers a free 7-day trial version, and if it suits your needs, you can purchase the full version for $49.95, unlocking all premium features.
Movavi offers a PPT to video converter software with various features for converting PowerPoint presentations into video clips. Here are the key points:
- Format Compatibility: Movavi supports over 180 media file formats, offering versatility in video output.
- Editing Tools: It provides advanced editing functions like splitting, voice-over, cropping, and more for creating high-quality videos.
A lifetime license for RZ PowerPoint Converter is available for $39.99, offering a budget-friendly option for those with basic conversion needs.
RZ PowerPoint Converter is an application designed for converting PowerPoint files into various video formats. Here are the key points:
- No Time Limit (Free Edition): The free edition of RZ PowerPoint Converter has no time limit, making it a cost-effective choice for basic conversions.
- DVD Conversion: It allows you to convert presentations to DVD and create custom menus.
- Open your PowerPoint presentation.
- Navigate to the slide where you want to insert the video.
- Click on the "Insert" tab.
- Select "Video" and choose your desired video file.
- Adjust settings and placement as needed.
To convert a video file to PPT, follow the steps mentioned earlier in this guide, using one of the online video to PPT converters.
Converting video to PPT slides online opens up a world of possibilities for dynamic, engaging presentations. With the right tools and techniques, you can captivate your audience, convey your message effectively, and leave a lasting impression. Elevate your presentations and embrace the multimedia revolution in PowerPoint.
AI Maker: Everything you need to know!
Text to Speech API Python: A Comprehensive Guide

Cliff Weitzman
Cliff Weitzman is a dyslexia advocate and the CEO and founder of Speechify, the #1 text-to-speech app in the world, totaling over 100,000 5-star reviews and ranking first place in the App Store for the News & Magazines category. In 2017, Weitzman was named to the Forbes 30 under 30 list for his work making the internet more accessible to people with learning disabilities. Cliff Weitzman has been featured in EdSurge, Inc., PC Mag, Entrepreneur, Mashable, among other leading outlets.

Microsoft 365 Life Hacks > Presentations > Six tips for recording a presentation
Six tips for recording a presentation
Your latest presentation is filled with crucial information and key concepts your colleagues need to remember. Record and archive it for easy reference and absorption.

How to record your presentation
Whether you’re recording a presentation for work, a webinar or school, both you and your colleagues will greatly appreciate having it available to reference. You can absorb information at your pace, ensuring that you retain pertinent information, without having to rely solely on your notes. While the method of recording depends on the virtual meeting platform or whether its in person, here are some guidelines on how to record you presentation:

Tell your story with captivating presentations
Powerpoint empowers you to develop well-designed content across all your devices
1. Choose the right equipment
High-quality recording equipment is essential for producing professional-looking and sounding presentations. Laptops are equipped with microphone and a high-resolution webcam, but it’s always a good idea to consider investing in higher quality recording equipment.
2. Test Your equipment
Before starting your presentation, it’s crucial to test your recording equipment to ensure everything is working properly. Check the audio levels, video quality, and any additional accessories you may be using, such as lighting or a green screen. Conducting a test run will help identify any technical issues that need to be addressed. Review the virtual meeting platform you are using to ensure that the recording feature is enabled, so you won’t have to search for it when the presentation time rolls around.
3. Optimize your environment
Choose a quiet, well-lit environment for recording your presentation. Minimize background noise and distractions to ensure clear audio and video quality. Consider using a neutral background or a virtual background to maintain a professional appearance. Natural lighting is ideal, but if that’s not possible, invest in good quality lighting equipment to ensure your face is well-lit and visible.
4. Organize your presentation contents
Organize your presentation materials in a logical order to facilitate smooth delivery. Create an outline or script to guide your presentation, making sure to include key points, transitions, and visual aids. Practice your presentation multiple times to become familiar with the contents and ensure a confident delivery. If you have multiple presenters, solidify the speaking order and designate one person to facilitate the presentation.
5. Engage with Your Audience
Even though you’re recording your presentation, it’s essential to engage with your audience as if they were present in the room with you. Encourage interaction by asking questions, prompting viewers to think critically, and inviting them to share their thoughts or experiences in the comments section. Respond to comments and questions promptly to foster a sense of community and connection with your audience.
6. Monitor Your Time
Keep track of time during your presentation to ensure that you stay within the allotted timeframe. Plan your presentation carefully, allocating sufficient time to cover each topic or section. If you find yourself running out of time, prioritize the most critical points and consider saving less crucial information for a follow-up or supplementary material.
For more ways to improve presentation skills, like calming presentation anxiety and connecting with a virtual audience , learn more presentation tips .
Get started with Microsoft 365
It’s the Office you know, plus the tools to help you work better together, so you can get more done—anytime, anywhere.
Topics in this article
More articles like this one.

How to introduce yourself in a presentation
Gain your audience’s attention at the onset of a presentation. Craft an impressionable introduction to establish tone, presentation topic, and more.

How to add citations to your presentation
Conduct research and appropriately credit work for your presentation. Understand the importance of citing sources and how to add them to your presentation.

How to work on a group presentation
Group presentations can go smoothly with these essential tips on how to deliver a compelling one.

How to create a sales presentation
Engage your audience and get them interested in your product with this guide to creating a sales presentation.
Everything you need to achieve more in less time
Get powerful productivity and security apps with Microsoft 365

Explore Other Categories
Critical PowerPoint Shortcuts – Claim Your FREE Training Module and Get Your Time Back!
How to Convert PowerPoint to Video (Step-by-Step)
- PowerPoint Tutorials
- Shortcuts & Hacks
- October 22, 2019
In this article you’ll learn how to convert PowerPoint to video, and the different options you have.

While most people know how to use PowerPoint to present their products and services live, few people know how to turn a PowerPoint into a video that runs on its own.
And while that might sound complicated, it’s in fact pretty easy, as you will see below.
There are two different ways to turn your PowerPoint presentations into video, the first of which gives you the most options, as discussed below.
But before you start the conversion process, here are some thoughts about why you should consider doing it in the first place.
Why Convert PowerPoint to Video?
It keeps your presentation the way it was intended.
Exporting your presentation as a video keeps all elements safely locked in place. That way you can email it to your colleagues or clients without worrying that something will shift, or that timings be messed up.
Video is more accessible and shareable
While most people have PowerPoint on their computer, we shouldn’t assume that they do. Convert your PowerPoint to video and the receiver can open it even if they don’t have a Microsoft subscription. They will have to have a media player though!
It’s also easier to view videos on a mobile device, so busy clients can check out your presentation while on the move.
Furthermore, it’s also easier to share videos on multiple platforms. They can be posted to YouTube, on your company blog, and on social media and video sharing networks.
People love videos!
With more than 75 million people watching online videos every day across the United States alone, you know you’re onto a good thing. According to marketing gurus, just mentioning the word ‘video’ in the subject line of an email increases the click-through rate by 19%.
We human beings naturally love a good story because it conveys a message on an emotional level; and videos are very effective for storytelling, especially in contrast to written text or even images.
Since people’s decision-making process is often based on emotions, turning your presentation into a video can be very convincing.
What is an MP4?
MP4 is short for MPEG-4 Video, and is a universal video format that plays on any device.
When converting PowerPoint to video, you can choose between the MPEG-4 Video file format (MP4) or the Windows Media Video file format (WMV), as discussed below.
The two main advantages of MP4 for your videos are:
- It’s a pre-compressed and compact file type format (so it’s small)
- It plays on just about any device
When converting PowerPoint to video, I highly recommend using the MP4 format unless you have a specific reason not to.
To learn more of the advantages of the MP4 format, see this Quora thread here .
Option #1. Convert PowerPoint to video

To convert your PowerPoint presentation into a video, simply:
- Click the File tab
- Select Export
- Select Create Video
- Choose your Video Quality and Recorded Timings and Narrations (see details below)
- Click Create Video
Choose where to save the video on your computer and click Save .

As a result, your PowerPoint presentation is converted into video, based on the Recorded Timings and Narrations you selected, or the preset seconds per slide you set (all discussed below).
You can even add music and loop it throughout your video if you want to. To learn how to add music to PowerPoint, read our guide here .
Video quality
Video quality determines not only the quality of your video output, but also how large the video file will be, as you can see in the image below.

For most situations, the Full HD (1080p) is a great choice.
That said, if you are showing your video on a large overhead projector and size isn’t an issue, you can improve the quality of your video by using the Ultra HD (4K) format.
Below you can see the different video quality options you have in the Create a Video dialog box.

If file size is an issue or you are just showing your video on a smaller laptop screen, you can save a lot of space with the HD (720p) or HD (480p) formats.
HD (720p) is supported on most websites and video platforms such as YouTube and Facebook. The HD (480p ) option is the best option for mobile devices.
Setting recorded timings and narrations

Recorded Timings and Narrations are important when converting PowerPoint to video as they not only dictate how long your video will be, but determine when things happen in your presentation.
There are a variety of ways you can set yourRecorded Timings or Narrations (all detailed below), but in short, your options are:
- Automatically set how many seconds you want per slide
- Set your own Rehearsal Timings (no audio or video) by clicking through your presentation
- Narrate your PowerPoint with voice and/or video, which automatically sets the slide timings for you
If you use the Record Slide Show dialog box to narrate your entire presentation, you can simply use the Save As dialog box (discussed next) to save your PowerPoint as a video, as your narrations will take care of everything in your video.
To learn everything you need to know about narrating a PowerPoint presentation, read our guide here .
Properly using PowerPoint animations
If you have animated sequences in your presentation and are going to use a pre-set number of seconds per slide, I recommend setting all your animations to After Previous.

To set an animation to trigger automatically as your slide changes, simply:
- Select your animated object
- Open the Animations tab
- Open the Start drop down
- Select After Previous
This ensures that your animations will trigger after the previous action, whether that is an animation or advancing to the next slide.
If you leave your animations set to On Click , they can add a delay of as much as 10 seconds to your video. This is especially if you are using the second conversion method (see the section below here on saving PowerPoint as a video).
Option #2. Save PowerPoint as Video
The fastest way to convert your PowerPoint presentations into a video format, is to use the Save As dialog box.
This works best when you have narrated your PowerPoint presentation using the Record Slide Show dialog box, and just want the Full HD (1080p) quality for your video.

That’s because all of your slide timings, actions and animated sequences are saved within your narration, so all PowerPoint then has to do is save itself as a video using the default settings.
If you are not narrating your presentation, then I recommend using the first method discussed above.

To save your presentation as a video from inside PowerPoint, simply:
- Hit F12 or Ctrl + Shift + S to open the Save As dialog box
- Choose a location to save your video
- Change the file type to either MPEG-4 Video (recommended) or Windows Media Video
- Click Save
Depending on the size of your presentation, it might take a minute or two to save your presentation as a video, so just hang tight.
When it is finished, your PowerPoint will be saved as a video in the Full HD (1080p) format. If you want a different video quality, you will need to use the Create a Video dialog box (see the first method discussed above).
After you save your presentation as a video, you can then embed it in other presentation if you want to. To learn how to embed a video in PowerPoint, read our guide here .
Note: I highly recommend saving your presentation in the MPEG-4 (MP4) file format as it is more universally accepted than the Windows Media Video (WMV) file format.
How to Record and Set Timings for Your Video
When converting PowerPoint to video, the timings not only determine the length of your video, they also determine the timing in which your animated sequences are triggered.
If you have a lot of animated sequences in your presentation, I don’t recommend using a set number of seconds per slide.
That’s because you can’t control the lag between the animated sequences and your content. Instead, I recommend using the Rehearse Timings command.
Here are the 4 different ways you can set and adjust slide timings for your presentation, from easiest to slowest.
1. Set a default number of seconds per slide

To use a standard number of seconds per slide for your slide timings, simply:
- Navigate to the File tab
- Click Export
- Select Create Video
- Set the number of seconds
The more seconds you set per slide, the longer your video will be in total.
2. Set transition timings to advance your slides
PowerPoint transitions are another great way to not only make flipping between your slides less abrupt, but also to automatically advance your slides.
Using the Transitions tab, you can both set a default number of seconds for all of your slides, as well as adjust the time spent on individual slides.

For example, to set a Fade transition and slide timings of 3 seconds per slide, simply:
- Navigate to the Transitions tab
- Click the Fade transition
- Under the Effect Options , choose Through Black
- Deselect On Mouse Click
- For After , input 3 seconds (and make sure there is a check mark next to After )
- Click Apply to All
As a result, all the slides in your presentation will now have a Fade transition and will automatically advance after 3 seconds.
You can also adjust the duration of the transitions between your slides if you want to get specific, but I think the default is usually fine.
3. Use the Rehearse Timings command
If you want to control the flow of your timings by manually clicking through your presentation, you can use the Rehearse Timings command.
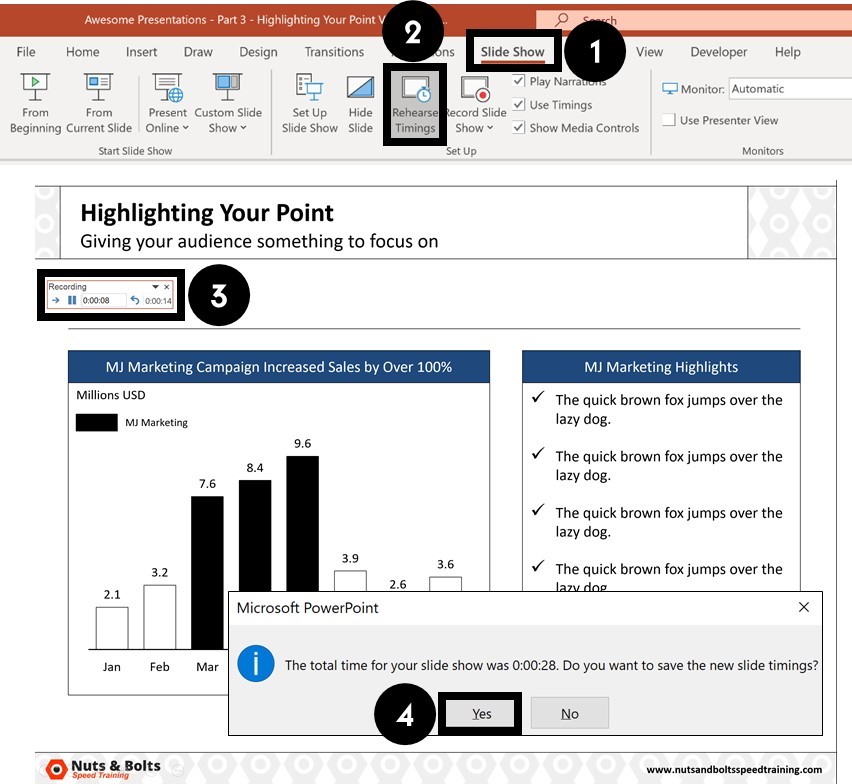
To set your slide timings with the Rehearse Timings command, simply:
- Navigate to the Slide Show tab
- Click the Rehearse Timings command
- Use the Rehearse Timings dialog box to click through your presentation
- When you are finished, click Yes to save the slide timings
Here is a quick run through of the commands on the Rehearse Timings dialog box.

Clicking Repeat starts the rehearsal timing over for the current slide you are on. That means you can restart the timing without having to start the presentation over from scratch.
4. Use the Record Slide Show command
The Record Slide Show command is the NEWEST and best way to add audio and video narrations to your presentations.
The advantage of using this tool to narrate your PowerPoint presentation, is that all of your slide timings, animations and actions are recorded for each slide.
That means you can simply use the Save As dialog box to quickly convert your narrated PowerPoint into a video.

To use the Record Slide Show command to narrate your presentation from the beginning, simply:
- Navigate to Slide Show tab
- Open the Record Slide Show drop down
- Select Record from Beginning
To learn how to use the Record Slide Show command to narrate your PowerPoint (and all the options you have), read our guide here.
Note: If you just click the Record Slide Show button (instead of opening the drop down), you will begin recording your narration from your current slide.
So that’s how to turn PowerPoint into a video, either by exporting your video using the Create a Video command, or by saving your PowerPoint presentation as a video using the Save As dialog box.
If you narrate you presentation using the Record Slide Show command, the Save As dialog box is the fastest way to turn your presentation into a video.
And while PowerPoint gives you two different video file types to choose from, I recommend using the universal MP4 video file format. That’s because it ensures that your video will play on any device (computer, tablet, or phone) that people may have.
If you enjoyed this article, you can learn more about our PowerPoint training courses and other presentation resources by visiting us here .
What’s Next?
Related articles, about the author.

This Post Has One Comment

Very useful tips. Many thanks!
Comments are closed.
Popular Tutorials
- How to Strikethrough Text (l̶i̶k̶e̶ ̶t̶h̶i̶s̶) in Word, Excel & PowerPoint
- How to Make Animated Fireworks in PowerPoint (Step-by-Step)
- Strikethrough Shortcut (l̶i̶k̶e̶ ̶t̶h̶i̶s̶) for Word, Excel & PowerPoint
- How to Create a Flash Card Memory Game in PowerPoint (Like Jeopardy)
- Keyboard Shortcuts Not Working: Solved
PowerPoint Tutorial Categories
- Strategies & Opinions
- Presentation Design
- Pictures, Icons, Videos, Etc.
- New Features
- Miscellaneous
- Charts & Data Viz
We help busy professionals save hours and gain peace of mind, with corporate workshops, self-paced courses and tutorials for PowerPoint and Word.
Work With Us
- Corporate Training
- Presentation & Template Design
- Courses & Downloads
- PowerPoint Articles
- Word Articles
- Productivity Resources
Find a Tutorial
- Free Training
- For Businesses
We help busy office workers save hours and gain peace of mind, with tips, training and tutorials for Microsoft PowerPoint and Word.
Master Critical PowerPoint Shortcuts – Secure Your FREE Training Module and Save Valuable Time!
⌛ Master time-saving expert techniques.
🔥 Create powerful presentations.
🚀 Propel your career to new heights.
We value your privacy – we keep your info safe.
Discover PowerPoint Hacks Loved by Industry Giants - KKR, AmEx, HSBC!
Over 114,880 professionals in finance, marketing and sales have revolutionized their PPT skills with our proven methods.
Gain FREE access to a full module of our premium PowerPoint training program – Get started today!
We hate spam too and promise to keep your information safe.
You are currently viewing a placeholder content from Facebook . To access the actual content, click the button below. Please note that doing so will share data with third-party providers.
Tutorial: Save your PowerPoint as a Video
It pays to know how to save PowerPoint as video. Whether you are preparing a PowerPoint presentation for work, school , non-profit, staff training or investor relations. Content marketing is one of the biggest trends of the past couple of years and knowing how to distribute your content via various media is critical to business success. This article will guide and show you, step by step, how to save your PowerPoint presentation in video format. Next, we discuss the advantages of PowerPoint to video conversion and how you can put a single presentation to greater use. This guide is written by 24Slides’ Powerpoint experts and includes instruction on using PowerPoint for Mac.

6 Reasons to save PowerPoint as video
So you are considering saving your PowerPoint presentation as video? Before we show you how to do it, let’s talk about why it’s a great idea to convert your PowerPoint to video.
- You can show your presentation to a wider audience by sharing the video on YouTube and other video platforms.
- Your audience do not need to have a copy of Microsoft PowerPoint to view your presentation.
- Burn your presentation video on CD or DVD and giveaway as promotional material to clients or potential customers.
- Leverage your presentation and increase the return on investment (ROI) of your presentations by distributing them as video.
- The technical ability of your audience will not become a barrier to delivering your message. Your video becomes easy to access without the knowledge and understanding of powerpoint.
- Your audience will see your presentation exactly as you have intended it to be seen. Unlike sharing it as a presentation, some slides may get deleted or changed.
Now that you know why you’re on the right track by learning how to save PowerPoint presentations as video, let’s get into the process of exactly how to do it.
How to save PowerPoint 2010 as a video
If you are still using PowerPoint 2010 to create your presentations, you’ll be pleased to know you can still convert your PowerPoint to video. The process is som simple that you’ll wonder why you haven’t been doing this all along.
Whether your presentation contains just text or is a multimedia presentation with sound narration, transitions and video, you will be able to convert it into video. Microsoft PowerPoint allows you to save PowerPoint as video in Windows Media Video (.wmv) file format. If you plan for sharing your presentation as a video before creating it, you can decide whether to record the narration before creating the presentation.
Here are the steps you need to follow:
- Create your PowerPoint presentation as normal and save it.
- If you’re using narration for your presentation, record the narration and add timings to the slideshow.
- Select the File menu and click on Save & Send .

- Under the Save & Send menu, find and click on Create a Video .

- Click on the Computer & HD Displays option to customise the video size and quality (small, medium and large size & quality).

- Click the Don’t Use Recorded Timings and Narrations to select if you’re using timings and narrations.

- Click Create Video and another dialogue box opens.

- Enter appropriate filename and saving location to save your newly created video.
Once your presentation to video conversion is complete, the video is ready to share via Facebook, Youtube, Vimeo or email.
How to save a PowerPoint 2007 presentation as video
There are many users still running Microsoft Office 2007, hence PowerPoint 2007 on their computers. If you are one of them, don’t worry, there are ways to convert your PowerPoint to video using a bundled Microsoft product, Windows Movie Maker.
If you want to convert a PowerPoint 2007 presentation to video and you are running a newer version of the program, you can open the file within PowerPoint 2013. You can then use the Create a Video feature to convert your PowerPoint to video.
Alternatively, if you only have access to PowerPoint 2007 and have a copy of Windows Movie Maker installed, you can save your presentation as image files (.jpg). Once you’ve saved each slide, fire up Windows Movie Maker and start a new project.

Next, import all the slides you saved as images into the new project and create your video.

Note: You can include transitions in Windows Movie Maker. However, animations will not convert when you save the slides as image (.jpg) files. Make sure you modify your slides to remove any animations and ensure you do not lose vital parts of your message before saving as images.
If your presentation has narration, you can import the the sound file directly into Windows Movie Maker. If you do not have the source audio file, you can save the presentation as a web page (a separate .wav file is created). You can then import the .wav file into your Windows Movie Maker video.
How to convert your PowerPoint to video in PowerPoint 2013 in 7 Steps
Turning your PowerPoint 2013 presentation slides into a video is easier than you think. In seven simple steps, you can turn your presentation into a video you can share with viewers wherever they are. Here’s how you do it.
- Access Powerpoint’s Backstage View by clicking on File.

- Select Export and click on Create a Video to access the video export menu.

- Click on the Create a Video option and expand the Computer and HD Displays option to select output video size and quality settings.

- Click on the drop down arrow to expand the Use Recorded Timings and Narrations menu. Use this to select whether you’re using recorded timings or not. If not using recorded timings and narrations, set the duration of each slide using the timings option at the bottom.

- Click the Create Video button to show the Save As dialogue box.

- Select the location where you want to save your video and choose a suitable filename for the video file. Also choose the video file type.

- Click Save and PowerPoint will begin converting your presentation to video. This may take a couple of seconds or a few minutes depending on the size of your presentation.

When the video creation is complete, the video is ready to view, upload to your website, Facebook, YouTube or sharing by email.

How to save a presentation as a movie file in PowerPoint For Mac
If you have an Apple computer running a Mac version of PowerPoint, you can convert your presentation into a movie for easier and wider distribution. The process is similar to Windows system with the inevitable differences between the operating systems. In just a few simple steps, you will be able to turn your powerful presentation into a movie file. The following limitations apply:
- The output is a .mov file compatible with only the Quicktime player or 3rd party converting programs.
- You will lose transitions and animations within the presentation and so make sure you modify your presentation prior to converting it.
- You will also lose narration during the conversion process, you may wish to add the narration as an audio soundtrack to the movie.
The steps are as follows:
- Click on File and choose Save as Movie .

- Click Movie Options to add a background soundtrack (music or your narration) or credits.

- Click Movie Settings to adjust the output quality and video size settings. You can also choose the slide durations, to create a looping video and slide transitions under this option.

- Click OK to close the Movie Options dialogue box.

- Click Save to start creating your video. The process will take a couple of seconds or longer depending on the size and quality options you select.
Once the process is complete, your movie is ready for playback or to convert into other file formats and share via Social Media or other outlets. If you’re using PowerPoint for Mac 2008 and 2011, these steps will work for either.
How to create a video from PowerPoint 2016
You can create a full-fidelity video from your presentation in PowerPoint 2016 in MPEG-4 (.mp4) or Windows Media Video (.wmv) format. In just six steps, you can turn your presentation into a video you can share and distribute on Facebook, YouTube, burn to DVD or via email. Here’s how you go about it:
- Click on the File tab to show file options.

- Scroll down and select Export and navigate to Create a Video.

- Select your video settings preference (video quality, timings and narration, video size).

- Click on Create a Video.

- Choose a filename, saving location and video type (.mp4 or .wmv).

- Click on Save to start video creation process.
This article has shown you how to convert and save PowerPoint as video. Once you’ve delivered a powerful presentation to an audience, making it available afterwards is always a great idea, especially for training presentations. To maintain the presentation in its entirety, saving it as a video and distributing it is the best option. By converting a presentation to video, you are able to reach a wider audience through YouTube, Facebook and other video hosting and sharing sites. We hope you’ve gained some useful insights on how you can achieve that following the simple, step by step guides for the version of PowerPoint you are running.

Did you know?
At 24slides, we provide stunning Powerpoint presentation services and are able to help you and your team have an incredible presentation to film. Take a look at some examples of our work and let’s get in touch . Alternatively, feel free to browse and download hundreds of free Powerpoint templates from our library.
You might also find this interesting: How to Create Social Media Videos With PowerPoint
Create professional presentations online
Other people also read

How To Convert Google Slides To PowerPoint and Vice Versa

How To Add Animations To PowerPoint

How To Create The Best PowerPoint Presentation Background
5 Video Presentation Techniques for Maximum Impact
Senior Marketing Manager at Loom

Traditional slideshows can be a snooze-fest. You know, the kind where the people read aloud the text on the slides verbatim while you're also reading the same text yourself.
The flood of information and monotonous narration don’t help their case either.
How will you transform your lackluster, one-way presentations into captivating experiences that leave a stronger impact on your audience?
The answer is simpler than you think: video presentations .
Ready to ditch the dull and embrace the dynamic? Learn five techniques to create video presentations that enthrall your audience and learn how to record them.
The power of video presentations
Video presentations aren’t just a fancy way to show off your tech skills. They’re a powerful way to interact with your audience and leave a lasting impression.
Think about all the times you zoned out during a PowerPoint presentation with endless paragraphs and bullet points. Video presentations serve as an antidote.
So, what really sets video presentations apart?
They grab attention like nothing else. Research shows that presentations with video get 32% more engagement . People are likelier to watch and interact with a video than stare at a static slide.
It’s not just about getting more people to watch your presentations. Videos also boost understanding and retention.
As they say, “A picture is worth a thousand words.” It turns out that a video is worth even more.
The same study revealed that presentations with videos embedded had a 37% longer average reading time. The data shows that video presentations keep people around longer to absorb your message.
How to record a video presentation with audio and video
Video presentations are staples in business and education.
Whether used as video messaging for internal communications , client-facing pitches, tutorials, intros to your webinars, or for onboarding new employees, presentations offer a dynamic way of presenting information.
Luckily, screen recording tools like Loom are now making this process easier than ever before.
You don't need to buy fancy mics or wrestle with clunky presentation slides. You just have to hit record, make some simple edits, and share your video presentation with as many people as you want with a single click. Anyone can create a good video presentation with a bit of practice. Plus, Loom’s video editing tools make it easy to trim and polish your presentation.
Here’s a quick step-by-step overview of how to record a video presentation with audio and video using Loom:
Step 1. Prepare your presentation material
Before you sit down to record, be prepared with your notes, script, or any props or visual aids you might need. At the same time, make sure you choose a quiet, well-lit environment to ensure excellent audio and video quality.
Step 2. Launch Loom
To capture your Mac or Windows screen, open the Loom app on your desktop or use the Chrome extension. If you’re using your mobile for screen recording , you can install Loom’s mobile app.
Also, if you plan to capture:
Google Slides: You can use Loom’s Chrome extension .
PowerPoint, Keynote, or Canva slides: Install the desktop app to capture yourself along with the slides.
Whatever device or computer system you use, you can download and install the Loom app within minutes.
Step 3. Select recording mode
Choose whether you want to record your screen, webcam, or both. If you have slides, select screen and webcam to capture both your presentation and your face. Your face will appear on the screen in a cam bubble, as shown here.

You can also choose to record only your screen or the entire desktop.
Step 4. Start recording
Finally, click the “Start Recording” button.
Watch Loom’s own training video on video recording best practices.
Step 5. Begin your presentation
Deliver your presentation as you would in person, and remember to make eye contact with the camera.
Step 6. Review and edit your presentation video
After stopping the recording, Loom automatically uploads the video file to your Loom account. You can trim the video, add a call to action (CTA), or make other edits directly in Loom’s video editor.
Where some video presentations fall short
Even well-intentioned presentations can sometimes miss the mark. Here are some areas where your video presentations might be falling short:
Lack of engagement: Presentations are a two-way street. If you don’t build in opportunities for audience engagement elements like Q&A, live feedback, polls, and even simple interaction, you’re missing out.
Information overload: Too many key points covered in one presentation can overwhelm viewers.
Technical glitches: Double-check your equipment before the final presentation. Technical glitches like a frozen screen or a microphone cutting out can derail even the best-prepared presentation.
Lack of personalization: What’s the point of the presentation if your tone and message don’t resonate with the audience? Consider your target audience and adjust your presentation style accordingly. For example, a video for new hires might need a different tone and content than one for senior executives.
Considering these nuances and implementing a few interactive elements will help you create an engaging video presentation.
5 techniques for creating great video presentations
Technique 1: engaging storytelling.
Viewers crave something more than just data. They want a story.
Stories resonate powerfully because they tap into your emotions, creating a connection that facts alone can't achieve.
There’s science behind it. When you hear a story, your brain releases oxytocin , which increases trust and positive emotions. Stories also activate multiple brain parts, making them more memorable than isolated facts. In a world where attention is scarce, stories capture and hold it.
So, how do you capture your audience with engaging storytelling? Here are some tips:
Find your narrative arc: Every good story has a beginning, middle, and end. Think of a classic hero facing obstacles, overcoming challenges, and emerging as the victor. Your video presentation can follow a similar arc, even if the hero is your product or service.
Evoke emotions: Identify your target audience to discover what type of content resonates with them. Based on your research, add emotional moments—either funny or thought-provoking—to catch your audience’s attention and create a lasting impact.
Build conflict: Before you start pointing out the solution, introduce the problem that needs solving, the challenge that needs overcoming, or a question that needs answering.
Show, don’t just tell: Talking doesn’t have the same effect as showing the problem your product solves. Use screen recording tools like Loom to demonstrate the problem and its solution firsthand. This helps the viewer appreciate the real value of your product.
Apple’s product launches are an excellent example of engaging storytelling.
They don’t just point out features, they weave a story and paint a picture of how Apple devices will enrich your daily life.
Technique 2: Visual impact and design
Remember those “wall of text” slides? The clipart that looks like it’s from the 90s?
While these types of presentations do the job, it’s worth noting that people process visuals faster than text. A visually appealing video presentation will endear you to your audience and engage them better.
According to research by Robert Horn at Stanford University, actions and visuals make written information 70% more memorable .
Clearly, incorporating visuals into your presentation isn’t just about aesthetics. It’s also about making your message stick.
Here are some tips to help you create visually stunning presentations:
Use high-quality videos and images. High-resolution visuals make your presentation more appealing and easier to grasp. If you’re recording your screen, invest in a good-quality screen recording tool to create polished and professional presentations.
Incorporate data visualization. Use charts, graphs, GIFs, and infographics to present data in an easily understandable manner.
Leverage color psychology. Pick a color combination that aligns with your brand image and messaging. For example, blue evokes professionalism and trust, while orange conveys energy and excitement.
Choose fonts wisely. Typography also affects how your presentation appears visually. Sans serif fonts like Helvetica and Arial are clean and modern, while serif fonts like Times New Roman and Georgia add a touch of sophistication.

Incorporating these tips makes your presentations both visually appealing and more effective in getting your point across.
Technique 3: Effective use of audio elements
You’re watching a National Geographic documentary. It features sweeping aerial shots of the sun-drenched plains of the Masai Mara, close-ups of exotic wildlife, and evocative narration.
But it’s not just the visuals that hold you spellbound. It’s the sound of the rustling leaves, the leap of the gazelles, the gentle river flow, and the commanding voice of the narrator. The background music ties it all together, transporting you into the experience.
While visuals and text capture attention, audio completes the experience by evoking emotions and reinforcing your message.
Want to create a similar immersive audio experience for your presentation? Here are some things to consider:
The voice-over should be crisp and clear. There are two ways to record crisp, clear voice-overs. One, you can invest in a good microphone. Or, you can record your screen with audio like Loom.
Add strategic sound elements. Add background music that matches your content and complements your messaging. In between your presentation, add sound effects that emphasize key points and transitions.
Embrace silence at strategic moments. A well-timed pause can help you create anticipation or emphasize a point. A pause before you move forward also allows the previous message to sink in.
Make sure you blend all these audio elements, including a voice-over, background music, sound effects, and even pauses, to create a perfect harmony.
Technique 4: Interactive elements to engage audience
According to a recent survey, 78% of people saw better online sales with interactive video compared to a passive video.
This means that viewers are more likely to stick around if your video has interactive elements, compared to a one-sided monologue.
Here are some interactive elements that can help you turn one-way presentations into two-way conversions:
Knowledge check quizzes: Keep your audience engaged with brief quizzes a few minutes into the presentation. This will reinforce your message while keeping the viewers engaged.
Polls and surveys: These elements work as the proverbial two birds, one stone—they keep viewers from dozing off and provide feedback you can use to tailor your content.
Clickable CTAs: Guide your viewers to take a specific action by adding clickable elements to your presentation.
Gamification elements: Add a touch of fun with animations, points, badges, and leaderboards. These elements also work as incentives and might encourage viewers to stick around to the end.
But how do you add these interactive elements to your videos?
Pro tip: The easiest way is to find a video recording platform that simplifies the process.
For instance, Loom offers a range of built-in interactive features.
Creators can embed clickable CTAs, annotate their screens, and even add tasks to their presentation videos.

At the same time, viewers can react with emojis for instant feedback, leave time-stamped comments to encourage discussions and tag their teammates.
Recipients can react to a Loom video with any emoji
Technique 5: Timing and pace for maximum retention
Ever watched a video that felt like it was dragging on forever? Or one that was so fast-paced you felt like you were missing key information?
The wrong timing and pace can leave your audience mentally exhausted or disengaged.
But how do you strike the right balance for maximum retention?
One approach is to use Guy Kawasaki’s 10/20/30 Rule of PowerPoint :
Your presentation should have at most 10 PowerPoint slides, which could be 10 critical points in the case of video presentations.
It shouldn’t be more than 20 minutes long.
The font shouldn’t be smaller than 30 points.
If you can’t contain your message in 20 minutes, break your video presentations into bite-size segments to prevent information overload.
Think of it like chapters in a book. Each segment contributes to the overall narrative while standing alone as a valuable piece of information.
You can use a video presentation tool like Loom to make this process seamless.
Loom automatically creates a video library to organize your video clips. This also allows your audience to revisit specific presentation segments later to access key takeaways.

You can also label your videos by specific topics or categories, making them easily accessible.
Elevate communication with video presentations
The verdict is clear: Video presentations help engage your audience and increase interaction.
So, why rely on traditional slideshows when you can get better outcomes with video presentations, especially with access to advanced video presentation software?
For example, with Loom, you can record, edit, and share high-quality video presentations that captivate your audience. No more technical headaches or pricey equipment.
Ready to turn your presentation ideas into videos? Sign up for free and create polished video presentations in no time with Loom.
Jun 29, 2024
Featured In:
Share this article:.
Jeong Lee works in Marketing at Loom.
- Accessories
- Entertainment
- PCs & Components
- Wi-Fi & Networks
- Newsletters
- Digital Magazine – Subscribe
- Digital Magazine – Info
- Smart Answers
- Amazon Prime Day
- Best laptops
- Best antivirus
- Best monitors
- Laptop deals
- Desktop PC deals
When you purchase through links in our articles, we may earn a small commission. This doesn't affect our editorial independence .
How to make a PowerPoint presentation into a video

Looking to turn your PowerPoint slides into a video? Well, you’re in luck. Microsoft PowerPoint has a built-in feature that lets you convert the presentation. This is especially useful if you want to share the presentation with someone, especially if they don’t have PowerPoint.
To get started, open the PowerPoint presentation you would like to turn into a video and click the “File” tab in the top-left corner of the window.

IDG / Marshall Gunnell
Next, click “Export” in the left-hand pane, and then select “Create a Video” under the Export options.

Now it’s time to pick the video quality and the recorded timings and narrations . There are four different options to choose from when it comes to video quality:
- Ultra HD (4K) : The largest file size available with ultra-high quality.
- Full HD (1080p) : A large file size with full high quality.
- HD (720p): A medium file size with moderate quality.
- Standard (480p): The smallest file size with the lowest quality.
Once you’ve selected the video quality, use the option below it to choose if you want to include recorded timings and narrations or not.

Next, you can adjust how many seconds each slide should be shown during the video. The default is 5 seconds. Click the up or down arrow to increase or decrease the timing by 1-second increments. When ready, click “Create Video.”

Finally, choose a location to save the video on your computer. Once selected, PowerPoint will then begin the conversion. The amount of time required to convert the presentation to video depends on the size of the presentation and the quality of the video you selected.
You can monitor the progress of the conversion at the bottom of the PowerPoint presentation. You’ll receive a notification when the conversion is complete.
Author: Marshall Gunnell
Recent stories by marshall gunnell:.
- How to add the Developer tab to the Microsoft Office Ribbon
- How to block (and unblock) someone in Gmail
- How to enable dark mode in Microsoft Office
Unsupported browser
This site was designed for modern browsers and tested with Internet Explorer version 10 and later.
It may not look or work correctly on your browser.
- Presentations
Why Make Your PowerPoint Into a Video ?
PowerPoint isn't marketed as a video tool. There are many advanced video tools out there like Adobe Premiere or Final Cut Pro X. With all of these options, you might be wondering why you would use PowerPoint to create a video file.
Here are four great reasons to use PowerPoint to create video presentations:
- The device you want to show your PowerPoint file on doesn't support PowerPoint files (think Smart TV's or handheld game consoles).
- You already have a finished PowerPoint presentation and don't have the time to recreate it from scratch in a video editor.
- Your recipient doesn't have PowerPoint installed on their device, but can open it in a standard video player app.
- You don't have the time to learn a new piece of video editing software to create a presentation video.
How to Quickly Convert Your PowerPoint to Video (Watch & Learn)
Let's walk through how to convert a PowerPoint (PPT) file into a video. In the quick, two minute screencast below, you can watch me cover the process step-by-step:

Keep scrolling to see more tips for making videos with PowerPoint, including compression tips that weren't mentioned in the video.
How to Export Your PowerPoint to Video
Start off by opening your PowerPoint presentation. Exporting a PowerPoint presentation to a video file should be the last step of your process. This is because you'll need to convert the PowerPoint presentation to video each time you make changes.
As I mentioned earlier, PowerPoint will export animations and transitions when you export the file as a video.
To begin the export, go to the File > Export > Create a Video menu option.

From this menu, there are several key settings to choose before you export your finished video. The dropdown boxes on the right side control the quality and timing of your presentation.
Here are the key choices you'll need to make before converting your PowerPoint to video:
1. Set PowerPoint Video Quality
Choose a quality setting from the dropdown to find the sweet spot between file size and video quality.
The better the quality setting you choose, the larger the finished file will be. If you're going to upload the video online to a service like YouTube, it's fine to export at the highest quality and let them handle the compression.

If you're sharing this video with a colleague via email or posting it on your own server, a smaller file size might be the right choice. Here are my recommendations for when to use each of the settings:
- Presentation Quality. When keeping the file size small is no object, use Presentation Quality. It will render a video that looks extremely close to your original presentation alongside a large file.
- Internet Quality. This is ideal if you want to upload quickly to a social service like Facebook or Twitter. Using Internet Quality is a good middle ground between file size and clarity.
- Low Quality. This is the right choice when you're trying to save space, such as when you'll attach a video to an email.
Choose a quality setting from the dropdown option to make your selection.
2. Control PowerPoint Slide Timings
Now, you need to set timings, the runtime for each slide in your video. There are two options for timings on the dropdown menu:
- Don't use Recorded Timings and Narrations. Simply set a length of time for each slide to show in the video, such as 5 seconds each.
- Use Recorded Timings and Narrations. Setup specific lengths of time for each slide to show, and optionally record narrations for the video version.

Basically, these two options let you choose between setting specific timings or using the same runtime for each slide.
For this example, let's leave the option set to Don't Use Recorded Timings and Narrations.

When you choose this option, you'll need to set the Seconds spent on each slide option. This is how long each slide will show in the video version. The default is 5 seconds as you can see in the screenshot above.
3. Create Your PowerPoint Video
Finally, click on Create Video. PowerPoint will open up a Save As window, and you'll need to set a folder and filename for your finished video.

You can also choose between an MPEG-4 video (.MP4 file) or Windows Media Video (.WMV) file when exporting, so choose the appropriate format if your device has any limitations. I typically leave this set to MP4.
How to Record Timings in PowerPoint
In the example above, we used the same amount of time spent on each slide (a flat 5 seconds in the example shown.) However, you can setup timings and narrations for your slide to customize how long each slide should show.
To setup timings and narrations, choose Record Timings and Narrations from the timings dropdown.

Then, a dropdown menu will appear. There are two options here:
- Slide and animation timings. Leave this box checked to record the amount of time
- Narrations, ink, and laser pointer. Leave this box checked if you want to record audio from your computer's default microphone.
Voiceovers are very helpful if you want to send a slide deck to a colleague and share your commentary while they watch the video.

Once you press Start Recording, PowerPoint will go into a fullscreen view of your presentation. Leave each slide on screen for the length of time it should show in the video.
Basically, PowerPoint is recording a live version of your presentation. If you leave a slide on a screen for 10 seconds, it will appear for 10 seconds in the video version.

You can use the arrow keys to advance the slides and change slides. When you reach the end of the presentation, PowerPoint will exit to the menu.

Now, you can save your finished video presentation with your own timings and narrations. The finished video will use the same timings you used while rehearsing.
Create Powerful Video Presentations Fast With the iSpring Suite
If you need to make video-based presentations that are more robust from within PowerPoint, then why not use a quality tool designed for this? Plug the iSpring Suite into your PowerPoint setup today.
With iSpring Suite, you can start recording video and audio directly from within the PowerPoint environment. Also, go one step further. Make use of a variety of iSpring Suite’s next-level eLearning presentation components. Then export to common video formats like MP4.

Take Your Video Presentations to the Next Level
Add more robust eLearning components into your presentation videos with iSpring Suite. Here are some of the advanced iSpring Suite capabilities you can tap into:
- Edit your video right from within PowerPoint. You can trim, add titles, transitions, audio, graphics and merge your presentation videos.
- Record screencasts and software tutorials with voiceovers. Or create a webcam video that's directly embedded into your PowerPoint presentation.
- Create full video-based courses. Take lectures and combine them with video slides and iSpring’s tools to quickly make your online course material.
- Build interactive assessments. You can pair your video material with a full assortment of quizzes. Use quiz templates, branching, and flexible scoring.
- Translate your text to speech to add professional voice-overs and localize courses in 42 languages.
- Take advantage of iSpring Suite’s adaptive player. It allows you to play your presentation on all devices seamlessly.

Quickly Add Videos and eLearning Components to Your Presentations
iSpring Suite will transform PowerPoint into a more powerful toolset. With it you can add videos to your presentations and edit them from within PowerPoint.
Pair these videos with so much more. Turn your presentations into full courses, with quizzes, eLearning interactions, and interactive role-plays. Then export your presentation into common video format or deploy as fully interactive mobile-ready courses.
The best way to get started is to sign up for the 14-day free trial , so that you can check out all the features at your own pace, without paying anything upfront.
Recap and Keep Learning More About PowerPoint
Maybe you're converting your PowerPoint presentation to go online, or maybe you're trying to make it easy for a co-worker that doesn't have PowerPoint installed. Either way, there are plenty of reasons to convert a PowerPoint file to a video for easy watching.
Don't stop here. There's much more to learn about PowerPoint. Check out these tutorials to do just that:
We also have plenty of professional PowerPoint templates with great design options, if you need a quick start to making your presentation. Browse through these curated collections:

What are your favorite tips for converting PowerPoint presentations? Let me know in the comments below.

How To Turn a Powerpoint Presentation Into a Video
The quick and easy was as well as expert tweaks
Powerpoint is a popular tool used to present and showcase a product or message. It comes with many layouts, themes, and tools to help you build professional presentations. What if you spend a lot of time creating a visually appealing and well laid-out presentation and you want to share it with someone who doesn’t have Microsoft Office?
The short answer is you can’t. However, if you turn it into a video it can be easily viewed by most people with an Internet connection. Another benefit of turning Powerpoint into a video is it is a great way to repurpose your content into another format. Video is quickly becoming a huge part of businesses’ digital marketing strategy.

Even though Powerpoint is not marketed as a video tool, and there are many video tools, apps, and platforms available, you might be thinking why should you use Powerpoint?
A few good reasons are:
- As mentioned above, you can’t share your presentation with someone who doesn’t have Powerpoint installed on their computer.
- You have already spent a lot of time creating a fully automated Powerpoint presentation and don’t want to start from scratch with a video.
- Video creation is not in your arsenal of skills, and you don’t want to learn how to use a new tool.
The Quick & Easy Way
If your presentation is complete with automatic timings, transitions and animations, you might be shocked to learn how easy it is to convert it into a video.
- Open your Powerpoint presentation.
- Click on File , select Save As , and from the drop-down menu, choose MPEG-4 Video (*.mp4). (available in Powerpoint 2010 and above).

Too easy? It actually is. But keep in mind this only works for presentations that are already completely set up and ready to show to viewers.
Use The Export Option
- Another way to convert to a video file is to click on File , choose Export , and click on Create a Video .

- There are a few options for you to select that will affect how your final video turns out. Start by selecting quality.

The choice you make will affect the clarity, resolution, and video file size. The higher the quality, the larger the file.
I generally use Full HD (1080p), but if you have a slow Internet upload speed or the file size is an issue, HD (720p) will also produce a high-res HD video.
Choose The Timings
The next option controls how long each slide stays on the screen or the timings of your video.

- If you choose Don’t Use Recorded Timings and Narrations , each slide will be shown for the same amount of time. When you use this option, you can select the number of seconds you want each side to stay before moving onto the next one.

- Now let’s click Create Video and save your file to your computer.

- Find the location where you saved your video and play it. It will open in your default video player or app. The slides will play for the length of time you set above.
- You may wish to do this to allow viewers to read slides with longer text. This can be accomplished by choosing a different timing setting. Select Record Timings and Narrations.

- This option enables you to customize how long each slide lasts on the video and gives you the option to record a voiceover. If you want to record a voiceover, you have several options. To change your microphone, look under settings .

- You can also include a box of yourself recording the video by selecting the Camera option from the settings shown above.
- To start your voiceover, click on the red Record button. Powerpoint will give you a few seconds to get ready while it counts down 3, 2, 1.

- While you are recording your voice, your Powerpoint is also recording the timings. The amount of time you spend on each slide before moving to the next will set the timing.
- To move to the next slide, use the arrow keys. When you get to the end, “X” out of the recording screen. You will then be taken back to the settings page with the timings you recorded.
- Click on Create Video and save it to your computer. Each slide in your video will now last as long as it took you to talk about it when recording.
How To Set Up Powerpoint Presentations With Transitions, Animations & Timings
If you would prefer to set the animations, timings, and transitions before creating the video, below are a few examples of how to do so. This way, you can use the quick and easy way to convert it into a video described above.
What Are Transitions?
Have you ever seen a Powerpoint presentation that does something flashy or catches your eye between slides? Those special effects are called transitions.
There are three categories of transitions you can choose to use in your presentation. They are:
- Subtle : Basic and simple movement from one slide to another.
- Exciting: More elaborate and more interesting than subtle.
- Dynamic: When used between two slides that are similar in layout, this transition will only move the placeholders, not the slides.

When applied in moderation, transitions can add a professional and visually appealing effect to your presentation.
If you use too many transitions, the results can be confusing, erratic, and distracting.
Apply a Transition
- Select the slide from the Slide Navigation panel where you want to apply the transition. This slide will appear after the transition you choose.
- Click on Transitions from the top navigation. Note that the default is None . Click on More or the down arrow to see all the available options.

When you click a transition, you will automatically see a preview of what it will look like if selected. You can either use the transition for a single slide or click Apply to All to use the same transition for all the slides in your presentation.

Customize The Direction Of The Transition
Each transition has different effect options.
- To choose the one you want to use, click on Effect Options , select one, and watch Powerpoint automatically show you a preview of your selection.

Change The Duration Of a Transition
- Choose the slide you want to change the time for and look for the Duration field. In this example, the side is set to 01.00 .

- Let’s increase the time to .025 to make the transition a little slower. You can choose to set the duration for the selected slide only.
- Click Apply to All to use the same transition duration for all the slides.
Add Sound To The Transition
- Click on the dropdown menu next to Sound from the top bar navigation. Choose a sound, then preview it.

- To preview the sounds, from the top bar navigation click Slide Show and then From Current Slide .

How To Move To The Next Slide
If you are doing a live presentation in front of an audience, you usually would press the spacebar or click your mouse to advance to the next slide.
However, as we are converting the presentation to a video, you want to use the Advance Slides setting to automate the process.

- Now you want to remove (deselect) the checkmark next to On Mouse Click . In the After field, enter the amount of time you want the slide to be displayed before moving onto the next one. In the example above, the slide will last 00:03.36 .
Custom Animations
Animations in Powerpoint add motion to different elements in your presentation. The purpose is to draw attention to the key points, such as specific text, shapes, tables, images, and other objects.
Using animations in Powerpoint videos makes it more engaging and exciting to watch. Some of the types of motion you can add to your slides are:
- Changing the color or size of an image or text.
- Causing an image to appear or disappear.
- Moving an object around your slide.
Add An Animation
- Start by selecting an object to animate, click on Animations , and choose an option. If you don’t see the Animation Pane , click on it to open it.

- Now click on Effect Options and choose one. Different animations have different options.

To start an animation, click on the drop-down menu next to Start and choose from one of the options below:
- On Click will start the animation when you click a slide.
- With Previous will start the animation at the same time as the previous animation on the previous slide.
- After Previous will play it immediately after the previous animation completes.
Click on Duration to set how long you want the animation to last. If you want to add a delay before an animation starts, use the Delay option.
To add more effects, click on Add Animation and choose the one you want to use. If you want to change the order an animation appears on the slide, click on the animation marker.

- Choose Move Earlier or Move Later to change the order the animation appears in the sequence.
Add An Animation To a Group
- Press control on your keyboard and select the objects you want to include in the group.
- Next click on Shape Format , then Group , and Group again.

- Then select Animations and choose the one you want to use.
Animate Text
- Highlight the text where you want to add an animation.
- Click Add Animation and choose an option. You will see it in the Animation Panel on the right side.

- The next step is to click the drop-down menu next to the animation you just added. This is another place where you can decide when you want it to start. Choose from Start On Click , Start With Previous , or Start After Previous .
- Click the drop-down again next to the text animation, and this time select Effect Options.

Here is where you will set the direction, timing, and other specific animation options.
There are a lot of special effects you can add to Powerpoint. With practice, you will be able to create an engaging presentation using automatic animations and transition timings.
Once you are finished completing the above steps, you can use the simple way described at the beginning of this content to turn a Powerpoint presentation into a video. In just a few minutes, you will have a compelling, engaging, and visually appealing video to share with others.

David has a background in small business and lives in Australia. He is a WordPress and Ubuntu Developer who enjoys design, CSS and tech tool integration. Read David's Full Bio
Read More Posts:


How to Make a PowerPoint into a Video in Under 5 Minutes
- how to make a powerpoint into a video

PowerPoint is, by far, the most popular tool people use to make presentations , whether for school projects or work-related activities, such as staff training or pitching a product idea to investors.
PowerPoint is genuinely a great tool. It’s simple and easy to use, offers hundreds of themes, and if you spend a bit of time playing around with all the different options inside the program, you can make professional presentations that will captivate your audience.
The only issue regarding PowerPoint—more specifically, presentations in general—is the limited usability of PPT files. You can’t upload a presentation on YouTube , for example. You could technically share it on your website or on social media, but a presentation without a presenter is just a random compilation of images.
Unless the person who created the presentation takes the time to weave the story, explain all the concepts, and expand on the bullet points the audience sees on the slides, the presentation won’t have the desired impact.
Does that mean that presentations are only viable in a face-to-face setting? Not exactly. There are a number of different ways to utilize presentations, but they all involve converting the PPT file into a video .
Now, the question begs itself— how do you make a video out of a presentation?
Turn PPTs into engaging videos
With InVideo’s online editor

Creating a Video from PowerPoint
The first thing that will go through most people’s minds is a webinar. When you stop to think about it, a webinar is nothing more than a glorified presentation. Someone takes the time to record themselves as they’re going through all the different slides and explaining everything in detail.
A webinar is a rather specific form of content, and it takes a lot of time and effort to put one together and to get enough people to watch it to make it worthwhile. Unless you’re an experienced salesperson who is adamant about selling a product and firmly believes that the best way to do so is to blabber about it for two hours, you’re probably looking for a faster, less painstaking way to turn a PowerPoint into a video.
Thankfully, there are a number of different ways to do so. In fact, PowerPoint itself gives you the option to convert the presentation into a video. In this article, we’ll walk you through the entire process step by step and show you how to make a video PPT using all the different versions of the program.
How to make a video from PowerPoint?(Office 365, PowerPoint 2019, PowerPoint 2016)
Although the option is there, keep in mind that it’s not as simple as clicking a Convert to video button. You do need to record narration and laser point gestures (mouse movement on-screen) beforehand.
The reason for that is simple and technical in nature—unless you record narration and timings beforehand, PowerPoint will default to five seconds per slide when creating a video.
You can change this by clicking the upward arrow next to the Timing under the Create a Video option, but keep in mind that you’ll be adjusting the time for all slides simultaneously. There is no option to adjust how long each individual slide will appear on the screen.
If you want to use different timings per slide, as well as record narration, select the Recording option inside PowerPoint and create a video.
Here’s how you’ll enable recording inside Office 365 PowerPoint, as well as PowerPoint 2019 and 2016:
1. Click on File and select Options on the left-hand side of the screen 2. Choose Customize Ribbon (A) from the drop-down menu 3. Check Recording (B) in the pop-up window and hit OK (C)

Image source: Microsoft
You’ll see a new option appear on your screen under the Recording tab, titled Record Slide Show. Clicking on the downward pointing arrow will allow you to choose whether you want to start recording the slideshow from the start or from the slide you’re currently on.
You can also choose to record the narration as audio or video, and you will be able to leverage a variety of different tools, such as pens and markers, to highlight certain elements on your slides.
As you’re recording, the red circle next to the Record Slide Show button will be blinking, indicating that the audio and/or video is being captured. Once you go through all the slides, you can either:
- Click on the square Stop button - Press S on your keyboard.
Exporting your video
The easiest way to export the video you just recorded is to navigate to the Recording tab and select Export to Video . This will open up a new menu, and PowerPoint will prompt you to choose the video quality.
|
| ||
|
| ||
| Standard (480p) | 852 x 480 | Portable devices like phones and tablets |
| HD (720p) | 1280 x 720 | The Internet |
| Full HD (1080p) | 1920 x 1080 | Computer monitors and HD screens |
| Ultra HD (4K) | 3840 x 2160 | Large TVs |
One thing to keep in mind is that the Ultra HD option is available only on Windows 10 .
Next up, you’ll need to either set the timings for the slides or select the Use Recorded Timings and Narration option.
Then, click on Create a Video , name your file, and choose where you want to save it.
Finally, select the Save as Type option and choose between two available formats:
- MPEG-4 Video - Windows Media Video
PowerPoint will start converting the slideshow into a video automatically. Depending on the video quality and length, this process might take a while, so we suggest timing it so that you don’t have to use the computer during that time. For larger, Full HD or Ultra HD videos, it’s best to keep the program running overnight.
PowerPoint 2013
One notable difference with the 2013 version of PowerPoint is that the video quality options are slightly different. Ultra HD (4K) was just entering the scene, and not a lot of people owned devices that supported the 3840 × 2160 video resolution, so it’s no surprise that the option doesn’t exist in this version.
|
| ||
|
| ||
| Presentation Quality | 1920 x 1080 | Computer and HD screens |
| Internet Quality | 1280 x 720 | The internet |
| Low Quality | 852 x 480 | Portable devices |
The interface didn’t change much over the years, so if you happen to be running PowerPoint 2013, you’ll go through the exact same process as with the newer versions of the program:
1. Navigate to File , click Export , and choose to Create a Video 2. Select the resolution 3. Set timing parameters or use recorded timings and narration 4. Click on Create Video 5. Choose Save as Type and select between MPEG-4 or Windows Media Video
PowerPoint 2010
If you are still using the 10-year-old version of PowerPoint, the options for creating a video out of your slideshow will be a bit different.
The first thing to keep in mind is that PowerPoint 2010 only supports .mp4 files and that the maximum resolution for the videos is 1290 x 720, which isn’t exactly ideal. If you want to create a professional-looking video from your PowerPoint presentation to share with business partners or your audience, you might want to consider a less restrictive alternative.
Here’s how you would turn your slideshow into a video in this outdated version of the program:
1. Select Save & Send under File 2. Choose the option Create a Video at the very bottom of the right-hand side of the screen 3. Find the Create a Video tab if you want to see the available video quality options 4. Click on the downward-pointing arrow next to the Computer & HD Displays option and choose from the three available options 5. Choose between Use and Don’t Use Recorded Timings and Narration depending on whether you want to use recorded timings and narration 6. Click on Create a Video , name it, choose the destination folder, and hit Save
|
| |
|
| |
| Computer & HD Displays | 1920 x 1080 |
| Internet & DVD | 1280 x 720 |
| Portable Devices | 852 x 480 |
PowerPoint Video Drawbacks
It’s always great when you can use the same tool for various different tasks. In the case of PowerPoint, you can both create the presentation within the program and convert it into a video on the spot.
That said, PowerPoint isn’t a video editing tool . What we mean by this is that you are severely limited in terms of what you can do with the video you create from your PPT. There are no transitions, you can’t leverage fade-ins and fade-outs, and there is no music, among other things.
No matter how you look at it, the videos created through PowerPoint will be bland. PowerPoint’s PPT to video conversion might get the job done if your only goal is to share a presentation internally with your team. Even then, it only makes sense in a remote work environment, where you can’t physically hold the presentation to your coworkers.
If you’re planning on using the presentation as a core part of your marketing strategy , then the video quality—and we don’t mean the resolution here—you’ll get from PowerPoint won’t suffice. No matter how professional you sound during the narration, the videos created through PowerPoint will still give off the impression that you didn’t try all that hard.
When you see the production value of the videos that businesses share on their websites, YouTube channels , and social media, it’s painfully obvious that PowerPoint videos can’t compete. This doesn’t mean you have to spend months learning video editing or spend a small fortune hiring a professional videographer to make and edit the videos for you.
With InVideo, a powerful yet easy-to-use online video editor , you can create stunning videos from your presentations in minutes! We’ll walk you through the whole process to show you how easy it is to create breathtaking videos from presentations with InVideo .
How to make a video from a PowerPoint Presentation using InVideo?
Videos are quickly becoming an integral part of every business’s marketing strategy. Whether you’re a startup, an enterprise, a medium-size business, or a solo entrepreneur, you will need to use videos if you want to attract as much traffic to your website as possible. The same goes for influencers and bloggers—videos beat any other type of content when it comes to user engagement.
InVideo makes video editing quick, easy, and fun. Thanks to our intuitive, drag-and-drop video editor , professionally designed video templates , and an extensive library of photos and audio tracks, you can create killer videos in no time, even if you have absolutely no video editing experience.
Our platform is cloud-based, meaning you can access it from any browser on your computer and laptop. This also means that your video editing capabilities won’t depend on how powerful your machine is, meaning you can create HD and Ultra HD videos even with a low-end PC or laptop.
The best part about InVideo is the fact that you can export up to 60 videos per month for free! With our free plan , you’ll have access to all of InVideo’s features so that you can play around with all the different options and learn video editing at your own pace. We also have dozens of video editing tutorials for different use-cases, so you can get started right away.
Creating videos from photos and PowerPoint presentations is one of many things you can do with InVideo.
Here’s are the simple steps you can follow to create a stunning video from your presentation with InVideo:
Step 1: Create an account
To get started, you’ll need to create an account.
Navigate to our website and click Sign Up in the top right corner. Input your email, set up your password, and you’re good to go. We’ll never ask you for your credit card information or phone number. We won’t bombard you with emails either—we hate spam as much as you do.
Step 2: Select a Template or start from scratch
Once you log in, you’ll see several different options on the homepage:

The Pre-made Templates option will be selected by default. While there are over 5000 stunning video templates in our library, we strongly suggest that you go with the Blank Template option for this purpose.
You will be starting from scratch, but it’s not as scary as it might sound. The blank template is the most convenient option since you’ll be treating each slide as a separate scene and editing them individually. Here’s how to do it:
- Choose how long each slide appears on the screen - Add the appropriate narration - Throw in effects , filters, transitions , etc.
Step 3: Upload your media
Assuming you are the one who created the presentation, you should have all the necessary media on your device—photos, slides, and the script . To add it to the video, you’ll first need to upload it through our video editor .
From the menu on the left, select the Uploads option and click on the Upload button at the bottom of the screen.

You can upload files up to 800MB at a time. If you have all the photos neatly sorted into a folder, you can upload the entire folder in one go. All the media you upload will be available immediately to the left of your video—for this and all future projects—and you can drag and drop images to the center of the screen to add them to the timeline.
Step 4: Add the photos
Let’s start with a single scene—the intro of your presentation. Drag and drop the desired image from the Uploads library onto the screen to add it to the scene.

The video editor will show you what the image will look like in the video. When you drop the photo, you’ll need to select one of the two options:
- Replace - Add as a layer

If the slide consists of a single image, choose Replace. Since we’re not using a pre-made template here, the image you chose will replace the black background.
If you would like to add additional images on top of it—such as graphs, screenshots, product photos, or lifestyle images—drag and drop them to the center of the screen once again, but this time select the Add as a Layer option. This will put the new image on top (in front) of the background one, making the first one act as a backdrop.
Step 5: Edit the Scenes and add text
By default, scenes will be about five to six seconds long, which probably isn’t sufficient for the narration. You can edit how long each slide—referred to as a scene in the video editor—will be on the screen for on the timeline.

The image above shows the basic timeline, which is great for having an overview of all your scenes. To edit a specific scene, click on it on the timeline and select the Advanced Timeline option in the top right corner.

On the left side, you’ll see all the different elements that make up the scene. Select each one you’d like to edit, whether it’s a logo, the text, or the image itself.
The middle of the timeline is reserved for the length of the scene. To adjust how long this scene will be in the video, move the sliders left or right. The duration of the scene will always be displayed in the center.
On the right side, you’ll be able to zoom in and out, so you can edit the timeline more easily.
As far as text editing is concerned, you can do so either from the timeline or by selecting the text box on the screen. You’ll be able to drag and drop the text box to adjust the positioning, rotate the text, change the colors and font, and more. To add multiple text boxes, select the Text option from the left-hand menu and drag and drop the new box onto the screen.

Step 6: Add narration
All that’s left to do is add narration. If you’ve recorded the audio already, you can add it through Uploads , the same way you did with photos. If not, you can add a voice-over to each individual scene. Select the Add VO option and import an existing voice-over or choose to record it on the spot.

Step 7: Export the Video
After you record or upload the VO, add the photos, and edit the length of each scene, you’re good to go. You can play around with filters, effects, and transitions if you’d like, but the base video is complete and ready to be shared with the world!
All that’s left to do is to click on Export in the top right corner and wait for the video to render. After a few minutes, depending on the video’s length, you’ll be able to download it, post it on YouTube and social media, or copy the shareable link and use the video in your marketing campaigns.
Turn your PPTs into epic videos
Without spending hours on editing

That’s how easy it is to create stunning videos with InVideo. Click here to get started today for free and turn your PowerPoint presentations into breathtaking videos in no time!
Let’s create superb videos
Home Blog PowerPoint Tutorials How To Convert a PowerPoint Presentation to a HD Video in 3 Steps
How To Convert a PowerPoint Presentation to a HD Video in 3 Steps
There are many reasons why you may consider converting a PowerPoint presentation to a High-Definition video ; for example if you want to share a presentation online through YouTube or Vimeo, create a self-running presentation or save the slide show video to a DVD.

In this article we will guide you on how to convert a PowerPoint presentations to a High Definition video (as an MP4 video file,Windows Media Video .wmv file or QuickTime Video File .mov) using Microsoft PowerPoint.
PowerPoint lets you save presentations as videos directly from the File > Save As dialog box; however if you need to choose the output video quality while saving the presentation then it is recommended to use the File > Export > Create a Video option.
High Definition (HD) or high-quality presentation uses a higher resolution (1280×720 or 1920×1080) to save the video information. It can improve the overall experience while watching a presentation online or playing a PowerPoint slideshow in a kiosk. It would be the preferred format if you plan to upload your video presentation to YouTube or Vimeo, and have higher quality. The main drawback is that the presentation video file size will be bigger and more bandwidth may be required.

Why You Should Convert a PowerPoint to a Video Format?
Converting a PowerPoint to a video format can have several advantages. From making intuitive videos to engaging your audience to address complex topics in just a few minutes.
Create a Video Slideshow
You can use the converted video file to create a video slideshow for display at an event or edit the content of the video to generate a video presentation.
Create Presentations and Tutorials
PowerPoint enables users to export their videos with voice-over narration and animations. This can help create extensive presentations for an audience
Use Professional Editing Software to Create Engaging Videos
Adding a voice-over, additional graphics, and some footage can help create a professional-looking presentation by using a video editing application. Similar to how you use Instagram tools to convert images into a stunning video, some famous video editing apps that can help you make the most out of your converted PowerPoint file to a video format include Adobe Premiere Pro, Camtasia Studio, iMovie, Final Cut Pro, etc. If you are a Windows user, you can look into alternatives to Final Cut Pro like Lightworks, Movavi Video Editor, and Shotcut.
Create a Video Instead of Using PowerPoint
You can convert PowerPoint to video by simply letting your slides play out, making the presentation easy to play for end users without the need to have PowerPoint installed. This approach can also be helpful if you intend to present your slides using a video player instead of PowerPoint, as the latter might not be available everywhere, whereas video players often come with all types of desktop and mobile operating systems.
Upload a Video Online
Many presenters also like to upload their presentations online for an audience. A teacher might be interested in making his/her presentation available for students, or an industry expert might wish to share a concept with others in the industry by uploading a video to a YouTube channel. Either way, converting your PowerPoint to a video can help make the content easily shareable via video streaming platforms like YouTube and Vimeo. Such a video can also be shared privately via file-sharing apps like Box, Dropbox, OneDrive, Google Drive, etc.
How To Convert PowerPoint to Video (Windows)
Step 1 – go to file > export.
The first step to save a PowerPoint presentation as a HD video go to File -> Export and then click Create a Video button.

Step 2 – Choose Video Resolution
Now, select a resolution to export your video. Other than the Standard (825×480) resolution, the high-definition resolution options include HD (Medium 1280×720), Full HD (Large 1920×1080), or Ultra HD 4K (Largest file size 1920×1080). If you are using an older version of PowerPoint, you might have limited options to select between HD resolutions, since versions older than PowerPoint 2013 only supported HD videos (1280×720).

Optional Step: Save Narrations, Laser Pointer Gestures & Recorded Timings in the Video Exported from PowerPoint
Aside from saving the PowerPoint presentation as an HD video, you can also save a video file that incorporates all the recorded timings during a rehearsal, narrations, and even laser pointer gestures.
In case you have recorded narrations for your slides, you can use them or select Record a Video option to instantly start narrating your slides. The Preview Timings and Narrations option in the same drop-down menu does what it says, it enables you to check and ensure that your narrations are correctly timed with your slides, so you can make necessary edits before finalizing your video.

Optional Step: Select Slide Duration
Choose the default time spent on each slide (in seconds) and whether to save the narrations, timings, and gestures. By default, 5.00 seconds are spent on each slide unless you have a different timing recorded for the presentation slideshow.

Step 3 – Select Video Format and Create a Video Presentation
Click Create Video button and choose the destination folder and output file name. For end users wondering how to convert ppt to MP4, this is the step where you can select MP4 as your output format. PowerPoint supports saving slide decks to MP4 or WMV video formats. Once you confirm, wait a few seconds in order for the file is being saved on your hard disk. Presentations with a lot of slides may require a longer wait time.

Something good about saving presentations as a video file is that all animations, transitions, and media are preserved.

How to Convert PowerPoint to Video (Mac)
How to Convert PPT to Video in Mac? If you’re wondering how to make a PowerPoint into a video on Mac, the steps are quite similar to how you would export PowerPoint to video on a PC, with a few minor differences.
To convert PowerPoint to video on Mac, go to File -> Export.
Step 2 – Choose Video Format
If you have been wondering how to save PowerPoint as MP4 on Mac, this is the step where you can pick a video file format to save your presentation as a video, including MP4 and MOV.
The difference between the PC and Mac during this step is the difference in the availability of video conversion options. The PC version, along with MP4, allows saving a video in the Windows Media Video (WMV) format, unlike Mac, which offers QuickTime video format (MOV) instead.
Step 3 – Select Video Resolution and Create Video
The new version of PowerPoint for Mac allows saving a presentation in HD (Medium 1280×720), Full HD (1920×1080), or Ultra HD 4K (1920×1080) format. The higher the resolution, the higher the file format, so make sure you have enough disk space to save a very heavy file, especially if you opt for Ultra HD 4K resolution.
Save Narrations, Laser Pointer Gestures & Recorded Timings (Optional)
To save narrations, recorded timings, and laser point gestures, select the Use Recorded Timings and Narrations option.
Select Slide Duration (Optional)
To precisely time how long each slide is presented in the video, select the time duration. The default duration is 5.00 seconds, unless you have specified time for each slide separately in the presentation.
Select Export to create your video. Depending on the resolution you have selected, it might take several minutes before the video is converted. Higher resolutions take more time to conversion.
Saving videos from PowerPoint can help you at the time you need to share a presentation slideshow online (for example, uploading it via YouTube or Vimeo, or any other online video platform ), but you can also use this technique to prepare a PowerPoint presentation for a kiosk, make interactive PowerPoint presentations or create a self-running presentation. PowerPoint presentations saved as videos can also be easily run from mobile devices without the need for PowerPoint to be installed on the device. If you wish to save your PowerPoint to video in a format easily accessible, you can opt for PowerPoint save as MP4 instead of using WMV or MOV file formats that are not supported by all types of video players.
Alternatively, check our article about how to insert a video into PowerPoint .

Like this article? Please share
mp4, Presentation Ideas, Presentation Videos, Video, Windows Media Video, wmv Filed under PowerPoint Tutorials
Related Articles

Filed under Design • July 3rd, 2024
ChatGPT Prompts for Presentations
Make ChatGPT your best ally for presentation design. Learn how to create effective ChatGPT prompts for presentations here.

Filed under Design • July 1st, 2024
Calculating the Slide Count: How Many Slides Do I Need for a Presentation?
There’s no magical formula for estimating presentation slides, but this guide can help us approximate the number of slides we need for a presentation.

Filed under Design • June 27th, 2024
How to Repurpose Your Content on Presentations
Adapt your content from presentation slides into other mediums and viceversa by learning how to repurpose your presentations. Detailed guide here.
6 Responses to “How To Convert a PowerPoint Presentation to a HD Video in 3 Steps”
Can’t believe no one has commended you for this helpful tutorial! We want to mount several TVs in the lobby and exam rooms of our veterinary hospital to run informational presentations for our clients about pet care, our services, and helpful products. Recording a PowerPoint as a video and then putting it on a USB thumb drive to connect to the TV seems like it will be an effective, inexpensive way to get that accomplished. Thank you so much!
I second the above comment. Thank You
how to present a power point presentation on a smart tv..and having it loop over to continuous display..keep running.
This was very helpful. I had no clue that this could be done. I dedicated a PC to running the Power Point presentation for our lobby. Having it run on the TV via USB will free up that resource for us.
I haven’t dug into it yet, but is there a way to make it loop?
I keep getting this audio data not supported. Is there anyway to remove this?
Send us your issue to [email protected] we might be able to help you.
Leave a Reply
Copilot tutorial: Create a branded presentation from a file

Note: This feature is available to customers with a Copilot for Microsoft 365 (work) license.
Duration: 56 seconds
See how Copilot in PowerPoint effortlessly transforms templates, files, or PDFs into sleek, branded presentations, intuitively incorporating insightful speaker notes.
Try in PowerPoint
See more videos

Kickstart a presentation

Create a presentation with a prompt

Summarize a presentation
Browse all Copilot videos

Need more help?
Want more options.
Explore subscription benefits, browse training courses, learn how to secure your device, and more.

Microsoft 365 subscription benefits

Microsoft 365 training

Microsoft security

Accessibility center
Communities help you ask and answer questions, give feedback, and hear from experts with rich knowledge.

Ask the Microsoft Community

Microsoft Tech Community

Windows Insiders
Microsoft 365 Insiders
Was this information helpful?
Thank you for your feedback.
- PRO Courses Guides New Tech Help Pro Expert Videos About wikiHow Pro Upgrade Sign In
- EDIT Edit this Article
- EXPLORE Tech Help Pro About Us Random Article Quizzes Request a New Article Community Dashboard This Or That Game Popular Categories Arts and Entertainment Artwork Books Movies Computers and Electronics Computers Phone Skills Technology Hacks Health Men's Health Mental Health Women's Health Relationships Dating Love Relationship Issues Hobbies and Crafts Crafts Drawing Games Education & Communication Communication Skills Personal Development Studying Personal Care and Style Fashion Hair Care Personal Hygiene Youth Personal Care School Stuff Dating All Categories Arts and Entertainment Finance and Business Home and Garden Relationship Quizzes Cars & Other Vehicles Food and Entertaining Personal Care and Style Sports and Fitness Computers and Electronics Health Pets and Animals Travel Education & Communication Hobbies and Crafts Philosophy and Religion Work World Family Life Holidays and Traditions Relationships Youth
- Browse Articles
- Learn Something New
- Quizzes Hot
- This Or That Game
- Train Your Brain
- Explore More
- Support wikiHow
- About wikiHow
- Log in / Sign up
- Computers and Electronics
- Media Software
- Media Conversion
- Video Conversion Software
How to Convert Powerpoint to MP4
Last Updated: June 17, 2024
wikiHow is a “wiki,” similar to Wikipedia, which means that many of our articles are co-written by multiple authors. To create this article, 14 people, some anonymous, worked to edit and improve it over time. This article has been viewed 233,526 times. Learn more...
PowerPoint is great for creating slideshows, but they can be difficult to share if the recipient doesn't have PowerPoint installed. One easy way to share your presentations is to create an MP4 video file. This will allow you to play it on any computer or device, or upload it to YouTube or another streaming service. Newer versions of PowerPoint have this ability built-in, but you'll need to do a little more work for PowerPoint 2007 and earlier.
PowerPoint 2010 and 2013

- Presentation (2013)/High (2010) - This will result in the highest-quality video, and is best suited for actual presentations on a big screen. If you are planning on using the video to project the presentation, select this option. It will produce the largest file out of the three options.
- Internet (2013)/Medium (2010) - If you're planning on uploading the video to YouTube, or want to share it with others who will be watching from a computer, select this option. The file size can be significantly smaller, and the quality will only be slightly worse than the high quality option.
- Low/Low - This will result in a very small file, but will also result in a smaller, blurrier video. This option is best suited for aging smart phones and tablets, though recent devices can easily play higher-quality versions.

- You are given the option to record timing and narration from this menu as well. You can preview your timings before proceeding.

PowerPoint 2007 and Earlier

- Click the Office button or the File menu and select "Save As".

- Select or create a new directory for all of the slide files.

- Click the File menu and select "Import Into Collections". In Movie Maker 2012, click "Add videos and photos" instead.
- Navigate to the folder containing the files you just created, and then select them all. The folder will have the same name as the presentation.
- Click Open after selecting all of the files in the folder. The image files will be opened into Movie Maker.

- See How to Add Transitions in Movie Maker for a detailed guide on using transitions.

- Click "Save movie" or "Save to my computer"
- If given the option to select a device, choose either "For a computer" or the specific device you intend to play the video on.
- Name and save the file. It should be in MP4 format. If it isn't, select "MPEG-4" from the "Save as type" menu.

Community Q&A
You Might Also Like

- ↑ https://support.nsula.edu/index.php?/Knowledgebase/Article/View/12/9/how-to-export-powerpoint-slide-show-to-mp4-video
- ↑ https://iconlogic.blogs.com/weblog/2010/12/powerpoint-2007-converting-presentations-to-movies.html
About This Article
- Send fan mail to authors
Is this article up to date?

Featured Articles

Trending Articles

Watch Articles

- Terms of Use
- Privacy Policy
- Do Not Sell or Share My Info
- Not Selling Info
wikiHow Tech Help:
Tech troubles got you down? We've got the tips you need
HitPaw Video Converter
- Ultimate video converter for videos, music, DVDs, blu-ray DVDs and images at 120x faster with rich editing options.
- HD video downloader to convert YouTube to MP3/MP4 and other 10000+ sites.
- Remove protection and download music from Apple Music, Spotify, Deezer, and Tidal to MP3/WAV/FLAC/M4A.
- Built-in AI tools: AI art generator, speech to text, vocal remover, background remover, and noise remover.

[Updated Guide]: How Do I Put a YouTube Video in a PowerPoint
Creating an engaging PowerPoint presentation often involves incorporating multimedia elements like videos to capture your audience's attention and enhance your message. Among the most popular choices, YouTube videos stand out due to their diverse and extensive content. Whether you aim to include a tutorial, a motivational clip, or a piece of news, embedding a YouTube video into your PowerPoint slides can significantly elevate the quality and impact of your presentation. How do i put a youtube video in a Powerpoint?
This guide will walk you through the simple steps required to help you know how to put a video from youtube in Powerpoint, ensuring your presentations are both informative and visually appealing.
Part 1. How Do I Put a YouTube Video in PowerPoint
Way 1. enter the url for a youtube video.
Inserting a YouTube video into your PowerPoint presentation by entering the URL is not only straightforward but also enhances the multimedia capabilities of your slides. This method simplifies the process of integrating external content into your presentation, allowing you to leverage YouTube's vast library of videos directly within your slides. By simply copying and pasting the video URL into PowerPoint, you maintain the video's original quality and playback settings, ensuring a seamless viewing experience for your audience.
This approach is ideal for presentations that require up-to-date information, instructional content, or visual storytelling, where incorporating dynamic multimedia elements can significantly enhance engagement and comprehension. Follow these steps to learn how to put a video from youtube on Powerpoint via URL:
Step 1: First, find the YouTube video you want to use in your presentation. Once you have the link, copy it from the address bar. After that, pick the PowerPoint slide on which you want to add the YouTube video. Choose the "Insert" tab from the toolbar located at the top of the screen.

Step 2: Next, select "Video" from inside the "Media" group through the drop-down menu's "Online Video" option. Paste the YouTube video's previously copied URL into the pop-up box that appears. You can also directly search for a YouTube video using this form, if that's more your style. To start your search, simply click the magnifying glass or hit Enter on your keyboard.

Step 3: In the end, select the web video thumbnail and press the "Insert" button. The video can now be resized and moved on your slide in the same way as any other object.

Way 2. [Offline] Download YouTube Video to PowerPoint Offline
Learning how to put a video from youtube to Powerpoint offers several advantages, particularly when considering factors like internet availability and playback reliability. This method ensures seamless integration of multimedia content into your slides, enhancing audience engagement and the overall impact of your presentation.
When you download YouTube videos using HitPaw Video Converter , you gain the ability to customize and optimize your content before inserting it into your PowerPoint slides. This flexibility allows you to trim videos, adjust quality settings, and even add subtitles or effects as needed, ensuring that your presentation is polished and professional.
Moreover, by downloading videos in advance, you eliminate the risk of unexpected internet interruptions or buffering delays during your presentation. This reliability is crucial for maintaining a smooth flow and capturing your audience's attention without distractions.
Features of HitPaw Video Converter:
- Download multiple videos at once to save time and energy
- Retrieves and downloads video metadata—such as the title, thumbnail, and tags—automatically.
- Enables the download of several language versions of videos with subtitles.
- The capacity to download whole YouTube channels or playlists at once.
- Schedule the download of videos at designated periods, which is useful for content planning and organization.
- Provides a browser extension that makes it simple and quick to download videos straight from popular web browsers like Chrome and Firefox.
- To ensure excellent playback, download videos in HD quality, up to 4K resolution.
How to Download YouTube Videos through HitPaw Video Converter:
Step 1: HitPaw Video Converter should first be downloaded and installed on your PC. When the installation is finished, launch the software.
Step 2: To begin downloading a YouTube video for offline use, first navigate to YouTube and locate the specific video you wish to include in your presentation. Once you have identified the video, simply copy the URL from the address bar. This URL serves as the direct link to the video content, allowing you to easily paste it into your chosen video downloader tool, such as HitPaw Video Converter, to proceed with the download process.

Step 3: Paste the copied YouTube video URL into HitPaw Video Converter by navigating to the "Download" tab within the software interface. Once there, locate the designated field where you can input the URL. After pasting the URL, proceed by clicking on the "Analyze" button. This action prompts HitPaw Video Converter to initiate the analysis of the video link, enabling the software to retrieve essential details about the video, such as its format, resolution options, and available subtitles.

Step 5: Once the download is finished, launch PowerPoint and select the slide on which you want the movie to appear. Go to the "Video" menu, then "Insert" and finally "Video on My PC." Find the video file you downloaded, pick it, and press "Insert." To fit your slide layout, reposition and resize the video as necessary.

Part 3. FAQs of How to Insert YouTube Videos into PowerPoint
Q1. How to embed a YouTube video in PowerPoint to play automatically?
- Use the previously mentioned techniques to embed the movie into your PowerPoint slide.
- To choose the embedded video, click on it.
- Navigate to the toolbar's "Playback" tab.
- Locate the "Start" dropdown menu under the "Video Options" group.
- Select "Automatically" from the drop-down menu.
- Now, whenever you get to that slide in your presentation, your video will start playing automatically.
Q2. Are you allowed to embed YouTube videos?
A2. Yes, you are generally allowed to embed YouTube videos into your presentations, websites, or other content, provided you follow YouTube's terms of service. YouTube provides an "Embed" feature specifically for this purpose. However, it is important to ensure that the content you are embedding does not violate any copyright laws or YouTube's policies. Always check the video's license and YouTube's terms of service to make sure you have the right to use the video in your presentation.
Final Thoughts
How do i put a youtube video in a Powerpoint? Embedding YouTube videos into PowerPoint presentations can greatly enhance their effectiveness and engagement. Whether you choose to insert videos online using direct URLs or download them for offline use with tools like HitPaw Video Converter, the process is accessible and straightforward.
HitPaw Video Converter offers a user-friendly solution for downloading and converting YouTube videos. With its fast download speeds, wide format support, and built-in video editing tools, Whether you need to ensure offline playback or prefer to edit your videos before inserting them into slides, the HitPaw Video Converter provides the versatility and ease of use needed for professional presentations.
Home > YouTube Tips > [Updated Guide]: How Do I Put a YouTube Video in a PowerPoint
Select the product rating:

Joshua Hill
Editor-in-Chief
I have been working as a freelancer for more than five years. It always impresses me when I find new things and the latest knowledge. I think life is boundless but I know no bounds.
Leave a Comment
Create your review for HitPaw articles
Recommended Products

HitPaw Edimakor
An Award-winning video editor to bring your unlimited creativity from concept to life.

HitPaw Watermark Remover
Quickly remove watermark from videos and images, super easy for beginners.
You May Be Interested

Top 4 YouTube Shorts Thumbnail Downloader Online & Offline

The Essentials of Re-encoding Video for Optimal Quality and Compatibility

Instagram GIF Maker- Guide to Convert Video to GIF Easily

How-To Geek
Convert a powerpoint 2010 presentation to video.

Your changes have been saved
Email Is sent
Please verify your email address.
You’ve reached your account maximum for followed topics.
Here’s Which Motorola Phones Will Get Android 15
Authy may have just leaked your phone number, the best bluetooth speakers of 2024.
Sometimes you might want to convert your PowerPoint 2010 presentations to video so users can watch them without having PPT installed on their computer. Today we take a look at converting presentations to video.
After you've created your Presentation click on File to access Backstage view.
Then click on Save & Send.
![sshot-2010-09-04-[04-35-10]](https://static1.howtogeekimages.com/wordpress/wp-content/uploads/2010/09/sshot20100904043510.png "can you convert a video to a powerpoint presentation")
Now under the File Types section select Create a Video.
![sshot-2010-09-04-[04-35-46]](https://static1.howtogeekimages.com/wordpress/wp-content/uploads/2010/09/sshot20100904043546.png "can you convert a video to a powerpoint presentation")
Now choose the size of the video, whether to use recorded narrations for the presentation, seconds to spend on each slide, the click Create Video.
![sshot-2010-09-04-[12-41-25]](https://static1.howtogeekimages.com/wordpress/wp-content/uploads/2010/09/sshot20100904124125.png "can you convert a video to a powerpoint presentation")
Select a location to save the video. If you're at the office and want several people to have access to it, you might want to put it on a shared network drive.
![sshot-2010-09-04-[15-03-28]](https://static1.howtogeekimages.com/wordpress/wp-content/uploads/2010/09/sshot20100904150328.png "can you convert a video to a powerpoint presentation")
While the video is converted to .wmv format there will be a progress bar displayed in the lower right corner of PowerPoint.
![sshot-2010-09-04-[04-24-44]](https://static1.howtogeekimages.com/wordpress/wp-content/uploads/2010/09/sshot20100904042444.png "can you convert a video to a powerpoint presentation")
Now you can watch the video of your presentation in your favorite .wmv compatible video player.
![sshot-2010-09-04-[12-47-18]](https://static1.howtogeekimages.com/wordpress/wp-content/uploads/2010/09/sshot20100904124718.png "can you convert a video to a powerpoint presentation")
PowerPoint 2010 has added a lot of new features like adding transitions to slideshows , and animating text and objects .
You could also take your video and edit it further with Windows Live Movie Maker and post it to YouTube.
- Microsoft PowerPoint
IMAGES
VIDEO
COMMENTS
On the File menu, select Save to ensure all your recent work has been saved in PowerPoint presentation format (.pptx). Select File > Export > Create a Video. (Or, on the Recording tab of the ribbon, select Export to Video .) In the first drop-down box under the Create a Video heading, select the video quality you want, which pertains to the ...
🔵 .ppt (PowerPoint Presentation) The .ppt format is the default file format for presentations created in Microsoft PowerPoint, a popular software for creating slideshows and presentations. PPT files can contain text, images, videos, animations, and formatted dataThey are widely used in business, education, and training settings for ...
In this comprehensive guide, we'll explore the tools, formats, and techniques to seamlessly integrate video content into your presentations. Can You Convert a Video to PPT Slides Online? Yes, you absolutely can! Converting a video to PowerPoint slides online is a game-changer, allowing you to harness the full potential of multimedia presentations.
On the PowerPoint window, in the left sidebar, click the slide in which you want to add a video. At the top of the PowerPoint window, click the "Insert" tab. In the "Insert" tab, under the "Media" section (which is to the extreme right side of the interface), click "Video." You'll now see an "Insert Video From" menu.
To turn a PowerPoint presentation into a video, first, open your presentation with the PowerPoint app on your Windows or Mac computer. In the top-left corner of PowerPoint, click the "File" option. From the sidebar that opens after clicking the "File" option, select "Export." In the "Export" menu, click "Create a Video."
Select Format to put frames and effects on your video. Select Video Effects, Video Border, or Video Shape to add effects, borders, or crop your video to a shape. Select Corrections or Color to adjust the video's color tone. Select Poster Frame to choose the video's opening frame, and then click and drag with your mouse to select your ...
Save in a video format. Select File > Export. (Don't use Save As, because it doesn't offer video options.) Open the File Format list and select the video format that you want ( MP4 or MOV ). If the MP4 and MOV options aren't in your version of PowerPoint, see Requirements below for more information. Select the video Quality you want ...
Browse to the location where you want to save the file and give it a name then press "Save.". While the video is being created, you will see the small progress bar at the bottom of your PowerPoint window. Wait till this is done and then go to your video. Now you can double-click your video file and it will automatically play with your video ...
1. Choose the right equipment. High-quality recording equipment is essential for producing professional-looking and sounding presentations. Laptops are equipped with microphone and a high-resolution webcam, but it's always a good idea to consider investing in higher quality recording equipment.
Watch this video to learn how to convert your PowerPoint presentation into a video. When you make a recording of a presentation, all its elements (narration,...
Learn how to publish your own video using Microsoft PowerPoint with narration, annotations, animations, and timings. As full disclosure, I work at Microsoft ...
To convert your PowerPoint presentation into a video, simply: Click the File tab. Select Export. . Select Create Video . Choose your Video Quality and Recorded Timings and Narrations (see details below) Click Create Video. Choose where to save the video on your computer and click Save.
2. Choose the video quality. Once you've saved your presentation, you can convert it from a PowerPoint presentation file into a video file. You can do this by clicking "File" in the top left of the program and selecting "Export" from the menu that appears. In the menu that appears, click on the "Create a Video" option.
Select your video settings preference (video quality, timings and narration, video size). Click on Create a Video. Choose a filename, saving location and video type (.mp4 or .wmv). Click on Save to start video creation process. This article has shown you how to convert and save PowerPoint as video.
Loom library to organize your video segments in one place. You can also label your videos by specific topics or categories, making them easily accessible. Elevate communication with video presentations. The verdict is clear: Video presentations help engage your audience and increase interaction.
To get started, open the PowerPoint presentation you would like to turn into a video and click the "File" tab in the top-left corner of the window. IDG / Marshall Gunnell. Next, click ...
In the Seconds spent on each slide box, select the default time you want to spend on each slide. Select Create Video. Enter a file name and then browse to the location you want to save your video. In the Save As type box, select if you want to save the video as a MPEG-4 Video or Windows Media Video. Tip: The MPEG-4 Video format is recommended ...
PowerPoint Forum Top Contributors: John Korchok - Steve Rindsberg ... Can you convert an MP4 PPT video back to a PPT slide presentation!!! Hello. I've been working on this reel for a work gig for most of the day - i'd finished the PPT slides and converted to a video. Then pressed a button that WASN'T save and my computer shut down.
Recap and Keep Learning More About PowerPoint. Maybe you're converting your PowerPoint presentation to go online, or maybe you're trying to make it easy for a co-worker that doesn't have PowerPoint installed. Either way, there are plenty of reasons to convert a PowerPoint file to a video for easy watching. Don't stop here.
The Quick & Easy Way. If your presentation is complete with automatic timings, transitions and animations, you might be shocked to learn how easy it is to convert it into a video. Open your Powerpoint presentation. Click on File, select Save As, and from the drop-down menu, choose MPEG-4 Video (*.mp4). (available in Powerpoint 2010 and above).
Choose the option Create a Video at the very bottom of the right-hand side of the screen. 3. Find the Create a Video tab if you want to see the available video quality options. 4. Click on the downward-pointing arrow next to the Computer & HD Displays option and choose from the three available options.
Step 3 - Select Video Format and Create a Video Presentation. Click Create Video button and choose the destination folder and output file name. For end users wondering how to convert ppt to MP4, this is the step where you can select MP4 as your output format. PowerPoint supports saving slide decks to MP4 or WMV video formats.
Unlock the power of Copilot in PowerPoint with our video tutorial to swiftly convert your existing files into engaging, branded presentations. ... files, or PDFs into sleek, branded presentations, intuitively incorporating insightful speaker notes. ... Try in PowerPoint. See more videos. Kickstart a presentation. Create a presentation with a ...
Export your PowerPoint presentation into image files. Once you have Movie Maker installed, you can convert your presentation slides into JPG files to make a movie from. Click the Office button or the File menu and select "Save As". Click the "Save as type" menu and select "JPEG File Interchange Format (*.jpg)".
The video can now be resized and moved on your slide in the same way as any other object. Way 2. [Offline] Download YouTube Video to PowerPoint Offline. Learning how to put a video from youtube to Powerpoint offers several advantages, particularly when considering factors like internet availability and playback reliability.
Learn How to turn a PowerPoint Presentation into Video with the narration. Record your presentation going through the slides and PowerPoint will pick up the ...
After you've created your Presentation click on File to access Backstage view. Then click on Save & Send. Now under the File Types section select Create a Video. Now choose the size of the video, whether to use recorded narrations for the presentation, seconds to spend on each slide, the click Create Video. Select a location to save the video.