
How Do You Copy a Microsoft PowerPoint Presentation? (Step-By-Step Guide)
Are you looking to make a copy of a Microsoft PowerPoint presentation? Whether you need to replicate a presentation for a new audience or you want to use the same elements in multiple presentations, copying a PowerPoint presentation can be a great way to save time.
In this step-by-step guide, we’ll explain what Microsoft PowerPoint is, why you may need to copy a presentation, and how to do it.
We’ll also provide helpful tips for saving and managing files, different ways to share the copied presentation, and troubleshooting common issues.
Let’s get started!
Table of Contents
Short Answer
To copy a Microsoft PowerPoint presentation, open the presentation you want to copy and select File > Save As.
Choose a location and name for the new presentation, then click Save.
You can also select the Save a Copy option from the File menu and save a copy of the presentation in your chosen location.
This method will create an exact copy of the original presentation so you can make any changes or edits you need to the copy without affecting the original.
What is Microsoft PowerPoint?
Microsoft PowerPoint is a powerful presentation software used by professionals and students alike to create dynamic presentations.
It is part of the Microsoft Office suite of applications, so it is compatible with other Microsoft Office programs, such as Word and Excel.
PowerPoint allows users to create slideshows, add images, video, audio, and text to create a visually appealing presentation.
It also has a range of features including the ability to add transitions, animations, and shape and color effects to enhance the presentation.
PowerPoint is a great tool for creating engaging and informative presentations that can be used in the classroom, in the workplace, or for personal use.
With its wide range of features, PowerPoint is an essential tool for anyone who wants to create a professional-looking presentation.
Why Copy a PowerPoint Presentation?
There are many situations in which copying a Microsoft PowerPoint presentation can be a useful tool.
For example, if youre preparing a presentation for a large group, you may want to make a copy of the presentation for each attendee.
Alternatively, if youre working with multiple versions of a presentation, you may want to keep a copy of the original presentation in case any mistakes are made in later versions.
Additionally, if youre collaborating on a project with other people, you may want to keep a copy of the presentation on your own computer to ensure that everyone has access to the same version.
Finally, if youre creating a presentation that will be shared with people outside of your organization, copying the presentation allows you to easily share the file with others without having to worry about them accessing the original version.
Overview of the Copying Process
Copying a Microsoft PowerPoint presentation is a straightforward process that only requires a few clicks.
Whether you are copying a presentation to share with others, or simply making a backup copy for safekeeping, the process is the same.
First, open the presentation that you would like to copy.
Then, click the “File” tab at the top of the window.
From this menu, select the “Save As” option.
In the window that appears, select the folder where you would like to save the file, enter a name for the file, and click “Save”.
This will create a duplicate copy of the presentation, which is now saved in the specified folder.
The copied presentation can now be used or shared with others.
It is important to note that the original version of the presentation will remain in its original location, and any edits made to the new copy will not affect the original.
Step-By-Step Guide to Copying a PowerPoint Presentation
Copying a PowerPoint presentation is an essential task for anyone who wants to share or reuse their presentation.
Whether you are preparing the same presentation for multiple audiences or simply want to have a backup copy of your work, the process for copying a PowerPoint presentation is easy to follow.
The first step in the process is to open the PowerPoint presentation you would like to copy.
Once the presentation is open, click the File tab at the top of the window.
This will bring up a list of options.
From here, select the Save As option.
A new window will appear, which will allow you to select the folder where you would like to save the file.
Once you have selected the folder, enter a name for the file and click Save.
After this, the PowerPoint presentation is officially copied and can be used or shared with others.
Its important to note that the name you enter for the file should be unique so that it can be easily identified.
Additionally, you may want to consider saving the file in a folder dedicated to your presentation.
This will help to keep all of your files organized and easily accessible.
Copying a PowerPoint presentation is a simple task that can be completed in a few easy steps.
So the next time you need to share or reuse your presentation, you can quickly and easily copy it.
Tips for Saving and Managing Files
When it comes to saving and managing Microsoft PowerPoint presentations, there are a few key tips to keep in mind.
For starters, be sure to give the file a descriptive name.
This will make it easier to locate when you need it later.
It’s also a good idea to save the presentation in a familiar location, such as a folder on your computer or a cloud storage platform like Dropbox.
This will help you keep track of all your presentations in one place.
Additionally, you may want to back up your files regularly to protect them from accidental deletion or corruption.
You can do this by saving the presentation to a USB drive or an external hard drive.
Finally, if you’re sharing the presentation with others, consider converting it to a PDF file so that it is easier to access and view on any device.
Different Ways to Share the Copied Presentation
Once you have successfully copied your Microsoft PowerPoint presentation, you can share it with others in a variety of ways.
You can save the file to a storage device, such as a USB drive or external hard drive, and distribute it to others that way.
You can also upload the file to a cloud storage service, such as Dropbox, Google Drive, or OneDrive, and share the link with others.
If youd like to share the presentation with people who dont have access to the same cloud storage service, you can compress the file and email it.
Additionally, some cloud storage services, including Dropbox, allow you to generate a link to share the file.
This is a great way to quickly share the presentation with someone without having to worry about emails bouncing or the file being too large to send.
If you think the presentation would be more effective if the viewers could interact with it, you can upload the file to an online presentation service, such as SlideShare or Prezi.
These services allow you to upload your PowerPoint presentation and then share it with others who can view it online.
They also allow you to create a unique link that can be shared with anyone, even if they dont have an account with the service.
Finally, if you want to share the presentation with a large group of people, you can use a video streaming service like YouTube or Vimeo to upload the presentation and then share it with your viewers.
By following the steps outlined above, you can easily copy a Microsoft PowerPoint presentation and share it with others in a variety of ways.
Whether youre sending it to a few people or sharing it with a large group, being able to quickly and easily copy and share your presentation is a great way to make sure your message is heard.
Troubleshooting Common Issues
When attempting to copy a Microsoft PowerPoint presentation, there are a few common issues that can arise that can prevent you from doing so successfully.
One of the most common is that the presentation may not save properly.
This can be caused by a variety of things, including not having enough hard drive space available, not having the correct permissions to save the file, or if the file is corrupt.
Another issue is that the presentation may not open properly.
This can be caused by a variety of things, including not having the right version of PowerPoint installed, not having the correct codecs installed, or if the file is corrupted.
Finally, you may have difficulty when attempting to share the copied presentation.
This can be caused by a variety of things, including not having the correct permissions to share the file, or if the file is corrupted.
Fortunately, most of these issues can be easily resolved by following the steps outlined in the blog post.
However, if the issue still persists after following the steps, you may need to contact Microsoft customer service for further assistance.
Final Thoughts
Copying a Microsoft PowerPoint presentation is a simple, straightforward process.
Now that youre familiar with the steps and the various options available for saving and managing your files, as well as different ways to share the presentation, youre ready to put your newfound knowledge into action.
So, go ahead and start copying and sharing your presentations with ease!
James Wilson
James Wilson has extensive knowledge in the information technology industry.His second love, besides dealing with computers, is smart home technology. He is continually updating information to better comprehend this problem and has a deep understanding of the apartment’s support system.
Recent Posts
Can Google Keep Scan Documents? (EXPLAINED)
Yes, Google can scan documents using its Google Drive app. You can use your phone's camera to scan physical documents and save them digitally on Google Drive. This feature allows for easy...
Can You Group Notes in Google Keep? (TOP TIPS AND TRICKS)
Yes, you can easily group notes in Google Keep by using labels. Labels allow you to categorize your notes and make them easier to find. Simply create a label for a specific group of notes, then...
- PRO Courses Guides New Tech Help Pro Expert Videos About wikiHow Pro Upgrade Sign In
- EXPLORE Tech Help Pro About Us Random Article Quizzes Request a New Article Community Dashboard This Or That Game Popular Categories Arts and Entertainment Artwork Books Movies Computers and Electronics Computers Phone Skills Technology Hacks Health Men's Health Mental Health Women's Health Relationships Dating Love Relationship Issues Hobbies and Crafts Crafts Drawing Games Education & Communication Communication Skills Personal Development Studying Personal Care and Style Fashion Hair Care Personal Hygiene Youth Personal Care School Stuff Dating All Categories Arts and Entertainment Finance and Business Home and Garden Relationship Quizzes Cars & Other Vehicles Food and Entertaining Personal Care and Style Sports and Fitness Computers and Electronics Health Pets and Animals Travel Education & Communication Hobbies and Crafts Philosophy and Religion Work World Family Life Holidays and Traditions Relationships Youth
- Browse Articles
- Learn Something New
- Quizzes Hot
- This Or That Game New
- Train Your Brain
- Explore More
- Support wikiHow
- About wikiHow
- Log in / Sign up
- Computers and Electronics
- Presentation Software
- PowerPoint Presentations
How to Save a PowerPoint Presentation
Last Updated: May 26, 2022
wikiHow is a “wiki,” similar to Wikipedia, which means that many of our articles are co-written by multiple authors. To create this article, volunteer authors worked to edit and improve it over time. This article has been viewed 50,164 times. Learn more...
A PowerPoint presentation is an excellent way of presenting information or ideas to an audience. The software is easy to use and offers a lot of cool effects for your slideshows, too. But, what's all the use of this if you don't even know how to save your finished PowerPoint? This wikiHow will teach you how to save your file.
Design your PowerPoint presentation.

- You don't have to wait until you're totally finished to save your work. It can help to save along the way, too, to ensure you don't lose any progress.
Open the File menu when you're ready to save.

Choose the Save or Save As option.

Decide where to save the presentation.

Name and save your presentation.

Expert Q&A
You might also like.

About This Article
- Send fan mail to authors
Is this article up to date?

Featured Articles

Trending Articles

Watch Articles

- Terms of Use
- Privacy Policy
- Do Not Sell or Share My Info
- Not Selling Info
wikiHow Tech Help Pro:
Level up your tech skills and stay ahead of the curve
- Insider Reviews
- Tech Buying Guides
- Personal Finance
- Insider Explainers
- Sustainability
- United States
- International
- Deutschland & Österreich
- South Africa

- Home ›
- tech ›
- how-to »
How to copy or duplicate a PowerPoint slide and put it anywhere in your slideshow

- You can copy a slide in the PowerPoint app or online version, and then paste it somewhere else in the slideshow.
- To copy a PowerPoint slide, you just need to right-click it, or open the "Home" menu.
- You can also use PowerPoint's "Duplicate" function, which will create a copy of a slide automatically, without having to paste anything.
Copying a slide in PowerPoint takes only a few clicks, whether you choose to do so in a web browser or in the app.
Additionally, you can also choose to directly duplicate a slide, which eliminates the need to click again to paste. The "Duplicate" option will create a copy of the slide, right behind its original.

Here's how to do copy or duplicate in either version of PowerPoint on your Mac or PC .
Check out the products mentioned in this article:
Apple macbook pro (from $1,299.00 at apple), acer chromebook 15 (from $179.99 at walmart), how to copy a slide in powerpoint 's online app.
1. Open Office365 in any internet browser, and log into your account.
2. Open a PowerPoint presentation by selecting one from the "Recent" list or other tabs. You can also click "Start new" below the plus sign icon, followed by "Presentation." Additonally, you can click "PowerPoint" from the options at the top.
3. Once your presentation is open, you can right-click on any slide in the left sidebar, and then select "Copy." You can select multiple slides at once by holding Copy or Command on your keyboard as you click.

5. You can also select "Duplicate Slide" instead of "Copy." This eliminates the need to right-click again to paste, as it automatically creates a copy of the slide or slides selected. Slides will immediately appear in order, directly behind their originals.
You can also select slides, and then find the Copy, Paste, and Duplicate options by clicking the clipboard icon at the top of the screen. If you don't see it, make sure you're in the "Home" tab.
How to copy a slide in the PowerPoint desktop app
1. Open a PowerPoint presentation on your Mac or PC.
2. Right-click on a slide in the left sidebar to copy it. You can also press Command + C or Ctrl + C on your keyboard. If you hold down Command or Ctrl, you can click multiple slides to select them all at once.
3. Right-click in the space between slides or the blank area at the end of a presentation to paste. You can also use Command + V or Ctrl + V.
4. When you right-click on the original slide to be copied, you can also choose the "Duplicate Slide" option instead. The keyboard shortcut for this is Shift + Command + D, or Shift + Ctrl + D. This eliminates the need to right-click again to paste, and instead immediately creates a copy directly behind the selected slide.
5. You can also access any of these options on the far left side of the "Home" tab. Click the page icon to copy the selected slide, or click the small arrow next to it to choose between "Copy" or "Duplicate." The "Paste" clipboard icon appears next to these options.
Related coverage from Tech Reference :
How to download and access microsoft powerpoint on your mac computer, how to embed a youtube video into your microsoft powerpoint presentations using a mac or pc, how to convert google slides to a powerpoint presentation in 4 easy steps, how to convert a powerpoint to google slides in 2 different ways, how to change the background on your google slides presentation.

- Current Location in Google
- Hide Whatsapp Messages
- Phone is hacked or not
- Whatsapp Deleted Messages
- Download photos from Whatsapp
- Instagram Messages
- How to lock facebook profile
- Unfollowed on Instagram
- Best printers for Home
- Best Mixer Grinder
- Best wired Earphones
- Best 43 Inch TV in India
- Best Wi Fi Routers
- Best Vacuum Cleaner
- Best Home Theatre in India
- Smart Watch under 5000
- Best Laptops for Education
- Best Laptop for Students

- Advertising
- Write for Us
- Privacy Policy
- Policy News
- Personal Finance News
- Mobile News
- Business News
- Ecommerce News
- Startups News
- Stock Market News
- Finance News
- Entertainment News
- Economy News
- Careers News
- International News
- Politics News
- Education News
- Advertising News
- Health News
- Science News
- Retail News
- Sports News
- Personalities News
- Corporates News
- Environment News
- Top 10 Richest people
- Cibil Score vs Cibil Report
- Top 10 Largest Economies
- Lucky Color for 2023
- How to check pan and Aadhaar
- Deleted Whatsapp Messages
- How to restore deleted messages
- 10 types of Drinks
- Instagram Sad Face Filter
- Unlimited Wifi Plans
- Recover Whatsapp Messages
- Google Meet
- Check Balance in SBI
- How to check Vodafone Balance
- Transfer Whatsapp Message
- NSE Bank Holidays
- Dual Whatsapp on Single phone
- Phone is hacked or Not
- How to Port Airtel to Jio
- Window 10 Screenshot
Copyright © 2024 . Times Internet Limited. All rights reserved.For reprint rights. Times Syndication Service.
Free All-in-One Office Suite with PDF Editor
Edit Word, Excel, and PPT for FREE.
Read, edit, and convert PDFs with the powerful PDF toolkit.
Microsoft-like interface, easy to use.
Windows • MacOS • Linux • iOS • Android

- Articles of PPT
3 Ultimate Ways to Copy Slides in PowerPoint (Step-by-Step)
As a PowerPoint User, you want to make your work as easy as possible. Users often want to reuse specific slides or sections of content from one presentation to another, saving time and effort in creating new material. How do we go about copying a slide in PowerPoint? This guide will inform you all you need to know about copying PowerPoint slides to another ppt template.
Why Is It Useful to Copy Slides in PowerPoint?
You need to know how to Copy a slide in PowerPoint without losing formatting
slides because;
One, it saves time by swiftly duplicating content, avoiding the need to recreate slides from scratch.
Secondly, it ensures consistency by maintaining the same theme across presentations, preserving a cohesive visual identity.
It also allows users to leverage the design work they've invested in a previous presentation, promoting efficiency and reducing the effort required to create new slides.
In essence, copying slides in PowerPoint streamlines the presentation creation process, saves time, and upholds a uniform theme, making it a valuable tool for presenters.
3 Methods to Copy Slides in PowerPoint
There are 3 main methods to copy PowerPoint slides to another PowerPoint template.
Method 1: Click, Drag, and Drop (Easy)
Step 1: Open both presentations on the same screen in the original presentation. In the "Slides pane," select the slide's thumbnail you want to copy.
Step 2: Drag the selected thumbnail to the destination PowerPoint slides pane, positioning it where you want in the presentation—whether as the first slide, in the middle, or at the end. The dragged thumbnail will adopt the format of the destination presentation.
Comment: This method offers slide placement flexibility and maintains the copied slide's visual consistency within the new presentation.
Method 2: Copy- Paste
Step 1: Open the original and destination PowerPoint presentations on your computer.
Step 2: In the original presentation, click the "View" option on the PowerPoint ribbon and select "Arrange All" under the "Window" group.

Step 3: Navigate to the desired slide in the slides pane. Right-click the slide thumbnail, then select "Copy" from the menu.
Step 4: Open the destination PowerPoint presentation and choose where to insert the slide. This can be between existing slides or at the end. Right-click on the chosen area and select one of the paste options: "Use Destination Theme," "Use Source Formatting," or "As a Picture."
Comment: This method allows precise slide placement and formatting control when copying slides between presentations.
Method 3: Reuse Slides tool
To use the Reuse Slides tool in PowerPoint 365, follow these steps:
Step 1: Go to the Home or Insert tab in the Slides group, click the New Slide arrow, and select the Reuse Slides.

Step 2: In the Reuse Slides box (usually on the right side), you can do either of the following:
a. Click the Browse button or Open a PowerPoint File link and select the presentation file containing the slides you want to use.
b. If you've recently opened the presentation, expand the list in the Insert slide from the field and choose the presentation from the list, or click the presentation file name in the Open section of the Reuse Slides pane.
Step 3: The Reuse Slides pane displays thumbnails of available slides from the selected presentation. Click on the thumbnail of each slide you want to insert into your current presentation.
Comment: This process simplifies importing slides from another presentation, offering the flexibility to apply the new theme automatically or retain the source formatting, depending on your needs.
Each of these three methods for copying slides in PowerPoint offers varying user experiences:
The click, Drag, and Drop method is straightforward and user-friendly, ideal for those who prefer a visual and intuitive approach. It provides flexibility in slide placement and preserves the visual consistency of the copied slide. It's quick and efficient for simple tasks.
The Copy-Paste method requires more technical knowledge but offers precise control over slide placement and formatting.
Reuse Slides Tool simplifies the process by offering a user-friendly interface and the option to apply a new theme or retain source formatting. It's convenient for users who want a guided, streamlined experience.
Copying Slides in PowerPoint: Desktop and Online Methods for Mac and Windows
Method 1: powerpoint desktop app.
To copy a slide in the PowerPoint desktop app:
Step 1 : Open your PowerPoint presentation.
Step 2: Right-click on the slide you want to copy in the left sidebar. You can also use Command + C (Mac) or Ctrl + C (Windows) to copy and select multiple slides by holding down Command or Ctrl.
Step 3: Right-click between slides or in a blank area at the end of your presentation to paste, or use Command + V (Mac) or Ctrl + V (Windows).
Step 4: Alternatively, right-click on the original slide to be copied, and choose "Duplicate Slide" or use Shift + Command + D (Mac) or Shift + Ctrl + D (Windows) to create a copy behind the selected slide immediately.
Method 2: PowerPoint's Online App
To copy a slide in PowerPoint's online app:
Step 1: Log into your Office365 account in a web browser.
Step 2: Open a PowerPoint presentation from your recent files or create a new one.
Step 3: Right-click on the slide you want to copy in the left sidebar and select "Copy." While clicking, you can select multiple slides by holding down the Ctrl key (Windows) or Command key (Mac).
Step 4: Right-click in the sidebar again and choose "Paste." Pasting in the gray space at the bottom adds the copied slide to the end of your presentation while pasting between two slides inserts it there.
How to Copy Slides in Powerpoint with WPS Office?
What Is WPS Office and Why Choose it?
WPS Office offers essential office tools for free, including Writer, Spreadsheet, Presentation, and PDF editing. It provides a powerful PDF toolkit, often premium in other software.
The platform offers a rich template store for Word, PPT, and Excel, and it's compatible across Windows, MAC, Linux, Android, and iOS, ensuring seamless synchronization.
It's a cost-effective choice with numerous free features, offering more value than Microsoft Office.
How to Copy Slides in WPS Presentation?
Here are the steps to copy a slide in the WPS Presentation:
https://res-academy.cache.wpscdn.com/images/c33e62a62ed5a6869211952860b6fe15.gif
Step 1: Open your presentation in WPS Presentation.
Step 2: Choose the specific slide you want to copy.
Step 3: Right-click and select "Copy" or use Ctrl+C as a keyboard shortcut.
Step 4: Click on the location where you want to paste the slide.
Step 5: Right-click again and choose "Paste" or use Ctrl+V as a shortcut. Your slide is now copied!
Use Word, Excel, and PPT for FREE, No Ads.
Edit PDF files with the powerful PDF toolkit.
Microsoft-like interface. Easy to learn. 100% Compatibility.
Boost your productivity with WPS's abundant free Word, Excel, PPT, and CV templates.
Why can't I copy and paste slides in PowerPoint?
If you encounter copy-and-paste errors in PowerPoint for the web due to clipboard access issues, follow these steps:
Allow Global Access as in the steps below.
Step 1: In the Chrome browser, open Settings.
Step 2: Select Security & Privacy > Site Settings > Permissions > Clipboard.
Step 3: Choose "Allow."
Allow Domain-Specific
This step is unnecessary if you've enabled global clipboard access. To do it;
Step 1: Access the browser settings for the clipboard (chrome://settings/content/clipboard).
Step 2: Ensure the Office.com domain is listed in the "Allowed to see your clipboard."
What is the difference between copying and duplicating slides?
Duplicating a Slide creates a copy of a slide within the same location or presentation, resulting in two identical slides in the same file.
Below are the steps required;
Step 1: Right-click on the slide you want to duplicate.
Step 2: Select "Duplicate Slide"
Step 3: The duplicate slide is created within the same presentation.
Copying a Slide creates a copy of it and allows you to place it in a different location or presentation you specify.
The steps involved include;
Step 1 : Right-click on the slide you want to copy.
Step 2: Select "Copy."
Step 3: Navigate to the desired location or presentation.
Step 4: Right-click in that location and select "Paste" to create a copy of the slide.
This article provides a comprehensive guide on three methods to copy slides in PowerPoint, highlighting their advantages. It explains the difference between duplicating and copying slides and offers troubleshooting tips for PowerPoint errors. Notably, it emphasizes the benefits of using WPS Office, a free alternative with powerful features and cross-platform compatibility, making it a cost-effective choice for users.
- 1. How to Select Multiple Slides in Google Slides (Easy & Fast)
- 2. Google Slides Login Ultimate Guide in 2024
- 3. How to download slides without microsoft powerpoint - step by step guide
- 4. How to Export PowerPoint to Google Slides [Step-by-Step Tutorial]
- 5. How to Print Powerpoint Slides with Notes Multiple Per Page: A Step-by-Step Guide
- 6. How to hide slides in Google Slides?

15 years of office industry experience, tech lover and copywriter. Follow me for product reviews, comparisons, and recommendations for new apps and software.
How to Copy a PowerPoint to a New PowerPoint: A Step-by-Step Guide
Copying a PowerPoint to a new PowerPoint is a straightforward task. You simply need to open the original presentation, save it with a new name, and then make the desired changes to the new copy. By doing this, you’ll have two separate PowerPoint files: the original and the copy.
After completing this action, you will have two PowerPoint presentations. The original will remain unchanged, while the copied version can be edited and customized without affecting the original file.
Introduction
Have you ever found yourself needing to duplicate a PowerPoint presentation, perhaps to create a similar one for a different audience or to make significant changes without losing the original? Whatever the reason, it’s a common need in the world of presentations. Copying a PowerPoint to a new PowerPoint can save you time and effort, especially if the new presentation will have similar content or structure. It’s also a valuable skill for anyone who often uses PowerPoint for work, school, or personal projects.
By understanding how to copy a PowerPoint presentation, you can more efficiently create multiple versions of a presentation, experiment with design changes, or prepare multiple presentations for different purposes. This guide will walk you through the simple steps to duplicate your PowerPoint presentation, as well as highlight the advantages and considerations of doing so.
Step by Step Tutorial on How to Copy a PowerPoint to a New PowerPoint
This section will guide you through the process of copying an existing PowerPoint presentation to create a new one.
Step 1: Open the Original PowerPoint Presentation
Open the PowerPoint application and the presentation you want to copy.
By opening the original presentation, you can ensure that all the content you want to duplicate is readily accessible before creating a copy.
Step 2: Save the Presentation with a New Name
Go to ‘File’ > ‘Save As’ and choose a new name and location for your copied presentation.
Saving the original presentation with a new name creates a separate file, allowing you to maintain the original while working on the new copy.
Step 3: Make the Desired Changes to the New Copy
Edit the newly copied presentation to suit your needs, whether it’s changing the content, design, or layout.
Once you’ve created the copy, you can freely make changes without worrying about altering the original presentation. This is the step where you can personalize the new PowerPoint for its intended purpose.
Additional Information
When you’re working on copying a PowerPoint to a new PowerPoint, there are some additional tips and tricks that can further streamline the process. For instance, if you’re looking to copy only specific slides rather than the entire presentation, you can use the ‘Duplicate Slide’ feature. This is particularly useful if the new presentation will only share certain parts with the original.
Another helpful tip is to use the ‘Slide Master’ to ensure that any changes you make to design elements like fonts, colors, and backgrounds are applied consistently across all slides in the new presentation. And remember, always double-check which file you’re working on to avoid accidentally overwriting your original presentation.
- Open the original PowerPoint presentation.
- Save the presentation with a new name.
- Make the desired changes to the new copy.
Frequently Asked Questions
Can i copy only selected slides from a powerpoint presentation.
Yes, you can select specific slides and use the ‘Duplicate Slide’ option to copy them into a new presentation.
Will copying a PowerPoint presentation also copy the animations and transitions?
Yes, copying a presentation preserves all elements, including animations, transitions, and media.
How do I ensure that I don’t overwrite the original presentation?
Always double-check the file name and save the copy with a distinct name in a different location.
Can I copy a PowerPoint presentation to a different version of PowerPoint?
Generally, yes, but some features may not be compatible if you’re moving between significantly different versions.
Is it possible to automate the copying process for multiple presentations?
While there’s no built-in feature for this, you could use macros or third-party tools to automate the copying process.
Copying a PowerPoint to a new PowerPoint is a useful skill that can greatly enhance your productivity and presentation management. Whether it’s for backing up your work, creating variations of a presentation, or simply experimenting with new ideas, understanding how to effectively duplicate your PowerPoint files is an asset.
With the simple steps outlined in this guide, you can confidently tackle this task and keep your presentations organized and efficient. Always remember to manage your files carefully to prevent confusion and to ensure that your original work remains intact. Now that you’ve learned how to copy a PowerPoint, you’re ready to tackle your next presentation project with ease.

Matthew Burleigh has been writing tech tutorials since 2008. His writing has appeared on dozens of different websites and been read over 50 million times.
After receiving his Bachelor’s and Master’s degrees in Computer Science he spent several years working in IT management for small businesses. However, he now works full time writing content online and creating websites.
His main writing topics include iPhones, Microsoft Office, Google Apps, Android, and Photoshop, but he has also written about many other tech topics as well.
Read his full bio here.
Share this:
Join our free newsletter.
Featured guides and deals
You may opt out at any time. Read our Privacy Policy
Related posts:
- How to Save Powerpoint as PDF with Notes
- How to Duplicate a Picture on an iPhone
- Can I Convert My Powerpoint to Google Slides?
- How to Make a Powerpoint Slide Vertical in Powerpoint 2013
- How to Duplicate a Slide in Powerpoint 2010
- How to Change Hyperlink Color in Powerpoint 2010 (An Easy 5 Step Guide)
- How to Loop a Slideshow on Powerpoint 2013
- Can You Save a Powerpoint as a Video in Powerpoint 2013?
- How to Insert Slides from Another Presentation in Powerpoint 2010
- How to Convert a PowerPoint to Word and Edit with Ease
- How to Find and Delete Duplicate Files on a MacBook Air
- How to Start PowerPoint: A Step-by-Step Guide for Beginners
- How to Set Time for Slides in Powerpoint
- How to End Powerpoint on Last Slide in Powerpoint 2010
- How to Change Line Spacing in Powerpoint for Every Slide at Once
- How to Put Embedded Youtube Video in Powerpoint 2010
- How to Make a Powerpoint Into a Video
- Can I Create a Timeline in Powerpoint?
- How to Check Word Count on Powerpoint 2010
- How to Add Page Numbers in Powerpoint 2010
How to share your Microsoft PowerPoint presentation on a Mac, PC, or web browser
- It's easy to share a PowerPoint presentation on your Mac or PC app.
- You can also share a presentation if you use the online version of PowerPoint.
- Sharing a presentation can help you collaborate with friends or coworkers.
- Visit Business Insider's Tech Reference library for more stories .
When creating Microsoft PowerPoint presentations for work or school, it's often necessary to collaborate with others on your projects.
Thankfully, it's easy to share a PowerPoint presentation no matter what version you use. The process looks fairly similar on both Mac and PC programs, as well as on the online version that can be accessed from any web browser. The online option is helpful if you don't have the Microsoft Office program downloaded to your desktop.
For all of these options, you can add a collaborator (which operates similarly to sharing Google Slides ) or opt to send your file as a presentation or PDF via email. There are also alternative methods, such as sending via social media.
Here's how to share a presentation.
Check out the products mentioned in this article:
Apple macbook pro (from $1,299.00 at apple), acer chromebook 15 (from $179.99 at walmart), microsoft office (from $149.99 at best buy), samsung chromebook (from $269.00 at amazon), how to share a powerpoint presentation on a pc.
Sharing a presentation on the PC version of PowerPoint should look similar on most computer types. The following steps and accompanying photos detail the process on a Samsung Chromebook.
1. Open the PowerPoint presentation you wish to share on your PC.
2. Click the "Share" symbol in the upper right hand corner of the screen. This should give you the option to share either the full document or just the current slide.
- If you prefer to add a collaborator instead (similar to Google Slides functions), you will need to click the orange button to save a copy of the file to your OneDrive.
3. Choose how you'd like to share the document or slide as an attachment. You can choose to send an email via Outlook or as a message via Zoom, for example.
Additionally, when you first launch the program, you can also find a "Share" tab on the left hand side. This will provide you with the same options for sharing a file.
How to share a PowerPoint Presentation on a Mac
1. Open the PowerPoint presentation on your Mac desktop or laptop.
2. Click the "File" tab in the top left corner.
3. Select "Share" from the dropdown menu. This will grant you the option to either send or copy a link to share, send the file as a presentation or PDF, or manage access to a shared file. Select whichever option you'd like and follow the directions to add contact information.
- If you wish to manage access and add collaborators, you will have to make sure the file has been uploaded to your OneDrive before proceeding. (If it hasn't, PowerPoint should prompt you to do so at this time.)
4. Sending the file as an email is the most common choice. Selecting this option will automatically open a new draft with the file attached. (Be sure to select "Send PDF" if you'd prefer it to send as a PDF file instead of as a presentation.) Add an address, subject, and body text before sending.
You can also share a presentation by clicking the "Share" button in the upper right hand corner. (This is similar to how it appears on a PC.)
This option is extremely helpful as it provides all of your possible options in a single pop-up. Enter a name or email address (along with an optional message) to send the document.
You can change the permissions settings at the top before clicking "Send," "Copy Link," or "Mail" to share your work. Click "More Apps" to browse additional options, such as sending via social media or text message. Lastly, you can select "Send a Copy" to send as a traditional attachment.
How to share a PowerPoint presentation on a web browser
You can access PowerPoint online on either a Mac or PC, as long as you have your login information for Microsoft Office. Regardless of what browser you prefer to use, the steps to share a presentation are exactly the same.
1. Log in to your Microsoft Office account on your preferred web browser and open the presentation you wish to share.
2. Click the "Share" button in the upper right hand corner of the screen.
3. This will open a pop-up in the center of the page. Enter a name or email address (along with an optional message) to send the document. You can change the permissions settings at the top before sending the link by clicking the "Send" or "Copy Link" option. (Those who have followed these steps on a Mac will recognize that it looks similar.)
Additionally, when you open the main menu, you can click the "Share" tab on the left hand side. This will allow you to invite others to edit the presentation or embed the presentation for a blog or website.
If you are looking to embed online, this will open a different pop-up that will generate a code for you. Select the dimensions desired and then paste the text as needed. Click the "Close" or "X" buttons to minimize the window.
Related coverage from Tech Reference :
How to embed a youtube video into your microsoft powerpoint presentations using a mac or pc, how to convert a powerpoint to google slides in two different ways, how to convert google slides to a powerpoint presentation in 4 easy steps , how to copy or duplicate a powerpoint slide and put it anywhere in your slideshow, how to download and access microsoft powerpoint on your mac computer.
Insider Inc. receives a commission when you buy through our links.
Watch: A diehard Mac user switches to PC
- Main content

Contribute to the Microsoft 365 and Office forum! Click here to learn more 💡
April 9, 2024
Contribute to the Microsoft 365 and Office forum!
Click here to learn more 💡
- Search the community and support articles
- Microsoft 365 and Office
- Search Community member
Ask a new question
Transferring one slide from local ppt file into O365 online ppt deck.
Report abuse.
- Microsoft Agent |

Besides, a slide cannot be separated from presentation and uploaded to Presentation Online, only as part of a presentation. So you can only upload the presentation containing the slide to PowerPoint Online. In addition to the methods provided by John, you can drag and drop the presentation containing the slide to PowerPoint Online and copy from the presentation to the target presentation. Best regards, Madoc
6 people found this reply helpful
Was this reply helpful? Yes No
Sorry this didn't help.
Great! Thanks for your feedback.
How satisfied are you with this reply?
Thanks for your feedback, it helps us improve the site.
Thanks for your feedback.
Replies (5)
Question info.
- Norsk Bokmål
- Ελληνικά
- Русский
- עברית
- العربية
- ไทย
- 한국어
- 中文(简体)
- 中文(繁體)
- 日本語
Insert and play a video file from your computer
Depending on the version of PowerPoint that you're using, you can insert an embedded video (the default behavior) or link to a video file stored on your computer.
Inserting an embedded video is convenient, but it increases the size of your presentation.
A linked video keeps your presentation file smaller, but links can break. We recommend storing presentations and linked videos in the same folder.

Supported video formats
We recommend that you use .mp4 files encoded with H.264 video (a.k.a. MPEG-4 AVC) and AAC audio.
For more details, see Video and audio file formats supported in PowerPoint .
Embed a video stored on your PC
In Normal view, click the slide that you want the video to be in.
On the Insert tab, click the arrow under Video , and then select This Device (or Video on My PC ).
In the Insert Video box, click the video that you want, and then click Insert .
Link to a video stored on your PC
To help prevent broken links, we recommend copying the video into the same folder as your presentation, and then linking to it there.
In Normal view, click the slide where you want the link to the video to be in.
In the Insert Video box, click the file that you want to link to, click the down arrow next to the Insert button, and then click Link to File .

Newer versions of PowerPoint support the playback of video with multiple audio tracks. They also support closed captions and subtitles that are embedded in video files. For more information, see Make your PowerPoint presentations accessible .
Find out where a linked video is stored
If there's already a video on a slide and you want to know where it's stored, go to File > Info . Under Optimize Media Compatibility , there will be information about all media files in the presentation—whether they are linked or embedded in the file. If there are any linked videos, PowerPoint gives you a View Links hyperlink. Click it to open a dialog box that shows the storage location of any linked files.
YouTube video
If you want to insert a video on YouTube, switch to Insert or link to a video on YouTube .
Preview a video
When a video is selected on a slide, a toolbar appears below the video that has a play/pause button, a progress bar, incremental forward/backward buttons, a timer, and a volume control. Click the Play button at the left of that toolbar to preview the video.

Play a video automatically or when clicked
By default, in Slide Show, the video plays as part of the click sequence. That means that when you click anywhere on the slide to advance to the next step (or when you press the Spacebar, Right arrow key, or other key that advances to the next step) the video plays. This Start option is called In Click Sequence .
But if you prefer, you can make the video start automatically as soon as it appears onscreen, or make it play when it is clicked:
Select the video frame.
On the ribbon, on the Playback tab, open the Start list and choose the option you prefer:

For more details about the options for playing the video in Slide Show, see Set the 'Play' options for a video .
In PowerPoint 2013, we recommend that you use .mp4 files encoded with H.264 video (a.k.a. MPEG-4 AVC) and AAC audio.
On the Insert tab, click the arrow under Video , and then click Video on My PC .
On the Insert tab, click the arrow under Video , and then click Video on my PC .
By default, in Slide Show, the video plays when it is clicked . But if you prefer, you can make the video start automatically as soon as it appears onscreen:
On the PowerPoint ribbon, on the Playback tab, open the Start list and choose Automatically :

To get the correct instructions, select the version of PowerPoint that you're using:
Insert a video stored on your computer
In Normal view, select the slide you'd like to add a video to.
On the Insert tab, click Video , then click Movie from File .
In the Choose a Movie dialog box, select the file you want to insert.
If you want to embed the video on the slide, simply click Insert .
If you want to put a link to the video on the slide, click Options at the lower left corner of the dialog box, and then select the Link to file box, and then click Insert .
Once you've added a video to your presentation, you can add effects and choose whether the video plays automatically or when it is clicked.
Tip: You can play back video that has multiple audio tracks. Closed captions and subtitles that are embedded in video files are also supported. For more information, see Make your PowerPoint presentations accessible .
Insert a video stored on your computer
Open a new or existing presentation in PowerPoint for the web.
Select Insert > Video > This Device .

Select the video you want and select Open to insert it in your slide.

After your video has been inserted and appears on the slide, you can move, resize, or apply shape effects to your video.

PowerPoint for the web supports insertion of video files up to 256 MB.
We recommend using .mp4 video file format for best presentations quality and experience. We also support the following file types: .mov, .wmv, .avi, .m4v, .mkv, .asf, .ts.
The speed at which videos from your computer or laptop are inserted is dependent on your network connection.
Want to insert an online video instead?
Go to Insert a YouTube video for all the details.
Video and audio file formats supported in PowerPoint
Add text to a video

Need more help?
Want more options.
Explore subscription benefits, browse training courses, learn how to secure your device, and more.

Microsoft 365 subscription benefits

Microsoft 365 training

Microsoft security

Accessibility center
Communities help you ask and answer questions, give feedback, and hear from experts with rich knowledge.

Ask the Microsoft Community

Microsoft Tech Community

Windows Insiders
Microsoft 365 Insiders
Was this information helpful?
Thank you for your feedback.
Copy and paste in PowerPoint for the web
Copying and pasting in PowerPoint for the web differs from copying and pasting in the PowerPoint desktop application because of certain web browser limitations.
(If you are using the Firefox browser to access PowerPoint for the web, see Copy and paste text or pictures using Firefox or Safari below.)
Copy and paste pictures
You can cut or copy pictures from one slide and paste to another slide in the same presentation or another presentation. You can also cut or copy a picture from another app, such as Word for the web, and then paste it in PowerPoint for the web.

If you're prompted for access to the Clipboard, click Allow Access .
You can also copy pictures from web sites and paste them to your slides as long as you have a license for the image:
Right-click the image on the web site and select the Cut or Copy command, then switch to PowerPoint for the web to paste the image on your slide.
PowerPoint for the web doesn’t support pasting pictures that are copied from Outlook. If there’s a picture in Outlook that you want to use in PowerPoint for the web, save the picture to your computer, then go to Insert > Pictures in PowerPoint for the web.
Copy and paste text
Shortcut key for Paste: Ctrl + V
Click where you want to insert the text, and on the Home tab, select the Clipboard button, and then select Paste .
Copy and paste unformatted text
Shortcut key for Paste Unformatted: Ctrl + Shift + V
Click where you want to insert the unformatted text, and on the Home tab, select the Clipboard button and then select Paste Text Only .

Currently, Paste Text Only is only available in Chrome and Microsoft Edge. For Chrome, you need an Office extension to use this command in PowerPoint for the web.
Copy and paste slides
Within PowerPoint for the web, you can cut or copy a slide and paste it elsewhere.
Also, between the desktop PowerPoint app and PowerPoint for the web, you can cut or copy slides and then paste them.
When you cut or copy and then paste an entire slide, any comments or animation effects on the slide are included.
In the thumbnail pane, select the slide you want to insert after, and then on the Home tab, select the Clipboard button, and then select Paste .
If the slide or slides you cut or copied come from a different presentation and you want to keep their original formatting, Click the (Ctrl) button that pops up at the bottom-right corner of the pasted slide, and select Keep Source Formatting .

When you're copying-and-pasting slides within the same presentation, Keep Source Formatting currently isn't supported.
Copy and paste text or pictures using Firefox or Safari
You have to use keyboard shortcuts to cut or copy text and then paste in the Firefox browser. While you can use the procedures above to cut or copy and paste pictures in Firefox, you can also use this same procedure for pictures.
Select the text you want to copy, and then on the keyboard, press Ctrl+X to cut or Ctrl+C to copy.
Go to the slide where you want to paste the text, and on the keyboard press Ctrl+P to paste.

Need more help?
Want more options.
Explore subscription benefits, browse training courses, learn how to secure your device, and more.
Microsoft 365 subscription benefits
Microsoft 365 training
Microsoft security
Accessibility center
Communities help you ask and answer questions, give feedback, and hear from experts with rich knowledge.
Ask the Microsoft Community
Microsoft Tech Community
Windows Insiders
Microsoft 365 Insiders
Was this information helpful?
Thank you for your feedback.
How to Copy and Paste in PowerPoint? [With Shortcuts & Tips!]
By: Author Shrot Katewa
![How to Copy and Paste in PowerPoint? [With Shortcuts & Tips!]](https://artofpresentations.com/wp-content/uploads/2021/05/Featured-Image-How-to-Copy-and-Paste-in-PowerPoint.jpg "how to copy powerpoint presentation to desktop")
Using Copy and Paste in PowerPoint is really one of the basic features. That said, it is also one of the most powerful and commonly used options in PowerPoint. So, how exactly does copy and paste work in PowerPoint?
Select the text or an object that you want to copy by clicking on it. Then, press Ctrl+C on your keyboard (Cmd+C on Mac) or right-click and select “Copy”. Go to the destination slide and press Ctrl+V (Cmd+V on Mac) or right-click and select “Paste” to paste the text or the object that you had copied.
As easy as the answer may seem, the copy and paste command can actually be used for more than just duplicating a line of text or creating another shape.
So, in this article, we will learn how to use the copy and paste command in PowerPoint for more than just a few basic things! Plus, you will get to know how to disable copy and paste for your audience. Additionally, I will also help you understand how to use copy and paste function correctly when working with images and charts!
That and much more! So, let’s get started!
[A Quick Note Before We Begin – for this article, I will be using one of the presentation templates from Envato Elements . With Envato Elements, you get access to thousands of presentation designs with unlimited downloads so you never run out of options again. Plus, you get free previews so you know exactly what you’re getting before buying! It is also very affordable. Check out their pricing here ]
1. How to Copy and Paste in PowerPoint?
In general, copying and pasting in PowerPoint is very straight forward. Here is how you do it in 6 simple steps:
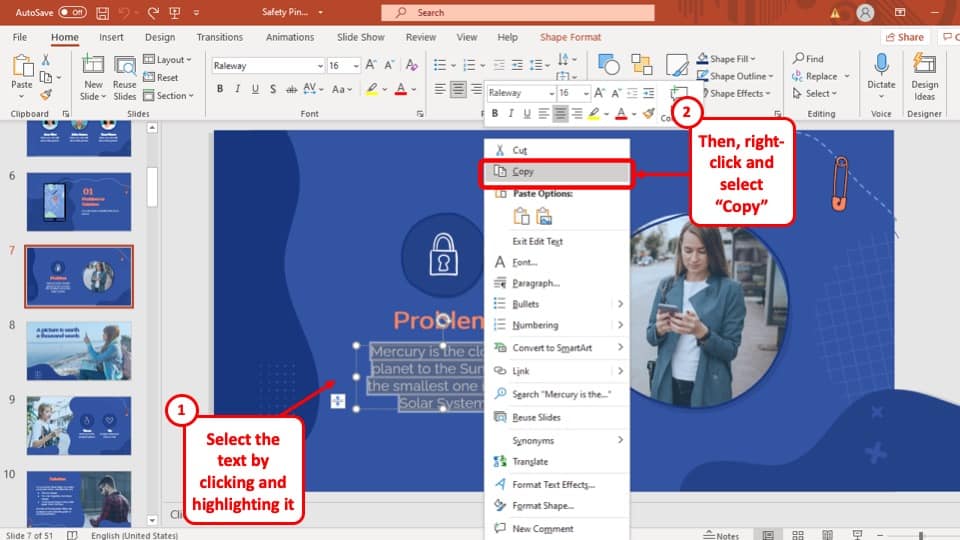
Step-1: Select the object or text you want to copy
At first, you have to select the object or text you want to copy by clicking on the ‘ Left ’ mouse button and dragging the cursor over it.
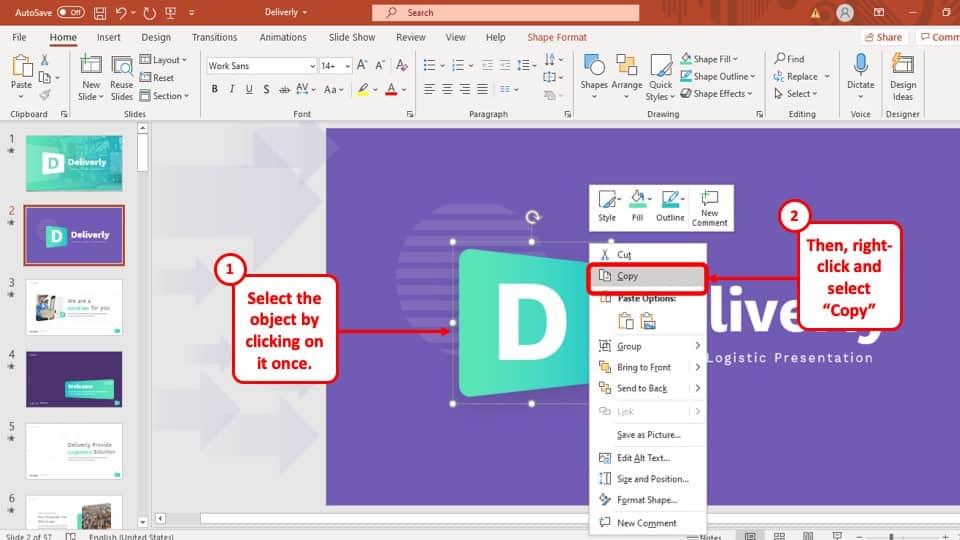
Step-2: Click on the ‘Right’ mouse button on the selected object to open the drop-down menu
After you have selected the object that you want to copy, hit the ‘ Right ’ mouse button. A drop-down menu will appear with several options.
Step-3: Press the ‘Copy’ option
In the drop-down menu, select the ‘ Copy ’ option. This will make a copy of the object and temporarily save it in the ‘ Clipboard ’ menu ready to be pasted in your preferred location.
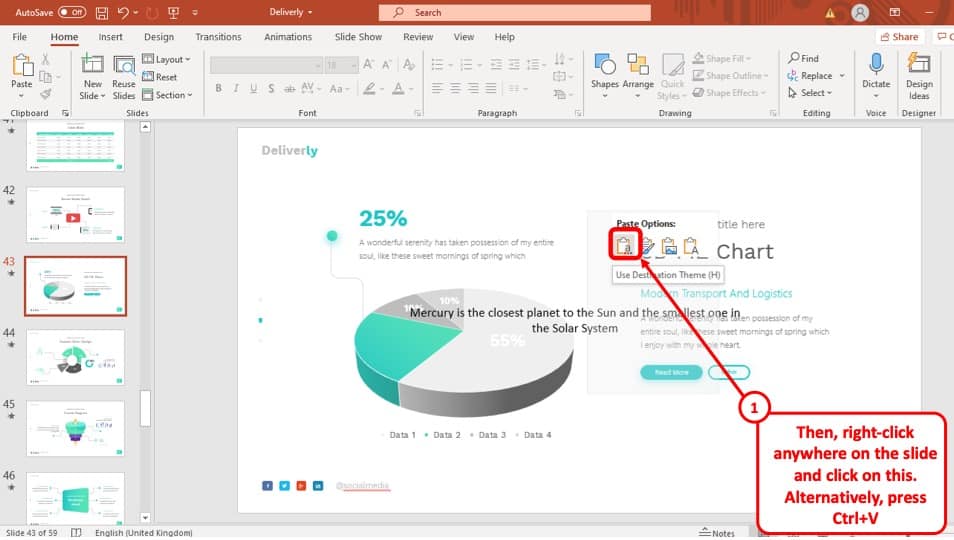
Step-4: Click on the ‘Right’ mouse button on the slide you want to paste your object or text.
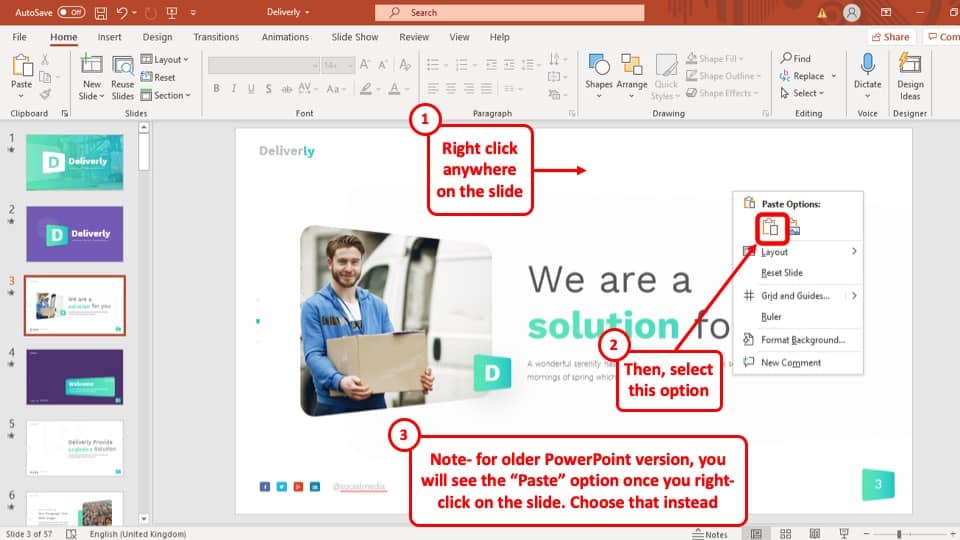
After you have copied the object, go to the slide where you want to paste the object, ‘ Right click ’ on your mouse anywhere in the slide to access the drop-down menu.
Step-5: Click on the ‘Use Destination Theme’ option.
Finally, after you have ‘ Right clicked ’ on the slide where you want to paste your object, select the ‘ Use Destination Theme’ option located under ‘ Paste Options ’ with an icon of a clipboard with a lower case ‘a’ on it. You can do the same for copied texts as well.
1a. How to Copy and Paste in PowerPoint on Mac?
Copy and pasting in PowerPoint on Mac is almost the same as it is on Windows . Follow these simple steps to copy and paste objects on your Mac computer:
Step-1: Select the object and click on the ‘Right’ mouse button
At first, go to the slide where the object or text you want to copy is located. Select it by clicking on the ‘ Left ’ mouse button. Then, press the ‘ Right ’ mouse button. This will give you access to a drop-down menu.
Step-2: Click on the ‘Copy’ button
Now click on the ‘ Copy ’ option from the drop-down menu. Similar to Windows operating systems, this will make a copy of the object and temporarily save it on the ‘ Clipboard ’ of your PowerPoint presentation.
Step-3: Go to the destination slide, and right-click on the slide
After you have copied the object, go to the destination slide where you want to paste the object and hit the ‘ Right ’ mouse button. This will again give you access to the drop-down menu.
Step-4: Click on “Paste” option
Finally, click on the ‘ Paste ’ option that is located on the menu. This will paste the copied object or text onto the destination slide.
1b. Keyboard Shortcuts for Copy and Paste in PowerPoint (For PC & Mac)
Microsoft PowerPoint has keyboard shortcuts to bypass the drop-down menu that makes the process much more efficient. To use your keyboard to copy and paste objects in your PowerPoint presentation, use the following keyboard shortcuts –
- To copy – Press Ctrl+C
- To paste – Press Ctrl+V
- To copy – Press Cmd+C
- To paste – Press Cmd+V
2. How to Copy and Paste a PowerPoint Slide?
While making your PowerPoint presentation, you might often need to copy an entire slide from one destination to another. The process is explained in 3 easy steps below:
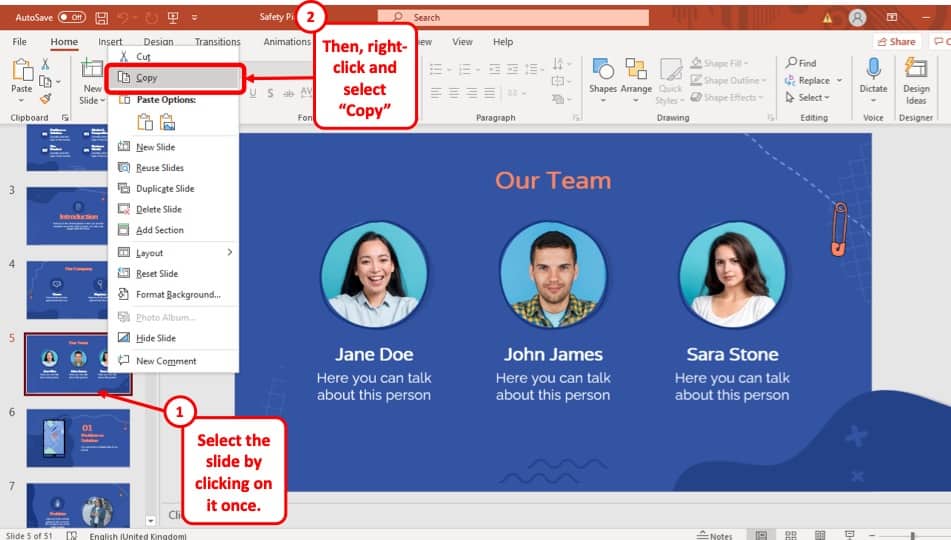
Step-1: ‘Right Click’ using your mouse on the Slide you want to copy.
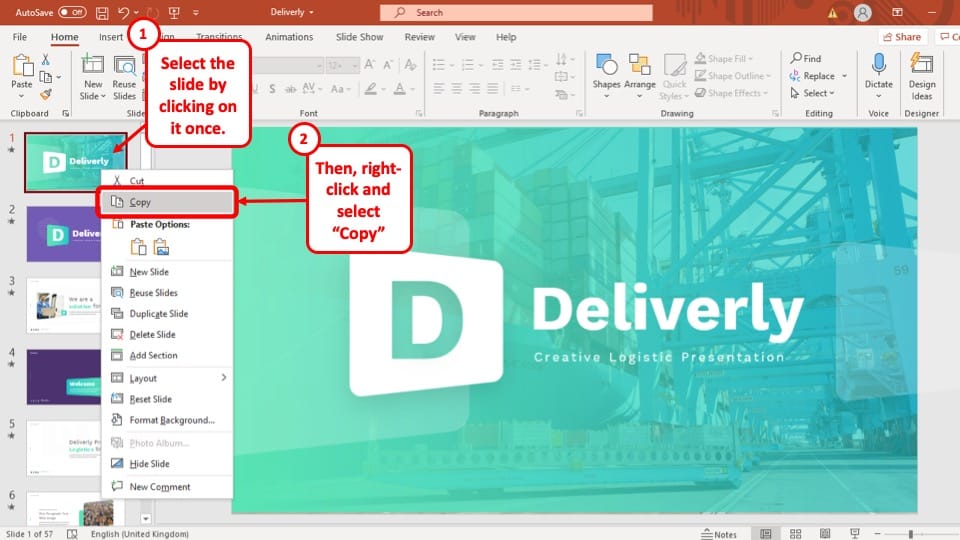
To begin, you have to move your cursor to the slide that you want to copy and click on the ‘ Right ’ mouse button to open the drop-down menu.
Step-2: Select ‘Copy’ option or press ‘Ctrl + C’
From the drop-down menu, Select the ‘ Copy ’ option. This will make a copy of the slide to your clipboard. Alternatively, you can skip ‘ Step-1 ’ by just selecting the slide and pressing ‘ Ctrl + C ’
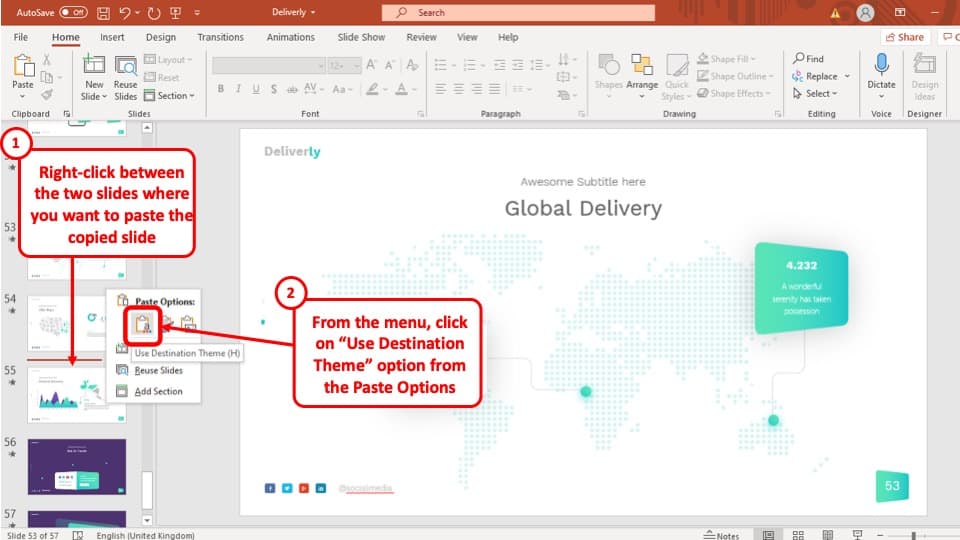
Step-3: Right-click between the two slides and Paste the Copied Slide
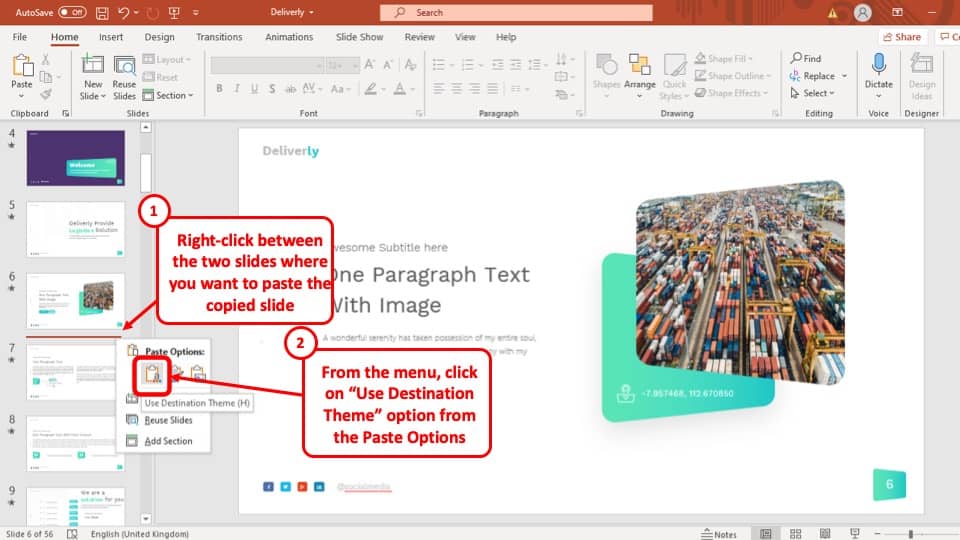
Finally, position your cursor on the slide bar where you want to paste the copied slide. Hit the ‘ Right ’ mouse button and select the ‘ Use Destination Format ’ option under ‘ Paste Options ’. Alternatively, you can also use the keyboard shortcuts ‘ Ctrl + V ’ to get the job done.
This will immediately paste your slide to your preferred position in the PowerPoint presentation.
2a. How to Copy and Paste a PowerPoint Slide in Another Presentation?
Copy and pasting a PowerPoint slide from another presentation is almost identical to copy and pasting a slide from the same presentation. The whole process is described below:
Step-1: Copy the Original Slide
At first, go to the PowerPoint presentation that has the slide that you want to copy into your presentation and then copy the slide.
Step-2: Paste the Slide in the Destination presentation
Now simply paste the slide you have copied from the other slide by positioning your cursor on the slide bar and clicking on the ‘ Right ’ mouse button and selecting ‘Use Destination Themes’ under the ‘Paste Options.’
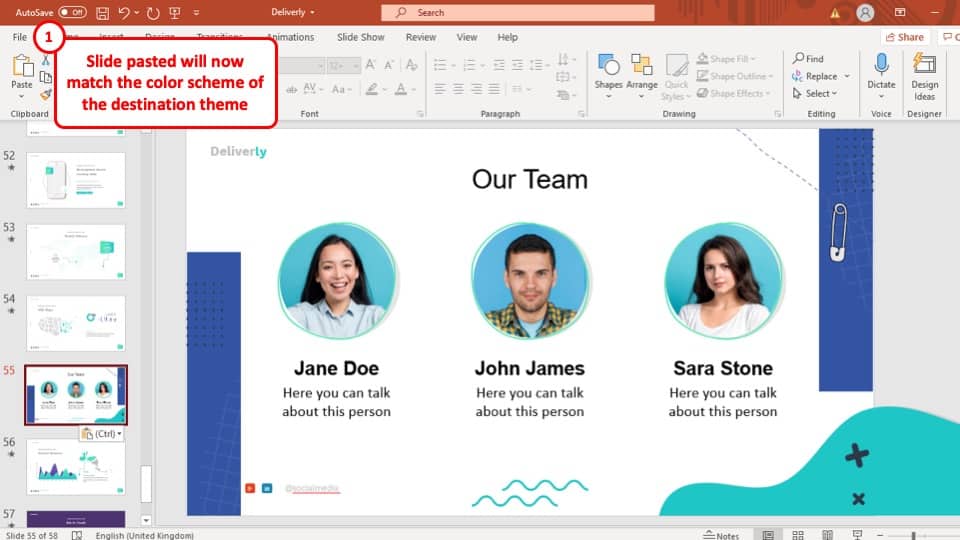
This will paste the slide you have copied to your preferred location while matching the theme used in your PowerPoint presentation.
2b. How to Copy and Paste a PowerPoint Slide without Losing Formatting?
PowerPoint also has the option to paste slides from other presentations while maintaining the original format of the slide. Below is a step-by-step guide on how to do that.
Step-1: Copy the slide you want to paste from the source presentation
Go to the presentation that has your preferred slide and copy it by hitting the ‘ Right ’ mouse button and then selecting the ‘ Copy ’ option from the drop-down menu.
Step-2: Go back to your PowerPoint presentation and click on the ‘Right’ mouse button in your preferred location.
In the next step, you have to go back to your PowerPoint presentation and click on the ‘ Right ’ mouse button on the position where you want to paste the slide that you copied. This will open the drop-down menu.
Step-3: Click the ‘Keep Source Format’ option under ‘Paste Options’
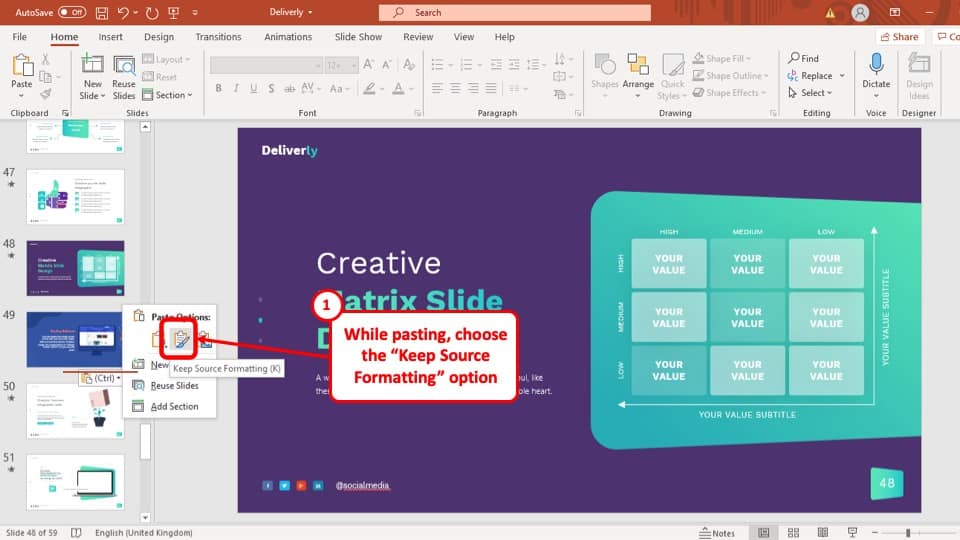
After you have accessed the drop-down menu, instead of clicking on the ‘ Use Destination Format ’ option, click on the ‘ Keep Source Format ’ option, the icon looks like a paintbrush on a clipboard as shown in the screenshot.
After selecting the ‘ Keep Source Format ’ option, the slide had copied will be pasted on your PowerPoint presentation, but it will match the format of the presentation it was originally in.
3. How to Copy and Paste Text in PowerPoint?
Copy and pasting text in your PowerPoint presentation is an easy 2 step process. They are explained below:
Step-1: Select the text that you want to copy in your PowerPoint presentation
At first you have to copy the text that you want to paste in your PowerPoint presentation. Simply select the text, press the ‘ Right ’ mouse button and click on the ‘ Copy ’ option from the drop-down menu.
Step-2: Go to the slide in your PowerPoint presentation and paste the copied text
Once you have copied the text you want to paste on your presentation, go to the slide where you want to paste the text, press the ‘ Right ’ mouse button and click on the ‘ Use Destination Format ’ option.
Check out our article on How to Format Text in PowerPoint to edit the text the correct way in PowerPoint and save some time!
4. How to Copy and Paste Pictures in PowerPoint?
The process of copying and pasting pictures in PowerPoint is almost the same as copying and pasting texts in PowerPoint. Simply copy your preferred picture and paste it in your PowerPoint presentation.
It is important to note that you can also copy and paste an image from a folder into your PowerPoint presentation. You can also do it using the keyboard shortcuts ‘Ctrl + C’ to copy and ‘Ctrl + V’ to paste.
“Unable to Paste Image” Error in PowerPoint
In some cases, users are unable to paste pictures in their PowerPoint presentation if the image is copied from a folder. In such a case, you will have to insert the image into your PowerPoint slide, instead of pasting it. The process is described step-by-step below.
Step-1: Click on the “Insert” tab to add an Picture
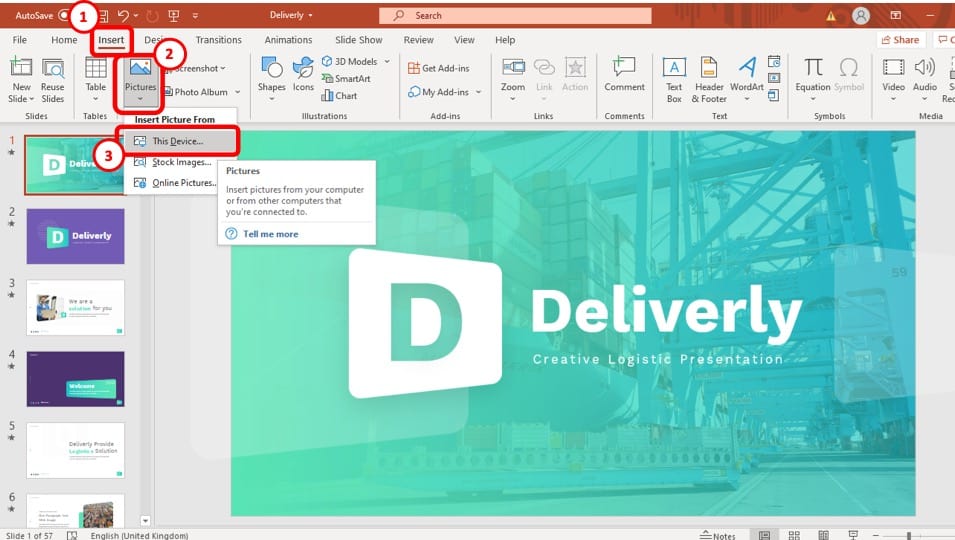
At first, you have to go to the slide where you want to insert the image and then go to the ‘ Insert ’ ribbon located in the upper left area of your PowerPoint window. Now click on the ‘ Pictures ’ option.
Step-2: Select the ‘This Device…’ option
After clicking on the ‘ Pictures ’ option, select ‘ This Device… ’ from the drop-down menu.
Step-3: Select the image click ‘Insert’
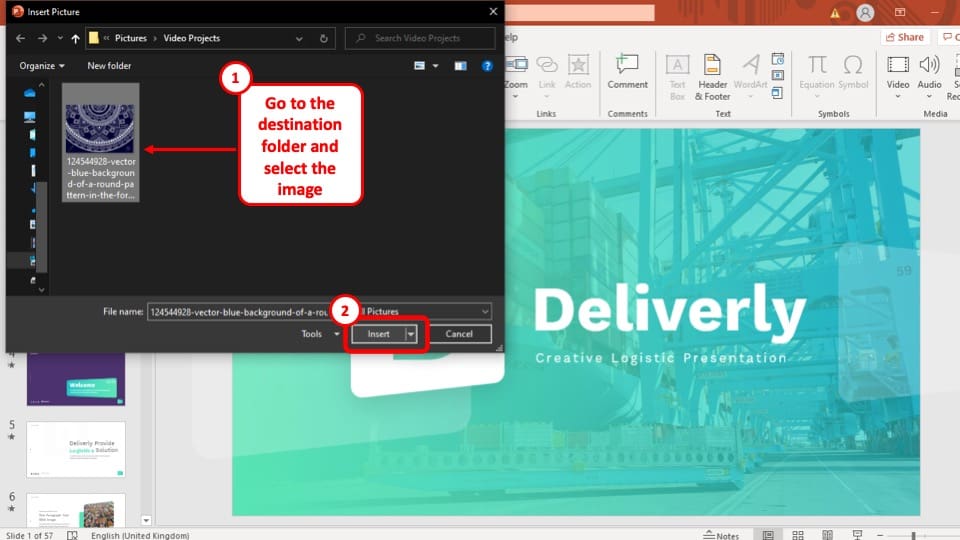
A pop-up window will appear, where you have to select the image, you want to add to your presentation. After selecting the image, click on the ‘ Insert ’ button at the bottom right corner of the pop-up window to successfully insert it to your presentation.
The image will be added to the slide in your PowerPoint presentation. Now all you have to do is resize it and place it in your preferred position.
5. How to Disable Copy and Paste in PowerPoint?
Although you cannot completely turn off the copy and paste option from your PowerPoint presentation file, you can, however, restrict the PowerPoint file to ‘ View Only ’ for permitted users.
This way only permitted users will be able to view the presentation file and they will not be able to edit or copy anything from it. A step-by-step guide to the whole process is given below.
Step-1: Go to the ‘Info’ section in the ‘File’ tab.
To restrict your PowerPoint presentation, at first you have to go to the ‘ Info ’ section which is located in the ‘ File ’ tab.
Step-2: Restrict the Access of the PowerPoint Presentation
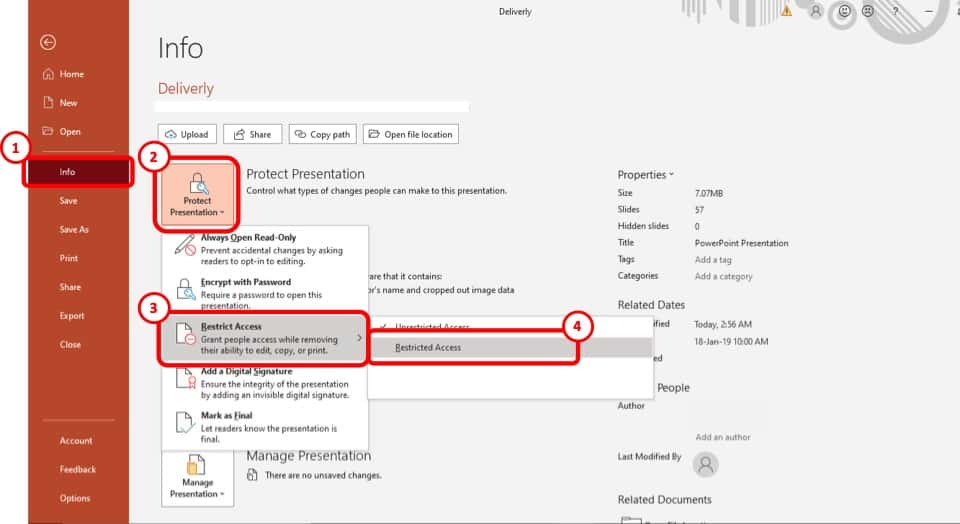
Now you have to go the ‘ Restrict Action ’ option under ‘ Protect Presentation ’ and select the ‘ Restricted Action ’ option.
Step-3: Tick the box that says, ‘Restrict permission to this presentation’
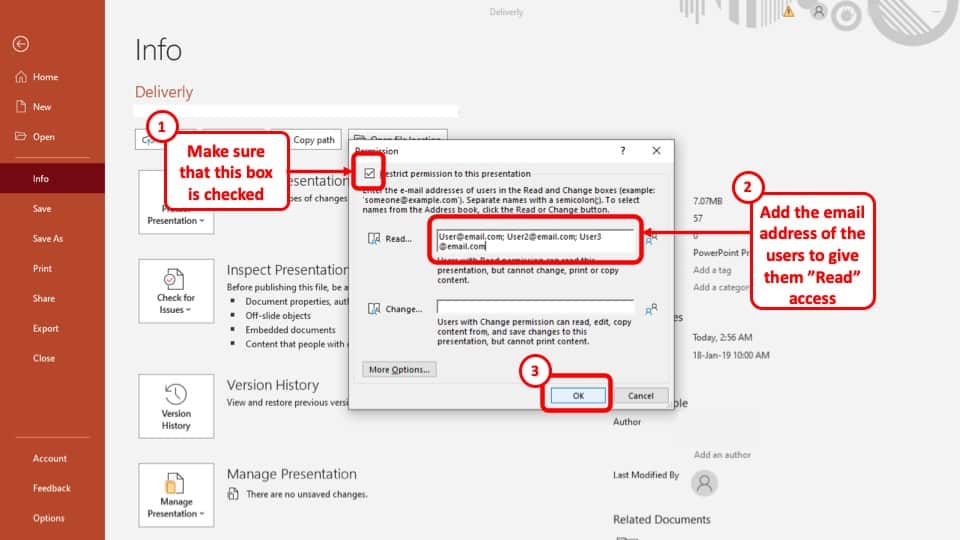
After you press the ‘ Restricted Action ’ option, a pop-up window will appear. Tick the box that says ‘ Restrict permission to this presentation ’ on the pop-up window to enable the restriction on your presentation. This will allow you to limit the viewership and use of your PowerPoint presentation file to selected users only.
Step-4: Add the email addresses of the users and press ‘Ok’
Add the email addresses of the users you want to show the presentation to in the first box that says ‘ Read… ’ and press the ‘ Ok ’ button at the bottom right corner of the pop-up window.
Now email the presentation to the users with access to your presentation. This way, only the users you added to the box will be able to see the presentation, without being able to edit or copy anything on it.
6. Troubleshooting Copy and Paste Issues in PowerPoint
There may be more than a few reasons why you cannot copy and paste in you PowerPoint presentation. In this section I will be discussing some of the reasons why that maybe and how to fix them.
6a. PowerPoint Won’t Copy and Paste? Here’s Why!
Although this is quite a rare occurrence, however, this can happen from time to time. Here’s what you can do to troubleshoot this problem –
- Restart Microsoft Office – Sometimes, the problem gets solved by simply restarting the PowerPoint or even Microsoft Office application. If it gets solved, then great! Else, move on to the next step.
- Restart your Computer – Restarting your computer will most definitely fix the problem. Perhaps your computer had an update or even the Microsoft Office application received an update and needed to restart. However, if the problem is still not fixed, then you need to check to see if any of the other common reasons have caused an issue! (mentioned below)
The 3 most common reasons why you might be having trouble copying and pasting in your PowerPoint Presentation are:
1. The latest update in you Microsoft Office may have a bug that needs fixing
2. The Microsoft Office installed in your computer maybe broken and needs to be repaired
3. One of the installed add-ins in your Microsoft PowerPoint might be causing this problem.
If you have managed to fix the above 3 errors, it is highly unlikely that you will have a copy and paste issue. If the issue still exists, you would be better off to check if this is a system-wide issue or just an issue in PowerPoint. Based on this, 2 scenario’s can emerge –
- Copy and paste issue is still seen only in PowerPoint – then, reach out to a customer support executive from Microsoft.
- You are unable to copy and paste anywhere on your computer – perhaps check to see if the “Control” key on your keyboard is functioning fine. Other than that, there isn’t any other solution apart from resetting your computer to factory default or replacing your computer altogether.
6b. Excel Chart Won’t Paste into PowerPoint!
Sometimes, the paste function just doesn’t work when trying to paste a chart from Excel to PowerPoint. This can be really annoying especially when you are in a hurry.
Below, I’ve shared 3 methods to fix the issue of an excel chart not pasting into your PowerPoint –
Method 1 – Using “Paste Special” Option
One of the solutions to not being able to paste your Excel Chart is to use the “ Paste Special ” option. Here is a step-by-step explanation of the process.
Step-1: Copy the chart from your Excel Workbook
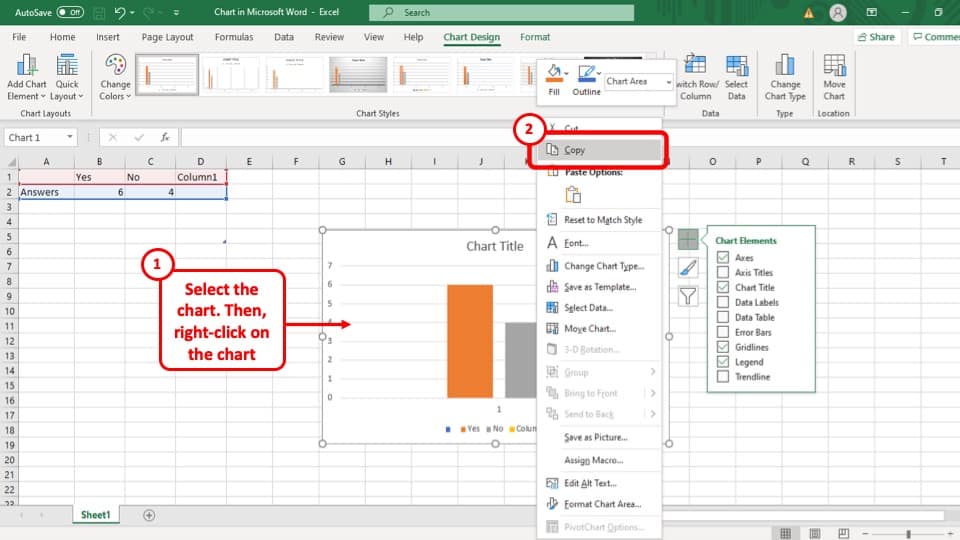
At first you have to copy the Chart by “ Right clicking ” on it and selecting the “ Copy ” option.
Step-2: Click on the arrow under the “Paste” option
After that, you have to go back to the slide you want to paste the chart. Click on the arrow under the “ Paste ” option in the “ Clipboard ” section of your “Home” tab . This will open a drop-down menu.
Step-3: Click on the “Paste Special” option
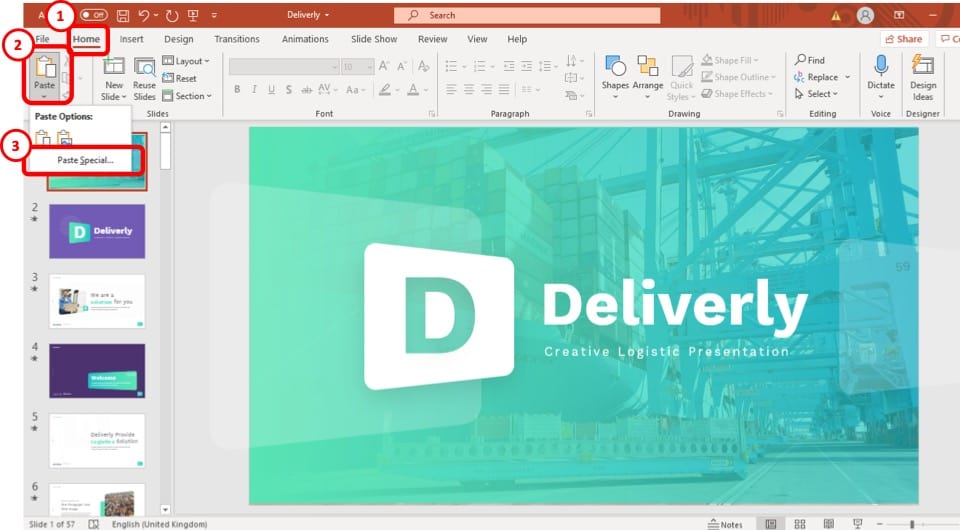
After opening the drop-down menu, click on the “ Paste Special ” option. This will open a pop-up window.
Step-4: Select “Microsoft Office Graphic Object” and press “Ok”
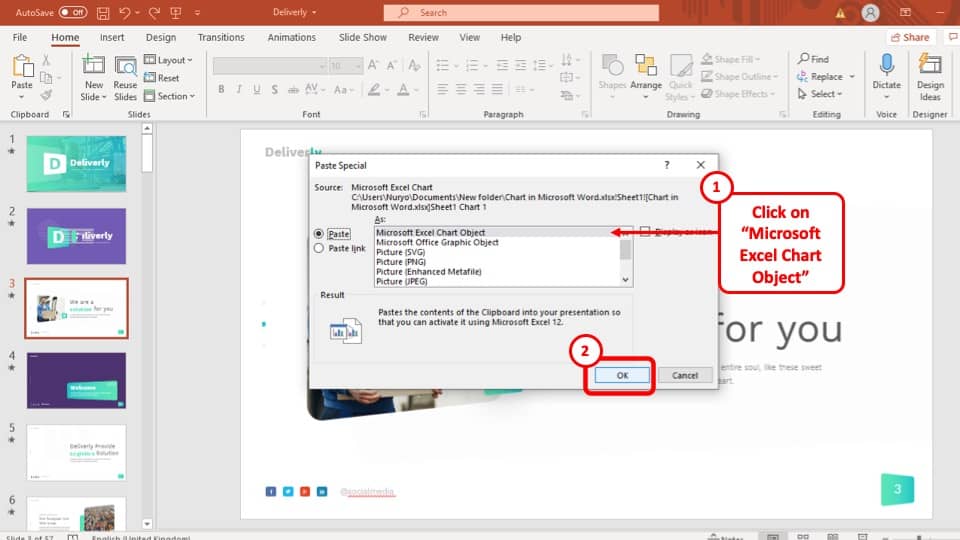
Once you have opened the “ Paste Special ” option, select “ Microsoft Office Graphic Object ” to past the chart in your PowerPoint presentation and then click on the “ Ok ” button.
Method 2 – Paste the Chart as an Image
Another solution to not being able to paste Excel Charts in your PowerPoint presentation can be to paste the chart as an image. That way, the chart will be saved to your presentation as an image instead of a chart.
The drawback to this method is that the edits that you make to your data in excel won’t automatically reflect in the chart in PowerPoint. That said, it is a temporary quick fix. If you don’t intend to update the source data for the chart, then this method will work just fine!
The process is described below.
Step-1: Save the chart as a picture from the Excel Workbook
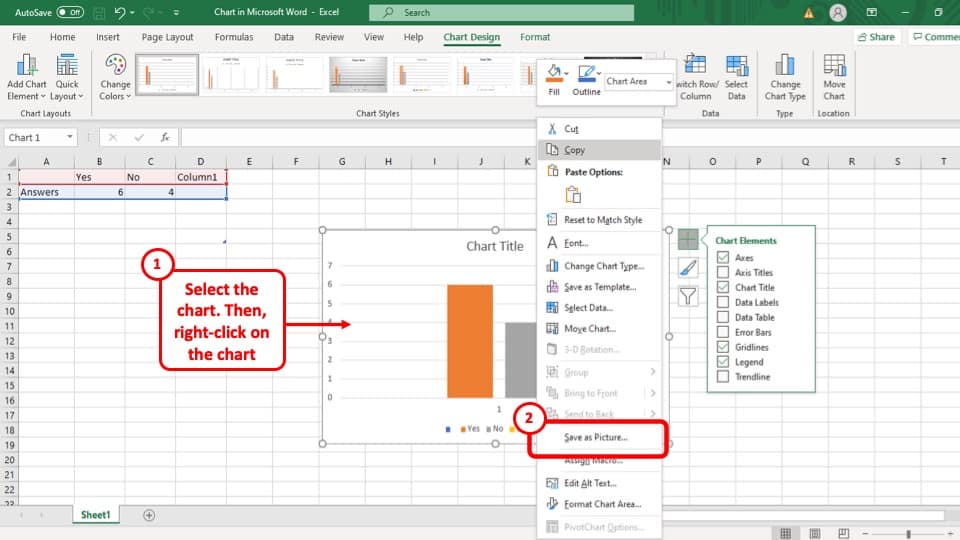
Go to the Excel Workbook with the chart that you want to add to your presentation, “ Right click ” on it and select the “ Save as Picture… ” option.
Step-2: Press “Save” on the pop-up window.
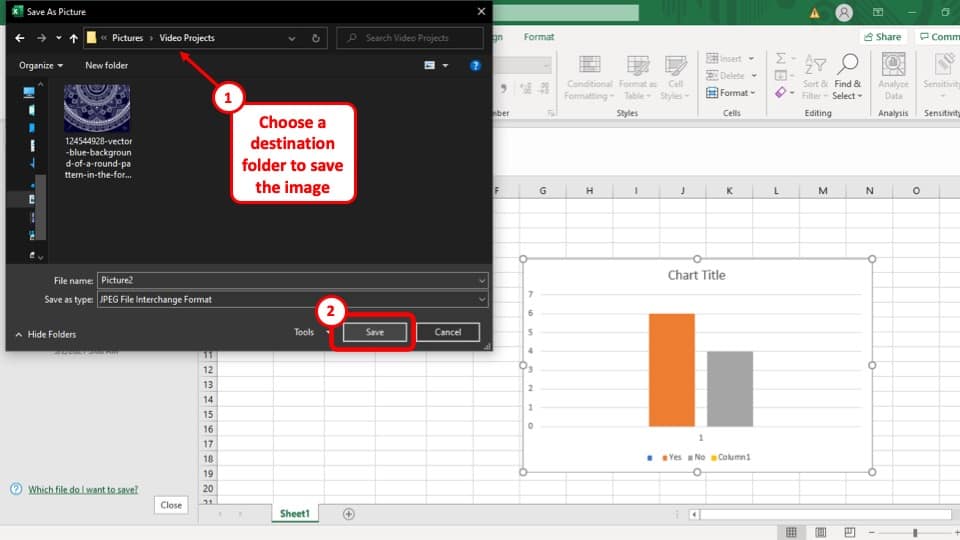
Once you have selected the “ Save as Picture… ” option, a pop-up window will appear on your screen. Save the image of the chart by clicking on the “ Save ” button at the bottom right corner of the pop-up window.
Step-3: Select the “This Device…” option
The next step is to select the “ This Device… ” option, under the “ Pictures ” drop-down menu which you can find in the “ Insert ” ribbon
Step-4: Select the chart and press “Insert”
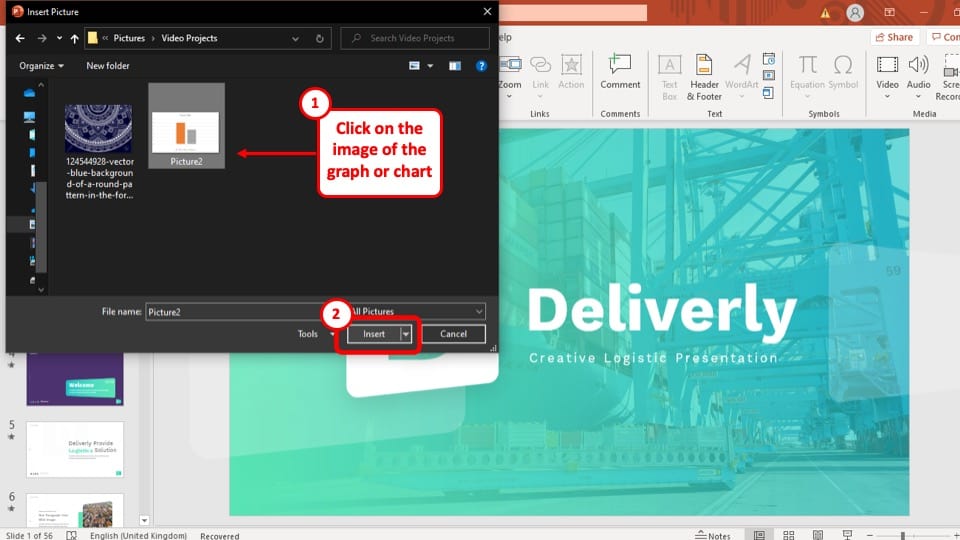
Finally, all you have to do is select the image of the chart and press the “ Insert ” button at the bottom right of the pop-up window.
Method 3 – Recreate the Chart in PowerPoint
If all else fails, you can still copy all the chart data from the Excel Workbook and create a new chart in your PowerPoint slide using those data. You can recreate an identical chart on your PowerPoint.
However, this may method may take time to recreate the chart exactly depending on how many customizations were done to the chart in Excel. Nevertheless, it is also an option that will work for you.
More PowerPoint Related Topics
- How to Crop a Picture in PowerPoint? [Complete Step-by-Step Tutorial!]
- How to Give a Presentation on Zoom? A Helpful Resource!
- What is a Presentation Clicker? [And How to Use it!]
- How to Convert a PowerPoint to PDF? [A Simple Guide!]
- PowerPoint vs Google Slides: Which is Better? [ULTIMATE Test!]
- How to Change Bullet Style in PowerPoint? A Complete Guide
Credit to diana.grytsku (via Freepik) for the featured image of this article
- Artificial Intelligence
- Generative AI
- Cloud Computing
- Computers and Peripherals
- Data Center
- Emerging Technology
- Augmented Reality
- Enterprise Applications
- IT Leadership
- IT Management
- Remote Work
- IT Operations
- Operating Systems
- Productivity Software
- Collaboration Software
- Office Suites
- Vendors and Providers
- Enterprise Buyer’s Guides
- United States
- Netherlands
- United Kingdom
- New Zealand
- Newsletters
- Foundry Careers
- Terms of Service
- Privacy Policy
- Cookie Policy
- Copyright Notice
- Member Preferences
- About AdChoices
- E-commerce Affiliate Relationships
- Your California Privacy Rights
Our Network
- Network World

Android file transfer: How to move data between your phone and computer
Moving files between your android device and a windows pc, mac, or chromebook doesn't have to be difficult — or dependent on any cloud services..

Your smartphone is a powerful computer in your pocket — and with Android, part of that PC-like muscle means being able to plug your phone into any Windows, Mac, or ChromeOS system and then drag and drop files either way.
Unlike iPhones, Android devices allow you to access their file systems directly from a desktop, without the need for any cumbersome interfaces or complicated procedures. In fact, transferring files to or from an Android device is basically no different than plugging an external hard drive into your computer and moving data to or from it.
All you need is your phone, your computer, and a cable to connect ’em — with micro-USB or USB-C on the phone side and USB-A or USB-C on the computer side, depending on the specifics of your devices. (Most current Android phones use USB-C, whereas most pre-2016 devices have the older micro-USB standard. USB-A, meanwhile, is the traditional connector port you’re used to seeing on computers, though more and more models now also offer USB-C .) There’s a decent chance that the same cable that connects your phone to its wall charger will work.
Got it? Good. Here’s what you need to do next, depending on whether you have a Windows, macOS, or ChromeOS system.
Android file transfers by operating system:
• for windows computers, • for macs, • for chromeos computers, • for any device: wireless transfers, android file transfers for windows computers.
With Windows, things are as simple as can be. Just plug your phone into any open USB port on the computer, then turn on your phone’s screen and unlock the device.
Swipe your finger down from the top of the screen, and you should see a notification about the current USB connection. At this point, it’ll probably tell you your phone is connected only for charging.

After you connect your phone to your computer, a notification will let you prepare it for transferring files.
Tap the notification and select “Transfer files” or “File transfer” in the menu that appears. If media files are all you’re planning to move, you could also use the “Transfer photos” (sometimes listed as “PTP”) option, which’ll treat your phone like a digital camera. Once you’ve made your selection, go to your desktop and open up a File Explorer window using the method that makes the most sense for your Windows configuration:
- Click the File Explorer icon in your taskbar
- Open the Start menu and click This PC or Computer
- Click the This PC, Computer, or My Computer icon on your desktop
Then look for an icon representing your phone alongside other portable devices and drives. Click or double-click that icon, and ta-da! You’re staring at your Android phone’s internal storage. You can now click around and browse folders, drag and drop files between your phone and PC, or manipulate the data in any way you want.

Your Android phone’s storage looks like any regular hard drive when viewed from a computer. (Click image to enlarge it.)
Android file transfers for Mac computers
Got a Mac? The Android file transfer process is a bit more complicated for you — but fear not, for it’s still pretty darn easy.
The main difference is that before things will work, you’ll need to download and install an official Google program called Android File Transfer . To use the program, your Mac must be running macOS 10.7 or later, and your Android device must have Android 3.0 or later — something that should hopefully be a given on both fronts at this point.
Once the program’s in place on your Mac, just plug your phone into your computer, turn on your phone’s screen and unlock the device, and then look for the same USB status notification described above.
Tap the notification and select “Transfer files” or “File transfer.” The Android File Transfer program should then automatically open on your Mac, and you should be able to browse your phone’s storage and transfer files to your heart’s content.
If the official Android File Transfer program doesn’t work well for you — a vexingly common complaint among Mac users these days — consider the favorably reviewed third-party Commander One Pro as an alternative. It costs $30 for a single license or $100 for a five-user team license.
Or — well, skip down to the final section of this story for one other option.
Android file transfers for ChromeOS computers
You’d expect file transfers between Android phones and Chromebooks to be as simple as can be, considering that Google’s the driving force behind both of those operating systems — and by golly, you’d be absolutely right.
Just like on a Windows system, all you’ve gotta do to connect your Android phone to a Chromebook is plug it into any open USB port, then tap the USB charging notification on the phone and select either “Transfer files” or “File transfer” from the prompt that appears — or select “Transfer photos” or “PTP” if you want your phone to be treated like a camera, with a focus exclusively on multimedia files.
Once you do that, the ChromeOS Files app should automatically appear on your Chromebook with your phone loaded as the active storage focus. You’ll find an option within the app’s menu (in the upper-right corner of the screen) to back up all of your phone’s media files to Google Drive, if you want to go down that road — or you can simply drag and drop files in either direction as needed.

Pulling up your Android phone’s storage on a Chromebook is easy as can be. (Click image to enlarge it.)
There’s really not much to it — nor should there be.
And if you want an even simpler way to take care of business…
Don’t like cables?
Hey, wait a minute — aren’t there apps and cloud services for this sort of thing? Sure there are, and we’ve got you covered there, too. Check out “ Transferring files wirelessly between devices ” in our in-depth guide to file management on Android for everything there is to know.
This article was initially published in August 2017 and most recently updated in October 2022.
Read this next: The best Android apps for organizing your life
Related content
How to use pivottables and pivotcharts in excel, 18 ways to speed up windows 10, google adds a premium option for chrome enterprise, jamf brings powerful new compliance tools to apple it, from our editors straight to your inbox.

JR Raphael has been covering Android and ChromeOS since their earliest days. You can ingest his advice and insight in his long-standing Android Intelligence column at Computerworld and get even more tasty tech knowledge with his free Android Intelligence newsletter at The Intelligence .
More from this author
What everyone’s getting wrong about google’s chrome incognito saga, android 14 upgrade report card: predictable unpredictability, a hidden new twist to a top android chrome trick, 27 advanced trello tips and tricks, most popular authors.
- Howard Wen Contributing Writer

Show me more
Google workspace gets new genai pricing options, vids app.

The AI talent shortage — can companies close the skills gap?

Enterprise buyer's guide: How to choose the right UEM platform

Is AR/VR set for another growth spurt? | Ep. 143

Voice cloning, song creation via AI gets even scarier

The link between smartphones and social media addiction

Is AR/VR set for another growth spurt?

Rare copy of comic featuring Superman's first appearance sells for $6 million at auction
A 1938 copy of the comic that first “introduced Superman to the world” has sold for a record-setting $6 million, the auctioneer that handled the purchase said last week
NEW YORK -- A 1938 copy of the comic that first “introduced Superman to the world” has sold for a record-setting $6 million, the auctioneer that handled the purchase said last week.
According to Heritage Auctions, the rare copy of Action Comics No. 1 was sold to an anonymous buyer on Thursday. The $6 million price tag makes the book the most expensive comic to ever sell at auction, the action house added.
Heritage Auctions hails Action Comics No. 1 as “the most important comic ever published” — noting that the Superman who first appeared in the 1938 spring issue “remains remarkably like" the version still seen in comic strips and on the big screen today. In addition to the Man of Steel's first appearance, the book also introduced central love interest Lois Lane.
A report from comic book grading service Certified Guaranty Company, cited by Heritage Auctions, estimates that there are only 100 surviving copies of Action Comics No. 1 today — out of 200,000 that were printed by National Allied Publications, the predecessor to DC Comics.
The copy sold last week, which comes from the Kansas City Pedigree, has a “Very Fine+” CGC rating of 8.5 — with only two other unrestored issues of grading higher, Heritage Auctions noted.
Although not as high as $6 million, other rare copies of Action Comics No. 1 have also gone for millions at auction in recent years, including a 6.0-rated issue that sold for $3.56 million through ComicConnect last year.
Thursday's record sale surpasses the previous titleholder of the most expensive comic book to ever be sold — which was a copy of another Superman-starring comic, Superman No. 1, that sold privately for $5.3 million in 2022, according to CGC.
The Action Comics No. 1 sale was part of a four-day comic auction event that featured several big-name superheroes and rare comics featuring them. The event realized more than $28 million by its end on Sunday, according to Heritage Auctions.
Top Stories

OJ Simpson, former football star acquitted of murder, dies at 76
- 2 hours ago

Mom gives celestial name to baby born during total solar eclipse
- Apr 9, 12:21 PM
21-year-old skier dies in 'high-risk' stunt trying to jump over US highway
- Apr 11, 5:41 AM

GOP nominee for NC governor failed to file federal income taxes for 5 years
- Apr 11, 5:05 AM

Husband of former Chiefs cheerleader who died after stillbirth speaks out
- Apr 11, 4:00 AM
ABC News Live
24/7 coverage of breaking news and live events
How-To Geek
How to copy a whole website to your computer using wget.
Want to save an entire webpage to your PC? No problem.
Quick Links
Before you start, how to copy a whole website locally using wget, what about downloading just one page, downloading websites for offline access, how do you access the site you downloaded, other tools for downloading web content for offline use, key takeaways.
- You can use wget to download entire websites for offline access.
- wget is a command line tool that is available for Linux, Windows, and MacOS.
- It can be used in place of other tools such as cURL, HTTrack, WebCopy and SiteSucker.
Downloading a whole website is useful if you want your own copy of the text, images, and other content on it, just in case the author deletes it or the website shuts down. However, web browsers don't include this functionality out-of-the box. Here's how to download a whole site using the wget tool.
Before you start, make sure you have enough disk space to save the site you want to download. Some sites have a lot of pages and a lot of content that can add up fast, so keep in mind what you'll be downloading, so you don't run out of storage. If you're on a laptop, make sure you're plugged in to a power outlet, as downloading potentially thousands of files might take a while.
If you're on Windows, you'll need to install the Windows Subsystem for Linux (WSL) to get access to wget.
Also, understand that a lot of modern websites are dynamically generated, meaning that they process data on their servers to generate pages that change when new content is added, or when you refresh the page. Downloading a website or page creates a snapshot of it at that moment in time, so you'll need to re-download the site if you want an up-to-date copy.
Wget is a command line tool for downloading data from the web. It's installed by default on Ubuntu (this means WSL as well) and Fedora. If you're on an Arch-based distribution, you'll need to install it . If you're on macOS, wget is available through MacPorts .
If you're on Linux or MacOS, you'll need to open up a Terminal window. If you're on Windows using WSL, launch whichever Linux distro you'd like to use .
You can confirm that wget is installed by running:
wget --help
If wget is available on your system, the command will return information about the wget command.
Now, you're ready to start downloading. This is the command to download a whole website:
wget -mpEk https://example.com
This command will try to grab everything it can from the website at https://example.com , scan all the links on the first page, download those linked pages and everything on them, and then continue on through the pages linked from those pages.
Here's what each of the command flags (the letters following the dash in the wget command above) mean:
- -m enables several options that configure wget for mirroring a website, including timestamp checking, and infinite recursion depth
- -p tells wget to get all the page requisites, such as images, media, stylesheets, and JavaScript files
- -E adjusts the file extensions of downloaded files to match those on the server
- -k converts links in the saved pages to point at your local copies, so that your offline site can be navigated fully without an internet connection
You'll know the website is being successfully downloaded when you see output resembling the following:
Note that while this is a recursive download, only links from the specified website will be downloaded. Pages on other websites will remain online and require an internet connection to view.
You can see a complete list of all the wget command flags and what they do in the wget user manual .
Remember, this might take a while and there's no real way to estimate how long large websites will take to download, so it's worth checking progress occasionally to make sure that things are still progressing.
If you want to download a single web page, your web browser can do that in a much easier process: just go to the File menu and then click the "Save" button (the wording might be a bit different for your browser, on Firefox it's "Save page as...").
If you want to use wget to download a single page, run the following command:
wget -pk https://example.com
This omits the options that tell wget to recursively download pages, and adjust extensions and links.
Downloading an entire site is useful in many situations, including:
- Backing up your blog in case your web host shuts down
- Archiving web pages for historical purposes (like saving a family members' website for your family history project)
- Saving web pages and everything on them to read while on vacation (not everywhere has decent internet yet!)
A site you download using wget will be saved as an HTML file on your PC. If you used WSL, you'll need to access your WSL files through File Explorer .
In our example, the file was located at "\\wsl.localhost\Ubuntu-22.04\home\example" since we used Ubuntu 22.04 and our Linux username is "example." Wget will save the folders to whichever directory you have active in the Terminal when you run the command, unless you specify another path manually.
HTML files can be opened by any browser, though there are other programs that can do it too, if you prefer one of those.
While wget one of the most common ways to download web content, there are others that you can use if you have different requirements, or don't want to deal with the command line.
- cURL is another free command line tool that can be used to download entire websites
- HTTrack is a Windows tool that provides a graphical interface for downloading entire sites, if you aren't comfortable using the command line
- Cyotek WebCopy also provides a GUI for downloading entire websites, and includes a lot of configurable options as well as rules to exclude content from being downloaded
- Scrapy and BeautifulSoup are Python libraries that can download whole sites, but are intended for Python developers
- SiteSucker provides a friendly graphical interface for downloading websites for MacOS, and is available in the App Store
- Webscrapbook is a Firefox or Chrome extension that can archive whole sites for later reading, and also lets you annotate and edit the pages
- Offline Explorer is powerful, and may be able to download website content where other tools struggle, but it's pricey
Whatever your reason for wanting to copy a whole website to your own computer, now you know how! If you're planning on doing some offline reading, a decent eReader is an absolute must .
IMAGES
VIDEO
COMMENTS
To save a copy of a PowerPoint presentation on your desktop, follow the 3 simple steps. Step-1: Click on the "File" tab. The first step is to click on the "File" tab. It is located on the left corner of the menu ribbon at the top of the screen. This will open the "File" menu. Step-2: Click on the "Save A Copy" option.
To get started, open the presentation you want to copy. Once youve opened the file, go to the File tab on the ribbon. When you select the File tab, a menu will appear with a variety of options. From this menu, select Save As. Once youve clicked Save As, youll be prompted to select a location to save the copy.
Click View, and then in the Presentation Views group, click Normal. In the slide thumbnails on the left side, click the slide that you want to copy: To select multiple sequential slides, click the first slide, press Shift, and then click the last slide that you want. Alternatively, you can click on the first slide, press Shift and then press ...
On the File tab, select Save. Do of the following: To save to your local drive, such as your laptop, a flash drive, CD or DVD drive, select Computer. To save to a SharePoint Library, select SharePoint. Under Save As > Recent Folders, select Browse, pick a path and file folder, and then name the file. Select Save.
First, open the presentation that you would like to copy. Then, click the "File" tab at the top of the window. From this menu, select the "Save As" option. In the window that appears, select the folder where you would like to save the file, enter a name for the file, and click "Save". This will create a duplicate copy of the ...
Choose the Save or Save As option. Download Article. Click Save to save to the current file, or Save as to create a new file. If you've already saved the file at some point, you'll have the option to click Save, which simply saves your changes to that file. Otherwise, choose Save as to create a brand new file. 4.
To save the PowerPoint presentation as a PDF file, follow the 4 easy steps. Step-1: Click on the "File" Tab. First, click on the " File " tab in PowerPoint to open the back stage view of PowerPoint. Step 2 - Click on the "Save As" option. In the menu ribbon located at the top of the screen, click on the "File" tab.
This video is made to help students open up a PowerPoint from their office 365 account and save it to their desktop.
PowerPoint for the web. PowerPoint for the web automatically saves your work to OneDrive, in the cloud. (This kind of operation in Microsoft 365 is often called Save As, but in Microsoft 365 for the web apps it is Save a Copy or Download As .) To save to another location (such as your computer or a USB thumb drive), or to save a copy, click a ...
2. Right-click on a slide in the left sidebar to copy it. You can also press Command + C or Ctrl + C on your keyboard. If you hold down Command or Ctrl, you can click multiple slides to select ...
To copy a PowerPoint slide, you just need to right-click it, or open the "Home" menu. You can also use PowerPoint's "Duplicate" function, which will create a copy of a slide automatically, without ...
1.In desktop version of PowerPoint, create a new file which contains the slides you want to reuse. 2.Go to OneDrive for Business in the cloud, click Upload>File in the top menu to upload the PowerPoint file to OneDrive for Business. 3.Open PowerPoint online>click Open from OneDrive for Business button as below, choose and open the file you have ...
Copying Slides in PowerPoint: Desktop and Online Methods for Mac and Windows Method 1: PowerPoint Desktop App. To copy a slide in the PowerPoint desktop app: Step 1: Open your PowerPoint presentation. Step 2: Right-click on the slide you want to copy in the left sidebar. You can also use Command + C (Mac) or Ctrl + C (Windows) to copy and ...
Copy Slides to Another PowerPoint Presentation. Right-click the thumbnail of the slide to be copied, select Copy, then right-click a blank area of the Slides pane where you want to place it. Alternate method: Click-and-drag the thumbnail of the slide you want to copy to the Slides pane of the destination presentation.
Step-1: "Right-click" on the slide. The first step is to go to the slide you want to save as an image and "Right Click" anywhere on the slide. This will open a drop-down menu. Step-2: Select the "Save as Picture…" option. From the drop-down menu, click on the "Save as Picture…" option. This will open a new window.
Step 2: Save the Presentation with a New Name. Go to 'File' > 'Save As' and choose a new name and location for your copied presentation. Saving the original presentation with a new name creates a separate file, allowing you to maintain the original while working on the new copy.
What to Know. In the source presentation, select View > Slide Master. In the Slide pane, right-click the Slide Master and select Copy. Go to View > Switch Windows and choose the second presentation. Go to View > Slide Master. Right-click the Slide pane and select Paste. Choose Use Destination Theme (keeps colors, fonts, and effects) or Keep ...
Follow these steps: To open the Save As dialog box, press Alt+F, A, and then O. If necessary, navigate to the location and name the file. To learn how, go to Save your presentation file. Press the Tab key until you hear "Save as type," followed by the default file format. To move through the list of file formats available in the Save as type ...
1. Open the PowerPoint presentation on your Mac desktop or laptop. 2. Click the "File" tab in the top left corner. 3. Select "Share" from the dropdown menu. This will grant you the option to ...
Then I select Copy this slide. When clicking Paste in PowerPoint Online, we can notice that the copied slide didn't be recognized as a presentation in PowerPoint Online. But if we press CTRL + V in the text box of the presentation of PowerPoint Online, it would be recognized as an image. Besides, a slide cannot be separated from presentation ...
On the Insert tab, click the arrow under Video, and then select This Device (or Video on My PC ). In the Insert Video box, click the file that you want to link to, click the down arrow next to the Insert button, and then click Link to File. Newer versions of PowerPoint support the playback of video with multiple audio tracks.
Shortcut key for Paste: Ctrl + V. Select the text you want to copy, and then on the Home tab, select the Clipboard button and then select Cut or Copy. Click where you want to insert the text, and on the Home tab, select the Clipboard button, and then select Paste. If you're prompted for access to the Clipboard, click Allow Access.
At first you have to copy the Chart by " Right clicking " on it and selecting the " Copy " option. Step-2: Click on the arrow under the "Paste" option. After that, you have to go back to the slide you want to paste the chart. Click on the arrow under the " Paste " option in the " Clipboard " section of your "Home" tab.
To open Windows Backup, type Backup into your taskbar search box, and click "Windows Backup." In the Windows Backup dialog box, you'll see the different things you can include in your transfer. Click the drop-down arrows next to each section to choose which folders, apps, settings, and credentials you want to transfer to your new computer.
Open the Start menu and click This PC or Computer. Click the This PC, Computer, or My Computer icon on your desktop. Then look for an icon representing your phone alongside other portable devices ...
After downloading it, you need to take just one small step: right-click it, select Properties, and look for a checkbox to click next to "Is Executable" or maybe "Allow executing file as program depending on your distro." This gives the app permission to operate on your device. (You can also do this in the Linux terminal if you're so inclined.)
The Associated Press. NEW YORK -- A 1938 copy of the comic that first "introduced Superman to the world" has sold for a record-setting $6 million, the auctioneer that handled the purchase said ...
Downloading a whole website is useful if you want your own copy of the text, images, and other content on it, just in case the author deletes it or the website shuts down. However, web browsers don't include this functionality out-of-the box. Here's how to download a whole site using the wget tool. Before You Start