- Brightspace Hub
- Brightspace Faculty Hub
- Teaching With Technology
- Tools & Guides for Teaching
- Professional Development
- EdTech Innovations Newsletter
- Policies & Laws in Education
- Brightspace Student Hub
- Learning With Technology
- Student Professional Development
- Learn Online at Hostos
- Academic Integrity
- Online Learning Student Hub
- Online Teaching Faculty Hub
- Mission & Team
- EdTech Leadership Council
- EdTEech Awards
- EdTech Services
- EdTech Office Policies

Submitting an Assignment
718-319-7915 [email protected]
BLACKBOARD TIPS FOR STUDENTS
Submit assignment on bb.
Submitting assignments on Blackboard is a simple process that allows you to upload your completed work to your instructors for grading and feedback. To submit an assignment, follow these steps:
- Log in to your Blackboard account.
- Navigate to the course where the assignment is located.
- Locate the assignment in the course content area and click on its link.
- Follow the instructions provided by your instructor for uploading or submitting your work. This may include attaching a file, typing in a text box, or using a submission tool provided by Blackboard.
- Review and verify your submission before finalizing it.
- Click the “Submit” button to submit your assignment.
It is important to check with your instructor or the course syllabus for specific instructions on how to submit assignments and for the deadline. Keep in mind that Blackboard has a feature for automatically saving your work, but it is recommended to keep a backup copy of your assignments in case of technical issues.
By submitting your assignments on Blackboard, you will be able to track your submissions and receive feedback from your instructor in a timely and efficient manner.

Blackboard Student Resources
You will find a comprehensive repository of information on how to use each of the learning management system's tools...

Cooperative Learning Assessment Fair and balanced grading of cooperative activities Create practical use rubrics for reuse Create differentiated rubrics...

Cooperative Learning Roles Goal: Designing activities to split group tasks among participants Takeaways (2) Maintains order during the activity...

How to use a Discussion Board
BLACKBOARD TIPS FOR STUDENTS Bb Discussion Board Blackboard Discussion Board (original experience) is a feature within the Blackboard Learning...

Creating SafeAssign Assignments
SafeAssign is an anti-plagiarism checking tool incorporated as an option in Blackboard Assignments. It’s designed to be used to...

Editing Assignments
Log in to Blackboard Select your course from the My Courses module (top-left) Make sure the Edit Mode is...

More than a rubric
Cooperative Learning: More than a Rubric Preloading resources for a rubric to help students navigate to what is needed...

I do not see my courses in Blackboard
BLACKBOARD TIPS FOR STUDENTS Where are my Bb Courses? By default, Blackboard courses are unavailable to students. Contact your...
Leave a reply Click here to cancel the reply
Your email address will not be published. Required fields are marked *
Save my name, email, and website in this browser for the next time I comment.
EDTECH OFFICE HOURS
Fall & Spring Monday – Friday 9:00 AM – 5:00 PM
Summer Monday – Thursday 8:30 AM – 6:00 PM
500 Grand Concourse, Bronx, NY 10451
718.319.7915
- facebok logo
- instagram logo
- twitter logo
- youtube icon
Accessibility
Accessibility modes, online dictionary, readable experience, visually pleasing experience, easy orientation.
Educational Technology Accessibility Statement
Accessibility Statement
- commons.hostos.cuny.edu
- April 11, 2024
Compliance status
We firmly believe that the internet should be available and accessible to anyone, and are committed to providing a website that is accessible to the widest possible audience, regardless of circumstance and ability.
To fulfill this, we aim to adhere as strictly as possible to the World Wide Web Consortium’s (W3C) Web Content Accessibility Guidelines 2.1 (WCAG 2.1) at the AA level. These guidelines explain how to make web content accessible to people with a wide array of disabilities. Complying with those guidelines helps us ensure that the website is accessible to all people: blind people, people with motor impairments, visual impairment, cognitive disabilities, and more.
This website utilizes various technologies that are meant to make it as accessible as possible at all times. We utilize an accessibility interface that allows persons with specific disabilities to adjust the website’s UI (user interface) and design it to their personal needs.
Additionally, the website utilizes an AI-based application that runs in the background and optimizes its accessibility level constantly. This application remediates the website’s HTML, adapts Its functionality and behavior for screen-readers used by the blind users, and for keyboard functions used by individuals with motor impairments.
If you’ve found a malfunction or have ideas for improvement, we’ll be happy to hear from you. You can reach out to the website’s operators by using the following email
Screen-reader and keyboard navigation
Our website implements the ARIA attributes (Accessible Rich Internet Applications) technique, alongside various different behavioral changes, to ensure blind users visiting with screen-readers are able to read, comprehend, and enjoy the website’s functions. As soon as a user with a screen-reader enters your site, they immediately receive a prompt to enter the Screen-Reader Profile so they can browse and operate your site effectively. Here’s how our website covers some of the most important screen-reader requirements, alongside console screenshots of code examples:
Screen-reader optimization: we run a background process that learns the website’s components from top to bottom, to ensure ongoing compliance even when updating the website. In this process, we provide screen-readers with meaningful data using the ARIA set of attributes. For example, we provide accurate form labels; descriptions for actionable icons (social media icons, search icons, cart icons, etc.); validation guidance for form inputs; element roles such as buttons, menus, modal dialogues (popups), and others. Additionally, the background process scans all of the website’s images and provides an accurate and meaningful image-object-recognition-based description as an ALT (alternate text) tag for images that are not described. It will also extract texts that are embedded within the image, using an OCR (optical character recognition) technology. To turn on screen-reader adjustments at any time, users need only to press the Alt+1 keyboard combination. Screen-reader users also get automatic announcements to turn the Screen-reader mode on as soon as they enter the website.
These adjustments are compatible with all popular screen readers, including JAWS and NVDA.
Keyboard navigation optimization: The background process also adjusts the website’s HTML, and adds various behaviors using JavaScript code to make the website operable by the keyboard. This includes the ability to navigate the website using the Tab and Shift+Tab keys, operate dropdowns with the arrow keys, close them with Esc, trigger buttons and links using the Enter key, navigate between radio and checkbox elements using the arrow keys, and fill them in with the Spacebar or Enter key.Additionally, keyboard users will find quick-navigation and content-skip menus, available at any time by clicking Alt+1, or as the first elements of the site while navigating with the keyboard. The background process also handles triggered popups by moving the keyboard focus towards them as soon as they appear, and not allow the focus drift outside of it.
Users can also use shortcuts such as “M” (menus), “H” (headings), “F” (forms), “B” (buttons), and “G” (graphics) to jump to specific elements.
Disability profiles supported in our website
- Epilepsy Safe Mode: this profile enables people with epilepsy to use the website safely by eliminating the risk of seizures that result from flashing or blinking animations and risky color combinations.
- Visually Impaired Mode: this mode adjusts the website for the convenience of users with visual impairments such as Degrading Eyesight, Tunnel Vision, Cataract, Glaucoma, and others.
- Cognitive Disability Mode: this mode provides different assistive options to help users with cognitive impairments such as Dyslexia, Autism, CVA, and others, to focus on the essential elements of the website more easily.
- ADHD Friendly Mode: this mode helps users with ADHD and Neurodevelopmental disorders to read, browse, and focus on the main website elements more easily while significantly reducing distractions.
- Blindness Mode: this mode configures the website to be compatible with screen-readers such as JAWS, NVDA, VoiceOver, and TalkBack. A screen-reader is software for blind users that is installed on a computer and smartphone, and websites must be compatible with it.
- Keyboard Navigation Profile (Motor-Impaired): this profile enables motor-impaired persons to operate the website using the keyboard Tab, Shift+Tab, and the Enter keys. Users can also use shortcuts such as “M” (menus), “H” (headings), “F” (forms), “B” (buttons), and “G” (graphics) to jump to specific elements.
Additional UI, design, and readability adjustments
- Font adjustments – users, can increase and decrease its size, change its family (type), adjust the spacing, alignment, line height, and more.
- Color adjustments – users can select various color contrast profiles such as light, dark, inverted, and monochrome. Additionally, users can swap color schemes of titles, texts, and backgrounds, with over 7 different coloring options.
- Animations – epileptic users can stop all running animations with the click of a button. Animations controlled by the interface include videos, GIFs, and CSS flashing transitions.
- Content highlighting – users can choose to emphasize important elements such as links and titles. They can also choose to highlight focused or hovered elements only.
- Audio muting – users with hearing devices may experience headaches or other issues due to automatic audio playing. This option lets users mute the entire website instantly.
- Cognitive disorders – we utilize a search engine that is linked to Wikipedia and Wiktionary, allowing people with cognitive disorders to decipher meanings of phrases, initials, slang, and others.
- Additional functions – we provide users the option to change cursor color and size, use a printing mode, enable a virtual keyboard, and many other functions.
Browser and assistive technology compatibility
We aim to support the widest array of browsers and assistive technologies as possible, so our users can choose the best fitting tools for them, with as few limitations as possible. Therefore, we have worked very hard to be able to support all major systems that comprise over 95% of the user market share including Google Chrome, Mozilla Firefox, Apple Safari, Opera and Microsoft Edge, JAWS and NVDA (screen readers), both for Windows and for MAC users.
Notes, comments, and feedback
Despite our very best efforts to allow anybody to adjust the website to their needs, there may still be pages or sections that are not fully accessible, are in the process of becoming accessible, or are lacking an adequate technological solution to make them accessible. Still, we are continually improving our accessibility, adding, updating and improving its options and features, and developing and adopting new technologies. All this is meant to reach the optimal level of accessibility, following technological advancements. For any assistance, please reach out to
Log in with your credentials
Forgot your details.
Web Request Blocked
Your request has been identified as a security risk and has been blocked by TeamDynamix. If you believe the request is valid, please report the blocked web request. You'll need to include the Blocked Request Url and Support ID in your report.
Contact Us for Help With Blackboard
Getting started.
- Getting Started with Blackboard
- Accessing Your Courses
- Suggested Hardware, Software, and Devices
- Best Practices for Success
- Campus Technical Support
Blackboard Basics
- How to Log In
- Navigating Blackboard
- Taking Tests
Submitting Assignments
- Communicating in Blackboard
- Kaltura Media
- Submitting Course Evaluations
Submitting Assignments in Blackboard
Submitting your work with the Assignment tool in Blackboard allows you to easily upload your homework files to your instructor and receive files back, along with your grade. There is no need for paper or even email.
Assignments Overview (Student) Assignments are created by your instructor. They can be used for simply submitting homework. Assignments can also be used to participate in a back-and-forth review process of projects and papers. Learn more: https://en-us.help.blackboard.com/Learn/Student/Assignments/Submit_Assignments
I tried to turn in an assignment, but nothing happened when I clicked submit.
If you’ve attached files to submit as part of your assignment, know that those files do not begin uploading to the Blackboard database until you click the ‘Submit’ button. Depending on the size of the attached files and the current upload speed of your internet connection, it may take a little time to complete the upload, especially if you’re submitting videos or other large items by directly attaching the file.
In the event that you’ve attached files, clicked submit, and nothing happens immediately, you may need to simply wait a few minutes — do not click submit more than once.
In some cases, this issue is related to the file name of the attached file. Before submitting, ensure that the name of the attached file is not unusually long and that it doesn’t contain any special characters.
Can I submit to an assignment dropbox more than once?
If you don’t see any indication that you are allowed multiple submissions, it’s best to assume that you only have one opportunity to submit. Do not click the submit button on the assignment submission page until you’ve confirmed that you’ve completed all of the assignment requirements, attached the correct files, and are ready to submit.
Some instructors allow their students to submit more than once to an assignment dropbox, but you will need to check the assignment instructions to be sure. If you are allowed multiple submissions, you will see the ‘Start New’ button on the Submission History page that appears when you click on the assignment link in the course after your initial submission.
Assignments in Blackboard are accessible once they’ve been deployed by your instructor in a Content Area of the course. Your instructor may have an entire area in your course dedicated to all assignments, perhaps even linked on the Course menu, or assignments may be placed along with related lesson material within unit folders in the course.
Once you click on an assignment link you will be brought to the submission page, which is split into three sections:
- Points and instructions: Check the top of the assignment submission page for instructions and any supporting documentation for your assignment. If your assignment is graded, you will see the points possible for the assignment listed in this section as well.
- Assignment submission: You have the option to type your submission directly into the Blackboard assignment tool or attach files from your computer or a cloud service like Google Drive. Be sure to check the syllabus and assignment instructions to see if your instructor has provided guidelines for how to attach your work to the assignment tool.
- Add comments: You can provide text comments to your instructor about your assignment submission, but you should never use the comments section to submit your actual work unless instructed to.
Full documentation at help.blackboard.com: Submit Assignments
Verifying and Viewing Submission Receipts
Each time you successfully submit to an assignment in Blackboard, you’ll be taken to the submission history page, which will show you grade information, a timestamp of your submission, a link to any attached files, and a preview of those files if they were submitted in one of the approved formats. You can return to this page by accessing the assignment link where you submitted your work within the course content and/or by clicking on the title of the assignment in the My Grades tool.
The system also generates a receipt of your submission that is sent to your UA Little Rock email account and stored in the My Grades section of the course. You should confirm that you’ve received a receipt of your submission each time you turn in your work by checking your UA Little Rock email account and/or by navigating to the Submitted tab in the My Grades section of the course.
It’s important to verify that your assignment has been successfully submitted each time you turn in your work. If you are not taken to the submission history page after submitting your work and/or do not receive a receipt of your submission, you should contact the Blackboard Student Support help desk immediately. Do not wait until the assignment due date has passed or until grades are submitted for your course to report an issue with submitting an assignment.
Viewing assignment feedback
Assignments submitted in Blackboard are not scored automatically, but need to be reviewed by your instructor. After reviewing your work, you instructor can use the same Assignment tool to provide you with a grade, written feedback, and additional files. You then can review the information in two ways: through the Assignment itself and through the My Grades area.
To review the assignment results through the Assignment Itself:
- Return to the Assignment for which you want to review the results.
- Click on the Assignment link to open the Submission History .
- At the bottom of your submission will be Instructor Feedback that will have a grade, any comments, and any attached files.
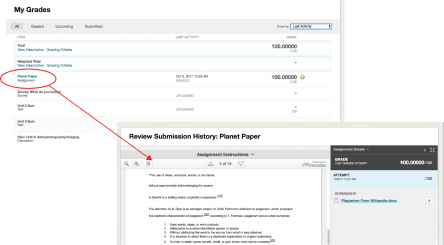
To review the assignment results through the My Grades Area :
- Click My Grades link in the Course Menu if it is available. Remember, your instructor can rename the title of this link. You will know you are on the right page because My Grades will be at the top.
- Look for the Assignment for which you want to review the results.
- Click on the name of the assignment to see instructor feedback, inline comments, or to obtain files that may have returned. Additionally, some comments will appear in the comments column to the right of the grade column.
Full documentation at help.blackboard.com: Assignment Grades
SafeAssign is a plagiarism prevention tool offered by Blackboard that helps educators detect unoriginal content in student papers. In addition to acting as a plagiarism deterrent, it also has features designed to aid you with learning about plagiarism and the importance of proper attribution of content from other sources and by other people.
Students submit their work to SafeAssign as part of the assignment submission process detailed above. Not all assignments in Blackboard use SafeAssign, but those that do will ask you to agree to submitting your paper to the Global Reference Database when you attach your work for submission.
Once submitted, SafeAssign checks the originality of your work by comparing the text to text on the Internet, within published articles, and to the work of other students at UA Little Rock. The amount of time it takes for SafeAssign to review your work depends upon the demand on the system and the length of your submission.
If your instructor allows it, you can view the SafeAssign originality report on the assignment submission page. You can find more information about accessing and interpreting the SafeAssign originality report on the Blackboard website.
- eLearning Blackboard Student Support
- More contact information
Related Sites
- eLearning – Faculty Support
- UA Little Rock Online
- IT Services
Creating Assignments
Assignments are created in Content Areas, but can also be added to Learning Modules, Lesson Plans, and folders. Any instructions and file attachments that students need to complete the assignment are provided at the time of creation. You can deliver assignments to each student individually or as collaborative work for groups of students.
As assignments are created, you will work in Edit Mode ON. Edit Mode ON allows you to view all of the instructor functions.
The easiest way to collect assignments, papers, or files from your students is to create an Assignment in Blackboard.
- In Edit Mode ON click the Assignments link on your course’s homepage.
- Click on Assessments.
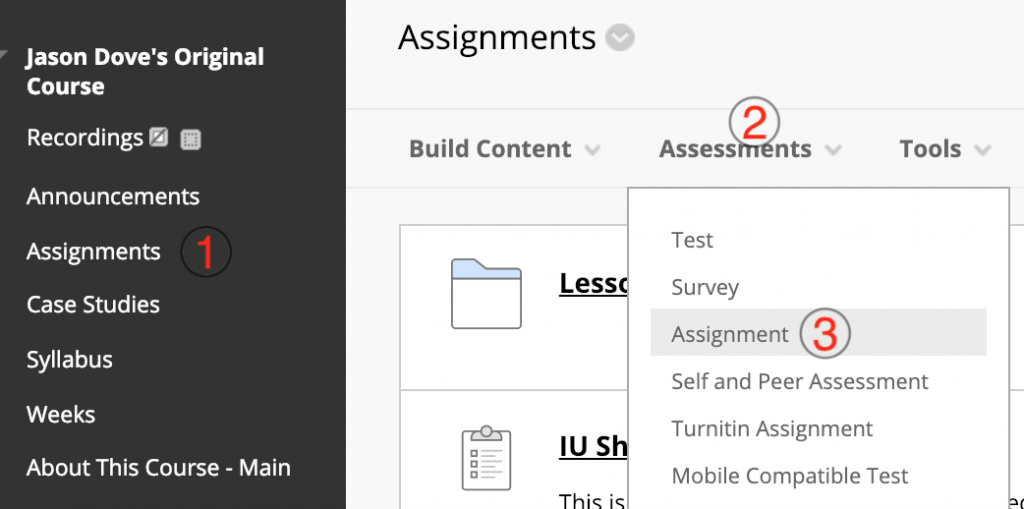
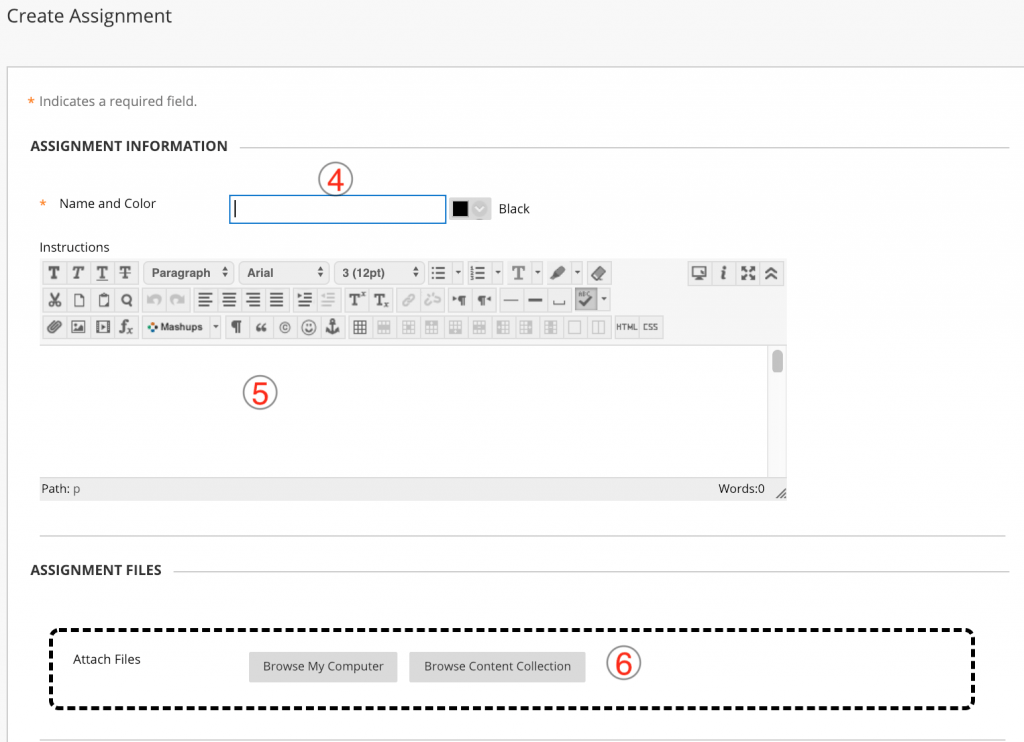
- On the Create Assignment page, enter a Name for your assignment. This is required.
- In the Instructions box, add the instructions for the assignment–if desired. This is optional.
- If you are going to accept late submissions, select and set the Due Date and time. If you are not going to accept late submissions, leave this section blank.
- Scroll down and enter the Points Possible.
- For Number of Attempts, we strongly recommend that you either allow unlimited attempts or allow a certain number of attempts rather than allowing just a single attempt. Experience shows that at least one of your students will accidentally submit the wrong file or accidentally submit an assignment with no file attached. If you set Number of Attempts to Allow Single attempt, that student will be locked out of the assignment and you will need to manually clear his or her assignment attempt in your Grade Center before the student will be able to submit the correct file. However, choosing to allow 2 attempts gives your students one “do-over” if they need it and it and won’t impact your grading at all because, by default, Blackboard shows you the student’s most recent submission (although there is an option to view and download a student’s previous submissions.)
- Select the checkbox to Make the Assignment Available. This makes your Assignment available to students, although you can choose the date and time that students can see or not see this Assignment under Limit Availability.
- Select and set Display After for the date and time you will start accepting student submissions and select and set Display Until for the date and time the assignment is due. This prevents students from submitting assignments after the deadline.
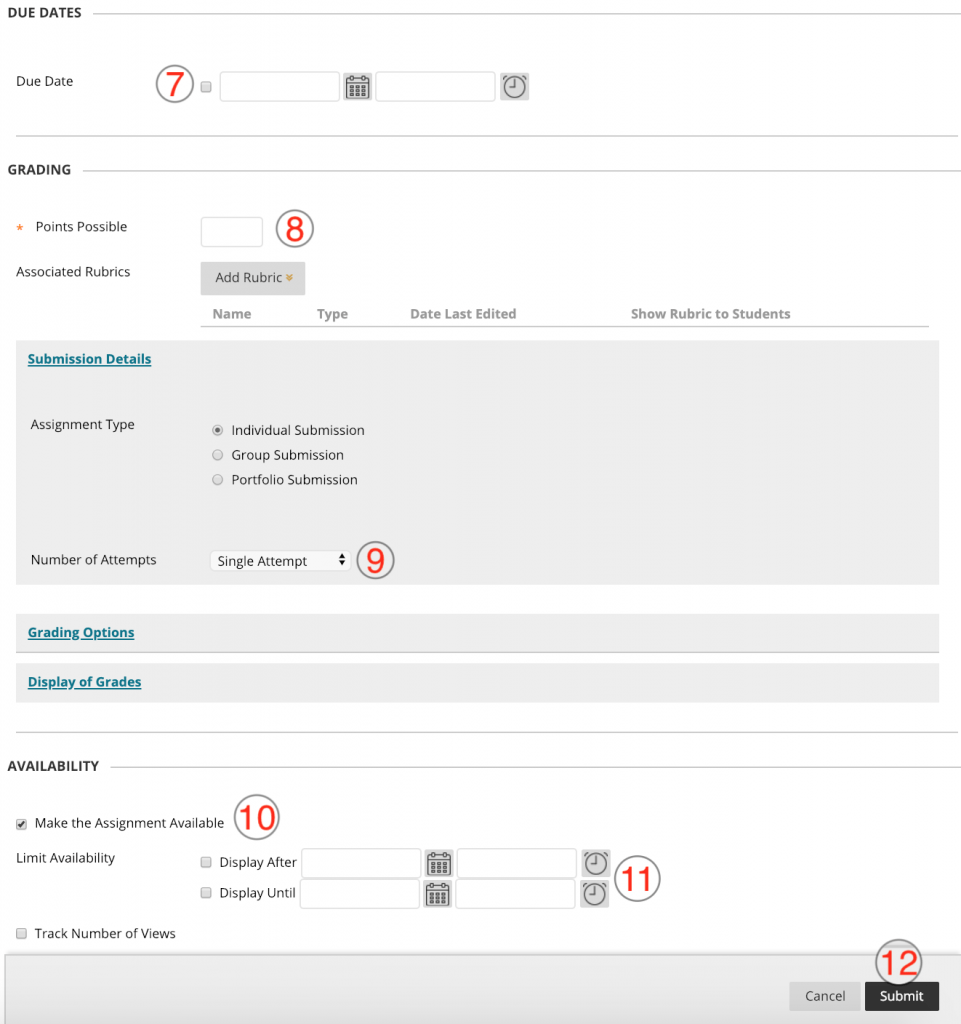
Blackboard will display a green success box telling you that you assignment has been successfully created. To see what your assignment looks like from a student’s point of view, turn Edit Mode off.
- QUICK LINKS
- How to enroll
- Career services
Classroom Resource Center
Get to know your online learning environment.

Learn more about Blackboard Ultra
Benefits of your learning platform

UOPX 101: Going Back to School

UOPX 101: Attendance and Participation
Quickstart guide
- Before You Start
- Assignments & Course Content
- Participation & Attendance
- Grades & Feedback
- Messages & Notifications
Is your browser compatible?
Before logging in to your classroom, please ensure your browser and operating system are up to date.
Need more info? See complete tech requirements
Finding your assignments

Step 1: You can access your course content by clicking on the first icon in the Course Navigation Bar.

Step 2: After clicking on the “Course Content” icon, you will find your course resources as well as a folder or module for each week of the course. These will vary by course.

Step 3: To view your course content, simply click on a folder to open it.
Submitting your assignments

Learn about submitting assignments in Blackboard Ultra
How to post in a discussion
Posts in this section count towards your attendance requirements, and are graded for participation points. Review the Syllabus and Instructor Policies before each course to find out how many discussion posts are required.

Step 1: To view your discussion board, simply click on the third icon from the left in your Course Navigation Bar.

Step 2: Once you enter your discussion board, you will see a list of all the discussions that are currently available to you.

Step 3: Within a given discussion, you will see the discussion topic along with a response area below it.

Step 4: Respond to a discussion using the given response area. You can choose to respond with your discussion post immediately, or save a draft for later.

Step 5: To view replies from others, simply click on their links. Any new replies will be highlighted.
Communicating with your group (also known as Learning Team)

Learn about communicating with your group in Blackboard Ultra
How to check grades and feedback

Method 1: You can access your grades by clicking on the “Gradebook” icon, fourth from the left of your Course Navigation Bar. If a grade has been posted, you will see it within your Gradebook. If feedback has been added, you will see a purple icon next to the grade. Click the purple icon to view any feedback. (Not all assignments will have written feedback)

Method 2: You can see all past assignments by clicking on the “Course content” icon and opening the folder containing your assignment. Click on the assignment to see if it has been graded. If it has, you will see the grade displayed. If feedback has been added, you will see a purple icon next to your grade. Click the purple icon to view any feedback.

Method 3: You can see when your Instructor updates grades within your Activity Stream. You can click on the “View my grade” button in an activity message to see your grade and feedback.
How to view your points in Gradebook

Learn how to view your gradebook in Blackboard Ultra
Viewing messages
Messages in this section are not considered part of your participation grades and do not count towards attendance.

Method 1: To check your messages, simply click the “Messages” icon on your Course Navigation Bar. After clicking on the icon, you’ll see specific message threads inside that you can click on to read your messages.

Method 2: From your Current Courses or Activity Stream, you can click on the messages tab on the left navigation bar.
Managing notifications

To manage notifications settings, click on your personal profile. Within your personal profile, you can choose to receive email, text and Activity Stream notifications.
Difference between messages, conversations and discussions

Messages, Conversations, and Discussions in Blackboard Ultra
Navigating your classroom

Navigating Blackboard, Your online classroom
Complete tutorial
This video will help you navigate your new online classroom.

Student resources
Take your classroom with you.
Log in to MyPhoenix using your mobile web browser, just as you would on your computer. Then click on “ Go to class ” from the home page.

Access the University Library
Scroll down to the library tile after logging in to MyPhoenix using your mobile web browser.

Collaborate in real time
Using Blackboard Collaborate, you can interact with students or faculty by swapping files, sharing applications, and taking notes on a virtual whiteboard.
Select “Join Session” in the Details and Actions section of the classroom on the left-hand side navigation menu.
More resources
Blackboard Ultra Manual (PDF)
Blackboard Ultra Help Site
Call Tech Support 877-832-4867
COMMENTS
Submit an assignment. When you finish your assignment, you must select Submit. If you don't, your instructor won't receive your completed assignment. If your instructor hasn't allowed multiple attempts, you may submit your assignment only once. Before you select Submit, be sure that you have attached any required files.
This video will show you how to post an assignment onto your blackboard page.
Step 2. On the Upload Assignment page, review the instructions, due date, points possible, and download any files provided by your instructor. If your instructor has added a rubric for grading, you can view it. Select Browse My Computer to upload a file from your computer or drag files from your computer to the hot spot in the Attach Files area.
To submit an assignment, follow these steps: Log in to your Blackboard account. Navigate to the course where the assignment is located. Locate the assignment in the course content area and click on its link. Follow the instructions provided by your instructor for uploading or submitting your work. This may include attaching a file, typing in a ...
Step 1: In your Blackboard course, click on the assignment link text as shown below. Note: the assignment title will be the name of the particular assignment for your class, not "Business Letter.". You will notice that Assignments have their own icon. Step 2: Click on the "Browse Local Files" button. Some instructors also may allow you ...
To enter text in a text box, under the Assignment Submission, click Write Submission button. Enter your text in the box. This text will be submitted to your instructor along with. your file. The double arrow on the far right of the box, expands and contracts your text options box. To upload your file to Blackboard, click on the Browse my ...
How to Submit an Assignment. 1. Find the link for submissions provided by your instructor. It is commonly found in a content area such as a weekly folder. 2. Click the link to open up the assignment submission window. 3. On the Upload Assignment page, review the instructions, due date, points possible, and download any files provided by your ...
ALWAYS save documents as .docx or .pdf before uploading to Blackboard. Blackboard has these instructions for you as you upload. Be sure to read all the words...
Self and Peer Assessment. Portfolios. Create and Edit Assignments. Assignment Grade Settings. Multiple Assignment Attempts. Grade Assignments. Download Assignments. Use SafeAssign in Assignments.
Look for the Assignment for which you want to review the results. Click on the name of the assignment to see instructor feedback, inline comments, or to obtain files that may have returned. Additionally, some comments will appear in the comments column to the right of the grade column. Full documentation at help.blackboard.com: Assignment Grades
Provide a description to students on how to post an assignment directly to blackboard.
To assign the assignment to groups: Select the Group Submission option under Assignment Type. Items to Select: Select the groups from the left column you wish to assign the assignment to. Click the right-facing arrow button to select the groups and move them into the Selected Items column: Selected Items: Groups to which the assignment has been ...
Click on Assessments. On the drop-down list, click Assignment. On the Create Assignment page, enter a Name for your assignment. This is required. In the Instructions box, add the instructions for the assignment-if desired. This is optional. You can also browse and attach a file from your local computer if you wish.
On the Course Content page, select the plus sign wherever you want to add an assignment. In the menu, select Create to open the Create Item panel and select Assignment. The New Assignment page opens. You can also expand or create a folder and add an assignment.
Learn about submitting assignments in Blackboard Ultra. ×. Participation & Attendance. How to post in a discussion. Posts in this section count towards your attendance requirements, and are graded for participation points. Review the Syllabus and Instructor Policies before each course to find out how many discussion posts are required.
To learn more: https://help.blackboard.com/Learn/Instructor/Ultra/Assignments/Create_and_Edit_Assignments
This video shows how to properly post a url as a hyperlink that opens in a new window.
Go back to Blackboard and click on the posted assignment.. Under Text Submission, click on Write Submission.. Once the user selects Write Submission, the Blackboard content editor will display.Select the Add Content button within the HTML editor. Under Add Content, select the option for YuJa Media Chooser.; In the Media Chooser window, find the applicable video assignment to submit and click ...
In this part, we learn how to create a video assignment as an instructor in Blackboard.You can find the next two parts here:Part 2: How to Submit a Video Ass...